1-click AWS Deployment 1-click Azure Deployment
Overview
Subversion is a free, open-source control system that can be used to keep track of source file and documents.Subversion comes with mod_dav_svn, which is an Apache module that allows you to access and manage the Subversion repository through a web-based interface
Apache Subversion (often abbreviated SVN, after its command name svn) is a software versioning and revision control system distributed as open source under the Apache License.[2] Software developers use Subversion to maintain current and historical versions of files such as source code, web pages, and documentation. Its goal is to be a mostly compatible successor to the widely used Concurrent Versions System (CVS).
Apache Subversion 1.7.14 is a super set of all previous Subversion releases and is as of the time of its release considered the current “best” release. Any feature or bug fix in 1.0.x through 1.7.x is also in 1.8, but 1.8 contains features and bug fixes not present in any earlier release. The new features will eventually be documented in a 1.8 version of the free Subversion book (svnbook.red-bean.com).
How to Install Apache Subversion :
Prerequisites
Two Alibaba Cloud ECS instances, one installed with an Ubuntu 16.04 server version and the other with an Ubuntu 16.04 desktop version..
- A static IP address 192.168.0.102 that is set up with one of your ECS instances.
- A root password that is set up to your instance.
For reference on how to complete these prerequisites, you can refer to create a new ECS instance and connect to your instance. Next, once you are logged in to your ECS instance, make sure to run the apt-get update -y command to update your base system with the latest available packages.
Install Apache Subversion
First, you will need to install Apache web server to your system. You can install it with the following command:
apt-get install apache2 apache2-utils -yOnce the Apache web server is installed, start Apache service and enable it to start on boot time with the following commands:
systemctl start apache2
systemctl enable apache2
Next, install Apache Subversion by running the following command:
apt-get install subversion subversion-tools libapache2-mod-svn libapache2-svn -yConfigure Subversion
First, you will need to create a directory for Subversion repository. You can create it with the mkdir /opt/svn command. Next, create the repository called svnrepo inside /opt/svn directory with the following command:
svnadmin create /opt/svn/svnrepoThen give proper permission to the repository with the following command:
chown -R www-data:www-data /opt/svn/svnrepoNext, you will need to configure Apache virtual host file for svn repository. You can do this with the nano /etc/apache2/mods-enabled/dav_svn.conf command. After which, you want to add the following lines:
<Location /svn>
 DAV svn
 SVNParentPath /opt/svn
 AuthType Basic
 AuthName "Subversion Repository"
 AuthUserFile /etc/apache2/svn.passwd
 Require valid-user
</Location>
Save and close the file. Then, create a password file for user (hitesh) with the following command:
htpasswd -cm /etc/apache2/svn.passwd hiteshProvide your passwords.
New password:
Re-type new password:
Adding password for user hitesh
Next, enable required Apache modules and restart Apache service with the following command:
a2enmod dav
a2enmod dav_svn
systemctl restart apache2
Access Repository
Apache Subversion is now installed, so now it’s time to test it from the remote system using the web browser.
Now, log in to your ECS instance installed with Ubuntu 16.04 Desktop version, open your web browser and type the address http://192.168.0.102/svn/svnrepo. You will be redirected to the following page:
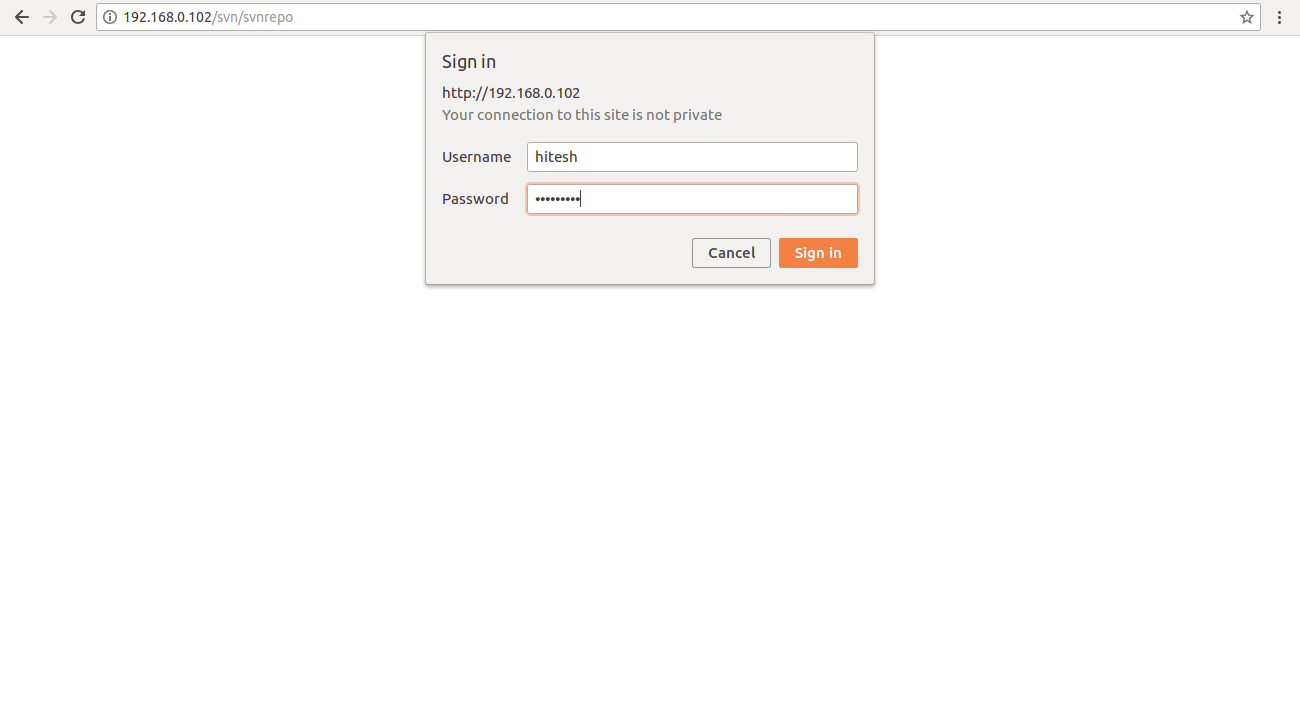
Now, provide your username and password, then click on Sign in button. You should see your repository in the following page:
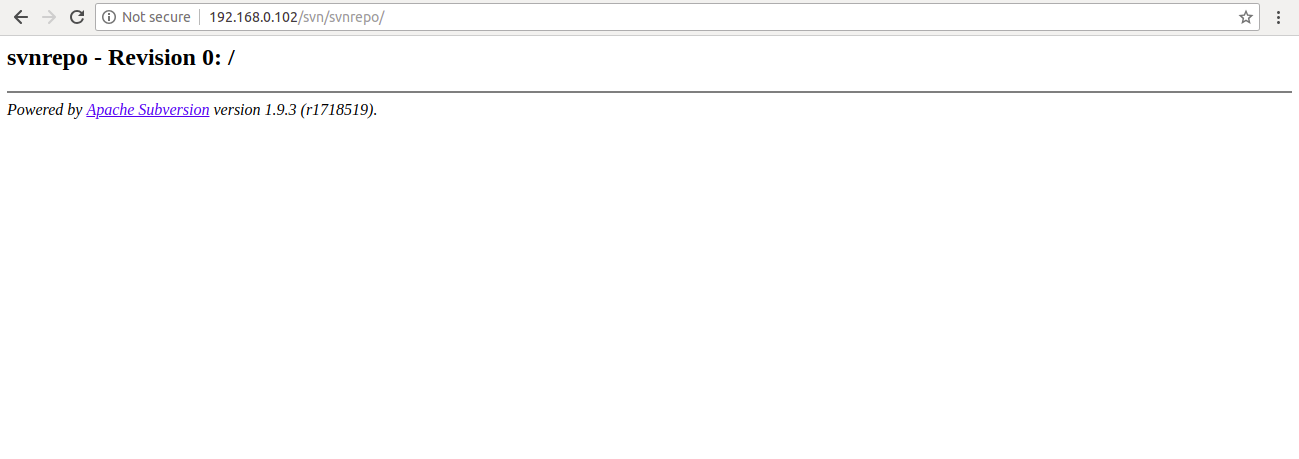
Next, create a directory called svnlocalrepo on the remote system (Ubuntu 16.04 desktop) with the mkdir svnlocalrepo command, and then check out your repository on svnlocalrepo with the following command:
svn checkout http://192.168.0.102/svn/svnrepo --username hitesh svnlocalrepo/You will be prompt to provide password for hitesh as shown below:
Authentication realm: <http://192.168.0.102:80> Subversion Repository
Password for 'hitesh': *********
Provide your password and press the Enter button. You should see the following output:
-----------------------------------------------------------------------
ATTENTION!  Your password for authentication realm:

   <http://192.168.0.102:80> Subversion Repository

can only be stored to disk unencrypted!  You are advised to configure
your system so that Subversion can store passwords encrypted, if
possible.  See the documentation for details.

You can avoid future appearances of this warning by setting the value
of the 'store-plaintext-passwords' option to either 'yes' or 'no' in
'/root/.subversion/servers'.
-----------------------------------------------------------------------
Store password unencrypted (yes/no)? yes
Checked out revision 0.
Next, change the directory to the svnlocalrepo and create some directory and files with the following command:
cd svnlocalrepo
mkdir testdir
touch testfile1.txt
touch testfile2.txt
Next, add the above created files and directory with the svn add testdir testfile1.txt testfile2.txt command. You will have the following output:
A         testdir
A         testfile1.txt
A         testfile2.txt
Next, commit the added file with the commit message with the svn commit -m 'My First Commit' command. You should see the following output:
Adding         testdir
Adding         testfile1.txt
Adding         testfile2.txt
Transmitting file data ..done
Committing transaction...
Committed revision 1.
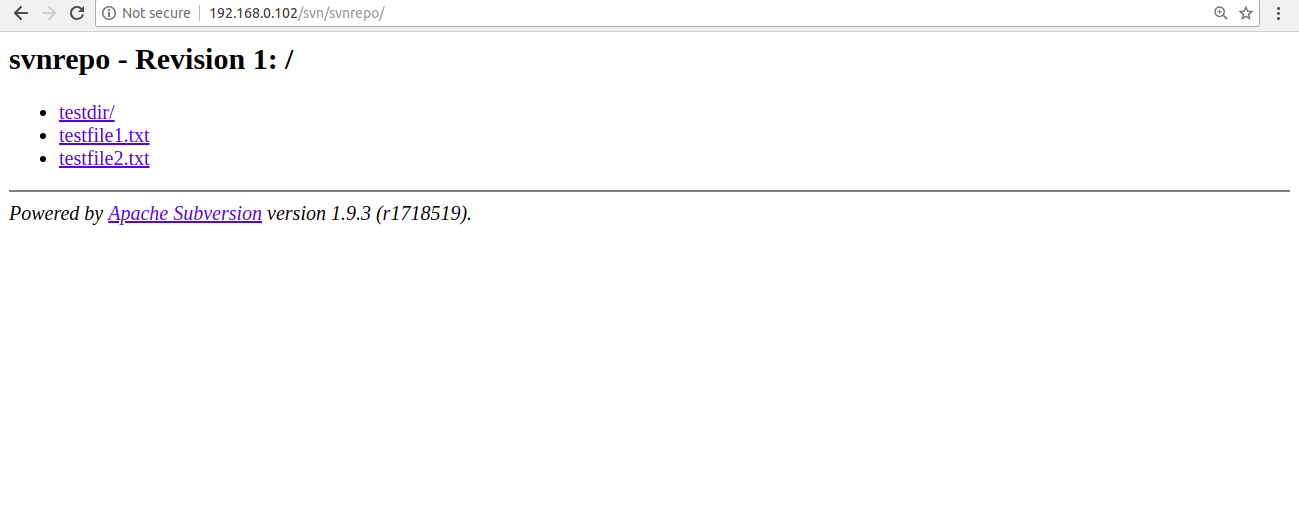
Now, open your web browser and access your repository. You should see the newly added files and directory in the following image:
Install Subversion Client and Setup Repository
Apache Subversion is now installed and working. It’s time to install Subversion client (RabbitVCS) on Ubuntu 16.04 Desktop instance and connect it to Apache Subversion.
RabbitVCS is a simple and easy to use graphical front-end for version control systems. You can integrate it into file managers to provide file context menu access to version control repositories. By default, RabbitVCS is not available in the Ubuntu 16.04 desktop default repository. So you will need to add the repository for that to your system.
You can add it with the following command:
add-apt-repository ppa:rabbitvcs/ppaOnce the repository is added, update the repository and install RabbitVCS with the following command:
apt-get install rabbitvcs-nautilus3 rabbitvcs-gedit rabbitvcs-cli rabbitvcs-core -yNext, open your Documents directory from Filemanager, right click under Documents directory. You should see the following image:
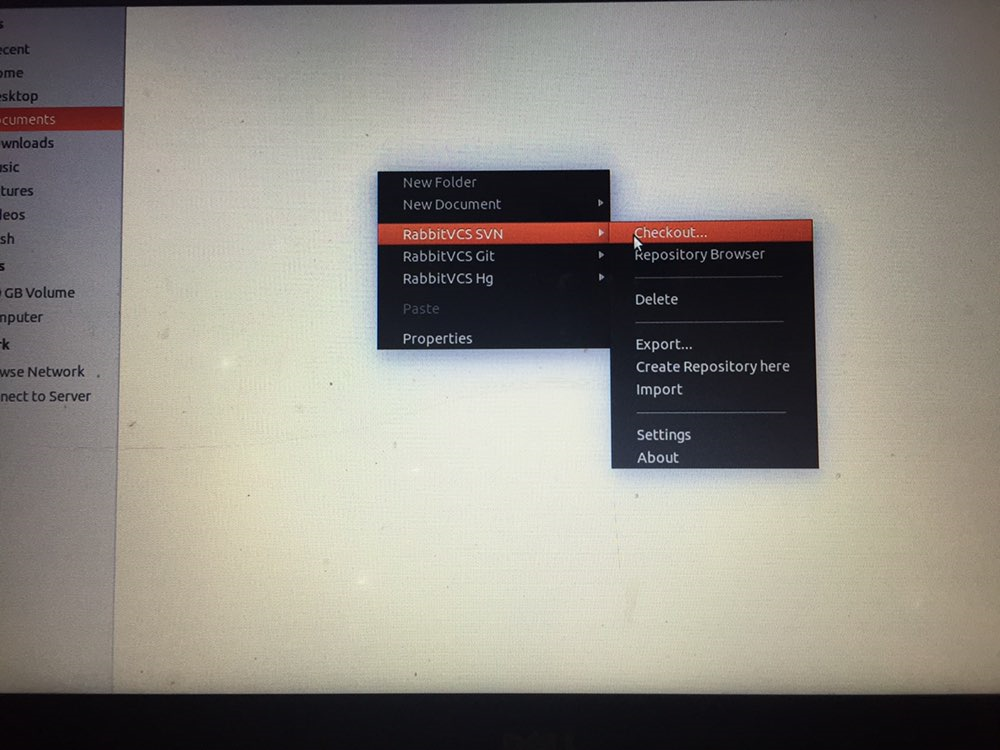
Now, click on the RabbitVCS SVN > Checkout. You should see the following page:
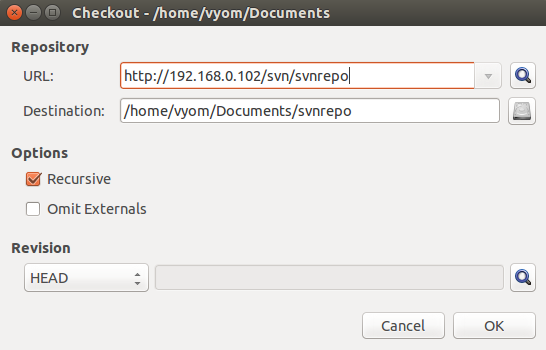
Now, provide your Subversion repository web address and Destination directory. Then, click on the OK button. You should see the following page:
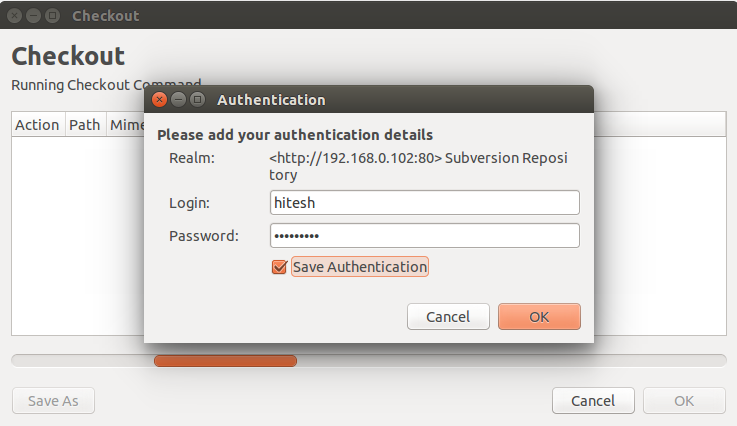
Now, provide your username and password. Then, click on the OK button. Once the repository is check out, you should see the output in the following image:
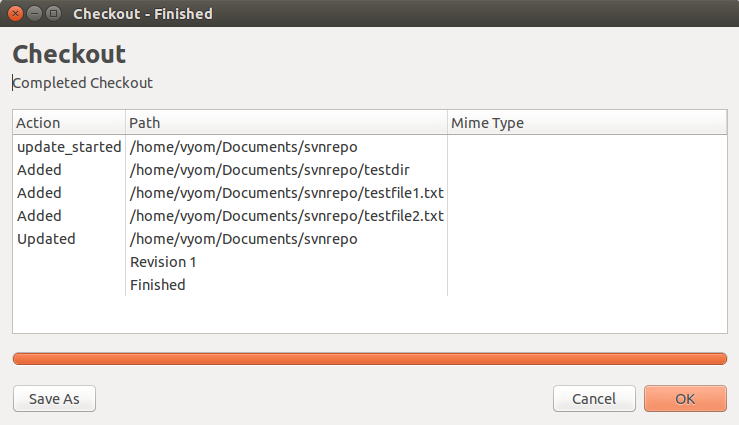
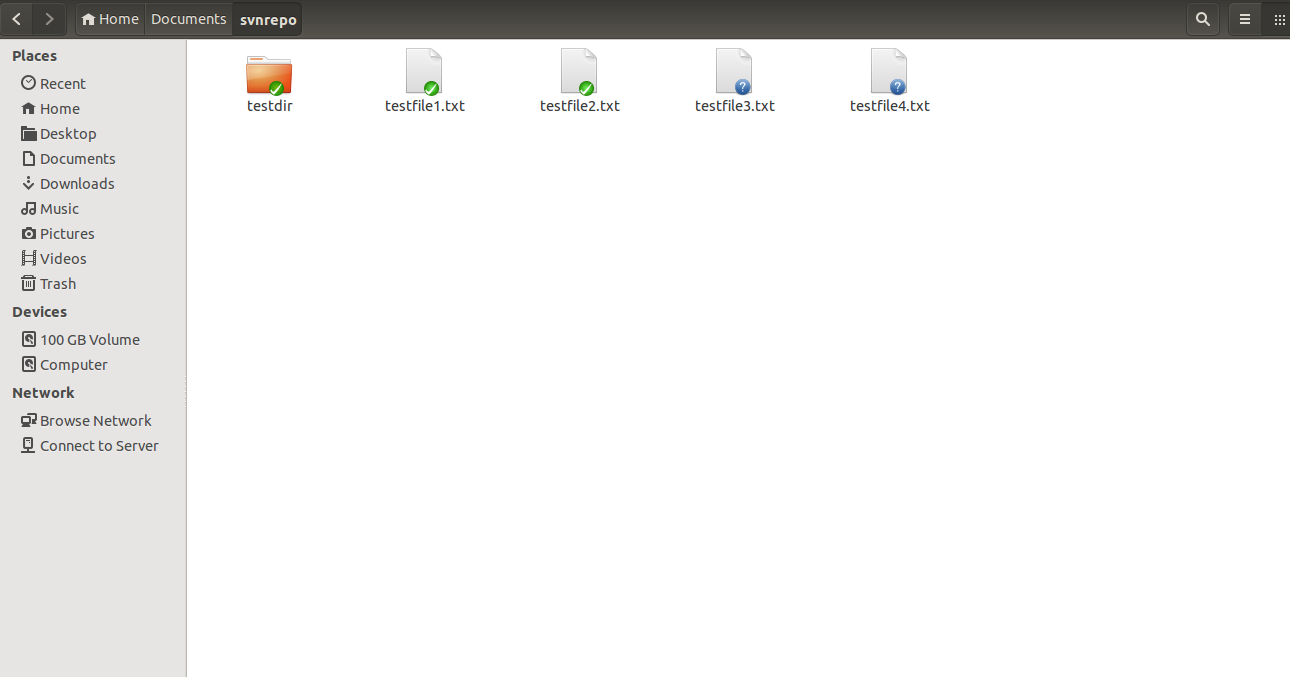
Now, click on the OK button. You should see the svnrepo in the following page:

Now, click on the svnrepo directory and create two other files testfile3.txt and testfile4.txt. You should see the following image:
Now, right click inside svnrepo directory. You should see the following image:
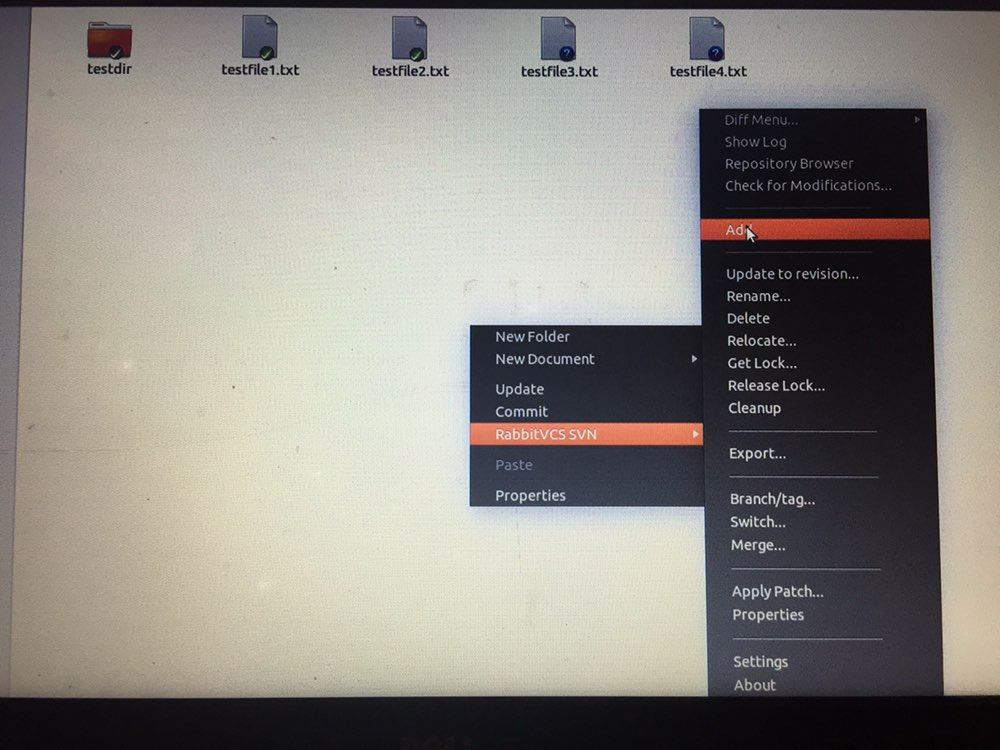
Now, click on the RabbitVCS SVN > add button. You should see the following image:
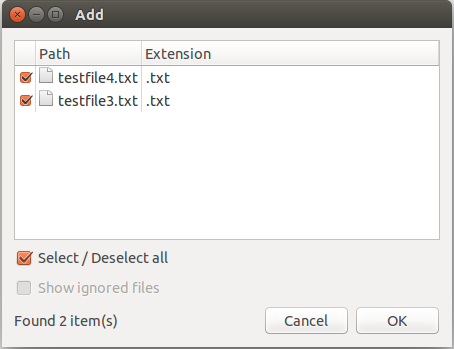
Now, select both files and click on the OK button. Once the files are added to the repository. You should see the following page:
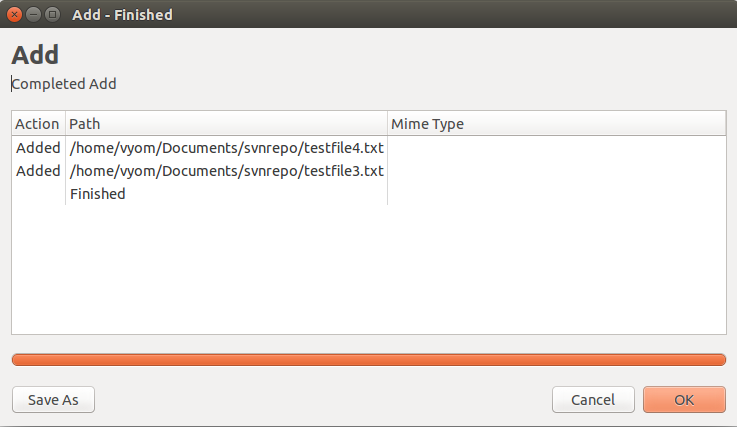
Now, press OK button to completed the process.
Next, right click inside svnrepo directory. You should see the following page:
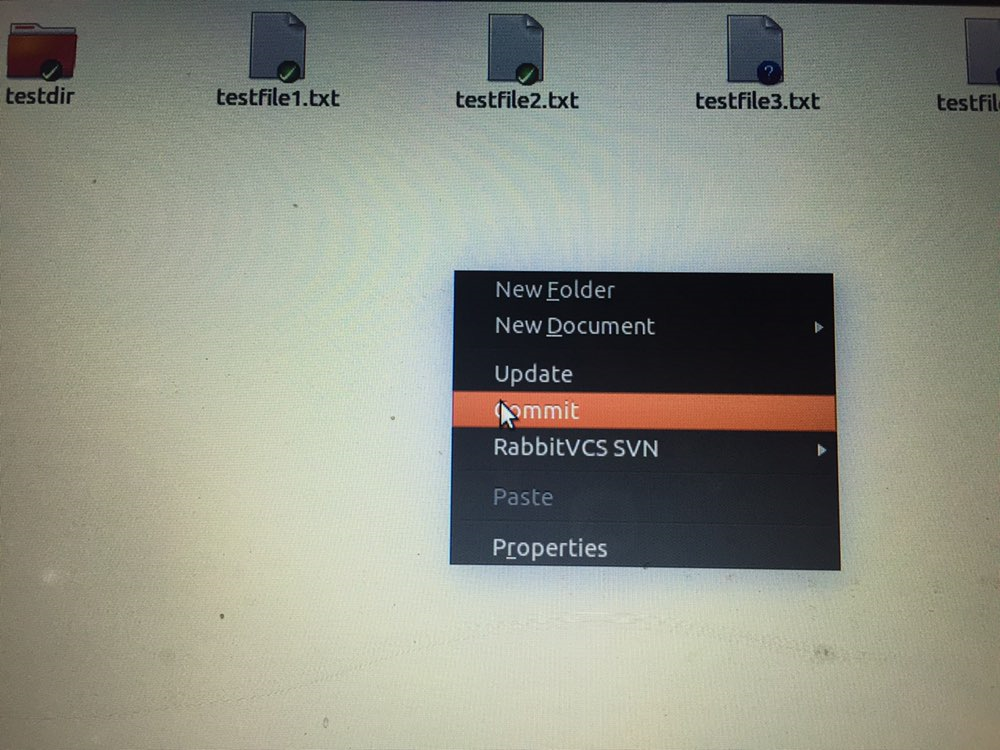
Now, click on the Commit button. You should see the following page:
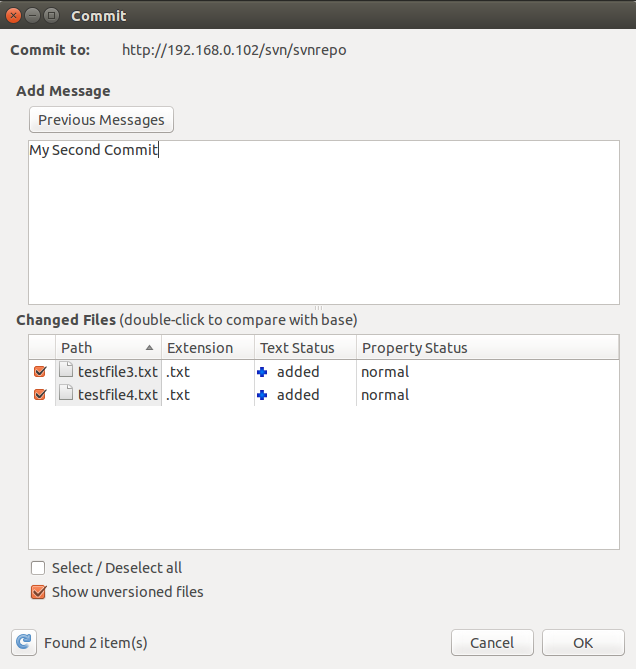
Now, type your Commit message and click on the OK button. Once the Commit completed successfully. You should see the output in the following page:
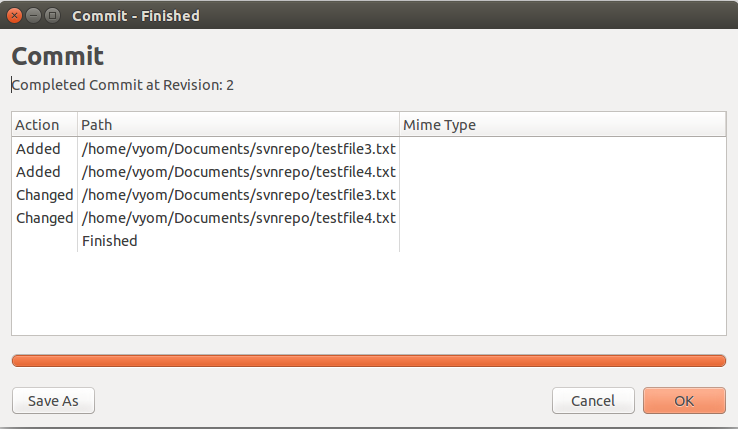
Now, click on the OK button to finish the process.
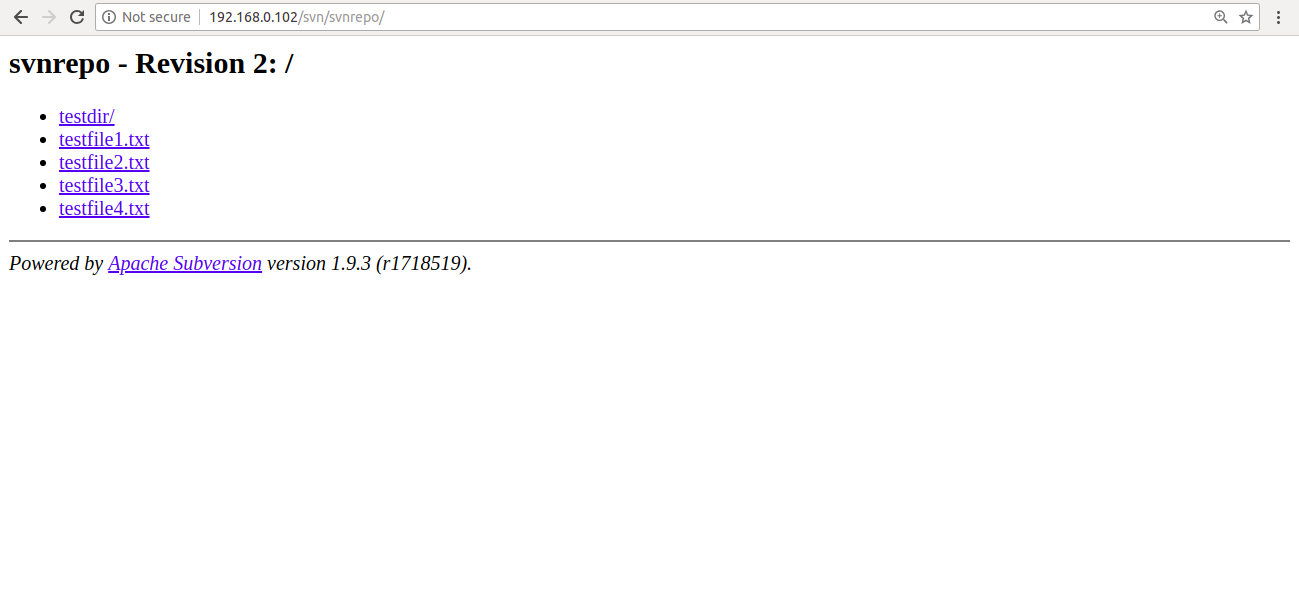
Next, open your web browser and access the Subversion repository. You should see the newly added files in the following page:
Subversion is owned by Subversion (https://subversion.apache.org/) and they own all related trademarks and IP rights for this software.
Subversion on cloud runs on Amazon Web Services (AWS) and Azure and ensures that your websites load faster.
Cognosys provides hardened images of Subversion on all public cloud ( AWS marketplace and Azure ).
Secured Subversion on Ubuntu 14.04 LTS
Features
Apache Subversion Features :
Apache Subversion is a full-featured version control system originally designed to be a better CVS. Subversion has since expanded beyond its original goal of replacing CVS, but its basic model, design, and interface remain heavily influenced by that goal. Even today, Subversion should still feel very familiar to CVS users.
The following list of features is presented with the assumption that you, the reader, have a basic understanding of what version control is and how version control systems work in general. If there’s a feature that you’re looking for that is not represented in this list, feel free to ask about it on our project mailing lists — perhaps we just didn’t think to list it here. If Subversion truly lacks a feature you need, your feedback will help us to improve Subversion, and in the meantime, perhaps we can help you meet your need with the features that Subversion does have.
-
Most CVS features
CVS is a relatively basic version control system. For the most part, Subversion has matched or exceeded CVS’s feature set where those features continue to apply in Subversion’s particular design.
-
Directories are versioned
Subversion versions directories as first-class objects, just like files.
-
Copying, deleting, and renaming are versioned
Copying and deleting are versioned operations. Renaming is also a versioned operation, albeit with some quirks.
-
Free-form versioned metadata
Subversion allows arbitrary metadata (“properties”) to be attached to any file or directory. These properties are key/value pairs, and are versioned just like the objects they are attached to. Subversion also provides a way to attach arbitrary key/value properties to a revision (that is, to a committed changeset). These properties are not versioned, since they attach metadata to the version-space itself, but they can be changed at any time.
-
Atomic commits
No part of a commit takes effect until the entire commit has succeeded. Revision numbers are per-commit, not per-file, and commit’s log message is attached to its revision, not stored redundantly in all the files affected by that commit.
-
Branching and tagging are cheap (constant time) operations
There is no reason for these operations to be expensive, so they aren’t.
Branches and tags are both implemented in terms of an underlying “copy” operation. A copy takes up a small, constant amount of space. Any copy is a tag; and if you start committing on a copy, then it’s a branch as well. (This does away with CVS’s “branch-point tagging”, by removing the distinction that made branch-point tags necessary in the first place.)
-
Merge tracking
Subversion 1.5 introduces merge tracking: automated assistance with managing the flow of changes between lines of development, and with the merging of branches back into their sources. The 1.5 release of merge tracking has basic support for common scenarios; we will be extending the feature in upcoming releases.
-
File locking
Subversion supports (but does not require) locking files so that users can be warned when multiple people try to edit the same file. A file can be marked as requiring a lock before being edited, in which case Subversion will present the file in read-only mode until a lock is acquired.
-
Symbolic links can be versioned
Unix users can place symbolic links under version control. The links are recreated in Unix working copies, but not in win32 working copies.
-
Executable flag is preserved
Subversion notices when a file is executable, and if that file is placed into version control, its executability will be preserved when it it checked out to other locations. (The mechanism Subversion uses to remember this is simply versioned properties, so executability can be manually edited when necessary, even from a client that does not acknowledge the file’s executability, e.g., when having the wrong extension under Microsoft Windows).
-
Apache network server option, with WebDAV/DeltaV protocol
Subversion can use the HTTP-based WebDAV/DeltaV protocol for network communications, and the Apache web server to provide repository-side network service. This gives Subversion an advantage over CVS in interoperability, and allows certain features (such as authentication, wire compression) to be provided in a way that is already familiar to administrators
-
Standalone server option (svnserve)
Subversion offers a standalone server option using a custom protocol, since not everyone wants to run an Apache HTTPD server. The standalone server can run as an inetd service or in daemon mode, and offers the same level of authentication and authorization functionality as the HTTPD-based server. The standalone server can also be tunnelled over ssh.
-
Parseable output
All output of the Subversion command-line client is carefully designed to be both human readable and automatically parseable; scriptability is a high priority.
-
Localized messages
Subversion uses gettext() to display translated error, informational, and help messages, based on current locale settings.
-
Interactive conflict resolution
The Subversion command-line client (svn) offers various ways to resolve conflicting changes, include interactive resolution prompting. This mechanism is also made available via APIs, so that other clients (such as graphical clients) can offer interactive conflict resolution appropriate to their interfaces.
-
Repository read-only mirroring
Subversion supplies a utility, svnsync for synchronizing (via either push or pull) a read-only slave repository with a master repository.
-
Write-through proxy over WebDAV
Subversion 1.5 introduces a write-through proxy feature that allows slave repositories to handle all read operations themselves while passing write operations through to the master. This feature is only available with the Apache HTTPD (WebDAV) server option.
-
Natively client/server, layered library design with clean APIs
Subversion is designed to be client/server from the beginning; thus avoiding some of the maintenance problems which have plagued CVS. The code is structured as a set of modules with well-defined interfaces, designed to be called by other applications.
-
Binary files handled efficiently
Subversion is equally efficient on binary as on text files, because it uses a binary diffing algorithm to transmit and store successive revisions.
-
Costs are proportional to change size, not data size
In general, the time required for a Subversion operation is proportional to the size of the changes resulting from that operation, not to the absolute size of the project in which the changes are taking place.
-
Bindings to programming languages
The Subversion APIs come with bindings for many programming languages, such as Python, Perl, Java, and Ruby. (Subversion itself is written in C.)
-
Changelists
Subversion 1.5 introduces changelists, which allows a user to put modified files into named groups on the client side, and then commit by specifying a particular group. For those who work on logically separate changesets simultaneously in the same directory tree, changelists can help keep things organized.
Features :
- Commits as true atomic operations (interrupted commit operations in CVS would cause repository inconsistency or corruption).
- Renamed/copied/moved/removed files retain full revision history.
- The system maintains versioning for directories, renames, and file metadata (but not for timestamps). Users can move and/or copy entire directory-trees very quickly, while retaining full revision history.
- Versioning of symbolic links.
- Native support for binary files, with space-efficient binary-diff storage.
- Apache HTTP Server as network server, WebDAV/Delta-V for protocol. There is also an independent server process called svnserve that uses a custom protocol over TCP/IP.
- Branching is a cheap operation, independent of file size (though Subversion itself does not distinguish between a branch and a directory)
- Natively client–server, layered library design.
- Client/server protocol sends diffs in both directions.
- Costs proportional to change size, not to data size.
- Parsable output, including XML log output.
- open source licensed – Apache License since the 1.7 release; prior versions use a derivative of the Apache Software License 1.1.
- Internationalized program messages.
- File locking for unmergeable files (“reserved checkouts”).
- Path-based authorization.
- Language bindings for C#, PHP, Python, Perl, Ruby, and Java.
- Full MIME support – users can view or change the MIME type of each file, with the software knowing which MIME types can have their differences from previous versions shown.
- Merge tracking – Merges between branches will be tracked, this allows automatic merging between branches without telling Subversion what does and does not need to be merged.
- Changelists to organize commits into commit groups.
Major Features of Subversion:
- Most CVS features.
- Directories are versioned.
- Copying, deleting and renaming are versioned.
- Free-form versioned metadata (“properties”).
- Atomic commits.
- Branching and tagging are cheap (constant time) operations.
- Merge tracking.
- File locking.
- Executable flag is preserved.
- Symbolic links can be versioned.
- Apache network server option, with WebDAV/DeltaV protocol.
- Natively client/server, layered library design with clean APIs.
- Binary files handled efficiently.
- Costs are proportional to change size, not data size.
- Bindings to programming languages.
Azure
Installation Instructions For Subversion 1.8.8 on Ubuntu
Note: How to find PublicDNS in Azure
Step 1) SSH Connection: To connect to the deployed instance, Please follow Instructions to Connect to Ubuntu instance on Azure Cloud
1) Download Putty.
2) Connect to virtual machine using following SSH credentials:
- Hostname: PublicDNS / IP of machine
- Port : 22
Username: Your chosen username when you created the machine ( For example: Azureuser)
Password : Your Chosen Password when you created the machine ( How to reset the password if you do not remember)
Step 2) Other Information:
Version – Subversion 1.8.8
1.Default ports:
- Linux Machines: SSH Port – 22
Configure custom inbound and outbound rules using this link
2. To access Webmin interface for management please follow this link
Installation Instructions For Subversion 1.7.14 on CentOS
Note : How to find PublicDNS in Azure
Step 1) SSH Connection: To connect to the deployed instance, Please follow Instructions to Connect to Ubuntu instance on Azure Cloud
1) Download Putty.
2) Connect to virtual machine using following SSH credentials:
- Hostname: PublicDNS / IP of machine
- Port : 22
Username: Your chosen username when you created the machine ( For example: Azureuser)
Password : Your Chosen Password when you created the machine ( How to reset the password if you do not remember)
Note: Use this to grant SELINUX permission when you configure repository
- chcon -R -h -t httpd_sys_content_t PATH_TO_REPOSITORY
Step 2) Other Information:
Version – Subversion 1.7.14
1.Default ports:
- Linux Machines: SSH Port – 22
Configure custom inbound and outbound rules using this link
2. To access Webmin interface for management please follow this link
Videos
Secured Subversion on Ubuntu 14.04 LTS
How to Work


