1-click AWS Deployment 1-click Azure Deployment
Overview
Zend Framework is a full-stack PHP framework created by Zend Technologies. For those who aren’t familiar with the company, Zend Technologies provides web developers with various tools to help them in their work. Notable examples are Zend Server, a web application server for running and managing PHP applications, and Zend Studio, a full-featured IDE for PHP. Needless to say, Zend is very invested in PHP, which is why Zend Framework is a great tool to add to any developer’s arsenal.
Zend Studio
Zend Studio is an IDE that includes multiple features to integrate with Zend Framework. It provides code generation and an MVC view. The current Zend framework 3.0 includes various new components such as XML to JSON converter, JSON RPC server, PSR-7 functionality, and compatibility with PHP 7.
Zend Framework2
Zend Framework2 is an open-source framework for creating web applications services by using PHP 5.3+. Zend Framework2 uses object-oriented code and utilizes most of the new features of PHP 5.3, namely Lambda Functions, Namespaces, and Closures.Zend Framework2 had evolved from Zend Framework1, which was a successful PHP framework with more than 15 million downloads.
Zend Server has two different versions which are the following:
- Free community version- It can be downloaded for Free. It has fewer features and mainly used by beginners or students to learn Zend Framework.
- Commercial version- It’s a paid version. This version has more advanced features. Mostly used by professionals to create attractive web applications.
Why Zend Framework:
Zend Framework is the most popular framework and is mostly used by PHP developers. It provides a flexible and stable code with full intellectual property rights. It also makes programming more accessible. It is fast and easy to learn thus, makes it a convenient framework. Zend also supports robust cryptography tools and various password hashing techniques.
A list of reasons has been provided here that favors the use of Zend framework i.e. the features which make it strong
1 Object Oriented Concept
- Zend framework follows the concepts like inheritance and interface as it is fully object oriented. As a result components of Zend framework is extendable to some extinct.
- The developer can customize the component as per functionality and it can later be reused in other project. ZF allows code reusability as it is fully object oriented.
2.Loosely Coupled Components
- While designing using Zend framework, the developer can use only required components from a vast collection of classes.
- The components of Zend framework is very loosely coupled which provides the advantage of using the required component library instead of using the whole framework.
3.Collection of Components
- Zend framework has a vast collection of different components. This helps the developers to handle the things easily.
- For different activities Zend framework provides different components. For example:
Zend_Auth is for authentication, Zend_Form is for form creation, Zend_cache to handle cache memory, Zend_Captcha is handle captcha, and so on.
4.Integration
- As a result of ZF’s decoupled nature, it is very easy to integrate other libraries too.
- This can be done by creating a wrapping class.
5. Web and CLI programming
- CLI scripts can be also written using Zend Framework.
- Zend_Console_GetOpt component provides argument parsing functionality.
6.Documentation
- A reference guide of 500 pages for using Zend Framework is provided in 6 languages.
- API documentation is also provided online as well as for downloading.
Zend Goals
Following are the goals of the Zend Framework:
- Flexibility- Zend Framework is flexible to work.
- Simple and productive- Zend Framework is very simple and produces productive code
- Compatibility- It is a compatible framework which works for every PHP- capable environment.
- Extensibility – The user can easily cover all the framework classes.
- Portability – Zend is built to support multiple PHP- capable environments.
Application Environment
All Zend Framework applications are also known as PHP applications that can run in any PHP-capable environment. This environment consists of at least the following three components:
- A base operating system that is usually either Microsoft Windows or Linux
- A Web server(Apache on Linux or Internet Information Services on Microsoft Windows) to intercept HTTP requests and serve them directly or pass them on to the PHP interpreter for further execution.
- A PHP interpreter to parse and execute the specified PHP code, and return the output to the Web server.
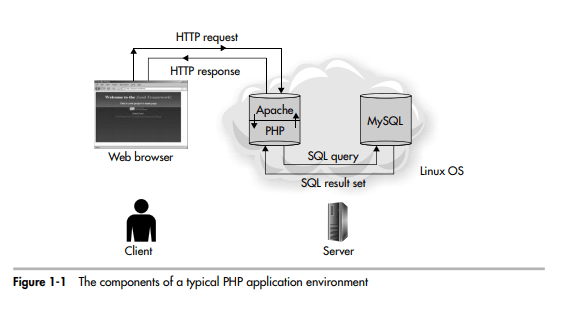
Above image is only for reference.
- There’s a very useful component called a database engine. It includes database such as MySQL or PostgreSQL, that holds application data, accepts connections from the PHP layer and modifies or retrieves data from the database. Figure 1-1 depicts the interface between these components.
Install Zend Framework
As a necessary first step, first, you must ensure that you have a working Apache/PHP/MySQL development environment.Zend Framework can be installed by two ways which are as follows:
- Manual installation
- Composer based installation
Manual Installation
Step 1: To begin, go to the Zend Framework website and download the latest version clicking the below-given link –
https://framework.zend.com/
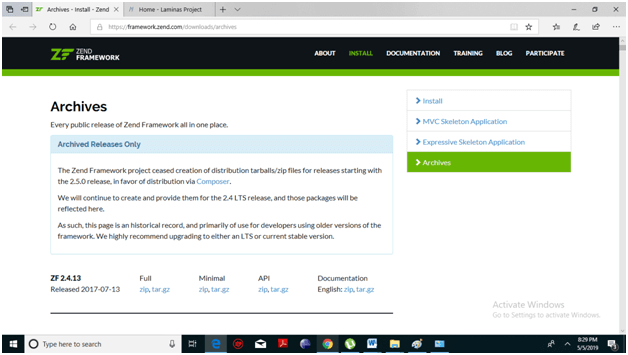
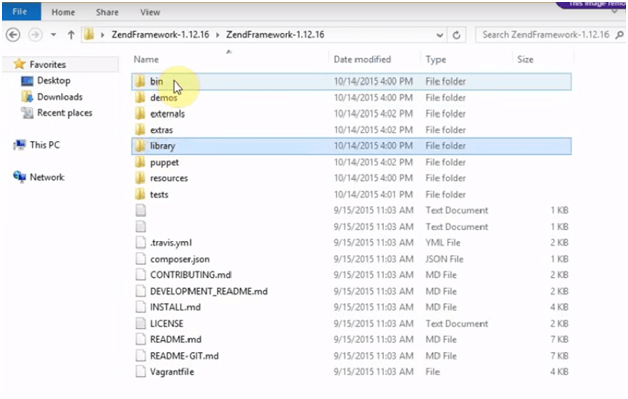
Step 2: After your download has been completed, extract the content of the downloaded archive file and place it to the folder where you would like to keep it. The two necessary files are bin and library as shown in the below screenshot.
Step 3: Please make sure that you have installed XAMPP or WAMP.
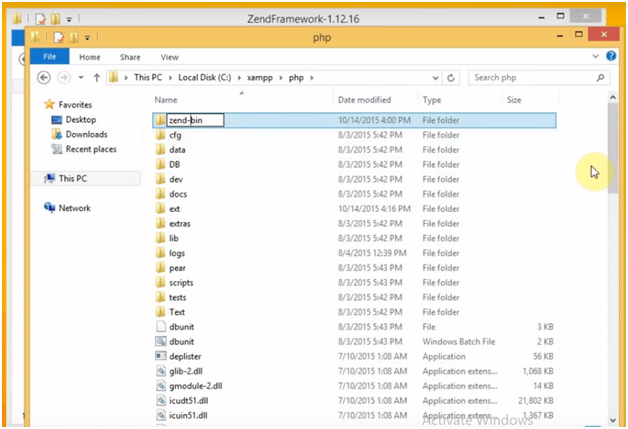
Step 4: Put the bin Folder inside your PHP folder and rename it to zend-bin. Please make sure that the Zend bin ha following two files.
- php
- bat
Step 5: Include the path in the php.ini file
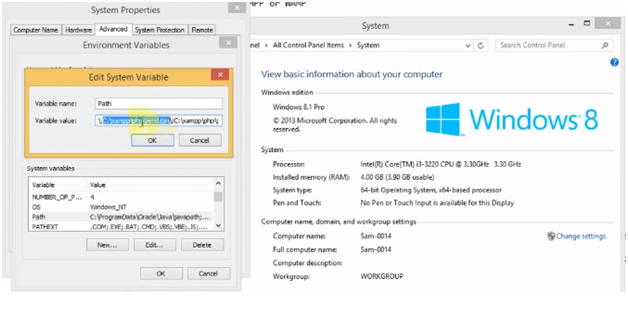
Step 6: Finally, we have to add the path in System variable so that we can configure the ZendCLI tool inside the zend-bin folder to work globally across the system.
Step 7: Right Click on This PC. Click on the properties option and then click on Advanced System settings. Click on environment variable under the Advanced tab.
Step 8: Click on the Path variable placed under the System variables list. Click on Edit and add your zend-bin directory location at the end.
Step 9: Try to restart your machine to make sure the System variables are implemented.
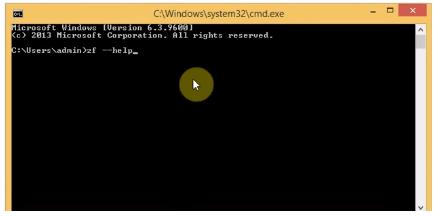
Step 10: To ensure that our configuration is working, open your command prompt and run “zf –help” command.
Composer Based Installation
Programmers use the Composer tool for the easy installation of Zend framework. This is the advanced method to install the latest version.To install all the modules of the Zend Framework collectively, use the given below command −
$ composer require zendframework/zendframework
The Zend Framework’s module can be installed separately. For example, for installing the MVC component, use the given below composer command:
$ composer require zendframework/zend-mvc
Add Zend Framework Libraries
Zend Framework gives the freedom to the programmer to decide whether to include the Zend Framework libraries with your application or leave it up to users to download and install these libraries themselves. There are pros and cons for each option which are as follows:
- Allowing the users to download the Zend Framework libraries themselves ensures that they always have access to the latest code (and bug fixes). However, the process can be confusing for beginners, and if the newer libraries are not backward-compatible with the original versions used, the user can also find unusual and hard-to-track bugs in the code.
- Bundling the Zend Framework libraries with the application ensures that users can begin using the application out of the box, with no version incompatibilities. However, it also “locks in” users to a particular version of the Zend Framework, possibly making it harder to upgrade to newer versions with additional features or necessary bug fixes.
Set up your Zend Framework Environment
After the download has completed, extract the files to your desktop in order to get a clear view of the contents. Inside, there are a lot of folders, but for the purposes of this tutorial, we will only need two — the bin folder and the library folder.

For organization’s sake, put the bin folder inside your PHP folder and rename it to zend-bin. Mine is D:\Development\PHP, so the end result should be D:\Development\PHP\zend-bin.

Go into the library folder and you should find a Zend folder. Place this inside your PHP's include_path. For me, that’s D:\Development\PHP\includes, so moving it there should result in D:\Development\PHP\includes\Zend. Remember to copy the Zend folder inside the library folder, not the library folder itself.

Lastly, we need to configure the Zend CLI tool inside the zend-bin folder to work in any directory. To do this, we have to add the directory to the Path System variable, so we can call it via the command prompt.
Right click the Computer link under Start to open the System Information window. Here, click on Advanced System Settings.

In the window that opens, click on the Environment Variables button. In the new window, look for the Path variable in the System variables list. Click on Edit and add your zend-bin directory location at the end.

When you’re done, just click OK to save it.
To ensure that our configuration is working, open a command prompt and run the zf --help command. This should output the commands we can use with the Zend CLI tool. If it doesn’t, try restarting your machine to make sure the System variables are implemented.

Additionally, there is a zf.sh file inside the zend-bin folder. This is for Unix-based operating systems like OSX or Linux. Just set up the environment variables accordingly to get the same result.
Step 3: Create your First Zend Framework Project
Now, we begin actual development work on our Zend Framework project. In the command prompt, go to the directory where you want to put your project files (ideally this should be the directory where your local web server points to). For me, it’s D:\Development\htdocs\nettuts, so I’ll run the cd D:\Development\htdocs\nettuts command on my prompt.

Type in the following command to create our base Zend Framework project: zf create project thenextsocial. In the command, thenextsocial is the name of our project. When you start creating your own ZF projects, replace this with the appropriate project name.

Check out the contents of the folder now — you should see a new thenextsocial folder. Inside the folder, you should see multiple project files. Most importantly, you should see a public folder, which should be the only publicly accessible folder via browser. To make this accessible, we now need to set up a VirtualHost for the project.

To set up a VirtualHost, open your Apache’s httpd.conf file. Inside, add the following code:
|
1
2
3
4
5
6
|
<VirtualHost *:80> ServerName thenextsocial.local DocumentRoot "D:/Development/htdocs/nettuts/thenextsocial/public/" <Directory "D:/Development/htdocs/nettuts/thenextsocial/public/"> </Directory></VirtualHost> |
You’ll also need to add the domain to your local hosts file. For Windows users, it should be in C:\Windows\System32\Drivers\etc. For Unix-based OS users, it should be in /etc/hosts. Open it up and add thenextsocial.local and point it to 127.0.0.1


Restart your web server. When you open http://thenextsocial.local on your browser, it should already point to your Zend Framework project.

Congratulations You’ve successfully created your first Zend Framework project!
Step 4: Learn about Zend Framework’s MVC Structure
What exactly is this MVC pattern?
From Zend Framework’s quickstart introduction:

The model-view-controller (MVC) pattern
So what exactly is this MVC pattern everyone keeps talking about, and why should you care? MVC is much more than just a three-letter acronym (TLA) that you can whip out anytime you want to sound smart; it has become something of a standard in the design of modern web applications. And for good reason. Most web application code falls under one of the following three categories: presentation, business logic, and data access. The MVC pattern models this separation of concerns well. The end result is that your presentation code can be consolidated in one part of your application with your business logic in another and your data access code in yet another. Many developers have found this well-defined separation indispensable for keeping their code organized, especially when more than one developer is working on the same application.
The gist of it is this: models contain our business logic, views contain our HTML, and controllers keep everything in line and tell both the views and models what to do.
MVC in a Zend Framework-powered application
The good thing about using the ZF CLI tool is that it automatically sets up your application to make use of Zend Framework’s MVC classes, which allows you to begin working on your projects more quickly.
Going back to our project, open the thenextsocial/application folder and you should see — you guessed it — models, views, and controllers folders.

Inside these folders, open controllers/IndexController.php and views/scripts/index/index.phtml. When you look at both of these files closely, you’ll see that the home page we saw above (Welcome to Zend Framework) is actually executed by both of these files. So how does Zend Framework call these?
Explaining Zend Framework’s default application routing
By default, all URLs on your Zend Framework project will follow a certain format:
|
1
|
[url]/[controller]/[action]/[GET parameter 1 value]/.../[GET parameter x]/[GET parameter x value] |
Another default is that if a controller and/or action is not provided, they both default to index. So calling http://thenextsocial.local is actually the same as calling http://thenextsocial.local/index/index or even http://thenextsocial.local/index.

Zend Framework default routing cycle
Zend Framework then takes the controller value and looks for it in the controllers folder, namely, our IndexController.php file. Inside the controller file, it takes our action value and executes that method, which is indexAction. After the action has been executed in the controller, ZF then automatically renders the view file inside the views folder in the following format:
|
1
|
../application/views/scripts/[controller]/[action].phtml |
Which is why we see the Welcome to Zend Framework page, since index.phtml contains the HTML code for this page.
Step 5: Pass Data From a Controller to its View
It’s relatively simple to pass data from a controller to its view. Each controller object is created, by default, to have a view object instantiate with it. Access to this view object is done via the $this->view accessor.
To send data to the view, we simply assign variables to the view object and give them values, like so:
|
1
|
$this->view->variable_name = "variable value"; |
Returning to our project, open IndexController.php in the controllers folder, and in the indexAction method, let’s pass the current date and time to our view.
|
1
2
3
4
5
|
public function indexAction(){ //action body $this->view->current_date_and_time = date('M d, Y - H:i:s');} |
We then need to edit our view to output this variable. To do so, open index.phtml in the view folder, and add the following code:
|
01
02
03
04
05
06
07
08
09
10
11
12
|
.........<div id="welcome"> <h1>Welcome to the <span id="zf-name">Zend Framework!</span></h1> <hr /><h2>It is now <?php echo $this->current_date_and_time; ?></h2> <h3>This is your project's main page</h3>......... |
As you can see, accessing the variable from inside the view file is as simple as echoing the variable via the echo PHP command, echo $this->variable_name;.
Now, refresh your browser, and you should see the current date and time on the page.

Step 6: Create a Layout in Zend Framework
You might have noticed that the html scripts in our project are just fragments and not complete HTML pages, so they lack html, head, and body tags. This is actually not a flaw but was done by design — this way, all actions return content relative only to the action itself, not the whole application. By creating a global layout for our site, we’ll be able to implement a consistent HTML container for all our HTML scripts.
To get started, we again open our command prompt and issue the following command. Make sure you’re inside the thenextsocial folder.
|
1
|
zf enable layout |

Enabling a layout in our Zend Framework project
The output after running the command suggests that a layout file called layout.phtml has been created inside the application/layouts/scripts folder. Let’s open it up and take a look at what’s inside:

layout.phtml contents
The command echo $this->layout()->content; is actually the layout file echoing all of the content from the view. To create our global layout then, we need to wrap this command with our HTML:
|
01
02
03
04
05
06
07
08
09
10
11
12
13
14
15
16
17
18
19
20
21
22
23
|
<!DOCTYPE html><html> <head> <title>The Next Social</title> <!-- Load Twitter Bootstrap and jQuery --> <link rel="stylesheet" href="http://twitter.github.com/bootstrap/1.3.0/bootstrap.min.css"> <script src="https://ajax.googleapis.com/ajax/libs/jquery/1.6.4/jquery.min.js"></script> </head> <body> <div id="site_container"> <div id="header"> <p>This is the header!</p> </div> <div id="content"> <!-- Echo our content here! --> <?php echo $this->layout()->content; ?> </div> <div id="footer"> <p>This is the footer!</p> </div> </div> </body></html> |
Now, refresh your browser again and you should see the changes:

Our index action with accompanying layout
Step 7: Create New Controllers and Actions
By using the ZF CLI tool, we can create new controllers and actions very quickly. To do so, simply run the following command:
|
1
|
zf create controller About |
About is our new controller’s name. If you check inside the controllers folder, you should see an AboutController.php file, indicating that our controller generation was successful. You can also check the contents of the views folder and see that a new about/index.phtml file has been created for our About controller!

Creating our About controller
We should then be able to access this controller by going to http://thenextsocial.local/about
By default, the ZF CLI tool creates one action for our controller, the indexAction. But what if we wanted to add other actions to the controller?
Creating a new action
Creating a new action is as is easy creating a new controller. To do so, just run the following command:
|
1
|
zf create action us About |
This effectively creates a new action called us inside the About controller. Checking the AboutController.php file, you should see a new usAction() method, as well as a new us.phtml file inside the about view folder.

Creating our us action in the About controller
As you can see, we rely heavily on the ZF CLI tool to generate actions and controllers. Manually creating them works the same way; the ZF CLI tool just makes it simpler and automatically does the heavy lifting for us.
Changing Layout in ZF2 Controller
Changing the layout or template within a Zend Framework 2 is easy. Thanks to the layout controller plugin, one can change the layout for a given controller action in just one line.
public function indexAction()
{
$this->layout(‘layout/default’);
return new ViewModel();
}
As you can see above, the only thing you have to do in order to change the layout for a ZF2 controller action, is to pass in the name of the layout to the layout controller plugin. Afterwards, simply return a view model or array as usual.
Make sure that the name that you passed to the layout controller plugin is available within the view manager’s template map. Simply add it to one of your module’s module.config.php (by convention) so it looks like below.
‘view_manager’ => array(
‘template_map’ => array(
‘layout/default’ => __DIR__ . ‘/../view/layout/default.phtml’,
)
)
Simply adjust to your particular needs.
Get Base Url within ZF2 Controller:
Getting the base url of a request in Zend Framework 2 is quite simple. Because you are probably extending the AbstractActionController class, you get some functionality out of the box, including easily accessing the current request. From the request, one can get the URI, which exposes various methods for different parts of the URI. In this case, we need the scheme as well as the host name, as in the below example.
public function indexAction()
{
$uri = $this->getRequest()->getUri();
$baseUrl = sprintf(‘%s://%s’, $uri->getScheme(), $uri->getHost());
}
That’s all it takes!
Getting URL Parameters in ZF2 Controllers:
Accessing URL parameters from controllers in Zend Framework 2 is extremely easy thanks to the params controller plugin. This plugin exposes various methods that one can use to retrieve parameters from various sources of a request, including from the URL.
Getting URL Parameters
To get URL parameters within Zend Framework 2 controllers, simply invoke the fromRoute or fromQuery methods on the params controller plugin. The fromRoute method should be used when you wish to retrieve a segment from a segment route for instance, while the fromQuery is used to fetch query parameters from the URL.
public function viewPostAction()
{
// Get segment from URL
$postId = $this->params()->fromRoute(‘postId’); // “postId” = segment
// Get query parameter
$postId = $this->params()->fromQuery(‘postId’);
return new ViewModel();
}
Getting POST Parameter
To get a POST parameter from a request, simply use the fromPost method on the params controller plugin.
public function viewPostAction()
{
// Get POST parameter
$postId = $this->params()->fromPost(‘postId’);
return new ViewModel();
}
Getting HTTP Headers
To get a given HTTP header within a Zend Framework 2 controller, simply use the fromHeader method on the params controller plugin.
public function viewPostAction()
{
// Get HTTP header
$userAgent = $this->params()->fromHeader(‘User-Agent’);
return new ViewModel();
}
Getting Files From Requests
To fetch a file from the request, one can simply use the fromFiles method on the params controller plugin.
public function viewPostAction()
{
// Get file from request
$myFile = $this->params()->fromFiles(‘MyFile’);
return new ViewModel();
}
Getting Parameters from any Source
Conveniently, one can also retrieve a parameter without specifying from where the parameter should be fetch. For instance, to retrieve a postId regardless of where it is present, simply do as below.
public function viewPostAction()
{
// Get parameter from any source
$postId = $this->params(‘postId’);
return new ViewModel();
}
The above will fetch the value of a postId parameter if one is available within any of the request sources.
Specifying a Default Value
When fetching parameters, one can also specify a default value that should be returned if the parameter is not available. This could for instance be useful when paginating a set of items; if no page parameter is available, it should default to one. This avoids having to make conditional checks and keeps the code slightly more clean.
public function viewPostAction()
{
// Specifying default value when retrieving from any source
$this->params(‘page’, 1);
// Specifying default value when retrieving from specific source
$this->params()->fromRoute(‘page’, 1);
return new ViewModel();
Zend Framework – Models & Database
Models in Zend Framework
A Model defines the logical data representation of the application. For example, in a shopping cart application – Product, Customer, Cart and Orders are models. They define the properties of the entity it holds. Some of the concepts of models are as follows −
- Controllers communicate with models and ask them to retrieve information they need. This retrieved information is then passed by the controller to the View. Finally, View will render the model as user consumable presentational data.
- It is very rare that a model directly interacts with a view, but sometimes it may happen.
- Models can talk with each other and aren’t self-contained. They have relationships with each other. These relationships make it easier and quicker for a controller to get information, since it doesn’t have to interact with different models; the models can do that themselves.
Let us take a look at a simple model – MyModel
<?php
namespace Tutorial\Model;
class Book {
   public $id;
   public $author;
   public $title;
}
Database in Zend Framework
Zend framework provides a simple and feature-rich class, Zend\Db\TableGateway\TableGateway to find, insert, update and delete data from a database table.Let us see how to connect the MySqlservice via PHP’s PDO driver in Zend framework through the following steps.
Step 1: Create database in MySQL
Create database tutorials in the local MySQL server. We can use phpmyadmin or any other MySQL GUI tools for this purpose. Let us use the MySQL client in the command prompt. Connect to the mysql server and run the following command to create the tutorial database.
create database tutorials
Step 2: Create table in the tutorials db
Let us now create a database book in the tutorials db using the following SQL command.
use tutorials;
CREATE TABLE book (
   id int(11) NOT NULL auto_increment,
   author varchar(100) NOT NULL,
   title varchar(100) NOT NULL,
   PRIMARY KEY (id)
);
Step 3: Populate data in the book table
Populate the book table with sample data. Use the following SQL command.
INSERT INTO book (author, title) VALUES ('Dennis Ritchie', 'C Programming');
INSERT INTO book (author, title) VALUES ('James gosling', 'Java Programming');
INSERT INTO book (author, title) VALUES ('Rasmus Lerdorf', 'Programming PHP');
Step 4: Update Database Connection
Update the global configuration file, which is – myapp/config/autoload/global.php with the necessary database drive information.
<?php
return array(
   'db' => array(
      'driver' => 'Pdo',
      'dsn' => 'mysql:dbname = tutorials;host = localhost',
      'driver_options' => array(
         PDO::MYSQL_ATTR_INIT_COMMAND => 'SET NAMES \'UTF8\''
      ),
   ),
   'service_manager' => array(
      'factories' => array(
         'Zend\Db\Adapter\Adapter' => 'Zend\Db\Adapter\AdapterServiceFactory',
      ),
   ),
);
Step 5: Update Database Credentials
Update the database credentials in the local configuration file, which is – myapp/config/autoload/local.php. In this way, we can separate the local and live database connection credentials.
<?php
return array(
   'db' => array(
      'username' => '<user_name>',
      'password' => '<password>',
   ),
);
Step 6: Create Model for Book
Let us create a Model, Book in our module src directory. Generally, models are grouped under the Model folder – /myapp/module/Tutorial/src/Model/Book.php.
<?php
namespace Tutorial\Model;
class Book {
   public $id;
   public $author;
   public $title;
}
Step 7: Implement exchangeArray in the book model
The TableGateway interacts with a model through the exchangeArray function. The standard argument of the exchangeArray function is the database result set stored as the PHP array. Using the exchangeArrayfunction, a model’s property can be easily synced with the corresponding database table.
Update the model, Book as shown below −
<?php
namespace Tutorial\Model;
class Book {
   public $id;
   public $author;
   public $title;
   public function exchangeArray($data) {
      $this->id = (!empty($data['id'])) ? $data['id'] : null;
      $this->Author = (!empty($data['author'])) ? $data['author'] : null;
      $this->Title = (!empty($data['title'])) ? $data['title'] : null;
   }
}
Step 8: Use TableGateway to fetch book
Create a class, BookTable to fetch book information from the database. Create the class, BookTable in the Model folder itself.
<?php
namespace Tutorial\Model;
use Zend\Db\TableGateway\TableGatewayInterface;
class BookTable {
   protected $tableGateway;
   public function __construct(TableGatewayInterface $tableGateway) {
      $this->tableGateway = $tableGateway;
   }
   public function fetchAll() {
      $resultSet = $this->tableGateway->select();
      return $resultSet;
   }
}
We have used select() method of the TableGateway class to fetch the book information from the database. But, we have not used any reference to the table – book in the code. The TableGateway is generic in nature and it can fetch data from any table by using certain configuration. Usually, these configurations are done in the module.config.php file, which we will discuss in the subsequent steps.
Step 9: Configure BookTable class
Update the tutorial module, Module.php with the getServiceConfig() method.
<?php
namespace Tutorial;
use Zend\Db\Adapter\AdapterInterface;
use Zend\Db\ResultSet\ResultSet;
use Zend\Db\TableGateway\TableGateway;
use Zend\ModuleManager\Feature\ConfigProviderInterface;

class Module implements ConfigProviderInterface {

   public function getConfig() {
      return include __DIR__ . '/../config/module.config.php';
   }
   public function getServiceConfig() {
      return [
         'factories' => [
            Model\BookTable::class => function ($container) {
               $tableGateway = $container->get(Model\BookTableGateway::class);
               $table = new Model\BookTable($tableGateway);
               return $table;
            },
            Model\BookTableGateway::class => function ($container) {
               $dbAdapter = $container->get(AdapterInterface::class);
               $resultSetPrototype = new ResultSet();
               $resultSetPrototype->setArrayObjectPrototype(new Model\Book());
               return new TableGateway('book', $dbAdapter, null, $resultSetPrototype);
            },
         ],
      ];
   }
}
Here, we have registered the BookTable class using the service manager. The BookTable class is used to fetch the book information and by registering it, we can access it wherever needed. Since, the registered services are shared, they increase performance, reduce the memory consumption, etc.
Another item, Model\BookTableGateway::class is the TableGateway object specialized for the Book model and is a dependency of the BookTable.
Step 10: Update TutorialController Configuration
We need the BookTable service in the tutorial controller to fetch the book information. To get the BookTable service, register it as constructor dependency in the TutorialController.
This Constructor dependency helps to get the BookTable service while the controller itself is in the initialization stage. Update the controller section of the tutorial module configuration, module.config.php as shown below.
'controllers' => [
   'factories' => [
      Controller\TutorialController::class => function($container) {
         return new Controller\TutorialController(
            $container->get(Model\BookTable::class)
         );
      },
   ],
],
Step 11: Update Tutorial Controller
This is done by adhering to the following three steps.
- Add constructor with BookTable as argument.
private $table;
public function __construct(BookTable $table) {
   $this->table = $table;
}
- Fetch book information using the BookTable’s fetchAll() method and register it into the view.
public function indexAction() {
   $view = new ViewModel([
      'data' => $this->table->fetchAll(),
   ]);
   return $view;
}
- Display the book information in the view script.
<table class = "table">
   <tr>
      <th>Author</th>
      <th>Title</th>
      <th> </th>
   </tr>
   <?php foreach ($data as $sampledata) : ?>
   <tr>
      <td><?php echo $this->escapeHtml($data->author);?></td>
      <td><?php echo $this->escapeHtml($data->title);?></td>
   </tr>
   <?php endforeach ?>
</table>
Step 12: Run the application
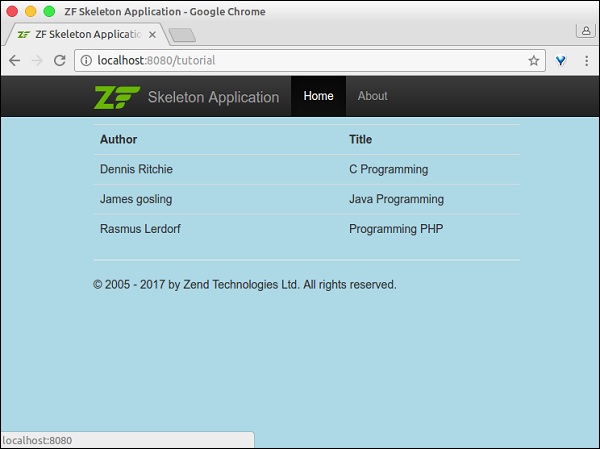
Check the application by running − http://localhost:8080/tutorial.
Advantages of Zend Framework
The advantages of the Zend Framework are given below:
- Loosely Coupled− Zend is a loosely coupled framework which offers the option to delete the modules which they don’t need in the web application. This loosely coupled architecture also allows the PHP developers to use the components they want.
- Performance− Zend Framework provides highly optimized performance. Zend Framework3 is four times faster than its previous version.
- Security– This Framework supports industry standard encryption for security purposes.
- Testing– Zend Framework has an integrated PHP Unit such that the testing can be done quickly.
- Rapid Release Cycle- TheZend Framework team follows an aggressive release schedule, with an average of between one and three releases each month.
- Code-Generation Tools- Zend Framework includes a “tooling” feature that allows developers to get a new Zend Framework project up and running with minimal effort.
-Zend Framework is based on simplicity, object-oriented best practices, corporate friendly licensing, and a rigorously tested agile codebase.Zend Framework is focused on building more secure, reliable, and modern Web 2.0 applications and web services, and consuming widely available APIs from leading vendors like Google, Amazon, Yahoo!, Flickr, as well as API providers and cataloguers like StrikeIron and ProgrammableWeb.ZendFramework is released under the BSD LICENSE.
Features
Features of Zend Framework
Some of the striking features of Zend Framework are given below −
- Object-Oriented- It 100% object-oriented web application framework.
- MVC Implementation- It supports advanced MVC implementation.
- Multi-databases- It provides multi-databases including PostgreSQL, SQLite, etc.
- API- It has a simple cloud API.
- Session Management- Zend Framework offers session management.
- Data Encryption- It maintains data encryption.
- URI- It has flexible URI Routing.
- Zend provides RESTful API development support.
- Reusability- It supports code reusability and is easier to maintain.
- Loosely Coupled- Zend’s loosely coupled architecture allows developers to use the components they want.
- start the course
- describe what an application framework is and the benefits of using a framework when creating a PHP project
- describe the MVC (Model-View-Controller) pattern and the overall functionality it provides
- describe the development concepts associated with using an application framework when creating a PHP project
- download, install, and configure the appropriate PHP files for the operating system on your development computer
- describe what the Zend framework is and identify the advantages and disadvantages associated with using it when creating PHP applications
- identify the prerequisite applications needed to be able to use the Zend framework
- download, install, and configure the Composer tool for dependency management in PHP
- download, install, and configure the Zend framework 2 and use Composer to add Zend as a project dependency
- install and recognize the file structure of the sample ZendSkeletonApplication and how it can be used as a starting point for your project
- configure the document root setting for the server to point to the public subfolder of your Zend project
- describe the concept of Zend modules and the benefits they provide in a PHP application
- recognize the folder structure for a typical Zend module as well as the required files contained in the module
- manually create the folder structure for a custom Zend module
- manually create the files needed in a custom Zend module
- configure the Zend ModuleManager to load a module
- use the Composer tool to install the ZFTool and describe the functionality it provides
- work with the ZFTool to automatically create a Zend module for your project and recognize the files and folders it creates
- configure controller files to add a controller and views to your zf2 project
- configure Zend routes to the appropriate controller in your zf2 project
- configure Zend views in your zf2 project
- create a Zend form and recognize the contents a typical form contains
- configure Zend forms in your zf2 project
- add a table to a Zend view and configure the controller to use the view
- work with the Zend framework to add various components used in a typical PHP application
-Major Features of Zend
- Extreme Simplicity and Productivity
- Object-oriented best practices
- Corporate friendly licensing
- Rigorously tested agile codebase
- Secure
- Reliable
- AJAX support through JSON
Videos
Install Zend Framework 2 in Xampp


