1-click AWS Deployment 1-click Azure Deployment 1-click Google Deployment
Overview
CakePHP is an open-source framework that helps make the development and maintenance of PHP apps much easier. It is based on the concept of MVC architecture. It helps you to separate your business logic from data and presentation layers.CakePHP is an open source web application framework. It follows the Model-View-Controller (MVC) approach and written in PHP. CakePHP makes building web applications simpler, faster and require less code.This CakePHP tutorial will drive you to the right direction for getting started with CakePHP framework and provide basic guide of CakePHP application development. Our step by step cakePHP tutorial helps beginners for install and configures the CakePHP application. You can learn CakePHP from scratch with our easy tutorial. Also we will develop a sample CakePHP project and it will help you for better understanding the whole process.
Application flow of the CakePHP are given below:

Download CakePHP
At first you need to download the stable release of CakePHP from Github – CakePHP Releases
Basic Configuration
- Step1: Extract zip file and change folder name with your desire project name. For example
cakephp/. - Step2: Move the
cakephp/folder to the localhost server. Your directory setup looks like the following.- /cakephp
- /app
- /lib
- /plugins
- /vendors
.htaccessindex.phpREADME
- /cakephp
- Step3: Create database at the phpMyAdmin. For example
cakephp_db. - Step4: Open the
app/Config/core.phpfile and make the following changes.- Change the value of
Security.saltat Line no.225.- Before changes:
Configure::write('Security.salt', 'DYhG93b0qyJfIxfs2guVoUubWwvniR2G0FgaC9mi'); - After changes:
Configure::write('Security.salt', 'codexworld');
- Before changes:
- Change the value of
Security.cipherSeedat Line no.230.- Before changes:
Configure::write('Security.cipherSeed', '76859309657453542496749683645'); - After changes:
Configure::write('Security.cipherSeed', '123456');
- Before changes:
- Change the value of
- Step5: Rename
database.php.defaultfile todatabase.phpat theapp/Config/directory. - Step6: Open the “app/Config/database.php” file and make the following changes.
- Go to the line no.67 and replace the values of host, login, password, database_name with your database host, database username, database password and database name.
- Before changes:
public $default = array(
    'datasource' => 'Database/Mysql',
    'persistent' => false,
    'host' => 'localhost',
    'login' => 'user',
    'password' => 'password',
    'database' => 'database_name',
    'prefix' => '',
    //'encoding' => 'utf8',

);
- After changes:
public $default = array(
    'datasource' => 'Database/Mysql',
    'persistent' => false,
    'host' => 'localhost',
    'login' => 'root',
    'password' => '',
    'database' => 'cakephp_db',
    'prefix' => '',
    //'encoding' => 'utf8',
);
- Before changes:
- Go to the line no.67 and replace the values of host, login, password, database_name with your database host, database username, database password and database name.
- Step7: Run the project URL(
http://localhost/cakephp/) at the browser.
CakePHP Naming Conventions
- Controller Conventions – Controller class names are plural, CamelCased and end in Controller.(
PostsController,LatestPostsController) - Model Conventions – Model class names are singular and CamelCased.(
Post,LatestPost) - Database Conventions – Table names corresponding to CakePHP models are plural and underscored. (
posts,latest_posts) - View Conventions – View template files are named after the controller functions they displayed, in an underscored form. The
postDetails()function of PostController class will look for a view template inapp/View/Post/post_details.ctp. The basic pattern isapp/View/Controller/underscored_function_name.ctp
Sample Project
In this sample project we will create a products table at the cakephp_db database. And we will insert some data manually at this table. We will fetch and display products in our sample CakePHP project.
Table Creation & Data Insert: Following SQL is used for products table creation.
CREATE TABLE `products` (
 `id` int(11) NOT NULL AUTO_INCREMENT,
 `title` varchar(255) COLLATE utf8_unicode_ci NOT NULL,
 `description` text COLLATE utf8_unicode_ci NOT NULL,
 `price` float(10,2) NOT NULL,
 `created` datetime NOT NULL,
 `modified` datetime NOT NULL,
 `status` tinyint(1) NOT NULL DEFAULT '1',
 PRIMARY KEY (`id`)
) ENGINE=InnoDB AUTO_INCREMENT=5 DEFAULT CHARSET=utf8 COLLATE=utf8_unicode_ci
Once table creation is completed, insert some demo product data into this table.
Controller: Create a products controller with ProductsController class into the app/Controller/ directory. Controller file and class name should be ProductsController.
<?php
class ProductsController extends AppController {
    public function index() {
        //fetch products resultset from databse
        $products = $this->Product->find('all',array('fields'=>array('Product.id','Product.title','Product.description','Product.price','Product.created','Product.status'),'conditions'=>array('Product.status'=>1)));

        //set products data and pass to the view
        $this->set('products',$products);
    }
}
View: Create view for display products in app/View/ directory. The controller class name is ProductsController and method is index. For creating the index view, we need to Products/ directory and a index.ctp file. So, the complete path of the view file (index.ctp) would be app/View/Products/index.ctp.
<ul>
<?php foreach($products as $row): ?>
    <li>
        <h1><?php echo $row['Product']['title']; ?></h1>
        <h6>Price: <?php echo $row['Product']['price']; ?></h6>
        <p><?php echo $row['Product']['description']; ?></p>
    </li>
<?php endforeach; ?>
</ul>
Model: Model creation is not required until you need validation or associations.
Routes: Open the app/Config/routes.php file and set the default controller and action. Go to the line no.27 and change controller name from “pages” to “products” and action name from “display” to “index”. If you want to load the different view for this action, you need to pass the view file name after the action element.
Router::connect('/', array('controller' => 'products', 'action' => 'index'));
Testing: Run the base URL at the browser, products list would displayed.

Benefits of using CakePHP Framework?
- Rapid Development: CakePHP is known for its “convention over configuration” approach, which allows developers to quickly build web applications. It provides a set of pre-built functionalities and follows the MVC (Model-View-Controller) architectural pattern, making it easy to create and organize code.
- Code Reusability: CakePHP promotes code reusability through its modular design and extensive library of components, behaviors, and plugins. Developers can leverage these ready-made components to speed up development and reduce the amount of code they need to write from scratch.
- Security: CakePHP includes built-in security features to help developers protect their web applications from common vulnerabilities, such as SQL injection, cross-site scripting (XSS), and cross-site request forgery (CSRF). It provides mechanisms for input validation, form tampering protection, and data sanitization, making it easier to build secure applications.
- Database Abstraction: CakePHP provides a powerful Object-Relational Mapping (ORM) layer, called CakePHP ORM. It simplifies database interactions by abstracting the underlying SQL queries, allowing developers to work with databases using a more intuitive and object-oriented approach. This helps reduce the complexity of data retrieval, manipulation, and persistence.
- Active Community and Documentation: CakePHP has an active and supportive community of developers who contribute to its growth and provide assistance through forums, chat channels, and open-source projects. The framework also offers comprehensive documentation, tutorials, and guides, making it easier for developers to get started and find answers to their questions.
Why we use CakePHP
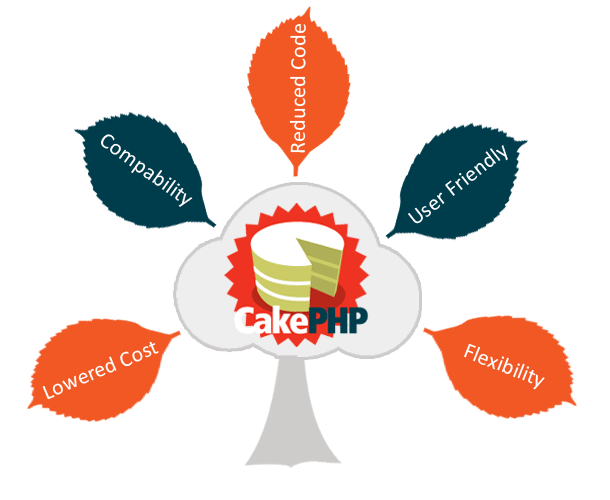
CakePHP has several features that make it highly recommended as a framework for quick and risk-free implementation of applications.
- User-friendly Tool: It is helpful to create a complex web application directly. Furthermore, we can easily customize the web application as per our needs in CakePHP applications. It allows us to create coding in the template editor quickly.
- Robust Performance: It also provides a built-in data validation process in CakePHP for validating the web application. Furthermore, it makes the complex structure simpler for the development of the website by the use of advanced tools that are supporting your developing site across the world.
- Compatibility with PHP4 and the above version: CakePHP’s application is supported with PHP4 and a higher version of PHP for the smoothly running web application.
- CRUD development: A CakePHP provides a beneficial thing for the development of an application is CRUD. A single line of code in crud can generate the database application for performing various tasks like create update and delete operation. Furthermore, it can be customized based on a specific requirement of the business application.
- Innovative Ability: All the applications of CakePHP support unit testing and provides some essential details for the functionality of your application also it supports multi-talent resource for the enhancement of the knowledge.
- Model View Controller (MVC) Architecture: It is based on the MVC pattern for handling the query to the database. If the user wants to alter the information that is saved on the database, then CakePHP allows to perform various task like insert, delete and update the details which you have filled in your database.
- Easily Extendable: CakePHP allows you to reuse their codes by writing at one time and reuse their component or method more than a single page. Furthermore, CakePHP also provides some functionality that can be used in your application like helper, plugins, and behaviors for directly calling in your application.
- It provides a fast and easily changeable template by use of PHP syntax with helpers.
- Security, Session, and Request Handling Components: In CakePHP, there is a built-in function to protect your application is security and authentication. It allows you to protect your web application while performing CRUD operations in your database. Besides, this it also creates a session for the web site user, if the user has not been interacting with the site for the last few minutes, it automatically closes that page and send your response on the front page of the applications. Furthermore, it handles the request or loading the component in your application by calling the element in your controller.
CakePHP in detail…..
- CakePHP was created by Michal Tatarynowicz in early 2005 as a minimalistic framework for his own web applications.
- It was inspired by Ruby on Rails and aimed to bring Rails’ benefits to the PHP community.
- CakePHP was released as an open-source project under the MIT license.
- Version 0.1, the first public release, came out in April 2005.
- CakePHP gained popularity quickly due to its simplicity, conventions, and built-in features.
- Version 1.0, released in 2006, marked a significant milestone for CakePHP with improved functionality and support.
- Version 1.1 introduced enhanced model associations and improved routing.
- Version 1.2 added built-in support for database migrations.
- In 2011, CakePHP 2.0 was released, bringing modern PHP practices, improved performance, and better security features.
- CakePHP 3.0, released in 2014, focused on performance, flexibility, and usability, embracing PHP 5.4 and above.
- CakePHP 4.0, released in 2019, further refined the framework with newer PHP versions and a more streamlined API.
- CakePHP continues to release updates, improving performance, security, and developer experience.
- It remains popular for its ease of use, convention-over-configuration approach, and extensive feature set.
CakePHP Folder Structure details
The folder structure of a typical CakePHP application follows a set convention that organizes the files and directories in a way that promotes code organization and separation of concerns. Here is an overview of the standard folder structure in CakePHP:
- app/: This is the main folder of your CakePHP application.
- bin/: Contains executable scripts related to the CakePHP project.
- config/: Contains various configuration files for the application.
- app.php: Configuration file for general application settings.
- bootstrap.php: File responsible for bootstrapping the CakePHP framework.
- routes.php: File for defining application routes.
- …: Other configuration files.
- src/: The source code of your application.
- Controller/: Contains the application’s controllers.
- Model/: Contains the application’s models (representing the data layer).
- Template/: Contains the application’s templates (views).
- Form/: Contains form classes used for form handling and validation.
- View/: Contains view classes used for rendering views.
- …: Additional directories and files for custom code.
- plugins/: Directory for CakePHP plugins used in the application.
- logs/: Directory for log files generated by the application.
- tmp/: Directory for temporary files, such as cached data and session files.
- vendor/: Directory for third-party libraries and dependencies installed via Composer.
- webroot/: The web-accessible root of the application.
- css/: Directory for CSS files.
- img/: Directory for image files.
- js/: Directory for JavaScript files.
- index.php: The entry point of the application.
Additionally, there are some other important files and directories outside the app/ directory:
- bin/: Contains executable scripts related to CakePHP’s command-line interface (CLI).
- config/: Contains global configuration files for the CakePHP installation.
- plugins/: Contains globally installed CakePHP plugins.
- tests/: Directory for testing-related files, including test cases and fixtures.
- vendor/: Directory for globally installed Composer dependencies.
The folder structure may vary depending on the specific version of CakePHP and any customizations made to the default setup. However, the outlined structure provides a foundation for organizing the various components of a CakePHP application.
CakePHP Configuration
CakePHP Configuration
When we install CakePHP software in our system, then it provides a predefined config folder, and we can modify it according to our needs in the application. CakePHP provides some configuration.
General Configuration
Here we have listed various elements and their descriptions in CakePHP configuration. In this configuration, we will learn about the component of CakePHP, how they affect your application.
Debug
It Changes the CakePHP-debugging output
false = Production mode (when you define debug is false then it will not show any error or warning message)
true = by defining true, it will show an error and warning too.
App.namespace
The namespace element is usually used to find the app class that is defined in the config folder.
App.baseUrl
If you want avoid the use of Apache’s mod_rewrite in your Cake PHP application, then you can uncomment it. Don’t forget to delete your .htaccess files as well.
App.base
The base directory app is in the config file and can auto-detect if the base directory is not present. And if you have not provided the correct base, it means that your string starts with a / and does not end with /.
App.encoding
The encoding/format is used to represent your data in the application that generates set characters in designing and encode entities. Besides, it will match all encoding values that are specified in your database.
App/webroot is the webroot directory.
App/wwwRoot – shows the file path to the Webroot.
App.fullBaseUrl
It provides the full url path to your application’s root. By default, $_SERVER is used to generate an absolute url in CakePHP. Although you can use it manually to optimize the performance.
App.imageBaseUrl
You can define your image path on the web page under Webroot.
App.cssBaseUrl
You can define your CSS file path on the web path under the Webroot folder.
App.jsBaseUrl
In the folder of Webroot, you can define your js file to the web path.
App.paths
It configured a path that is based on non-class resources such as plugins, location subseries, templates that provide definition paths for plugins, view templates, and locale files.
Security.salt
It uses a random string for hashing. For this purpose, it uses the HMAC salt to provide security to your database value.
Asset.timestamp
It contains a digital record of the last modified file using the asset. timestamp. Also, it records the particular file at the end of the Asset Files URL (CSS, JAVASCRIPT, IMAGE), when appropriate coding values are used.
(bool) false – it will not perform any task.
(bool) true – It appends the timestamp interval when debug is true.
(string) ‘force’ – It always adds the timestamp.
Database Configuration
All the connections related to the database can be configured in config / app.php. And this file can be called in Cake \ Datasource \ ConnectionManager to establish the database connection configuration in your application.
When you configure all the database settings in your config/app.php file, then it will show the given below image in your localhost server.
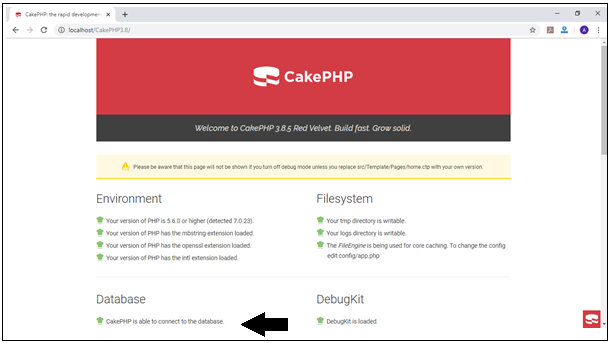
And if you are using mysql for database connection, then you have to define the given below connection in your application.
Cake- PHP naming conventions
CakePHP follows a set of naming conventions that promote consistency and standardization within the framework. Here are the key naming conventions used in CakePHP:
- Class and File Names:
- Class names should be in CamelCase.
- Controller classes should be suffixed with “Controller” (e.g.,
PostsController). - Model classes should be suffixed with “Table” (e.g.,
UsersTable). - View classes should be suffixed with “View” (e.g.,
IndexView). - Helper classes should be suffixed with “Helper” (e.g.,
FormHelper).
- File and Folder Structure:
- Class files should be named after their respective classes, with the filename matching the class name (e.g.,
PostsController.php). - Controllers should be placed in the
Controllerdirectory. - Models should be placed in the
Model/Tabledirectory. - Views should be placed in the
Templatedirectory, under the corresponding controller’s directory.
- Class files should be named after their respective classes, with the filename matching the class name (e.g.,
- Database Table Names:
- Database table names should be in lowercase and pluralized.
- Table names should use underscores to separate words (e.g.,
users,blog_posts).
- Controller Actions and URLs:
- Controller actions (methods) should be in lowerCamelCase (e.g.,
index,editPost). - URLs follow a lowercase, hyphenated format for controller and action names (e.g.,
/users/edit-post).
- Controller actions (methods) should be in lowerCamelCase (e.g.,
- View Templates:
- View templates should be named after the corresponding controller action, using lowercase, hyphenated format (e.g.,
index.ctp,edit-post.ctp).
- View templates should be named after the corresponding controller action, using lowercase, hyphenated format (e.g.,
- Variable Names:
- Variable names should be in lowerCamelCase (e.g.,
$userName,$postTitle).
- Variable names should be in lowerCamelCase (e.g.,
Following these naming conventions in CakePHP helps maintain a consistent codebase and improves code readability. Additionally, adhering to these conventions allows the framework to automatically associate components, models, views, and actions based on the naming patterns, making development more efficient.
Databases Configuration
In CakePHP, the configuration for connecting to databases is typically done in the config/app.php file. This file contains an array named 'Datasources' where you can define one or more database connections. Here’s an example of how the database configuration looks in CakePHP:
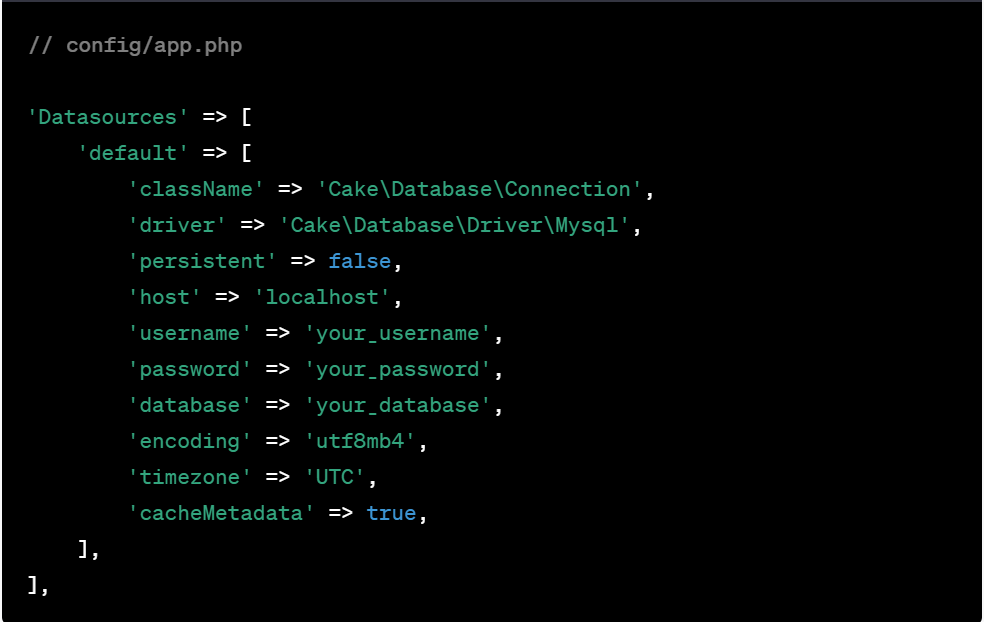
'default' key represents the default database connection. You can define additional connections by adding more keys to the 'Datasources' array.Here’s an explanation of the key configuration options:
'className': Specifies the class to use for the database connection. In this case,'Cake\Database\Connection'is used.'driver': Specifies the database driver to use. For example,'Cake\Database\Driver\Mysql'for MySQL.'persistent': Set it totrueif you want to use a persistent database connection.'host': Specifies the database host.'username'and'password': The credentials for accessing the database.'database': The name of the database to connect to.'encoding': Specifies the character encoding for the database connection.'timezone': Specifies the timezone to use for the database connection.'cacheMetadata': Set it totrueto enable metadata caching for improved performance. It’s recommended to keep this option enabled in production.
You can add additional configuration options as needed, depending on the database and driver you are using. Once the configuration is set, CakePHP will use this information to establish a connection to the database when needed.
MVC in CakePHP
CakePHP follows the Model-View-Controller (MVC) architectural pattern, which provides a structured way to develop web applications. Here’s how MVC works in CakePHP:
- Model (M):
- The Model represents the data and business logic of the application.
- In CakePHP, Models are responsible for handling database interactions, data validation, and business rules.
- Models retrieve, store, and manipulate data from the database.
- Models are typically located in the
src/Model/Tabledirectory and extend theCake\ORM\Tableclass.
- View (V):
- The View is responsible for presenting data to the user.
- In CakePHP, Views are used to generate the HTML output that is sent to the browser.
- Views are typically located in the
src/Templatedirectory and contain PHP templates (.ctpfiles) with HTML and embedded PHP code. - Views retrieve data from the Controller and display it to the user.
- Controller (C):
- The Controller acts as an intermediary between the Model and the View.
- In CakePHP, Controllers handle user requests, process data, and prepare the response.
- Controllers receive user input, interact with the Model to retrieve or update data, and pass the data to the View for rendering.
- Controllers contain action methods that correspond to different user actions.
- Controllers are typically located in the
src/Controllerdirectory and extend theCake\Controller\Controllerclass.
The flow of data and control in CakePHP’s MVC pattern is as follows:
- The user makes a request by accessing a URL.
- The request is routed to the appropriate Controller and action based on the URL.
- The Controller’s action method is executed, which may involve retrieving data from the Model, processing it, and preparing a response.
- The Controller passes the necessary data to the View for rendering.
- The View receives the data from the Controller and generates the HTML output.
- The generated HTML output is sent back as a response to the user’s request.
CakePHP’s MVC architecture helps separate concerns and promotes a clear separation of responsibilities between the Model, View, and Controller components. This separation enhances code organization, maintainability, and reusability, making it easier to develop and maintain complex web applications.
CakePHP is an open-source MVC framework. It makes developing, deploying and maintaining applications is easy. CakePHP has number of libraries to reduce the overload of most common tasks. Following are the advantages of using CakePHP.
- Open Source
- MVC Framework
- Templating Engine
- Caching Operations
- Search Engine Friendly URLs
- Easy CRUD (Create, Read, Update, Delete) Database Interactions.
- Libraries and Helpers
- Built in Validation
- Localization
- Email, Cookie, Security, Session, and Request Handling Components
- View Helpers for AJAX, JavaScript, HTML Forms and More
CakePHP Request Cycle
The following illustration describes how a Request Lifecycle works −
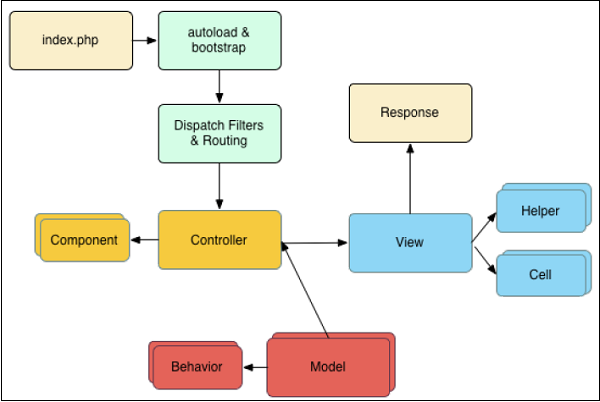
A typical CakePHP request cycle starts with a user requesting a page or resource in your application. At a high level, each request goes through the following steps −
- The webserver rewrite rules direct the request to webroot/index.php.
- Your application’s autoloader and bootstrap files are executed.
- Any dispatch filters that are configured can handle the request, and optionally generate a response.
- The dispatcher selects the appropriate controller & action based on routing rules.
- The controller’s action is called and the controller interacts with the required Models and Components.
- The controller delegates response creation to the View to generate the output resulting from the model data.
- The view uses Helpers and Cells to generate the response body and headers.
- The response is sent back to the client.
Structure of CakePHP
Model-view-controller
It is a pattern in software design that allows you to differentiate the code logically, make it more reusable, maintainable, and generally better.
Model
In Cake Terms, the model represents a specific database table/record, and its relationship to other tables and files. The model also has rules to validate your data that implement the inserted or updated operation in your database table. Handles all data processing, validation, and association that related to the data
View
It works as a Presentation layer that displays the information in such a way that can be beneficial for the user. What to end-user sees on the web browser.
Controller
It interacts with the model and view to deliver a response to the user. The controller handles the requested data, ensuring that the correct model is called and the proper response or view is provided.
Structure of CakePHP
You can see the folder structure of CakePHP, described below.
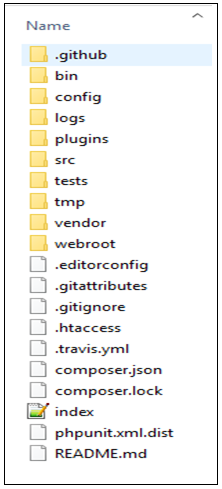
Folder Name & Description
Bin
The bin folder contains the Cake console executables files.
Config
The config folder contains some configuration files for CakePHP uses. Database connection details, route files, bootstrapping, core configuration files, and more.
Logs
The log folder usually holds some log files of your application based on the log configuration.
Plugins
A CakePHP plugin which is used for providing additional functionality in your application. You can also reuse it in other applications of CakePHP.
Src
The src folder contains the MVC files of your application. In this folder, you will put your CakePHP files for the development of web applications. Now, take a look at the src files in brief.
- The console holds the console command prompt for running your application file.
- A Controller that holds the controller’s files and their components too.
- The locale contains string files for internationalization.
- A model that is used for connecting with the database table, so it holds the application’s tables, entities, and behavior.
- The view is a presentational class that placed in cells, helpers, and template files, which can call in the controller file.
- A template is also a presentational file that put in element, error pages, layout, and view template files
Tests
The test folder which contains the test cases of your application.
Tmp
Tmp is a folder of CakePHP in which it stores the temporary file, and the actual data depends on the configuration of CakePHP. This folder is used for storing the model data, and sometimes it can store session information.
Vendor
The vendor is a folder of CakePHP in which it holds the dependencies of CakePHP and other applications. So, we can’t edit these files, and if you changed by mistakes, then the composer will overwrite your previous record.
Webroot
The webroot is a folder of CakePHP in which it contains all the public document which you want to fetch in your helper class like jpg, CSS, javascript file.
CakePHP Request Cycle
A CakePHP request cycle begins with a user-requested page in your application program. At each stage of the application, the user-requests are passed one by one.
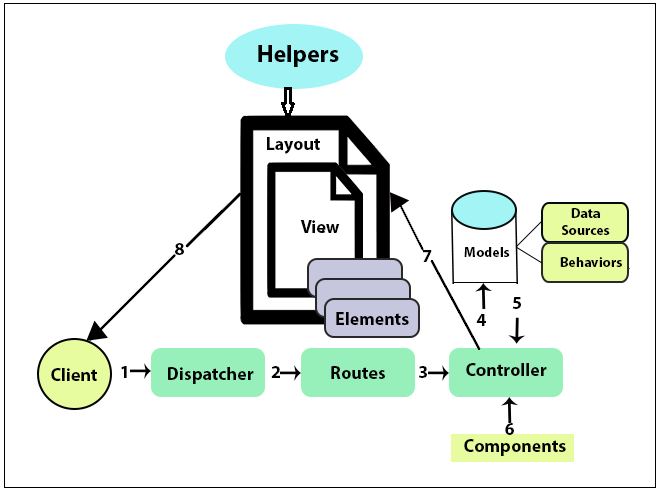
- Suppose a client request for a particular item on the web browser. Then the request carried out by the dispatcher. Example: suppose a user wants to fill his examination fee online. The dispatcher, filter the client request from the number of applications on the server, send their request for a particular web server.
- Dispatcher filters or select only the routes that have been requested by the client that can be configured and handle the request.
- A large number of routes are determined for the request in the respective controller and take action based on routing rules.
- Then the controller’s action is implemented, and the controller interacts with the required model and components. It takes dynamic data from the model that is relevant to the request. Example When you fill the contact_us / feedback page in your web application, the model stores the details in the format of the data source and behavior. We can also identify from which website we have collected the details
- The controller can check dependencies from component and database models, send feedback to the view.
- CakePHP uses a view helper and element to generate a responsive body.
- And finally, the requested page will show to the user web browser.
CakePHP Controller
Controller
A Controller, as the name suggests, is a controller that controls the web application by calling the correct action. The controller takes the request from the user through dispatchers like action, which makes sure the right models and views are called. So, it acts as a bridge between models and views.
AppController
The AppController class is the superclass of all controllers, which extends the main Controller class. This class is predefined in src/Controller/AppController.php, and it contains some function that’s shared between all of your controller applications. This class expands CakePHP’s controller class.
Controller Actions
All the method of the controller, which is predefined in the controller class, is known as Actions. It is responsible for handling the request and sending an appropriate response to the browser. It represents output in the form of visuals that can be provided to create a responsive browser for the user. Furthermore, the view file is rendered in the controller by defining the action in controllers.
Syntax:
|
0
1
2
3
4
|
public function action_name()
{ // here we can define variable and statement
}
|
Or
|
0
1
2
3
4
|
public function index()
{
}
|
Here, action_name() and index () methods are the activities that can be called by the controller in your localhost server.
Here is an example in which we will learn how to create a controller in CakePHP.
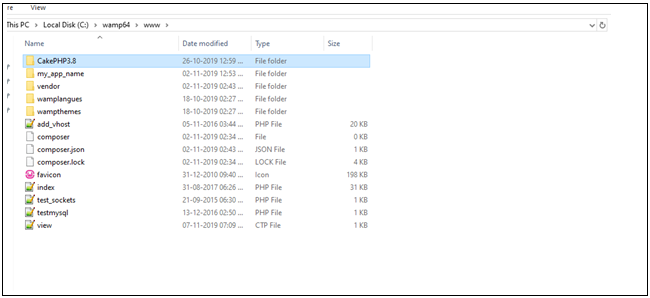
Step1. Firstly, we have to go to our localhost server like wamp or xampp of the C directory folder. If in your system have installed a wamp server, then go to www folder and click on the CakePHP folder, which you have created during the installation of CakePHP. If your system has xampp installed, then click on the xampp folder of C directory, where you will see an htdocs folder. In that folder, you will find the name of that folder which you have created during the installation of CakePHP via Composer. In the given below image, you will find the folder name of your project.
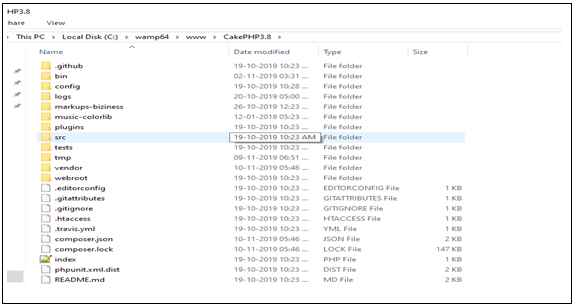
Step2. Now click on the CakePHP folder of your project, then it will show you this page.
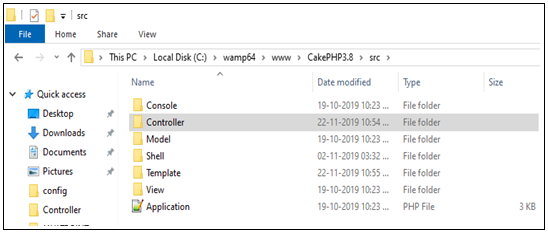
Step3. Now click on the src folder.
Step4. After clicking at the src folder, you will find the controller, view, model and template folder.
Step5. Click on the Controller folder in which you have to create a Controller file with the use of controller name as a suffix in Controller class like FirstsController.php and SecondsController.php. Here we have created many controllers in the CakePHP3.8 folder.
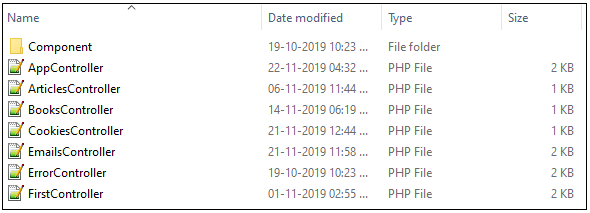
In this example, we have created our controller with the name of FirstController.php.
|
0
1
2
3
4
5
6
7
8
9
10
|
<?php
namespace App\Controlller; //we have to write these two lines evert time while we create use App\Controller\AppController; // controller.
class FirstController extends AppController {
public function fun()
{
echo “Welcome to the online Tutorial”;
}
}
?>
|
Now you have to run this file on the local server like wamp or xampp by writing on the URL like localhost/CakePHP3.8/First/fun
- Cakephp3.8 is the folder name of your project
- You can write your Controller name either in a small letter or capital letter like First/first is the controller name
- fun is the action name that you have to call in your Controller after writing the Controller name in your localhost server.
When you run your Controller in the localhost, then it will show an error “Missing Template” because you have not created a view file for this text on the server.
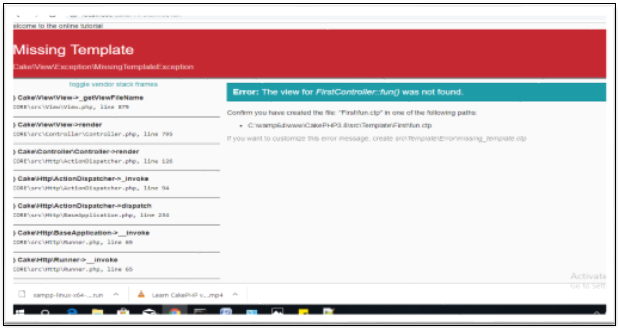
NOTE: – If you don’t want to create a template file, then you can run your controller by the use of this syntax “$this->autoRender=false”. You have to define this syntax in your action method of a controller like this.
FirstController.php
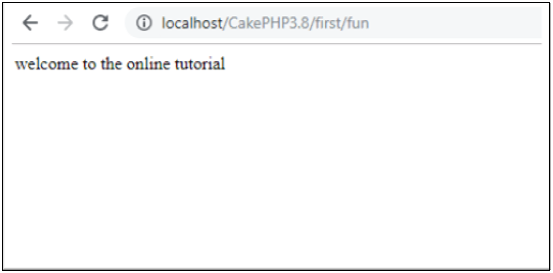
Here we have created multiple actions in LastsContoller.php.
|
0
1
2
3
4
5
6
7
8
9
10
11
12
13
14
15
16
|
<em></em>class LastsController extends AppController
{
public function view($id)
{
// Action logic goes here.
}
public function index($userId, $recipeId)
{
// Action logic goes here.
}
public function find($query)
{
// Action logic goes here.
}
}
|
And if we want to run a particular method from two or more method, then we have to pass that method on the localhost server by writing simply
localhost/CakePHP3.8/Controllername/method name
Use of initialize method
This method is used to load the component or process in the controller by defining their name. CakePHP provides an initialize() method that called the component at the end of a Controller’s constructor for direct accessing.
CakePHP View
In CakePHP, views are responsible for creating and showing the output of an application. It means everything that the user sees on the screen is called View. For viewing the content, we have to write the data on the view and the template folder.
App View
AppView is the default application’s View class. So AppView itself extends by this keyword “use Cake\View\View” class included in CakePHP, and it is described in src/View/AppView.php as follows:
|
0
1
2
3
4
5
6
7
8
|
<?php
namespace App\View;
use Cake\View\View;
class AppView extends View
{
}
?>
|
We can use our own AppView to load helpers that will be used for every View rendered in the application. CakePHP provides an initialize() method that is called at the end of a View’s constructor.
|
0
1
2
3
4
5
6
7
8
9
10
11
12
13
|
<?php
namespace App\View;
use Cake\View\View:
class AppView extends View
{
Public function initialize()
{
// it will load the html Helper in view
$this -> loadHelper(‘Html’);
}
}
?>
|
The function of the view layer
· Views – It is a templates file that is responsible for presenting the structure of an application
· Elements – Small, reusable bits of code rendered inside views
· Layouts – Template wrapper code. Most views are delivered inside of a layout
· Helpers – Classes that encapsulate view logic that can be used in many areas of the application like date pattern or currency pattern.
VIEW TEMPLATE
The view layer of CakePHP described as how are you handling your users. Most of the time, your views may be degenerate the use of HTML/XHTML documents to browsers, but you may also need to respond through the use of an isolated application with the use of a JSON, or output a CSV file for a user.
View template files have a default extension of .ctp(CakePHP Template), and it uses alternate PHP syntax for control statement and output. These files contain the logic required to generate the data received from the controller in a presentation format that is ready for the user.
Steps for creating view template File:
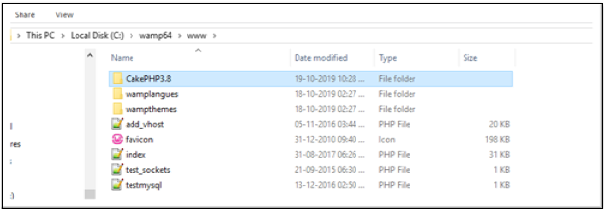
1) Click on the www folder of the local server, and it will show your CakePHP folder.
2) Click on the src folder where you will see the template folder.

3) Then in the template folder, you have to create a folder whose name is the same as the name of the controller.
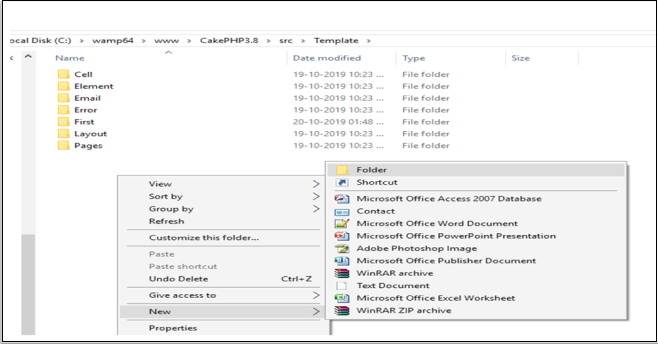
4) Here we have created a template folder name “Second”, which same as our controller.
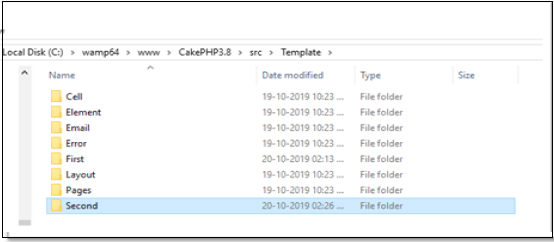
Now in the Second folder, you have to create a .ctp file and write your message, which you want to see in your template file of the browser.
Like
Here is the action file nameis fun3.ctp
|
0
1
2
|
<p> WELCOME TO THE Tutorials & Examples. IT IS AN ONLINE LEARNING TUTORIAL FOR IT PROFESSIONAL.
|
Here we have created a controller with the name SecondController.php.
|
0
1
2
3
4
5
6
7
8
9
10
11
|
<?php
namespace App\Controller;
use App\Controller\AppController;
class SecondController extends AppController
{
Public function fun3()
{
}
}
?>
|
We will run this program by type on the url of local server like as localhost/CakePHP3.8/Second/fun3
Here CakePHP3.8 is the folder name inside your local server folder, and second is the controller, while fun3 is the action or method that will run on the server.
This is the output:

CakePHP Installation
CakePHP has some system requirements:
1. In our system, there should be a local server like WAMP or XAMPP Server. For example, Apache and we can also use Nginx or Microsoft IIS.
2. For running the CakePHP web application, we should require the minimum version of PHP 4.3.2 or higher (including PHP 7.3).
3. mbstring PHP extension
4. intl PHP extension
5. simplexml PHP extension
6. PDO PHP extension
7. You require at least these database engines (phpMyAdmin, MySQL 4+, PostgreSQL, and a wrapper for ADODB).
8. You have to sure that the directories logs, tmp, and all its subdirectories give write permission for various operations in CakePHP.
Installation of CakePHP
Before installing the CakePHP, you have to check whether your system contains the current php version or not, you can check it by writing in command prompt.
|
0
1
2
|
php –v
|
Installation of Composer
- The installation procedure of CakePHP is easy. CakePHP uses a Composer for dependency management tool in php. So, we have to install the composer before installing Cakephp. We can install composer by visiting this website: https://getcomposer.org

- It will show this page where we can click on the download button, and then it will open a new window for choosing the OS version to download either Linux, MacOS, and window. Now click on Download the Composer-Setup.exe file. It will download the current version of the composer in your system. You can see in below screenshot.

- Now double click on the composer setup file, then it will show you this pop-up screen.
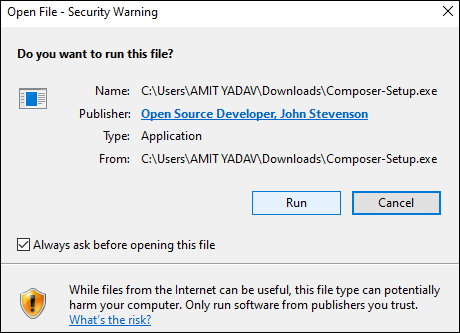
- After that, you have to click on the Run button.
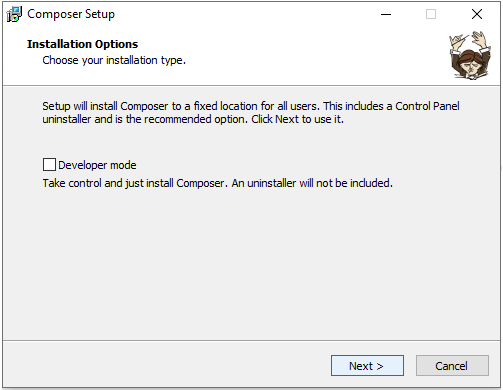
- Then click on Next button to continue the further steps
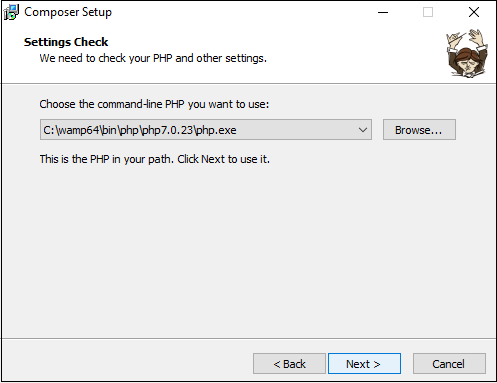
- In the above screen, you can see the path of the composer then click on the Next button.
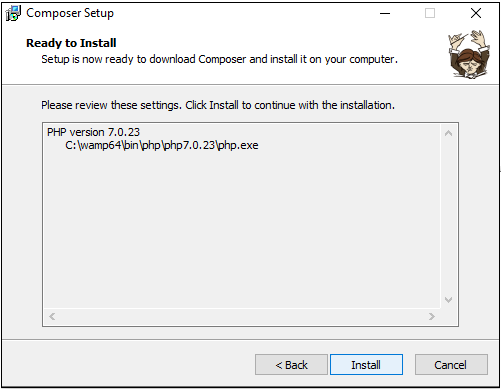
- After this, click on the install button.
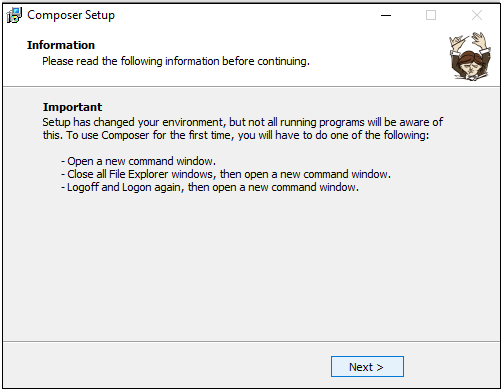
- Then again, click on the Next button.
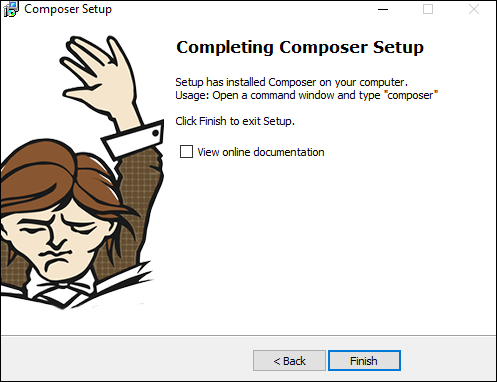
- After that, click on the Finish button to come out from the installation procedure.
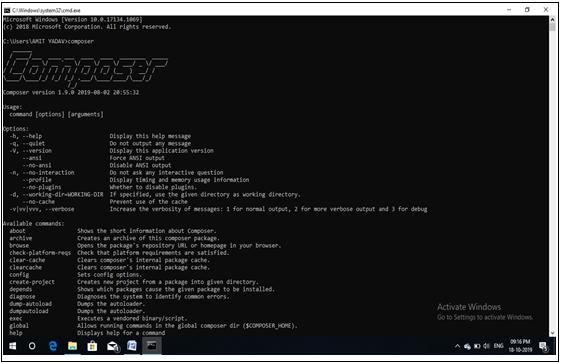
- If you want to check-in, your system has an installation of the composer setup successfully. Then you can check by command prompt: by just writing as a composer. That time your computer must be connected with the internet because the composer will download some packages and framework for CakePHP, and it may take a few minutes, then it will show the below picture.
- After downloading some packages and framework then it will show this screen for successful completion of the composer in your system
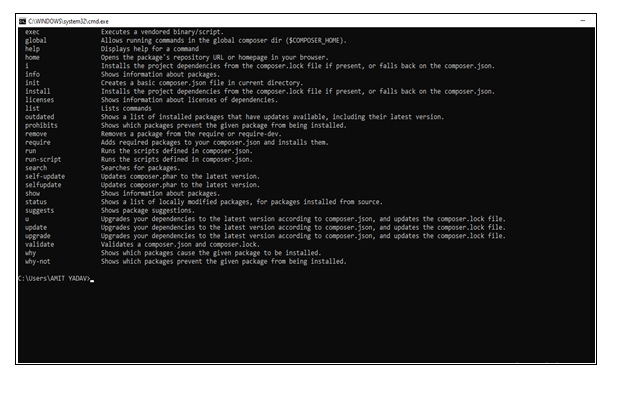
Now we have to create the CakePHP folder in our local server either in htdocs of xampp folder or in the www folder of wamp. So, we have to provide a proper path in command prompt to that directory where we want to install the CakePHP like this C:\wamp64\www and then press enter button.
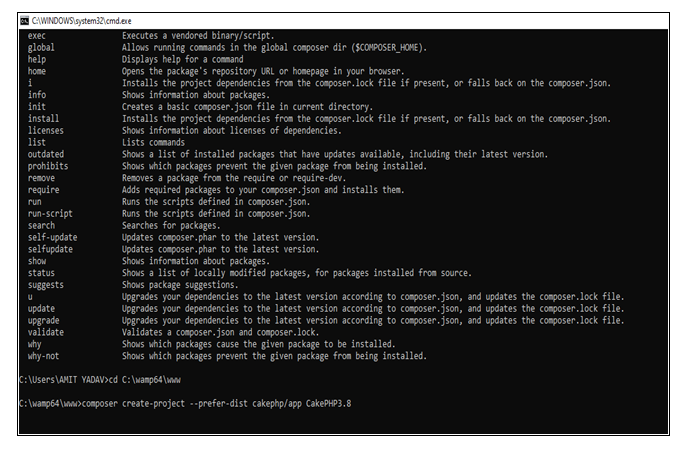
After that you have to write this statement like this:
|
0
1
2
|
composer create–project —prefer–dist cakephp/app <strong>my_app_name</strong>
|
“CakePHP3.8” is the folder name of your project, and if you want to change the name of your project, then you can change by editing in the command prompt before running the project and then press the enter key from your keyboard. It will start the downloading of CakePHP supportive files in your folder name, which you have provided at that time. The supportive data of CakePHP maybe took some more time to download online.
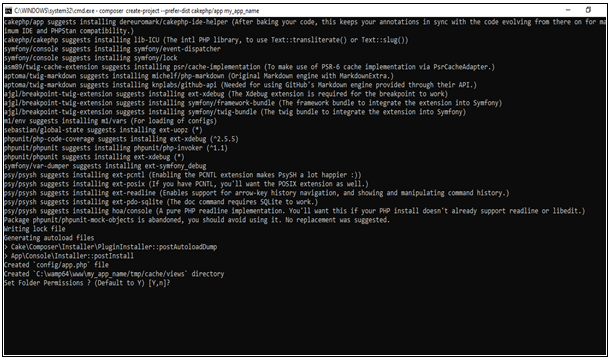
After this, it will take permission to set the folder name by yes/no option. And if you write y, then it set that folder name which you have provided, or if you don’t want to set another folder name, then you can change by “n,” and again, it will ask for set the folder name of your CakePHP.
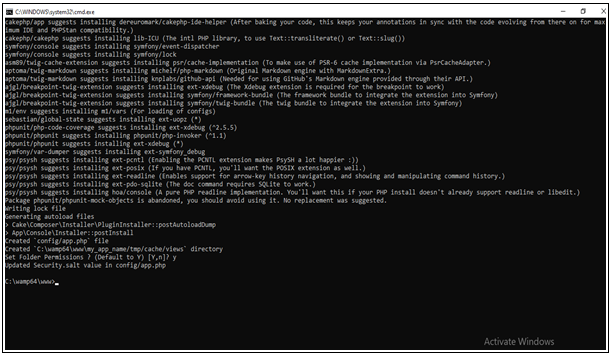
After that, you will see your CakePHP application have successfully installed in your system.
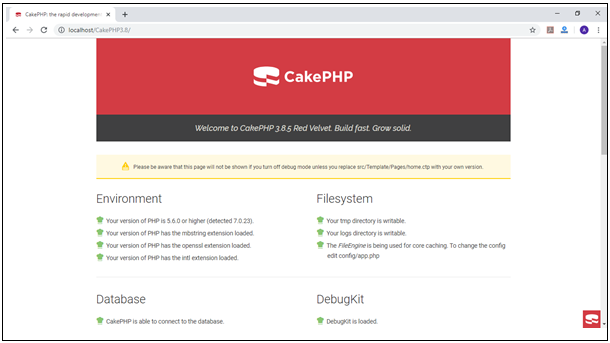
You can check it directly by visiting this URL –http://localhost/CakePHP3.8/ in the browser. This URL will direct link you to the given below screen. This image shows that your CakePHP software has successfully installed.
Top 10 advantages of using CakePHP
1. Open Source platform
The first and foremost rule of making a commodity popular is the fact that it should be easily accessible and open to all. CakePHP wins this bet by making sure that it remains an open source web development program. With no licensed or recurring fees and no probability of even investing a penny in web development. As the name suggests, this platform supports PHP, which gives the web developers the freedom to create an amazing website.
2. No Pre-configuration Required
CakePHP is superior in the sense that it saves web developers a lot of hassle. No system configuration is to be done before using this platform. What does this mean? This means one need not to invest time in configuring Linux-Apache-MySQL-PHP setup.It does this on its own by auto-detecting all the settings that are to be configured. Additionally, Apache configuration is also not needed. It saves you further precious time by even taking charge of the validation features which are built-in. The developers can create different validation rules, this feature is efficient and very simple at the same time.It eliminates developer efforts by eliminating XML and YAML files. So, there isn’t a single part of a code, where you need to specify the location of the library. The only thing you need to care about is the Database settings.
3. ORM
Object Relational Mapping is a technique through which data is converted between an incompatible system using an object-oriented programming language. CakePHP has an outstanding inbuilt ORM and is highly capable. This is why working with databases and CRUD operations is as easy as anything. Data is presented in the form of classes, which are used to define relations. Along with that, it is also possible to pre-define callbacks.At the moment, there are two versions – version 2 and 3. CakePHP version 3 supports a PHP package manager, whereas the former version does not.
4. Easily extendable
CakePHP allows you to create reusable code parts which can be reused for more than a single project. Instead of extending its own libraries, functionality can be given to components, helpers, plug-ins, and behaviors. The cakeforge site has a lot of plugin helpers and components, this saves your effort of writing everything on your own.
5. CRUD scaffolding
CRUD is an acronym for “create, read, update and delete”. These are some of the primary actions in a web application. Various entities can easily be created, viewed, read, updated and deleted. This allows you to view a demo of your application. This allows all models and controllers to be modified for the specific necessities of the application. It also allows an easy management of data in the web development process.This is extremely helpful, because with a single line of code you can see preliminary view of your application.
6. Ability to create test
CakePHP boasts of the ability to test all fragile and critical points of your application. They range from core tests to custom-made tests, which you can make according to your own requirements. This becomes really useful when you build a large application, where its performance should be checked at each step. It is most preferred by the developers because of the ease of debugging and testing any application, once it is developed. This helps in instant identification of errors and correcting them.It provides you with the ability to check the critical points in your application.
7. Security
For most people, security is the biggest problem faced in any situation and a secure environment earns more points than any other trait. Its core security and CRUD features allow securing the user submission process in less time. CakePHP has a built-in security and authentication. It protects the security of your application much more than any other framework. It has many built-in tools for CSRF protection, input validation, SQL injection prevention, form tampering protection, and XSS prevention.
8. Proper class inheritance
CakePHP inheritance is amazingly easy and understandable. It has two main folders in each of its projects: the core library and the second being the application specific one. All application specific controllers are extended app controller class which is empty but can easily be extended by some smart measures such as pre-defining core functions. The same applies to models as well.
9. Model View Controller (MVC) Pattern
Being based on the MVC, CakePHP allows saving any query to the database. If any alterations are needed in the database, then CakePHP allows the web developers to insert, delete and change the model according to their custom requirement. This helps them to separate the data presentation layer from the business layer. This model helps to collaborate the data with the logic and save it in the database in a presentable way to the end-user. Model option supports data management and it is supported by Controller option.
Though you might not see much of the usage of MVC patterns for small-scale websites when developing large scale websites, MVC architecture is a blessing.
10. Friendly license and easily extend with components and plug-ins
Acquiring an MIT license helps CakePHP become even more vast and perfect for building applications for commercial use. With its improved bootstrapping process, it allows even more developer control and better performance. Apart from that, it allows developers to create parts of reusable code which is highly useful for more than one project. You can easily modularize your projects by placing special functionality in components, behaviors, helpers and a combination of Models, Views, and Controllers – encapsulated as plug-ins. There are a number of plug-ins already available for use on CakeForge website, so you need not to worry about writing everything from the Scratch.CakePHP has proven to be very efficient and useful tool and we can say that it has become a favorite among developers. With its amazing features for translating, caching, validating and authenticating, it is the best choice for developing a perfect content management system.
-CakePHP makes building web applications simpler, faster and require less code.CakePHP is a rapid development framework for PHP which uses commonly known design patterns like Active Record, Association Data Mapping, Front Controller and MVC.
CakePHP is owned by CakePHP (https://cakephp.org/) and they own all related trademarks and IP rights for this software.
Cognosys provides hardened and ready to run images of CakePHP on all public cloud ( AWS marketplace and Azure).
Deploy your CakePHP securely on cloud i.e. AWS marketplace and Azure with Reliable Services offered by Cognosys at one-click with easy written and video tutorials.
Secured CakePHP on Windows 2012 R2
Secured cakephp on centos
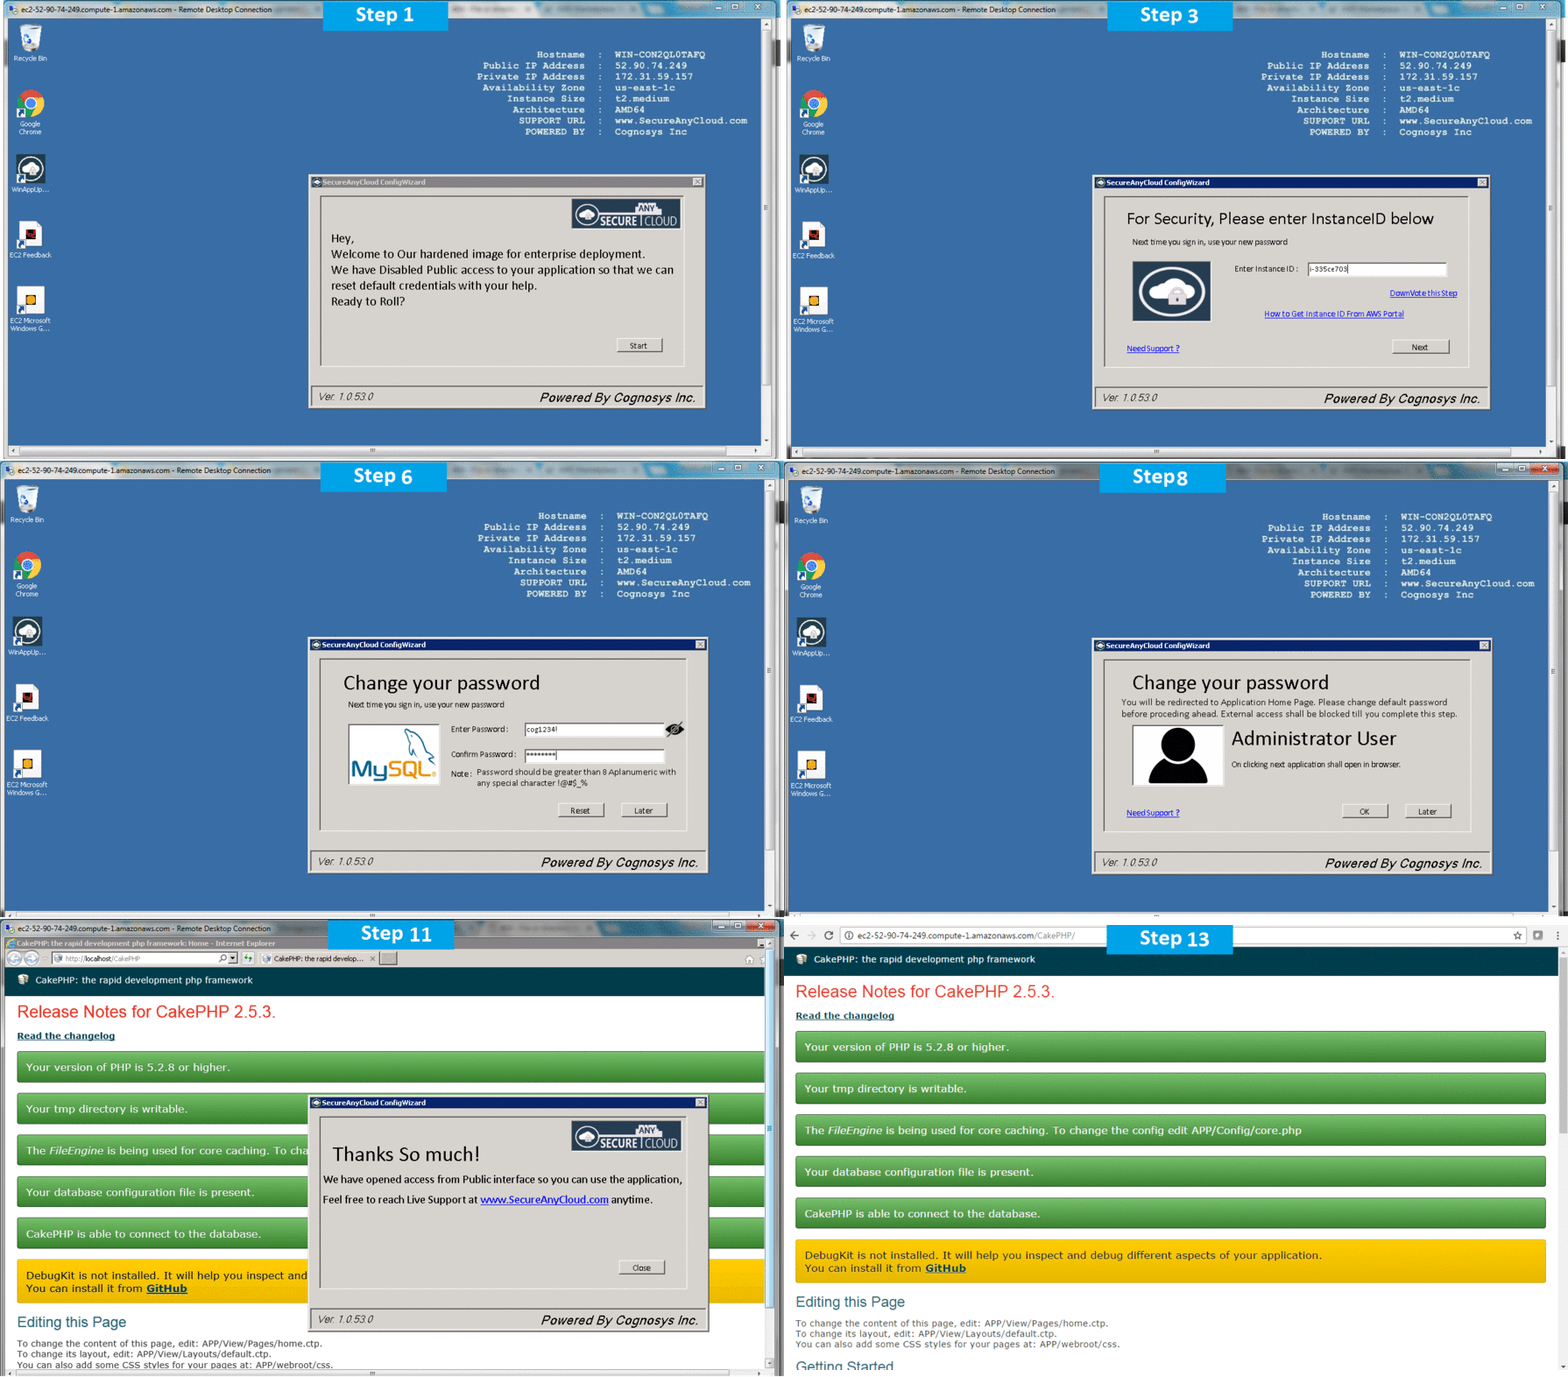
CakePHP on cloud For AWS
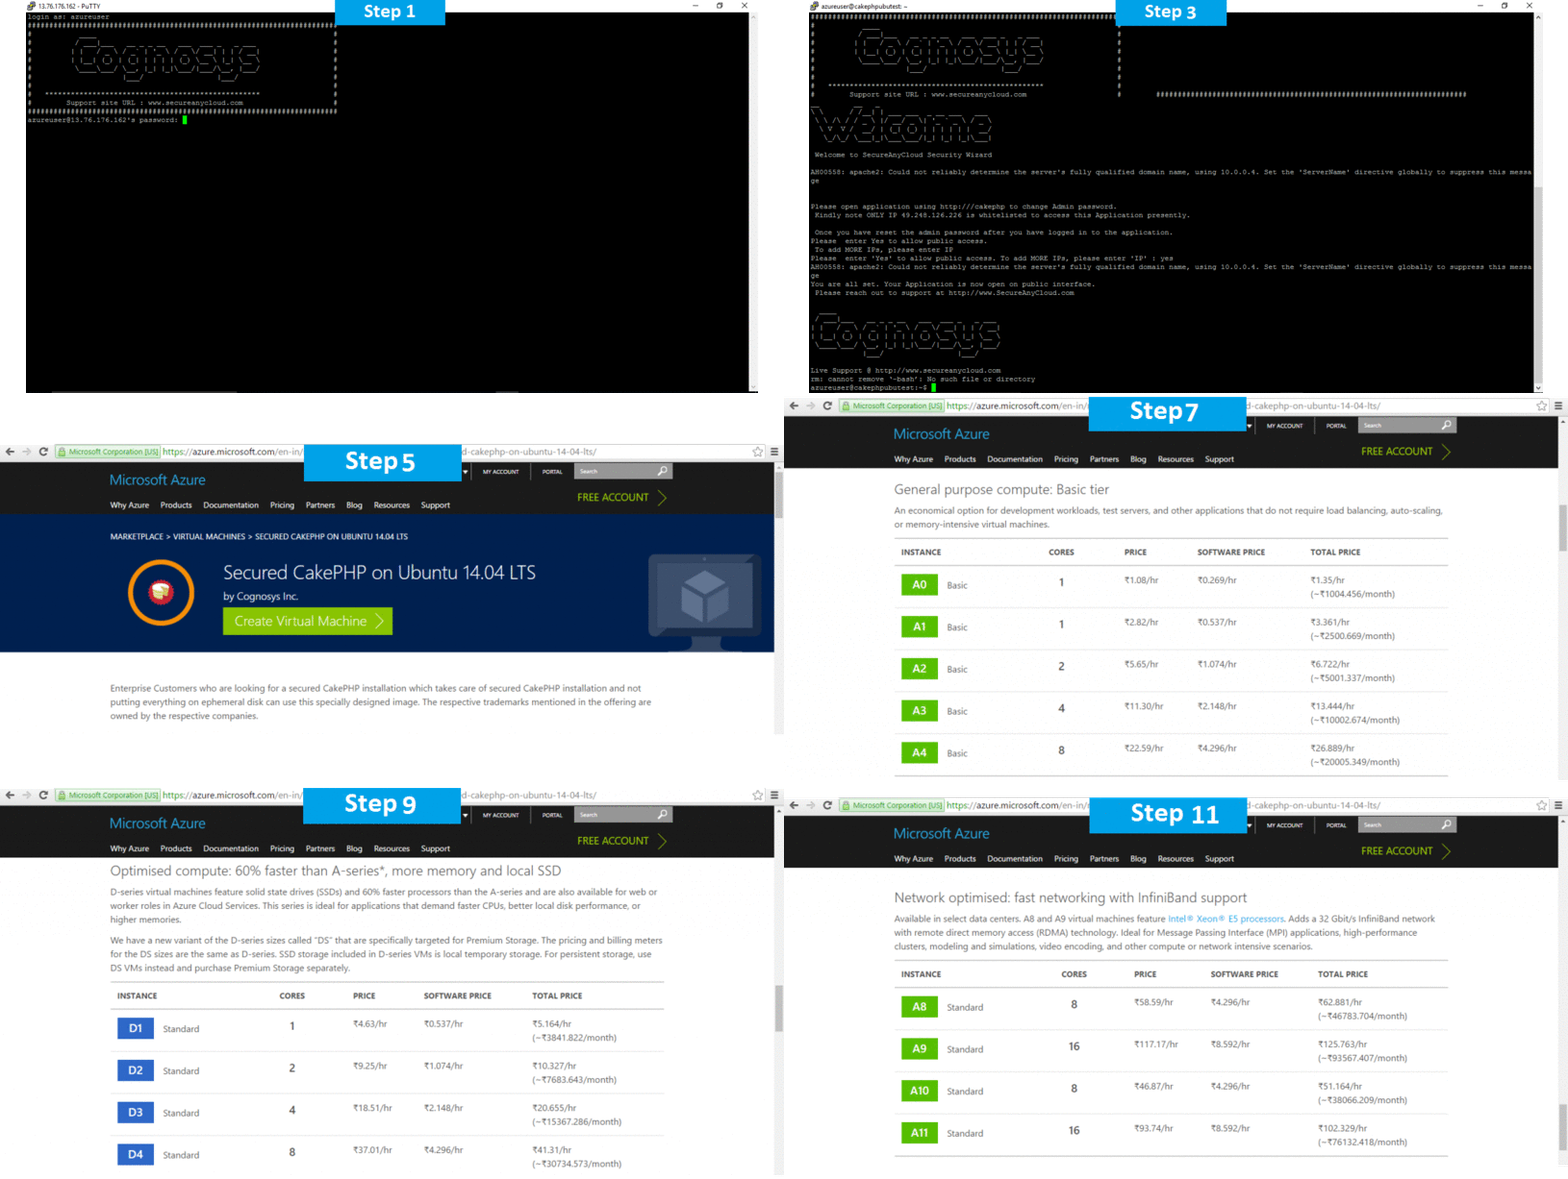
CakePHP on cloud For Azure
Our primary goal is to provide a structured framework that enables PHP users at all levels to rapidly develop robust web applications, without any loss to flexibility.
Features
Top 6 Cakephp Features That Enhance Web Development Process
1. User-Friendly Tool:
One reason behind getting widely accepted and used is that, it is extremely user friendly. It helps you to complex websites in simple way. Moreover, with CakePHP, it is easy to customize the website as per the business requirements. It lets you build designs with the help of template editor easily.
2. Robust Performance:
Another good thing about CakePHP is that, it provides flexible data validation process. Moreover, it makes the complex structures simple for your website with the help of the advanced tools, ultimately supporting you to develop the websites in the languages being used across the world.
3. Innovation Ability:
One best thing about CakePHP development is that, it supports unit testing and provides necessary skills to make sure that it offers best functionality and provides multi-talent resources with extensive knowledge.
4. Reasonable Approach:
It helps you to keep your business website ahead of your competitors and links it with your targeted audience; it helps you satisfy your clients and achieve your business goals. In short, it is one of the easiest and the best way to create qualitative applications at the affordable rates.
5. CRUD Scaffolding:
This is one of the best things about CakePHP web development, as the single line of code can generate the website application and it provides three major activities for your app. Well, the word CRUD stands for Create, Read, Update and Delete and most importantly, it can be customizable on the basis of the specific business requirements to cater all the needs necessary to achieve goals.
6. Testing Method:
It is extremely difficult to analyze the important points and fix the errors in your web applications and business websites and you can do it with the testing process which CakePHP enables you when you hire CakePHP developers. It simplifies your work when you develop a huge application with errors. It helps you identify the bugs.
Features and Enhancements in CakePHP 3.5
Scoped and New Middleware
The new middleware added to CakePHP 3.5 makes it easier for PHP developers to apply encrypted cookies and cross-site request forgery (CSRF) tokens. At the same time, the programmers also have option to build specific middleware stack for different parts of the web application. They can even apply middleware conditionally to routes in specific URL scope. CakePHP 3.5 even allows them to build middleware stack without writing URL checking code.
Cache Engine Fallbacks
The enhanced CakePHP features allows CakePHP developers to configure cache engines with a fallback key. The programmers can define custom cache configuration through the fallback key. If the cache engine is not unavailable or misconfigured, the cache engine will automatically fall back on the custom cache configuration defined through the fallback key.
Improved Console Environment
The updated version of CakePHP enables PHP developers to build web application in an improved console environment. The web developers can integrate the application class into the command-line interface (CLI) environment using a new console dispatcher provided by the framework. They can further accelerate console commands testing by taking advantage of integrated testing helpers. At the same time, CakePHP 3.5 suggests valid options to PHP programmers through missing options and subcommands.
Cookie Objects
CakePHP 3.5 comes with two new classes – Cookie and CookieCollection. These new classes enable PHP developers to work with cookies in an object oriented way. At the same time, the developers can access the classes while working with Cake\Http\ServerRequest, Cake\Http\Response, and Cake\Http\Client\Response.
Built-in dotenv Support
The version 3.5 of CakePHP makes the application skeleton support dotenv natively. While using CakePHP 3.5, programmers can take advantage of a robust zero-dependency module like dotenv to work with environment variables more efficiently. Dotenv further makes it easier for PHP developers to configure applications using environment variables, while keeping the configuration and code separated.
New Methods
CakePHP 3.5 also comes with new methods related to console, collection, database, datasource, event, ORM, routing, validation, testsuite, and view. The new methods enable PHP developers to work with various components of CakePHP more efficiently. They can even use the new methods to accomplish varying web development tasks without writing additional code.
The PHP developers can easily upgrade to CakePHP 3.5.0 by running a simple composer command. But the latest version of CakePHP does not support certain methods. For instance, it requires programmers to use separate get/set methods instead of combined get/set methods. Hence, it becomes essential for PHP developers to know these deprecated methods and their replacements. The web application developers can further refer to the CakePHP 3.5 Migration Guide to upgrade to the latest version of the popular PHP framework smoothly.
-Major Features Of CakePHP
- Build Quickly- Use code generation and scaffolding features to rapidly build prototypes.
- No Configuration- No complicated XML or YAML files. Just setup your database and you’re ready to bake.
- Friendly License- CakePHP is licensed under the MIT license which makes it perfect for use in commercial applications.
- Batteries Included- The things you need are built-in. Translations, database access, caching, validation, authentication and much more are all built into one of the original PHP MVC frameworks.
- Clean MVC Conventions- Instead of having to plan where things go, CakePHP comes with a set of conventions to guide you in developing your application.
- Secure- CakePHP comes with built-in tools for input validation, CSRF protection, Form tampering protection, SQL injection prevention and XSS prevention, helping you keep your application safe & secure.
AWS
Installation Instructions For Ubuntu
Step 1) SSH Connection: To connect to the deployed instance, Please follow Instructions to Connect to Ubuntu instance on Azure Cloud
1) Download Putty.
2) Connect to virtual machine using following SSH credentials :
- Hostname: PublicDNS / IP of machine
- Port : 22
Username: To connect to the operating system, use SSH and the username is ubuntu.
Password : Please Click here to know how to get password .
Step 2) Database Login Details :
- MYSQL Username : root
- MYSQL Password : Passw@rd123
Note :-Please change password immediately after first login.
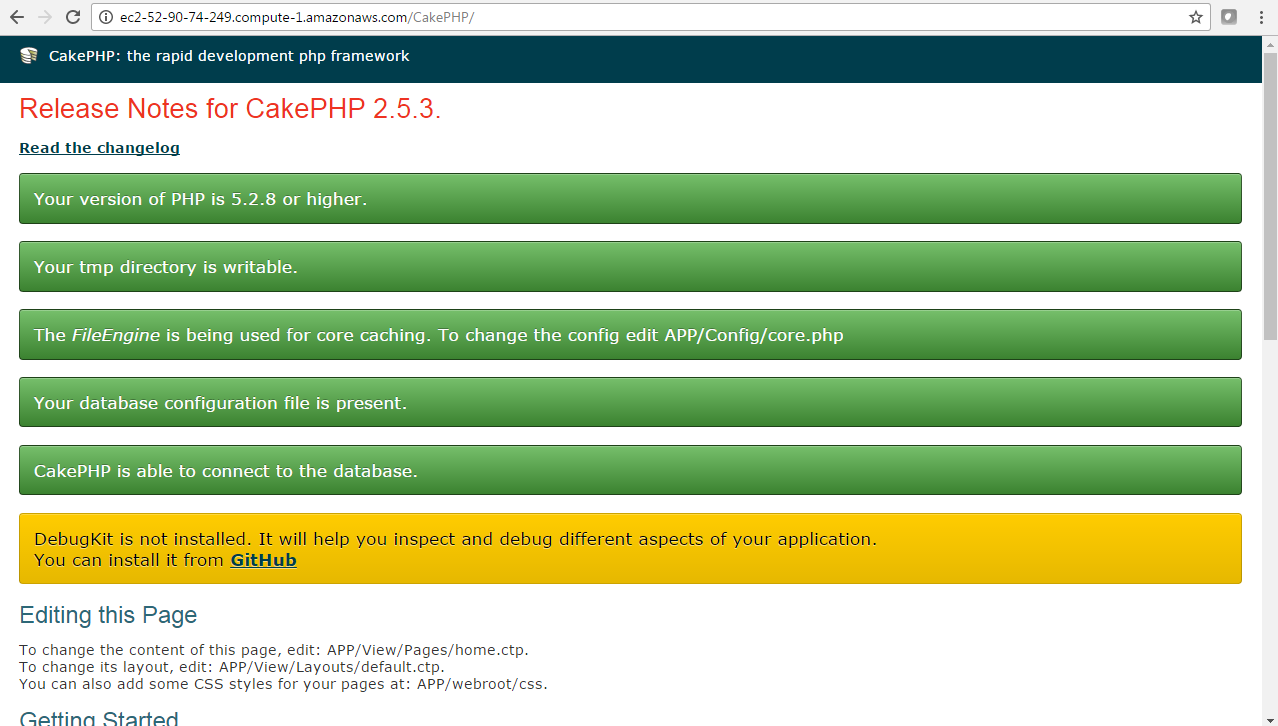
Step 3) Application URL: Access the application via a browser at http://PublicDNS/Cakephp.
Note: How to find PublicDNS in Azure
Step 4) Other Information:
1.Default installation path: will be in your web root folder “/var/www/html/cakephp”.
2.Default ports:
- Linux Machines: SSH Port – 22
- Http: 80
- Https: 443
- Mysql ports: By default these are not open on Public Endpoints. Internally Mysql server: 3306
Configure custom inbound and outbound rules using this link
Installation Instructions for Windows
Note: How to find PublicDNS in AWS
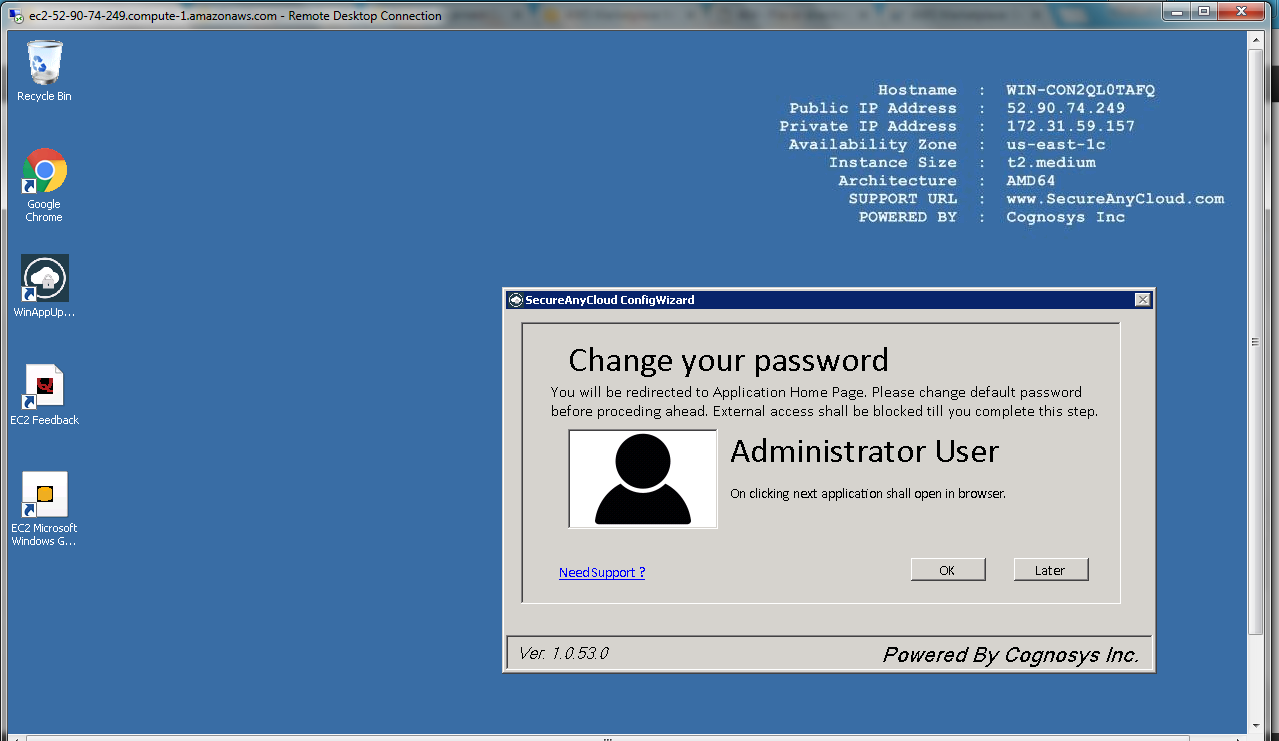
Step 1) RDP Connection: To connect to the deployed instance, Please follow Instructions to Connect to Windows instance on AWS Cloud
1) Connect to virtual machine using following RDP credentials :
- Hostname: PublicDNS / IP of machine
- Port : 3389
Username: To connect to the operating system, use RDP and the username is Administrator.
Password : Please Click here to know how to get password .
Step 2) Database Login Details :
- MYSQL Username : root
- MYSQL Password : Passw@rd123
Please change the password immediately after the first login.
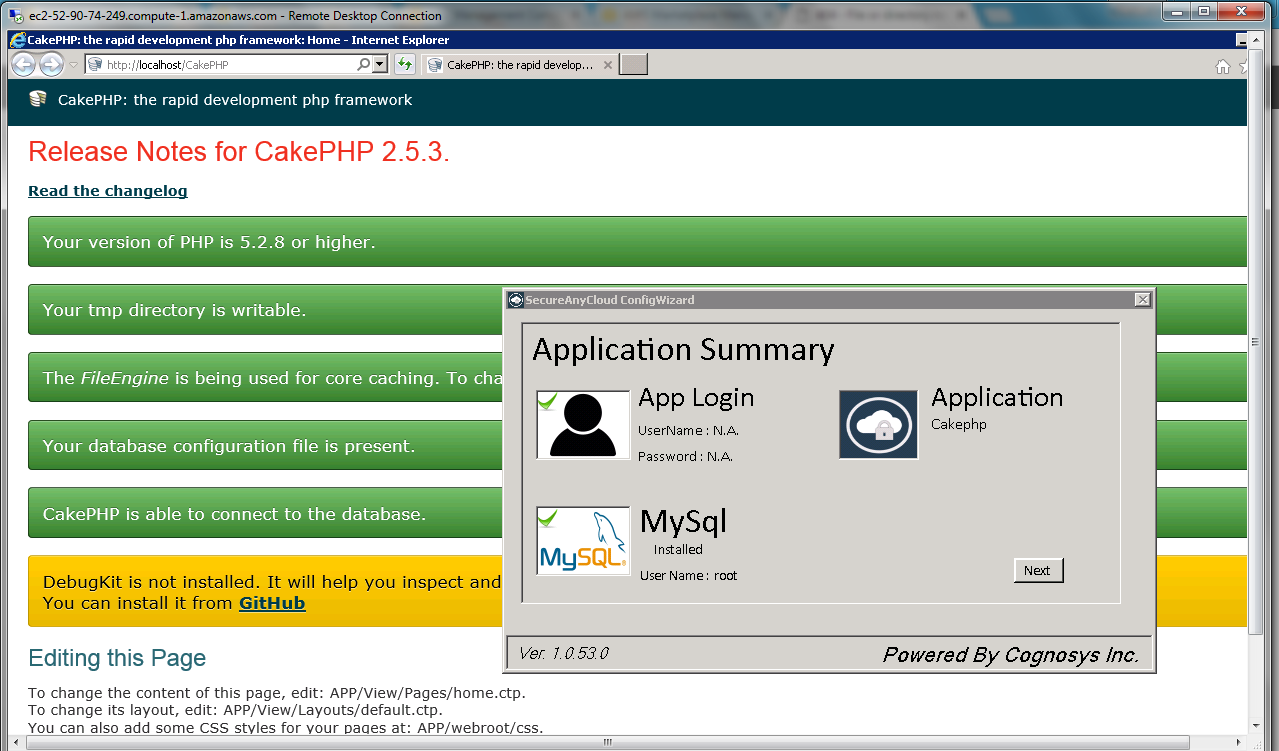
Step 3) Application URL: Access the application via a browser at http://PublicDNS/Cakephp
Step 4) Other Information:
1.Default installation path: will be in your web root folder “C:\inetpub\wwwroot\Cakephp”
2.Default ports:
- Windows Machines: RDP Port – 3389
- Http: 80
- Https: 443
- Mysql ports: By default these are not open on Public Endpoints. Internally Mysql server: 3306
Configure custom inbound and outbound rules using this link
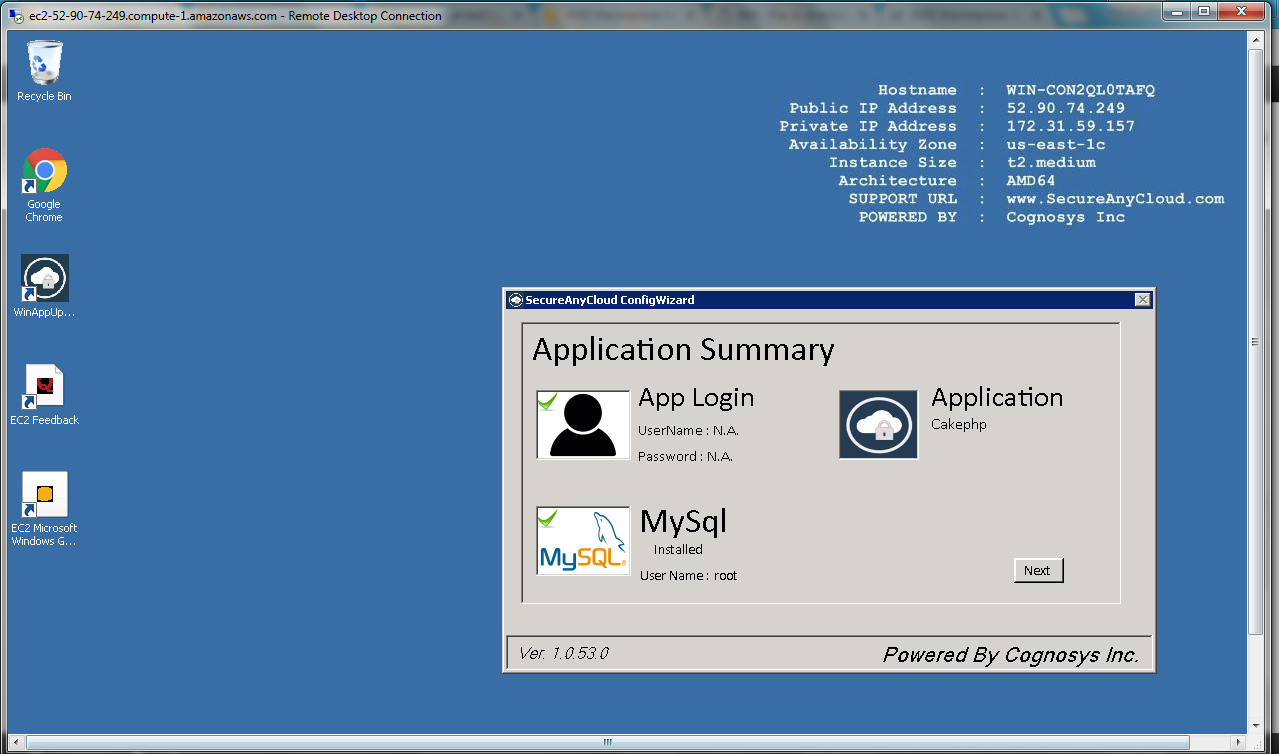
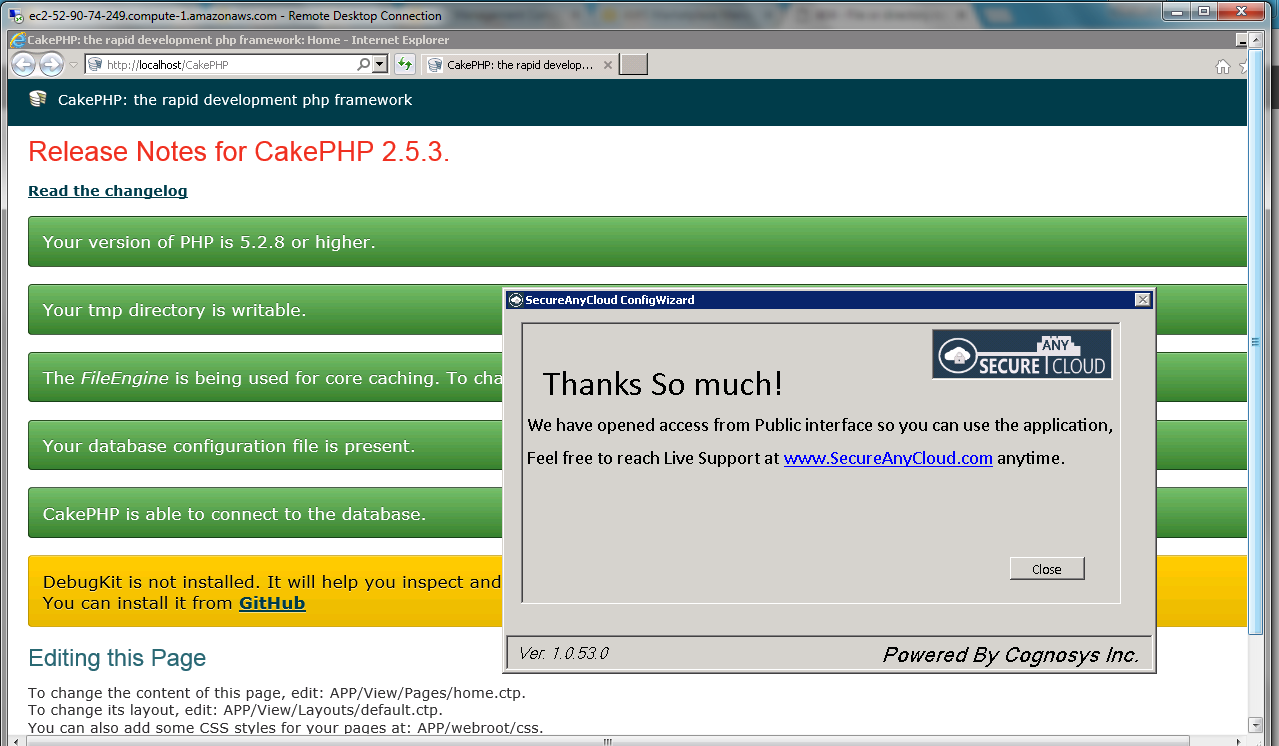
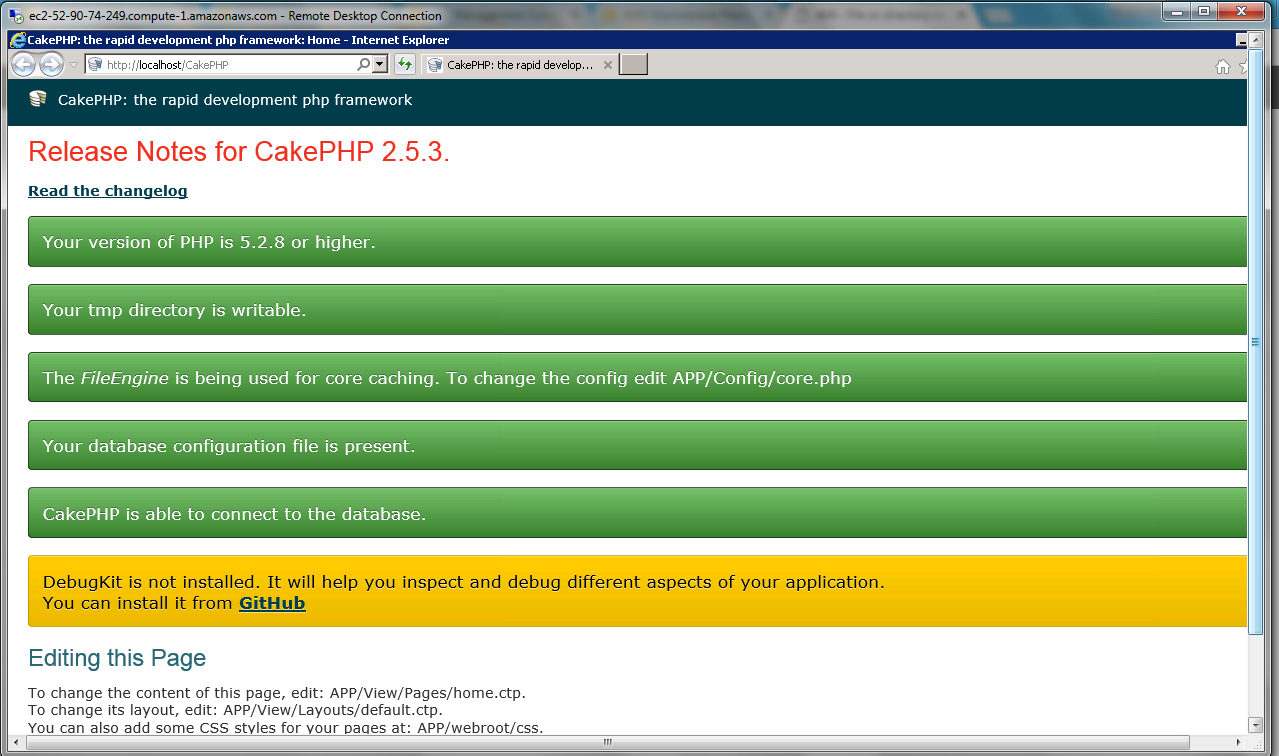
AWS Step by Step Screenshots
Azure
- Installation Instructions For Ubuntu
- Installation Instructions For Windows
- Installation Instructions For Centos
Installation Instructions For Ubuntu
Version:- CakePHP 3.4.4
Note : How to find PublicDNS in Azure
Step 1) SSH Connection: To connect to the deployed instance, Please follow Instructions to Connect to Ubuntu instance on Azure Cloud
1) Download Putty.
2) Connect to virtual machine using following SSH credentials :
- Hostname: PublicDNS / IP of machine
- Port : 22
Step 2) Database Login Details :
- MYSQL Username : root
- MYSQL Password : Passw@rd123
Note :-For Stack Database: DB cakephp with user cakephpuser and password Passw@rd123 has already been created.Please use this database for you Stack Configuration.
You can create a new cakephp application with below command
composer create-project –prefer-dist cakephp/app YourAppname
If you create a new app please change the path in Apache2 config
Note :-Please change password immediately after first login.
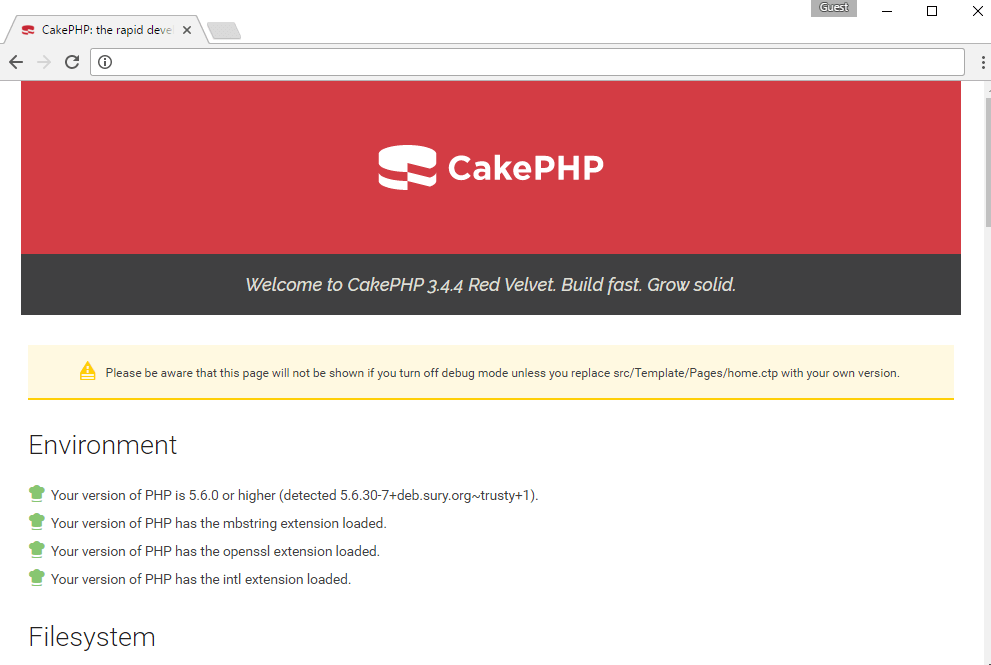
Step 3) Application URL: Access the application via a browser at http://PublicDNS/.
Step 4) Other Information:
1.Default installation path: will be on your web root folder “/var/www/html/”.
2.Default ports:
-
- Linux Machines: SSH Port – 22
- Http: 80
- Https: 443
- Sql or Mysql ports: By default these are not open on Public Endpoints. Internally Sql server: 1433. Mysql :3306
Configure custom inbound and outbound rules using this link
Installation Instructions for Windows
Note: How to find PublicDNS in Azure
Step1 ) RDP Connection: To connect to the deployed instance, Please follow Instructions to Connect to Windows instance on Azure Cloud
1) Connect to virtual machine using following RDP credentials :
- Hostname: PublicDNS / IP of machine
- Port : 3389
Username: Your chosen username when you created the machine ( For example: Azureuser)
Password : Your Chosen Password when you created the machine ( How to reset the password if you do not remember)
Step 2) Database Login Details :
- MYSQL Username : root
- MYSQL Password : Passw@rd123
Step 3) Application URL: Access the application via a browser at http://PublicDNS/Cakephp
Step 4) Other Information:
1.Default installation path: will be on your web root folder “C:\inetpub\wwwroot\Cakephp”
2.Default ports:
- Windows Machines: RDP Port – 3389
- Http: 80
- Https: 443
- Sql or Mysql ports: By default these are not open on Public Endpoints. Internally Sql server: 1433. Mysql :3306
Configure custom inbound and outbound rules using this link
Installation Instructions For CentOS
Note : How to find PublicDNS in Azure
Step 1) SSH Connection: To connect to the deployed instance, Please follow Instructions to Connect to Centos instance on Azure Cloud
1) Download Putty.
2) Connect to virtual machine using following SSH credentials :
- Hostname: PublicDNS / IP of machine
- Port : 22
Step 2) Database Login Details :
- MYSQL Username : root
- MYSQL Password : Passw@rd123
Note :-For Stack Database: DB cakephp with user cakephpuser and password Passw@rd123 has already been created.Please use this database for you Stack Configuration.
You can create a new cakephp application with below commands
cd /var/www/html
composer create-project –prefer-dist cakephp/app YourAppname
If you create a new app please change the path in Http config
Note :-Please change password immediately after first login.
Step 3) Application URL: Access the application via a browser at http://PublicDNS/.
Step 4) Other Information:
1.Default installation path: will be on your web root folder “/var/www/html/”.
2.Default ports:
- Linux Machines: SSH Port – 22
- Http: 80
- Https: 443
- Sql or Mysql ports: By default these are not open on Public Endpoints. Internally Sql server: 1433. Mysql :3306
Configure custom inbound and outbound rules using this link
Azure Step by Step Screenshots
Installation Instructions For Ubuntu
Installation Instructions for Ubuntu
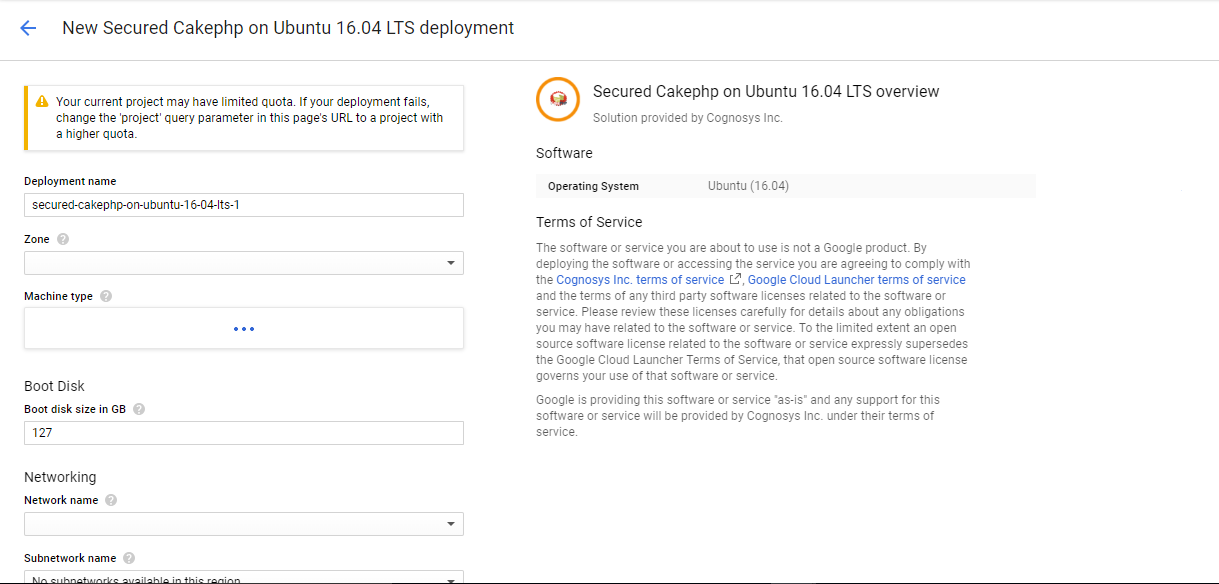
Step 1) VM Creation:
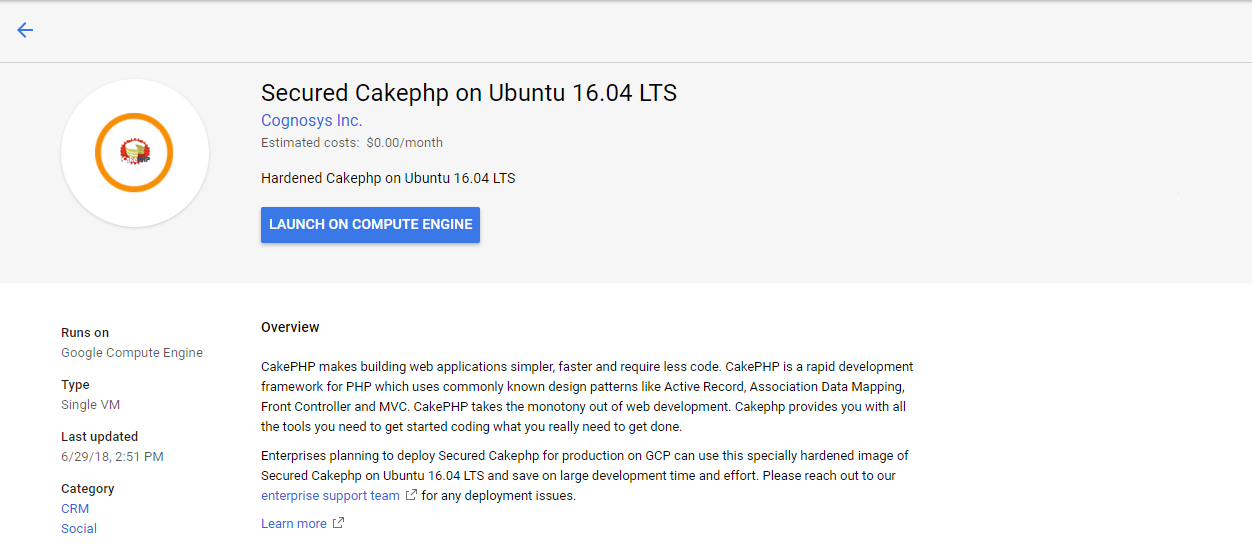
- Click the Launch on Compute Engine button to choose the hardware and network settings.

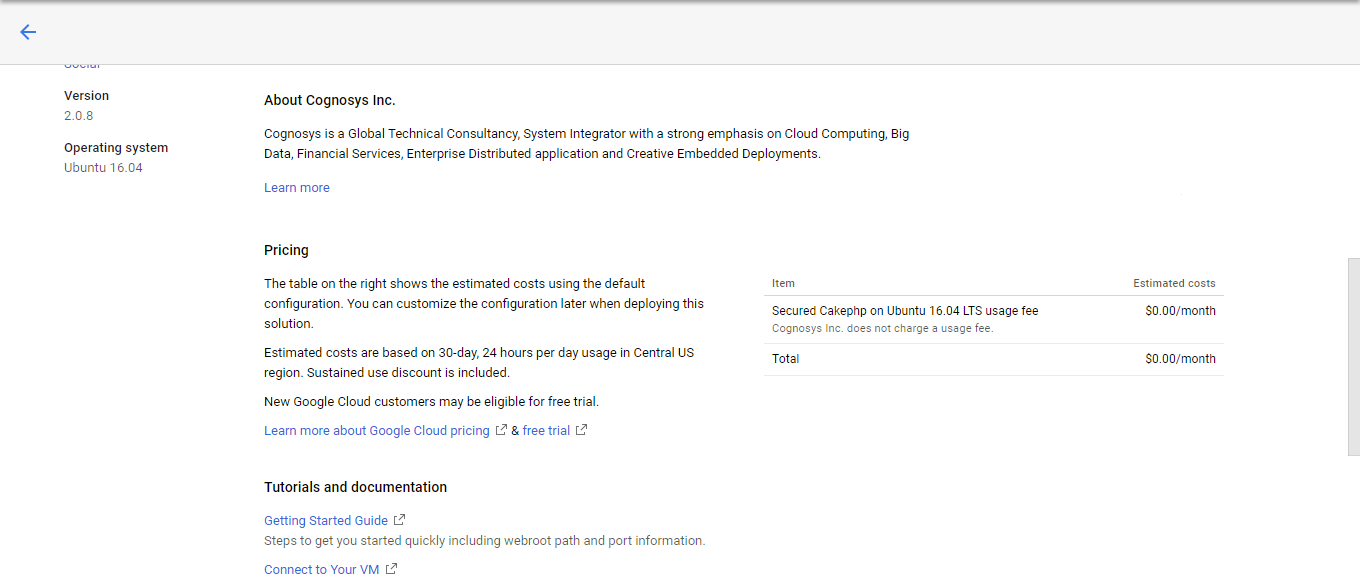
- You can see at this page, an overview of Cognosys Image as well as estimated cost of running the instance.

- In the settings page, you can choose the number of CPUs and amount of RAM, the disk size and type etc.
Step 2) SSH Connection:To initialize the DB Server connect to the deployed instance, Please follow Instructions to Connect to Ubuntu instance on Google Cloud
1) Download Putty.
2) Connect to the virtual machine using SSH key
- Hostname: PublicDNS / IP of machine
- Port : 22
Step 3) Database Login Details:
The below screen appears after successful deployment of the image.

For local MySQL root password, please use the temporary password generated automatically during image creation as shown above.
i) Please connect to Remote Desktop as given in step 2 to ensure stack is properly configured and DB is initialized.
ii) You can use MySQL server instance as localhost, username root and password as shown above.
If you have closed the deployment page you can also get the MySQL root password from VM Details “Custom metadata” Section.
Note: You shall see a error “CakePHP is NOT able to connect to the database.” You are required to enter the database and credentials information in /var/www/cakephp/config/app.php under Data-sources section
Please use MySQL root user with the password which was generated during the deployment to configure same.
Step 4) Application URL: Access the application via a browser at http://PublicDNS/Cakephp.
Step 5) Other Information:
1.Default installation path: will be in your web root folder “/var/www/html/cakephp”.
2.Default ports:
- Linux Machines: SSH Port – 22
- Http: 80
- Https: 443
- Mysql ports: By default these are not open on Public Endpoints. Internally Mysql server: 3306
Videos
Secured CakePHP on Windows 2012 R2
Secured cakephp on centos
CakePHP Introduction & Installation

