1-click AWS Deployment 1-click Azure Deployment
Overview
TYPO3 in profile
In 2012 this content management system began to be distributed under the name ‘TYPO3 CMS’. This was a reaction by the TYPO3 Association to, among other things, a split in the development team to leave and work on ‘TYPO3 Neos’; another CMS that has since come to resemble something a lot more different than the original TYPO3. Despite the new name of ‘TYPO3 CMS’, we still mainly only use the handle TYPO3 when referring to the classic content management system from the ‘TYPO3 Association’.Alongside WordPress, Joomla!, and Drupal, TYPO3 is one of the world’s most common CMS programs with over 400,000 installations.Like other popular content management systems, TYPO3 offers an open source software that users can edit using templates to create their personal web design. The operation is then carried out via the web browser.
But unusually for a CMS, TYPO3 users enter the content for their website’s user interface on a special configuration language called typoscript – no easy task for a beginner. Though, if website security is your number one concern, it may just be worth it: TYPO3 is considered the most secure content management system. Other benefits include its high flexibility and very large, active community. There are tonnes of extensions for TYPO3: templates, plugins, and many other things that are usually free of charge. Should you encounter issues, there are numerous online forums and tutorials within the community as well as professional service assistants on-hand to offer TYPO3 support.
TYPO3: Extensions for greater functionality:
Even in its basic version, TYPO3 delivers an excellent CMS package that can be used in so many different web projects. The core of the program, as well as the front and backend, can be adjusted and extended if required. For this reason, there are TYPO3 extensions available for use – modules with specific functions and that can be integrated via specific interfaces. This allows you to add useful features to the content management system, e.g. security features – to do with the acceleration of backend passwords or the automatic blocking of certain IP addresses displaying unusual login behaviour, as examples. Furthermore, there are also extensions for the optimisation of user administration, the integration of specific interactive elements, or the implementation of additional formulas.
TYPO3: How the extension development work:
Regardless of the area of application, PHP is the basis of every TYPO3 extension. As a result, being familiar with the script language is one of the most important requirements for setting up such TYPO3 extensions. However, the content management system offers two valuable and useful tools to make the development process a lot easier. The template engine Fluid helps to generate the extension in the user interface. Then the MVC framework Extbase acts as a template for the software architecture to keep the data from the processing and the presentation separate. In this way, the source code is made clearer and the removal of bugs becomes easier. On top of this, Extbase has a function that makes the registration of newly developed extensions easier.
Anyone looking to enter the world of TYPO3 extension development themselves in order to programme their own extension should familiarise themselves with Extension Builder. This allows for the quick and uncomplicated generation of a basic framework for the planned extension. All necessary files are generated automatically, which saves a lot of time and work.
How to install TYPO3 extensions
Once you have found useful plugins for your TYPO3 project you next need to install them. Before the installation, make sure that the selected installation is compatible with the version of the content management system that you are using. You should also check the reputation and reliability of the extension. You can do this by looking at the basic information like the version’s history, the date of the last update, or the download numbers. To install the desired TYPO3 extension, you can refer back to the Extension Manager, which is a standard component of the program. The manager makes possible the installation and configuration of extensions directly within TYPO3 itself; something which is always preferable to a manual installation via an external package.
In most cases, the extension that you are looking for can be found using the search function within the Extension Manager. All that you need is the complete and correct key, which for example you can find in the official repository. To begin the installation, simply click on the ‘Import and install’ button, which can be found next to the title of the selected extension. If the implementation was a success, TYPO3 will inform you of this by displaying a brief dialogue window.
TYPO3 Extension Repository:
For developers who have programmed a TYPO3 extension and wish to share it with the whole community, then the TYPO3 Extension Repository (TER) is the right platform for this. This central directory, which can be accessed via the official homepage of the content management system, offers the possibility of uploading one’s own plugins, templates, and so on to make them available for the entire TYPO3 user community. With the upload process, the developer also assigns (among other things) the aforementioned extension key, that can be found through the Extension Manager and installed.
The TYPO3 Extension Repository offers more than 1800 different extensions, which makes it one of the most important portals for TYPO3 users. One of the directory’s particularly useful features is the integrated search function, which among other things, allows you to filter results based on development status, category, and TYPO3 compatibility.
TYPO3 templates:
TYPO3 is a simple way of giving your TYPO3 project the layout and design that you desire. When it comes to optical design, instead of having to start from scratch, you can use handy templates to create a basic framework, upon which content can be built. The selected structure can also be changed at a later point or also completely scrapped – in this case, the content will simply be transferred and integrated into the new system.
Many programmers have made it their mission to develop TYPO3 templates and make them available to users. Either they make the templates available for download on their own site or else on the websites of providers that specialise in the sale of such things. However, keep in mind that the price should not necessarily be the gauge of the quality of the website template.
Selecting a TYPO3 template:
When searching for TYPO3 templates for your web project, you will encounter both free, as well as fee-based options. Some sites offer various templates, whereas others will only have the one. However, prices and choices should not decide whether or not you download a template. Much more important are the optical components of a template.
Next, you should ask yourself whether the design and layout of the envisaged template fit both your vision and more importantly your web project (not only thematically but also functionally). For example; imagine if you use an unchanged template because it gives your website a long-envisaged navigation structure but at the same time this structure distracts from the actual content or is even unsuited to it. This will then quickly lead to an unwanted devaluation of your project. If a template contains only a few elements of interest to you, then you should weigh up whether the subsequent necessary adjustment work is worth your time and money. Furthermore, consider the following things before downloading a TYPO3 template:
- Responsive web design: Use a TYPO3 responsive template from the very start. Having such a flexible template as a basis means that your website will fit automatically to the display size of different devices. This allows desktop users and those with a tablet or smartphone to have the optimal user experience, without you having to create and manage an additional mobile version of your project.
- Compatibility: before you use a certain template for your project, you need to make sure that it will even be compatible with your version of TYPO3. Normally, providers will include details in the description of a template, regarding which versions the template is suitable for. However, if this is not the case then you should carefully consider whether you wish to take the risk that the TYPO3 template doesn’t work. This becomes an even more important decision if you are paying for the template. If you plan on updating your TYPO3 regularly, then you should search for templates that keep you up to date with the newest versions of the content management system.
- Licensing: TYPO3 templates are published with very different licences; something which later has an effect on potential uses. Regardless of whether you are dealing with a commercial or a free licence, you should always check whether the applicable guidelines fit your plans. In some cases, it is prohibited to modify a template or use it for commercial purposes. Most of the time, it is at least required of you to include a link to the developer or provider.
- Reliability: Downloading TYPO3 templates brings with it all the risks typically associated with the online world. It could happen that you end up using the wrong provider and then along with the desired template, also end up unwittingly downloading Adware or even Malware. These types of dubious providers are not always immediately recognisable, meaning that there is always a certain amount of skepticism that accompanies the emergence of new service providers in this area. Keep an eye out for the signs of an established and honest provider; these could include positive comments from users, as well as details regarding contact and support. Additionally, it is also a good sign if there are demo versions and example screenshots available from the TYPO3 templates on offer.
Finding TYPO3 templates: an overview of the free and fee-based options
The search for a template is often more complicated than originally envisioned. It is not unusual for one to find the perfect solution, only for it to turn out that it is not actually compatible with your version of TYPO3. In other cases, the entire package might be the perfect fit; except that the price of the template exceeds your budget. You should approach the whole issue with patience and not immediately pounce on the first decent solution that you encounter. This is the only way to ensure that you find a TYPO3 template that meets all your expectations and can be used long term. Below is an overview of the established and reputable providers.
typo3.org – Extension Repository (free)
The previously mentioned extension repository from TYPO3 also introduces us to a number of templates. While the repository doesn’t actually offer the possibility of choosing an extension category, it does have a filter option that can help you search for the template you need. The templates in question come from a variety of developers who use this platform to make their products available to the user community. Along with a short description, the most important basic details for each TYPO3 template will also be written. These include the current version of the template, the compatible TYPO3 versions, whether the template is dependent on other extensions to function, as well as the name of the developer responsible for the template.
Sometimes it is also possible to access a manual, which alongside a detailed introduction, offers information relating to the licensing. When downloading a TYPO3 template you will have the choice between a T3X package and a ZIP archive – both formats can load the content management system as standard.
t3Bootstrap.de/en (fee-based)
A template of particular note is the t3Bootstrap Template from WapplerSystems, which as the name suggests, is based on the CSS Framework Bootstrap. This template is primarily aimed at TYPO3 users who are creating their own template but do not wish to work with the standard engine. Along with a series of basic components – like a grid system, sidebar menu, typographies, and a function for responsive images – you also have access to a template maker that makes the creation of basic components for your project so much easier. Alternatively, thanks to the finished bootstrap elements, the TYPO3 responsive template can also be used, unchanged, for content management.
In order to be able to use t3Bootstrap, you need to acquire one of the licenses on offer. One of the relatively cheap private user licences is usually sufficient for a basic homepage. If it is the case, however, that you wish to use the TYPO3 template for your company website, then you will need the individual commercial licence. WapplerSystems offers a multi-project licence for unlimited commercial use. Non-profit organisations can use the template free of charge, on the one condition that they use a backlink.
sklein-medien.de/en
The web developer Sebastian Klein has also created a template for TYPO3 that you can use as a basis for your own templates. Apart from the t3Bootstrap template, his template (named ‘basetemplate’) contains no integrated frontend solution like Bootstrap. Instead, it has a simple HTML structure that aims to make the use of TYPO3 FLUID templates that little bit easier. For this purpose, the template has a logical file structure, a basic TypoScript setup, as well as a basic configuration of the TYPO3 module (TSconfig). All settings can be adjusted without complication if required. You can find the free basetemplate, in three versions: ‘basetemplate62’ (for TYPO3 6.2), ‘basetemplate7’ (for TYPO3 7.6), and ‘basetemplate8’ (for TYPO3 v8 LTS), available for download on GitHub.
OnePage Template for TYPO3 CMS (free)
If you are looking for an onpage layout for your web presence and are working with TYPO3 6.2, then the t3onepage template is an excellent choice. The TYPO3 template from Maximilian Mayer contains the right TypoScript and the corresponding module basis in order to allow you to present your content on a single page. The package made up of fonts, icons, JavaScript snippets, Cascading Style Sheets (CSS), is available under a free MIT license, and can be utilised and modified for both private and commercial aims (provided licence and copyright are indicated). The web page onepage.compuart.com functions as a live preview of the template that you can download for free on Github.
codingpeople.com (fee-based)
While Codingpeople Ltd. offers no TYPO3 templates for download, it does offer the service of creating a standard, complete template on demand within 5 working days. This German company orientates itself on the official TYPO3 coding guidelines and, therefore, focuses on a clean separation between design and code, as well as an object-orientated PHP, and JavaScript development. For the agreed upon price, you will receive a high-performance template with all the basic functions of the content management system, and various optional features like a responsive web design, contact formulae, multi-language, newsletter, and special fonts. All of these, as well as the desired number of subpages can be selected in the configurator and then added to the standard package.
How do you create a TYPO3 template
Apart from the option of making use of the finished templates, there is also, of course, the possibility of creating your own TYPO3 template. This gives you maximum control over the layout and design of your web presence. In order to do this, you need have the necessary skills for HTML, CSS, and JavaScript. It is possible to make the creation of a basic framework like this easier by using the likes of Bootstrap [Build web projects with Bootstrap], ZURB Foundation, or HTML5 Boilerplate. This then means that you don’t have to start right from scratch. Also, an alternative to creating templates via HTML template, you can also create yours with TYPO3 internal configuration language TypoScript. Although for this to happen, a certain amount of time for familiarisation is required.
It is recommendable that you create your own template in the form of a TYPO3 extension. This allows you to easily embed the template using the Extension Manager.
What are the steps involved in a TYPO3 update
When upgrading to a new TYPO3 version, there are a couple of things that you need to do. Regardless of whether it is a small update (e.g. from 7.6.2 to 7.6.3) or a large one (e.g. from 6.2 to 7.6), you should first create a backup of both your current TYPO3 installation as well as your database. This means that if there are any complications with the update process, you can still quickly change back to the old version. Before switching over to the new version, you should also definitely make sure to update the reference index. With larger TYPO3 updates, i.e. for those that should be done with the help of the Upgrade Wizard, it is necessary to take further steps:
- Convert global extensions to local extensions
- Run the database analyzer
- Empty the cache table and delete temporary cache files
- Delete backend user settings
- Read the ChangeLog and the NEWS.md file of the new TYPO3 update
- Updating of extensions and the language module
In most cases, switching to a new TYPO3 version can occur without much complication. The adjustments that will be necessary is dependent on the range of extensions and different versions being used. Given that these often involve a significant amount of work, many hosting providers will offer the implementation of TYPO3 updates as a service as well.
Impressive examples of what you can do with TYPO3
TYPO3 is particularly popular in Europe. To see what can be achieved using this CMS, here are a number of famous organisations across Europe who use TYPO3 for their website:
- Deutscher Fußball-Bund (the German national soccer association)
- France’s central airline company Air France
- Germany’s largest airline Deutsche Lufthansa
- Subway’s European internet presence
- Internationally-recognised electronics brand Philips
If you’d like to see TYPO3 in action, you can try a demo version in your browser.
Pros and cons of TYPO3
Compared to other content management systems, TYPO3 is less user-friendly. For those with absolutely no CMS experience, it may take a while longer to get to grips with TYPO3’s operation and many different functions than with some of the other options.
On the other hand, this is an enormously flexible CMS that offers endless possibilities (with the right know-how). The diverse range of plugins allows you to equip your TYPO3 website with a large variety different features, while the workflow tool makes organising collaboration between several editors and admins easy.
The ease of localisation for many languages gives TYPO3 an advantage over WordPress and it’s also easy to manage several websites on the CMS. When it comes to troubleshooting, tutorials, or just new updates, the large community on TYPO3 is on hand to help. While admittedly complex, TYPO3 is a comprehensive CMS, offering almost limitless web design opportunities.
Typo3 Installation :
To install TYPO3 manually you need to download the latest version from the TYPO3 project page and upload the archive on your server. Using the File Manager from your cPanel extract the contents to a directory or to the root folder if you want TYPO3 to be accessible at www.yourdomain.com.
Make sure that you’ve created database, user and that you’ve granted privileges to that user from the “MySQL Databases” function in your cPanel.
Note that TYPO3 requires PHP version 5.3, so if you are not using PHP 5.3 for your account yet, you will need to set it now via the PHP Version Manager tool available in cPanel.
Once you create a MySQL database and user and set PHP 5.3, you can proceed with the installation. If you have extracted TYPO3 in a directory public_html/typo3, open http://www.mydomain.com/typo3 to continue with the TYPO3 Install Tool.
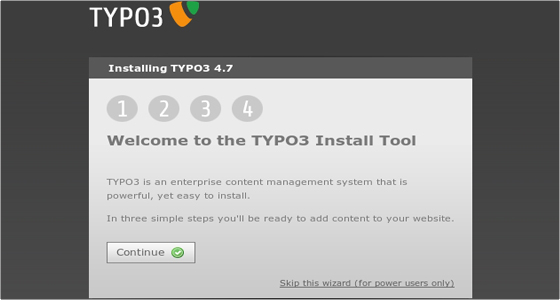
Click Continue to proceed with the installation. You will be taken to the next page:
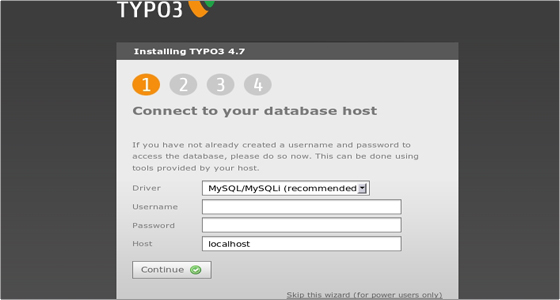
Type in the username and password for the MySQL database you created earlier. Leave localhost as Host and click Continue. Next you will be asked to create a file called ENABLE_INSTALL_TOOL in the typo3conf/ folder.
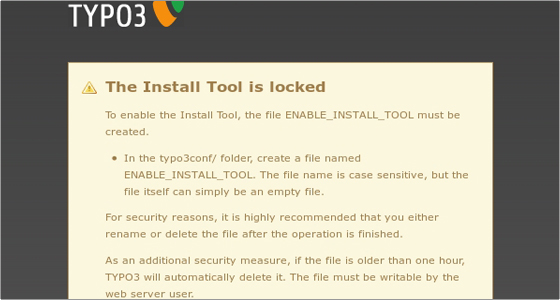
You can do this using the File Manager in cPanel. Once you create the file, refresh the page. You will see the Select database page. Select the database you created earlier from the drop-down menu available under the “Select an EMPTY existing database” option. In our case the database is called user_typo3:
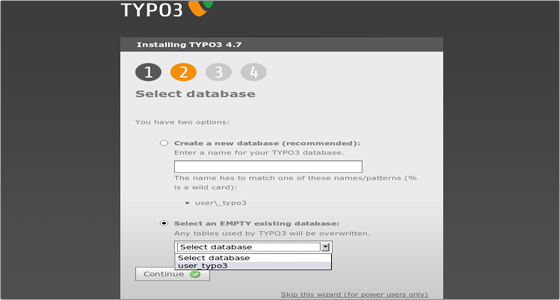
Click Continue to proceed to the next step of the installation which is choosing a package:
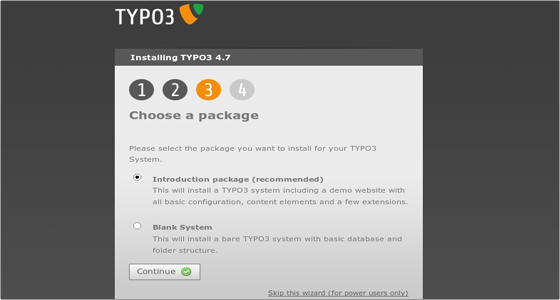
Here you have to choose whether to install some sample data (recommended for inexperienced TYPO3 users) or install a bare TYPO3 system. In our case we’ll install the sample data. Click Continue to proceed. At this point you will have to allow a few moments for the system to be populated with data:
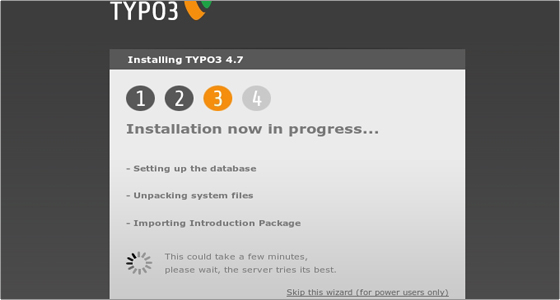
Then you will have to set a password for your TYPO3 (make sure you set a complex password) and choose a color for the site.
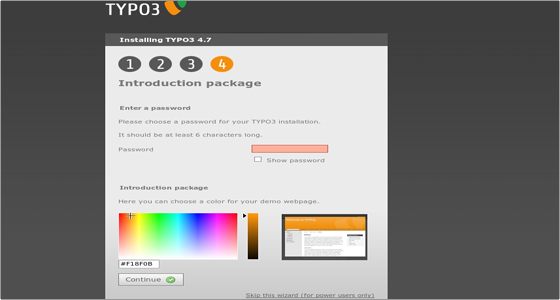
Click Continue one last time and the installation will be completed:
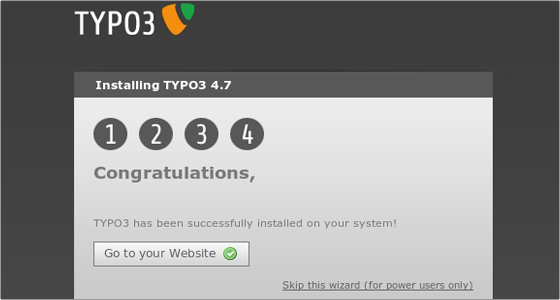
You can click the “Go to your Website” button to visit your newly-installed TYPO3 system.
Typo3 Administration
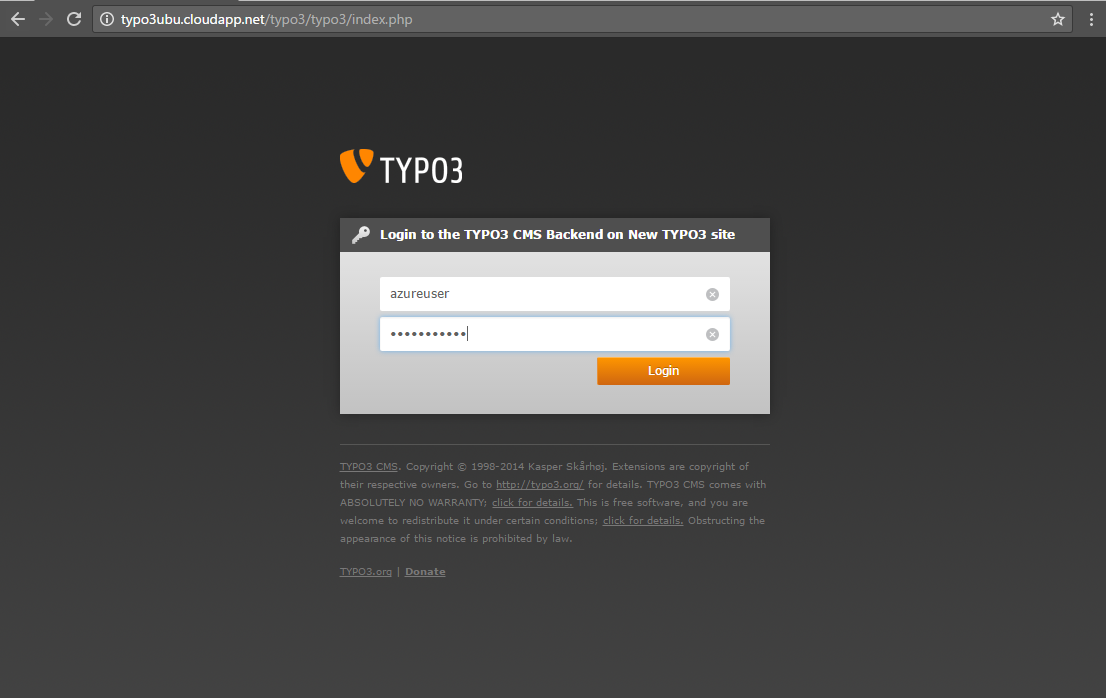
The Typo3 administrative area, provided you installed Typo3 in a folder called typo3, can be accessed at:
http://yourdomain.com/typo3/typo3/index.php
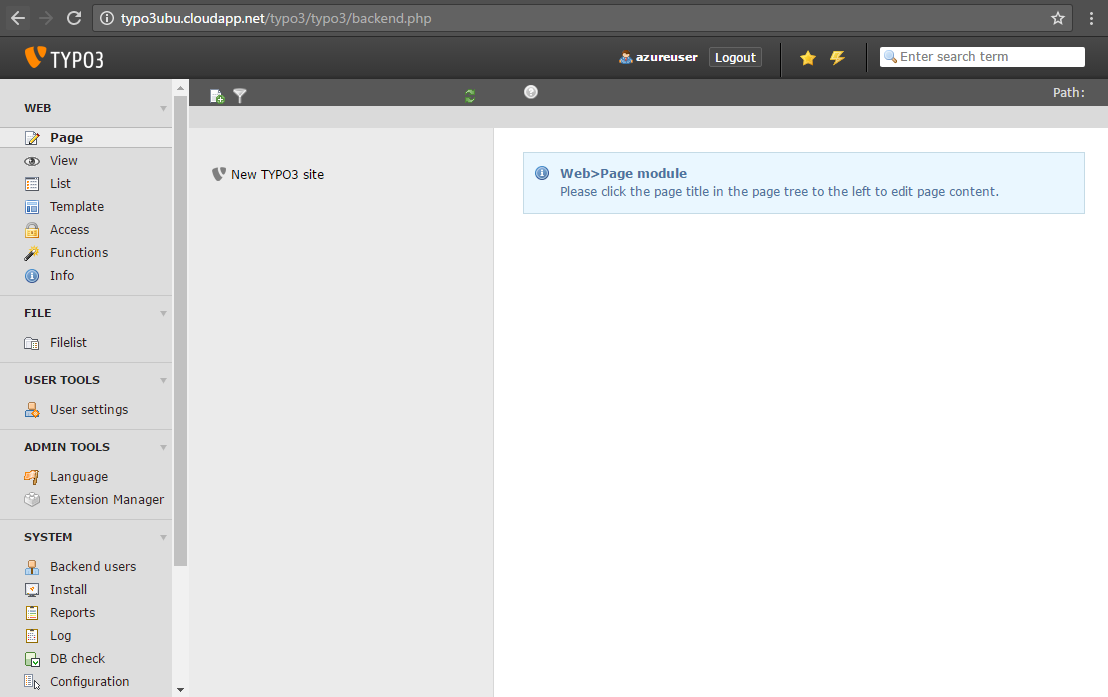
When you log in to your Typo3 admin area, you will see a lot of modules in the menu to the left. Each module’s function is briefly explained on the About Modules page in the HELP section to the left.
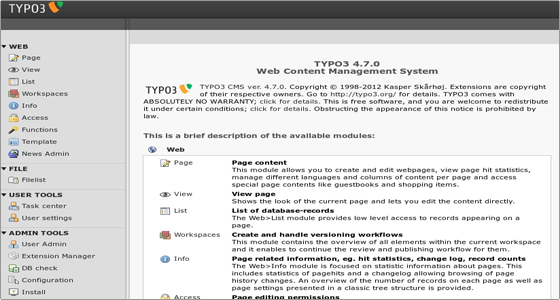
It is strongly recommended that you check this page to learn more about each module.
Since you are the administrator you have access to all modules. There are other “normal” users that have access only to the modules you select! Try to click the different modules in the menu to look around.
Pagetree
The header “Web” in the menu is called a “main module” and all the modules listed under it are “sub modules”. All modules under the “Web” module will show a dual view in the content frame – the page tree and the content module. The page tree can be expanded/collapsed by clicking the plus/minus icons. This works like the folders on any PC. The page tree is a directory structure where web pages are organized in a hierarchy with main pages, sub-pages, etc.
Keep in mind that if you click the page title you will see a content from the module in the right frame and if you click on the page icon a context menu will appear. In this menu you can select options relevant to this page.
Typo3 Themes :
When TYPO3 generates webpages the frontend engine combines unformatted content from the data source (database) with a HTML template defining all the formatting. The template record is a control element that instructs TYPO3 how to handle certain branch of the page tree.
Creating a template record
To create a template record for a page, select Templates from the left menu and click on the page title. In the right frame it will open a page where you can select to create a template for a new site or to create an extension template that allows you to enter TypoScript values that will affect only this page and subpages.
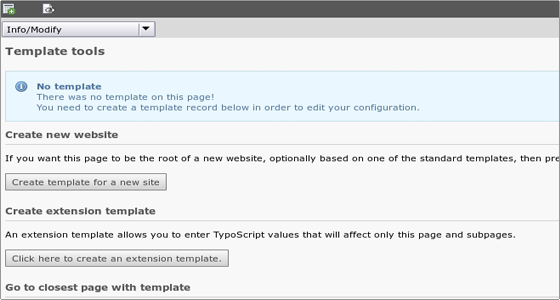
Making changes to the template
To edit the template record select List from the left menu and click on the page title. In the right frame click on the Pencil next to the name of the template you want to edit.
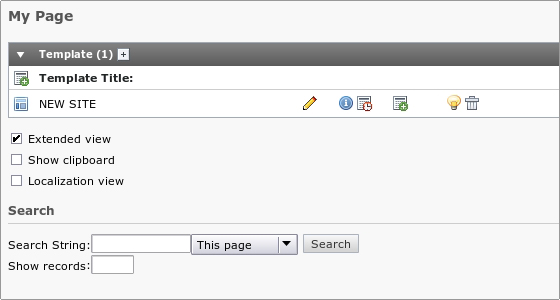
You will be taken to a page where you can edit many different parameters of the page. The Constants field is often the place to change values for the standard templates. After saving the template record, click “Clear all cache” in the “Admin Functions” menu. Always do that if you edit the template records directly and not from the Template module.
The constant editor
The constant editor can be found in the Template module from the drop-down menu on the right.
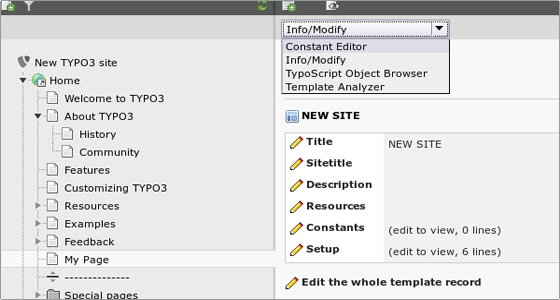
You can access many options there, there are explanations for most of them and there are various categories. You can change logos, backgrounds, margins and many many more. Play with them and see what happens.
Typo3 Content Management
Creating pages
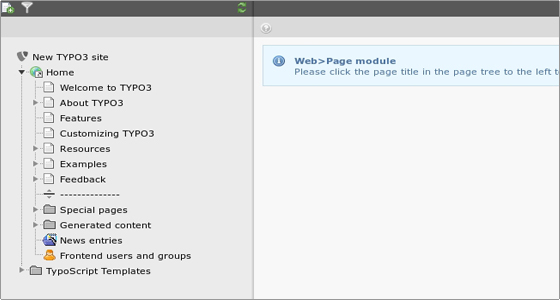
Since we installed the Introduction Package, we already have some pages available in the page tree. We have a root page called “Home” and several subpages under it:
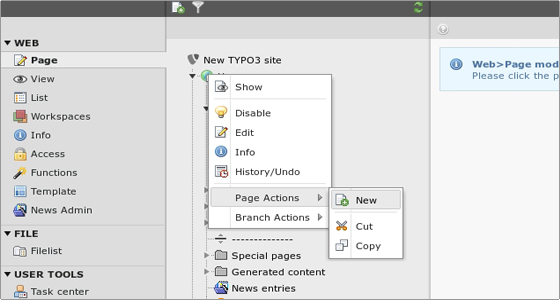
Now let’s create a new page. Click on the Page module on the left, then on the little icon next to the Home root page title > Page Actions > New.
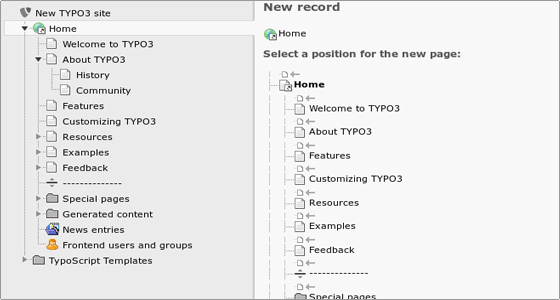
Next you need to select a position for the new page:
Then you will have to fill in the page details which are separated in 6 tabs:
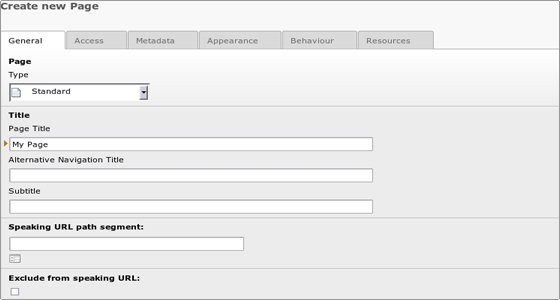
Above each option you can hover with the mouse and you will see a short explanation of what the option is for. Only the Page Title field is required, the others are optional.
Once you set all page options, save the page by clicking the Save document button above the page settings (looks like a floppy disk).
Creating content
To add content to a page you should click on its name to open the page content module in the right frame. You will see the page elements where you can add content:
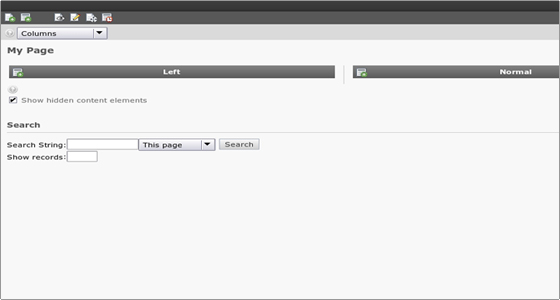
To create a new content record for the element, click the little icon with the plus located to the left of the content element name. You will see the “New content element” menu with the content element types:
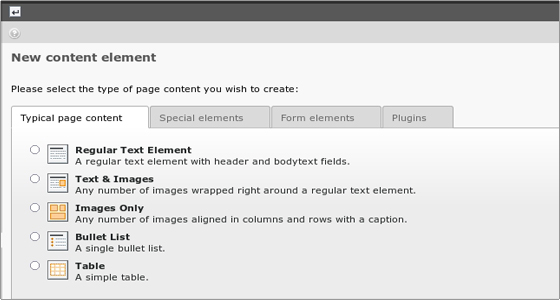
There are several page content element types available and combining them is the key to creating diverse web pages. The most used elements are the “Regular Text Element” and “Text & Images”.
Let’s select “Regular Text Element” – a new page will load and you be asked to fill in the details for the new text page you want to create. You can use the rich text editor to easily add your content:
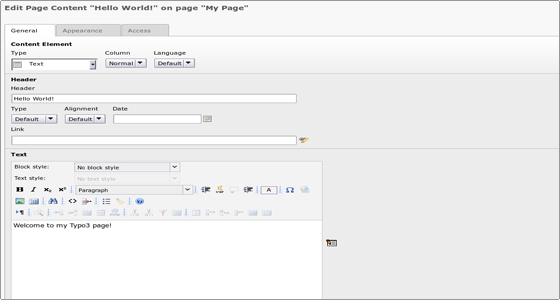
You can hover with the mouse over the different options to learn more about each one. When you are ready, save the document.
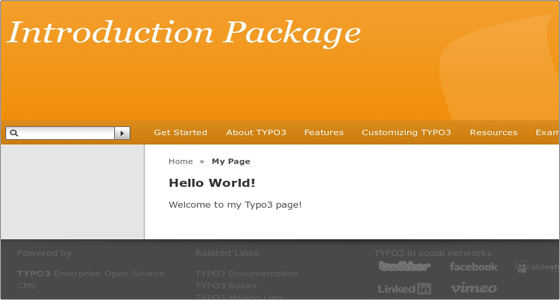
Your page is saved now and you can see it on your site’s frontend:
Typo3 Password protected pages
Create users/groups
Before you can create access restricted pages you must first have one or more frontend users and groups.
There are two kinds of users – frontend (orange icon) and backend (blue icon). A frontend user (also called website user) can log in to the website, but cannot change content. A backend user works in the backend and is concerned with changing the information.
You can create new users from the User Admin module under the Admin Tools section on the left. You need to click on the “Create new user” button in the module’s header. You will then be able to set the access rights for the new user.
Create login forms
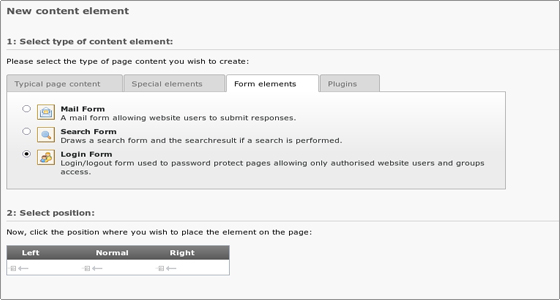
Click the page module, then click on the name of the page. Click the “Create new record” button for the page column where you want the login form to appear. In the “Form elements” tab choose Login Form.
Create restricted pages
You can easily restrict the access to some of your pages. This is done via the Access tab:
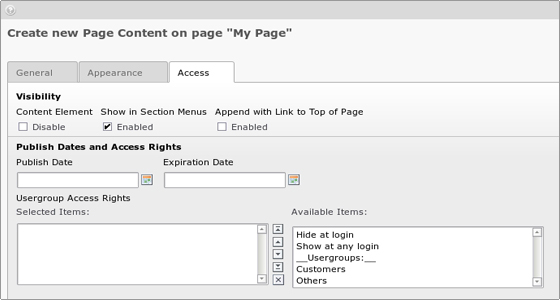
There you can set up the access to be only for the members of certain group. You can also select to include the subpages. If you add more groups then you can create different access rules for different users!
Two other useful options are “Hide at login” and “Show at any login”. “Hide at login” is useful if you have pages with information only relevant for users not yet logged in. “Show at any login” is the opposite. If you are logged in you are shown the page. No need to be a member of a particular group.
Typo3 User Management
Backend users
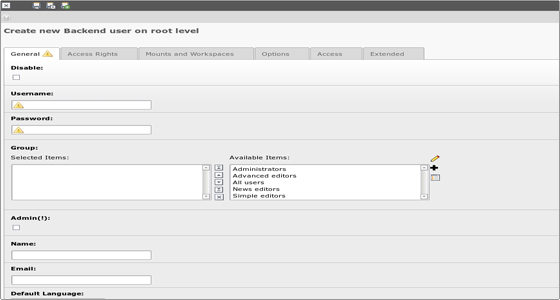
You can create new users from the User Admin module. To do it just click on the “Create new user” button in the module’s header. You will then be able to set the access rights for the new user. A quite large page with many options will open, where you can select for example which modules the user can access and many more.
User permissions
For every backend user you can select which Modules, Folders, Pages, etc to access. From “File Mounts” under the “Mounts and Workspaces” tab you can mount certain directory to the user’s Filelist module. The “DB mounts” points which page from the whole page tree will become the root page for the user. That way you can give to specific user a specific part of the page tree. Just set the value to that page.
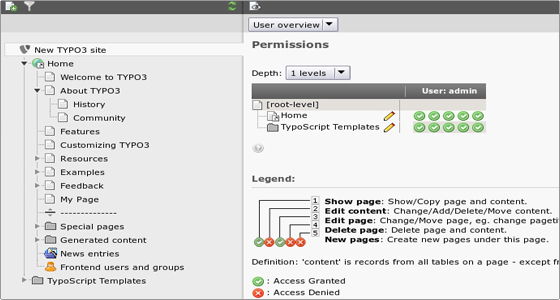
Each page has a permission setting for access like the file system on a Unix server. There is an owner user, an owner group and then permission settings for each in five different categories: read page, edit page, delete page, new sub-page and page content. You can set and view permissions in the “Access” module.
Typo3 Images
If you want to manage the files that are behind the scenes the Filelist is the place to go. It has a folder tree and a list view of files in the folders. The default folder for admin users is the “fileadmin” located under the TYPO3 folder. These files are not used on the website directly. If you want to use them you can either link to the files from content elements or pick the files in the process of selecting files for content elements.
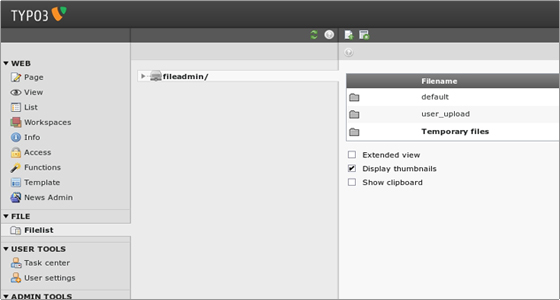
Instead of uploading the files with the “Browse” option one by one you can select multiple files already on the server. After saving the files are attached to the record and moved to the upload/pics folder where TYPO3 stores images attached to page content elements.
Uploading images
You can upload images to the archive through FTP. But you can also upload directly in the File module. Just click on the folder icon and the menu will appear. Clicking “Upload Files” will bring up a form where you can upload files. The context menu also allows renaming, coping, deleting, etc.
How to create a full backup of TYPO3
The steps for a full TYPO3 backup are:
Backup the Files
The first step is to generate a backup of your website’s files. For that purpose, you can download all of the files of your TYPO3 installation to your local computer. First, locate the exact directory that contains all of the files of your website. If you are accessing your website directly using the primary domain of your account, this indicates that your website is in the public_html/ directory of your account. However, this may be different if you are acessing your website through a subfolder, subdomain or an addon.
Download Files
There are two ways of downloading your files to the server – using an FTP client, or downloading directly through your cPanel account > File Manager.
Backup the Database
The second step is to create a backup of your TYPO3 database. First, you need to review the actual name of your database. This can be done easily via the main configuration file of your website. Once you get the name of your database, log into your cPanel account. Scroll down to the Databases section and click on the phpMyAdmin service.

The system will list all of the databases on your account on the left side of the screen. Click on the one you are using on your website.

Once you access the database, you will be able to see all of the tables in it. Click on the Export button at the top menu to proceed with the backup.

Click on the Go button to export a dump backup copy of your database to your local computer.

How to restore a full backup of TYPO3:
The full backup restore of TYPO3 requires from you to:
Restore Files
The first step is to restore the files of your TYPO3 backup. First, you need to decide the location, where you wish to restore the files. If you would like to access your website directly via your primary domain, this means that you need to upload your backup files to the public_html/ directory of your account. However, note that this may differ, depending on your requirements.
Also, ensure that the directory where you upload your TYPO3 files is empty.
Upload Files
There are two ways of uploading your files to the server – using an FTP client, or uploading directly through your cPanel account > File Manager.
Restore Database
To restore the database of your website, you first need to create a new one on your account. This will allow you to import the database backup of your TYPO3 website without any issues.
MySQL Configuration
You can create a new database and a user assigned to it via cPanel.
Once you create a new and empty database on your account, you can proceed further with the restore. First, access your cPanel account and locate the Databases section. Click on the phpMyAdmin service.

Select the newly created database on your account from the list on the left side of the screen.

Click on the Import button at the top menu.

Select the dump backup copy of your database from your local computer and click on the Go button to proceed with the import.

The last thing you will have to do is to link the files and the database together. For that purpose, you need to access the TYPO3 main configuration file for your website. From there, you need to enter the details for your new database, user and the password it is using to access the database. Save the file and you will be able to access your restored website normally.
ADVANTAGES OF TYPO3:
Being open-source, the TYPO3 CMS is highly secure with frequent updates and an enthusiastic community of developers. The list of advantages is enormous, with some being:
- Flexible open-source code based on PHP and MySQL
- Elegant WYSIWYG Editor
- Can handle huge number of files
- Easily integrate to external systems
- Doesn’t require a graphics editor to manage images
- Effective utilisation of SEO URL address
- Manage multiple websites with a single installation
- A proper differentiation between content and layout
-TYPO3 is a free Open Source content management system for enterprise purposes on the web and in intranets. It offers full flexibility and extendability while featuring an accomplished set of ready-made interfaces, functions and modules.Typo is free, open and available to anyone under the GNU/GPL license.Typo3 is owned by Typo3 (https://typo3.com/) and they own all related trademarks and IP rights for this software.
Typo3 on Cloud runs on Amazon Web Services (AWS) and Azure and is built to enable first-time users to get an working example website quickly and to experiment with built-in features.
Cognosys provides hardened images of Typo3 on all public cloud i.e. AWS marketplace and Azure.
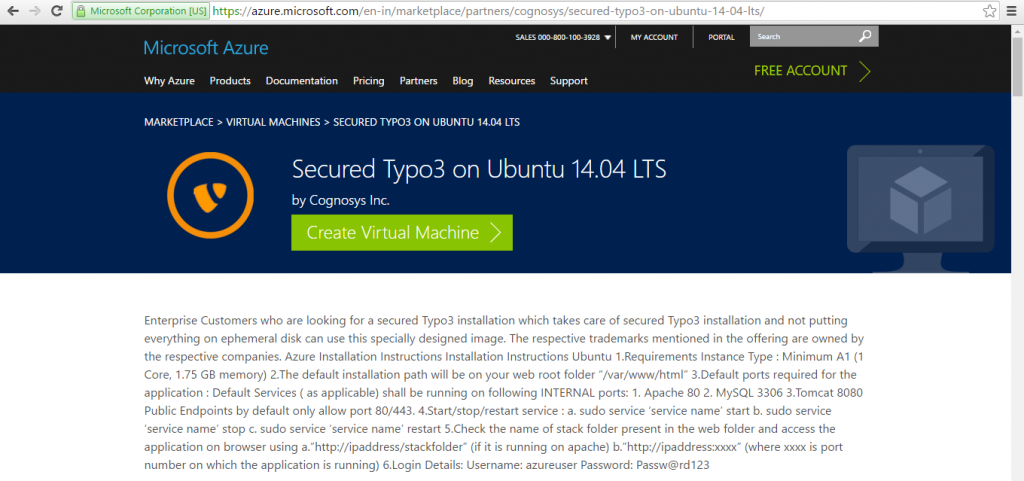
Typo3 ON Coud For Azure
Features
TYPO3 features:
TYPO3 makes it possible to create web presences of all kinds and sizes. Due to its impressive functionality, TYPO3 can cater for even the most specific web design demands. The following is a brief overview of the most important TYPO3 features:
- Multiple editors can contribute to web content. This can be easily controlled and adjusted thanks to the Workflow function, which also saves all drafts in its history, allowing you to restore older versions easily.
- Changes to content and layout can be tested in workspaces. A workspace is a specially designed working environment that simulates the front end of the site.
- It’s possible to set detailed instructions for who has access to which areas of your website, both front end and back end. Numerous settings allow you to modify the access rights of individual users, editors, administrators or particular groups.
- There are no restrictions on the management of multiple independent sites. Installations only need to be made once for all sites.
- There are over 6,000 extensions and applications to choose from. The Extensions Manager makes them easy to locate and install.
- Making a web presence or several websites available in different languages is simple. There are more than 50 localisations available for this.
- Both the front and back end are responsive. It is also possible to set special previews of the front end for mobile devices.
-Major Features Of TYPO3:
- TYPO3 harmonizes with HTML5
- Web Accessibility by default
- Improvements within the Rich Text Editor
- TCEforms – record editing in TYPO3
- Content management (text, images, links, downloads, forms)
- Text formatting with Rich Text Editor (italic,etc.)
- File management
- History and versioning
- Dynamic generation of menu items in the navigation
- Autom. compression and downsizing/enlargement of images
- Autom. generated sitemap
- Time control of content points or the whole website (start-/finish date)
- Wide permission system
Azure
Installation Instructions For Ubuntu
Note : How to find PublicDNS in Azure
Step 1) SSH Connection: To connect to the deployed instance, Please follow Instructions to Connect to Ubuntu instance on Azure Cloud
1) Download Putty.
2) Connect to virtual machine using following SSH credentials:
- Hostname: PublicDNS / IP of machine
- Port : 22
Username: Your chosen username when you created the machine ( For example: Azureuser)
Password : Your Chosen Password when you created the machine ( How to reset the password if you do not remember)
Step 2) Application URL: Access the application via a browser at http://PublicDNS/
Step 3) Other Information:
1. Default installation path: will be on your web root folder “/var/www/html/”.
2. Default ports:
- Linux Machines: SSH Port – 22
- Http: 80
- Https: 443
Configure custom inbound and outbound rules using this link
Installation Instructions For Centos
Note : How to find PublicDNS in Azure
Step 1) SSH Connection: To connect to the deployed instance, Please follow Instructions to Connect to Centos instance on Azure Cloud
1) Download Putty.
2) Connect to virtual machine using following SSH credentials:
- Hostname: PublicDNS / IP of machine
- Port : 22
Username: Your chosen username when you created the machine ( For example: Azureuser)
Password : Your Chosen Password when you created the machine ( How to reset the password if you do not remember)
Step 2) Database Login Details:
Username : root || Password : Passw@rd123
Please change the password immediately after the first login.
Step 3) Application URL: Access the application via a browser at http://PublicDNS/
Step 4) Other Information:
1. Default installation path: will be in your web root folder “/var/www/html/”.
2. Default ports:
- Linux Machines: SSH Port – 22
- Http: 80
- Https: 443
- MySQL ports: By default these are not open on Public Endpoints. MySQL :3306
Configure custom inbound and outbound rules using this link
3. To access Webmin interface for management please follow this link
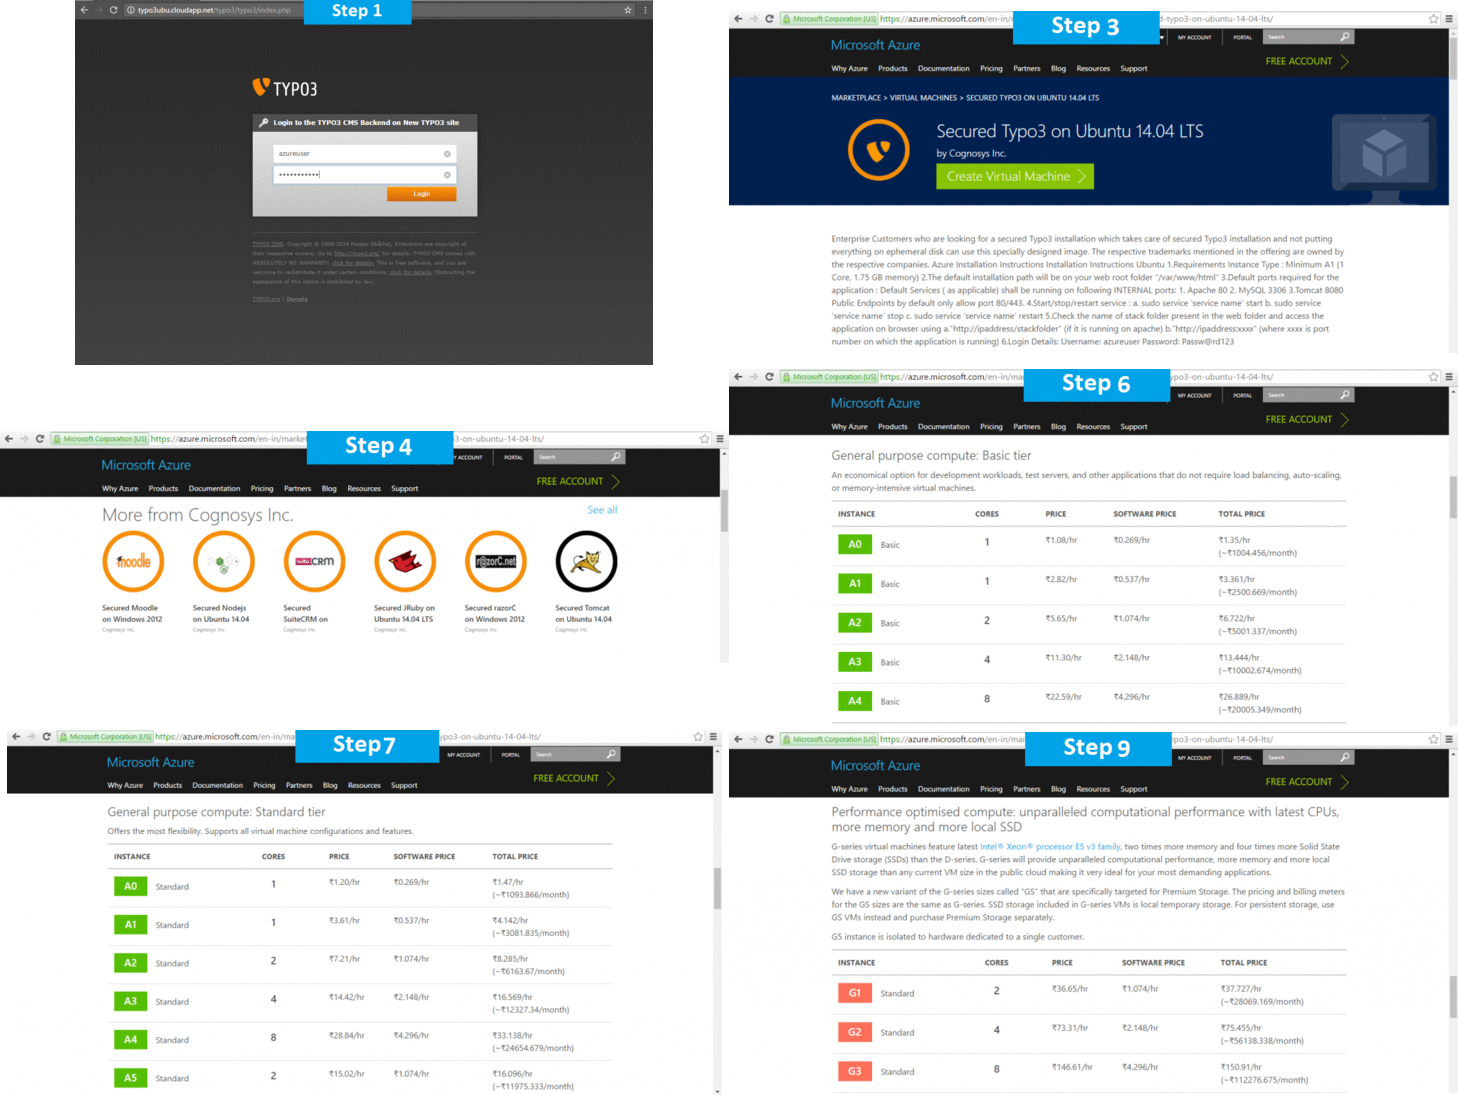
Azure Step by Step Screenshots
Product name
Videos
Introduction to TYPO3


