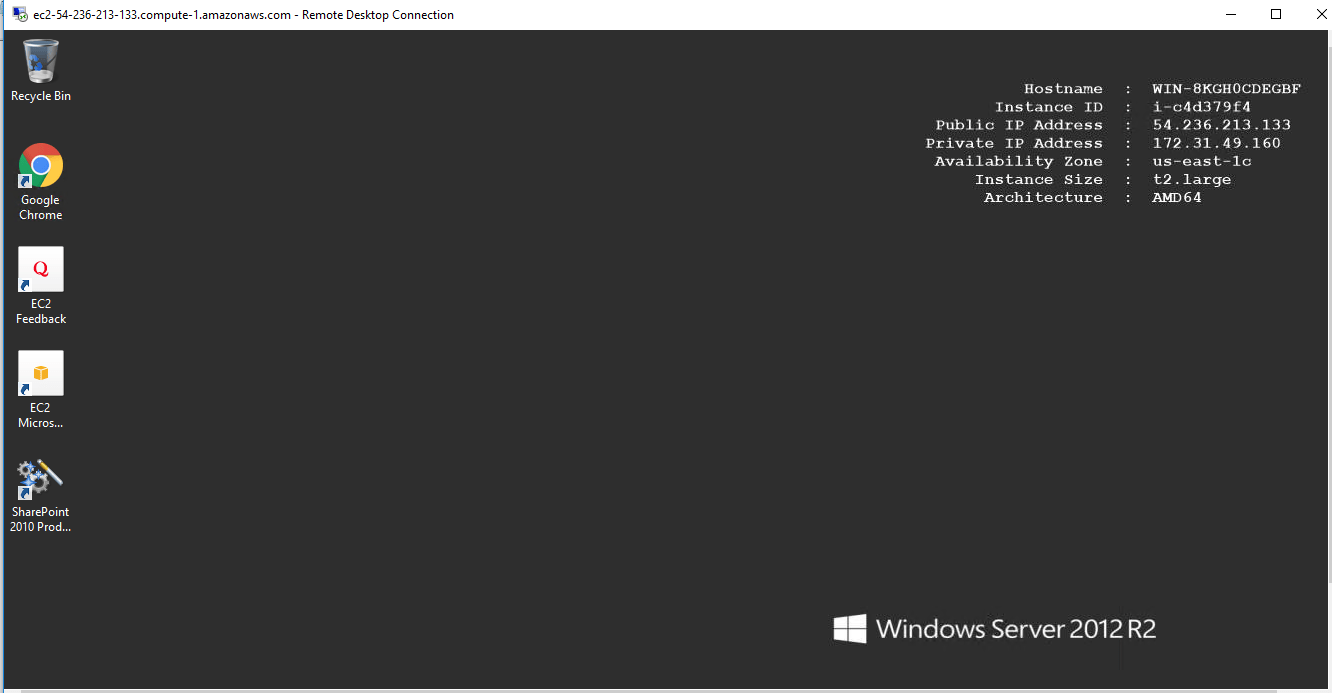
1-click AWS Deployment 1-click Azure Deployment
Overview
SharePoint Server 2019 delivers an enhanced hybrid experience to all users. Also, all the good qualities of SharePoint Online are now available for on-premises users, including modern sites, communication sites and hub sites,” said Dux Raymond-Sy, CMO of SharePoint migration specialist AvePoint. “Most importantly, the new rock-solid sync feature for OneDrive makes it more compelling for enterprises to retire competing file, sync and share solutions like Box or Dropbox, allowing SharePoint to become their one-size-fits-all solution for all of these needs.”
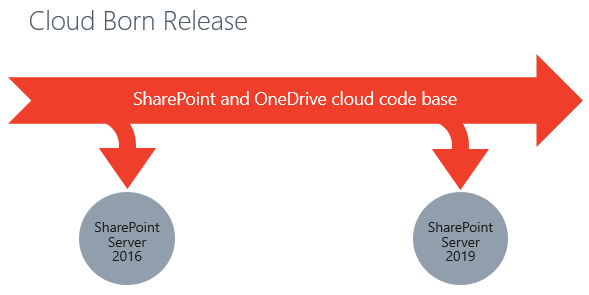
SharePoint Server 2019 Preview provides a first look at a select set of new investments that will help define the scope, scale and reliability of SharePoint Server 2019. In spite of the promise of more features to come, the main elements and upgrades have already become clear. They are based around three different themes:
-
User experiences developed through SharePoint Online.
-
Content engagement across all browsers and devices.
-
Powerful scaling security and compliance capabilities.
What is SharePoint
SharePoint is a web-based platform developed by Microsoft and first launched in the year 2001. It provides an enterprise collaboration and content management portal, which enables users to connect with each other and share the information across the organization. Since it is a content management portal, so it also allows the non-technical users to easily create and manage their own web sites.
SharePoint provides sufficient space to store and share data, information, and documents.

Microsoft SharePoint has 6 different areas, which are:
1) Sites: Building and managing Websites
SharePoint sites provide a set of tools that helps you to create your own websites, which can be your personal site, a website for your company, and the website for the world.
2) Communities: Creating a social Collaboration Environment
SharePoint Online provides modern approaches that help you to work, collaborate, organize, and communicate with multiple people at the same time. SharePoint 2013 and the above versions have an ability to create detailed user profiles, shared calendars, document libraries, and discussion boards.
3) Content: Managing your Documents, Information, and Records
SharePoint provides a place to store your content on the SharePoint rather than saving it in the local folder or network share device. SharePoint also provides a tool for managing all your organization’s documents, information including that who can read and update them, and make content lock for further changes.
4) Search: The Google for your Organization’s Private Info
SharePoint provides a complex search engine that allows you to search your content and people in a very easy and secure way.
Search in SharePoint includes the ability to:
- Enhance the search results with filters like the site, Author, Result Type, and more.
- Previews of the content within the result set
- Enhance search results based on the metadata.
5) Insights: Digging for Business intelligence
SharePoint allows you to bring all your information together, understand it, organize the content into different places such as spreadsheets, blogs, business intelligence systems, and present it in a way to make sense. It is also used to create dashboards, Visio diagrams, and scorecards.
6) Composites: Integrating your Business System
Composites in SharePoint combines data, documents, and business process in a “do-it-yourself” business solution. The main advantages of composites are that it provides better utilization of investment, Solutions do not depend on the coding, Rapid deployment, prototyping, and modifications.
Now, let’s understand the Collaboration and Content Management System.
Collaboration
The word Collaboration means “working together.” It enables individual people to work together for a common purpose i.e., achieve business benefits.
A good collaboration includes the following:
- A shared sense of purpose
- A sense of shared responsibility
- Mutual trust
Collaboration plays a very important role in SharePoint. SharePoint 2013 and above versions collaboration are managed through the Apps.
Content Management System (CMS)
Content Management System (CMS) is a software application that helps users to create, manage, and modify a website’s content without the need of any technical knowledge.
Content Management is divided into four types:
- Enterprise Content Management System
- Web Content Management System
- Web group Content Management System
- Component Content Management System
Example: Magento, WordPress, Wix, Drupal, Joomla, etc.
The basic features of a CMS are given below:
- Content Creation: It allows users to easily create and modify content.
- Content storage: It is the place where content is stored.
- Workflow management: Workflow is used to define how tasks are structured, who performs the tasks, how information flows to support the tasks, and how tasks are being tracked.
- Publishing: It allows users to publish content on the web.
Why SharePoint?
SharePoint is a leading tool which is used by most of the organizations to develop their online and offline projects. It is a platform for proving collaboration, secure document management, website integration, and more.
SharePoint is used for the following purposes –
- Most of the organizations use SharePoint to improve employee collaboration and interaction. With SharePoint, you can instantly access the information such as project tasks, calendars, data, documents, and more.
- SharePoint is used to store documents in a shared place instead of one location, such as a hard drive.
- SharePoint is also used to create and manage external and internal websites for your company.
- SharePoint is used to enhance employee interaction and communication using social networking tools.
- SharePoint offers better document management capability like adding the permissions such as who can access the particular document and who can’t access these documents.
Features of SharePoint
A list of features of SharePoint is given below –
- Social Computing
Enables advanced collaboration within the SharePoint environment supports such as wikis, Blogs, Forums, etc.
For example, SharePoint integrates with skype, which allows employees to easily communicate with their business partners. - Rich UI
SharePoint offers automatically built the user interface for your websites in which you can easily edit, customize user interface according to your requirement. - Business Search Engine
SharePoint provides a Business search engine that helps you to search relevant content based on your query, for example- Google. - Mobile App Integration
SharePoint integrates with the mobile app to carry your company intranet with you and all this is done by using SharePoint’s mobile app. SharePoint mobile app allows you to use a mobile device for quick access to team sites, recent files, and more. - OneDrive for Business
Previously OneDrive is known as SkyDrive. It allows the employees to store files in one location for easily share and collaboration. - Azure Search
Azure Search uses the advanced search functionality with a customized application. - Outlook Integration
Outlook Integration with SharePoint extend capabilities using a folder hierarchy that can be accessed in both online and offline mode. It helps users to synchronise folders with SharePoint and use drag-drop or copy-paste to move emails to the folder.
What’s New with SharePoint 2019 On-Prem?
The first thing that’s coming in SharePoint 2019 that looks almost exactly like Office 365 in this vein is Site Creation. The new release is going to have a modern Site Creation interface that’ll allow users to use the Waffle to navigate to the SharePoint application and create a site themselves through the GUI. This should significantly lessen the load on admins and circumvent the need to click through an overwhelming amount of settings links.
There will also be updates to the modern team Sites. “Modern” is a term to differentiate between the old code and the new code. There are a lot of pieces that remain in place, but there’s also a huge reduction in the amount of code in general. You’ll also notice that this is the same infrastructure as Office 365. The beauty of it is that the re-formatting is actually usable and easy for people as opposed to the older versions (such as 2013 sites, for instance).

Modern Libraries are where data and information is stored and organized in lists and libraries. From the library side of things, there are surfacing capabilities that makes it significantly easier for users to get hard-to-find information. You’ve also got the nice modern slider panes that are now built into the libraries.
The other thing which is really liked about Modern Libraries is the ability to change your view to a tile view or a preview of the documents and images that exist in those libraries. It makes it so much easier than what it used to be in the old SharePoint UI interface. Now it’s a drop-down option that you can quickly access. Along with the updates to the Modern Libraries, there are now a lot more modern capabilities to go along with them too! For example, there are now one-click moves for documents and information.
Speaking of information, Modern Pages have made their way to SharePoint 2019. Modern Pages essentially use all of these preset zones and make it easier to add text to different web parts and incorporate your own information through those SharePoint framework web parts. It’s become so much easier now!
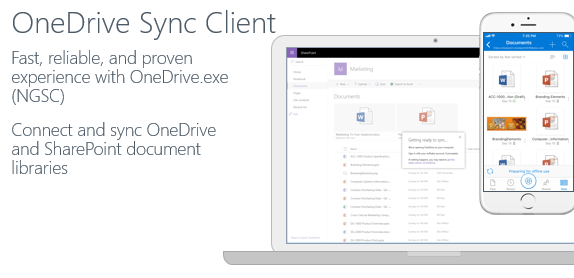
One of favorite updates is the OneDrive Sync Client. W e all questioned once if we wanted to use the OneDrive Sync Client or the SkyDrive Sync Client, and now it is what’s called the “Next Generation Sync Client,” and it’s being used across On-Premises, the cloud, OneDrive, and SharePoint. It can get a little confusing because it can be used for all SharePoint document libraries, and your data can be On-Premises while still using the OneDrive Sync Client that’s already loaded with your OneDrive.
The new Modern experience is really catching SharePoint up to what industry standards are for what a web interface should look like. It’s great that they’re bringing this to the On-Premise platform with all these features that we’ve been enjoying in Office 365 for a while now.
Next up there are updates to Communication Sites. Communication Sites are where all the other features come together. It’s great for creating a site where people congregate and gather information. A great example of would be an HR site.
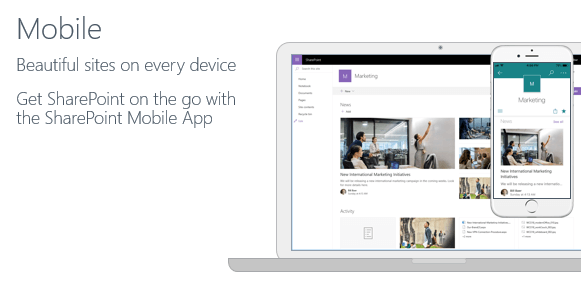
The out-of-the-box phone app for SharePoint works a whole lot better than anything that previously existed, especially with Modern Sites and the new mobile app redesign. It’s now significantly easier to use and see what’s being surfaced.
When it came to SharePoint 2013 and 2016, there was a lot of capability to connect and build out a hybrid environment. SharePoint 2019 pushes that capability even further. As opposed to having some features that allow you to build out a hybrid model, 2019 almost encourages you to build out that hybrid model.Part of this is likely due to Microsoft’s push towards cloud adoption. If you want to have and maintain a hybrid environment in the long term, for whatever reason, it’s a lot easier to do with 2019.
Installing SharePoint 2019
1. Preparing Windows Server to install SharePoint 2019
SharePoint 2019 can be installed on top of Windows Server 2016 or 2019 and both Standard and Desktop editions are supported, with Desktop Experience listed as required. Many of you will find the Desktop Experience requirement quite strange with all the push towards Core and Nano Server things, but this is how things are for now. Another thing to keep in mind is that installing the Office 2019 client and SharePoint Server 2019 on the same computer is not supported .
Here we opted for Windows Server 2019. We have taken Azure B4ms VM to get my Windows Server 2019 platform. B4ms has 4 vCPUs and 16 GB of memory which is enough for basic installation and testing. Official hardware requirements for SharePoint 2019 state 12 GB of RAM as the absolute minimum (in 3-tier farm scenario) and looks as follows:
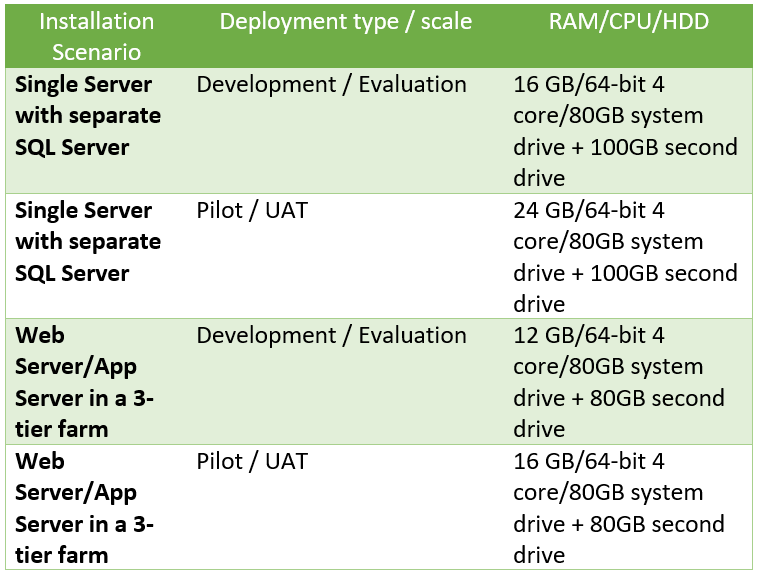
And, by the way, these requirements are exactly the same as those listed for SharePoint 2016 (you can check it here), so we have no reason to complain about any increased hardware demands.
2. Database server for installation
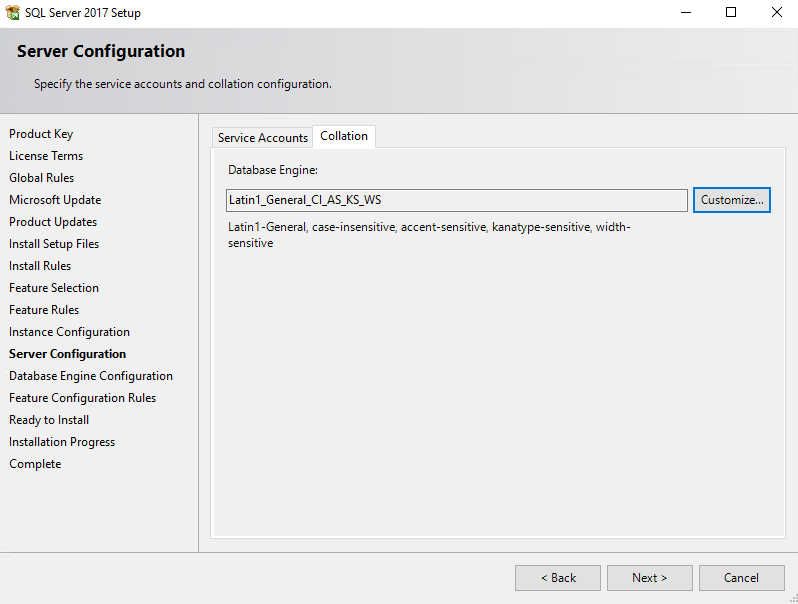
As a SQL Server for hosting SharePoint databases, we can use Server 2016/2017 Standard or Enterprise editions (any public updates are supported through the product life cycle). Obviously, SQL Server Express is not supported, and, strangely (at least to me), SQL Azure SaaS service is not supported also (for any SharePoint Databases). In my case, I’ve installed SQL Server 2017 on my Azure VM using trial version of on SQL Server 2017 on-prem. We set up SQL Server 2017 Trial default instance with Latin1_General_CI_AS_KS_WS collation, like so:
3. Software prerequisites
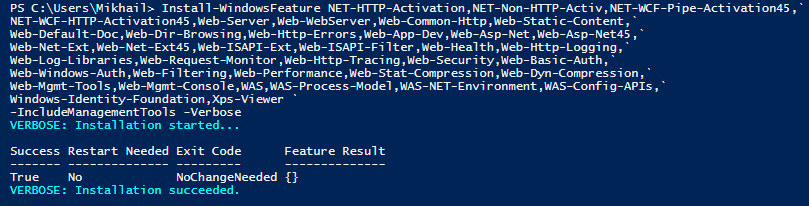
Having Windows Server 2019 and SQL Server 2017 (along with alias and SSMS) in place, the next step is to install all the software prerequisites for SharePoint 2019.First, we need to install the required Windows Server roles and features. The easiest way to do this is with PS script. Copy the script and execute it from elevated PowerShell or PowerShell ISE window:
Next, we need to run SharePoint 2019 Products Preparation Tool launching PrerequisiteInstaller.exe from the root of product installation media:
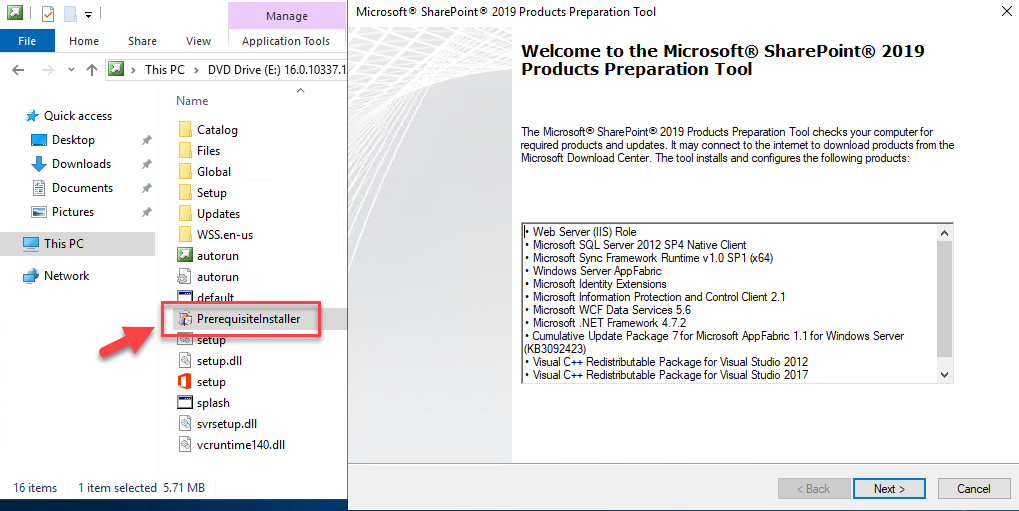
We just click Next on the initial wizard´s page, accepting License Terms and letting it do its job. In my case, it was completed in 2,5 minutes and asked for a restart:
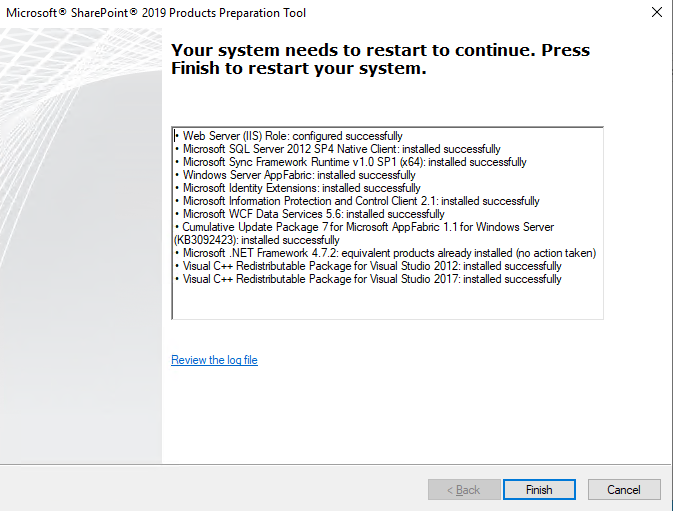
Ensure that your SharePoint 2019 installation media is still mounted after reboot, otherwise you will see the following error:
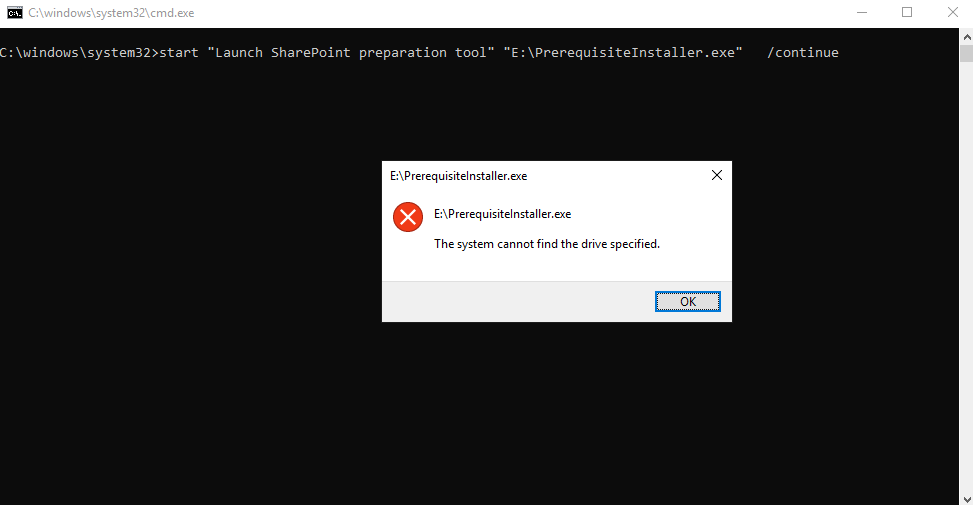
If you run into this, just re-run PrerequisiteInstaller.exe with /continue switch manually. Once it is completed, Preparation Tool will report the “Installation Complete” status:
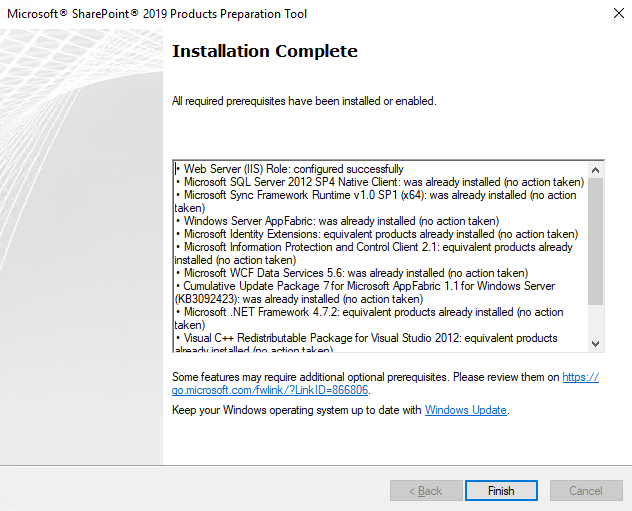
Just click Finish and move on to the next step.
4. Running SharePoint 2019 Setup
We are now ready to kick off SharePoint 2019 Setup executing setup.exe from the root of installation media:
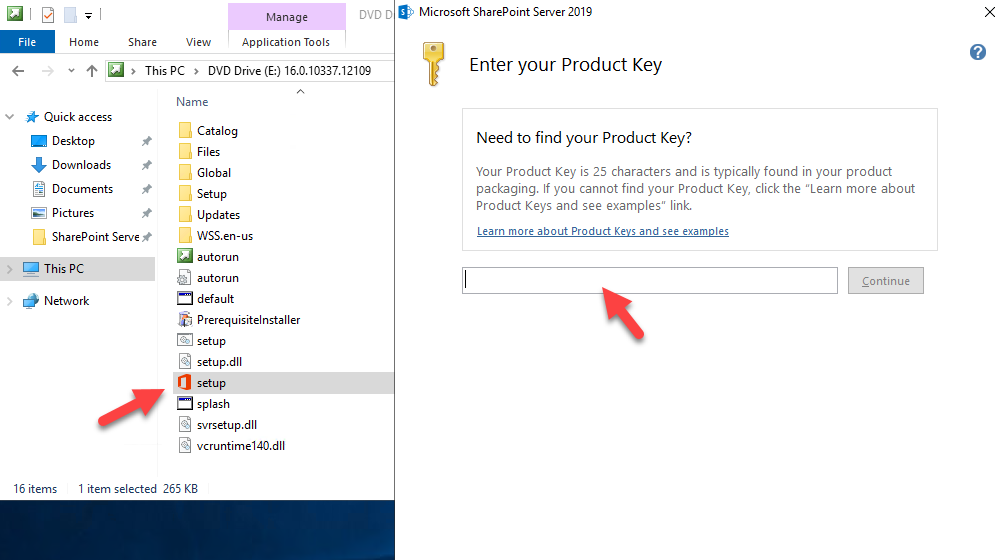
Remember that for the trial version installation, you can use the trial product key from SharePoint 2019 trial download page. Once you enter the product key, you will be prompted to agree with the license terms .
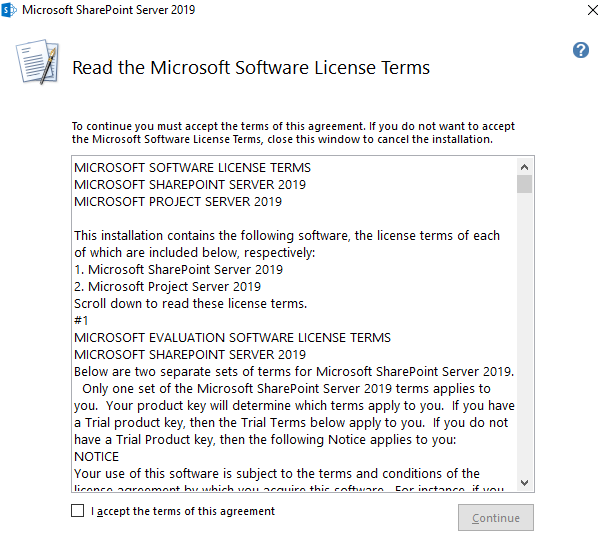
Tick “I accept…” check box and hit Continue to move on to file locations selection step:
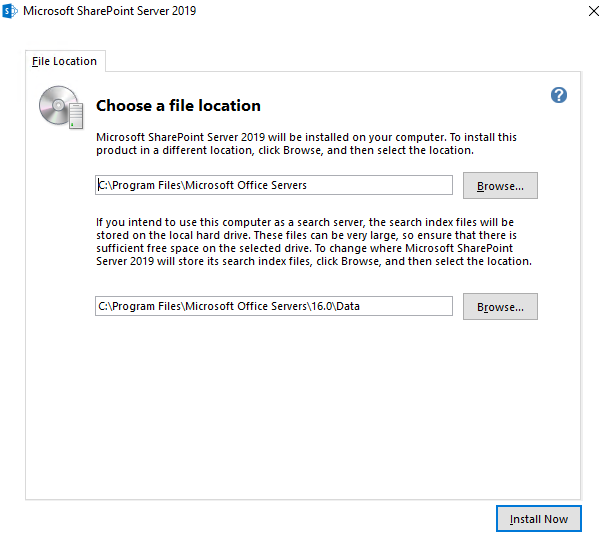
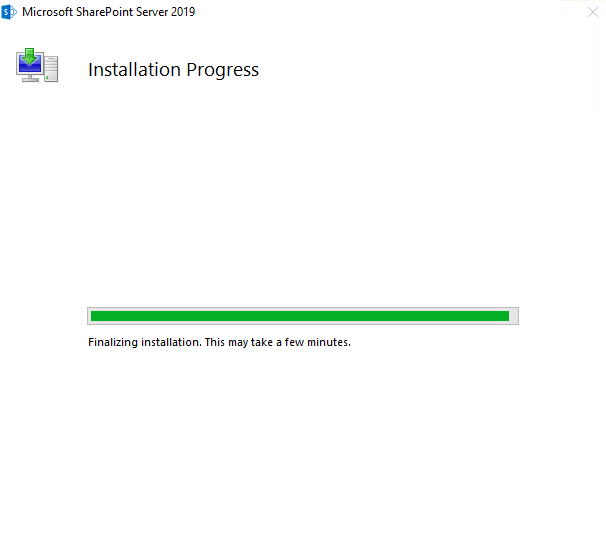
For our purpose here, it is OK to accept defaults and click on Install Now button.
At this step, you can have some coffee and contemplate the green progress bar for some time (which generally should be your favorite part, unless you are repeating this process eight times in a row and expect it to fail yet again).
Once the installation completes, you can click Close and move on to SharePoint Products Configuration Wizard. You may be also prompted to reboot to complete your installation at this stage:
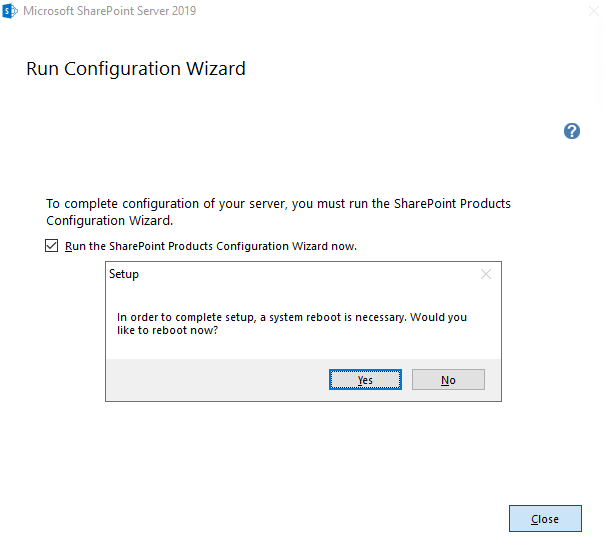
Click yes to perform the restart required to complete the installation process.
 |
StarWind HyperConverged Appliance is a turnkey, entirely software-defined hyperconverged platform purpose-built for intensive virtualization workloads. Bringing the desired performance and reducing downtime, the solution can be deployed by organizations with limited budgets and IT team resources. Also, it requires only one onsite node to deliver HA for your applications that make the solution even more cost-efficient. |
| Find out more about ➡ StarWind HyperConverged Appliance |
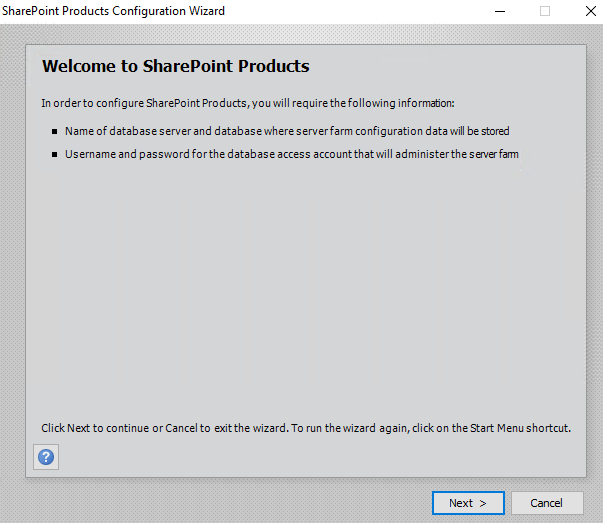
5. Running SharePoint Products Configuration Wizard
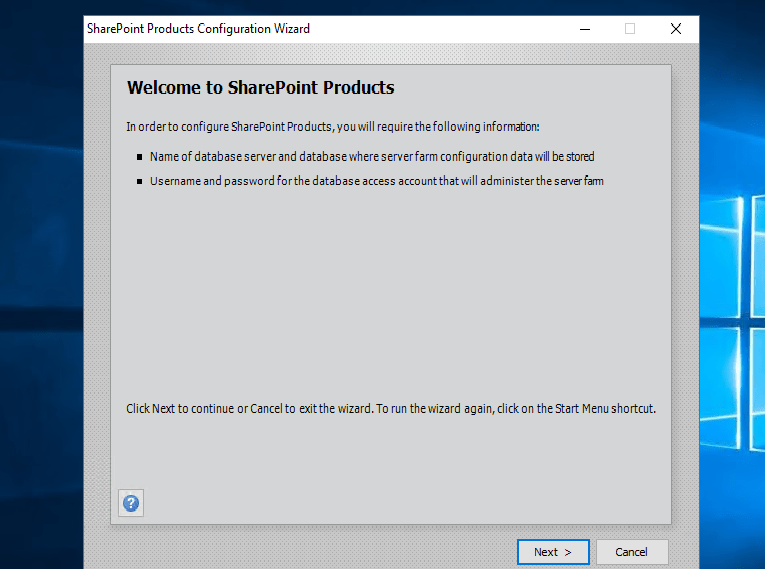
Unless you unchecked “Run the SharePoint Products Configuration Wizard now” check box or your installation media was removed, you will be presented with SharePoint Products Configuration Wizard after the reboot:
Let’s go through it together. After clicking Next on the initial screen, we need to explicitly confirm that we are OK with the restart of IIS, SharePoint Administration and SharePoint Timer services:
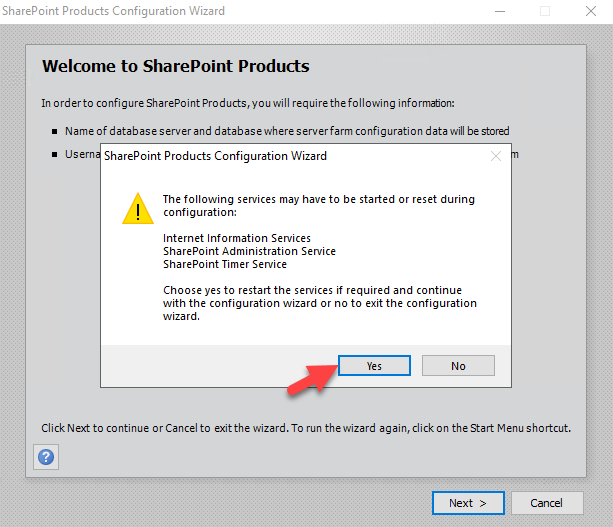
This is a way of taking care about those who don’t care about their agreed downtime windows, so that they are at least warned and have a chance to think twice.
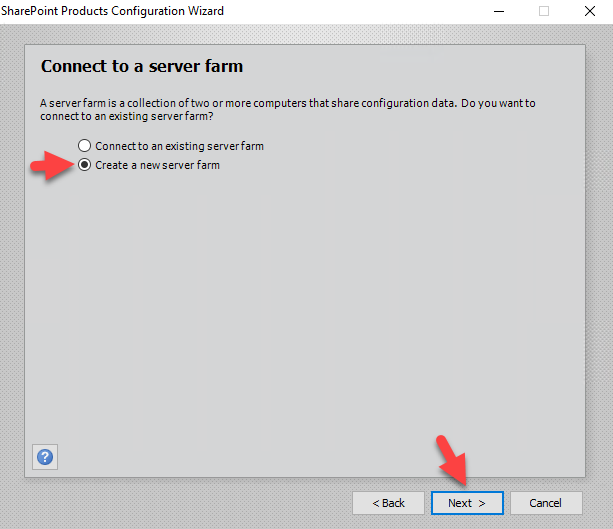
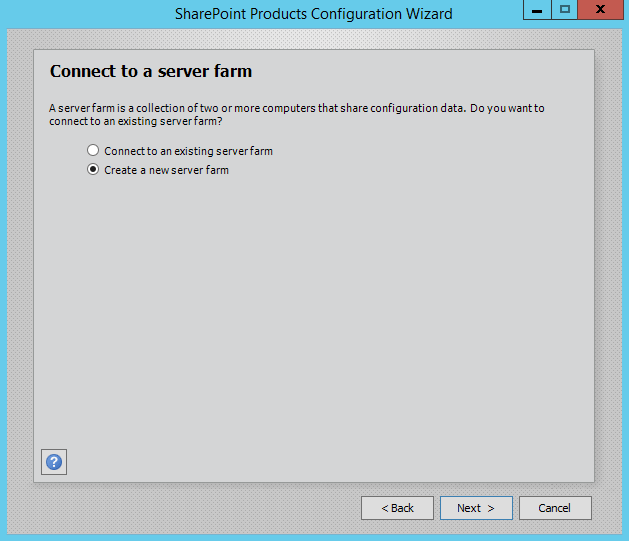
As we are performing a brand new installation, we select “Create a new server farm” on the next page of the wizard:
On the next page, we specify our SQL Server alias as database server, database name and database access account:
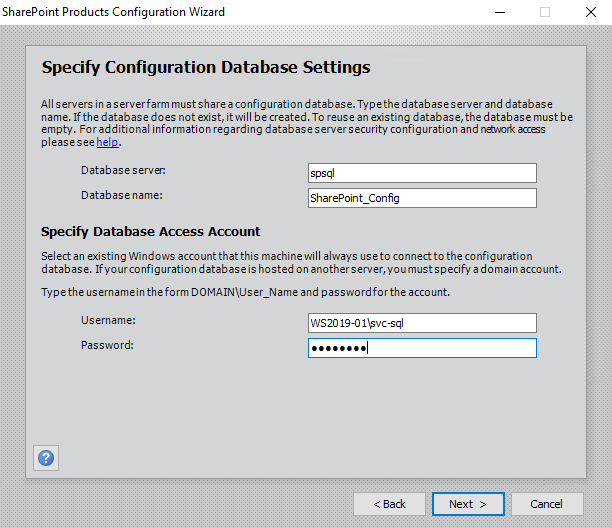
Your database access account is supposed to be the domain user, otherwise, you will get the following warning:
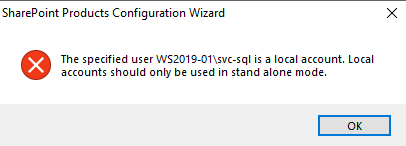
You can workaround this by creating your SharePoint configuration database using New-SPConfigurationDatabase cmdlet and specifying – the LocalServerRole SingleServerFarm parameter, like that:

Note: If you decide to go this route, you should understand all the implications of using this approach fully. In my case, I just spin up local domain controller and switch to domain accounts.
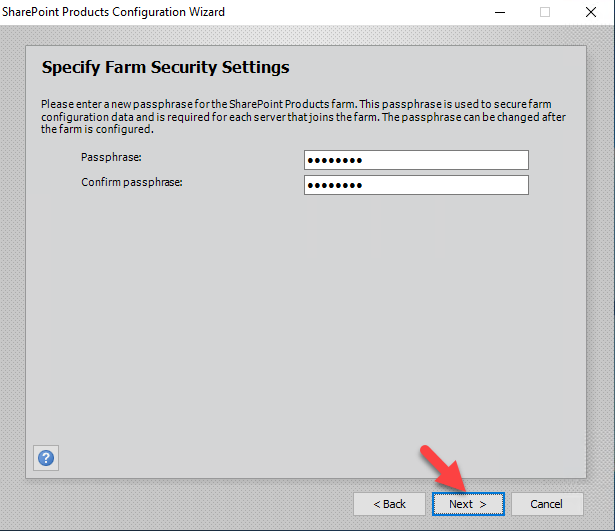
On a SQL Server side, the database access account needs to have dbcreator and securityadmin fixed server roles as well as db_owner fixed database roles on all existing SharePoint databases. Following the wizard, our next step is to specify the farm pass phrase, which will be used to join new servers to the farm, and click Next:
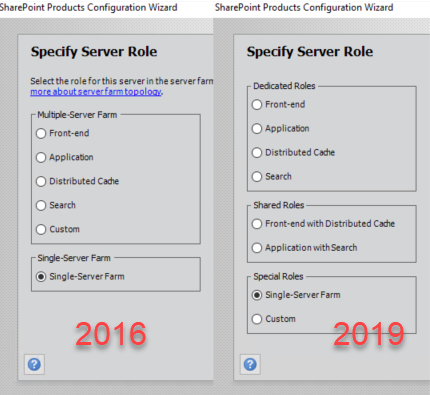
We then specify our server role as “Single-Server Farm”:
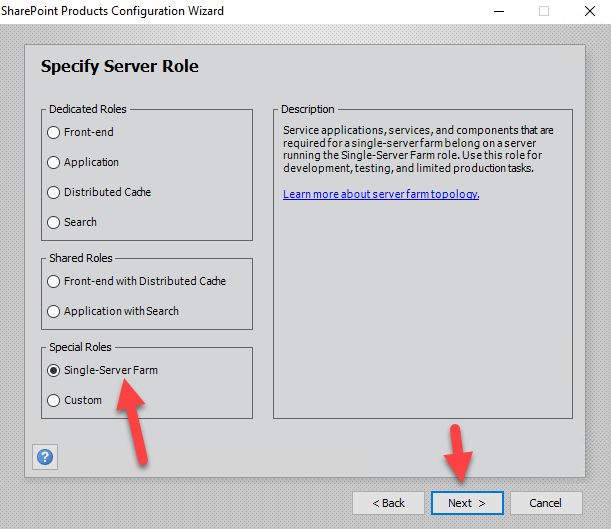
This is the part where we can see some differences in the server role options exposed to us by the wizard as you can easily see if we compare respective pages in SP2016 and SP2016 configuration wizards:
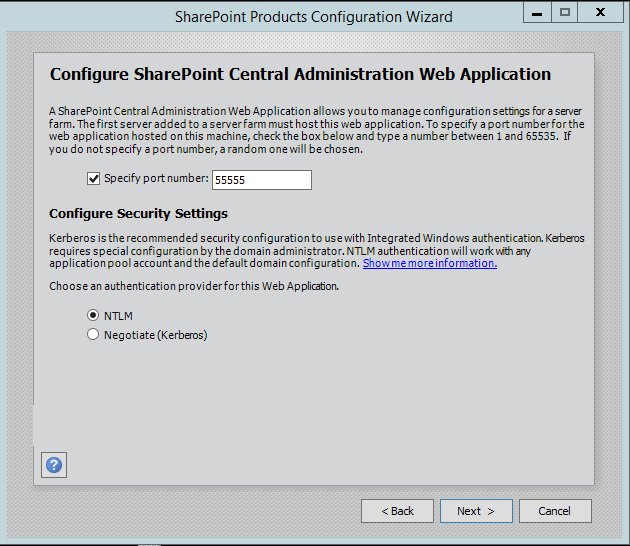
On the next step, we have options for configuring Central Administration (CA) web application port number (be sure to specify one, if you don’t want to end up with a random port), as well as the authentication provider for it:
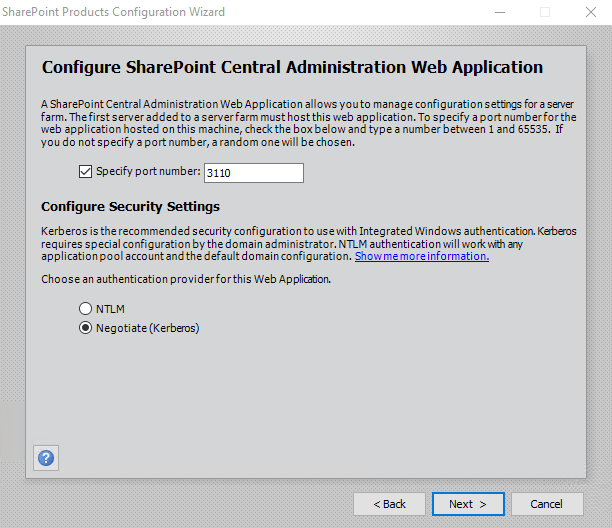
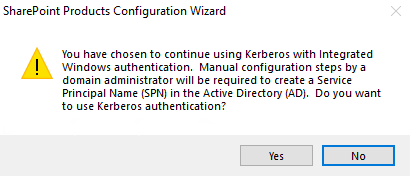
If you select the Negotiate (Kerberos) option, you will receive a warning about additional manual configuration steps required:
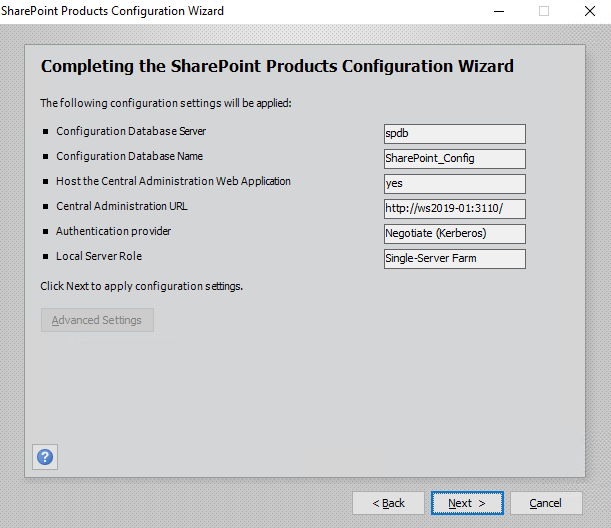
The next wizard step just shows you the summary of selected configuration settings to review before you start the configuration process:
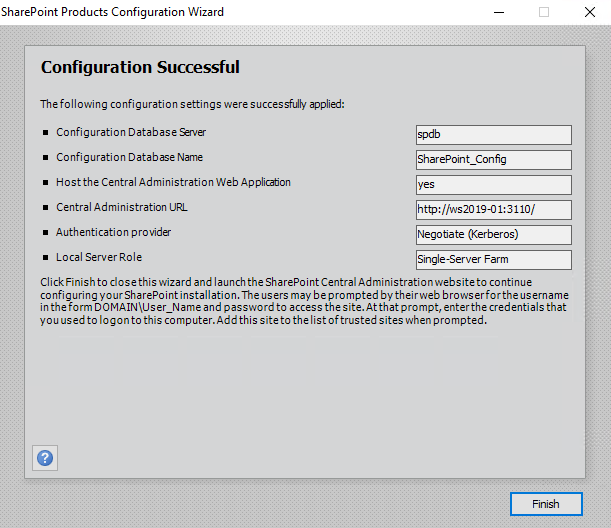
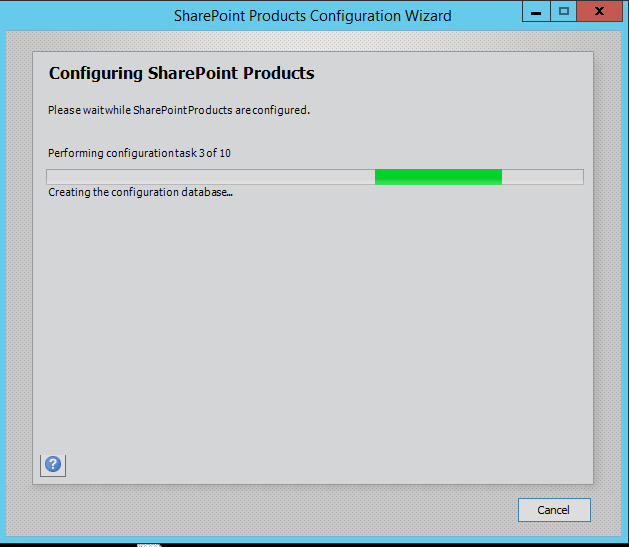
Once you click Next, the configuration process begins:
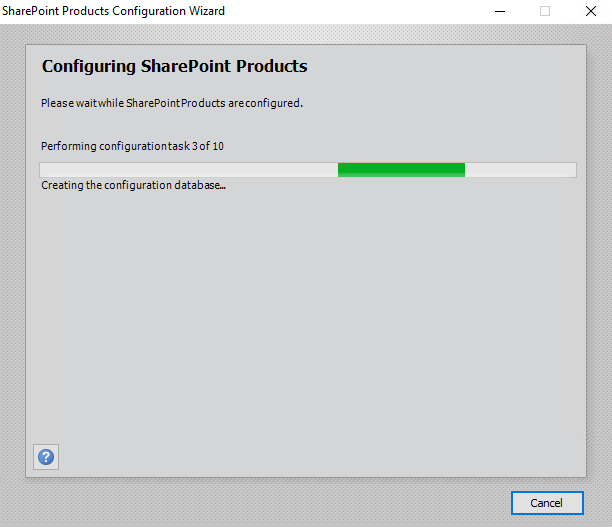
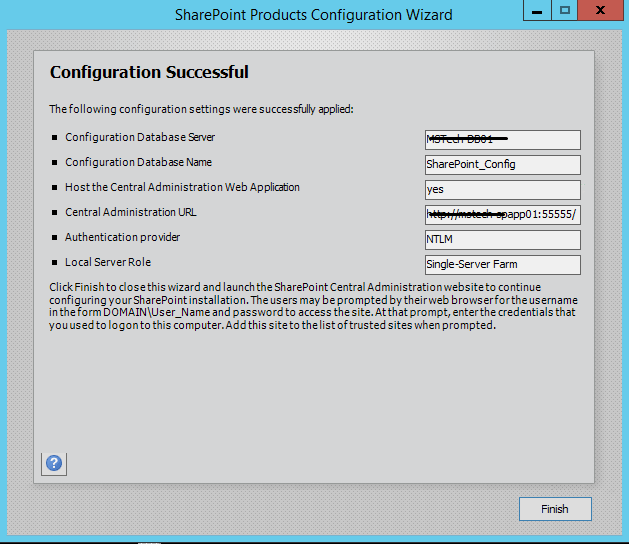
It involves ten configuration tasks, including such things as creation of configuration database, registration of SharePoint features, provisioning of SharePoint CA web application and so on. As soon as the process completes, we will see the Configuration Successful window and click Finish to complete the process:
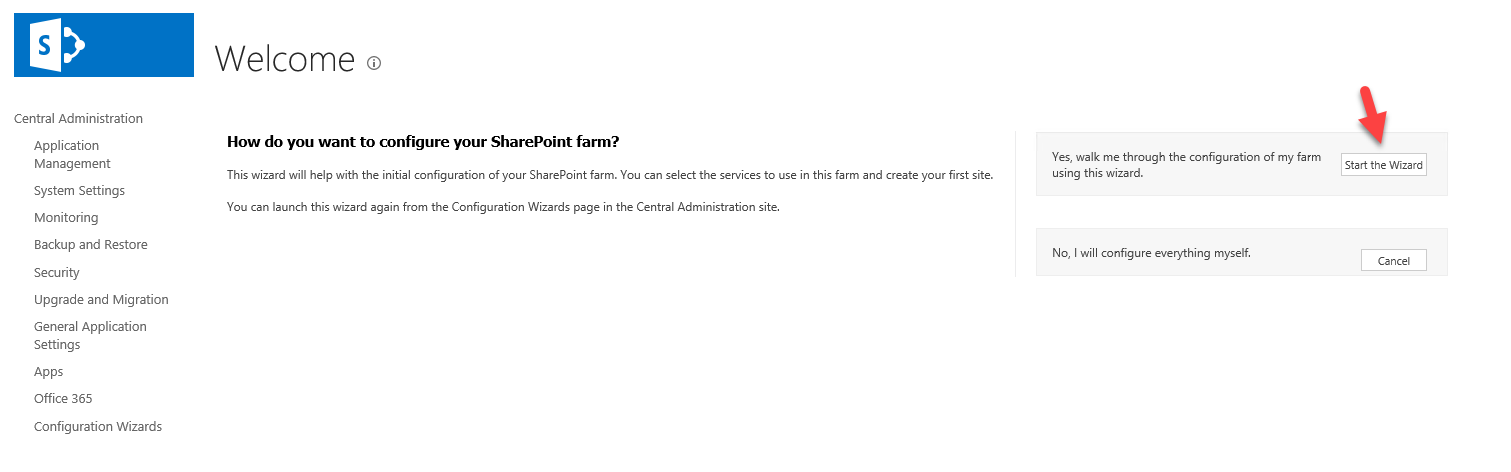
After you click Finish, Setup Manager opens the CA page for you, presenting you with the “Help us improve SharePoint and OneDrive” pop up prompt (something we used to know as Customer Experience Improvement Program or CEIP):
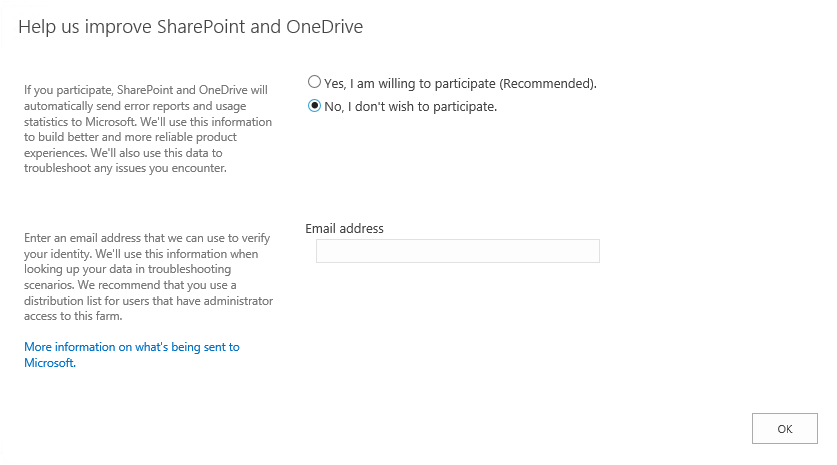
Once you get that pop up out of the way of selecting options of your preference, then you can select between manual and wizard configuration approaches to further configure your farm. For the sake of simplicity, we opt for the “Start the Wizard” option:
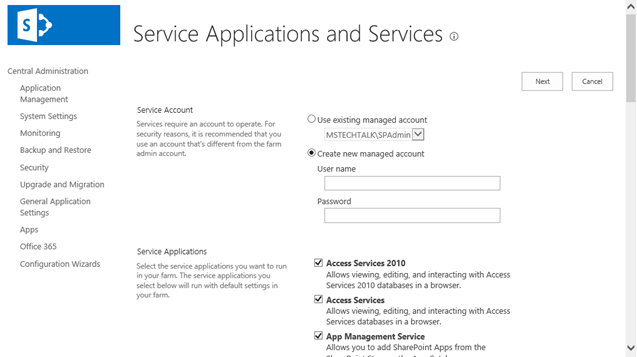
Wizard presents us with options to configure the service account, service applications and services:
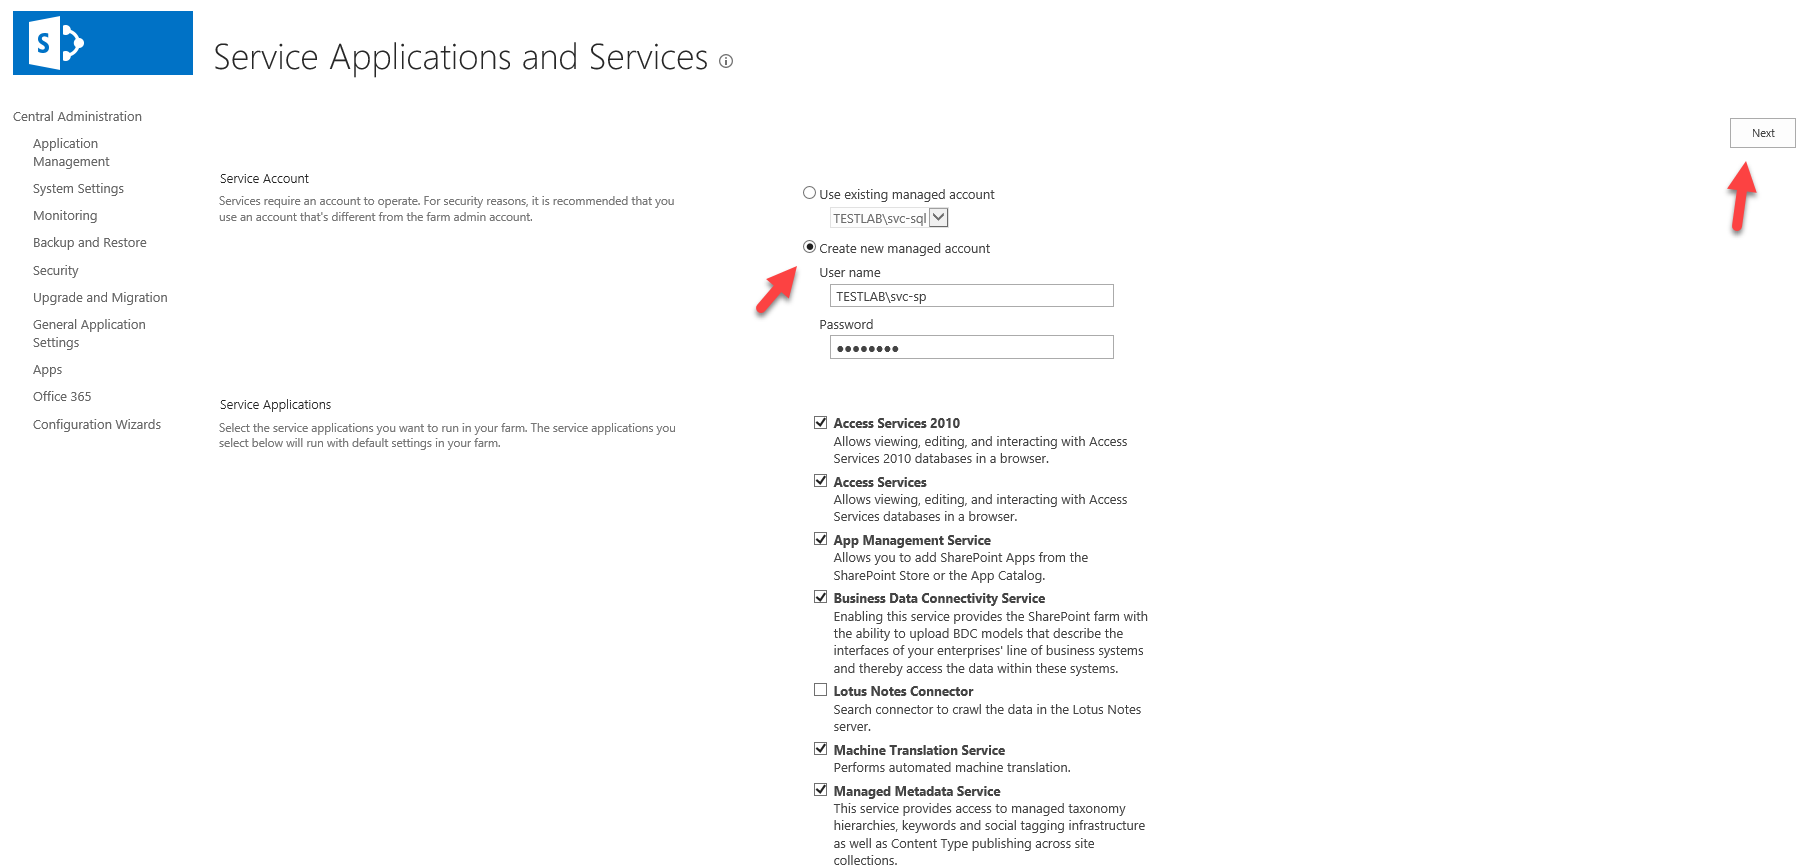
Create the new service account in AD DS and type in its name and password to register it as a new managed account, make your service applications and services selection and click Next. After contemplating a bit about that famous “This shouldn’t take long” message (which sometimes does take long), you will be redirected to Create Site Collection page:
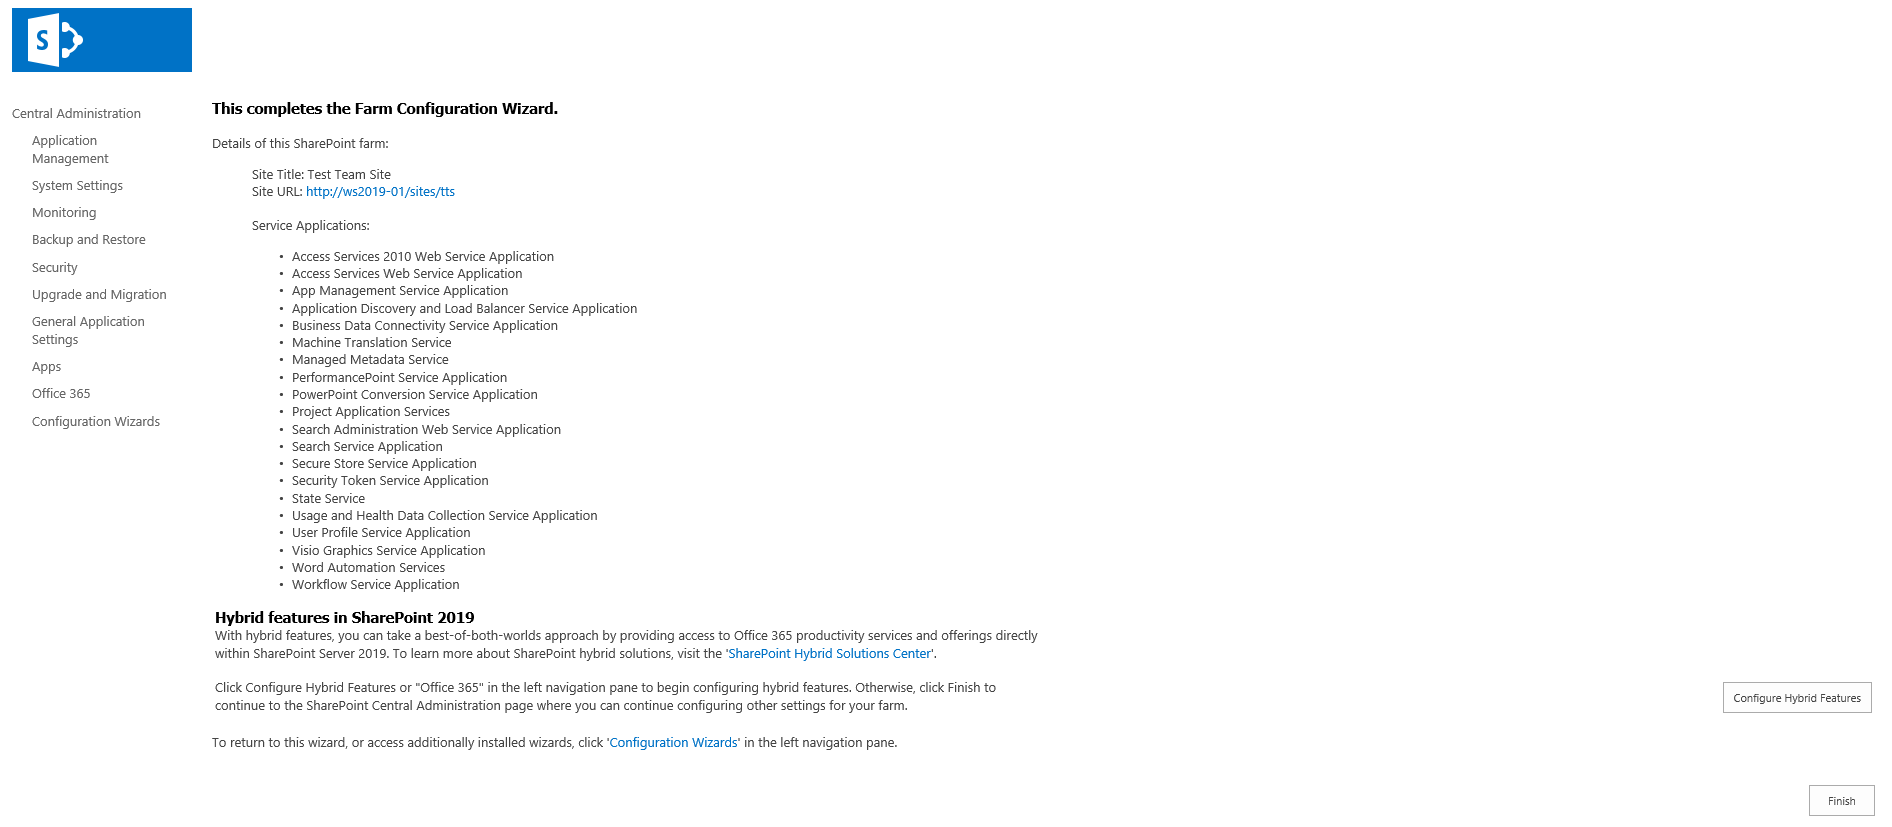
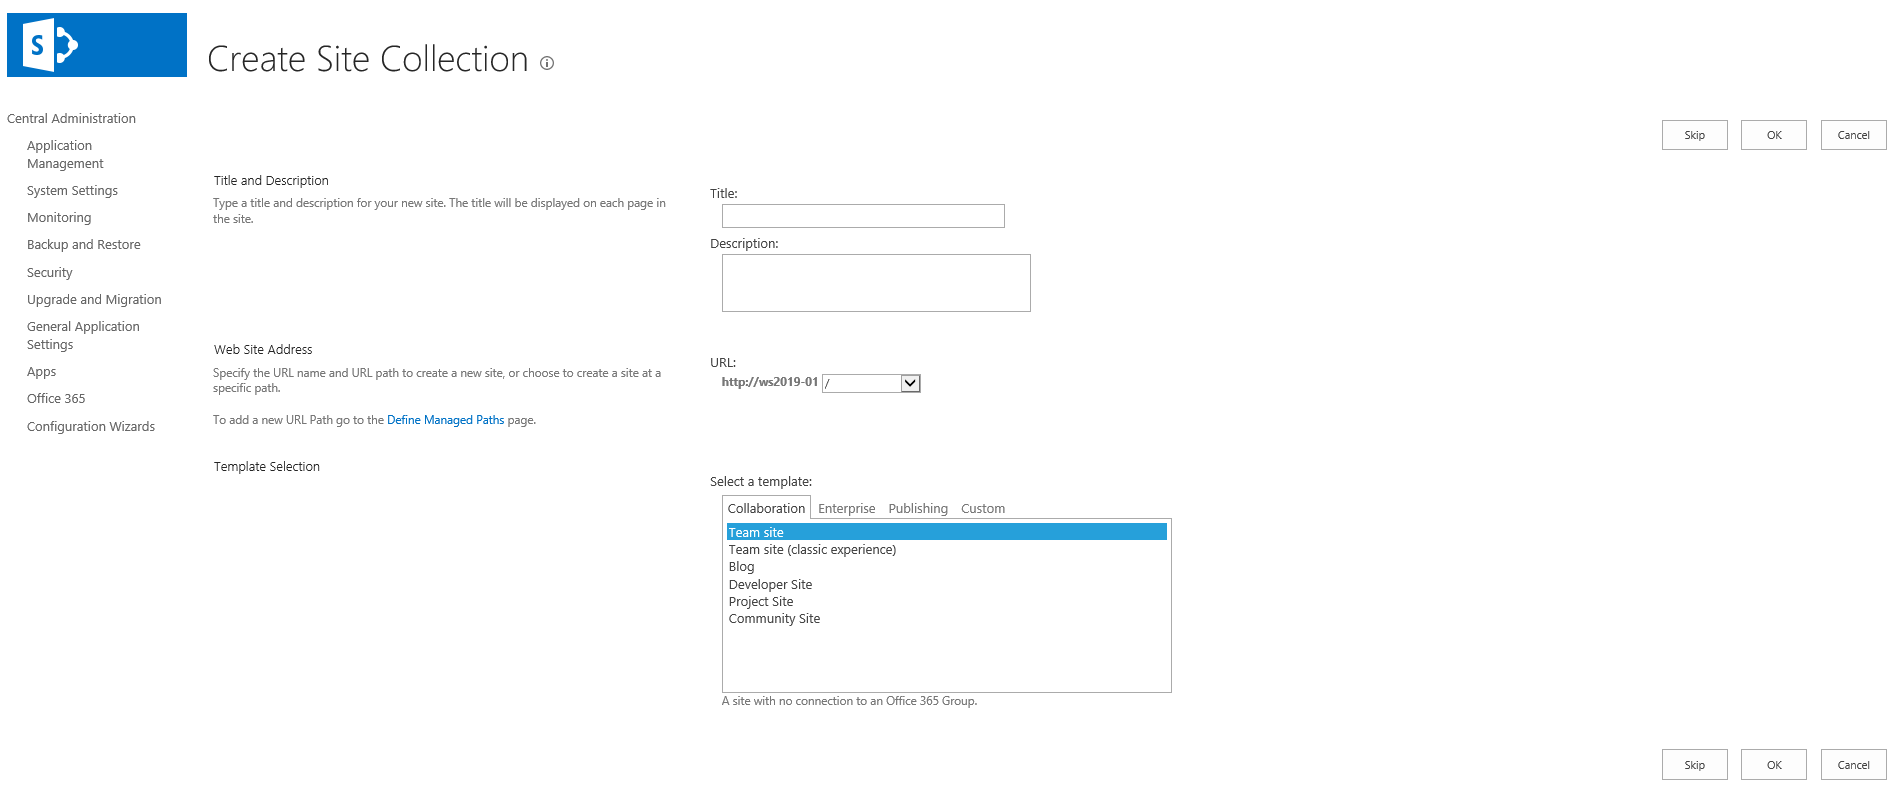 As you may notice, you now have Team Site and Team Site (classic experience) options amongst available templates. You can create site collection or skip this step, but in any case you will be next presented with the Farm Configuration Wizard completion page, which lists the details of your SharePoint farm configuration and offers you to configure SharePoint 2019 Hybrid Features:
As you can see, the installation process has not changed too drastically compared with SharePoint 2016, but what is clear about this version is that this release really tries to get you ready to move to the cloud – no more loud declarations about “last on-premise release.” Instead, it is just very clear that all ground work is here in the product to prepare you to go the hybrid route, if not fully cloud, along with a clear message that you need to design and build your SharePoint based solutions and infrastructures with the cloud in mind, even if you still install the on-premise version. Just another example of this messaging:
And, yes, you can now create these sleek looking Team Sites which we saw before only in SharePoint Online:

-Microsoft SharePoint 2019 makes it easier for people to work together. Using SharePoint 2019, you and your team can set up websites to share information with others, manage documents from start to finish, and publish reports to help everyone make better decisions. SharePoint
2019 is a platform for hosting shared activities over the web, manage documents from start to finish, and publish reports to help everyone make better decisions.
- SharePoint allows you and your team to store files in a shared team space so that everyone has access to the latest versions.
- It can store copies of earlier versions so you never have to worry about loosing earlier work
- SharePoint is a collaboration tool. By sharing documents, you can also collaborate on work.
- Depending on how your site is setup, you can check documents in and out for editing.
- SharePoint seamlessly integrates with Office applications such as Word, Excel, and Access.
- SharePoint also provides a search tool for finding information on your site.
SharePoint offers your team full security over your site. Security settings are managed within your team by site owners.There’s much more you can do with SharePoint including sharing Calendars, team directories, task lists, and so forth.
Cognosys Provides Hardened images of SharePoint on the cloud ( AWS marketplace, Azure and Google Cloud Platform).
Deploy SharePoint securely on cloud i.e. AWS marketplace, Azure and Google Cloud Platform (GCP)S

Features
Top 10 Features in SharePoint 2019
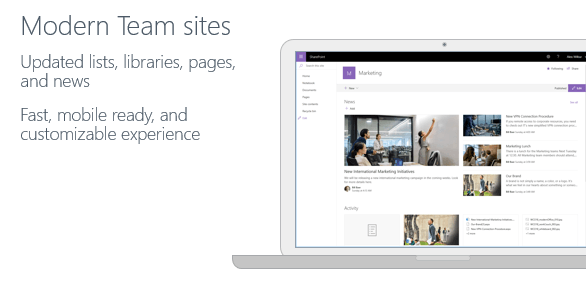
1. MODERN SHAREPOINT TEAM SITES
The first pillar of modern SharePoint experiences is the modern team sites seen in the Figure below. Modern Team sites are responsive by default, include an out of the box news publishing engine, allowing users to share news with the rest of the team. Unlike Office 365 where most modern team sites are connected to an Office 365 Group, on-premises modern team sites do not need any integration with Exchange to function correctly.
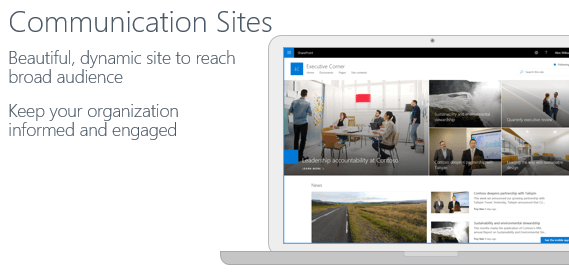
2. MODERN SHAREPOINT COMMUNICATION SITES
The next pillar of modern SharePoint experiences is modern communication sites. Communication sites are sites that are mainly used to share news, policies, and information to the users that are included. SharePoint Server 2019 includes three different templates of communication sites: Blank, Topic, and Showcase. You can view a modern communication site in the Figure below.
3. MODERN LISTS AND LIBRARIES
Digging deeper into our sites, SharePoint Server 2019 also brings support for modern SharePoint lists and libraries. Modern SharePoint Libraries, seen in the Figure below, allows users to quickly view information about their documents, including permissions and metadata. Another useful Office 365 feature brought over to SharePoint 2019 are the “Move To” and “Copy To” actions, allowing users to quickly change the location of a document to a more appropriate one.
Modern SharePoint lists in SharePoint 2019 also include the conditional formatting feature seen in the Figure below. Conditional Formatting allows Power Users to configure different display rules for specific columns, to quickly view the status of that item.
4. MODERN SEARCH EXPERIENCE
The last piece of modern SharePoint to make it On-Premises in SharePoint Server 2019 is Modern Search. The modern search experience, seen in the Figure below makes it easier for users to find documents, list items and people inside the SharePoint environment.
5. THE SHAREPOINT HOME
Our next new significant feature in SharePoint On-Premises is the SharePoint Home. The SharePoint Home, seen below, brings all the news from Team Sites and Communication sites together in a single location. All the sites you follow are also brought together, including activity from each site, and quick access to your favorite sites.
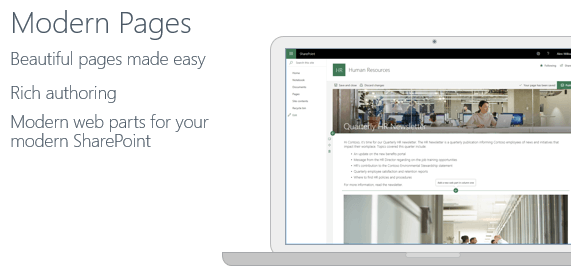
6. IMPROVED SHAREPOINT FRAMEWORK SUPPORT
Another new feature in this version of SharePoint is that SharePoint Server 2019 now supports SharePoint Framework 1.4.1 to allow developers to create modern web parts that work for both SharePoint Online, as well as SharePoint On-Premises. With SharePoint Server 2019, developers can use Webhooks for list items, SharePoint Framework Client-Side web parts and extensions in modern experiences, as well as Asset packaging and automatic JavaScript file hosting from app catalog.
7. ONEDRIVE SYNCHRONISATION WITH THE NEW ONEDRIVE CLIENT
SharePoint Server 2019 allows organisations to run on-premises SharePoint to profit from the latest improvements in OneDrive and Windows 10. SharePoint 2019 works with the latest version of OneDrive, also known as Next Generation Sync Client (NGSC) and supports the latest innovations in windows such as Files on Demand.
8. IMPROVED HYBRID APP LAUNCHER
The Hybrid App launcher in SharePoint 2019 is more aligned with the one in Office 365 , allowing users to have an even more seamless experience between their On-Premises and Online environments in a hybrid mode.
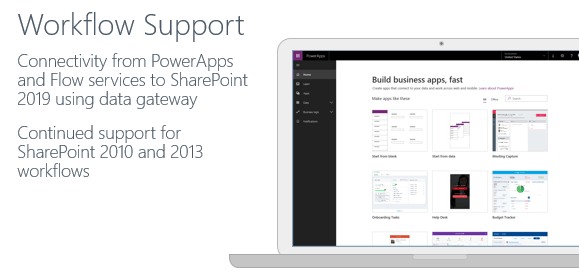
9. POWERAPPS AND FLOW INTEGRATION
With InfoPath and SharePoint Designer both being deprecated in SharePoint, users might want to look elsewhere for new projects requiring custom workflows and forms. While, InfoPath and SharePoint Designer are still supported on-premises until 2026 and are the only available option for organisations that are 100% on-premises, there is a better option for organisations in a hybrid environment.
By leveraging the on-premises data gateway, organisations will now be able to use Flow, PowerApps and Power BI in Office 365, even on their on-premises content. This will not only allow users to have a friendlier Business Process Automation creation process, but it will also allow organisations to create on a supported platform that gets new features every week. While this feature was also technically available in SharePoint Server 2016, in SharePoint 2019 it provides a better integration with Modern SharePoint Sites.
10. POWER BI REPORT SERVER INTEGRATION
With the release of SharePoint 2019, quite a few Business Intelligence features that we’re used to got deprecated or removed from the product. However, we can now use Power BI Report Server, which is the version of Power BI for On-Premises to create stunning reports, and easily display them in SharePoint Server 2019.
As you can see from the ten previous features, the most exciting features that were released in SharePoint Online did make it to On-premises in SharePoint Server 2019.
–Major Features of Sharepoint 2019 Enterprise
- Access Services Access Services allows you to easily publish Microsoft Access 2019 databases to your existing SharePoint site. Now you have a site that hosts all of your Access databases and stores all database objects in a list within that site.Excel ServicesUsing Excel Services allows you to create and publish Excel workbooks directly from the browser. You can also create interactive reports and dashboards that can be displayed directly from your browser, using SharePoint. Not only can you view Excel workbooks in the browser, but you can also create and modify them with no need for the client to be installed on your workstation.PerformancePoint ServicesPerformancePoint Services is BI’s best friend. This lets you utilize KPI’s to create reports and dashboards, allowing you to effectively monitor all aspects of your business. If business analysis is essential to your company, you’ll want to use PerformancePoint Services.InfoPath Forms ServicesInfoPath Forms is a great tool for creating forms and uploading them to your SharePoint site. For example, are you tired of manually filling out expense reports and faxing them to your Human Resource department? Creating an InfoPath form will allow your employees to simply fill out an expense report directly from your SharePoint site and submit them to HR immediately. In other words, any paper form can easily be converted to an electronic form using InfoPath services.Enhanced Search CapabilitiesIf you are using SharePoint 2019 Enterprise edition, you have the ability to provision FAST Search. FAST Search turns your SharePoint search results into Google-esque (err…Bing-esque) search results. Below are features (provided by Microsoft) that primarily only come with FAST Search:
- Advanced Content Processing
- Advanced Sorting
- Contextual Search
- Deep Refinement
- Extensible Search Platform
- Extreme Scale Search
- Rich Web Indexing
- Similar Results
- Thumbnails and Previews
- Visual Best Bets
AWS
Installation Instructions for Windows
Step 1) RDP Connection: To connect to the deployed instance, Please follow Instructions to Connect to Windows instance on AWS Cloud
1) Connect to virtual machine using following RDP credentials :
- Hostname: PublicDNS / IP of machine
- Port : 3389
Username: To connect to the operating system, use RDP and the username is Administrator.
Password : Please Click here to know how to get password .
Step 2) Application Access Instructions:-
Note : Users need to reach out to us for CAL license providing number of CAL required.
If you face any issue in running this image or activating license, Please reach out to support@secureanycloud.com.
- Sharepoint Server has already been installed.
- Sharepoint configuration should be completed by the user.
- Please join a domain and have a SQL Server instance ready before starting the Sharepoint Configuration.
1. Default Login Credentials for SharePoint Access are same as your RDP Credentials,
- User Name: Administrator
- Password: Retrieved from Console
Step 3) Other Information:
1.Default installation path: will be in your root folder “C:\Program Files\Common Files\microsoft shared\Web Server Extensions\14\BIN”
2.Default ports:
- Windows Machines: RDP Port – 3389
- Http: 80
- Https: 443
Configure custom inbound and outbound rules using this link
Installation Step by Step Screenshots
Step 1. Open SharePoint 2019 Application using desktop icon
Step 2.Welcome Page sharepoint. Click on Next to Create a new server farm

Step 3. Select Create a new server farm option from the given options, if you are already have installed a new farm and doing a MinRole installation then select the first option to connect an existing server farm.

Step 4.Enter the database server details and database access account details, use a separate user for this but we are using the same SPAdmin user for the preview installation. I have assigned it below rights in DB server:
- Dbcreator
- SecurityAdmin
- SysAdmin

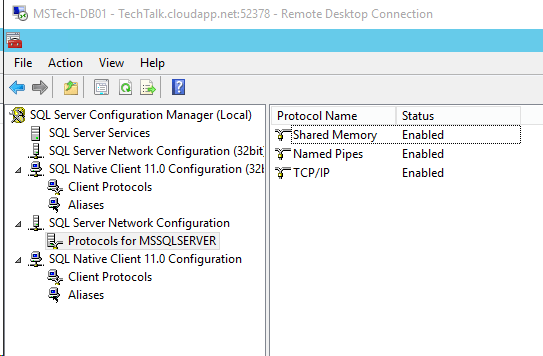
Step 5. If you are facing problem in connecting SQL Server then make sure TCP/IP is enabled in SQL Server Configuration Manager. If you are still getting an error then turn off the firewall in SQL server machine.

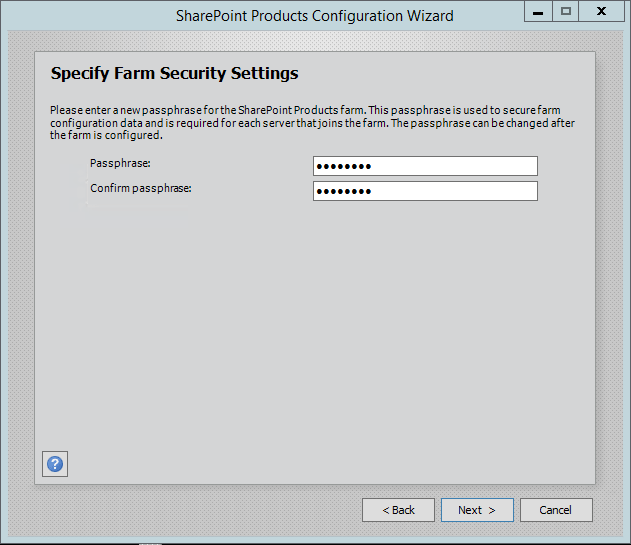
Step 6. After completing the database settings, press next which will take to you on Farm security settings page. Enter passphrase here which is required to secure the farm configuration data and is required for each server that joins the farm.
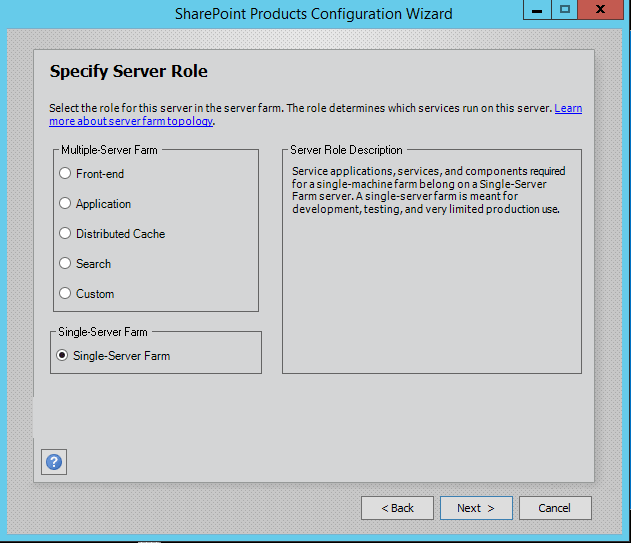
Step 7. Server Roles or the MinRoletopology
Here comes the MinRoles, SharePoint Server
2019 has six types of server roles:
- Front-end
- Application
- Distributed Cache
- Search
- Custom
- Single-Server Farm
You can either select single-server farm or can do a multi-server installation using MinRoles topology. If you have selected Single-Server Farm then you cannot extend to Multi-Server environment, so if you plan to extend to multi-Server farm in future then select the Custom MinRole or Application.
I am using single-server farm installation so will go with the last option.
Step 8.On next screen, you can specify port for Central Admin or can use the default which is selected randomly. we have never used the default port, we always use an easy one which I can remember like 5555. Select NTLM installation mode at this phase and press next.

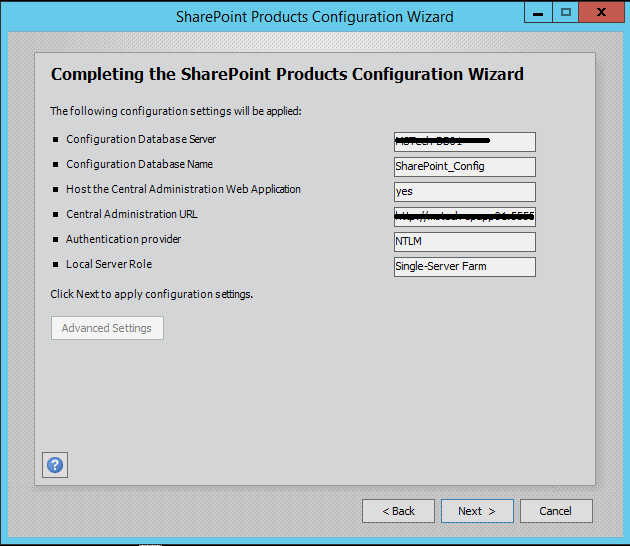
Step 9. Verify the settings in configuration wizard, press next to start the wizard. Advance option is not enabled for Single-Server installation.
Step 10. Press Next button, it will start the configuration of SharePoint farm. This is similar to what we do in past with MOSS 2007, SharePoint
2019 and SharePoint 2013 or even with SharePoint Foundation which is no more part of SharePoint 2016.
Step 11. The wizard would take some time and if you get some error then you have to verify the roles of the user in SQL Server.


Step 12. After the installation, run the services wizard from Central Administration, setup will take you to the service configuration wizard page, you can either configure them through wizard and can also configure them manually.
Step 13. As this is test environment, so we will prefer configuring services using wizard. We can define a separate account for services but I am using the same SharePoint Admin account for all services.
Step 14.This will complete the services wizard for us and now we are ready to use SharePoint.


Installation Instructions for Windows
Step 1) VM Creation:
- Click the Launch on Compute Engine button to choose the hardware and network settings.
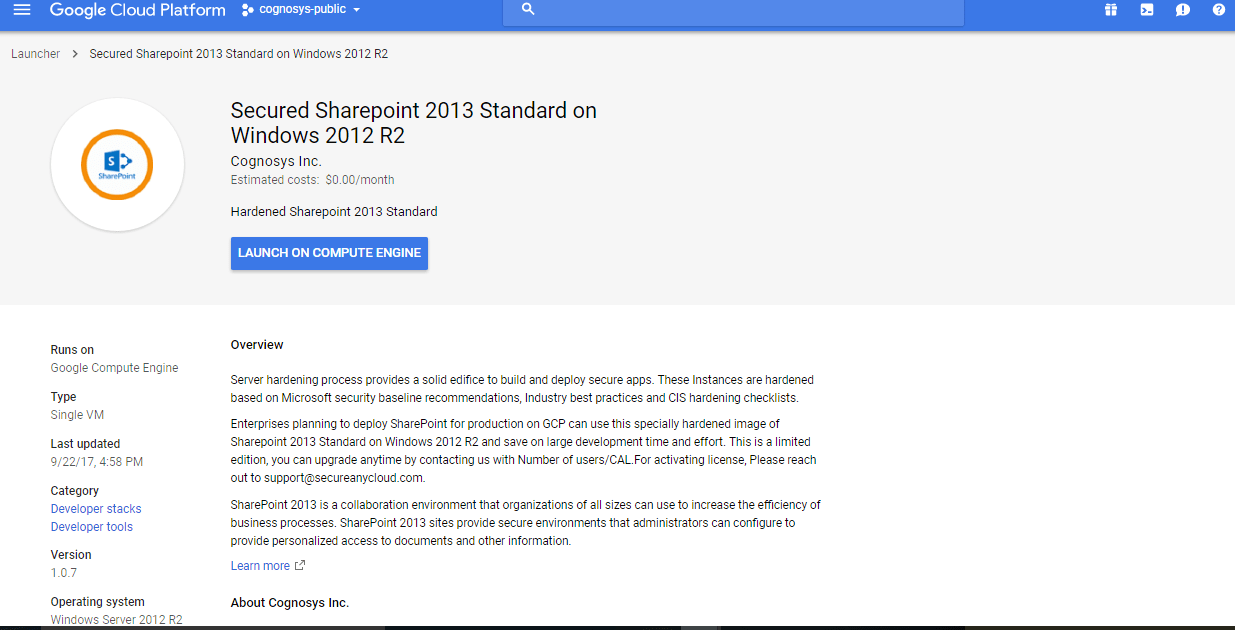
2. You can see at this page, an overview of Cognosys Image as well as some estimated costs of VM.
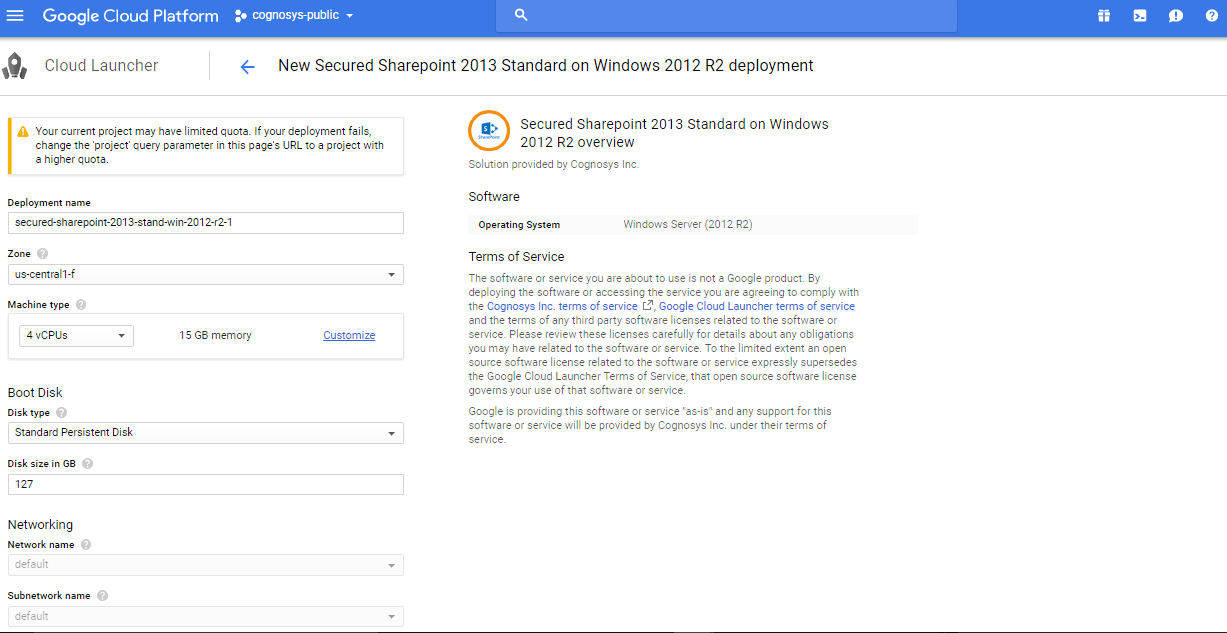
 3.In the settings page, you can choose the number of CPUs and amount of RAM, the disk size and type etc.
 Step 2) Application Access Instructions:-
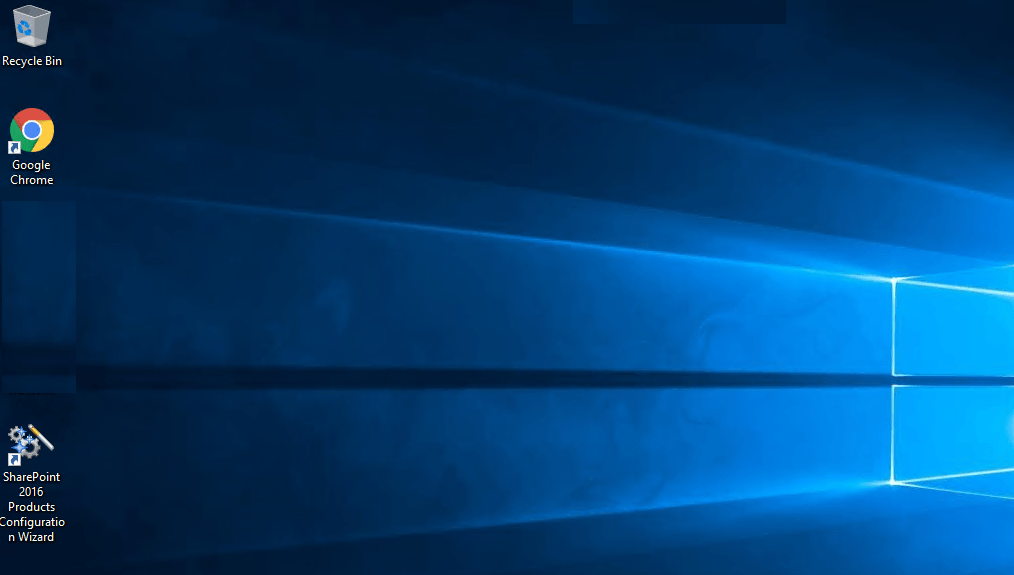
Click the Windows “Start” button and select “All Programs” and search for Sharepoint
Step 3) Other Information:
1.Default ports:
- Windows Machines: RDP Port – 3389
- Http: 80
- Https: 443
Installation Step by Step Screenshots
Step 1. Join the Computer to Active Directory and with Domain login open SharePoint Product Configuration
Step 2.Welcome Page SharePoint
Step 3.Select Create a new server farm option from the next step as shown in below screen if you are already have installed a new farm and doing a MinRole installation then select the first option to connect to an existing server farm.
Step 4.Enter the database server details and database access account details, use a separate user for this but I am using the same SPAdmin user for the preview installation. I have assigned it below rights in DB server:
- Dbcreator
- SecurityAdmin
- SysAdmin

Step 5.If you are facing issues in connecting to SQL Server then make sure TCP/IP is enabled in SQL Server Configuration Manager. If you still getting the error then turn off the firewall on SQL server machine.
Step 6. After completing the database settings, press next which will take to you on Farm security settings page. Enter passphrase here which is required to secure the farm configuration data and is required for each server that joins the farm.
Step 7. Server Roles or the MinRoletopology
Here comes the MinRoles, SharePoint Server 2016 has six types of server roles:
- Front-end
- Application
- Distributed Cache
- Search
- Custom
- Single-Server Farm
You can either select single-server farm or can do a multi-server installation using MinRolestopology. If you have selected Single-Server Farm then you cannot extend to Multi-Server environment, so if you plan to extend to multi-Server farm in future then select the Custom MinRole or Application.
I am using single-server farm installation so will go with the last option.

Step 8.On next screen, you can specify the port for Central Admin or can use the default which is selected randomly. I have never used the default port, I always use an easy one which I can remember like 5555. Select NTLM installation mode at this phase and press next.
Step 9. Verify the settings in configuration wizard, press next to start the wizard. The advance option is not enabled for Single-Server installation.
Step 10. Press Next button, it will start the configuration of SharePoint farm. This is similar to what we do in past with MOSS 2007, SharePoint 2010 and SharePoint 2013 or even with SharePoint Foundation which is no more part of SharePoint 2016.

Step 11. The wizard can take some time and if you get some errors then you have to verify the roles of the user
Step 12. After the installation, run the services wizard from Central Administration, setup will take you to the service configuration wizard page, you can either configure them through the wizard or you can also configure them manually.
Step 13.As this is test environment, so I will prefer configuring services using the wizard. We can define a separate account for services but I am using the same SharePoint Admin account for all services.
Step 14.This will complete the services wizard for me and now I am ready to explore SharePoint.


Videos
Embedded media removed during static cleanup.
