1-click AWS Deployment 1-click Azure Deployment
Overview
SharePoint is a cloud-based platform that facilitates easy sharing of files and documents along with a multitude of other features. With a plethora of options including libraries, databases, discussion boards, calendars, tables, and other file-sharing services. SharePoint can be easily configured to suit your needs which makes it a platform that is easy to use and customize. The uses of Sharepoint include:
- Collaboration: It is a comprehensive platform for teams to be able to work together. That is, in SharePoint, it is possible for multiple people in a team, who may be a part of a team site, to work together on one document, list, etc. It is intended for intensive collaborative work.
- Interoperability: It enables computer software to exchange data or information. Since this is a cloud-based platform, all web-integrated information can be shared and used across different computer systems.
- Platform: The developer tools and cloud integration provide the platform for collaboration and interoperability.
Sharepoint Types and Versions
Sharepoint has a twin benefit of being available as an on-premise version as well as an online, cloud-integrated version. The on-premise version has two types; SharePoint Foundation and SharePoint Server. Office 365 is the cloud-integrated, fully online version of SharePoint.
SharePoint Foundation
SharePoint foundation has the basic features for collaboration. It is a secure and manageable platform. It has free shipping and can be downloaded to install. Its features include collaboration, security and administration, and apps such as documents, lists, etc. These core features help users get started with SharePoint. It is based around primarily document management and collaboration to enable better communication within teams. Some of its benefits include:
- Centralisation of information that teams need to access
- It is available as free downloaded software for Windows users, which means that the cost of implementation and use is very low
- It secures all business data
- Customizing and expanding SharePoint Foundation enables web collaboration.
It consists of the foundational features of SharePoint and is a user-friendly platform for collaboration.
SharePoint Server
This is essentially an upgrade from the SharePoint Foundation platform. It provides some advanced features apart from the core features available on the Foundation version. The advanced features of the SharePoint Server are as follows.
- Advanced search: It allows users to create customized search pages with customised results.
- Web content management: With SharePoint Server, you can create and publish content on the internet.
- Enterprise services: Allows you to make solutions with tools available among Office products.
- Business connectivity services: Users can access external data sources and publish business data using web parts, user profiles, or lists.
- Social networking and computing.
Support for managing content and records
Office 365
This is essentially the online version of SharePoint.
- It provides licenses based on number of users, nature of content, etcetera.
- Allows app development without having to pay on-premise costs.
- It has development capabilities.
- It is possible to build .NET, HTML5 or JavaScript applications on this platform.
- It is customizable.
Key Features of SharePoint
- SharePoint makes it possible for multiple people to work within a team. You can work on a single document at the same time from different locations.
- Being a cloud-based facility, all web integrated information can be shared and accessed across different computer systems.
- One does not have to bother about investing memory space in order to be able to access or edit any documents. All the tasks can take place online on the same platform.
Here is an easy guide to exploring all the facets of SharePoint describing how it can be used in different contexts.
The first thing to think about is what version of the software you will be using.
There are different versions available and you need to choose the one that suits your requirements. There is an on-premise version as well as on online, or cloud-integrated version. Now, you need to consider the network availability for a strong internet connection before opting for any of the two. Both versions have their own benefits. The online version can make things a lot easier for use provided that internet is not a problem. There can be an immediate update of all progress within the group. However, if this is not needed for your project or business, and internet availability happens to be a problem, then one might want to consider the offline features.
Layout and Navigation:
- One needs to navigate the team site.
- For this, start with launching, open your preferred choice of a browser, and then type the address of your team site in the browser.
- The top link bar can be used for navigating.
- The title name will show which tea site you are on currently.
You can navigate between the parent site and a created child site by using Quick Launch. This is the section where you can use any documents from the quick launch menu. The idea is to be able to swiftly move from one zone to another within the site. The home page can be accessed as well along with the setting for your user profile. These features are usually related with the initial setting up of the team and its requirements. Once this is sorted out, one can focus on the more specific features and functions.
Capabilities
Some of the capabilities of the application involve the following:
- Access services
- Compliance features
- Customized web parts
- Document library accessibility
- Durable links
- Encrypted connections
- Fast site collection creation
- Expanded support for special characters in file names
- Hybrid (integration of on-premise with online)
- Identify and search for sensitive content
- Image and video previews
- Information rights management
- Large file support
- MinRole
- New features in November 2016 Public update
- New controls for working with OneDrive for business
- Recycle bin for Onedrive and Team sites
- Open document format
- Project server
- ReFS file system support
- SharePoint Business intelligence
- SharePoint Search
- Sharing improvements
- Site folders view
- Sites page pinning
- SMTP Connection Encryption
- SMTP non-default ports
- Web Application Open Platform Interface Protocol
Key features of Sharepoint and their functionality
Now, it is important to understand the features and their benefits for the team as a whole. The general areas of concern of some of the key features are described below:
- Sites: This is where you can collaborate on and create, store and retrieve data. Content management, tagging searching, documentation and information all take place here.
- Content: You can find, explore and manage content here. Web, pages, apps, workflow or content types help with this.
- Search: This allows you to search for content within SharePoint.
- Insights: This represents business intelligence features such as key performance indicators.
- Communities: This is the social feature that facilitates communication.
- Composites: This represents the capability to integrate external services, for example, by business connectivity services.
SharePoint Farms and SharePoint Architecture Workflow:
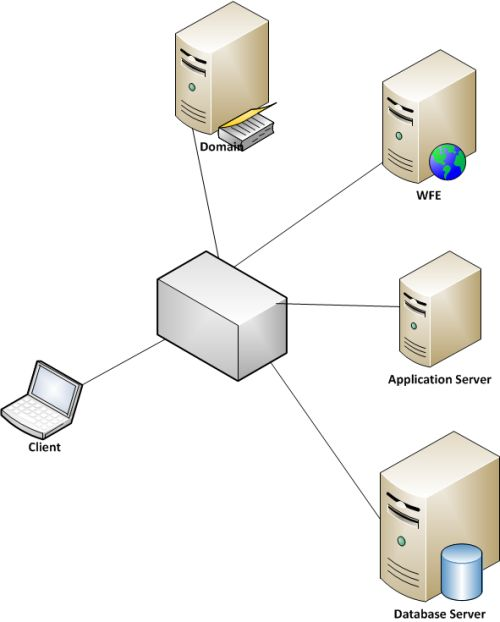
In layman’s terms, SharePoint farms are a collection of servers that work together to deliver a service to support a site. There are three types of servers: web front ends (WFEs), application servers, and database (SQL) servers.
Web Front End Servers
Web Front End Servers (WFEs) handle web page requests from users. This means that each time a user opens a SharePoint page in a browser, it’s processed by a WFE server. If there are multiple WFE servers, a Network Load Balancer is put in place to distribute requests between them. This enables organizations to scale their SharePoint environments as needed; the more users you have, the more WFE servers you will need to handle the workloads as the environment and user needs grow.
Application Servers
An Application Server is a computer that provides key infrastructure and services for applications that are hosted in an organization’s SharePoint farm(s). This usually means that the server has been assigned to run applications such as Excel, PowerPoint, Visio, Access services, or Index/Search services.
Database Servers (SQL)
SQL Server is a database server that implements Structured Query Language (SQL). This language is specifically designed to handle data in a relational database management system—in this case, a SharePoint farm.Now that you know how SharePoint collections work together, it’s time to dive into the difference between single farms and multiple farms!
Single Farm vs. Multiple Farms
A single farm is made up of a group of servers that come together using a tiered model to provide services and content. In SharePoint’s case, this single farm environment is made of WFEs, Application Servers, and SQL Database servers. With a single farm you will have a strong foundation of services and as many databases, web applications, and site collections as needed for your organization!
On the other hand, multiple farms are made of services farms, My Site farms, and content farms that only perform certain functions or services. This architecture enables organizations to have specific services to provide for business needs based on scalability, function, and policy requirements.
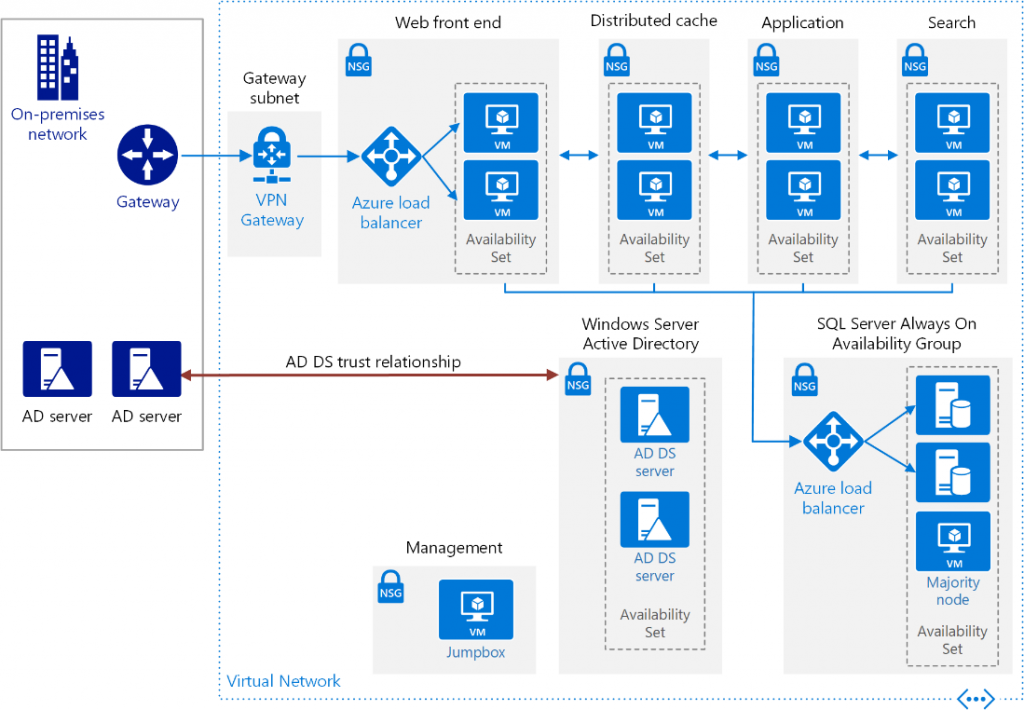
For an organization that is using a multi-farm architecture, the expectation would be to have multiple administrators handle those different farms. This is necessary if you’re in an organization that has multiple county departments or regions with their own unique policies that need to be adhered to. As such, a multi-farm architecture approach should be used when necessary despite its added complexity. The environment requires more mindful administration and control of multiple environments, after all.
For example, if the ACME corporation has regional offices in different countries, they may need to adhere to any country-specific data sovereignty laws if it’s collecting, managing, or generating data.
In response to this, the ACME corporation could create multiple farms that are geo-specific and built to technically comply with the regulations placed in each country while still providing the entire corporation with a unified approach to managing their SharePoint environment for end-users. This will facilitate ACME’s adherence to region-specific policy and regulations–including any data sovereignty requirements–while maintaining a unified “singular” SharePoint user experience for ACME employees.
SharePoint – Development Tools
the different levels of “development” concerning SharePoint. Each level serves the end user of the SharePoint site in some way. You can divide this spectrum into the following −
- End users − who use the platform as an application platform.
- Power users − who create and administer (and maybe brand) sites.
- Designers − who brand the site and build the user experience.
- Developers − who build and deploy apps.
A range of people interacts with SharePoint from the developers to the end users. It is represented in the following figure

Site Settings
Site Settings is one of the main parts of SharePoint. It is very important that we need to be familiar with it.
Step 1 − To access the Site Settings page, click User Profile in SharePoint Admin center. Click the option Setup My Site under My Site Settings.
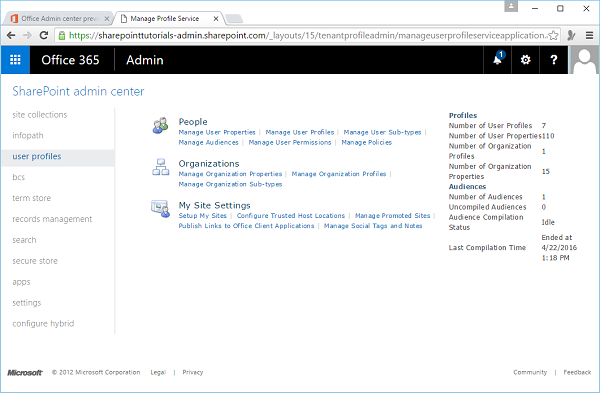
The following page will open.
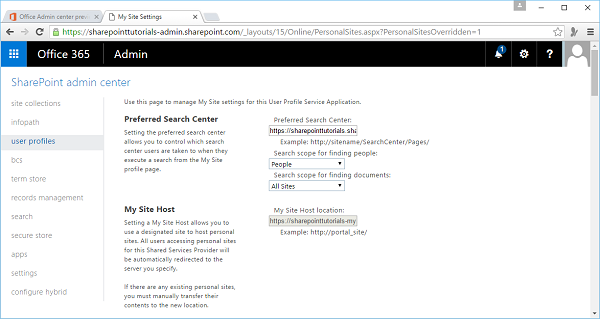
You will find most of the configurations for your site on this page such as −
- Change the theme of your site.
- Activate features.
- Manage permissions.
Step 2 − Some settings options are also available in the Settings. So click the Settings in the left pane.

Note that the core features of the Site Settings page are split into major categories. For example, most of your security settings are available to you in the Users and Permissions category, theming in Web Designer Galleries, and so on.
Add HTML page
The editing experience ranges from formatting text to adding images or multimedia. You can get a little more into the code by embedding HTML directly within your SharePoint site.
This task feels a little more like development, so let us have a look at a simple example by adding an HTML page.
Step 1 − Open your SharePoint site and navigate to the home page of the site. On the Page tab, click the Edit menu option.
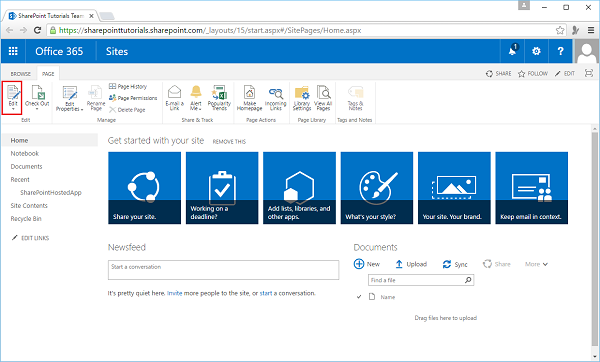
Step 2 − On the INSERT tab, click the Embed Code option.
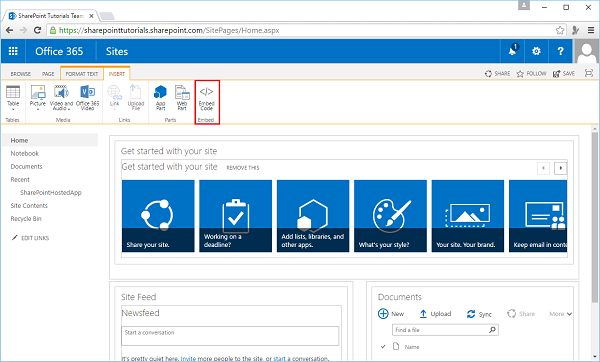
The following dialog box will open −
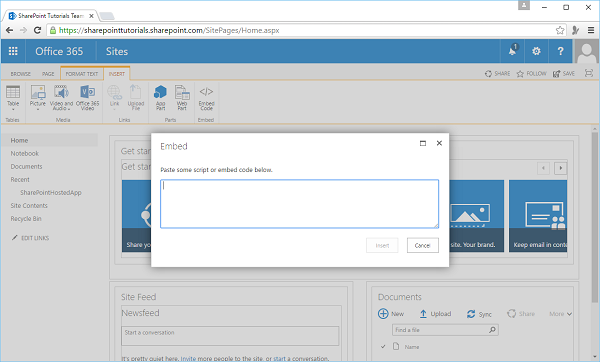
Step 3 − Add some HTML code into the code field as shown below −
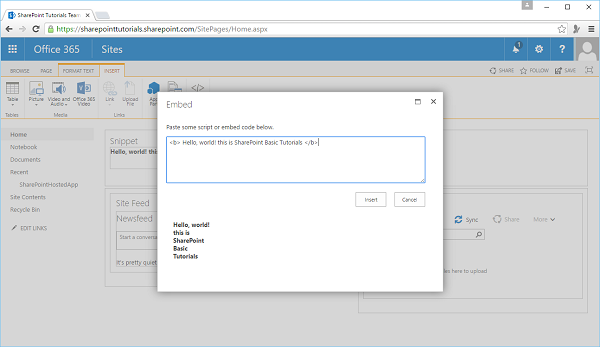
Step 4 − Click Insert and you will see that the HTML snippet is inserted.

Step 5 − Click Save.
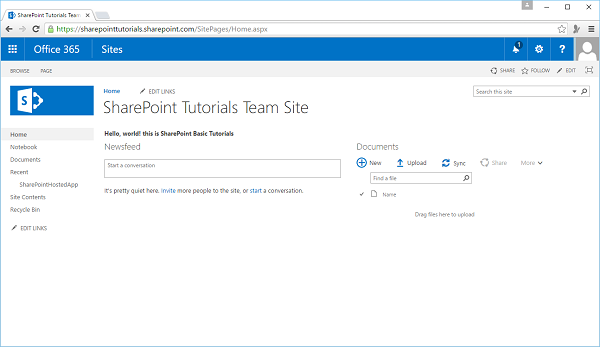
You can see that the HTML code is inserted in your SharePoint site.
Add Media file
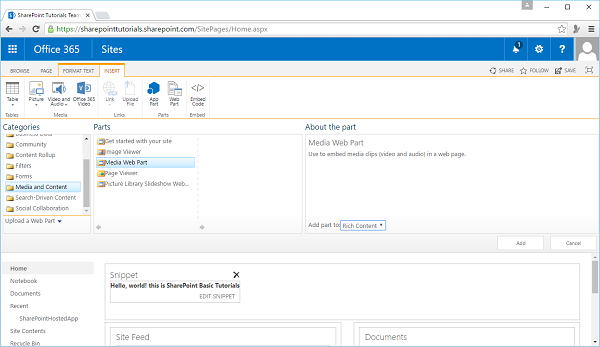
To add a Media Player app to your SharePoint site, open your SharePoint site and navigate to the home page of the site.
Step 1 − On the Page tab, click the Edit menu option.
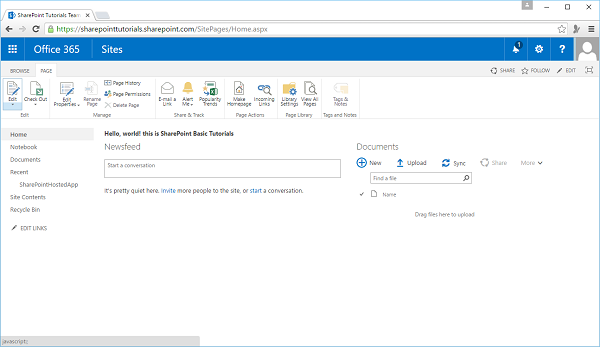
Step 2 − Select the Web Part option.
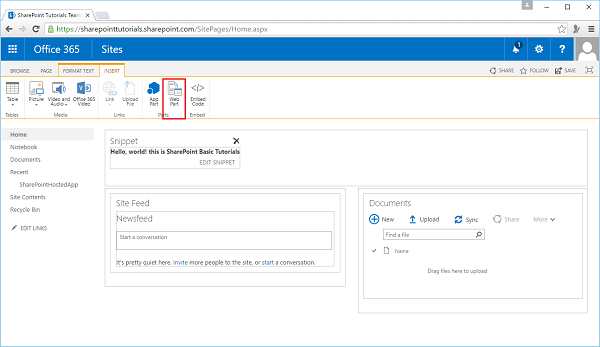
Step 3 − Select the Media and Content from Categories and select the Media with Parts from the Parts section. Click Add.
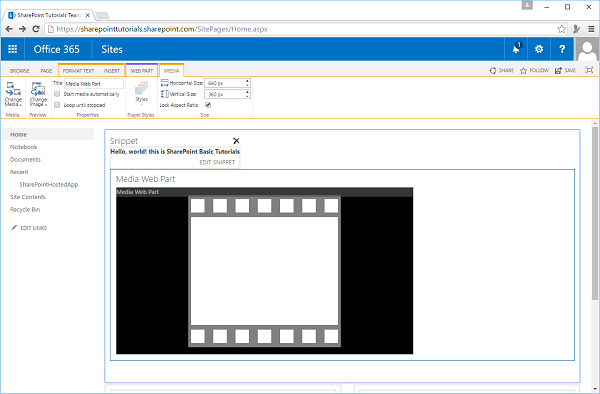
Step 4 − Save the page and you will see the following page, which contains the Media file.
SharePoint Designer
Many developers prefer not to use SharePoint Designer as a tool for developing SharePoint site. However, the point is that the SharePoint Designer tool can make some development tasks easier.
The important features are −
- SharePoint Designer can be used for a variety of designer functions for SharePoint, including creating and editing sites, pages, lists, and content types.
- SharePoint Designer is also useful for creating rules-based, declarative workflow that can then be imported in Visual Studio for deeper-level customization.
- It can be downloaded and installed from microsoft website.
- When you first open SharePoint Designer, you need to provide it with the URL for your SharePoint site and authenticate as an elevated user.
- SharePoint Designer inherits standard SharePoint permissions.
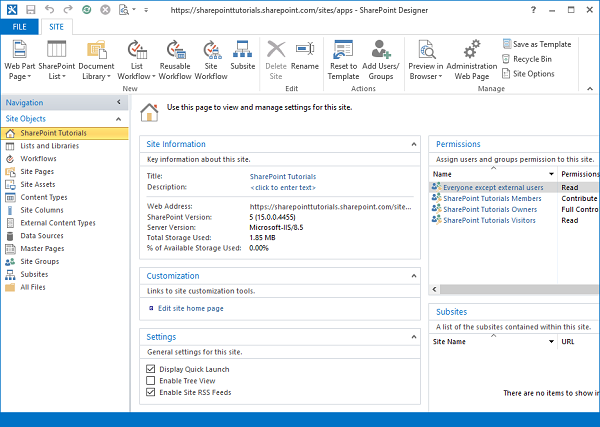
- After you open your site in SharePoint Designer, a number of navigable options and some information about your site appear, such as site metadata, permissions, subsites etc.
So let us use the SharePoint Designer, but first we need to setup SharePoint Designer using the Office 365 by opening your SharePoint site.
Step 1 − Open the SharePoint site.
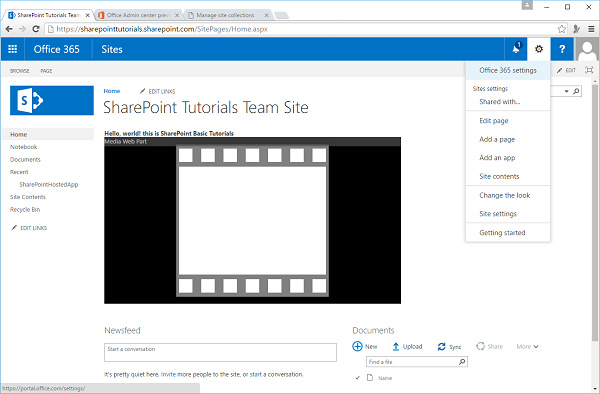
Step 2 − Select Office 365 Settings menu option. Select Settings in the left pane and then select the software in the middle pane.
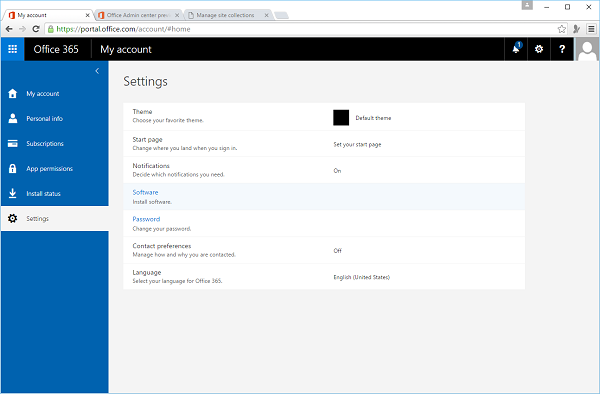
Step 3 − Select Tools & add-ins in the left pane and you will see the different options. In the end you will see SharePoint Designer Option, click the link.
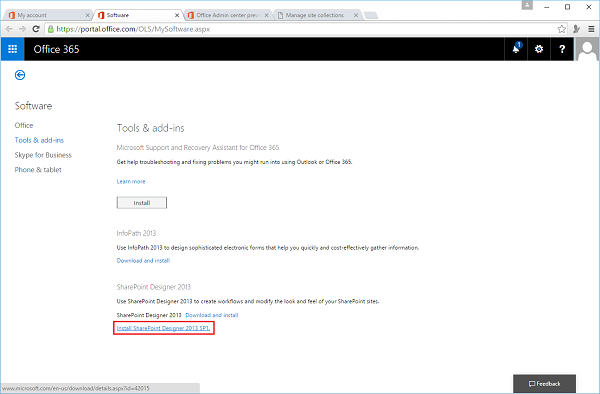
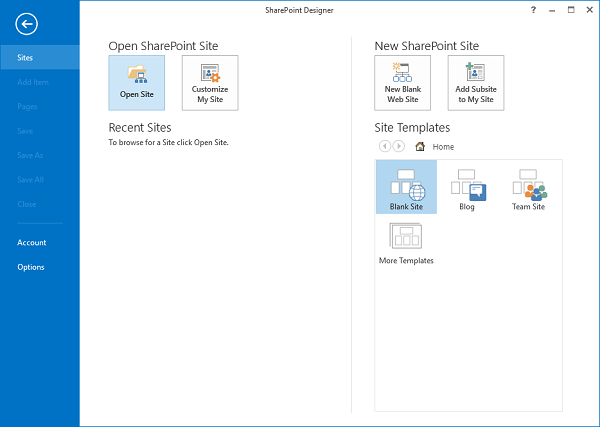
Step 4 − Open the SharePoint Designer after installation. Click the Open Site option.
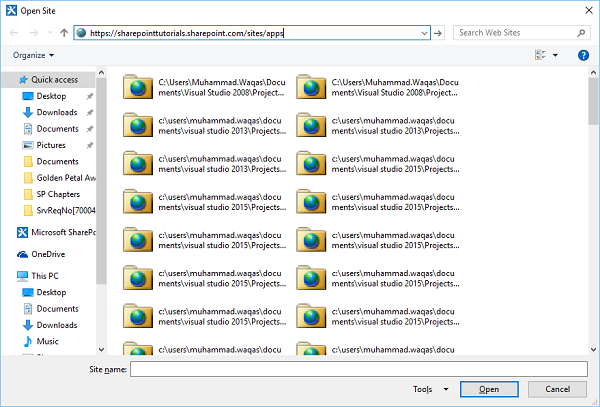
Step 5 − Specify the URL for your SharePoint site and click Open.
Step 6 − Once the SharePoint Designer site is open, you will see that different options are available.
Step 7 − Click SharePoint Lists on the Ribbon and select Tasks from the menu.
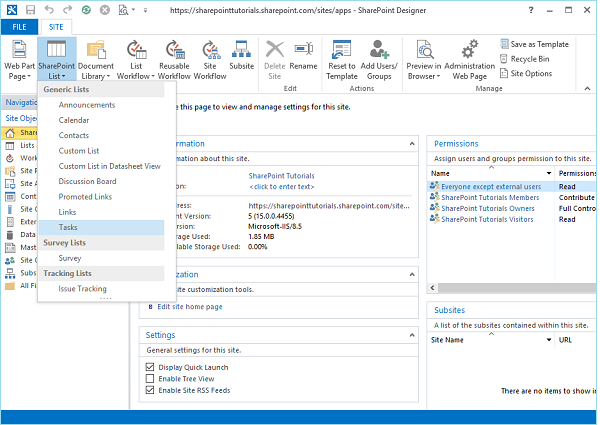
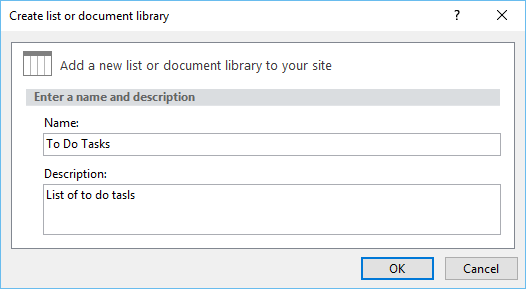
Step 8 − A new dialog box opens. Specify the name and description and click OK.
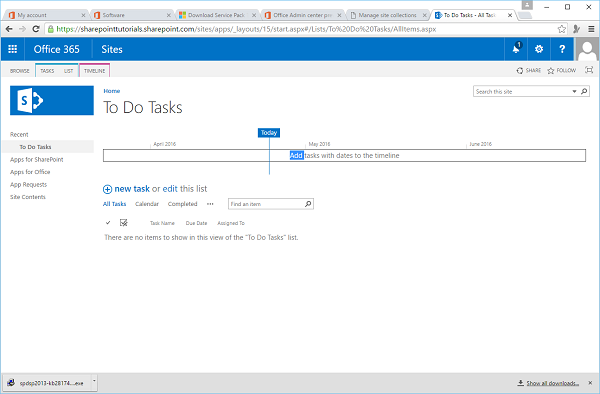
Step 9 − Let us go the same site, using the portal and you will see the To Do list in your site.
Creating Apps Using List Templates
In SharePoint 2016, lists are created by creating Apps. The out-of-the-box Apps you can create include both lists and libraries. The primary difference between lists and libraries is that libraries always store a document with each item, such as a Word document or Excel spreadsheet. Libraries will be covered in a separate lesson in this course.
To create a list App you first select a list template as a starting point for your list. List templates define the characteristics of a list when used to create a new list. The characteristics defined by list templates include the column types, views, and forms for editing and viewing list data.
There are many factors that define the list templates available to a site such as the version of SharePoint and the features that have been enabled in the farm, site, and site collection. New list templates can be easily added to a site so the list templates choices can vary between different SharePoint installations and even sites within a single installation.
The following is a list of some of the default list templates available in an out-of-the-box SharePoint team site.
- Links
- Announcements
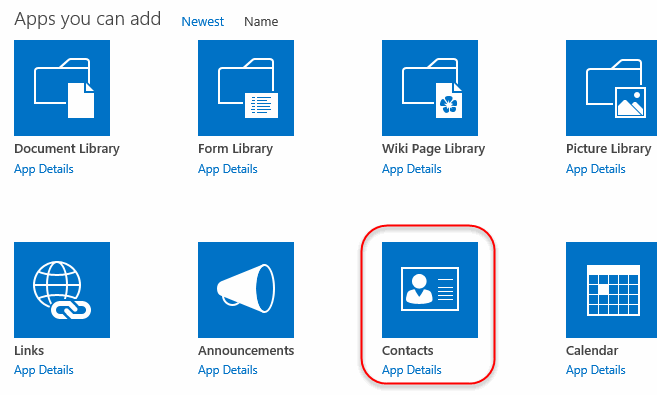
- Contacts
- Calendar
- Discussion Board
- Promoted Links
- Tasks
- Issue Tracking
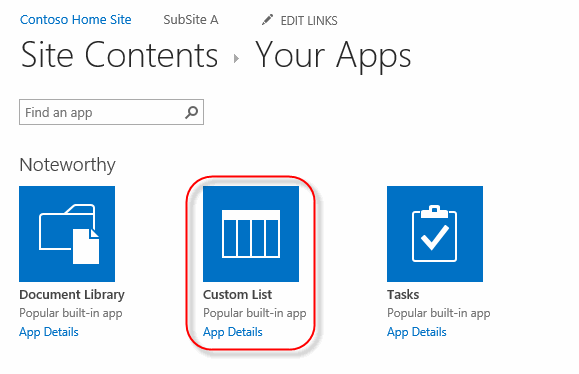
- Custom List
- External List
- Survey
Creating Lists
Creating Lists Using List Templates
The following walk-through will show you how to create new lists using some of the standard out-of-the-box list templates.
All of the lists in this demonstration are created in the Contoso Home Site.
- Create an instance of a Contacts list.
- Click the Settings menu and then choose the Add an app menu item.

- Scroll down the list of Apps templates and locate and click the Contacts template link.

- Enter “Contoso Contacts” in the Name field and click the Create button.

Naming Conventions: Many website administrators feel strongly about not using spaces when naming a list, library, or new site. The reason for this is that the spaces will be replaced with “‘%20” characters in the URL. This can make the URL difficult to read and links can become convoluted. The title of the list, library, or site can always be changed after they are created using the properties pages that will be covered in a later part of this course. This will change what is displayed but not affect the URL. For simplicity and readability, the exercises and walk-throughs in this course often include the space in the name and accept the fact that the URL will have the “%20” replacement characters.
- Note that Contoso Contacts are now displayed in the Quick Launch menu under the Recent heading as well as listed on the Site Contents page.

- Click the Settings menu and then choose the Add an app menu item.
- Add a permanent link to Contoso Contacts in the Quick Launch menu.
- Click the Contoso Contacts link under the Recent heading in the Quick Launch menu.
- Click the List tab to navigate to the List Toolbar.

- Click the List Settings link button on the List tab toolbar.

- Click the List name, description and navigation link on the list settings page.

- Click the Yes radio button to add Contoso Contacts to the site’s Quick Launch menu and click the Save button.

The Name field is where you would change the name of the list or library without affecting the URL.
- Note that Contoso Contacts now shows on the site’s Quick Launch menu as a root-level item.

- Create a new contact item in the Contoso Contacts list.
- Click the Contoso Contacts link in the Quick Launch menu.
- Click the new item link within the Contoso Contacts list.

- In the Contoso Contacts – New Item form, use the following table to fill in the fields and click the Save button. Note that only the Last Name field is required.
Field Data Last Name Simpson First Name Marge Full Name Marge Simpson E-mail Address Marge@Contoso.com Company Contoso
- Create an instance of a Discussion Board list.
- Click the Settings menu and then choose the Add an app menu item.

- Scroll down the list of Apps templates and locate and click the Discussion Board template link.

- Enter “Contoso Discussion” in the Name field and then click the Create button.
- Note that you could optionally add Contoso Discussion as a permanent link in the Quick Launch menu as you did with Contoso Contacts.
- Click the Settings menu and then choose the Add an app menu item.
- Create a new discussion in the Contoso Discussion list.
- Click the Contoso Discussion link in the Quick Launch menu and click the new discussion link in the main view of the list.

- In the new discussion form, enter “SharePoint 2016 Features” for the Subject field.
- Click inside the Body field. Note that the discussion form now has a toolbar at the top with two tabs Format Text and Insert.
- Inside the Body field type the following text:Among the many SharePoint 2016 features the following are some of my favorites:BrandingMobile devicesSearchWeb content management
- Highlight the list text Branding, Mobile devices, Search, and Web content management and then click the Numbering icon on the Editing Tools Format Text tab toolbar.

Note the Question check box. When this is checked, it is used as a filter for an Unanswered Questions view. Views will be covered in a later part of this course.
- Click the Save button to save it to the list.
- Click the Contoso Discussion link in the Quick Launch menu and click the new discussion link in the main view of the list.
- Read and reply to the new discussion in the Contoso Discussion board.
- Click the new discussion subject SharePoint 2016 Features link inside the Contoso Discussion list.

- Click the Add a reply text within the text box to create a reply to this post.

Normally a different user would be replying to a new discussion item, but this walk-through uses a single account.
- Type the following text in the body of the reply text box and click the Reply button:
From the list my top favorite is Branding.
- Note that the reply dialog form has the same editing toolbar as when you created the new discussion item.
- Verify that the reply now displays under the original.

- Click the new discussion subject SharePoint 2016 Features link inside the Contoso Discussion list.
List Columns
Creating List Columns
In this walk-through, you will learn to create a new list using the Custom List template and add various list columns to it. Although any SharePoint list can have custom columns added to it, the Custom List template creates a nice clean list to work with.
- Create a new list in your Team Site using the Custom List template.
- Click the Settings menu and then choose the Add an app menu item.

- Select the Custom List template from the list of available templates.

- Enter “Demo List” in the Name field and then click the Create button.
- Click the Settings menu and then choose the Add an app menu item.
- Add a new Single line of text list column to Demo List.
- Click the Demo List link in the Quick Launch menu under the Recent group.

- Click the List tab to open the lists toolbar.

- Click the Create Column button link in the List tab toolbar.

The Create Column button might not display the text next to the icon if your browser window is not wide enough.
- Enter “Favorite Food” in the Column name field and leave the default for The type of information in this column is: option field set to Single line of text.

- Note the Additional Column Settings region that allows you to set options for this Single line of text list column. Leave the options set to their defaults and click the OK button to complete creating the new list column.

- Click the Demo List link in the Quick Launch menu under the Recent group.
- Add a new Choice list column to Demo List.
- Click the Create Column button link in the List tab toolbar.
- Enter “Favorite Color” in the Column name field and change The type of information in this column is: option field to Choice.
- In the Additional Column Settings region, type some colors into the field labeled Type each choice on a separate line and change the Display choices using field to Radio Buttons. See the following image for some suggested colors to add:

Note the Display choices using options that include Radio Buttons and Check Boxes. The check boxes allows for multiple choices and the radio buttons provides an alternative display for single selections. The default Drop-Down Menu takes up the least amount of room if the column is included in a view. Views will be covered in a later part of this course.
- Click the OK button to complete creating the new list column.
- Add a new Date and Time list column to Demo List.
- Click the Create Column button link in the List tab toolbar.
- Enter “Birthday” in the Column name field and change The type of information in this column is: option field to Date and Time.
- In the Additional Column Settings region, change the Require that this column contains information option field to Yes and the Default value option field to Today’s Date.

- Click the OK button to complete creating the new list column.
- Add a new Person or Group list column to Demo List.
- Click the Create Column button link in the List Tools List tab toolbar.
- Enter “Who” in the Column name field and change The type of information in this column is: option field to Person or Group.
- In the Additional Column Settings region, change the Show field drop-down box to Work e-mail.

- Click the OK button to complete creating the new list column.
- Create a new custom list and add it as a Lookup list column to Demo List.
- Click the Settings menu and then choose the Add an app menu item.

- Select the Custom List template from the list of available templates.

- Enter “States” in the Name field and then click the Create button.
- Click the States link in the Quick Launch menu to navigate to the list.
- Click the Create Column button link in the List tab toolbar.
- Enter “Abbreviation” in the Column name field and set the Maximum number of characters text box under Additional Column Settings to “2”.
- Click the OK button to complete creating the column.
- Click the new item link in the States list.
- Enter “Florida” in the Title field text box and “FL” in the Abbreviation text box.
- Click the Save button to save the new States item.
- Repeat the previous steps to create the following States items:

- Click the Demo List link in the Quick Launch menu to navigate to the list.

- Click the List tab at the top of the list’s page to open the List toolbar.
- Click the Create Column button link in the List tab toolbar.
- Enter “Home State” in the Column name text box field and change The type of information in this column is option field to Lookup (information already on this site).
- In the Additional Column Settings region change the In this column drop-down box to Abbreviation and select the Title check box under the Add a column to show each of these additional fields field.

- Click the OK button to complete creating the new list column.
- Click the Settings menu and then choose the Add an app menu item.
- Set Demo List to permanently display in the Quick Launch menu.
- Click the LIST tab to open the toolbar.
- Click the List Settings button on the LIST toolbar.
- Click the List name, description and navigation link on the Settings page.

- Click the Display this list on the Quick Launch option to Yes and click the Save button.

- Create a sample item in the new Demo List to test the results of the custom columns.
- Click the new item link within the Demo List to create a new item.
- Use the data in the following image as sample data for the new Demo List item, change the Who field data to an account name that exists in your SharePoint installation.

For the Who field, you can optionally click a name from the drop-down list that SharePoint provides.
Column Validation
Validating a List Column
In this walk-through, you will learn how to enable validation on a custom list column. This walk-through will add validation to the Birthday list column added in the previous walk-through.
- Configure validation on the Birthday column within the Demo List.
- Select the Demo List from the Quick Launch menu if you are not already on the list.
- Click the List tab at the top of the list’s page to open the List toolbar.
- Click the List Settings button on the List tab toolbar to navigate to the list settings page.

- Click the Birthday link within the Columns region to navigate to the column settings page.

- Expand the Column Validation region within the column settings page and enter =[Birthday]<Today() in the Formula field and The birthday must be earlier than the current date. in the User message field.

The formula in this example will ensure that the user cannot enter a date that is the same as or after the current date.
- Click the OK button to save the changes.
- Test the new column for validation.
- Select the Demo List from the Quick Launch to navigate back to the main browse view of the list.
- Click the new item link within the Demo List to create a new item.
- In the required Title field, enter “Testing” and select a future date in the Birthday field.
- Click the Save button. You should get a validation error message similar to the following image:

If you did not get an error message, go back and check our column settings validation formula and make sure it was typed in correctly.
- Change the Birthday date field to a date earlier than the current date and click the Save button. The new item should be saved and displayed in the list.
Working with Team Site Lists
In this exercise, you will work with some of the default list templates in SharePoint 2013.
- Create a new Calendar list.
- Click the Settings menu and then choose the Add an app menu item.

- Scroll down the list of templates to locate and select the Calendar template from the list of available templates.

- Enter “Calendar” in the Name field and then click the Create button.
- Click the Settings menu and then choose the Add an app menu item.
- Add a permanent link to Calendar in the Quick Launch menu.
- Click the Calendar link under the Recent heading in the Quick Launch menu.
- Click the Calendar tab to open the toolbar.

- Click the List Settings link button on the Calendar tab toolbar.

- Click the List name, description and navigation link on the list settings page.

- Click the Yes radio button to add Contoso Contacts to the site’s Quick Launch menu and click the Save button.

Note the option to Use this calendar to share member’s schedule. The default is No, which makes the calendar events visible to everyone who has view permissions to the list. If you set the option to Yes, then events have an added option to invite attendees. Only attendees that have been invited by the person creating the event will see the event when they view the calendar.
- Note that Calendar now shows on the site’s Quick Launch menu as a root-level item.

- Create a Calendar entry.
- Click the Calendar link within the Quick Launch menu. This will take you to a special view of the calendar.
- Note how this calendar view has added a couple of new tabs to the top of the page next to the Browse tab. In addition, the Quick Launch has been modified with a tool that allows you to change the year and month being viewed.

- Click the Events tab to get the calendar’s toolbar to display.

- Click the New Event link button in the Events toolbar.

- Fill in the form with whatever values you like. You must enter values for the Title, Start Time, and End Time fields, These are required fields as indicated by the blue asterisks next to their labels.

- Click the Save button once you have finished filling out the form.
- Verify that the calendar displays with a shaded bar and event title across the days the new event is scheduled.
- Feel free to experiment by creating additional events in the calendar.
- Create a new Tasks list.
- Click the Settings menu and then choose the Add an app menu item.

- Scroll down the list of templates to locate and select the Tasks template from the list of available templates.

- Enter “Tasks” in the Name field and then click the Create button.
- Click the Settings menu and then choose the Add an app menu item.
- Add a permanent link to Tasks in the Quick Launch menu.
- Click the Tasks link under the Recent heading in the Quick Launch menu.
- Click the List tab to open the toolbar.

- Click the List Settings link button on the List tab toolbar.

- Click the List name, description and navigation link on the list settings page.
- Click the Yes radio button to add Tasks to the site’s Quick Launch menu and click the Save button.
- Note that Tasks now shows on the site’s Quick Launch menu as a root-level item.

- Create a new Task.
- Click the Tasks link within the Quick Launch menu. This should take you to a view of the tasks list.
- Note how this tasks list view has added a couple of new tabs to the top of the page next to the Browse tab.

- Click the Tasks tab to get the task list’s toolbar to display.

- Click the New Item link in the Task list’s toolbar to open the new task form.

- Click the SHOW MORE link in the form to open the view the additional task fields.

- Use the following table for information to fill in the new task form:
Field Data Title: Type “Complete lesson on creating SharePoint lists” Priority: Select (2) Normal Status: Select In Progress % Complete Type “50” Assigned To: Enter your account name here. Description: Type “Creating and working with SharePoint lists.” Start Date: Select (Date course started) Due Date: Select (Date course ends) - Click the Save button once you have finished filling out the form.
- Verify that the Task list displays with the new task you created. Feel free to experiment by creating additional tasks in the Tasks list.
Create Custom Lists and Columns
In this exercise, you will learn to create a new list from the Custom List template. In addition, you will learn to modify column properties as well as add new custom columns.
- Create a new list in your Team Site using the Custom List template.
- Click the Settings menu and then choose the Add an app menu item.

- Select the Custom List template from the list of available templates.

- Enter “Favorite Cars” in the Name field and then click the Create button.
- Click the Settings menu and then choose the Add an app menu item.
- Add custom columns to the new Favorite Cars list.
- Click the Favorite Cars list from the Quick Launch menu if it is not already selected.
- Click the new Item in the middle of the empty list main page. This will open a new list item.

- Do not enter anything at this time; just verify that the only field is the required Title field. Click the Cancel button to close the dialog form without creating a new list item.
- Click the List tab to open the lists toolbar.

- Click the Create Column button in the Manage Views section of the toolbar.

Note that the image is only showing a portion of the list’s toolbar due to space constraints. In addition, your web browser window’s width will affect the buttons displayed on the toolbar.
- Enter “Model” for the Column name field and leave the default Single line of text as the data type for the column.
 Take a few moments to read through the additional column settings, but the default values are fine for this exercise.
 - Click the OK button to create and save the changes to the new list column.
- Repeat the steps above to create two additional columns and use the following table for information about the new columns:
Column name Data type Top Speed Number Price Currency - Keep the default column settings for the new Top Speed and Price columns based on their data types. Take a moment to note that the different data types have different additional settings. For example, the Currency data type has a currency format selection.
- Rename the existing Title column in the Favorite Cars list to Make.
- Verify that the newly created Favorite Cars list is selected in your site’s Quick Launch menu. Select it if it is not.
- Click the List Settings button on the List tab within the Settings group in the toolbar.

- Take a moment to read through the list settings page. This page offers links to various list administration task links grouped by category. The group we are going to be working with is the Columns.

- Click the Title column link to bring up the column settings page. Note how using this page you can change various settings of the column based on the data type of the column.
- To rename this column, type over the text in the Column name field with the text “Make”.
- Click the OK button to save your changes and return to the list settings page.
- Verify that the old column Title has been renamed to Make in the column group.

- Click the Favorite Cars link in either the Quick Launch or the Site’s Breadcrumbs to navigate back to the browse view of the Favorite Cars list.

- Add some new Favorite Cars to the custom list.
- Click either the new item link within the list or the New Item button on the Items tab toolbar of the Favorite Cars list.

- The Favorite Cars new item dialog form will open with fields for the custom columns you added earlier.

- Enter the following values for new Favorite Car item and click the Save button to save the data back to the list.
Make Model Top Speed Price Bugatti Veyron SS 268 2,420,000.00 - To add multiple cars to the new Favorite Cars list, you can use the edit link to enter items in a spreadsheet type of view. You can use the following table for data to input but feel free to use your own “favorite cars” as well.
Make Model Top Speed Price SSC Ultimate Aero TT 257 654,500.00 Koenigsegg CCX 250 720,500.00 Saleen S7 Twin Turbo 248 597,000.00 McLaren F1 240 1,100,000.00 Ferrari 458 Italia 202 150,000.00 Ferrari 599 GTO 208 383,500.00 
- Compare your list to the following image:
 It should look the same or similar depending on whether you used your own “favorite cars” or not. Note the Price column is formatted as currency for you based on the data type you chose for that column.
 - Click the Stop link to exit the editing view.
- Click either the new item link within the list or the New Item button on the Items tab toolbar of the Favorite Cars list.
Adding Page Content through Sharepoint:
Wiki Library Pages
Editing the Team Site Home Page
This walk-through will show you how to edit the Home page of a team site. This walk-through will use the Marketing team site created in an earlier walk-through. Sites based on the Team Site template store their default Home page in the Site Pages library that is an instance of a wiki library. The walk-through explore some of the tools available to wiki pages by modifying the site’s Home page.
- Navigate to the Marketing team site in your browser.
- Remove the Get started with your site section from the home page.
- Click the REMOVE THIS link at the top of the Get started with your site section

- Click the OK button on the Message from webpage dialog asking you to confirm the removal.
- Note that you can still access the Getting Started tasks from the Settings menu at any time.

- Click the REMOVE THIS link at the top of the Get started with your site section
- Add an image to the home page of the Marketing site.
- Click the EDIT link located below the Settings cog icon.

- Click the INSERT tab to open the toolbar.

- Click the Picture drop-down link and choose From Computer in the list.

- In the Upload Picture dialog form click the Browse button to open the Choose File to Upload dialog window.

- Navigate to the course files folder and select the victory.jpg file. Click the Open button to complete the file selection.
- Click the OK button to complete the image upload. Note that the file will be loaded to the Site Assets library by default.
- Click the EDIT link located below the Settings cog icon.
- Change the layout of the Marketing site’s Home page.
- With the Marketing site’s Home page still in edit mode, click the Format Text tab to open the toolbar.

- Click the Text Layout drop-down button and select One column with sidebar from the menu of options.

- With the Marketing site’s Home page still in edit mode, click the Format Text tab to open the toolbar.
- Add text above the image added earlier.
- Hover and click just to the left of the image so that the insertion point is located right next to the image.

- Type the following text to the left of the image: Marketing Rules!

- Highlight the text we just typed, “Marketing Rules!” and click the Heading 1 option from the Styles area of the Format Text toolbar.

- Hover and click just to the left of the image so that the insertion point is located right next to the image.
- Add a link to the Site Assets list inside the new region below the heading from the previous steps.
- With the Home page still in edit mode hover and click to add your insertion point just below the “Marketing Rules!” text.

- On the new line type the following: [[. A menu will open after you type the second “[“, select List: from the menu.

- From the second menu, select Site Assets/ from the list.

- A matching set of “]]” should be automatically added to the end of what we entered in the previous steps. The completed link should look similar to the following image.

- Click the Save button on the toolbar to save your changes.

- Verify the wiki style link to Site Assets works by clicking it. It should take you to the Site Assets library.

- With the Home page still in edit mode hover and click to add your insertion point just below the “Marketing Rules!” text.
Web Part Pages
Creating a Web Part Page
This walk-through will show you how create a new Web Part page in a team site. This walk-through will use the Marketing team site created in an earlier walk-through.
- Open your browser if it is not already open and navigate to the Marketing site.
- Create a new Web Part page in the Site Pages library of the Marketing site.
- Click the Site Contents link the Marketing site’s Quick Launch menu.

- Click the Site Pages link on the Site Contents page.

- Click the FILES tab in the Site Pages library to open the toolbar.

- Click the New Document drop-down button and choose Web Part Page from the options menu.

- Type “MarketingInfo” in the Name field. Take a moment to read through the different options in the Layout list box as well as the options in the Save Location combo box.

- Select Header, Footer, 3 Columns in the Layout list box and change the Document Library to Site Pages as the choice for the Save Location. Click the Create button to complete the process.
- The new Web Part page will look similar to the image below. Note the regions within the page that are arranged based on the layout option you chose when you created the page and inside those regions are links that allow you to add Web Parts.

The next walk-though will show you how to add Web Parts into some of those regions.
- Leave the MarketingInfo page in edit mode for the next walk-through.
- Click the Site Contents link the Marketing site’s Quick Launch menu.
Working with Web Parts
Adding Web Parts to Pages
This walk-through will show you how to add Web Parts to the MarketingInfo Web Part page of the Marketing site. Due to the large number of Web Parts, this walk-through will only use a few of them but the basic use and properties are shared by all Web Parts.
- If the MarketingInfo page is not open, then open it from the Site Pages library in the Marketing site. The Site Pages library is not listed on the Quick Launch menu by default so to view it you can click the Site Contents link within the Quick Launch menu.
- Add a Content Editor Web Part to the Header region of the MarketingInfo page.
- With the MarketingInfo page open in edit mode, click the Add a Web Part link in the Header region.

- From the Web Parts list pane, select Media and Content under Categories and then select Content Editor from under Web Parts. Click the Add button to add the Web Part to the Header.

- Click the Click here to add new content link within the newly added Content Editor Web Part.

- Type “Marketing Information” inside the Content Editor Web Part.
- Highlight the text “Marketing Information” and click the Heading 1 style from the Styles group in the FORMAT TEXT toolbar.

- With the MarketingInfo page open in edit mode, click the Add a Web Part link in the Header region.
- Save your changes to the Web Part page.
- Click the PAGE tab in the toolbar.

- Click the Stop Editing button on the Page tab toolbar.

- Click the PAGE tab in the toolbar.
- Add an Image Viewer Web Part to the Header region of the MarketingInfo page.
- Before you add an Image Viewer Web Part, you need to add an image you can link to. Click the Site Contents link in the Quick Launch menu.

- Click the Site Assets link on the Site Contents page.
- Click the New link on the Site Assets page.

- Click the Browse button in the Add a document dialog.
- Navigate to the class files folder and select the formal-with-laptop.jpg file. Click the Open button to complete the file selection.
- Click the OK button to complete the upload process.
- Click the Site Contents link in the Quick Launch menu.
- Click the Site Pages link on the Site Contents page.
- Click the MarketingInfo link in the Site Pages library to open our Web Part page so you can add the Image Viewer to it.
- To edit the page, click the Page tab and select Edit Page from the toolbar.

- Click the Add a Web Part link above the Content Editor Web Part in the Header region.
- From the Web Parts list pane, select Media and Content under Categories then select Image Viewer from under Web Parts. Click the Add button to add the Web Part to the Header region.

- Click the open the tool pane link within the newly added Image Viewer Web Part.

- In the Image Viewer properties pane, type either the full path or the relative page to your Site Assets library and the “formal-with-laptop.jpg” image. In this walk-through example the root relative path is /sites/student/marketing/siteassets/formal-with-laptop.jpg, you can use the Test Link link to verify the path. Click the OK button at the bottom of the properties pane once you have verified the path.

- Before you add an Image Viewer Web Part, you need to add an image you can link to. Click the Site Contents link in the Quick Launch menu.
- Add a List View Web Part to the Middle Column region of the MarketingInfo Web Part page.
- Click the Add a Web Part link in the Middle Column region.

- From the Web Parts list pane, select Apps under Categories then select Site Assets from under Web Parts. Click the Add button to add the Web Part to the Middle Column region.

- Click the Add a Web Part link in the Middle Column region.
- Click the Stop Editing button on the PAGE tab toolbar to view the results.

- Remove the Image Viewer and Content Editor titles from their respective Web Parts.

- Click the Edit Page link on the Page toolbar.
- Hover the mouse cursor over the upper-right corner of the Image Viewer Web Part and click on the down-down arrow that appears. Select Edit Web Part from the drop-down menu.
- In the Image Viewer Web Part properties pane, expand the Appearance settings.

- In the expanded Appearance settings, click the Chrome Type drop-down field and select None from the list.

- Click the OK button at the bottom of the properties pane to save the changes to the Web Part.
- Repeat the previous steps to remove the title from the Content Editor Web Part.
- Click the Stop Editing button on the PAGE toolbar to see the results.
Working with Wiki Pages
In this exercise, you will add a new wiki page to the root parent site’s Site Pages wiki library. You will explore the editing tools by editing and adding content to the new wiki page.
- Create and edit a new page in the Site Pages library of your root parent site.
- Make sure you are on the Home page of the root site.
- Click the Site Contents link in the Quick Launch menu.
- Click the Site Pages link on the Site Contents page.

The Site Pages is a wiki page library created by default when the Team Site was created. It is also where the sites default Home page is located.
- Click the New link in the Site Pages library page.

- In the New Item form, enter “NewCEO” in the New page name field. Click the Create button to complete the process.

- Your browser will now be on the new blank page in edit mode. Take a few moments to familiarize yourself with the FORMAT TEXT and INSERT toolbars.

- Enter the following text into the new page, each on a separate line:New CEO of ContosoPlease Welcome Wilbur Whipple as the new CEO of Contoso.Wilbur’s achievements to date include:Masters degree from NYU
Former CEO of Intel
Retired Marine Sergeant
- Select and highlight the line “New CEO of Contoso” and click the Heading 3 option from the Styles options in the FORMAT TEXT toolbar.

- Select and highlight the three lines of Wilbur’s achievements, Master’s degree from NYU, Former CEO of Intel, and Retired Marine Sergeant. Click the Bullets button on the FORMAT TEXT toolbar in the Paragraph group.

- Click the Text Layout drop-down button on the FORMAT TEXT toolbar in the Layout group. Select the One column with sidebar option.

- Click in the upper-left corner of the new sidebar box to place your insertion bar at that point.

- Click the INSERT tab to open the toolbar.

- Click the Picture drop-down in the INSERT toolbar and select the From Computer option.

- In the Upload Image dialog form, click the Browse button to open the Choose File to Upload dialog window.

- Navigate to the folder you downloaded the class files to and select the ceo-wilbur.jpg file. Click the Open button to complete the file selection.
- Click the OK button to complete the image upload. Note that the file will be uploaded to the Site Assets library by default.
- The final formatted version of the wiki page should look similar to the following image.

Note that with the picture selected in the wiki page there is a new IMAGE toolbar tab for formatting the picture on the page.
- Click the PAGE tab and then click the Save button to save your wiki page edits back to the Site Pages wiki library.

- Edit the Home page of Contoso Home Site and add a link to the new CEO wiki page.
- Click the Contoso Home Site link in the Top Link Bar to navigate to the Home page of Contoso Home Site.

- Click the REMOVE THIS link on the home page to remove the Get started with your site region.

- Click the OK button on the dialog confirming you wish to remove the Getting Started panel.
- Click the Edit icon to switch the Home page into edit mode.

- Click inside the Home page just below the welcome paragraph to place your insertion bar at that point.

- Enter the following text at the insertion point:
Introducing the new CEO of Contoso [[
- >After you type the second square bracket, you will get a drop-down menu of available pages to link in the Site Pages library.

- Select NewCEO from the drop-down link choices, the two closing square brackets ]] should be added automatically for you.
- The final text should look like the following with the page in Edit mode.

- Click the Save button on the FORMAT TEXT tab toolbar to save your changes.

- Note how the square bracketed text has become a link to the NewCEO wiki page you created earlier.

- Click the Contoso Home Site link in the Top Link Bar to navigate to the Home page of Contoso Home Site.
Working with Web Part Pages and Web Parts
In this exercise, you will create a new Web Part page and add Web Parts to it.
- Create a new Web Part page.
- Click the Site Contents link in the Quick Launch menu.
- Click the Site Pages link on the Site Contents page.

- Click the FILES tab to open the toolbar.

- Click the New Document drop-down arrow and then choose the Web Part Page option.

- Type “MyWebPartPage” in the Name field. Take a moment to read through the different options in the Layout list box as well as the options in the Save Location combo box.

- Select Header, Left Column, Body in the Layout list box and select Site Pages as the choice for the Save Location. Click the Create button to complete the process.
- Your new Web Part page will look similar to the image below. Note the regions within the page that are arranged based on the layout option you chose when you created the page and inside those regions are links that allow you to add Web Parts.

- Adding a Content Editor Web Part to the Web Part page and create sample content.
- With the MyWebPartPage you created in edit mode, click the Add a Web Part link within the Header region.
- This will open a new area below the toolbar with categorized Web Parts to choose from. Take a few moments to browse the different categories and Web Parts within those categories. Note how you can choose which region on the Web Part page the Web Part will be added to with the Add Web part to: drop-down field.

- Select the Media and Content category and select the Content Editor Web Part. Click the Add button to add it to the Header region.
- Click the link Click here to add new content inside the Content Editor Web Part you just added.
- Type the following text inside the Content Editor Web Part.My Web Part PageWelcome to my Web Part page.This content was created using the Content Editor Web Part.
- Select and highlight the line “My Web Part Page” and click the Heading 1 from the Styles area of the FORMAT TEXT tab toolbar.

- Select and highlight the text “Content Editor” and click the Bold button from the Font area.

- Add a List View Web Part the Web Part page.
- Click the Page Tools Insert tab and click the Web Part icon in the Web Parts area.

- Click Apps in the Categories list box, Favorite Cars in the Web Parts list box, and Body from the Add Web Part to: combo box.

- Click the Add button to insert the selected Web Part to the Body region.
- Hover your mouse over the top right corner of the new Favorite Cars List View Web Part and click on the arrow that appears and from the drop-down menu select Edit Web Part.

- The previous step will open a properties control for the Favorite Cars List View Web Part with several expandable property regions. Take a few moments to expand and read through the various property options the Web Part offers.

- Expand the Appearance region in the Favorite Cars List View Web Part properties control.
- In the Appearance region, replace the text in the Title field with “Really Fast Cars” and select Title and Border in the Chrome Type combo box.

- Click the OK button at the bottom of the Web Part properties control to save your property changes.
- Click the Stop Editing button on the PAGE tab on the page’s toolbar to view the final version of the page.

- Click the Page Tools Insert tab and click the Web Part icon in the Web Parts area.
Advantages and Disadvantages of SharePoint
Advantages of SharePoint
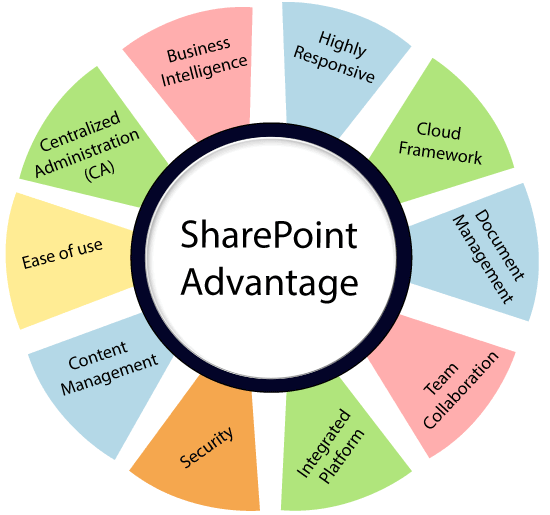
A list of advantages of SharePoint is given below –
1) Business Intelligence
SharePoint allows users to collect and publish data that is stored on the portal and accessible by the relevant organization. Depending upon the SharePoint installation, data can be published and pulled from the various sources, including the Excel, OneNote, and Microsoft SQL Server. This optimises the business process by ensuring the necessary information that the user wants.
2) Highly Responsive
SharePoint is highly responsive for all devices and platforms. It performs important tasks such as sharing of documents, storing the records of business reports, answering to customer’s queries, etc.
3) Cloud Framework
SharePoint is scalable, simple, quick, and easily connect with your project from anywhere, any time through the web.
4) Document Management
Document Management is the most widely used benefit of SharePoint. It includes many features that help to maintain documents.Some important features of document management are Version Control, Document Check out & Check-In, Document Search, Permission alerts, Customized Templates Document Workflow, and Document alerts.
5) Team Collaboration
Team Collaboration is one of the most important benefits of SharePoint. It allows you to connect with your colleagues and business partners in a creative way to share ideas, documents, and important information. This approach allows information and knowledge to flow more frequently throughout the organization.
6) Integrated platform
SharePoint allows easy integration techniques such as Simple Object Access Protocol (SOAP), Extensible Mark-up Language (XML), numerous Application Programming Interface (APIs), and event handlers for documents and lists.
7) Security
As you know, the security of business data is the first priority for any organization. SharePoint allows users to effectively manage business data using the firewalls and prevent its unauthorized use. It also uses cloud solutions to ensure that confidential documents are stored on the cloud and will never be compromised.
8) Content Management
Creating, modifying, and deleting the content from the website is a very difficult task for a non-technical person. SharePoint allows content management, which helps a non-technical person to easily create, modify, and delete content form their websites.
9) Ease of use
SharePoint provides many features and tools that allow any organization to respond quickly according to the organization’s needs. It provides an easy way to create and maintain business solutions such as creating dashboards, web portals, scorecards, and business data connectivity without having the technical knowledge.
10) Centralized Administration (CA)
SharePoint allows users to easily access data from anywhere in the world. It also provides a place where you can perform administration tasks from a central location.
Disadvantages of SharePoint:
A list of disadvantages of SharePoint is given below –
1) Integration requires more development effort
SharePoint integration issues should be considered very important because every user spend his more time and cost to create the project but if project fails then there will be a wastage of time and money.
2) Expensive
SharePoint can be expensive to set up and maintain. The biggest disadvantage of SharePoint is its licensing structure
- SharePoint Online Plan 1 – $5.00 user/month
- SharePoint Online Plan 2 – $ 10.00 user/month
- Office 365 Enterprise E3 – $ 20.00 user/month
3) Poor Search Capabilities
SharePoint provides poor search capabilities. It requires a lot of internal customization.
-SharePoint is a web application platform in the Microsoft Office server suite. Launched in 2001, SharePoint combines various functions which are traditionally separate applications: intranet, extranet, content management, document management, personal cloud, enterprise social networking, enterprise search, business intelligence, workflow management,web content management, and an enterprise application store. SharePoint servers have traditionally been deployed for internal use in mid-size businesses and large departments alongside Microsoft Exchange, Skype for Business, and Office Web Apps.
While Office 365 provides SharePoint as a service, installing SharePoint on premises typically requires multiple virtual machines, at least two separate physical servers, and is a somewhat significant installation and configuration effort.The software is based on an n-tier service oriented architecture.Enterprise application software (for example, email servers,ERP, business intelligence and CRM products) often either requires or integrates with elements of SharePoint. As an application platform, SharePoint provides central management, governance, and security controls. The SharePoint platform manages Internet Information Services (IIS) via form-based management tooling.
Since the release of SharePoint 2013, Microsoft’s primary channel for distribution of SharePoint has been Office 365, where the product is continuously being upgraded. New versions are released every few years, and represent a supported snapshot of the cloud software. Microsoft currently has three tiers of pricing for SharePoint 2013, including a free version (whose future is currently uncertain). SharePoint 2013 is also resold through a cloud model by many third-party vendors.The next on-premises release is SharePoint 2016, expected to have increased hybrid cloud integration.
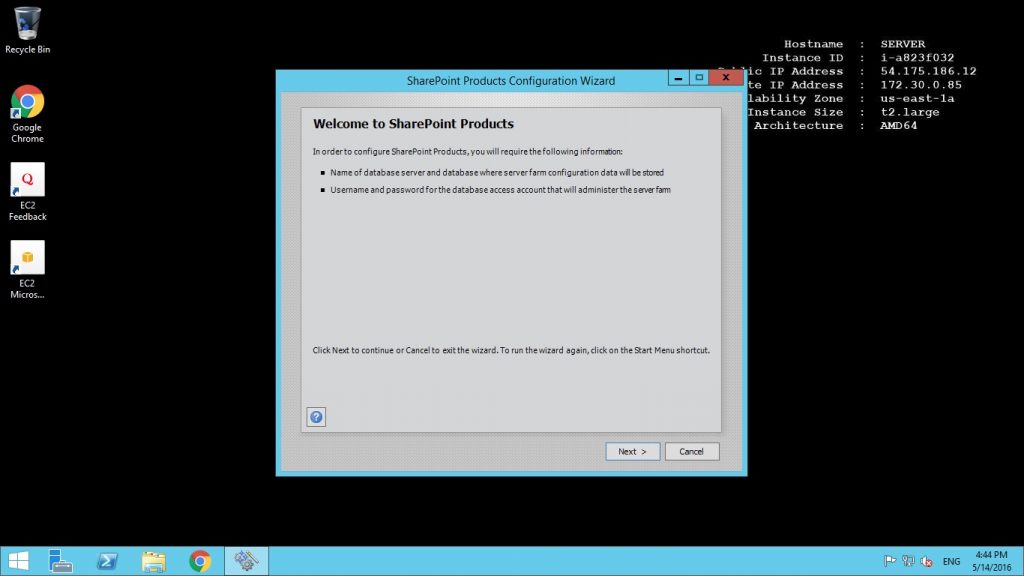
Welcome To Share Point
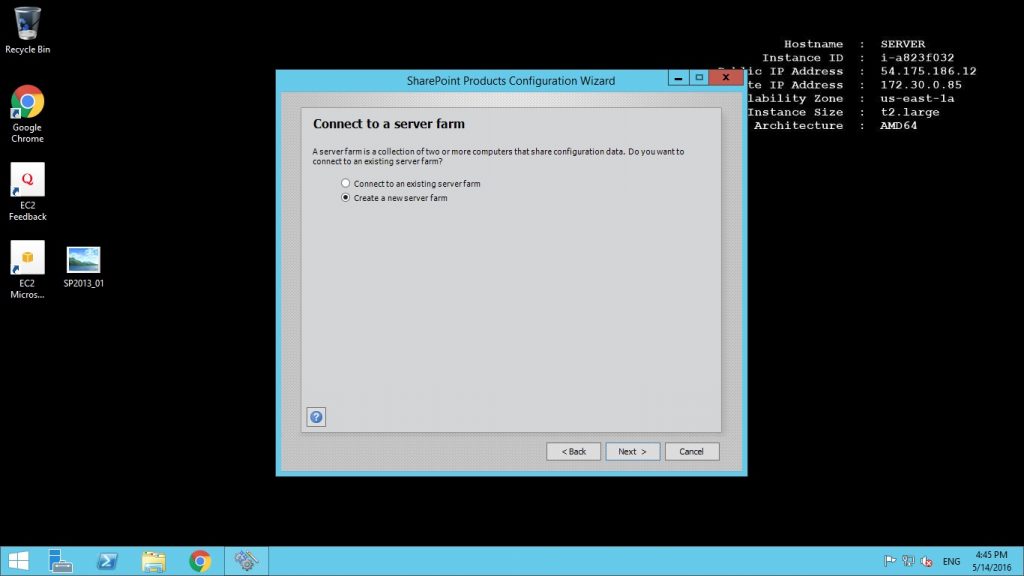
Connect to a server farm
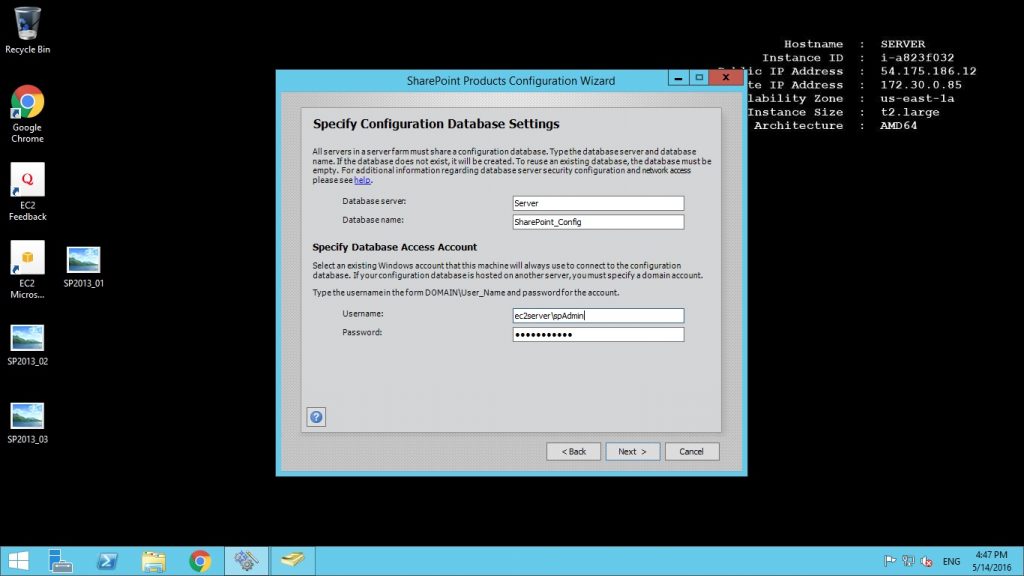
Specify Configuration Database Settings
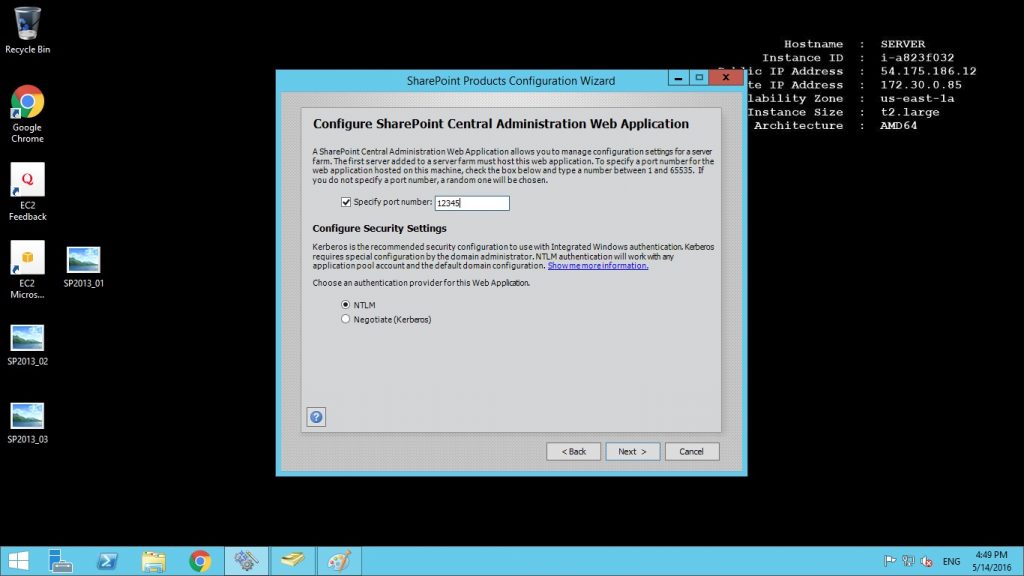
Configure SharePoint Central Administration Web Application
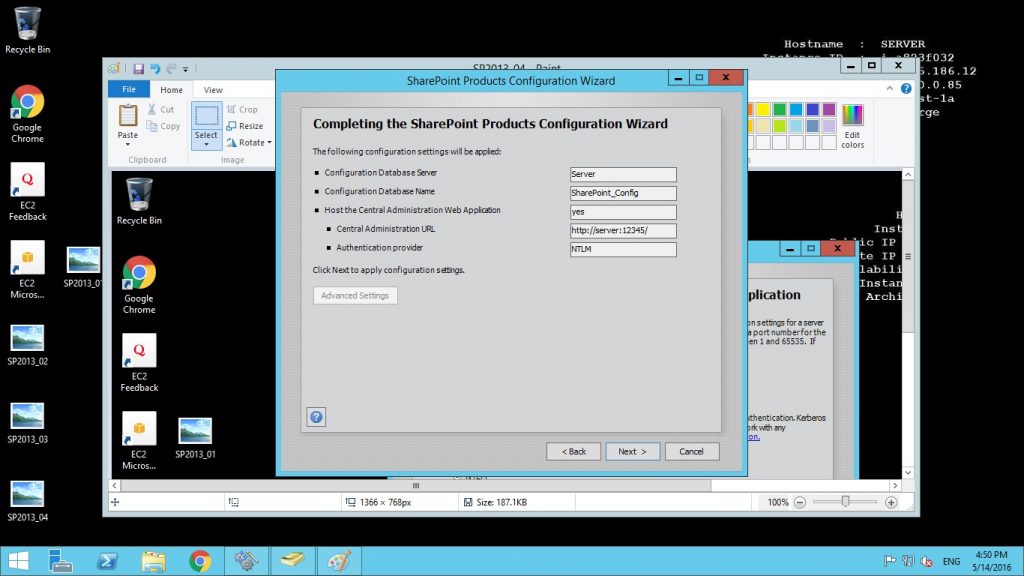
Completing SharePoint Products Configuration Wizard
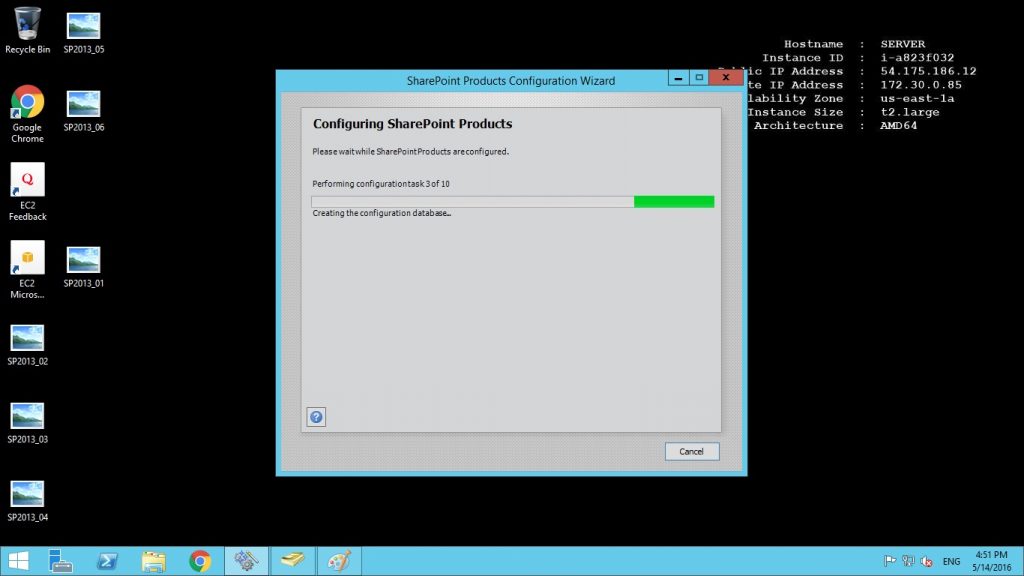
Configuration SharePoint Products
Features
Features of Sharepoint :
1) Using SharePoint Lists
SharePoint provides two primary ways to manage information: libraries and lists. Lists are like spreadsheets in the way that they consist of rows and columns. However, unlike Excel spreadsheets, they reside in SharePoint, and are available to many people at once for concurrent access, avoiding the hassle of emailing a spreadsheet around for review, or trying to track changes from multiple users.
SharePoint provides all the web-based features and capabilities necessary to create, review, update, and delete a list, or items in a list. To begin the process, click on Add lists, libraries and other apps pane in the Get started with your site web-part.

2) Adding SharePoint Workflows
A workflow is a set of tasks and decision points that lead to one or more outcomes. Think of them as an automated flowchart-like application that controls execution of standard business processes. SharePoint provides a set of templates used to generate workflows that are designed to save you time and effort, and establish consistency and efficiency for tasks you perform on a regular basis.
To add a workflow, you must have the correct permission for the list, library, or site collection where the workflow runs. There are four roles associated with workflows:
– Workflow creator – the person who creates a workflow template. This is typically someone very familiar with the business process.
– Workflow author – the person who configures a new workflow using a workflow template by associating it with a specific library, list, or content type.
– Workflow initiator – the person who starts a new workflow instance for a document or list item. They would also be able to terminate the workflow if necessary.
– Workflow participant – one of the individuals who perform a task associated with the workflow.
3) Using SharePoint Search
SharePoint’s basic search feature allows users to enter and execute a search query against indexed data in a SharePoint Server Farm. The scope of the search is the current site and any sub-sites below it.
The search application processes the query and returns a set of search results that fully or partially match the query. Search results contain links to documents, libraries, list items, lists, web-pages, or sites. SharePoint’s search engine takes into account your permissions, context, and previous searches in responding to the search query.

Most SharePoint web-pages have a search query box displayed in the upper right of the page. You can search SharePoint by entering a word or words (your search query) then clicking on the magnifying glass icon. SharePoint will then return a results page.
4) Using SharePoint Libraries
SharePoint Libraries provide a host of features to easily store, modify, group, filter, and capture essential data or “meta-data” about the content stored in a given library, enhancing search and analysis.
A library allows team members to collaboratively create, collect, update, and manage files. With SharePoint, you have access to a number of default library apps already preconfigured for specific purposes. We can use these default library apps to create new libraries. Depending on your version, set-up, and permissions, you will see the following default library apps from the Your Apps page:
To create a library you can start from SharePoint Class site, click on the “Add lists, libraries, or other apps” pane.

SharePoint libraries isquite a large topic; check out our chapter on our SharePoint course here.
5) Adding a Project Site
The Project Site template includes several components that facilitate and support work management, including:
- A Project Summary web part
- A Task list
- A Document Library
- A Calendar
- A task Timeline web part
- Built-in task management features
Project Sites provide a convenient way for teams to manage smaller, less complex projects. However, complex projects with hundreds or thousands of tasks, and dozens to hundreds of resources are too large to be managed in a SharePoint Tasks List.
To add a new Project Site using the Project Site template, first, click on Site Contents from the Quick Launch. At the bottom of the Site Contents screen, click on +new sub-site. Then enter the information for our new project site, including name, description, URL, language, and select the Project Site template from the Collaboration tab. Accept the remaining defaults and click the Create button at the bottom.

-Major Features of Share point server
Cloud-inspired infrastructure-Ever changing business conditions require you to be agile, and that means investing in solutions that provide reliability and choice. SharePoint Server 2016 provides the flexibility to tailor deployments based on your unique business needs.
Modern user experiences-Making decisions faster and staying in contact are critical for making any organization more effective. Your ability to access information on the go is now a workplace necessity. SharePoint Server 2016 makes file storage and document collaboration more people-centric, with touch-based experiences across devices and improved mobile access to content, people, and applications. SharePoint Server 2016 improves user experiences and capabilities based on innovations in Office 365,available either as part of your on-premises deployment or through a hybrid implementation of SharePoint Server 2016 and Office 365.
People-centric compliance-Data loss is non-negotiable, and overexposure to information can have legal and compliance implications. SharePoint Server 2016 provides a broad array of features and capabilities to help ensure that sensitive information remains safe and the right people have access to the right information, at the right time.
Videos
SharePoint Overview
First look at SharePoint Server 2016
SharePoint 2016 Installation and setup






 Take a few moments to read through the additional column settings, but the default values are fine for this exercise.


 It should look the same or similar depending on whether you used your own “favorite cars” or not. Note the Price column is formatted as currency for you based on the data type you chose for that column.


