1-click AWS Deployment 1-click Azure Deployment
Overview
Oxwall is a free and open source community software distributed under the Common Public Attribution License. It is written in PHP and is used as a platform for social networking and community sites.
Oxwall is the easiest way to start and manage a Social Network website. Due to its user-friendly interface and great flexibility everyone can build and maintain their public or private social network, collaboration website.
Oxwall is also extremely easy to expand and modify. Its flexibility is an extremely easy way to change the way it works using Oxwall plugins. These plugins are complete units of functionality that can be used for various purposes. Whether you are a freelance developer willing to streamline your work for client projects; an individual willing to create a community site; or a brand planning to set up a destination for your customers – Oxwall is for you.
Oxwall is the easiest way to start and manage a Social Network website. Due to the user-friendly interface and great flexibility of Oxwall software, everyone can build and maintain their public or private social network, dating or collaboration website. The software is also extremely easy to expand and modify. Its flexibility is an extremely easy way to change the way it works using plugins. These plugins are complete units of functionality that can be used for various purposes.
Whether you are a freelance developer willing to streamline your work for client projects; an individual willing to create a community site; or a brand planning to set up a destination for your customers – Oxwall is for you.
Furthermore, Oxwall is free and open-source. This means that you can download and install the application completely free of charge and start your website in just a few minutes. In this page you are likely to encounter a lot of code modifications.
The following guidelines will keep your website safe from danger:
- Always make a copy of the file or folder you are modifying.
- Custom modification are subject to changes after any platform or plugin update. Log and create a backup for the changes you have made..
- Put your website on maintenance mode if you need to do heavy changes to the website.
Oxwall architecture:
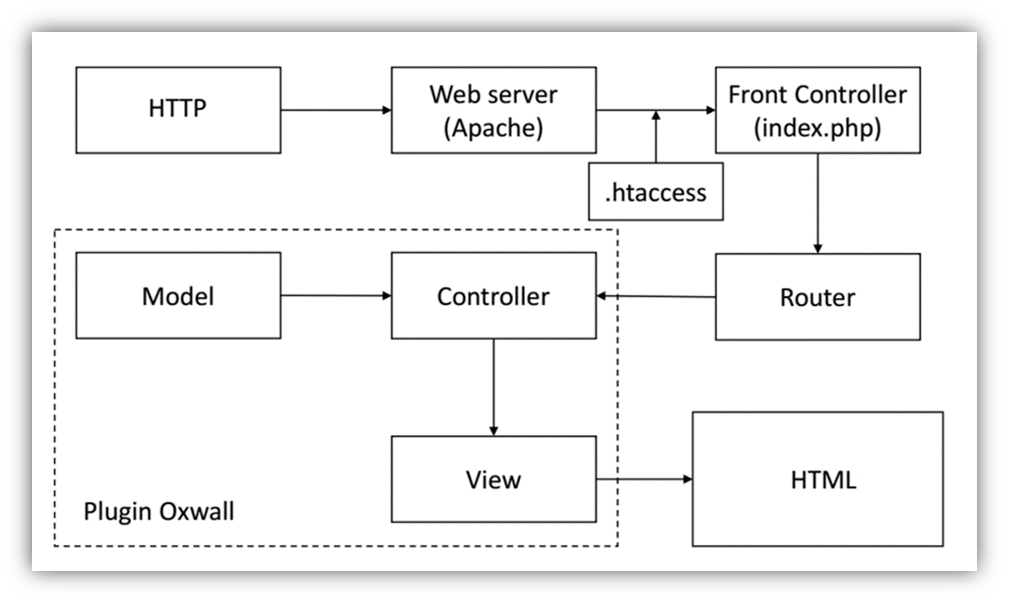
Oxwall implements the Model View Controller design pattern. Oxwall, as mentioned before, is entirely written in PHP for the server side, exploits MySql for data persistence, Smarty PHP template Engine for View layer and Javascript/JQuery for client side page manipulation. The data persistence, also, is “plug-in based”. Each plug-in must explicitly handle its persistence layer. Every plug-in developer must create the necessary table/s inside the database for data persistence and must create the ORM class to handle with the table/s. Moreover Oxwall has an event driven mechanism for platform extension. Every action inside the Model or Controller can trigger an event. Every plugin can register to an event in order to perform additional action for that specific event. This architectural organization allows altering even the base functionalities of the platform with minimum impacts on the source code.
 4444
4444In the figure above, we show the page lifecycle in Oxwall. It implements the Front Controller design pattern. In this design pattern all the request to the platform are addressed to a single point (the Front Controller). The Front Controller uses a Router class that, based on requested address, selects the plug-in that will process the user request. In addition, the plug-in internally must respect the MVC pattern. Every plug-in has private database table/s for persistence. Programmer can create custom database table/s for its needs. In order to modify base platform behaviour through plug-in, we used Event. Event are generated by action inside the platform, a plug-in can register to Event and perform action that alter/enhance the standard platform operation.
How to manually install Oxwall:
If your host does not provide Oxwall auto-installer you can still install Oxwall by downloading the Oxwall installation package from the Oxwall official website.
Start an Oxwall Social Network in just 3 minutes:
To help you get started with Oxwall our Technical Support team provides Free Oxwall Installation.
- Free Oxwall Installation by our Support Team
- Free Domain Name for Life
- Optimized SSD Oxwall Hosting
- Fast and Secure Servers
To complete the Oxwall Installation, please follow these steps:
- Step 1: Download Oxwall Installation Package
- Step 2: Upload Oxwall Installation Files
- Step 3: Start Oxwall Installation Process
- Step 4: Configure Oxwall Database
- Step 5: Setup Oxwall Cronjob
- Step 6: Install Oxwall plugins
Step 1Download Oxwall
By the time of this tutorial the latest stable Oxwall version is 1.7.1. We highly recommend to always install the latest version of Oxwall for optimal performance. To download the Oxwall installation package click on the download link.
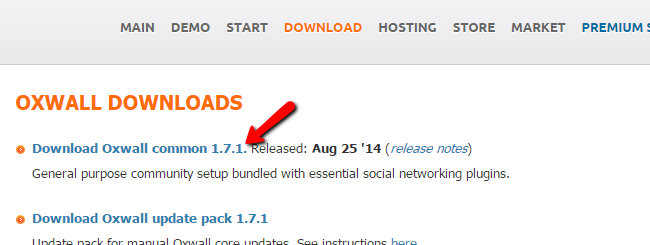
The download process will begin in just a few seconds. When you have the installation package downloaded on your local computer unzip the archive and open the folder. You should see a number of files and folders.
Step 2Upload Oxwall Installation Files
In order to begin the installation process on your hosting account you will need to upload the content of the installation archive under a directory accessible via your browser. If you have a cPanel-based hosting account this is the public_html folder.
If you would like to have your Oxwall directly accessible via your hosting account main domain name, please upload the Oxwall installation files directly under the public_html directory. In case you would like to have the application accessible via a subdirectory, create the desired folder on your account first and upload your files.You can upload files and folders of your hosting account using your favorite FTP client.
Step 3 Start Oxwall Installation
When the upload process is complete, access your Oxwall directory via your browser. You will be directed to the Oxwall installation page.
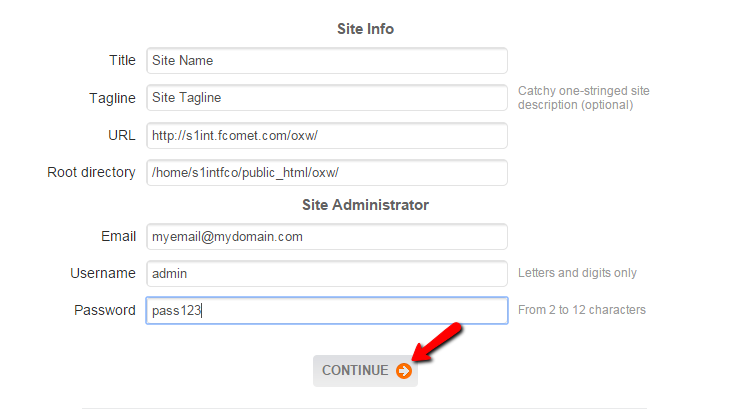
On this page you should input your Oxwall preferences as well as your Oxwall admin account username, password and email address. When you are satisfied with your settings, please click on the Continue button.
Step 4Configure Oxwall Database
Next, you should configure your Oxwall database, username and password as well as your MySQL Hostname.
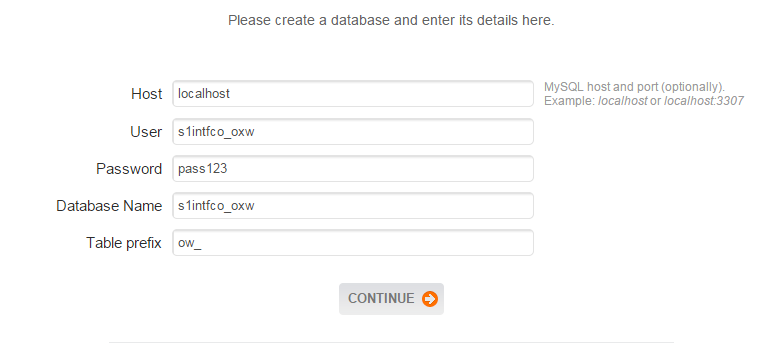
When you are ready, click on the Continue button to proceed. The next step will require to create a cron job for your Oxwall website.

You can create such via your cPanel → Cronjobs using the following command:
wget -q -O /dev/null http://www.yoursite.com/ow_cron/run.php
Remember to change ‘yoursite.com’ with your actual domain name. If you experience any difficulties to setup your Oxwall cron, you may skip this step for now and read our tutorial on how to setup Oxwall cron after the installation.
Step 6 Install Oxwall plugins
When you are ready with the cronjob setup click on the Continue button to install your Oxwall Plugins.
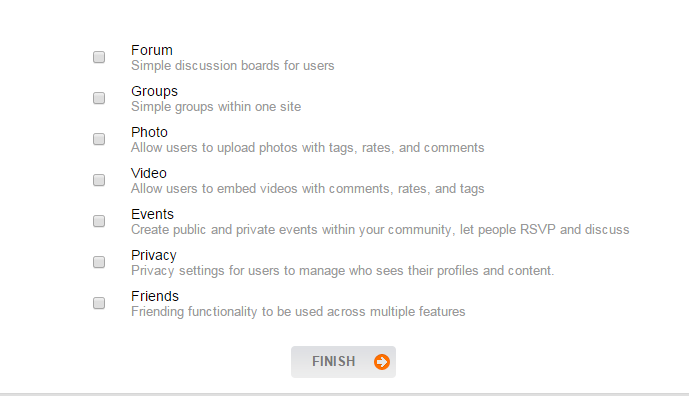
Select the desired plugins and click on the Finish button to complete the installation process.

Congratulations! Your Oxwall has been successfully installed. You can access your Oxwall admin panel now via the Oxwall Admin area link.
General Oxwall Settings
The best thing to do after installing Oxwall social application on your hosting account is to set your general website settings such as site name and administrative contact email address.You can perform this by logging into the Oxwall admin dashboard and refer to the Settings>General section.

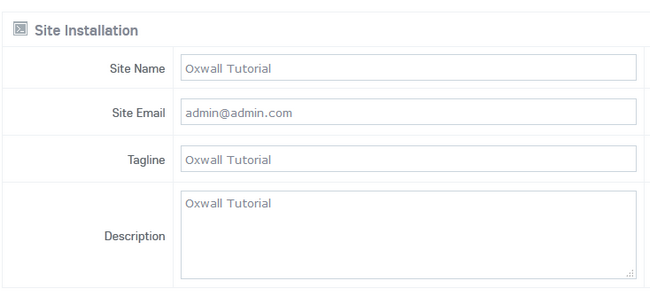
You can proceed with the basic configuration settings by configuring your Site Name, Site Email, Tagline and Site Description.
Next, you may configure your Time settings such as Date Format, Time Zone and site currency settings.
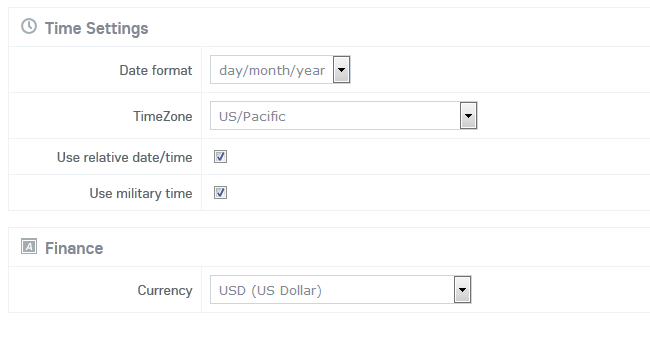
When you are ready with your settings, click on the Save button to apply your changed.
Oxwall SMTP Settings
Configuring your application to use SMTP instead of the standard PHP mail function may significantly improve your emails delivery and avoid IP blacklisting. Additionally, using the SMTP configuration settings you may configure your Oxwall website to use third party mail service such as Mandrill or similar provider for transactional emails.
Setting Oxwall SMTP settings is easy and involves just a few quick steps. First, please access your Oxwall admin dashboard and navigate to the Settings>SMTP section.
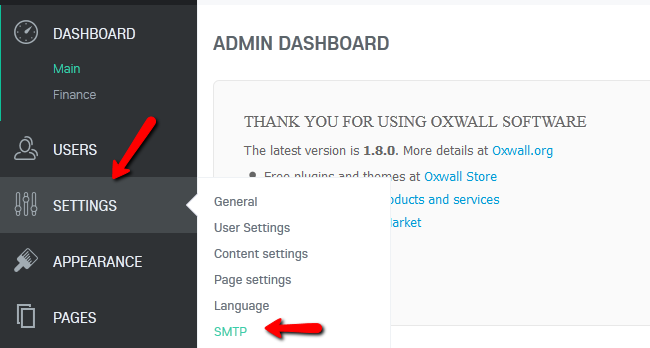
To enable the SMTP method for your Oxwall application, please tick the Enable option first.
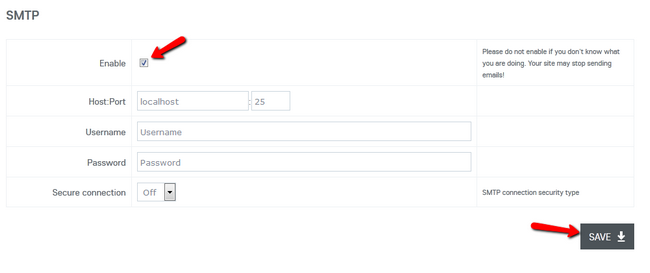
Additionally, you will need to configure the following options:
- Host:Port – In most cases your domain name should be sufficient as a host name and the default SMTP port is 25. If you host your application on our Oxwall Hosting plans, these configuration settings will work perfectly. If your host has a non-standard SMTP configuration, please consult with our technical support team for additional information.
- Username – Your outgoing mail server username. In most cases your full email address name is your SMTP username.
- Password – Your outgoing mail server password. In most cases your email account password should be sufficient.
- Secure Connection – If you have an SSL/TLS support setup on your SMTP server you may enable this option.
When you are ready with your configuration, please click on the Save button to apply the new settings.
How to Configure User Settings in Oxwall:
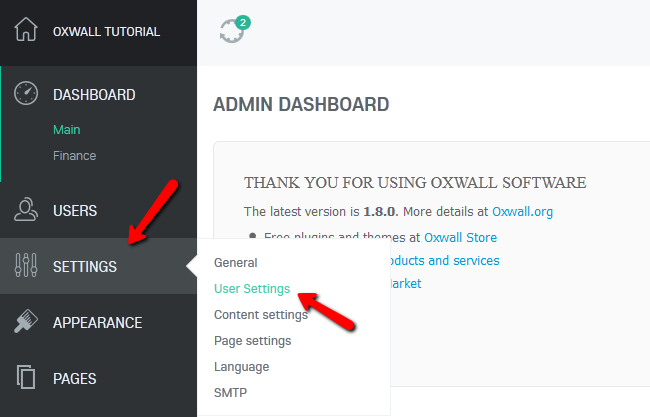
The User Settings in Oxwall will allow you to change the basic display elements for users on your website.To access the User Settings section of your website you will need to login to your admin dashboard and navigate to Settings>User Settings.
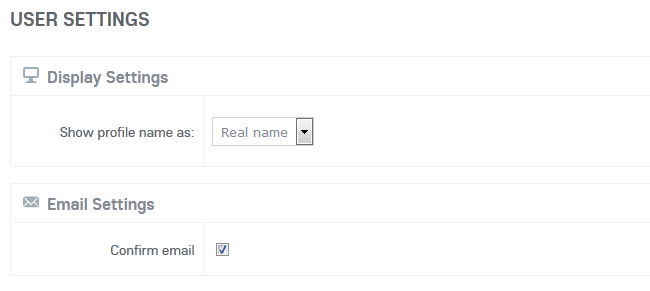
Display Settings:
- Show profile name as – Shows the profile name of a user as either his real name or username
Email Settings:
- Confirm email – When turned on users will have to verify their email addresse before they can access the site for the first time.
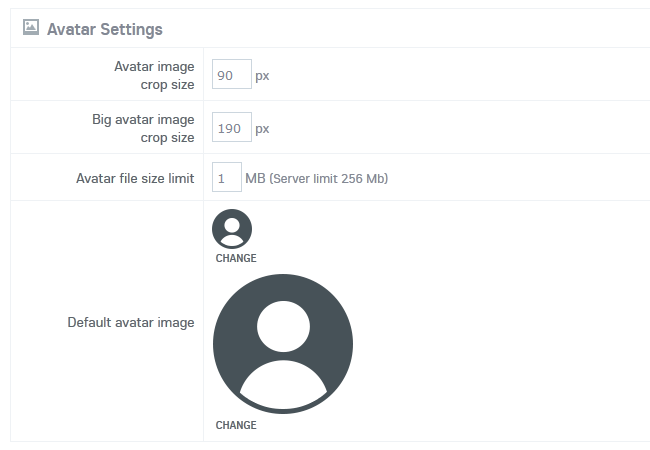
Avatar Settings:
- Avatar image crop size – The size of the avatar that will be shown in all listings (you will also need to change your theme CCS if you change this)
- Big avatar image crop size – The size of the avatar which will be shown on the profile page
- Default avatar image – Click the Change text to overwrite the default theme avatar with a custom one
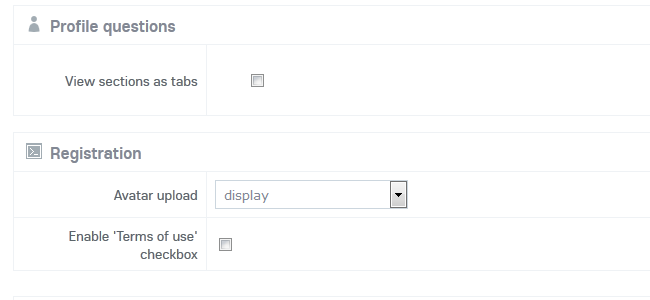
Profile questions:
- View sections as tabs – This is a valuable option if the profile pages have a lot of fields to fill out
Registration:
- Avatar Upload – You can select the corresponding option from the drop-down menu to let users upload avatar on registration (display – makes the field optional on registration, display and set required – makes the field required on registration and the hide option removes the avatar field from registration page)
Privacy:
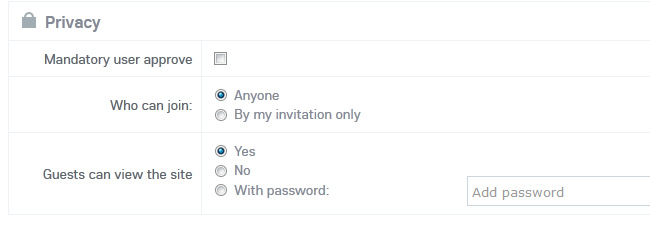
- Mandatory user approve – If checked the website administrator will need to manually approve the user registration
- Who can join – Here you can choose if you want your website to be accessible by anyone or just people you have invited
- Guests can view the site – Choose if non registered users will be able to view the content of the website
Once you have configured all of the User Settings click on the Save button at the bottom of the page to save the changes.
How to Manage Users in Oxwall
Managing the users of your website is an important part of keeping your website operational. In this tutorial we will show you how to find specific users on your website, change their status, roles and restricting some usernames from being used.
To fully manage your userbase, you will need to:
- Step 1: Browse Users and change their status
- Step 2: Configure User Roles
- Step 3: Restrict Usernames
Step 1 Browse Users and change their status
To access the user search function you will need to login to your admin dashboard and navigate to the Users>Browse Users section.
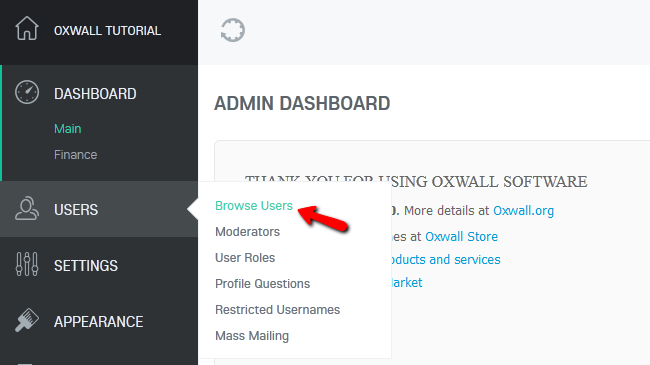
Here you can search for users based on their Real Name or Email. To see all users click Go without specifying any search criteria. You can apply actions in bulk or to a specific user(note that you cannot modify the status of the Admin user):
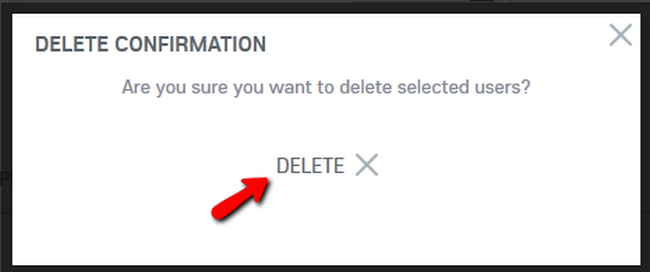
- Delete – Removes the user and all his content published on the website
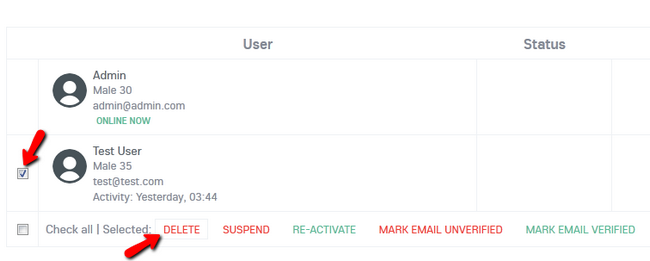
You will need to confirm the deletion of the user before proceeding.
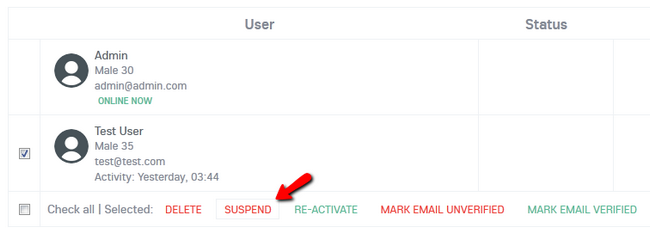
- Suspend – deactivates the user. Suspended users are moved to the list under Suspended tab and can not access the website. However, the content they have uploaded to the website will remain active
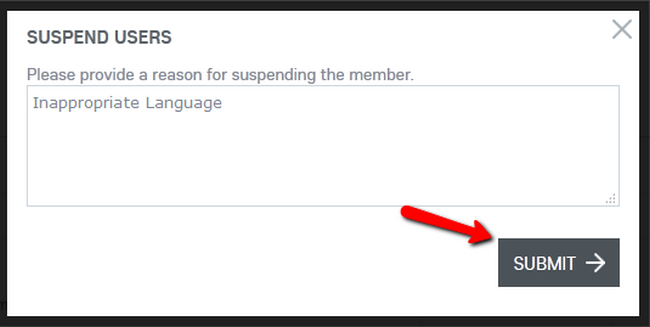
You can provide the exact reason for the suspension before confirming it.
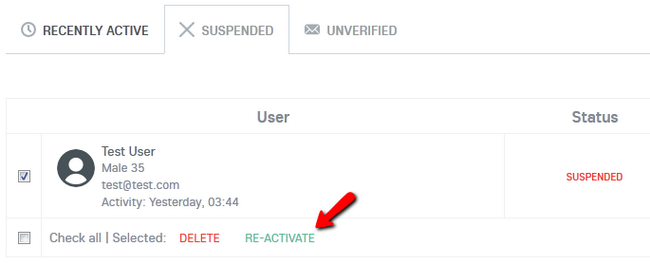
- Re-activate – activates a suspended user
- Mark email unverified – marks user’s email as unverified. Users with unverified emails won’t be able to log in to the website. The list of all unverified users is available under Unverified tab
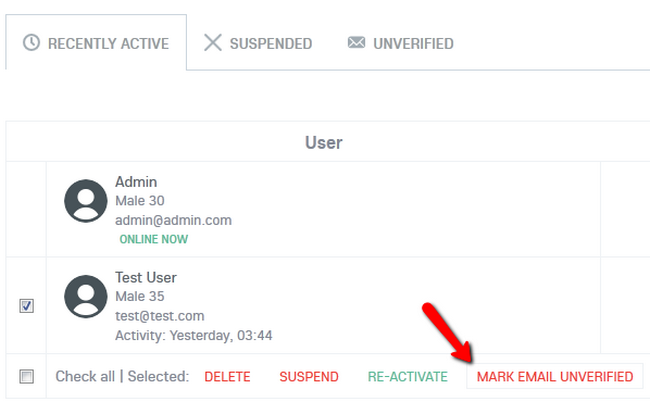
- Approve – approves users. If Mandatory User Approve check box is checked in the Global Rrivacy Settings, users won’t be able to use the site until they are approved by an admin
Step 2 Configure User Roles
User roles can be used to distinguish between the different user groups of your website. If you want to have additional features only available for specific users you can create a custom User Role and then add set users to it. To accomplish this, you will need to navigate to the Users>User Roles section of your admin area in Oxwall.
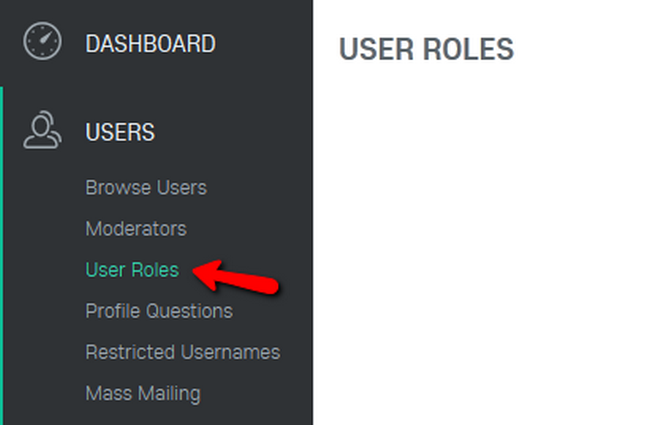
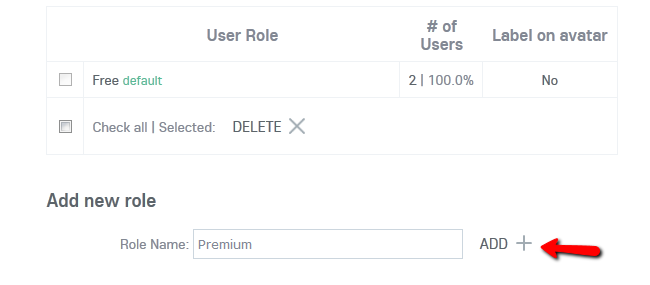
Now you can create a new User role by typing a name for it and clicking on the Add button.
Additionally you will need to set up the permissions for that role.
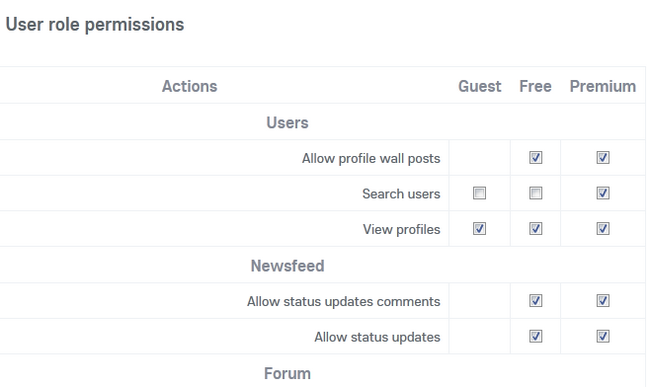
Once you have configured the new User Role according to your needs, click the Save button at the bottom of the page.
Step 3 Restrict Usernames
As with any website, you will want to filter out some usernames from being used. This can avoid admin/moderator impersonations as well as the bad user experience from seeing an inappropriate word used in a username. To restrict a username you will need to go to Users>Restricted Usernames.
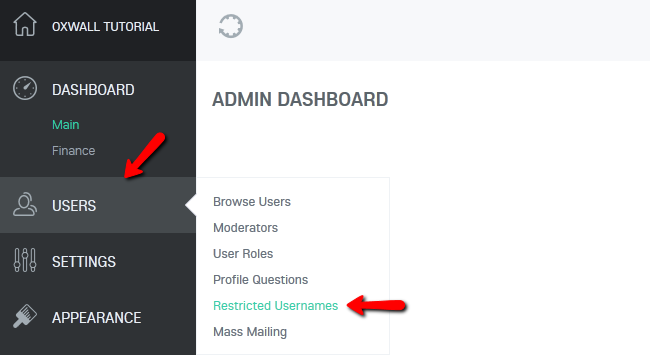
Now you will need to type the username you wish to restrict and click on the add button to Add it to the restriction list.

You can now manage your Oxwall website’s userbase.
How to change the Appearance of Oxwall:
The appearance of a website is the first thing a user sees and in most cases the user’s decision to stay on a website and check the content is mainly affected by the design and layout of the site. That is why, it is important to know how to change and better the appearance of your Oxwall website.
To modify the appearance of your Oxwall website, you will need to:
- Step 1: Change Themes
- Step 2: Customize Themes
Step 1 Change Themes
The easiest way to change the appearance of your website is to change the Active theme for it. You can do that by accessing the Appearance>Themes section of your admin dashboard.
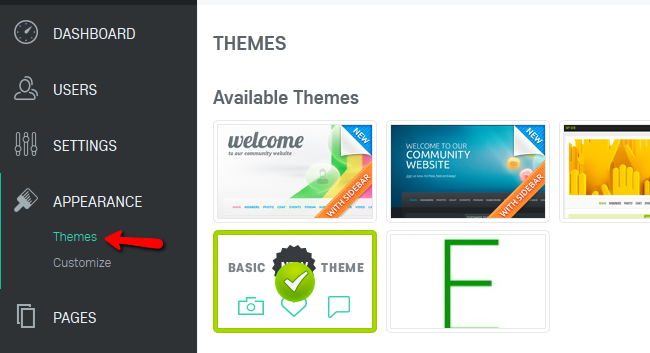
Here you will be able to choose a theme for your front-end as well as the admin dashboard of your website. The currently active theme is marked by a green checkmark.
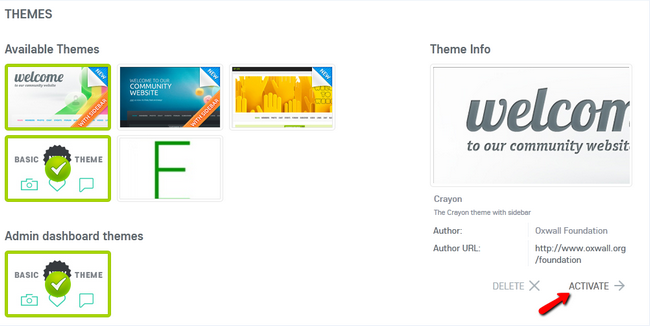
You can change the theme by selecting a new one and clicking on the Activate button. When selecting a theme, you will be able to see a little preview of the theme in the screen on the right under the Theme info section.
Step 2 Customize Themes
Even if you are not a developer, you can customize a theme by using the Oxwall Theme customization settings which the application offers. To accomplish this, you will need to login to your admin dashboard and navigate to the Appearance>Customize menu of your admin dashboard.
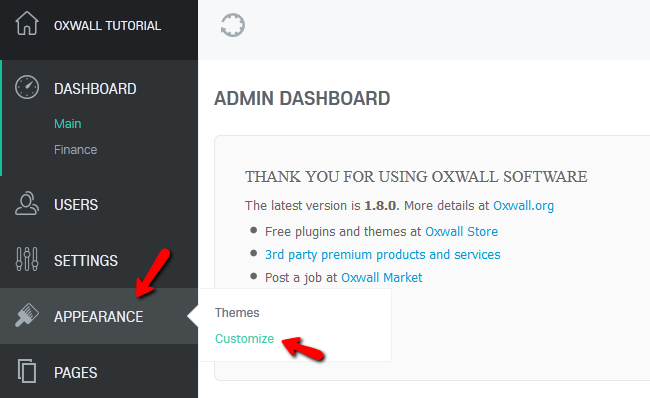
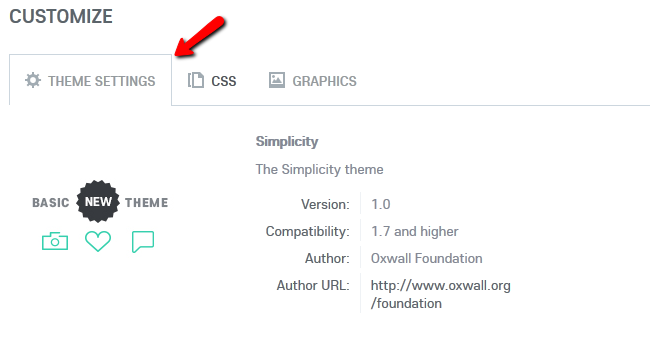
Here you will see 3 tabs to choose from. Let us start from the Theme Settings tab. It contains general information regarding the theme which is currently active.
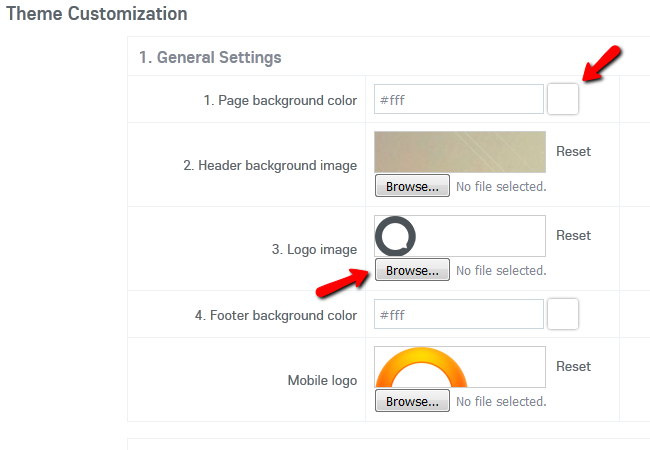
Underneath it you will find the General Settings for the theme which include the Page background color, Header and Footer settings and the Logo of your website. You can change each of those individually and upload custom images.
The last part of the Theme Settings tab is the Colors of the elements used by the website. Here you can edit the color for the text, titles, links and menus.
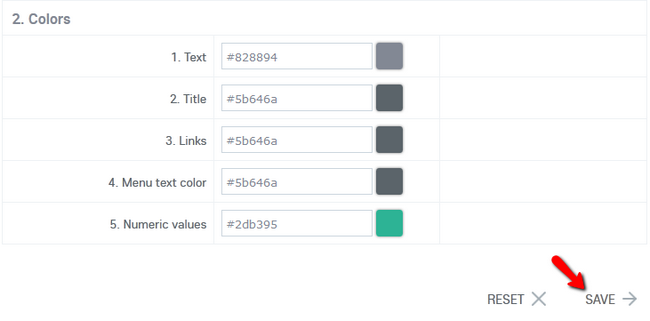
When you are done configuring this tab, hit the Save button at the bottom of the page.
In the second tab you will find the CSS code of the theme.
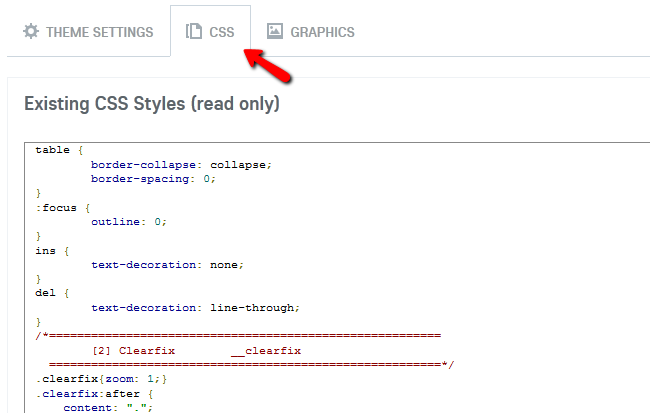
If you have the knowledge of how to edit the CSS code, you can scroll down and do that. When you are ready, don’t forget to click the Save button.
The third and final tab is for uploading Graphics to your website. You can do that by clicking on the Upload Photos + button and then selecting the images you want to use.
How to Install Plugins in Oxwall:
Plugins provide additional functions which are not present in the core version of Oxwall. You can choose which of these plugins to install depending on your needs.
To install plugins in Oxwall, you need to follow these steps:
- Step 1: Automatic Plugin Installation
- Step 2: Manual Plugin Installation
Step 1 Automatic Plugin Installation
To Install a new Plugin you will need to login to your admin area and navigate to Plugin>Available Plugins for a list of the pre-defined plugins for Oxwall.

Let us install the Birthdays plugin as an example. Hover over the plugin and then hit the green Install button.
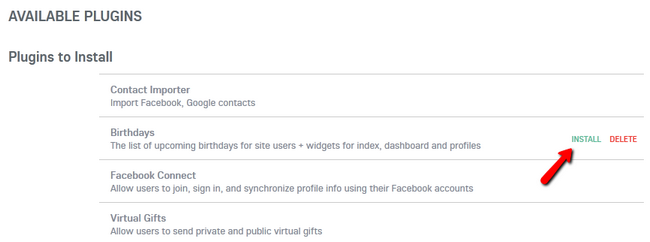
After 1-2 seconds you will receive the notification that the plugin was successfully installed.

You now have a list of upcoming birthdays for your site’s users to use.
Step 2 Manual Plugin Installation
If you have a 3rd party plugin you wish to install please access the Add New section of the Plugins menu.
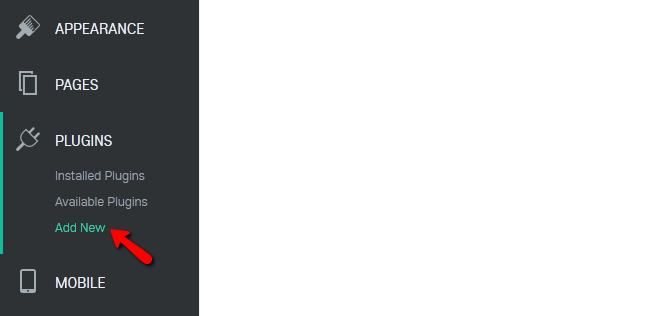
If you are looking for 3rd party plugins you can always check the official Oxwall Store page.
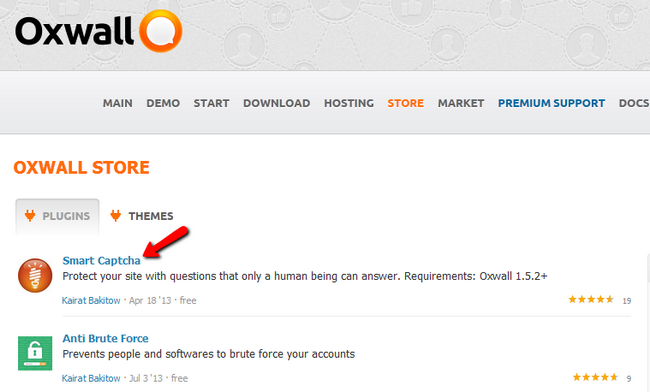
In this case we will install the Smart Captcha plugin to provide a protection to our Oxwall website. Click on the plugin and then click on the Download button.
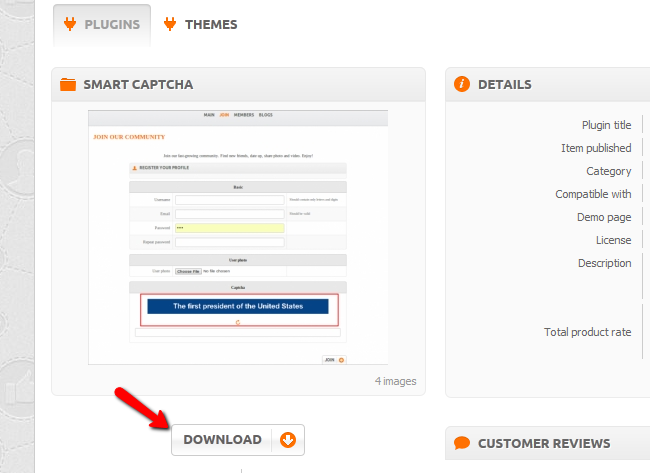
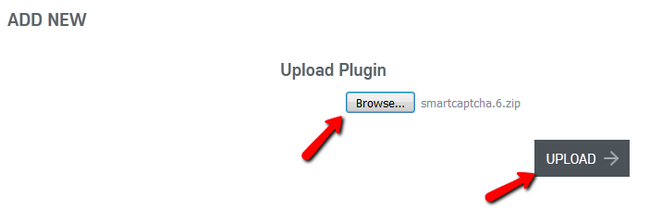
Now let us return to the Add New section of our admin dashboard. Select the zip file you just downloaded and click upload. This will upload the file to the server and will list it in your available plugins.
From here you can proceed with the installation as illustrated in step 1.
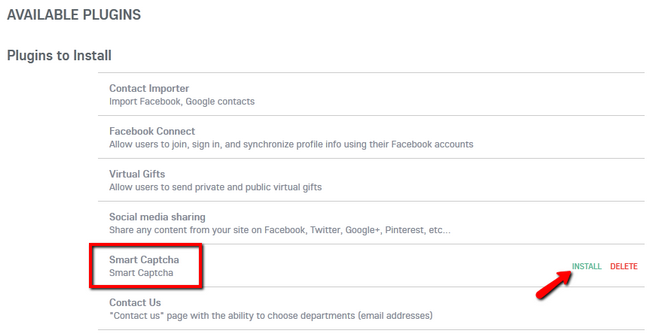
After you have installed the plugin you will be able to modify it by selecting the Settings option of that plugin. Congratulations, you now know, how to install additional plugins for your website.
How to Install Themes in Oxwall:
Installing a theme in Oxwall is very easy and requires only a few minutes. You can browse the Official Oxwall Store for additional themes and even download some of them for free.
To Install a new Theme in Oxwall, you need to complete the following steps:
- Step 1: Choose and Download a Theme
- Step 2: Upload and Activate the Theme in Oxwall
Step 1 Choose and Download a Theme
The first thing you will need to do is to select a theme from the store and click on it.

Check if the theme is compatible with your version of Oxwall and then click on the Download button.

Step 2 Upload and Activate the Theme in Oxwall
Now login to your Oxwall administrator area, navigate to Appearance>Themes scroll down till you see the Add new theme section, click on the Browse… button to select the zip file with the theme you downloaded from the website and then click Upload.

Once the theme has been uploaded and installed you will be able to select and activate it.

Congratulations, your new theme is now Active and ready to use.
Advantages of Oxwall:
Easy installation both manual and by using scrip installer like Softaculous, Fantastisco.
Easy to understand the concepts for newbie.
Admin panel is easy to operate.
Online chat to communicate between members.
Easy to setup privacy settings
Acceptance of membership by mail validation.
Customizing profile options.
Integration of facebook login for membership.
Photos, Videos, Blog and Forum for effective social networking.
Customizable layout.
Limitations:
For site verification by google and other search engines you should have to edit .htaccess.
The same issue is for accesing the sub domains.
-Oxwall is unbelievably flexible and easy to use PHP/MySQL community software platform.Oxwall is used for a wide range of projects starting from family sites and custom social networks to collaboration tools and enterprise community solutions.Oxwall is released under the Common Public Attribution License 1.0.
Features
Oxwall main features:
- Social network base mechanisms
- Friendships, post, like, comments, etc.
- Dashboard
- shows all the user friend activity (posts/likes/photos) by date.
- Main
- shows all the platform event (posts/likes/photos/events etc.) even for not related users.
- Forums
- Groups
- allows to create a small community inside the platform based on common interests/topics.
- Blogs
- Events
- Realtime activity notifications, newsfeed, instant chat
- Photo, Video sharing
- Blogs, forums, wiki
- Groups, events, friends
- Comment, tag, rate any kind of content
- Privacy and profile customization
- Collaboration, file sharing, video-conference tools
Videos
How to manually install Oxwall


