1-click AWS Deployment 1-click Azure Deployment 1-click Google Deployment
Overview
OwnCloud provides a free, open source file sharing and application server and platform with desktop and smartphone applications, allowing you to create a personal or corporate cloud under your own control. If you’re a Dropbox user, then you’re familiar with the advantages of a remote cloud which keeps files on all of your desktops and devices in sync and allows you to share them with other people. Dropbox has come under scrutiny for privacy and security issues as well as its controversial decision to appoint former Bush administration Secretary of State Condoleezza Rice to its Board of Directors. OwnCloud allows you to host and secure files on your own server, providing you increased control over your remote files.
The synchronization itself keeps files in two separate repositories the same. When synchronized:
- If a file is added to one repository it is copied to the other synchronized repository.
- When a file is changed in one repository, the change is propagated to any other synchronized repository.
- If a file is deleted in one repository, it is deleted in any other.
ownCloud is different from other syncing software as both changes to the local files or server will result in other files also being synced until a complete match is available.
During synchronization, ownCloud Client checks both repositories for changes very frequently. The local repository is also monitored, so if you decide to make a change (add, edit or remove data) the sync will immediately begin even if it is not check time.
Previous versions of ownCloud used timestamps as a way of determining which files have been changed. However, as time can be relative to the zone you are currently in this could lead to some unwanted miscommunication between the server and local clients unless you run the NTP (Network Time Protocol) on all participant devices.
That is why a more reliable way of syncing has been created – it involves a unique number that is changed whenever file is changed. In order to match different repositories the platform will have to make sure that all files from the first repository have the same unique number as the ones in the second.
How to Install the ownCloud Desktop Client
For you to sync files between the server and your personal computer a desktop client is required. You will need to open your favorite web browser and navigate to the official ownCloud download page.
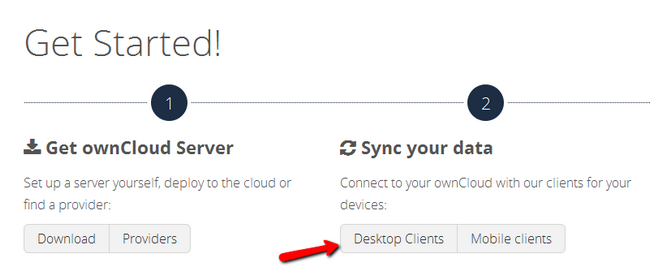
Click on the Desktop Clients button to proceed.
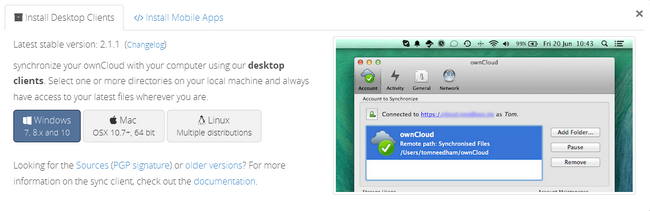
Here you can choose from the clients for Windows, MacOS or Linux. Choose the one corresponding to your operating system and run it. For the purposes of this tutorial we will show you how to install the windows version as currently this is the most popular OS.

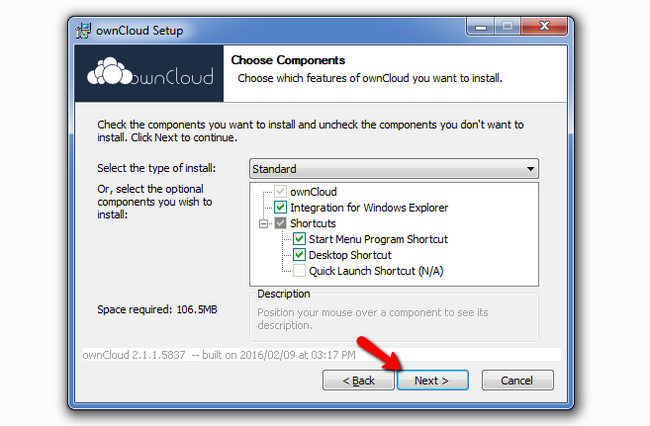
Choose the type of installation you wish to have for ownCloud with standard being the recommended option here.
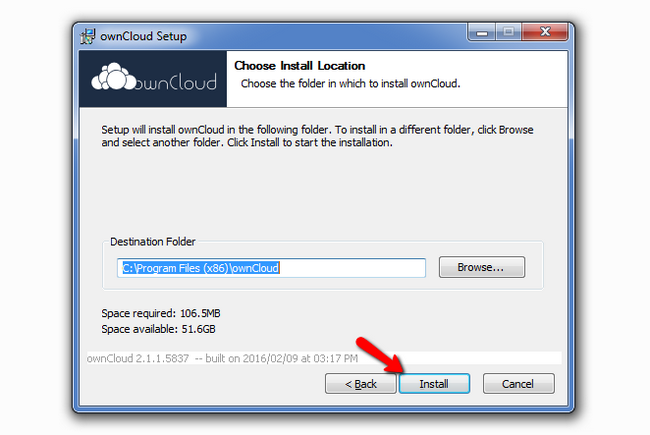
Afterwards select the destination folder for the installation.
Once the installation has been completed click on the next button to exit the installer.
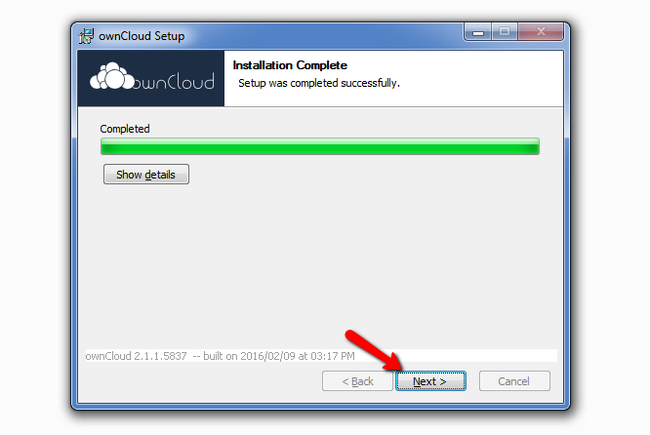
You have successfully installed the ownCloud desktop client and you can find the application accessible via the newly created desktop shortcut.
Configuring ownCloud
In ownCloud you will be able to configure some extra features that can make your user experience more enjoyable.To start off, open the ownCloud desktop client and click on the General section. There are 3 general settings:
- Launch on System Startup – With this you can decide whether or not the ownCloud Desktop Client will launch at system startup.
- Show Desktop Notifications – If enabled, you will receive notifications about your sync activity.
- Use Monochrome Icons – Enabling this will make the icons for ownClpoud less obstructive.
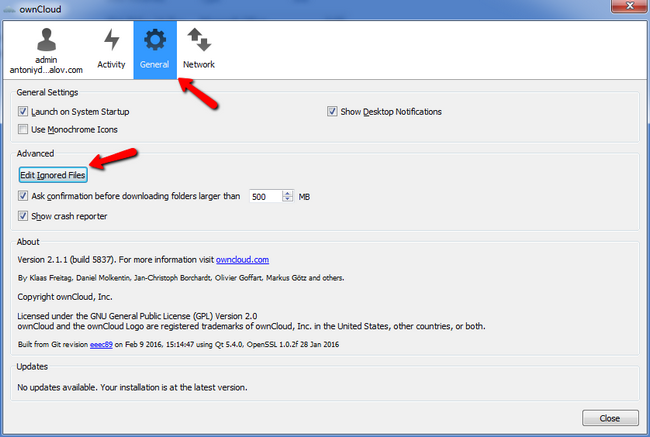
If you have local files which you do not want to sync with the server you can exclude them by using the Ignored Files Editor.
The editor is populated by default with a list of the most common ignore patterns. Aside from that you can also create custom patterns suitable to your needs. However, due note that custom patterns are not automatically checked for syntactical errors, and if the synchronization does not work as intended after such changes the issue is most likely in your syntax.
Additionally you can decide the minimum size of a folder that will require your user input before being downloaded. You can also see a detailed crash report if something goes wrong if you check the last available box.
The first 4 steps after you installed the ownCloud appliance
The first 4 steps
The recommended first steps to take after installing ownCloud involve both Univention and ownCloud apps. Those are very useful to configure ownCloud according to your needs. Continue from there and adjust your ownCloud to your perfect setup!
To get you started, we have 4 steps to do after the setup:
1. Get Let’s Encrypt SSL Certificates
Let’s Encrypt is a free, automated, and open Certificate Authority. With Let’s Encrypt, you can easily secure your ownCloud with https transport layer encryption.
Important note: for Let’s Encrypt to work, the appliance must be connected to the Internet and have a FQDN in the public DNS. So you need to buy a domain and route it to the appliance.
There is an easy way to install certificates for the appliance – the Let’s encrypt Univention app.
Get the app from the Univention app store, enter your domain name and check the “Apache” option after the installation in the app settings, and it’s done.
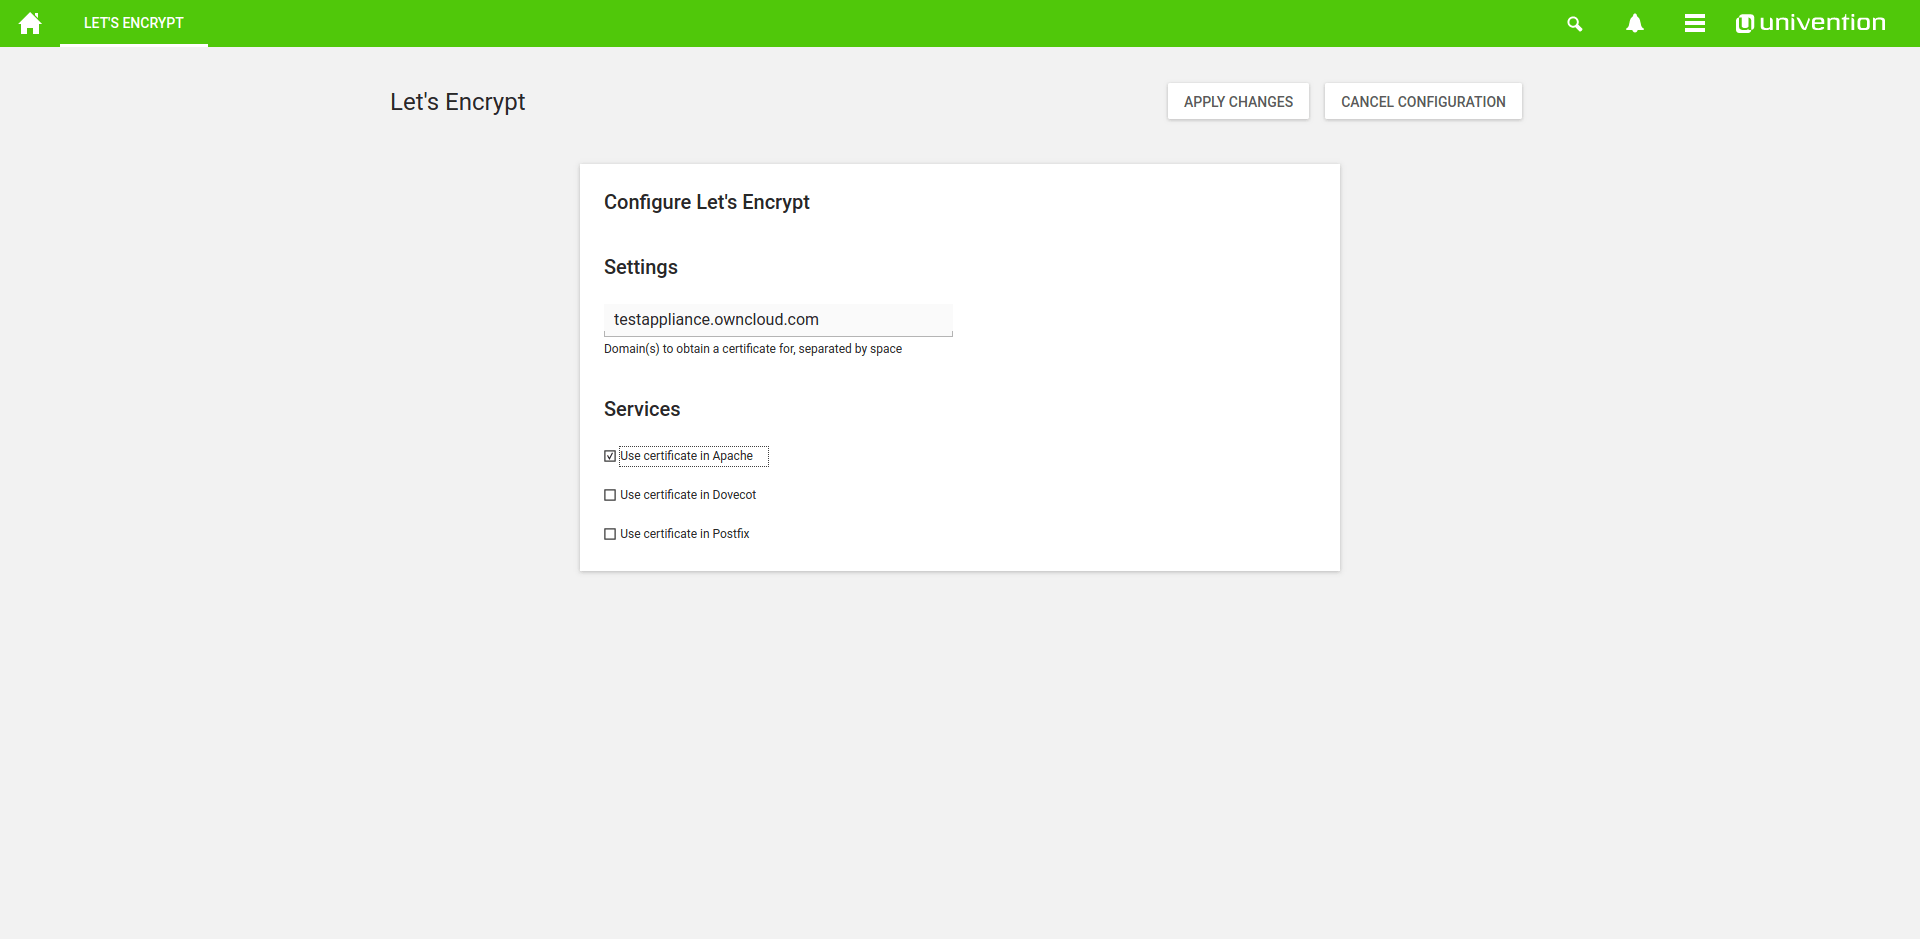
Enter your domain and choose Apache to setup Let’s Encrypt for ownCloud.
Once the certificate has been configured, you need to restart the desired services via the “System services” module in the UMC. Select “apache2” and restart the module. Press confirm, and don’t be surprised about the error message afterwards – of course you can’t connect to the web server in the very second you restarted it. Now just add “https://” to the URL of your appliance, and the Let’s Encrypt certificate should work.
Alternative: Import own Certificates
If Let’s Encrypt doesn’t work for you for some reasons, you can use your own certificates instead. To do this, you need to go to the UCS command line interface. In the virtual machine screen, log in with your UCS credentials, transfer the certificates to the VM and use these 2 commands:
ucr set apache2/ssl/certificate="/path/to/certificate/cert.pem"
ucr set apache2/ssl/key="/path/to/certificate/private.key"
Optional: use HTTPS only
For security reasons, it may be a good idea to restrict the access to your instance to HTTPS only. You can do this with this command on the UCS command line:
ucr set apache2/force_https=yes
2. Collaborate on Documents
With ownCloud, you can work on documents online, with others. ownCloud can integrate Collabora or OnlyOffice for editing and creating documents. For the sake of this example we will choose Collabora.
Important note: Collabora only works if you access your appliance with https and domain name.
Collabora can be installed next to ownCloud.
In order to use Collabora with ownCloud, start with installing the app from Univention:
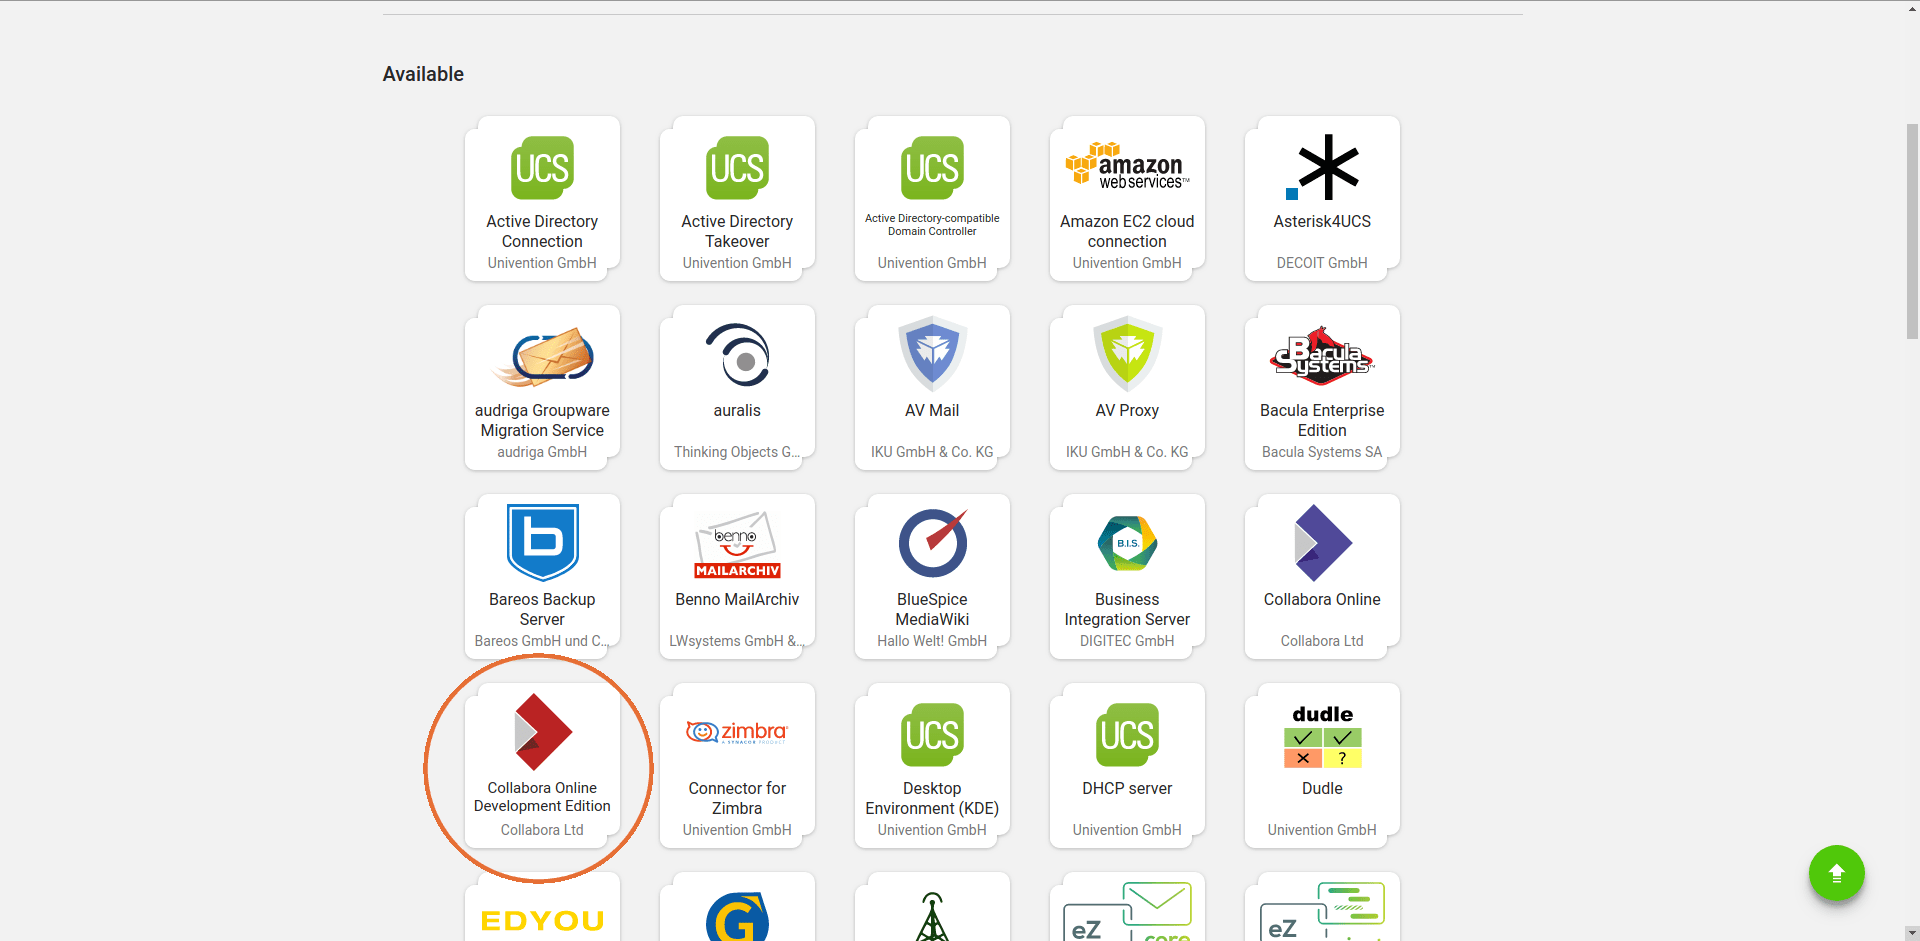
Collabora in the Univention app center
During the installation process of the Collabora Univention app, you will be presented with following settings page:
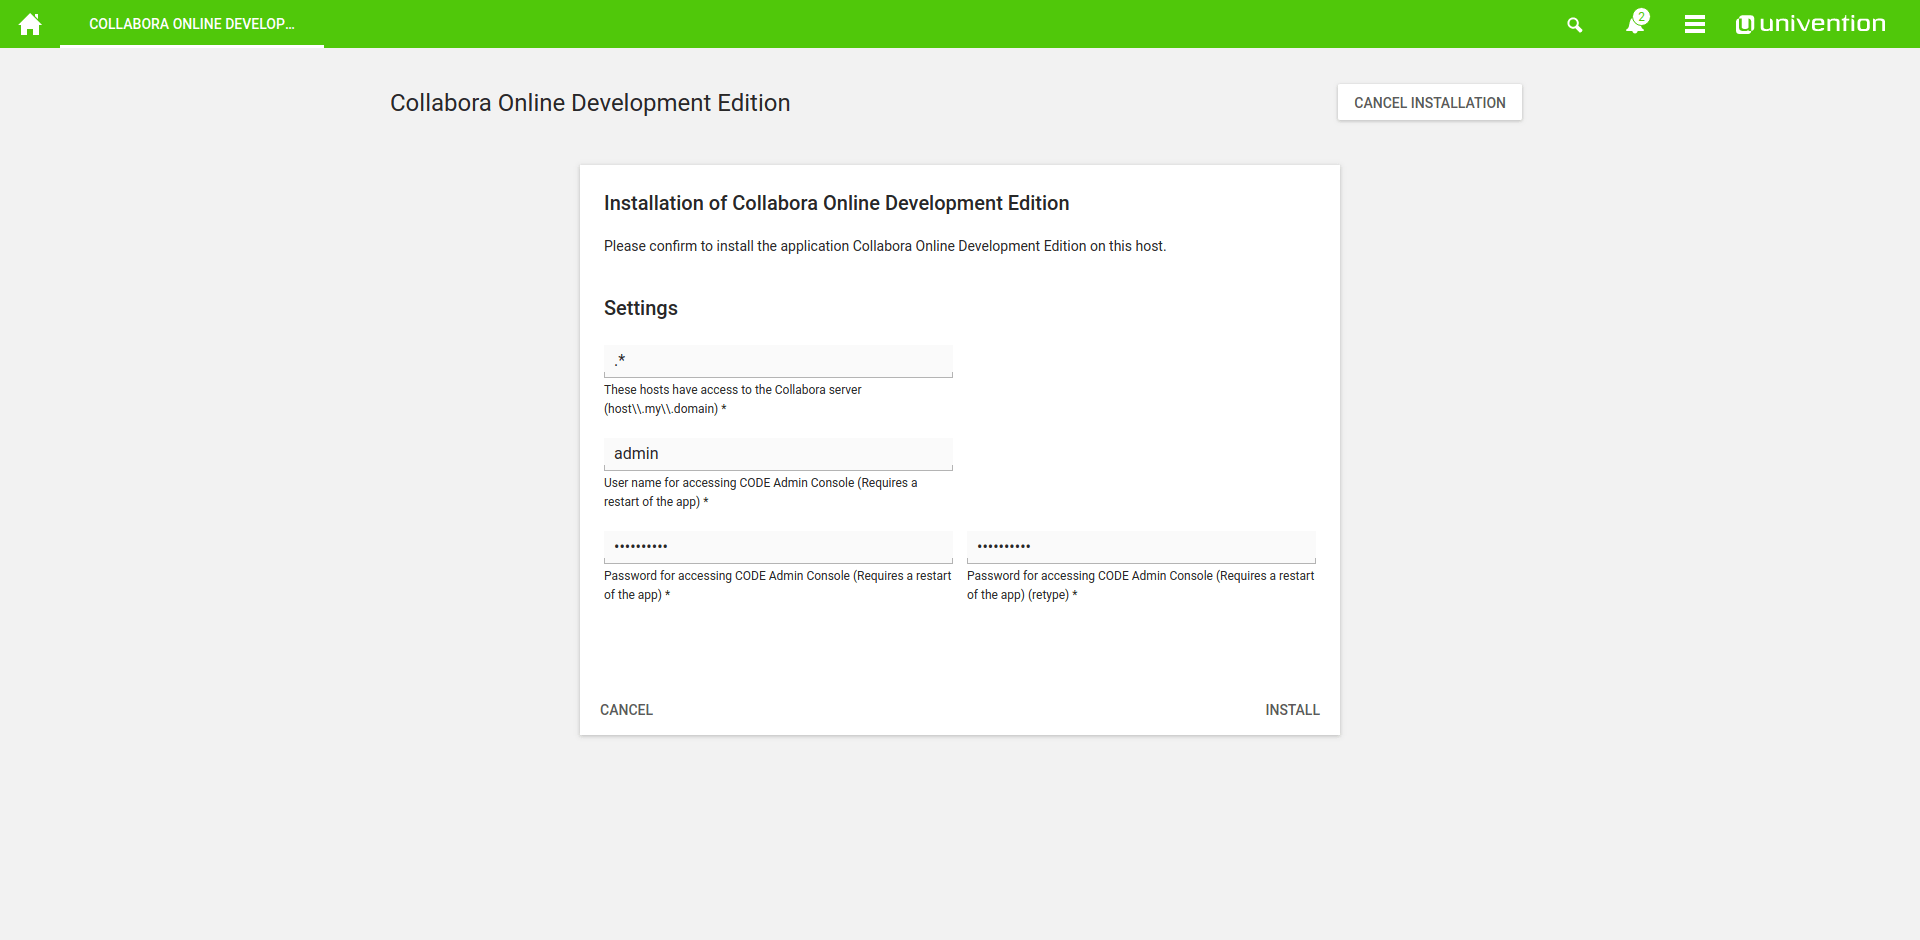
Default Collabora installation settings
Those settings should be okay, set a passphrase and use the default settings. Then click on install and watch how the process completes.
In ownCloud, you have to install the Collabora integration app. Then go to the additional settings. You can find them at https://example.org/owncloud/index.php/settings/admin?sectionid=additional, please substitute your domain name. There, in the Collabora settings, enter https://example.org as your Collabora Online Server. Again, substitute your domain name.
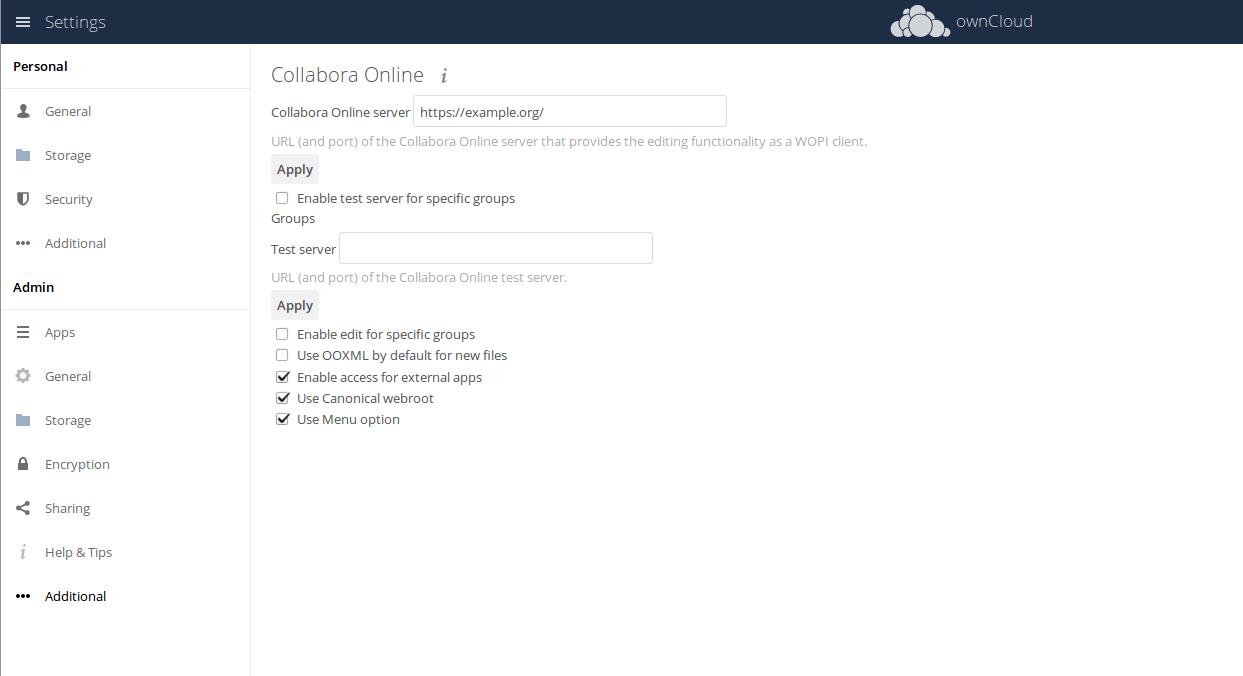
The Collabora settings on in the additional ownCloud settings
If you used the Let’s Encrypt Univention app in step 1, this will work out of the box. Try it out and open a document in the ownCloud web interface! This way you will never again have to use Google Docs.
3. Enable E-Mail notifications
With ownCloud, you can keep track of various activities performed by your server with E-Mail notifications.
To configure the settings for E-Mail in ownCloud, you have to go to your settings. First you have to enter your own E-Mail address in “personal > general”.
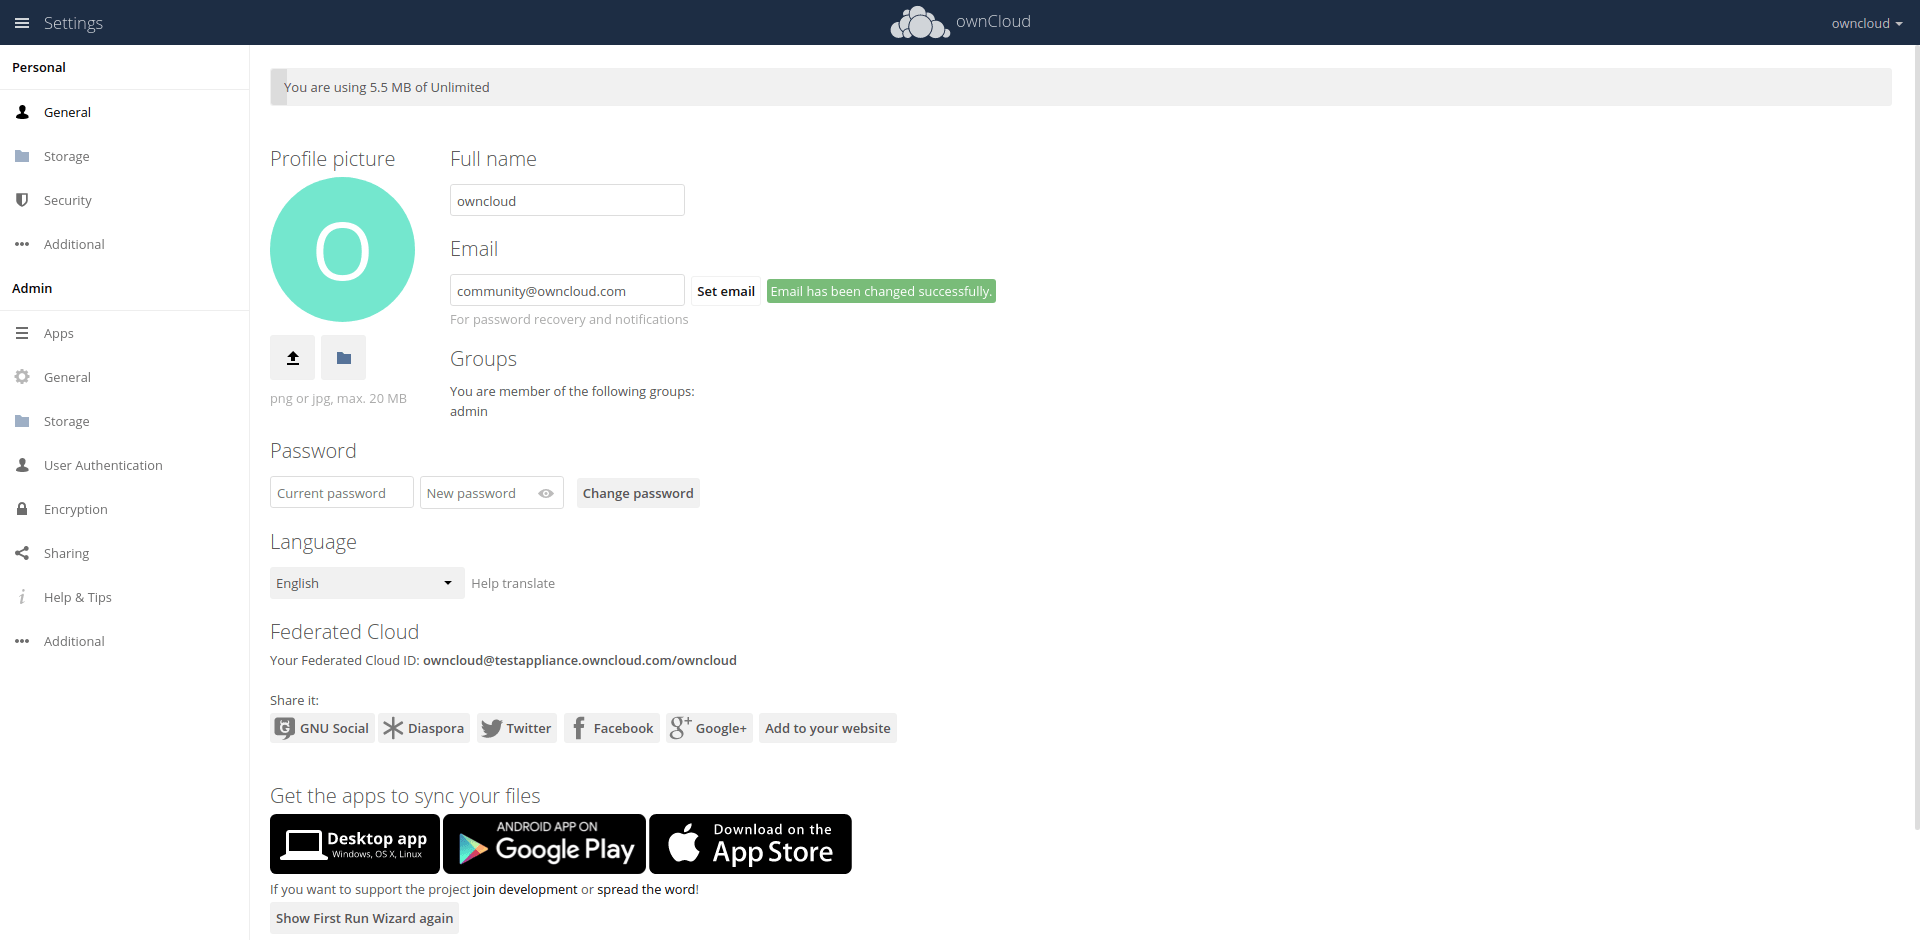
Change the E-Mail of your user to receive mails from your ownCloud
Afterwards, you have to go to the “admin > general” section. Here you can configure the integrated E-Mail server to send out E-Mail notifications. Now you can send a test mail to try whether it worked!
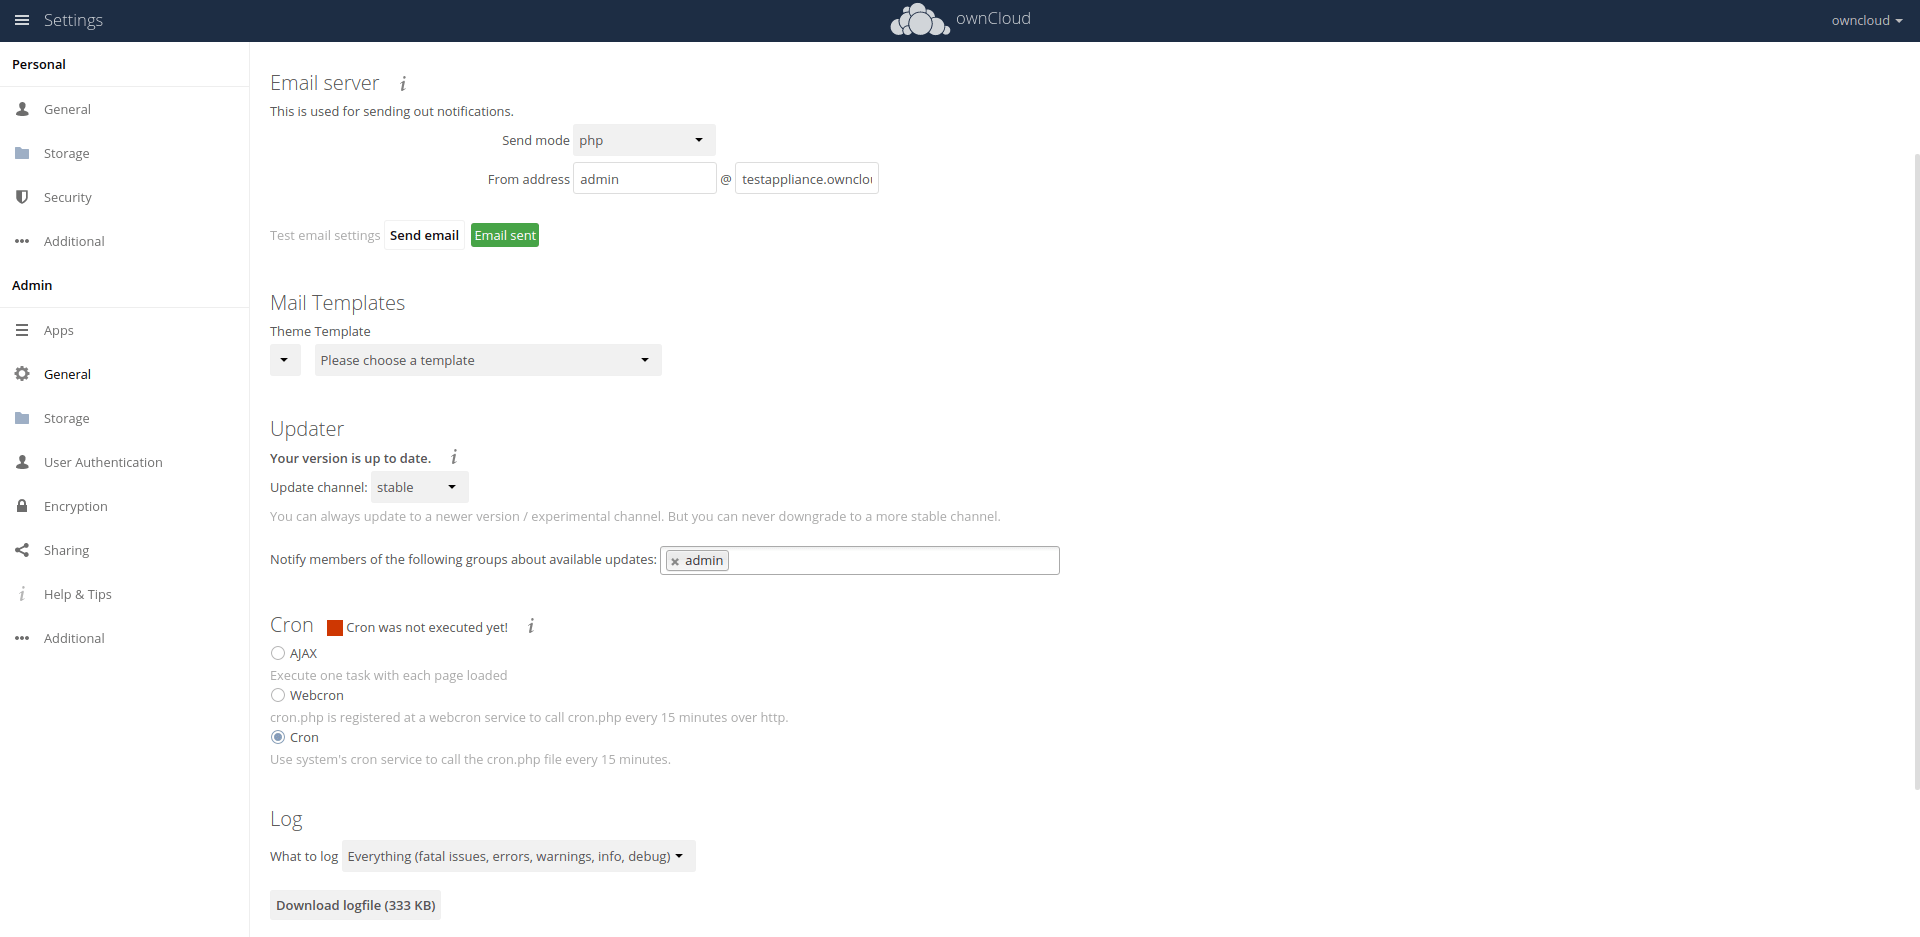
Configure E-Mail notifications for your users in the administration settings
For a summary of the various activities on your server, you can install the “Activity” app from the Marketplace in ownCloud.
4. Further Extensions and Apps
If you are looking for ways to explore the full functionality of ownCloud, you should visit our Marketplace. There are many apps which extend the functionalities of ownCloud. A few examples? Contacts and Calendar sync, End-to-End Encryption, or an app to sync Bookmarks across devices.
What is an ownCloud server?
To use ownCloud like any other File Sync & Share provider, you need an ownCloud server. Unlike Dropbox, we don’t store your files for you – only if you run ownCloud on a machine you own, the data is under your control.
You can install ownCloud on your own PC, on some old PC at home, on a dedicated server somewhere else, or a VPS. It doesn’t really matter, just use what’s the easiest for you.
The ownCloud server synchronizes data with client applications. Clients can be installed on Windows, Mac, or Linux, and of course we have Android and iOS apps. You can also use ownCloud through the web interface in your day-to-day file sharing.
The server takes care of all the background tasks. It stores the files centrally, manages shares, users, and sync processes. It makes the ownCloud apps available and gives their functionality to the users.
So normally, the users only interact with their clients or the web interface. The server only runs in the background and does the hidden work.
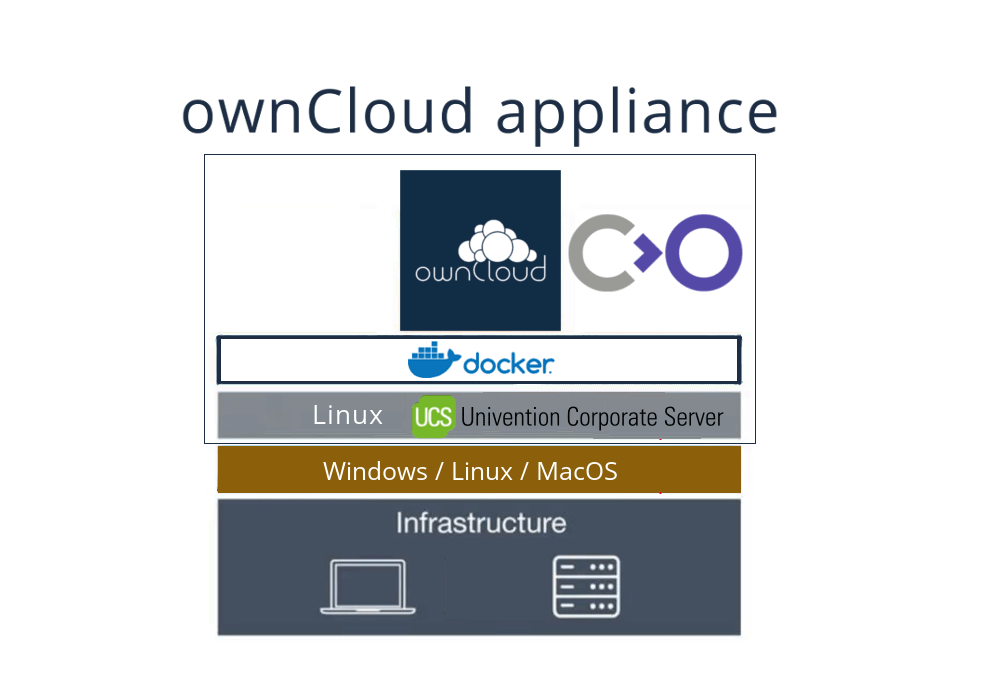
For whom is the ownCloud appliance intended:
If you want a low administration effort and don’t plan to have more than 500 users, the appliance is best for you. The appliance can also be run on a Windows Server. You can easily add 3rd party services like user management, collaboration software and others to extend your business processes. This recommended setup is perfect for most beginner use cases.
Install the ownCloud appliance!
You can install an ownCloud server in many different ways. On our download page, you can find tarballs, packages, docker containers – and the ownCloud appliance. They all have different advantages.
This may seem overwhelming first, but if you don’t know which of those installation methods is best for you, you should probably pick the ownCloud appliance. It will let you get started using ownCloud quickly and easily. You don’t need any special IT skills to set it up.
To make the installation possible for everyone, we prepared this small guide. It takes you through the whole installation process in 7 steps. Grab a coffee and tackle it, then it’s no big deal to set up your own cloud server.
Stay tuned! We will soon publish more posts on what else you can do with ownCloud appliances – e.g. advanced configuration options and integration of other Univention apps.

The beginning of the ownCloud appliance setup process.
Limitations of ownCloud
| Limitations of ownCloud | Alternative Solution |
|---|---|
| Extremely large files eg. individual files that are larger than 16GB. | A storage file share should be requested (ie. a CIFS or NFS file share/export). |
| Data or files that are to be directly accessed by systems undertaking intensive analysis and modelling. | Copy the data to be analysed from ownCloud to the processing system (eg. High Performance Grid); run the analysis/modelling job on the local copy of the data; and when completed, copy the resulting data/files back to ownCloud. |
| Synchronising folders to a desktop where the total folders/files synchronised exceeds 200GB | Contact the ARCS team for advice. |
| Interactive and simultaneous document authoring with multiple people. | Contact the ARCS team for advice. |
ownCloud Benefits
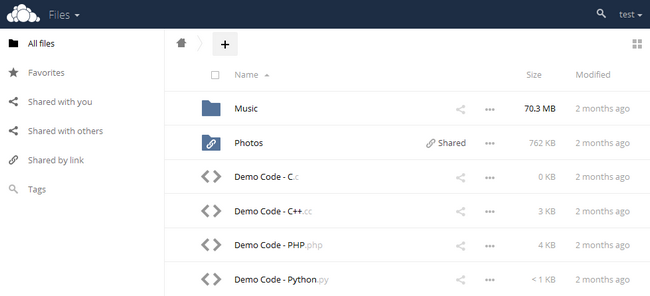
Users can seamlessly access their data whenever and wherever they are using the native Android and iOS apps, which can automatically upload pictures after they are taken. The desktop client allows syncing files at home by keeping selected folders synced between devices. Users can send password-protected public links to other people, allowing them to upload files. It also notifies users when file sharing takes place. Its collaboration features make it possible for users to edit documents at once, or to comment on pictures and make video calls.
ownCloud serves Windows, Mac, Linux as well as native apps for Android and iOS, which makes it an ideal solution to be used on any device. Users can easily add external storage to their ownCloud via FTP, Dropbox, Swift, Amazon S3, Google Drive, OpenStack Object Storage, WebDAV, SMB/CIFS, local hard drives and more. Apps and data can be encrypted on local as well as on cloud storage, without the keys leaving the ownCloud server. However the keys can also be managed by an external key management tool if required. All data transfers are encrypted with HTTPS, based on the WebDAV standard.
Calendars and contacts can be accessed and easily shared. Rich text documents can be edited in real-time, while users can also read PDFs, watch videos, see pictures, and much more. Collaborative editing allows up to five people to collaborate on document files from within the browser. The software comes with activity feed and notifications to keep users updated about their activities related to their data.
6 creative ways to use ownCloud:
Let’s look at six creative things ownCloud can do. Some of these are possible because ownCloud is open source, whereas others are just unique features it offers.
1. A scalable ownCloud Pi cluster
Because ownCloud is open source, you can choose between self-hosting on your own server or renting space from a provider you trust—no need to put your files at a big company that stores it who knows where. Find some ownCloud providers here or grab packages or a virtual machine for your own server here.
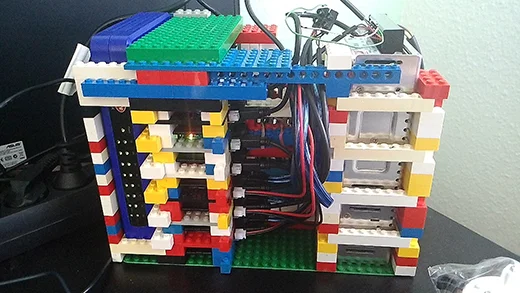
The most creative things we’ve seen are a Banana Pi cluster and a Raspberry Pi cluster. Although ownCloud’s scalability is often used to deploy to hundreds of thousands of users, some folks out there take it in a different direction, bringing multiple tiny systems together to make a super-fast ownCloud. Kudos!
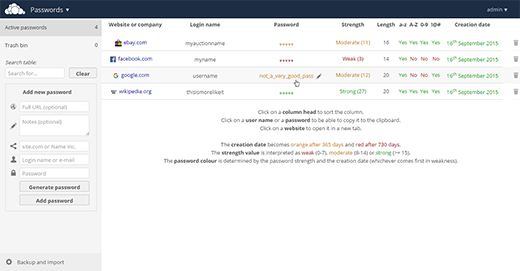
2. Keep your passwords synced
To make ownCloud easier to extend, we have made it extremely modular and have an ownCloud app store. There you can find things like music and video players, calendars, contacts, productivity apps, games, a sketching app, and much more.
Picking only one app from the almost 200 available is hard, but managing passwords is certainly a unique feature. There are no less than three apps providing this functionality: Passwords, Secure Container, and Passman.
3. Store your files where you want
External storage allows you to hook your existing data storage into ownCloud, letting you to access files stored on FTP, WebDAV, Amazon S3, and even Dropbox and Google Drive through one interface.The “big boys” like to create their own little walled gardens—Box user can only collaborate with other Box users; and if you want to share your files from Google Drive, your mate needs a Google account or they can’t do much. With ownCloud’s external storage, you can break these barriers.A very creative solution is adding Google Drive and Dropbox as external storage. You can work with files on both seamlessly and share them with others through a simple link—no account needed to work with you!
4. Get files uploaded
Because ownCloud is open source, people contribute interesting features without being limited by corporate requirements. Our contributors have always cared about security and privacy, so ownCloud introduced features such as protecting a public link with a password and setting an expire date years before anybody else did.Today, ownCloud has the ability to configure a shared link as read-write, which means visitors can seamlessly edit the files you share with them (protected with a password or not) or upload new files to your server without being forced to sign up to another web service that wants their private data.This is great for when people want to share a large file with you. Rather than having to upload it to a third-party site, send you a link, and make you go there and download it (often requiring a login), they can just upload it to a shared folder you provide, and you can get to work right away.
5. Get free secure storage
We already talked about how many of our contributors care about security and privacy. That’s why ownCloud has an app that can encrypt and decrypt stored data.Using ownCloud to store your files on Dropbox or Google Drive defeats the whole idea of retaking control of your data and keeping it private. The Encryption app changes that. By encrypting data before sending it to these providers and decrypting it upon retrieval, your data is safe as kittens.
6. Share your files and stay in control
As an open source project, ownCloud has no stake in building walled gardens. Enter Federated Cloud Sharing: a protocol developed and published by ownCloud that enables different file sync and share servers to talk to one another and exchange files securely. Federated Cloud Sharing has an interesting history. Twenty-two German universities decided to build a huge cloud for their 500,000 students. But as each university wanted to stay in control of the data of their own students, a creative solution was needed: Federated Cloud Sharing. The solution now connects all these universities so the students can seamlessly work together. At the same time, the system administrators at each university stay in control of the files their students have created and can apply policies, such as storage restrictions, or limitations on what, with whom, and how files can be shared.
-OwnCloud on cloud gives you freedom and control over your own data.A personal OwnCloud on cloud which runs on your own server. OwnCloud on cloud allows you to access your data wherever you are, when you need it. OwnCloud is released under the GNU AFFERO GENERAL PUBLIC LICENSE.
In order for desktop machines to synchronize files with their OwnCloud cloud server, desktop clients are available for PCs running Windows, OS X, FreeBSD or Linux. Mobile clients exist for iOS and Android devices. Files and other data (such as calendars, contacts or bookmarks) can also be accessed, managed and uploaded using a web browser without any additional software. Any updates to the file system are pushed to all computers and mobile devices connected to a user’s account.
The OwnCloud cloud server is written in the PHP and JavaScript scripting languages. For remote access, it employs sabre/dav, an open-source WebDAV server. OwnCloud is designed to work with several database management systems, including SQLite, MariaDB, MySQL, Oracle Database and PostgreSQL.OwnCloud is owned by OwnCloud (https://owncloud.org/) and they own all related trademarks and IP rights for this software.
Cognosys provides hardened images of OwnCloud on all public cloud ( AWS marketplace and Azure).
Deploy your OwnCloud Web Content securely on cloud i.e. AWS marketplace and Azure with Reliable Services offered by Cognosys at one-click with easy written and video tutorials.
Secured ownCloud on CentOS 7.3
Secured ownCloud on Ubuntu 14.04 LTS
OwnCloud on Cloud For Azure

Features
Few features and benefits that ownCloud :
Access, Share and Sync Your Data with OwnCloud
OwnCloud provides you with access to your data through a web interface, sync clients or WebDAV while providing a platform to view, sync and share across devices. It is a self-hosted file sync and share server that is all under your control. Its open architecture is extensible through simple but powerful API for plugins and applications that works with any storage.
Access to Everything Important
With ownCloud you are able to store all of your private pictures, documents, calendars and contacts on your server at home. You can access your existing data on an FTP drive at work, shared images with Dropbox through your ownCloud server. It should be run in a place that you trust and access all the data you want in one location. ownCloud also gives you the capability to access your data through your IOS and Android devices from anywhere in the world. You can automatically upload pictures after taking them, sync files at home or work and access the web interface to view, share or edit your files alone or with others.
Ability to Share ownCloud with Anyone
You are also able to send password protected links for others to upload files. You will receive notifications on your phone when you receive a share from another or your own ownCloud server. A place where you can edit documents together, have video calls and comment on photos that are shared by or with you. You can easily share and collaborate with whomever you choose.
There are many features and benefits that ownCloud has to offer and with a safe place to store your files, data, images and anything else you feel is important. ownCloud is an open source web application that you can trust.
ownCloud 7 Features:
Main Features
- Improved user-interface including a new sidebar
- Files list supports sorting and infinite scrolling
- Removal of the “Shared” Folder – shares can now be moved anywhere
- Better Display of sharing information including new sharing overview pages
- Overview of external storage mounts of the current user
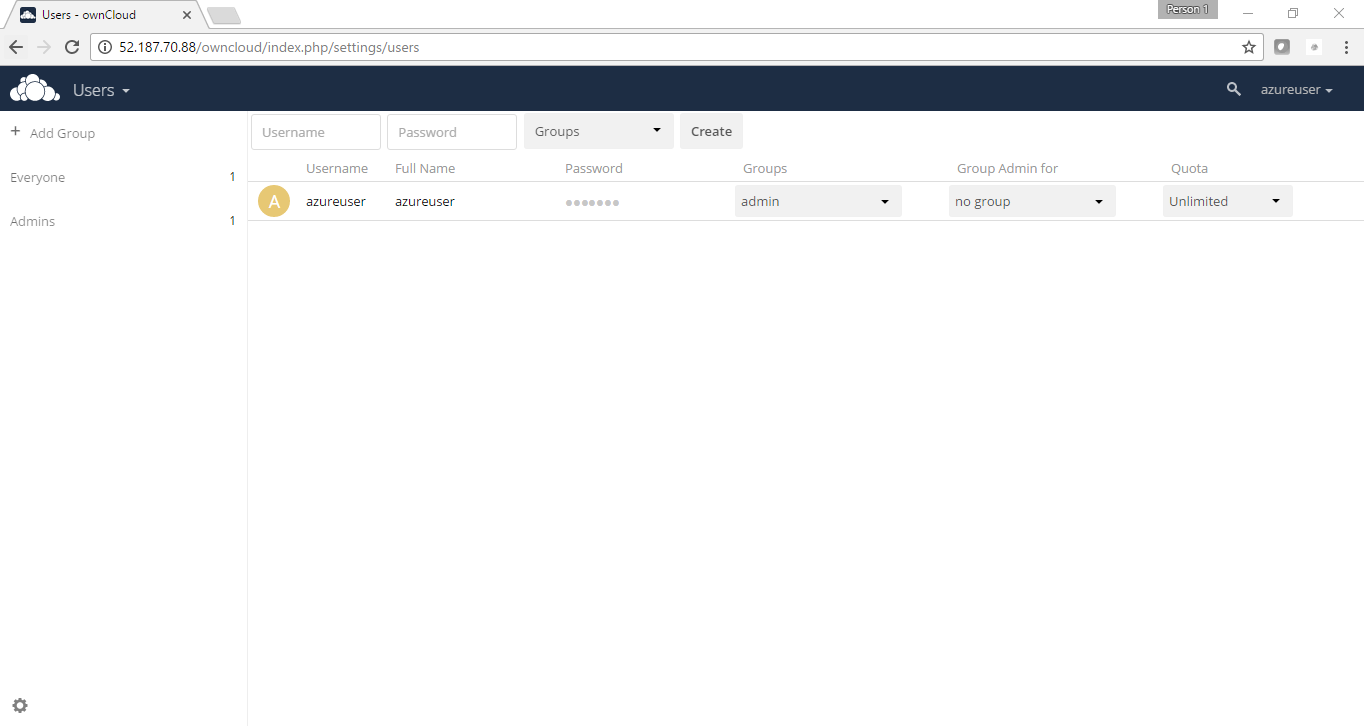
- New user-management interface with better group management and search
- ownCloud Documents gets annotation and MS Word support
- Syncing speed improvements
- Big web-interface speed improvements because of static css/js files and more AJAX
- First version of server to server sharing
- Improved activity app including a new design
- Send activity notification emails
- Support for SWIFT based object stored as primary storage
- Responsive design to work better on tablets and smartphones
- New external storage backend that uses ownCloud credentials to connect to a Samba share
- Overlay icon API for clients – now sync status icons can be shown on files directly on the desktop!
Minor Features
- Password strength indicator
- enable/disable sharing by group
- enable apps by group
- Default share expire
- Force users to set a sharing password
- LDAP improvements
- Antivirus app offers more options if a virus is detected
- New web hooks system
- A migration script can migrate between different databases
- Improved ownCloud upgrade process
- Mailserver configuration wizard
- Email template editor
- Better controllers for App Framework
- Simple database layer for App Framework
- Support DB connections via sockets
- Easy CORS implementation for App Framework
- PDF viewer for public shared documents
- Up to date app development documentation
-Major Features of OwnCloud :
- Access Your Data
- Sync Your Data
- Share Your Data
- Versioning
- Encryption
- Drag and Drop Upload
- Viewer for ODF Files
- Application API’s
- Migration and Backup
- Tasks
- Application Store
- Calendars
- File Notifications
- Galleries
- External Storage
- Logging
- LDAP / Active Directory
Azure
Installation Instructions For Ubuntu
Note : How to find PublicDNS in Azure
Step 1) SSH Connection: To connect to the deployed instance, Please follow Instructions to Connect to Ubuntu instance on Azure Cloud
1) Download Putty.
2) Connect to the virtual machine using following SSH credentials:
- Hostname: PublicDNS / IP of machine
- Port : 22
Username: Your chosen username when you created the machine ( For example: Azureuser)
Password: Your Chosen Password when you created the machine ( How to reset the password if you do not remember)
Step 2) Database Login Details:
- MYSQL Username : root || MYSQL Password : Passw@rd123
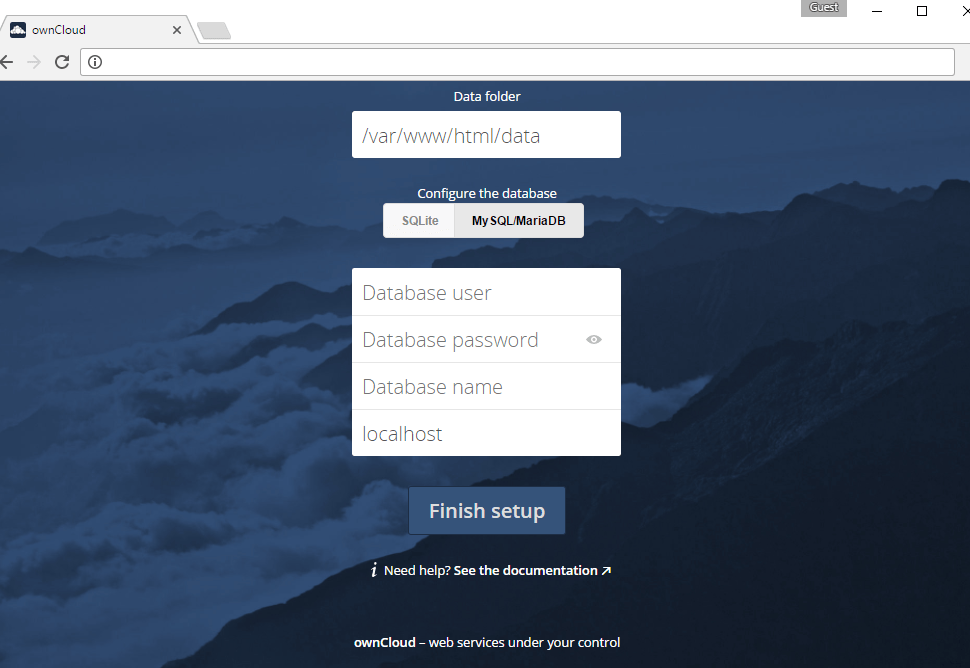
Note: For Stack Database: MySQL DB owncloud with user owncloud and password Passw@rd123 has already been created. Please use this MySQL database for you Stack Configuration.
Please change the password immediately after the first login.
Step 3) Application URL: Access the application via a browser at http://PublicDNS/.
Step 4) Other Information:
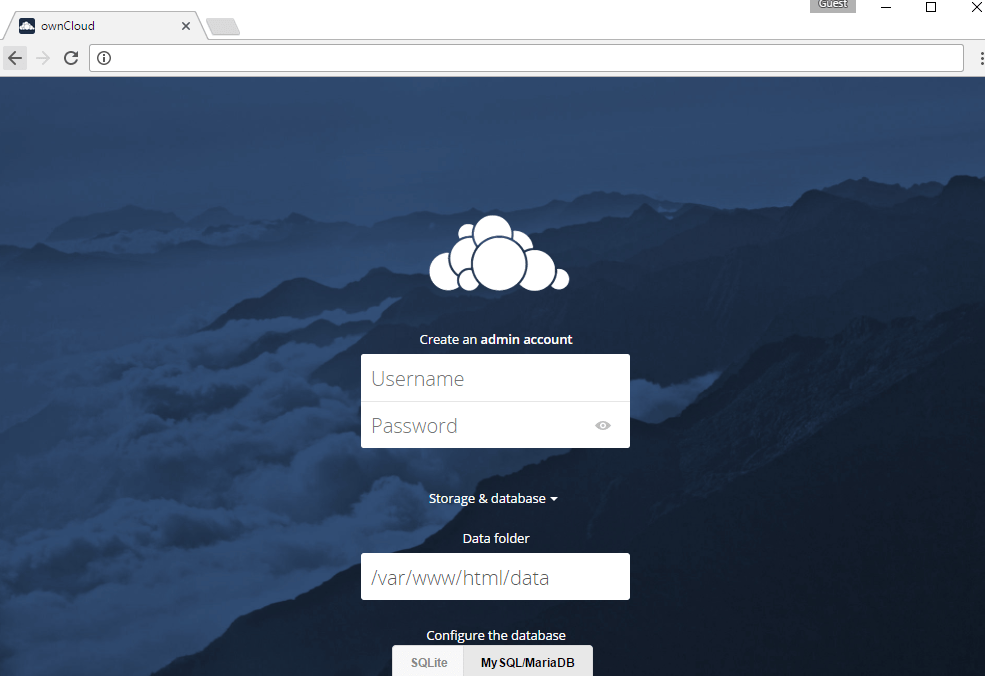
Note: Please do the initial OwnCloud 9 setup with http://YourIP/
1. Default installation path: will be in your web root folder “/var/www/html/”
2. Default ports:
-
- Linux Machines: SSH Port – 22
- Http: 80
- Https: 443
- MYSQL ports: By default, these are not open on Public Endpoints. MYSQL: 3306
Configure custom inbound and outbound rules using this link
3. To access Webmin interface for management please follow this link
Installation Instructions For Centos
Note : How to find PublicDNS in Azure
Step 1) SSH Connection: To connect to the deployed instance, Please follow Instructions to Connect to Centos instance on Azure Cloud
1) Download Putty.
2) Connect to virtual machine using following SSH credentials :
- Hostname: PublicDNS / IP of machine
- Port : 22
Username: Your chosen username when you created the machine ( For example: Azureuser)
Password : Your Chosen Password when you created the machine ( How to reset the password if you do not remember)
Step 2) Database Login Details:
- MYSQL Username : root || MYSQL Password : Passw@rd123
Note: For Stack Database: MySQL DB owncloud with user owncloud and password Passw@rd123 has already been created. Please use this MySQL database for you Stack Configuration.
Please change the password immediately after the first login.
Step 3) Application URL: Access the application via a browser at http://PublicDNS/.
Step 4) Other Information:
Note: Please do the initial OwnCloud 9 setup with http://YourIP/
1. Default installation path: will be in your web root folder “/var/www/html/”
2. Default ports:
- Linux Machines: SSH Port – 22
- Http: 80
- Https: 443
- MYSQL ports: By default, these are not open on Public Endpoints. MYSQL: 3306
Configure custom inbound and outbound rules using this link
3. To access Webmin interface for management please follow this link
Step by Step Screenshots:

Installation Instructions For Windows
Installation Instructions for Windows
Step 1) VM Creation:
- Click the Launch on Compute Engine button to choose the hardware and network settings.
- You can see at this page, an overview of Cognosys Image as well as estimated cost of running the instance.
- In the settings page, you can choose the number of CPUs and amount of RAM, the disk size and type etc.
Step 2) RDP Connection: To initialize the DB Server connect to the deployed instance, Please follow Instructions to Connect to Windows instance on Google Cloud
Step 3) Database Login Details:
The below screen appears after successful deployment of the image.

For local MySQL root password, please use the temporary password generated automatically during image creation as shown above.
i) Please connect to Remote Desktop as given in step 2 to ensure stack is properly configured and DB is initialized.
ii) You can use MySQL server instance as localhost, username root and password as shown above.
If you have closed the deployment page you can also get the MySQL root password from VM Details “Custom metadata” Section.
Step 4) Application URL:
1.Default installation path: will be in your root folder “C:\iometer-1.1.0-win64.x86_64-bin”
2.Default ports:
- Windows Machines: RDP Port – 3389
- Http: 80
- Https: 443
Configure custom inbound and outbound rules using this link
Step 5) Other Information:
1.Default ports:
- Linux Machines: SSH Port – 22
2. To access Webmin interface for management please follow this link
