
1-click AWS Deployment 1-click Azure Deployment 1-click Google Deployment
Overview
MODX CMS is a free open source content management system created using PHP and a MySQL or Microsoft SQL server database. … Three years after the release of MODX Revolution, a known developer in the community launched Modmore, a place where you could get addons for your MODX website.
MODX, like many popular frameworks, is built with PHP. It can run on popular servers such as Apache, IIS, Lighttpd and nginx. Its database of choice is MySQL, and it uses xPDO as an ORB (object-relational bridge). xPDO is built directly on PDO, and uses an active record style pattern for database access. It can be compared to the likes of Doctrine or Propel, for example.
The Manager is built with ExtJS, Smarty templates, and MODX’s own API. Editing the manager itself and its dashboards, menus and other features is an ability built right in to the UI. You have fine control over everything in the Manager as far as what you want your clients to have access to.
Custom menus, and very fine-grained ACLs (access control lists) round out your back-end options. Security is probably one of the top features MODX fans love about it, though understanding it fully involves a significant learning curve.
MODX itself is backed by an LLC, which is MODX, LLC. They offer other products such as cloud hosting and consulting services. MODX is not an SGP (some guy’s project); it has a bit more staying power than some other modern CMSs that just popped up, created by one person, managed in their spare time. You can be pretty confident that if you choose MODX for your projects, it’s not going to disappear any time soon, and good support is available.
Installing MODX With An Existing Site :
Development sites often begin in a subdirectory, and then are moved to the root directory when completed. The subdirectory method is useful if you’ve got an existing site that must remain available during development, or for subdomain MODX installations. It is also possible to leave MODX in a subdirectory and use .htaccess to rewrite your urls to the root.
Existing Static HTML Site
If your existing site is static html with an index.html or similar start page, you can install MODX into the root folder alongside your static site while developing. When you are ready to go live, rename or move your static html files and MODX will take over. Do not enable Friendly URL’s if using this method until after your html files have been moved or renamed. As always, back up your existing site prior to installing MODX Revolution or making any changes to your current file structure.
Existing Other CMS or Dynamically Driven Site
Do not install MODX Revolution into a directory that contains another dynamically driven site or CMS until that site is removed. Use the subdirectory method to develop MODX in this case.
In all cases except for a new blank site, installing MODX Revolution to a subdirectory for development is the safest method.
Pre-DNS Transfer Installation to Temporary Directory
If your host provides a temporary installation folder to develop in prior to DNS transfer, once your DNS has been transferred you will need to reference the Moving Your Site to Another Server page and update the configuration files: core/config/config.inc.php, /config.core.php, /connectors/config.php, and /manager/config.core.php paths to point to your new root directory.
Installing MODX Revolution
Start the install process by loading your web browser and running the setup script by navigating to the setup/ folder.
You might want to check the Server Requirements page first. If you’re still having issues installing, please read the Troubleshooting Installation page.
Before running setup, make sure your core/cache/ and core/config/ directories are writable by PHP.
From there you will be asked to choose a language, and be presented with a welcome screen. Click Next when you’re ready.
Install Options
After this, you’ll be presented with a screen with some Install Options:
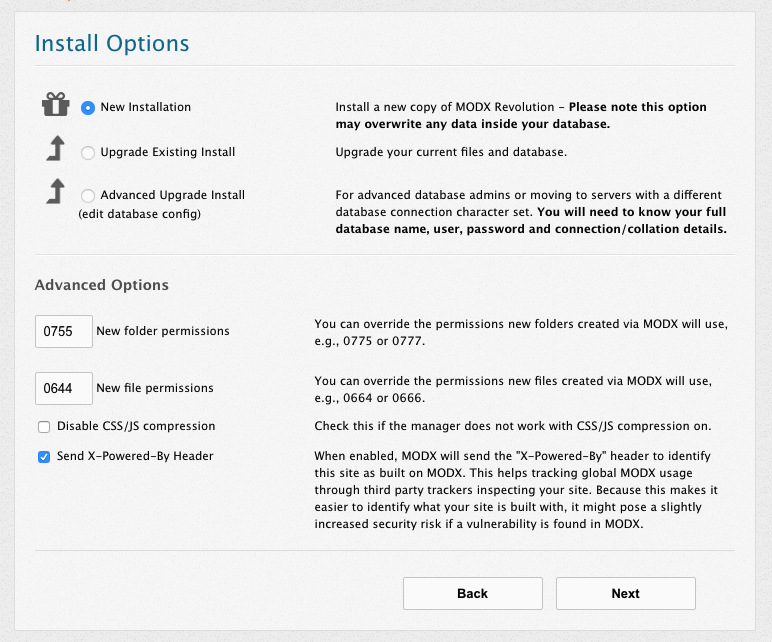
The New Installation option should be the only available option for you to choose. If you need to adjust the file permissions for your webserver, you can do so in the textfields below. Most servers will be fine with the default values.
When you’re finished, click Next to proceed.
Database Options
From here, you will get a form asking you for your database information:
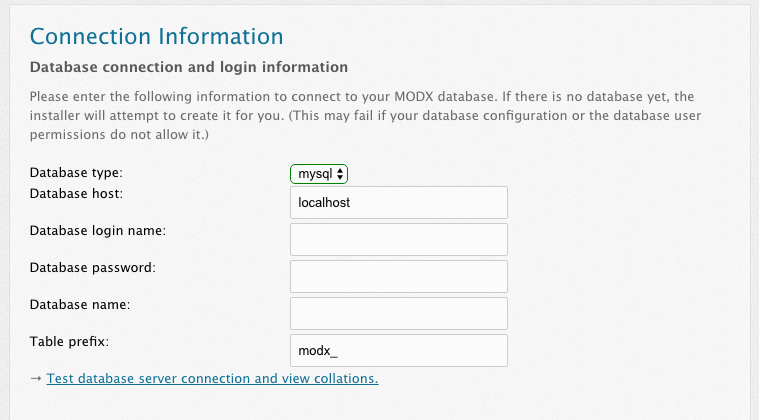
You can create your database and user prior to this step. Make sure your database user is associated with the new database and the user is given permission for all privileges for that database.
- Add in your database hostname, which is the URL at which your database is located. For most users, this will be ‘localhost’.
- Enter your database user name. On some hosts, your database username is prefixed with the site owner directory name such as
siteOwner_modxDatabase. In this case, the entire database name must be entered. Check your database tool in your control panel, or the database itself for such a prefix. - Your username may also be prefixed with the same site owner directory name. If so, you must prefix your username here the same. i.e.
siteOwner_databaseUserName. - Enter your password.
- Also, if you want, you can specify a different table prefix here. This tells MODX to prefix the tables with this value – this is useful should you want to make multiple MODX installations on one database.
- When finished, click the ‘Test database server connection and view collations’ link. Should you have any errors, they will show below. If you do have errors, check to make sure your database username and password are correct. Also, if your user does not have access to create a database, you might need to do that manually.
MySQL Notes
If you have your MySQL server on a different port, specify it like so: “my.database.com;port=3307”, with the ;port= appending the IP/hostname. If you are running your MySQL server with networking disabled, you can specify the socket name like this: “;unix_socket=MySQL”.
Microsoft SQL Server Notes
Support for Microsoft SQL Server was introduced in MODX Revolution 2.1 Depending on your SQL Server’s network configuration, there are different ways you may specify your host.
- Named pipe: (local)/SQLEXPRESS
- Tcp/ip: 127.0.0.1,2301 (IP, port)
Due to the way that the PDO driver for SqlSrv works, you may not get an error message or a response back after clicking ‘Test database server connection and view collations’. If this happens, it is an indication that there is a problem connecting to the database, authenticating or selecting the database itself. After verifying your settings, click the Back button to go to the previous page, and then Next to get back to the Database Options page.
Collations and Charsets
This will then popup another form for setting your database charset and collation:
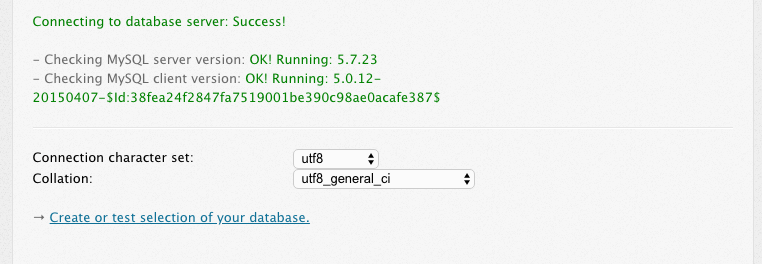
For most users you can leave these values at what they are. However, if you need to change them, make sure the collation matches the charset. Click the ‘Create or test selection of your database.’ after you’ve finished.
Microsoft SQL Server Notes MODX has only been tested with SQL Server’s Latin1 character set.
Creating an Administrator User
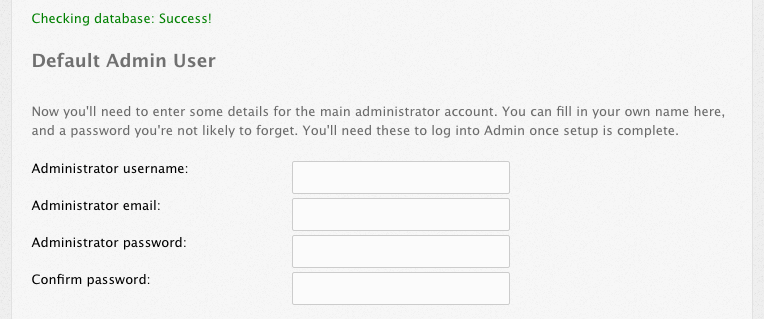
This form will now present you with a few fields for setting up your administrator user. Specify a username that you want to be the administrator username.
MODX recommends not using ‘admin’, as this is a common administrator username and is often the first username hackers check.
From there, put in your email (or the email of your administrator) and specify a password. Click next when you’re finished.
Some host’s server configurations won’t allow MODX to send emails if the System Setting emailsender (set at install to the email address entered for the default admin user) is not valid for the domain. If MODX is not sending registration or form emails, check the emailsender and set it to a valid email address for the hosted domain.
Pre-Installation Checks
MODX will then proceed with a list of checks to verify that your system is ready for installing. If any of these fail, you’ll need to proceed with the directions that it suggests to make sure your environment meets the Server Requirements and has the correct directories writable.
Once you’re ready, and all the checks pass, click ‘Install’ to proceed.
If you get a blank screen or cannot proceed after clicking ‘Install’, verify these steps:
- Make sure the directories “/core/packages”,”/core/cache”, “/core/import”, and “/core/export” are writable.
- Make sure your php.ini setting sets
memory_limitto 128M, andmax_execution_timeto 120 - Create a blank file “/core/config/config.inc.php” and make it writable. DO NOT COPY config.inc.tpl! Just make it a blank file!
- Post a message in the Revolution forum regarding your issue. State your server setup and installation info, and we’ll try and help you find a solution.
Post-Installation Summary
MODX will then let you know if any errors occurred during install, and prompt you to attempt reinstallation should any of those errors have occurred.
When install is successful, click ‘Next’ to proceed, and you’ll be presented with one final option:
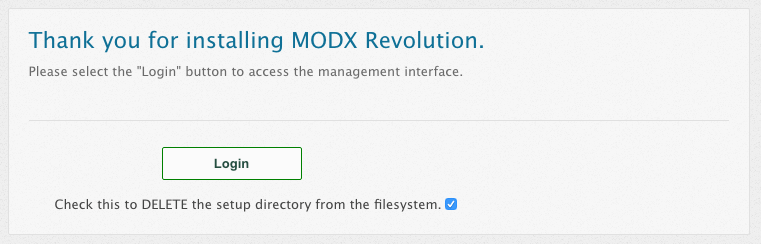
MODX recommends that you make sure to remove the setup/ directory after installing, to safeguard your site from anyone else trying to run setup on your site. You can do this by clicking the ‘Check this to DELETE the setup directory from the filesystem.’ checkbox.
WARNING: the setup application grants powerful and far-reaching control over your server. DO NOT leave it in place, after you’ve finished installing MODX.
When ready, click ‘Login’ to be presented with the Login form for the manager interface. You’re finished!
How To Install MODX CMS on Ubuntu 18.04 LTS :
Prerequisites
Before you begin, you will need the following:
- A virtual machine running on Ubuntu 18.04
- A non-root user with sudo privileges.
With these items in check, we are good to go.
MODX requires a web server based on PHP languages and also utilizes MariaDB database for its functioning. For this reason, you need to install MariaDB,PHP, and Apache on your system.
To install LAMP stack follow the steps below:
Step 1- Installing Apache Server
Run the command below to update your system:
- $ sudo apt update
To install Apache2 on Ubuntu, run the following command:
- $ sudo apt install apache2
Once Apache is installed, disable the directory listing by running the command below:
- $ sudo sed -i “s/Options Indexes FollowSymLinks/Options FollowSymLinks/” /etc/apache2/apache2.conf
Next, you should start and enable Apache2 service to ensure it always starts when the server boots.
- $ sudo systemctl start apache2.service
- $ sudo systemctl enable apache2.service
Step 2 – Installing MariaDB Database
Akeneo requires a database server to work properly and MariaDB is a good database server to start with. Run the command below to install it.
- $ sudo apt-get install mariadb-server mariadb-client
Once you have installed MariaDB, use the command below to start and enable the newly installed MariaDB service and ensure it start every time the server boots.
- $ sudo systemctl start mariadb.service
- $ sudo systemctl enable mariadb.service
Once you’re done, run the command below to secure the MariaDB service.
- $ sudo mysql_secure_installation
You will be prompted to answer a few questions as shown below:
Enter current password for root (enter for none): Since you just installed MariaDB and no password is set, Press Enter.
Set root password? [Y/n]: Press Y
New password: Enter password
Re-enter new password: Repeat the password
Remove anonymous users? [Y/n]: Y
Disallow root login remotely? [Y/n]: Y
Remove test database and access to it? [Y/n]: Y
Reload privilege tables now? [Y/n]: Y
Now restart the MariaDB server
- $ sudo systemctl restart mysql.service
Step 3 – Installing PHP Modules
You may not find PHP 7.1 on default repositories on Ubuntu 18.04. So, to install this service, you have to download it from third-party repositories.
To add a third party repository (Ondrej PHP repository), run the following commands:
- $ sudo apt-get install software-properties-common
- $ sudo add-apt-repository ppa:ondrej/php
Now, update the settings and upgrade the service to PHP 7.1.
- $ sudo apt update
To install PHP 7.1 and it’s related modules, run the following commands:
- $ sudo apt install php7.1 libapache2-mod-php7.1 php7.1-apcu php7.1-bcmath php7.1-common php7.1-mbstring php7.1-xmlrpc php7.1-soap php7.1-gd php7.1-xml php7.1-intl php7.1-mysql php7.1-cli php7.1-mcrypt php7.1-ldap php7.1-zip php7.1-curl
Once PHP is installed, open the default file for Apache2 PHP using the following commands:
- $ sudo nano /etc/php/7.1/apache2/php.ini
Now, make the following changes by editing the lines in the file then save.
- file_uploads = On
- allow_url_fopen = On
- memory_limit = 256M
- upload_max_filesize = 100M
- max_execution_time = 30
- max_input_vars = 1500
- date.timezone = America/Chicago
Step 2: Creating A Database for MODX CMS
After securing MariaDB, now log into MariaDB shell:
- $ sudo mysql -u root -p
Create a database and a root password for MODX:
- MariaDB [(none)]> CREATE DATABASE modxdb;
You also need to create a user for MODX database and grant it privileges:
- MariaDB [(none)]> CREATE USER ‘modx’@‘localhost’ IDENTIFIED BY ‘password’;
- MariaDB [(none)]> GRANT ALL ON modxdb.* TO ‘modx’@‘localhost’ IDENTIFIED BY ‘password’ WITH GRANT OPTION;
The next step is to flush out the privileges using the command below:
- MariaDB [(none)]> FLUSH PRIVILEGES;
Now, save and exit the MariaDB shell:
- MariaDB [(none)]> exit;
Step 3: Installing MODX
The first step here is to download the current stable version of MODX from their website. Use the command below to download it:
- $ wget https://modx.s3.amazonaws.com/releases/2.6.3/modx-2.6.3-pl.zip
After completing the download, extract the file using the command below:
- $ unzip modx-2.6.3-pl.zip
The next step is to copy this file to the web root directory on Apache:
- $ sudo cp -r modx-2.6.3-pl /var/www/html/modx
Now, grant permissions to MODX directory:
- $ sudo chown -R www-data:www-data /var/www/html/modx
- $ sudo chmod -R 775/var/www/html/modx
MODX needs an apache virtual host directive, we’ll execute the commands below to to create one.
- $ sudo nano /etc/apache2/sites-available/modx.conf
Now, include these lines to your configuration:
- <VirtualHost *:80>
- ServerAdmin admin@example.com
- DocumentRoot /var/www/html/modx
- ServerName example.com
- ServerAlias www.example.com
- <Directory /var/www/html/modx/>
- Options +FollowSymlinks
- AllowOverrideAll
- Requireall granted
- </Directory>
- ErrorLog${APACHE_LOG_DIR}/modx_error.log
- CustomLog${APACHE_LOG_DIR}/modx_access.log combined
- </VirtualHost>
Save and exit the file once you’re done.
Next execute the commands below to start MODX virtual host file and enable Apache rewrite module using:
- $ sudo a2ensite modx.conf
- $ sudo a2enmod rewrite
Once, that is done, run the command below to restart apache.
- $ sudo systemctl restart apache2
Step 4: Accessing MODX
Go to your web browser then enter the URLhttp://example.com/setup. Then follow the on-screen instructions until MODX is successfully installed.
First, select the language you want then press the Select .

Press the Next to initiate the installation.

Select New installation then press Next to proceed.

Now, enter the admin and database information, then click the Next.


Next, press the Install button start installing MODX on your system. The page below will appear:

The page below will appear. Click the Next button:

Then, click Login:

Enter the admin login details and press the Login as shown below:

You should see the page below to show MODX is installed successfully:

-MODX is a content management system that helps you create superlative web sites. There are two key benefits to MODX. First, it makes web sites easy for you and others you designate as site admins to maintain. Second, once you get used to it, it allows you to create very complex web sites in a very short time. Things that would take many lines of code for you to do yourself can often be accomplished with a line or two in MODX.
Within the MODX manager, you have access to a built-in package library which contains most of what any developer would need for common tasks. Creating your own plugins and scripts is quite trivial and there are some good for-pay extras out there too. It helps you take control of your online content. An Open Source PHP application framework, it frees you to built sites exactly how you want and make them 100% yours. Zero restrictions and fast to build. Super-simple templates in regular HTML/CSS/JS (any lib you want). Registered user systems and a killer community. Welcome to web-building nirvana.
MODX Revolution (Revo) is an easy-to-use Content Management System (CMS) and Application Framework rolled into one. Despite the limitless possibilities that MODX affords you, we think you’ll find it refreshingly intuitive to work with. At every step, MODX strives to deliver Creative Freedom.
In addition to this documentation site, the MODX Community is vibrant and always willing to help. Go ahead and ask questions there – you’ll be pleasantly surprised at the responsiveness of the MODX user base. Additionally, there are trusted, experienced MODX Professionals with whom you can engage to get the job done. MODX also has vendor-backed commercial support options, so no matter your needs and requirements – you’re covered.
MODX is released under the GNU/GPL license.
MODX is owned by MODX (https://modx.com/) and they own all related trademarks and IP rights for this software.
MODX on Cloud runs on Amazon Web Services (AWS) and Azure. MODX on cloud has brought the revolution in creating websites and manage without any limits.
Cognosys provides hardened images of MODX on all public cloud i.e. AWS marketplace and Azure.
Secured MODX on Ubuntu 14.04 LTS
Secured MODx CMS on Windows 2012 R2
MODx CMS on Cloud For AWS
MODx CMS on Cloud For Azure
Features
Features:
Any Design, Any Framework
If you can prototype it, MODX can power it with pixel-perfect precision.
- Supports Bootstrap, Foundation, and any other front-end technology.
- Power React, Vue, Angular and any other Javascript projects.
- Supported HTML5/CSS3 in 2005, supporting HTML6 today.
Extend MODX with Extras
Unlike other CMS platform plugins, MODX Extras are designed to be easily tailored to your specific design and requirements.
- More adaptable Extras means fewer plugins and extensions to manage.
- Power testimonials, directories, store locators, and more as easy as a blog.
- Visual drag-and-drop content authoring with the Fred Extra.
Integrate Anything
Connect to the tools your team already uses – MODX easily integrates with anything that has an API.
- Works with any PHP library to communicate with your data points.
- xPDO processesor can connect to, maintain, and extend your database.
- Take advantage of any HTML, CSS, or Javascript library you wish.
Additional MODX features include:
- Graphical web-based installer.
- Supports PHP 5.1.1 and above.
- Supports WYSIWYG rich-text editors.
- The Manager application works cross-browser and cross-platform, including Firefox, Safari, and Internet Explorer on Windows, Mac OS X (Firefox and Safari), and Linux (Firefox).
- Can be installed under IIS, Apache, Lighttpd, Hiawatha, Cherokee, nginx, and Zeus web servers.
- Supports any Ajax library, including jQuery, MooTools, ExtJS, and Prototype.
- Recursive parser for nested functionality.
- Complete control of all metadata and URL structure for Search Engine Optimization (SEO) purposes.
- Object-oriented, MVC compliant core code.
- Role-based permissions for the Manager.
- Ability to customize the Manager on a per-deployment basis.
- Ability to install add-ons right from the Manager.
- Ecommerce integration via Foxy Cart.
Major Features of Modx
-
- ModX is FREE
- ModX is easy to use
- ModX is SEO optimized
- ModX gives you the freedom to create your pages exactly the way you want them
-
- Adding and managing Snippets
- Adding and managing Chunks
-
- Adding and managing Plugins
- Adding and managing Modules
AWS
Installation Instructions For Ubuntu
Note: How to find PublicDNS in AWS
Step 1) SSH Connection: To connect to the operating system,
1) Download Putty.
2) Connect to virtual machine using following SSH credentials :
- Hostname: PublicDNS / IP of machine
- Port : 22
Username: To connect to the operating system, use SSH and the username is ubuntu.
Password : Please Click here to know how to get password .
Step 2) Database Login Details:
Username : root || Password : Passw@rd123
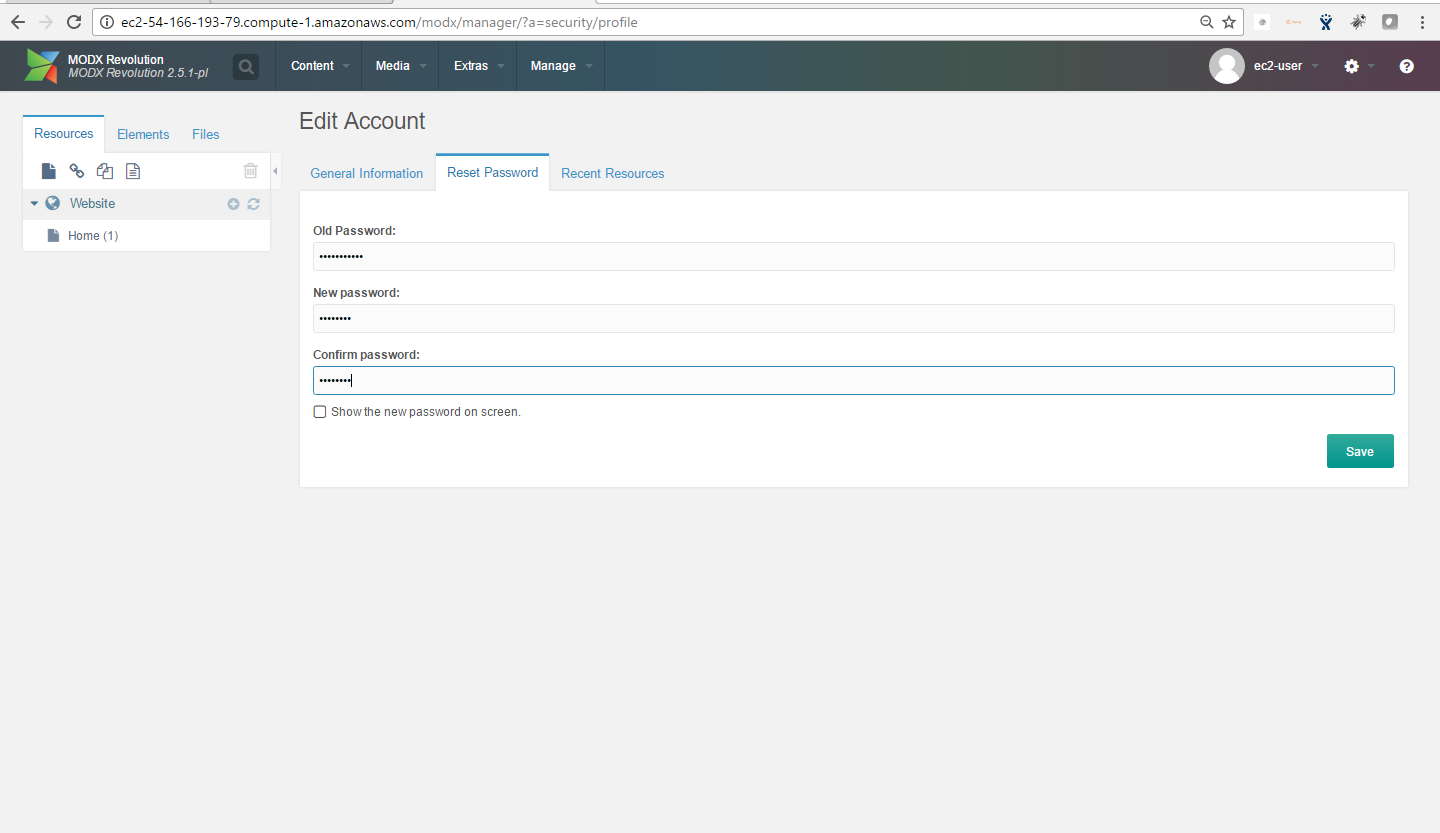
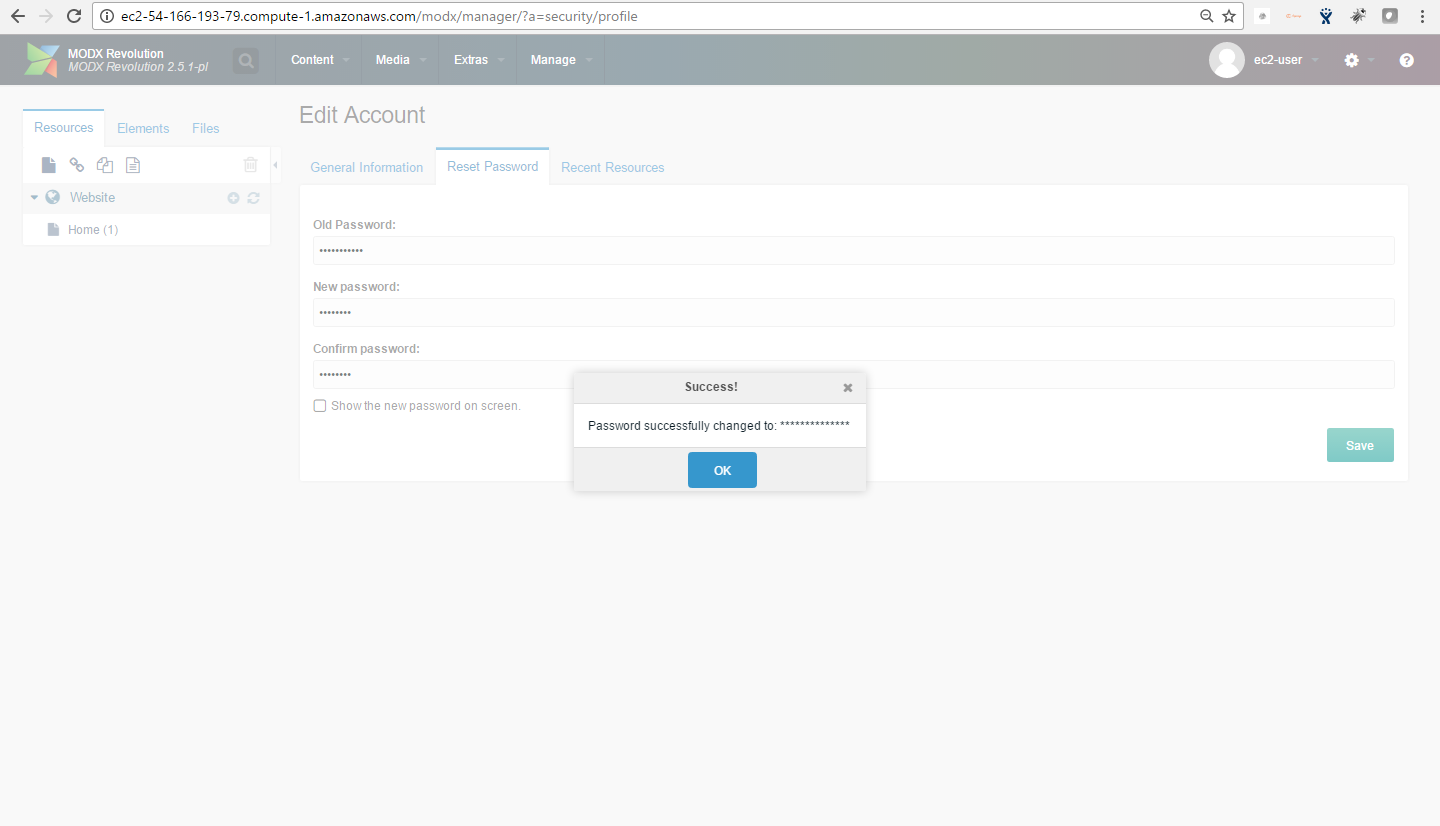
Note: Please change the password immediately after the first login.
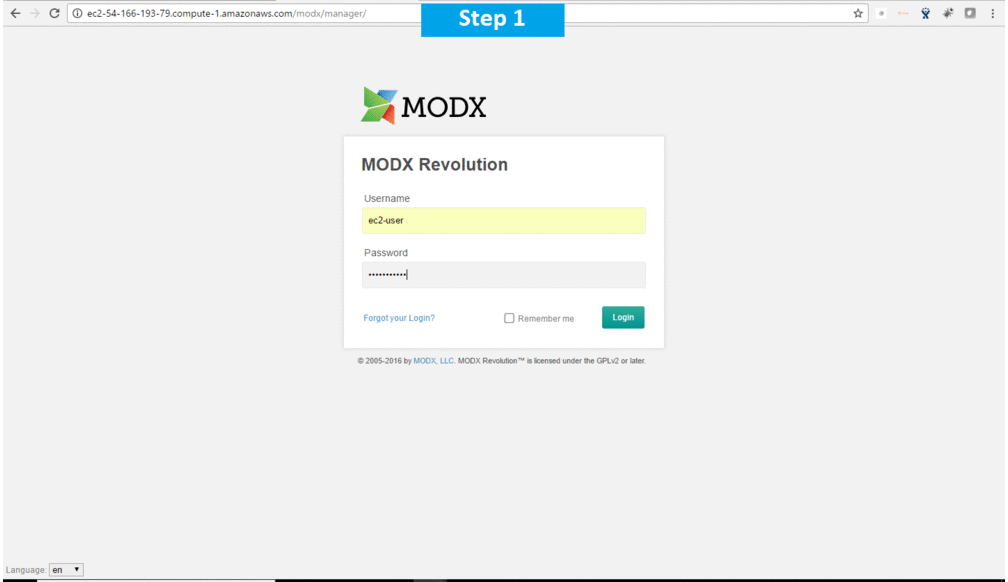
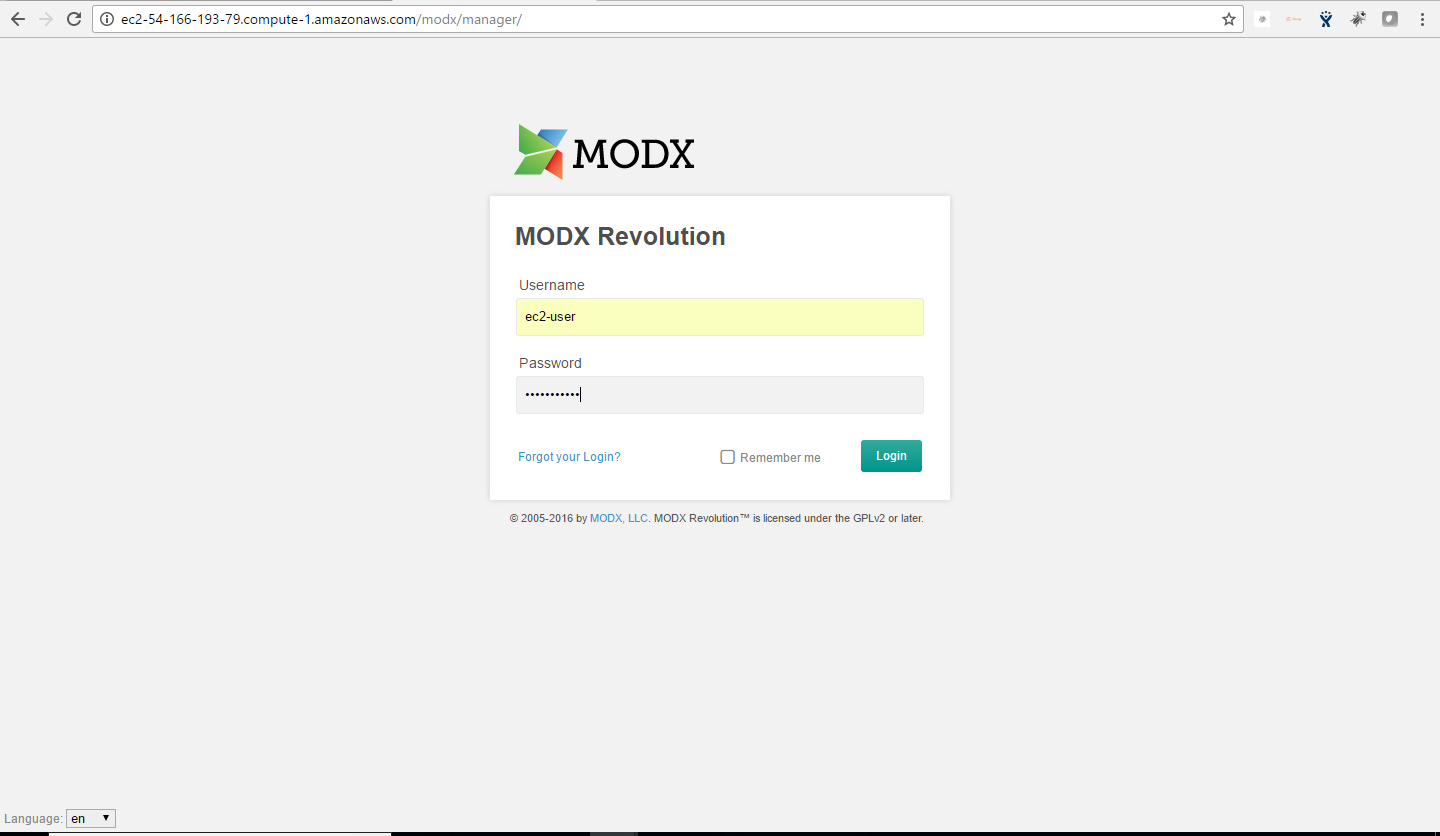
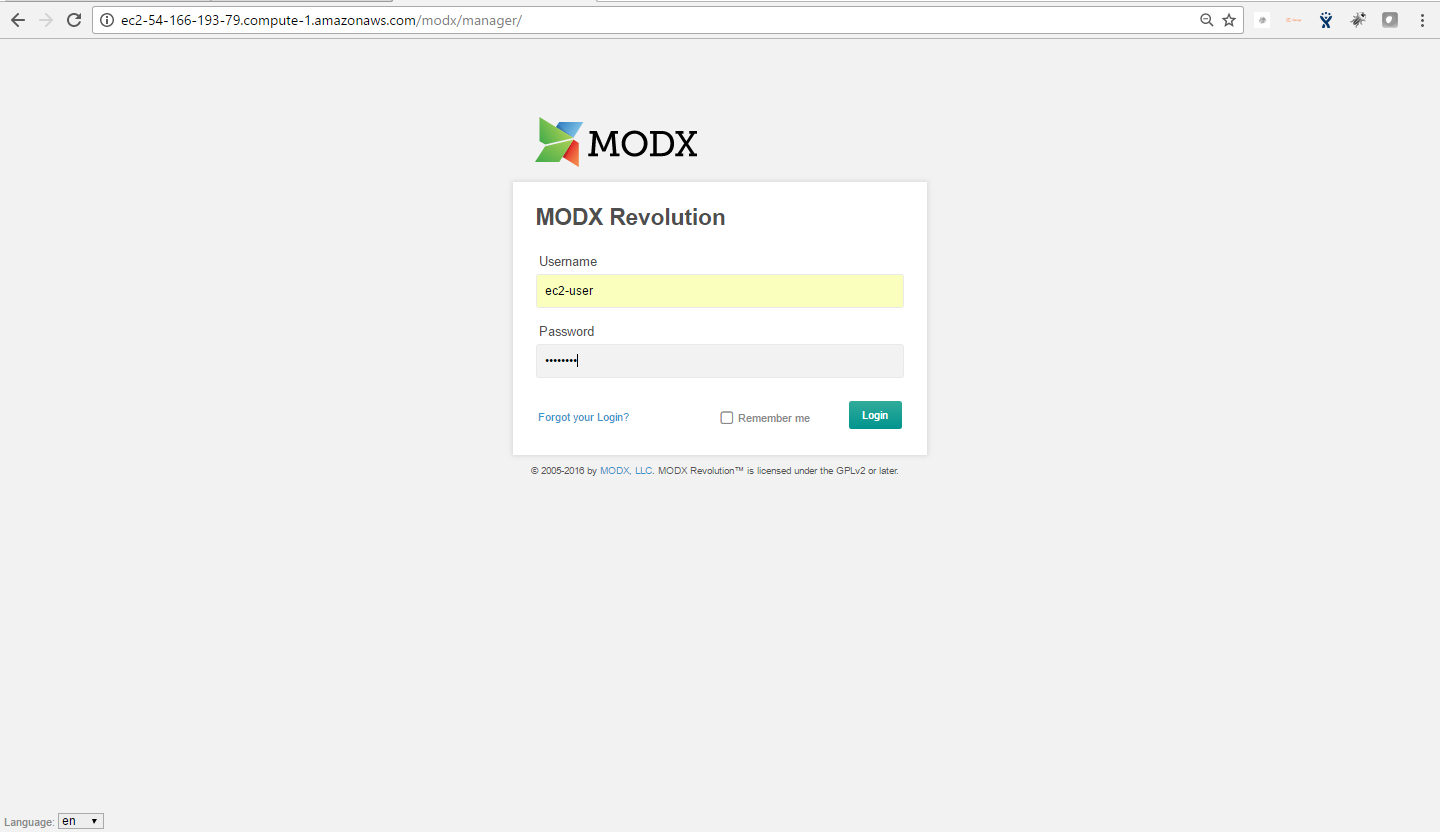
Step 3) Application URL: Access the application via a browser at http://PublicDNS/modx
- Username : ec2-user
- Password : Passw@rd123
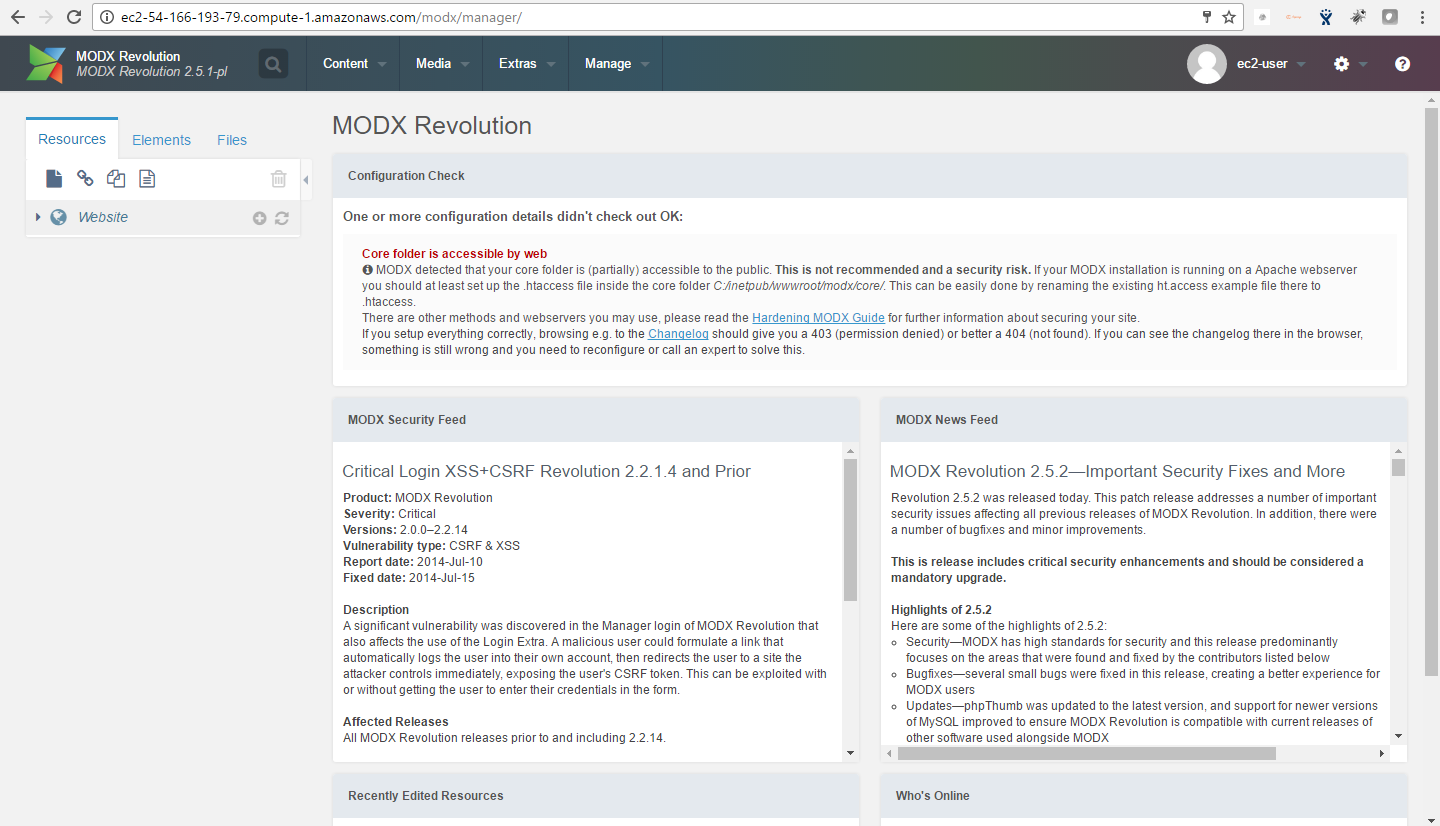
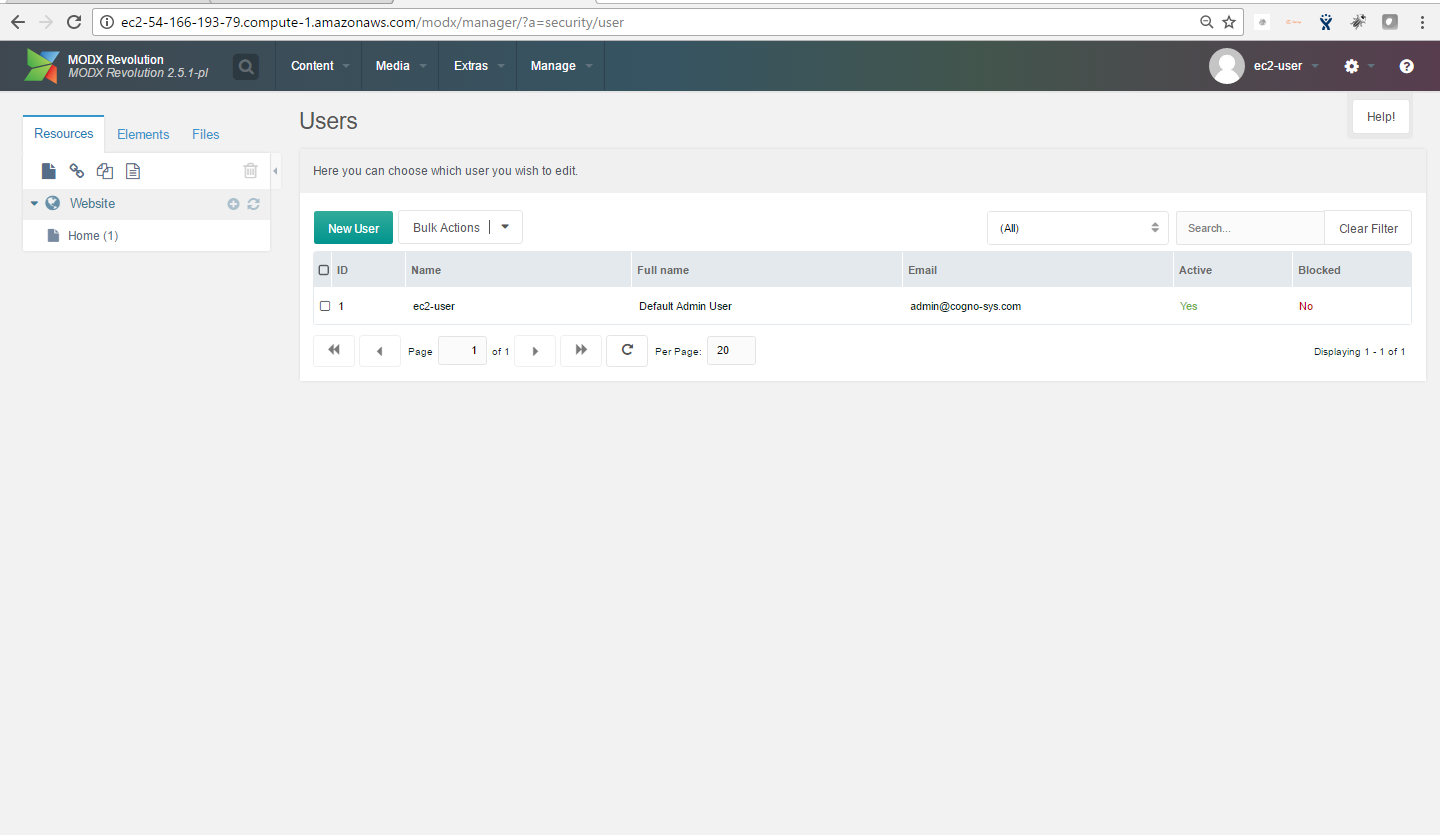
Steps to access the Admin Panel:
- To login to MODX Administrative Panel, you need
to open your browser and navigate to http://localhost/MODx/manager - Enter username and password in the given fields and click on the “Login” button to access the Admin Panel.
- After successful login to the Admin Panel, you will get access to MODX Dashboard.
Step 4) Other Information:
1. Default installation path: will be in your web root folder “/var/www/html/modx”.
2. Default ports:
- Linux Machines: SSH Port – 22 or 2222
- Http: 80 or 8080
- Https: 443
- Mysql ports: By default these are not open on Public Endpoints. Internally Mysql server: 3306
Configure custom inbound and outbound rules using this link
Installation Instructions For Windows
Note: How to find PublicDNS in AWS
Step 1) RDP Connection: To connect to the deployed instance, Please follow Instructions to Connect to Windows instance on AWS Cloud
Connect to the virtual machine using following RDP credentials:
- Hostname: PublicDNS / IP of machine
- Port : 3389
Username: To connect to the operating system, use RDP and the username is Administrator.
Password: Please Click here to know how to get password .
Step 2) Database Login Details:
Username : root || Password : Passw@rd123
Note: Please change the password immediately after the first login.
Step 3) Application URL: Access the application via a browser at http://PublicDNS/modx
- Username : ec2-user
- Password : Passw@rd123
Steps to access the Admin Panel:
- To login to MODX Administrative Panel, you need
to open your browser and navigate to http://localhost/MODx/manager - Enter username and password in the given fields and click on the “Login”button to access the Admin Panel.
- After successful login to the Admin Panel, you will get access to MODX Dashboard.
Step 4) Other Information:
1.Default installation path: will be in your web root folder “C:\inetpub\wwwroot\modx”
2.Default ports:
- Windows Machines: RDP Port – 3389
- Http: 80
- Https: 443
- Mysql ports: By default these are not open on Public Endpoints. Internally Mysql server: 3306
Configure custom inbound and out bound rules using this link
AWS Step by Step Screenshots
Azure
- Installation Instructions For Ubuntu
- Installation Instructions For Windows
- Installation Instructions For Centos
Installation Instructions For Ubuntu
Note : How to find PublicDNS in Azure
Step 1) SSH Connection: To connect to the deployed instance, Please follow Instructions to Connect to Ubuntu instance on Azure Cloud
1) Download Putty.
2) Connect to virtual machine using following SSH credentials:
- Hostname: PublicDNS / IP of machine
- Port : 22
Username: Your chosen username when you created the machine ( For example Azureuser)
Password : Your Chosen Password when you created the machine ( How to reset the password if you do not remember)
Step 2) Database Login Details:
Username : root || Password : Passw@rd123
Note: Please change the password immediately after the first login.
Note : How to find PublicDNS in Azure
Step 3) Application URL: Access the application via a browser at http://PublicDNS/
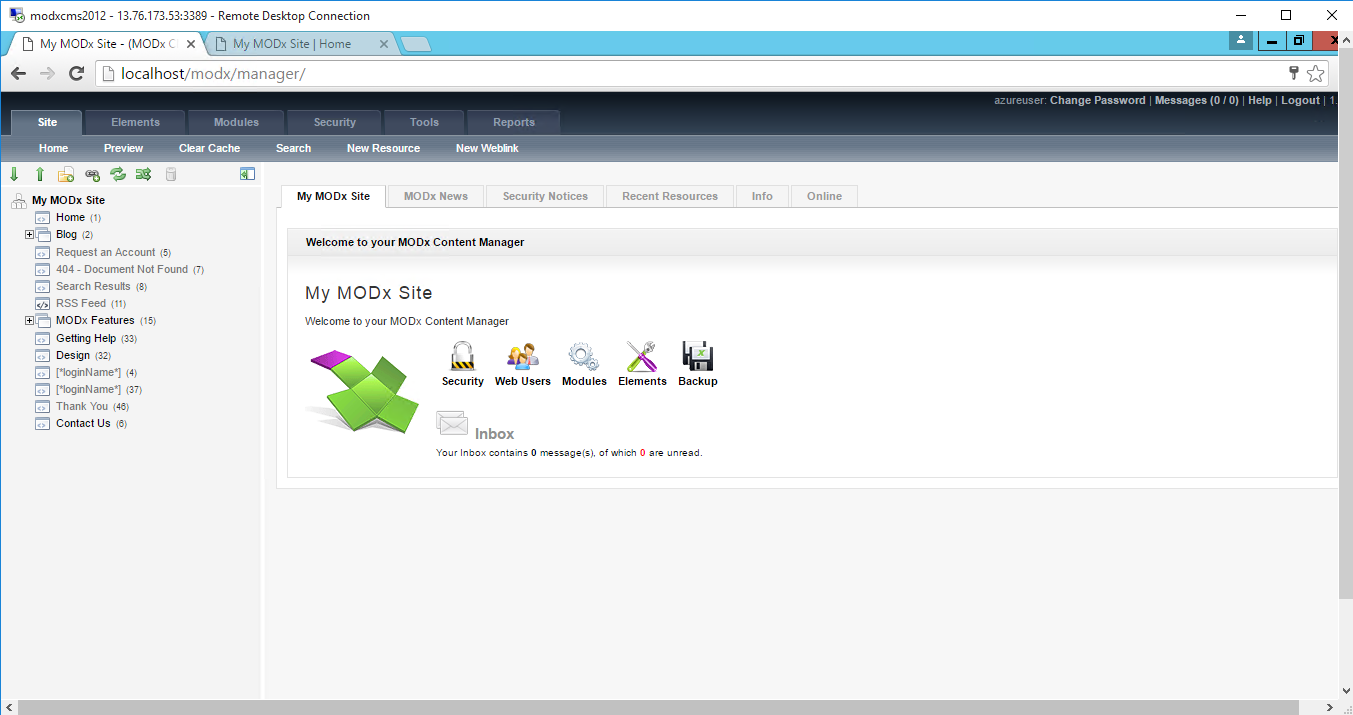
Steps to access the Admin Panel:
- To login to MODX Administrative Panel, you need
to open your browser and navigate to http://PublicDNS/modx/manager - Enter username and password in the given fields and click on the “Login”button to access the Admin Panel.
- After successful login to the Admin Panel, you will get access to MODX Dashboard.
Step 4) Other Information:
1. Default installation path: will be in your web root folder “/var/www/html”
2.Default ports:
- Linux Machines: SSH Port – 22
- Http: 80
- Https: 443
- MYSQL ports: By default, these are not open on Public Endpoints. MYSQL: 3306
Configure custom inbound and outbound rules using this link
3. To access Webmin interface for management please follow this link
Installation Instructions for Windows
Note: How to find PublicDNS in Azure
Step1 ) RDP Connection: To connect to the deployed instance, Please follow Instructions to Connect to Windows instance on Azure Cloud
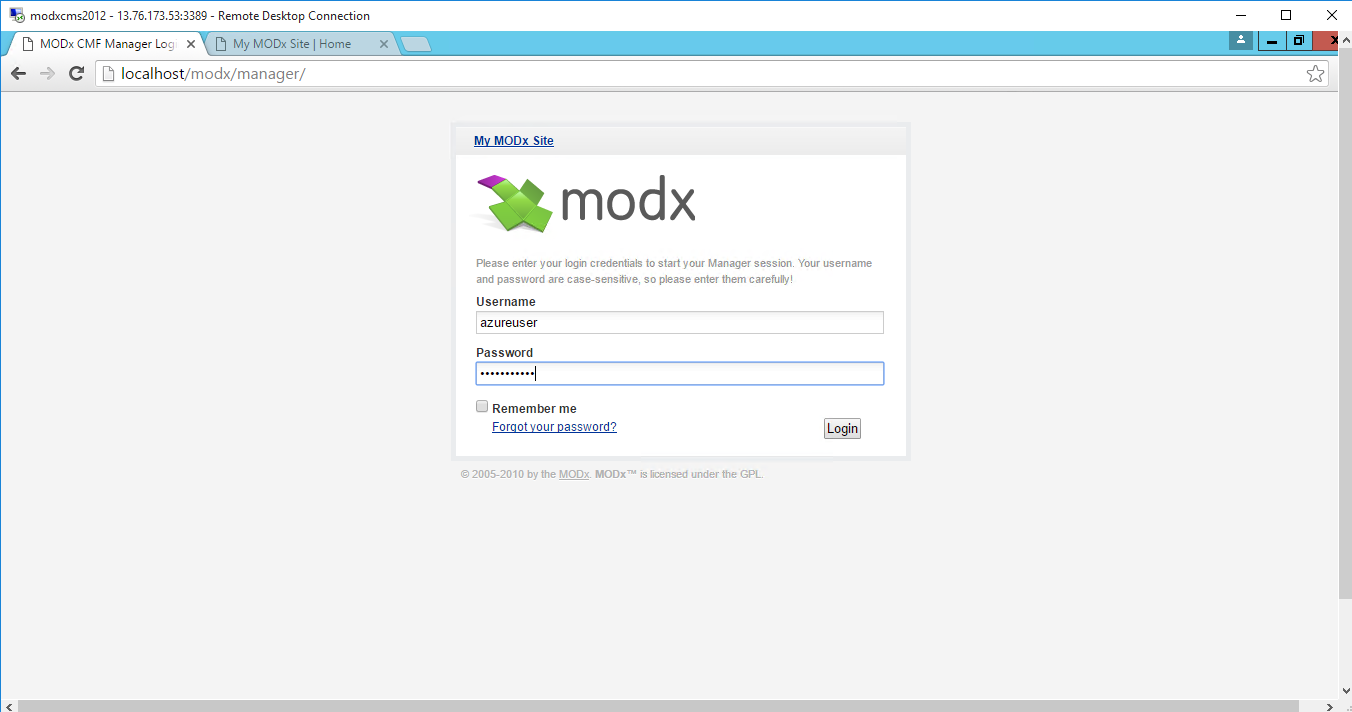
Connect to virtual machine using following RDP credentials:
- Hostname: PublicDNS / IP of machine
- Port : 3389
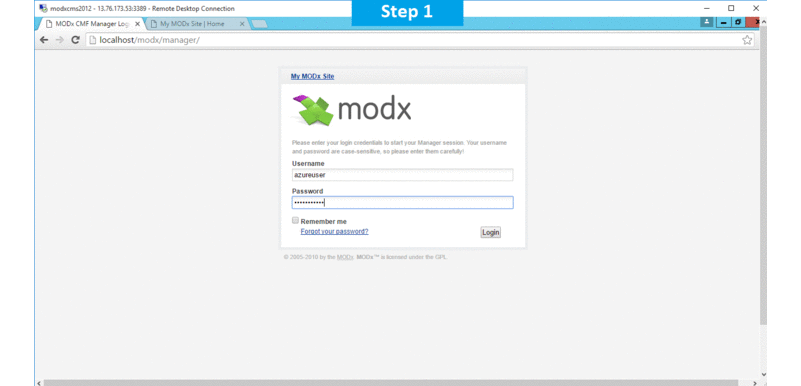
Username: Your chosen username when you created the machine ( For example Azureuser)
Password : Your Chosen Password when you created the machine ( How to reset the password if you do not remember)
Step 2) Database Login Details:
Username : root || Password : Passw@rd123
Note: Please change the password immediately after the first login.
Step 3) Application URL: Access the application via a browser at http://PublicDNS/modx
- Username : azureuser (Please create new user and delete this user)
- Password : Passw@rd123
Step 4) Other Information:
1.Default installation path: will be in your web root folder “C:\inetpub\wwwroot\modx”
2.Default ports:
- Windows Machines: RDP Port – 3389
- Http: 80
- Https: 443
- Mysql ports: By default these are not open on Public Endpoints. Internally Mysql server: 3306
Configure custom inbound and outbound rules using this link
Installation Instructions For Centos
Note : How to find PublicDNS in Azure
Step 1) SSH Connection: To connect to the deployed instance, Please follow Instructions to Connect to Centos instance on Azure Cloud
1) Download Putty.
2) Connect to virtual machine using following SSH credentials:
- Hostname: PublicDNS / IP of machine
- Port : 22
Username: Your chosen username when you created the machine ( For example Azureuser)
Password : Your Chosen Password when you created the machine ( How to reset the password if you do not remember)
Step 2) Database Login Details:
Username : root || Password : Passw@rd123
Note: Please change the password immediately after the first login.
Step 3) Application URL: Access the application via a browser at http://PublicDNS/
Steps to access the Admin Panel:
- To login to MODX Administrative Panel, you need
to open your browser and navigate to http://localhost/MODx/manager - Enter username and password in the given fields and click on the “Login”button to access the Admin Panel.
- After successful login to the Admin Panel, you will get access to MODX Dashboard.
Step 4) Other Information:
1. Default installation path: will be in your web root folder “/var/www/html”
2.Default ports:
- Linux Machines: SSH Port – 22
- Http: 80
- Https: 443
- MYSQL ports: By default, these are not open on Public Endpoints. MYSQL: 3306
Configure custom inbound and outbound rules using this link
3. To access Webmin interface for management please follow this link
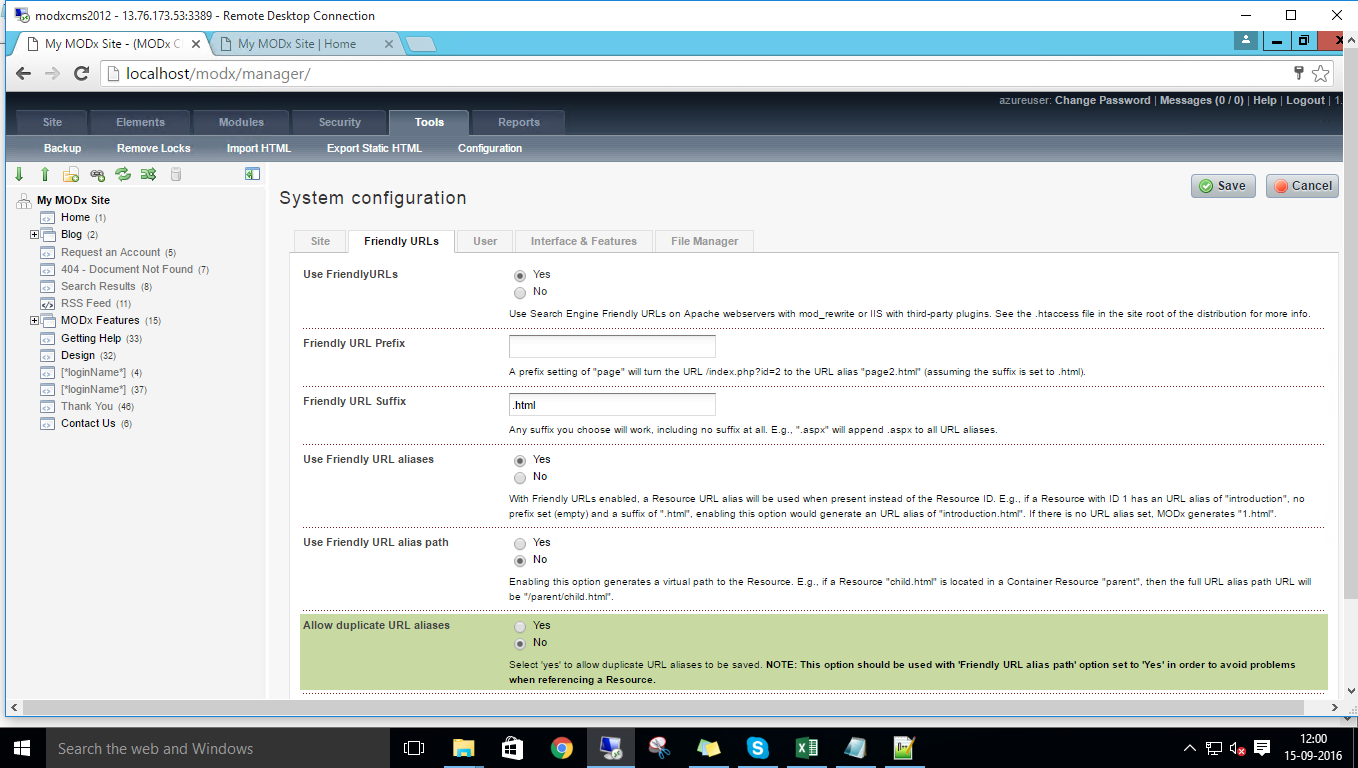
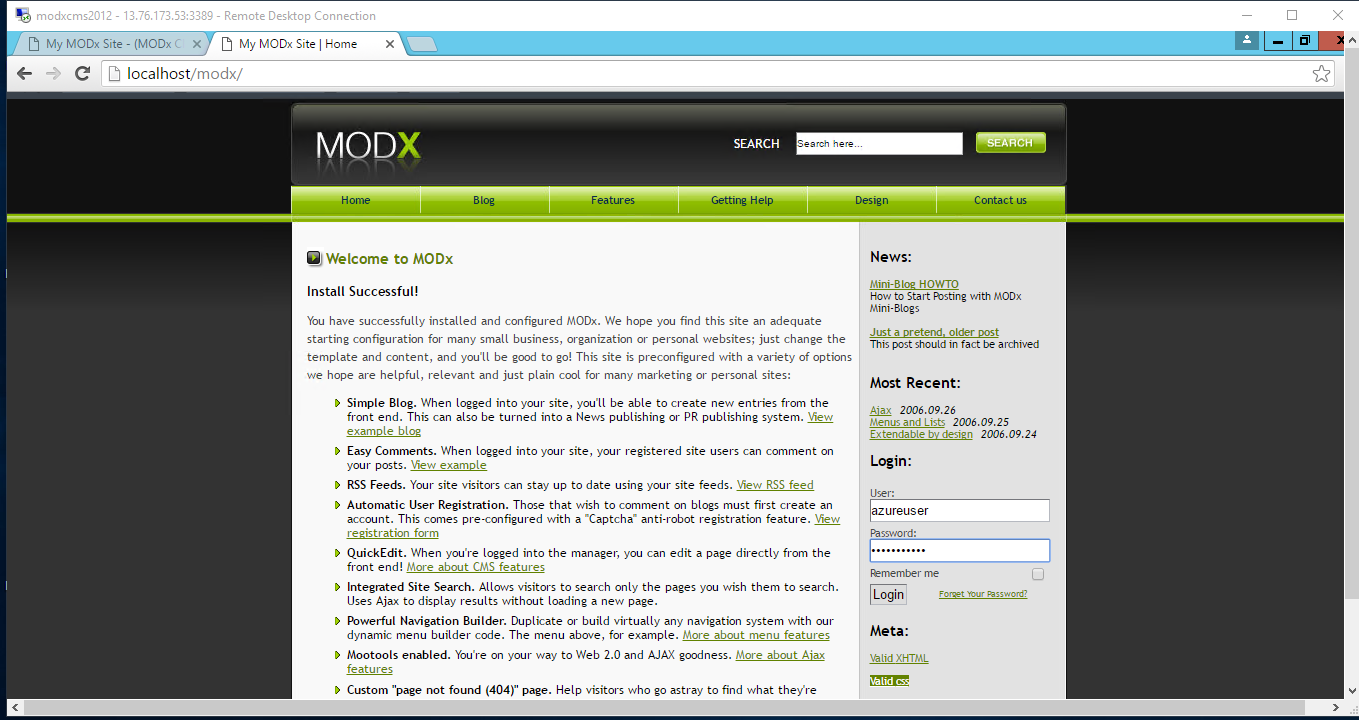
Azure Step by Step Screenshots
Installation Instructions For Windows
Step 1) VM Creation:
1.Click the Launch on Compute Engine button to choose the hardware and network settings.
2.You can see at this page, an overview of Cognosys Image as well as some estimated costs of VM.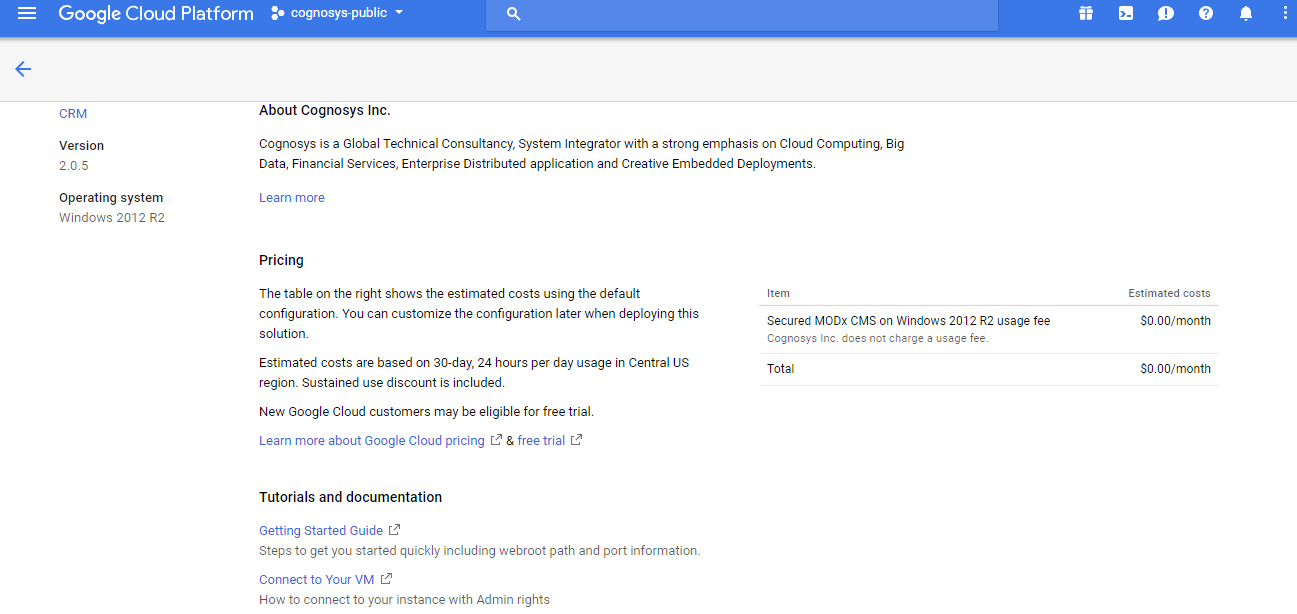
3.In the settings page, you can choose the number of CPUs and amount of RAM, the disk size and type etc.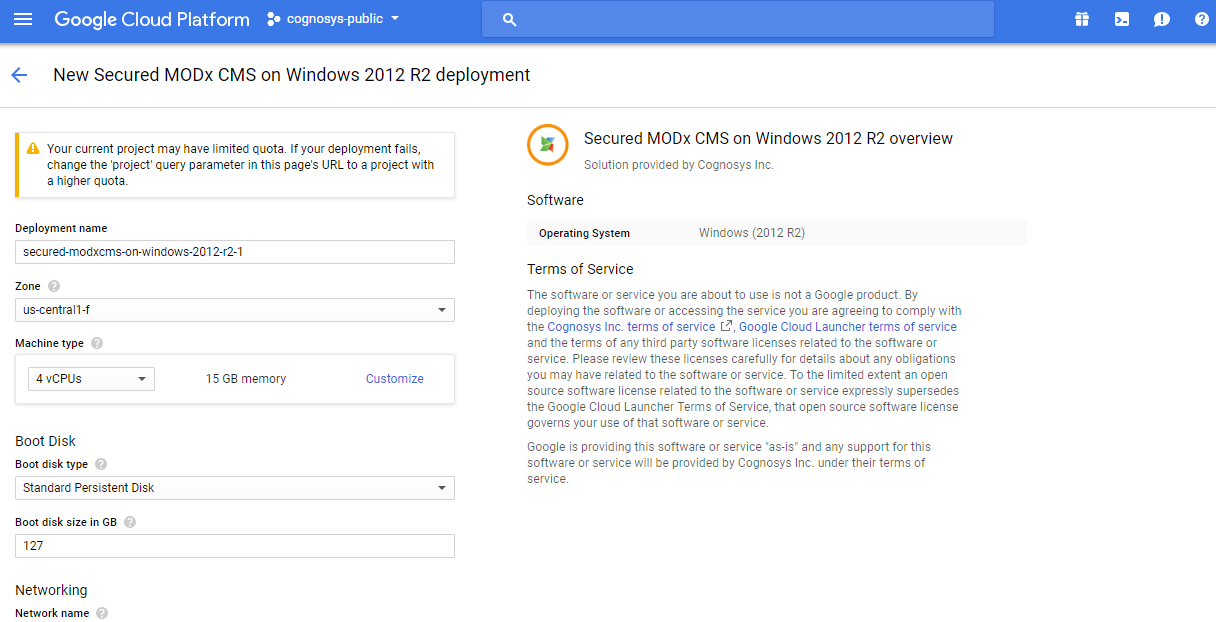
Step 2) RDP Connection: To initialize the DB Server connect to the deployed instance, Please follow Instructions to Connect to Windows instance on Google Cloud
Step 3) Database Login Details:
The below screen appears after successful deployment of the image.

For local MySQL root password, please use the temporary password generated automatically during image creation as shown above.
i) Please connect to Remote Desktop as given in step 2 to ensure stack is properly configured and DB is initialized.
ii) You can use MySQL server instance as localhost, username root and password as shown above.
If you have closed the deployment page you can also get the MySQL root password from VM Details “Custom metadata” Section
Step 4) Application URL: Access the application via a browser at http://PublicDNS/modx
Steps to access the Admin Panel:
- To login to MODX Administrative Panel, you need
to open your browser and navigate to http://localhost/MODx/manager - Enter username and password in the given fields and click on the “Login”button to access the Admin Panel.
- After successful login to the Admin Panel, you will get access to MODX Dashboard.
Step 5) Other Information:
1.Default installation path: will be in your web root folder “C:\inetpub\wwwroot\modx”
2.Default ports:
- Windows Machines: RDP Port: 3389
- Http: 80
- Https: 443
- Mysql ports: By default these are not open on Public Endpoints. Internally Mysql server: 3306
Videos
Secured MODX on Ubuntu 14.04 LTS
MODx PHP/MySQL Content Management System (CMS) Overview
