1-click AWS Deployment 1-click Azure Deployment
Overview
Jenkins is a powerful application that allows continuous integration and continuous delivery of projects, regardless of the platform you are working on. It is a free source that can handle any kind of build or continuous integration. You can integrate Jenkins with a number of testing and deployment technologies.Jenkins is free and is entirely written in Java.
Jenkins is an open-source automation server widely used for continuous integration and continuous delivery (CI/CD) processes. It enables developers to build, test, and deploy software projects automatically. Jenkins offers a vast array of plugins that enhance its functionality, supporting various tools and technologies. It is highly configurable, scalable, and facilitates the integration of version control systems like Git. Jenkins streamlines development workflows, leading to faster software delivery and improved collaboration among development teams.
By using Jenkins, software companies can accelerate their software development process, as Jenkins can automate build and test at a rapid rate. Jenkins supports the complete development lifecycle of software from building, testing, documenting the software, deploying and other stages of a software development lifecycle.
Jenkins Architecture
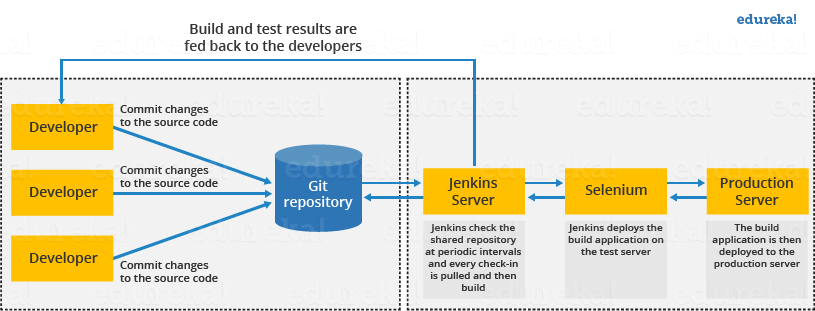
This single Jenkins server was not enough to meet certain requirements like:
- Sometimes you might need several different environments to test your builds. This cannot be done by a single Jenkins server.
- If larger and heavier projects get built on a regular basis then a single Jenkins server cannot simply handle the entire load.
To address the above stated needs, Jenkins distributed architecture was introduced.
Jenkins Distributed Architecture
Jenkins uses a Master-Slave architecture to manage distributed builds. In this architecture, Master and Slave communicate through TCP/IP protocol.
Jenkins Master
Your main Jenkins server is the Master. The Master’s job is to handle:
- Scheduling build jobs.
- Dispatching builds to the slaves for the actual execution.
- Monitor the slaves (possibly taking them online and offline as required).
- Recording and presenting the build results.
- A Master instance of Jenkins can also execute build jobs directly.
Jenkins Slave
A Slave is a Java executable that runs on a remote machine. Following are the characteristics of Jenkins Slaves:
- It hears requests from the Jenkins Master instance.
- Slaves can run on a variety of operating systems.
- The job of a Slave is to do as they are told to, which involves executing build jobs dispatched by the Master.
- You can configure a project to always run on a particular Slave machine, or a particular type of Slave machine, or simply let Jenkins pick the next available Slave.
The diagram below is self explanatory. It consists of a Jenkins Master which is managing three Jenkins Slave.
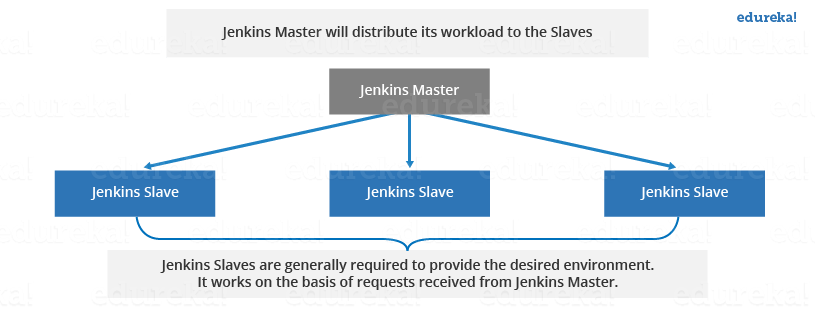
Now let us look at an example in which Jenkins is used for testing in different environments like: Ubuntu, MAC, Windows etc.
The diagram below represents the same:
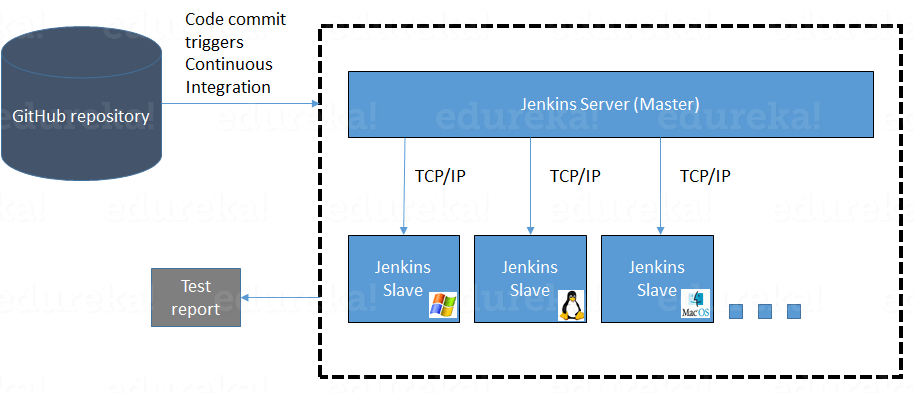
The following functions are performed in the above image:
- Jenkins checks the Git repository at periodic intervals for any changes made in the source code.
- Each builds requires a different testing environment which is not possible for a single Jenkins server. In order to perform testing in different environments Jenkins uses various Slaves as shown in the diagram.
- Jenkins Master requests these Slaves to perform testing and to generate test reports.
Jenkins Build Pipeline
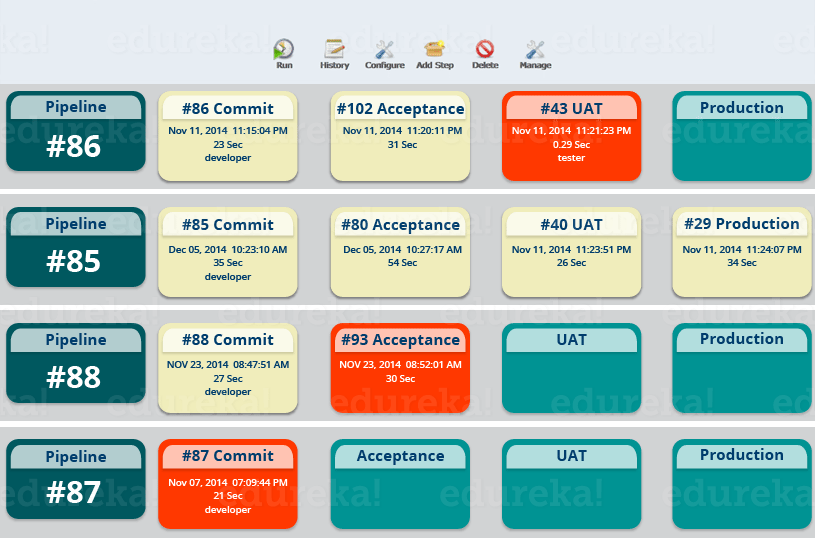
It is used to know which task Jenkins is currently executing. Often several different changes are made by several developers at once, so it is useful to know which change is getting tested or which change is sitting in the queue or which build is broken. This is where pipeline comes into picture. The Jenkins Pipeline gives you an overview of where tests are up to. In build pipeline the build as a whole is broken down into sections, such as the unit test, acceptance test, packaging, reporting and deployment phases. The pipeline phases can be executed in series or parallel, and if one phase is successful, it automatically moves on to the next phase (hence the relevance of the name “pipeline”).The below image shows how a multiple build Pipeline looks like.
Hope you have understood the theoretical concepts. Now, let’s have some fun with hands-on.
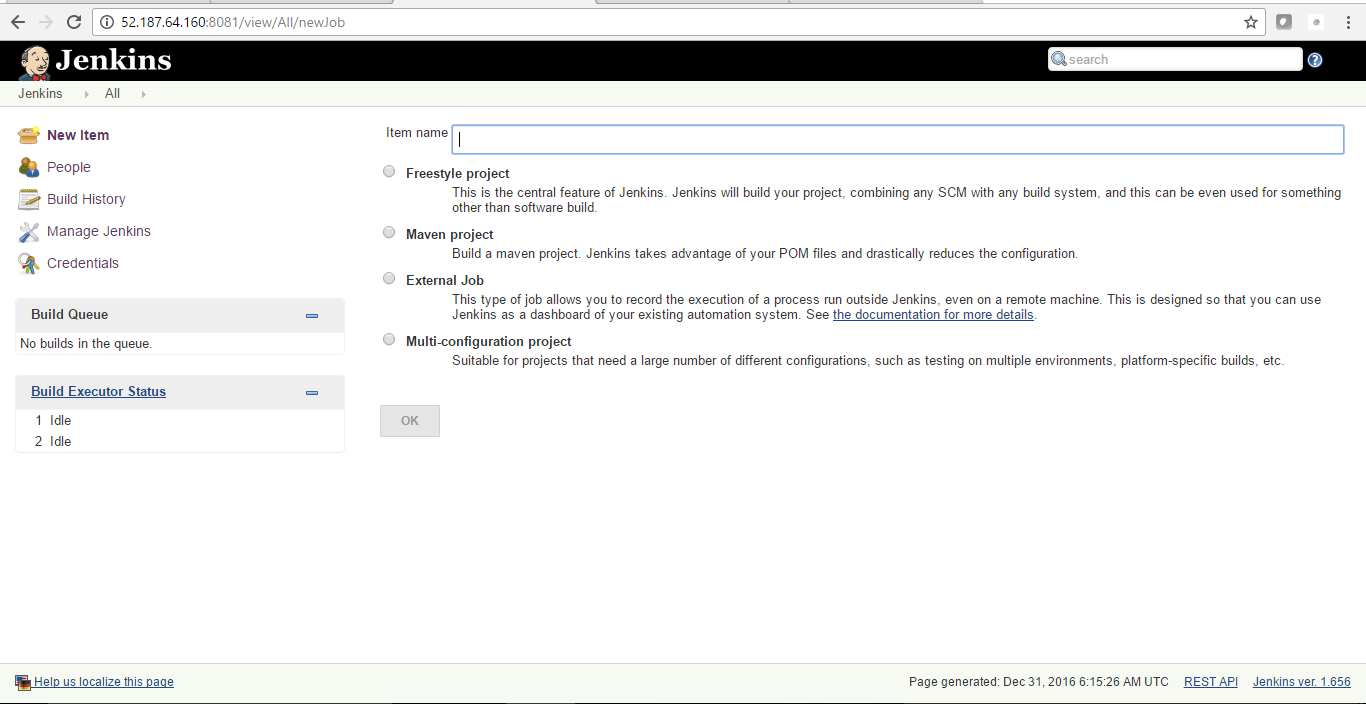
Now we will create a new job in Jenkins, it is a Freestyle Project. However, there are 3 more options available. Let us look at the types of build jobs available in Jenkins.
Freestyle Project:
Freestyle build jobs are general-purpose build jobs, which provides maximum flexibility. The freestyle build job is the most flexible and configurable option, and can be used for any type of project. It is relatively straightforward to set up, and many of the options we configure here also appear in other build jobs.
The “multiconfiguration project” (also referred to as a “matrix project”) allows you run the same build job on different environments. It is used for testing an application in different environments, with different databases, or even on different build machines.
Monitor an External Job:
The “Monitor an external job” build job lets you keep an eye on non-interactive processes, such as cron jobs.
Maven Project:
The “maven2/3 project” is a build job specially adapted to Maven projects. Jenkins understands Maven pom files and project structures, and can use the information gleaned from the pom file to reduce the work you need to do to set up your project.
Jenkin – History in short
- Jenkins was originally developed as “Hudson” by Kohsuke Kawaguchi while working at Sun Microsystems in 2004. In 2011, after a dispute with Oracle over the rights to the name “Hudson,” the project was forked and renamed “Jenkins.” The name “Jenkins” was chosen as an homage to the butler in the TV show “The Avengers.” Since then, Jenkins has become one of the most popular and widely adopted CI/CD tools in the software development industry, fostering a strong community of contributors and users. Its continuous growth and development have led to its widespread use in automating software delivery pipelines.
Continuous Integration – Jenkins
Using Continuous Integration (CI) with Jenkins offers several benefits that streamline the software development process and improve the overall quality of the codebase. Here are some key reasons to use Continuous Integration with Jenkins:
- Early Detection of Issues: Jenkins automatically triggers builds and tests whenever code changes are pushed to the version control system. This early and frequent testing helps identify bugs, integration issues, and other problems at an early stage, making it easier and less costly to fix them.
- Automated Builds and Testing: Jenkins automates the entire build and testing process, eliminating the need for manual intervention. It ensures consistent and reliable builds, reducing human errors and enhancing the reliability of the software.
- Faster Development Cycles: With CI, developers get rapid feedback on their code changes, allowing them to iterate quickly and release new features faster. This accelerated development cycle improves the overall efficiency of the development team.
- Easy Integration with Other Tools: Jenkins supports a vast ecosystem of plugins that enable seamless integration with various development, testing, and deployment tools. This flexibility allows teams to customize their CI/CD pipelines according to their specific needs.
- Collaboration and Transparency: Jenkins provides a centralized platform where teams can collaborate on code changes, review each other’s work, and ensure everyone is on the same page. This transparency fosters better communication and coordination among team members.
- Scalability and Flexibility: Jenkins is scalable and can handle projects of different sizes and complexities. It can be deployed on-premises or in the cloud, offering flexibility in setting up CI/CD infrastructure as per the organization’s requirements.
- Continuous Delivery and Deployment: Jenkins can be extended to support Continuous Delivery (CD) and Continuous Deployment (CD) practices. It automates the process of deploying applications to various environments, reducing the time between development and deployment.
- Stable Master Branch: With CI in place, the master/main branch of the version control repository is kept in a more stable state as all changes are tested before being merged. This ensures that the mainline codebase is less prone to breaking changes.
Install Jenkins on Windows
- Check System Requirements:
- Make sure your Windows system meets the minimum requirements for Jenkins. You’ll need Java Development Kit (JDK) installed (preferably version 8 or later).
- Ensure you have administrative privileges on your machine.
- Download Jenkins:
- Go to the official Jenkins website: https://www.jenkins.io/download/
- Download the Windows installer (usually an .msi file) that matches your system architecture (32-bit or 64-bit).
- Run the Installer:
- Locate the downloaded .msi file and double-click on it to start the installation process.
- If prompted by User Account Control (UAC), click “Yes” to allow the installation.
- Install Jenkins:
- The installation wizard will appear. Click “Next” to proceed.
- You will be asked to choose an installation directory. The default directory is usually fine, but you can select a different location if needed. Click “Next.”
- Choose Installation Options:
- During the installation, you can choose whether to install Jenkins as a Windows service or run it standalone.
- If you plan to use Jenkins continuously, select “Install as a Windows service” so that Jenkins starts automatically with Windows.
- If you want to run Jenkins manually when needed, choose the “Run Jenkins as a standalone application” option. In this case, Jenkins will run in the command prompt.
- Configure Jenkins URL:
- You will be prompted to configure the Jenkins URL. The default value is usually correct, but you can change it if required. Click “Install” to proceed.
- Wait for Installation:
- Jenkins will be installed on your system. The process may take a few moments.
- Completing the Installation:
- Once the installation is complete, you will see a confirmation message. Click “Finish” to close the installer.
- Accessing Jenkins:
- Jenkins should now be running on your Windows machine. You can access it by opening a web browser and navigating to http://localhost:8080
- During the first access, Jenkins will ask you to unlock it by providing an initial administrator password. To find this password, go to the file path:
C:\Program Files (x86)\Jenkins\secrets\initialAdminPassword. Copy the password and paste it into the Jenkins setup wizard.
- Complete Jenkins Setup:
- Follow the on-screen instructions to complete the Jenkins setup, including installing recommended plugins and creating the first admin user.
That’s it! You’ve successfully installed Jenkins on your Windows system, and now you can start configuring and using it for continuous integration and continuous delivery processes.
How to Create Users & Manage Permissions: Role Strategy Plugin
To create users and manage permissions in Jenkins, you need administrative privileges. Follow these steps to set up user accounts and configure permissions:
- Access Jenkins Dashboard:
- Open your web browser and navigate to the Jenkins URL (e.g., http://localhost:8080) to access the Jenkins dashboard.
- Login as Admin:
- If you haven’t already logged in, enter the initial administrator password (generated during Jenkins setup) and create an admin user account.
- Manage Jenkins:
- Click on “Manage Jenkins” in the left-hand sidebar. This will take you to the Jenkins management page.
- Configure Global Security:
- On the Jenkins management page, click on “Configure Global Security.” This is where you manage overall security settings for Jenkins.
- Enable Security:
- In the “Security Realm” section, select “Jenkins’ own user database” or integrate with an external user database like LDAP or Active Directory, depending on your needs.
- Tick the checkbox “Allow users to sign up” if you want to allow users to create their accounts.
- User Creation:
- To create a new user, go to “Manage Jenkins” > “Manage Users” > “Create User.”
- Enter the necessary details for the new user, such as username, password, full name, and email address. Click “Create User” to save the user account.
- Assigning Permissions (Authorization):
- Jenkins uses an “Authorization Strategy” to control access to different features and jobs.
- In the “Authorization” section, choose the appropriate authorization method:
- “Matrix-based security”: Allows you to assign permissions to specific users or groups by ticking checkboxes for desired actions.
- “Project-based Matrix Authorization Strategy”: Provides more fine-grained control over job-specific permissions.
- “Role-Based Strategy”: Enables you to define roles and assign them to users or groups.
- Configure the permissions as per your requirements. For example, you can grant “Overall/Administer” permission to admin users and limit specific permissions for other users.
- Save Configuration:
- After setting up user accounts and permissions, scroll down and click “Save” to apply the changes.
- Testing Permissions:
- Log out of Jenkins and log back in using the new user account to test the assigned permissions.
Please note that managing permissions in Jenkins is a critical task, and it’s essential to grant access carefully to ensure the security and proper functioning of the CI/CD environment. Additionally, always keep Jenkins updated with the latest security patches to safeguard your Jenkins installation.
Jenkins – Unit Testing
Jenkins provides an out of box functionality for Junit, and provides a host of plugins for unit testing for other technologies, an example being MSTest for .Net Unit tests.
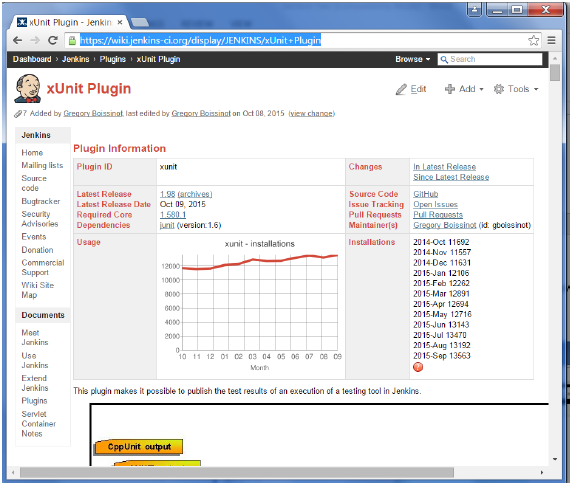
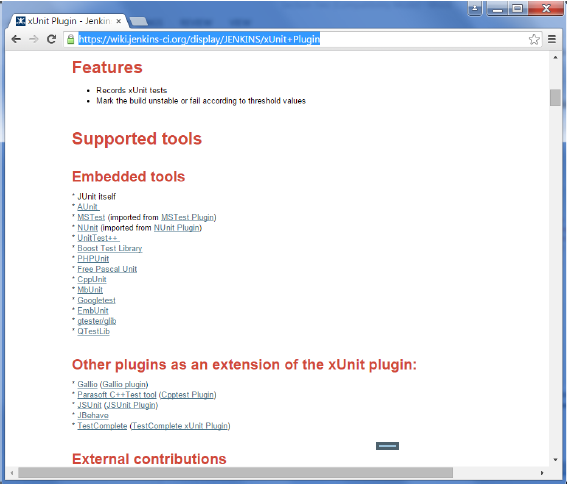
Example of a Junit Test in Jenkins
The following example will consider
- A simple HelloWorldTest class based on Junit.
- Ant as the build tool within Jenkins to build the class accordingly.
Step 1 − Go to the Jenkins dashboard and Click on the existing HelloWorld project and choose the Configure option
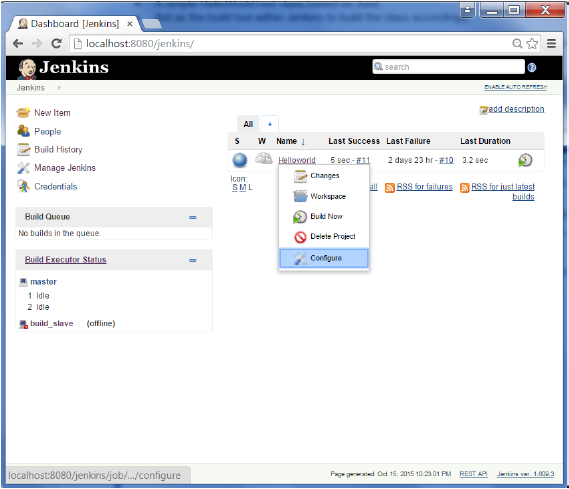
Step 2 − Browse to the section to Add a Build step and choose the option to Invoke Ant.
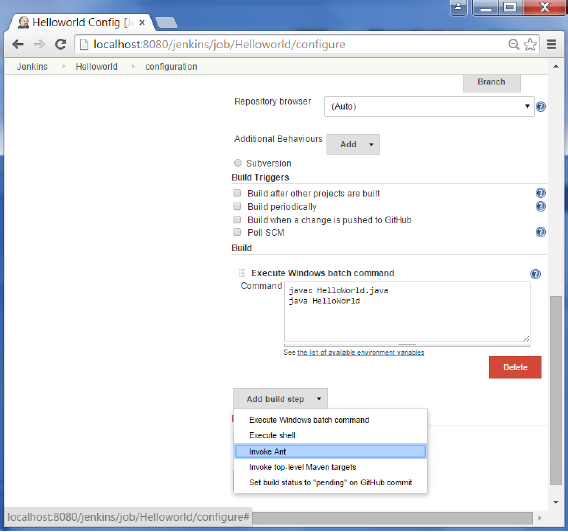
Step 3 − Click on the Advanced button.
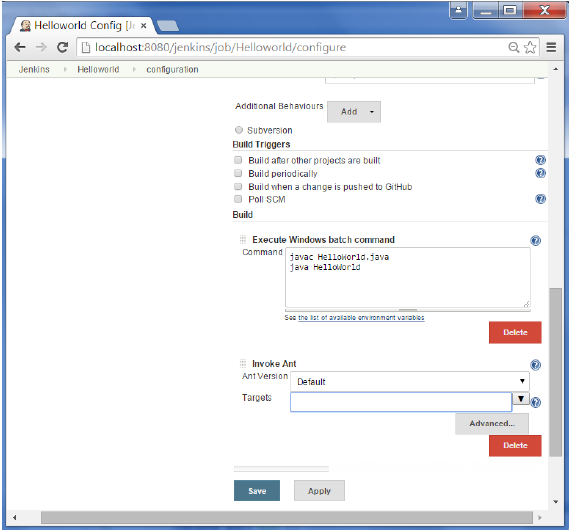
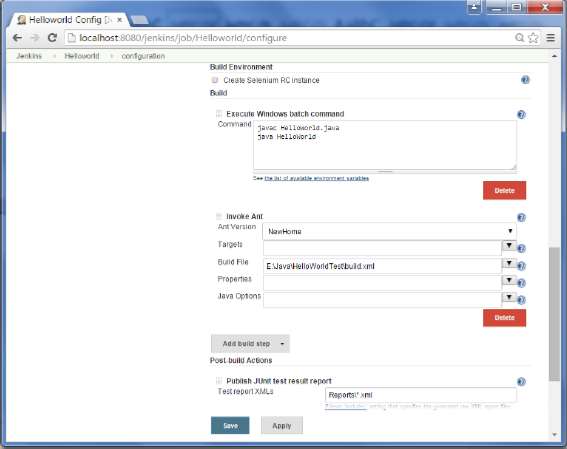
Step 4 − In the build file section, enter the location of the build.xml file.
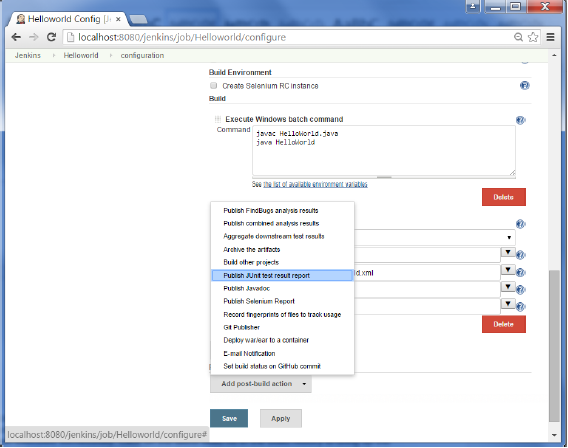
Step 5 − Next click the option to Add post-build option and choose the option of “Publish Junit test result report”
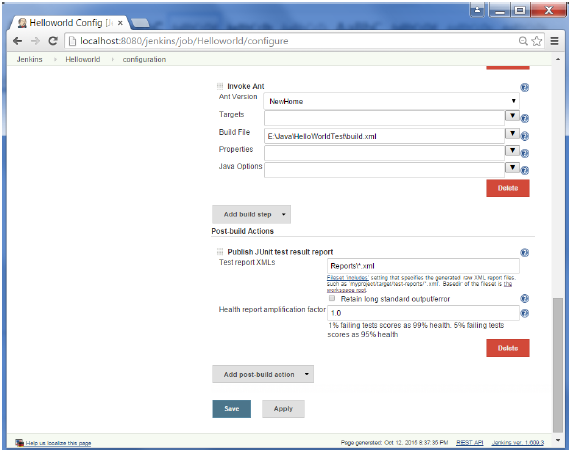
Step 6 − In the Test reports XML’s, enter the location as shown below. Ensure that Reports is a folder which is created in the HelloWorld project workspace. The “*.xml” basically tells Jenkins to pick up the result xml files which are produced by the running of the Junit test cases. These xml files which then be converted into reports which can be viewed later.
Once done, click the Save option at the end.
Step 7 − Once saved, you can click on the Build Now option.
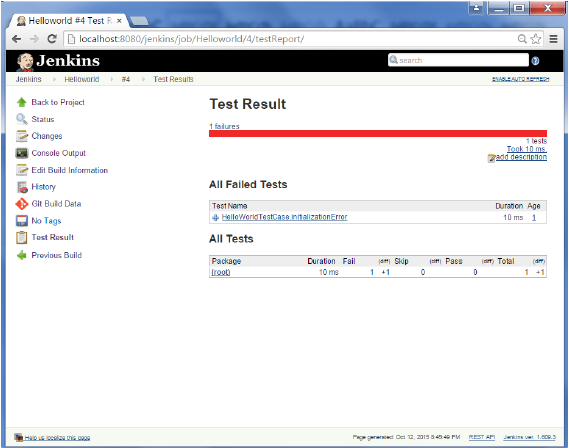
Once the build is completed, a status of the build will show if the build was successful or not. In the Build output information, you will now notice an additional section called Test Result. In our case, we entered a negative Test case so that the result would fail just as an example.
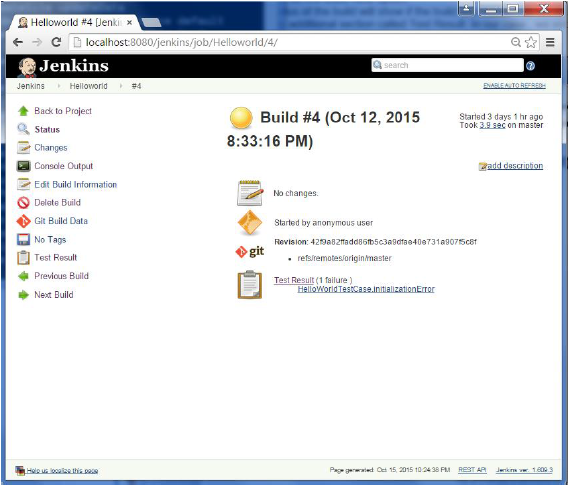
One can go to the Console output to see further information. But what’s more interesting is that if you click on Test Result, you will now see a drill down of the Test results.
Jenkins – Automated Testing
One of the basic principles of Continuous Integration is that a build should be verifiable. You have to be able to objectively determine whether a particular build is ready to proceed to the next stage of the build process, and the most convenient way to do this is to use automated tests. Without proper automated testing, you find yourself having to retain many build artifacts and test them by hand, which is hardly in the spirit of Continuous Integration. The following example shows how to use Selenium to run automated web tests.
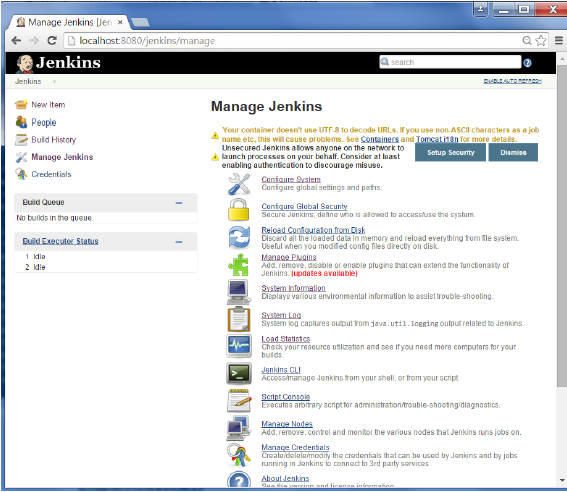
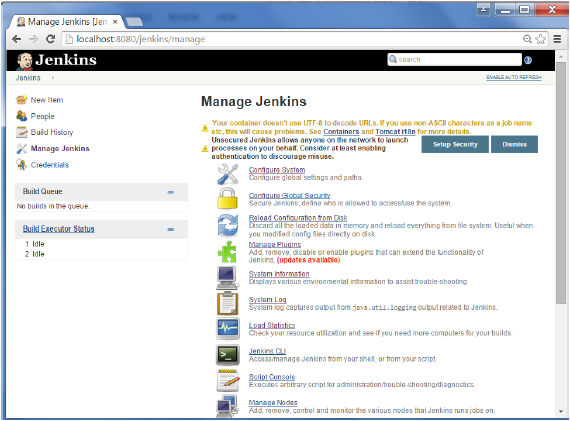
Step 1 − Go to Manage Plugins.
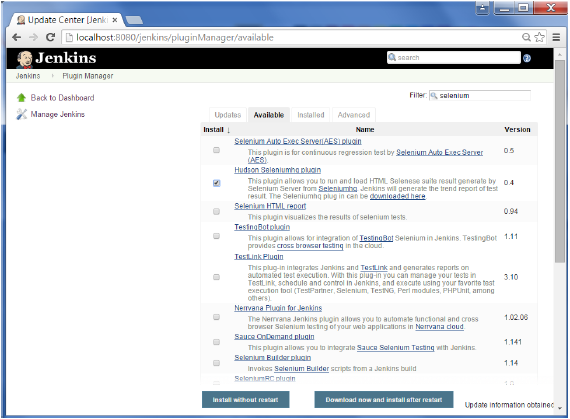
Step 2 − Find the Hudson Selenium Plugin and choose to install. Restart the Jenkins instance.
Step 3 − Go to Configure system.
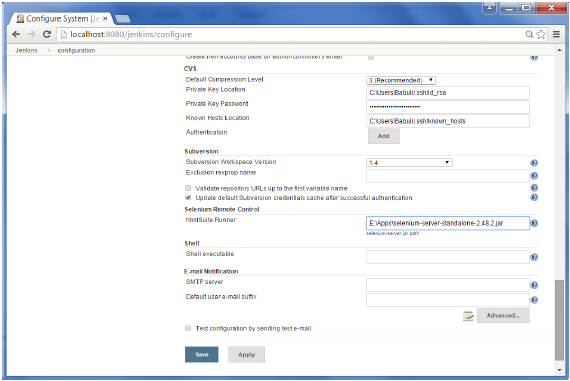
Step 4 − Configure the selenium server jar and click on the Save button.
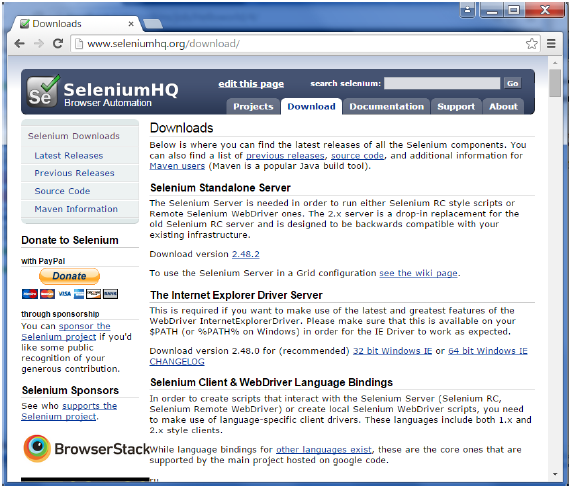
Note − The selenium jar file can be downloaded from the location SeleniumHQ
Click on the download for the Selenium standalone server.
Step 5 − Go back to your dashboard and click on the Configure option for the HelloWorld project.

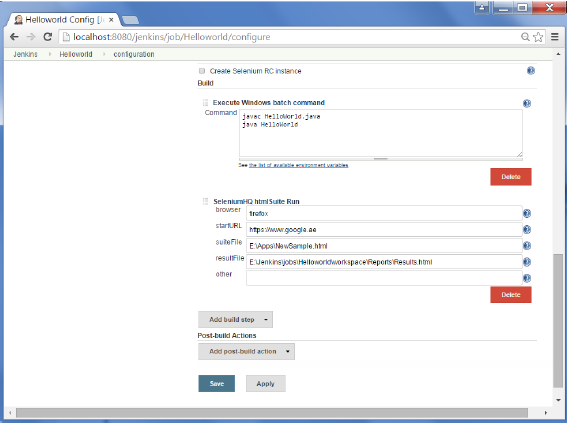
Step 6 − Click on Add build step and choose the optin of “SeleniumHQ htmlSuite Run”
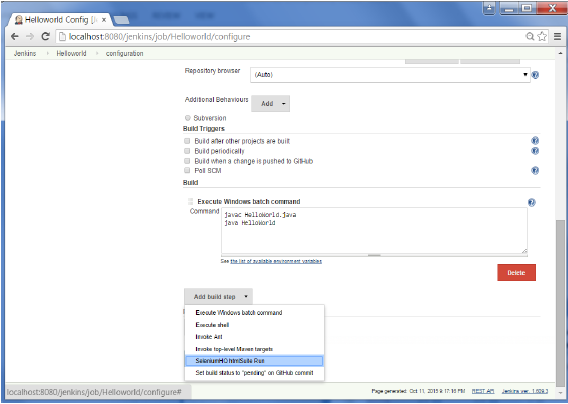
Step 7 − Add the necessary details for the selenium test. Here the suiteFile is the TestSuite generated by using the Selenium IDE. Click on Save and execute a build. Now the post build will launch the selenium driver, and execute the html test.
Jenkins – Reporting
In Jenkins, a report is a structured and graphical way where we can see the execution results or output of the test. Reports are also useful when we have to communicate the results with our team members or with other stakeholders. There are many plugins available for reporting in Jenkins. It is easy, convenient, and recommended.In Jenkins, Test results are generated in the form of Graphical Reports. These reports are just not graphical but can produce the detail written reports. This written report can be in different formats, and we can manage it by specifying along with the build command.
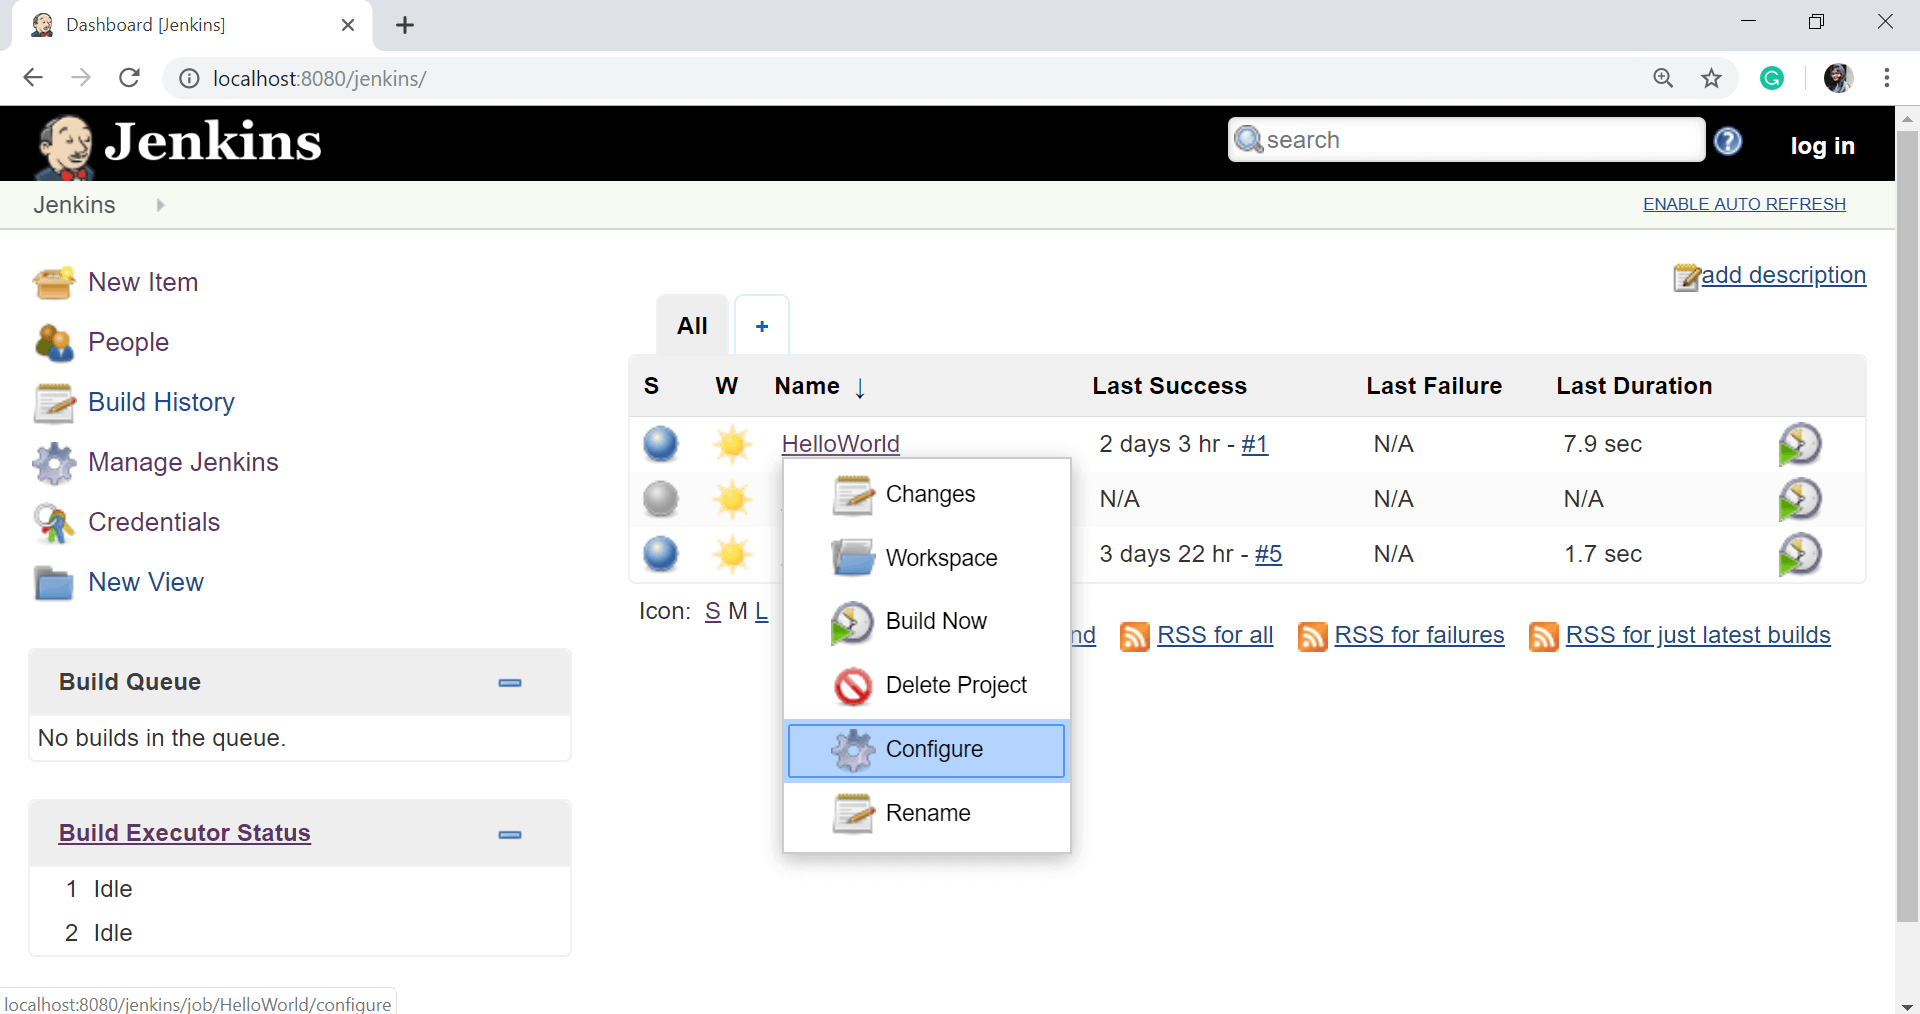
- In the Post-build action for any job, you can define the reports to be created. To do that, go to your job -> configure.
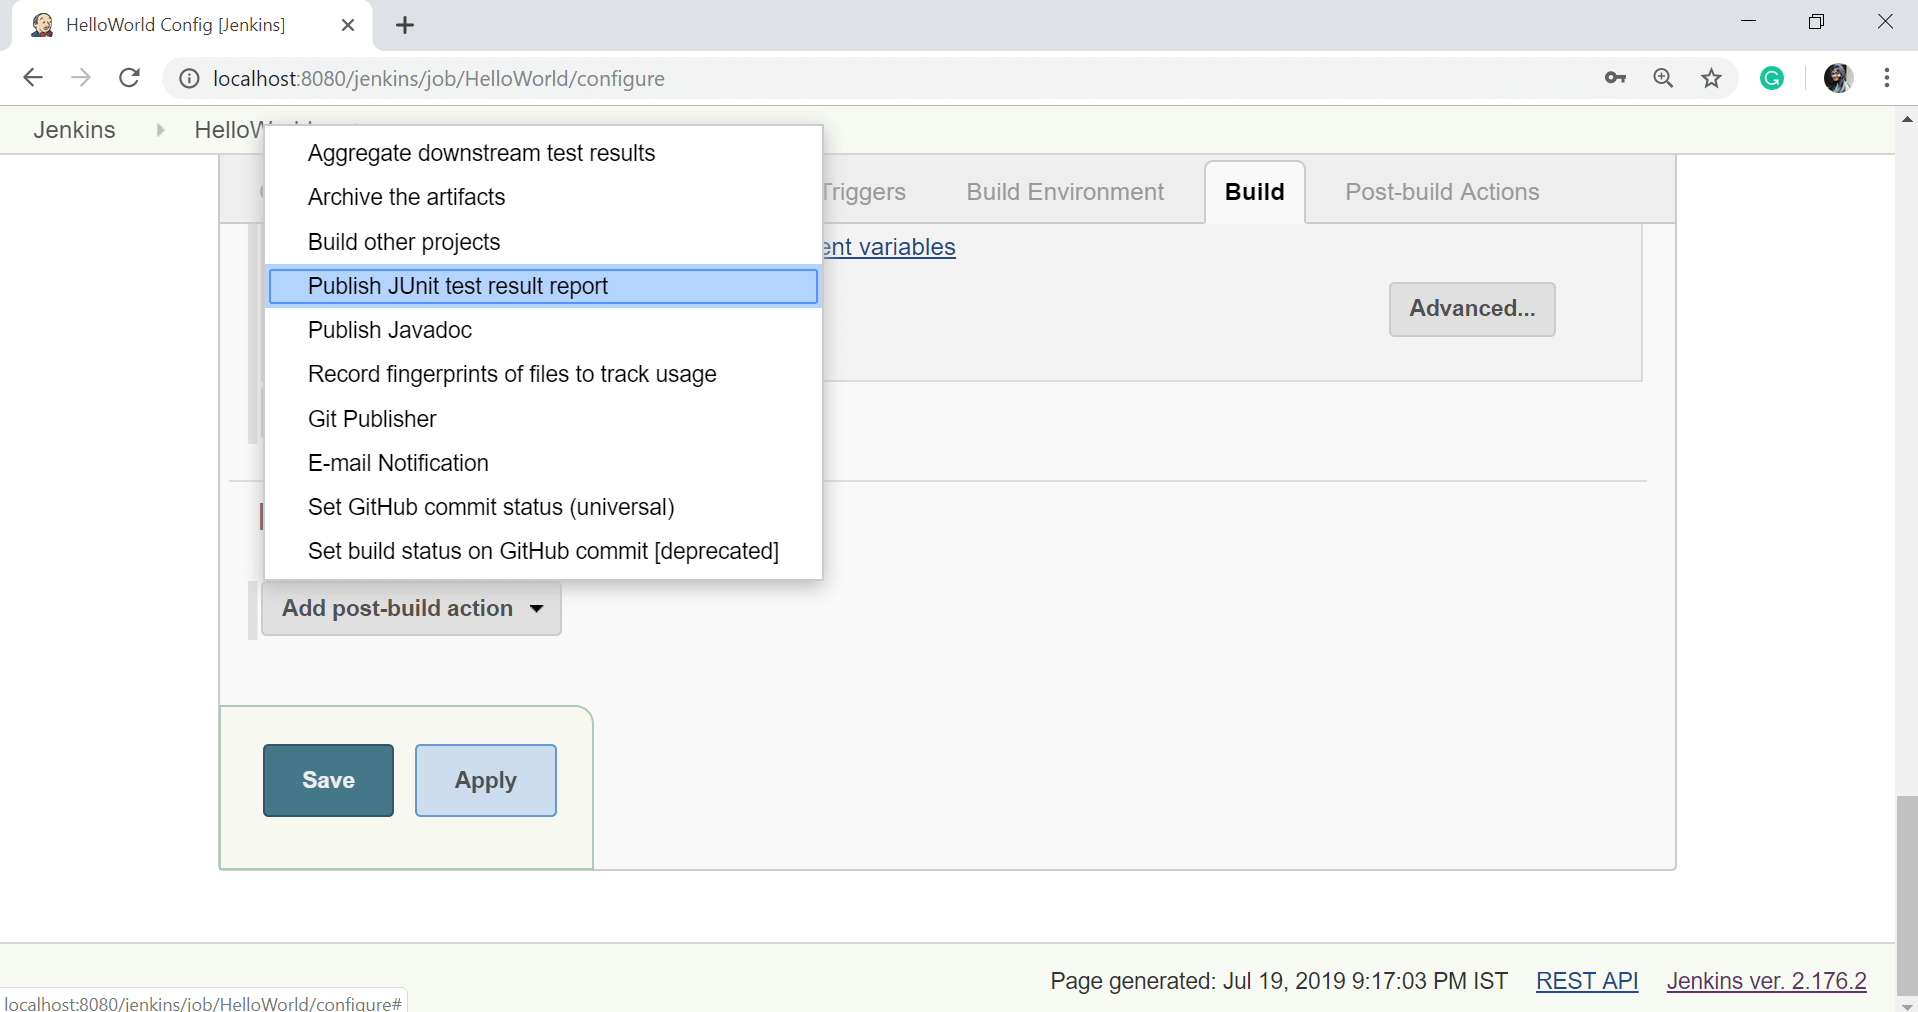
- Scroll down and click on Post-build action button and select Publish JUnit test result report option.
- On the Test reports XMLs section, enter the path of the file.
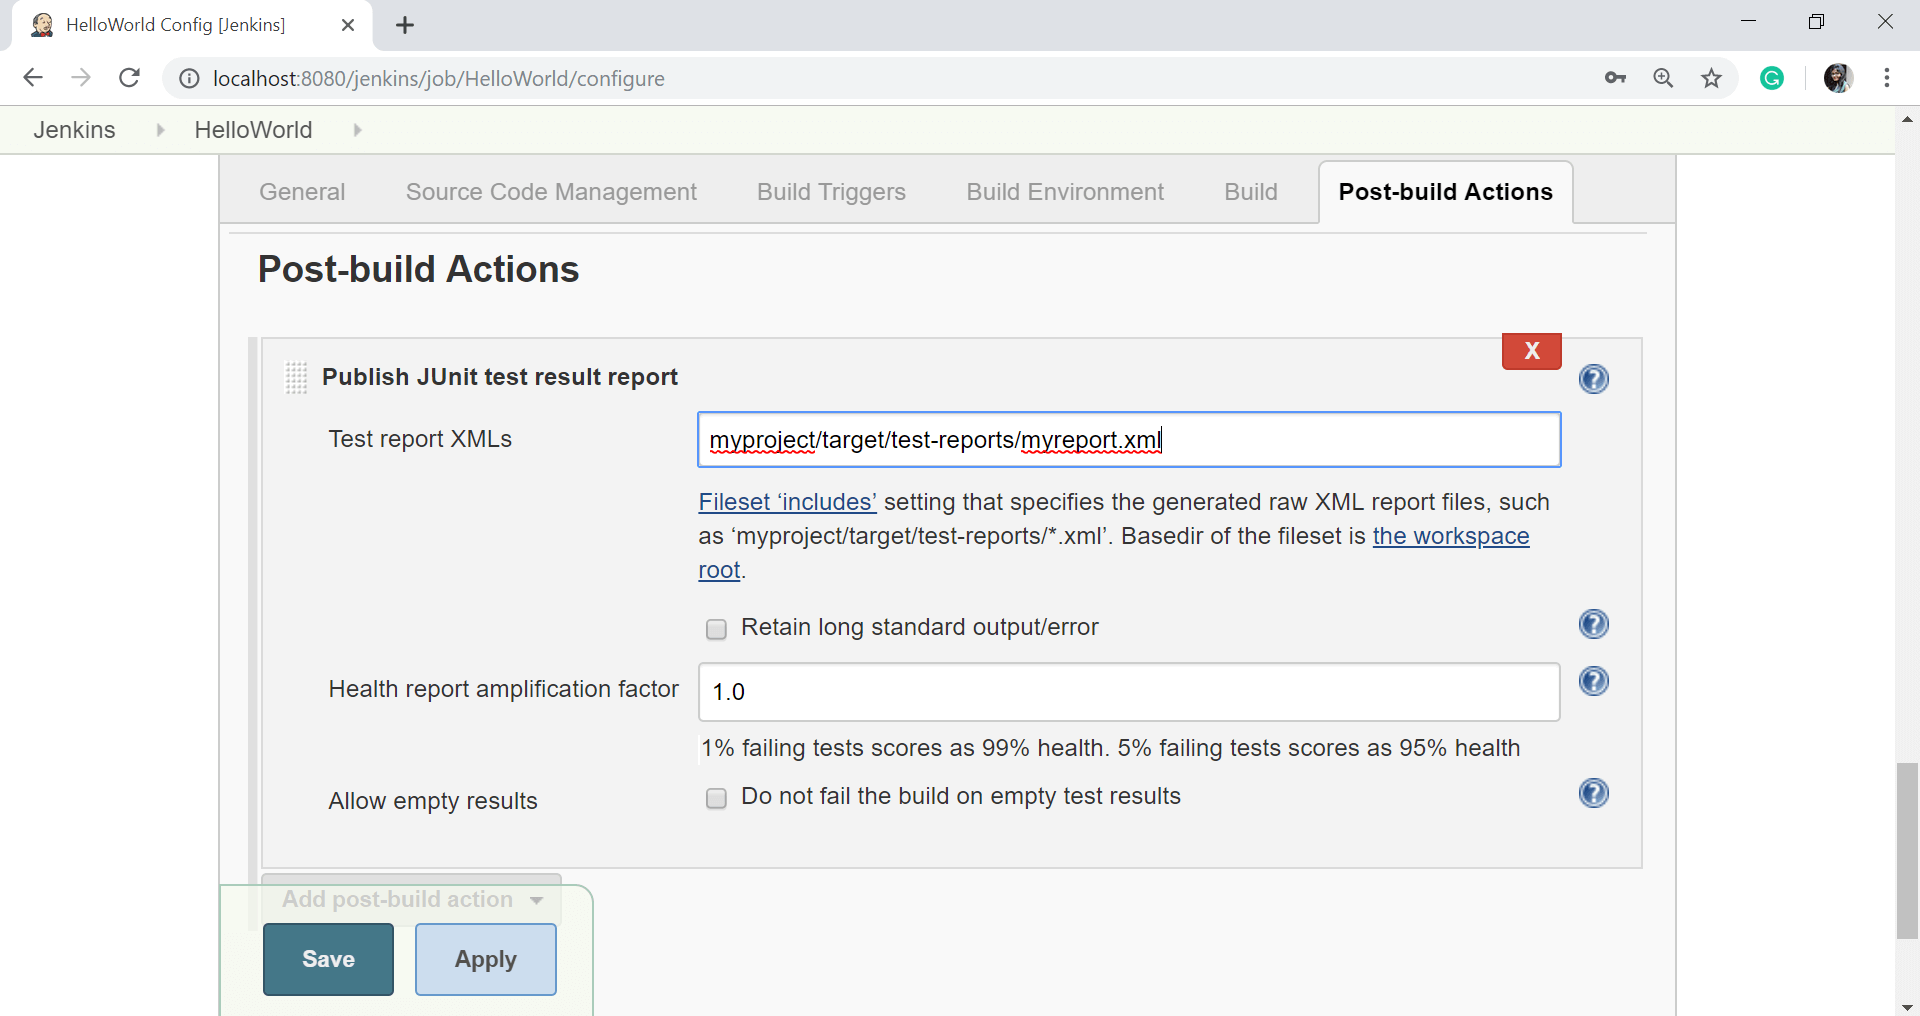
- Click on Apply then Save button.
- Now click on the Build Now to build the project again.
- In the “Build history” section, select the build and open up the build results.
- Click on Test Result.
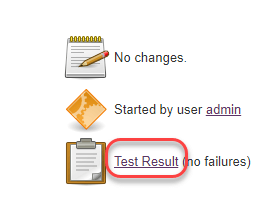
- When you click on Test Result option, then you can see the test results which are simple, beautiful, and easy to understand.As you can see, the below report is so much understandable than the XML code.

Here, you can see the number of passed tests and the number of failed tests. If your test fails, it will be displayed in red color.
Jenkins – Reporting
In Jenkins, a report is a structured and graphical way where we can see the execution results or output of the test. Reports are also useful when we have to communicate the results with our team members or with other stakeholders. There are many plugins available for reporting in Jenkins. It is easy, convenient, and recommended.
In Jenkins, Test results are generated in the form of Graphical Reports. These reports are just not graphical but can produce the detail written reports. This written report can be in different formats, and we can manage it by specifying along with the build command.
- In the Post-build action for any job, you can define the reports to be created. To do that, go to your job -> configure.

- Scroll down and click on Post-build action button and select Publish JUnit test result report option.

- On the Test reports XMLs section, enter the path of the file.

- Click on Apply then Save button.
- Now click on the Build Now to build the project again.
- In the “Build history” section, select the build and open up the build results.
- Click on Test Result.

- When you click on Test Result option, then you can see the test results which are simple, beautiful, and easy to understand.
As you can see, the below report is so much understandable than the XML code.

Here, you can see the number of passed tests and the number of failed tests. If your test fails, it will be displayed in red color.
-Jenkins is an open source continuous integration tool written in Java. The project was forked from Hudson after a dispute with Oracle.Jenkins provides continuous integration services for software development. It is a server-based system running in a servlet container such as Apache Tomcat. It supports SCM tools including AccuRev, CVS, Subversion, Git, Mercurial, Perforce, Clear case and RTC and can execute Apache Ant and Apache Maven based projects as well as arbitrary shell scripts and Windows batch commands. The primary developer of Jenkins is Kohsuke Kawaguchi. Released under the MIT License, Jenkins is free software.
Builds can be started by various means, including being triggered by commit in a version control system, by scheduling viae a cron-like mechanism, by building when other builds have completed and by requesting a specific build URL.
Jenkins is a cross-platform, continuous integration and continuous delivery application that increases your productivity. Use Jenkins to build and test your software projects continuously making it easier for developers to integrate changes to the project and making it easier for users to obtain a fresh build. It also allows you to continuously deliver your software by providing powerful ways to define your build pipelines and integrating with a large number of testing and deployment technologies.
Jenkins is owned by Jenkins (https://jenkins.io/) and they own all related trademarks and IP rights for this software.
Cognosys Provides Hardened images of Jenkins on the cloud ( AWS marketplace, Azure and Google Cloud Platform).
Deploy Jenkins securely on cloud i.e. AWS marketplace, Azure and Google Cloud Platform (GCP)
Secured Jenkins on Ubuntu 14.04 LTS
Features
Top 10 Jenkins Plugins and Features
Here is a list of my own and the team’s top 10 must-have Jenkins plugins and features:
- Pipeline
- Easy Installation
- Easy Upgrades
- Scriptability
- View Filters
- Maven
- Amazon EC2
- HTML Publisher
- Throttle Builds
- Join
- Green Balls
Pipeline
Jenkins Pipeline is an incredibly useful addition that came to life with the Jenkins 2.0 release. It allows you to script your build pipeline consisting of one or more build jobs into a single workflow. It makes the visualization of the pipeline much easier, the monitoring of which parts have been run and which jobs are still in the queue a non-issue.
The best part is that it’s integrated with the SCM, so you can develop your pipeline definition script using proper tools and see the historical changes, audit, do the code reviews, etc. The build pipeline can become the essential part of your mental model about the CI.
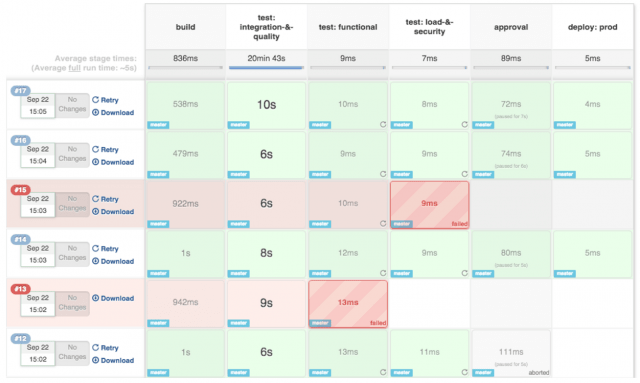
And with the pipeline plugin it is not easier to achieve than before. The image above is taken from the CloudBees blog, where you can read more about the best practices of using the pipeline plugin!
Easy Installation
Jenkins comes as a WAR file (there are also a wide variety of Linux packages available and a Windows installer) that you can drop into your favourite JEE container (Tomcat, Jetty, Glassfish etc.) or you can start the WAR file directly with java -jar jenkins.war. That’s it!
Now that it is up and running, you can start configuring jobs and installing plugins. It will use a folder in your $HOME to persist the configuration and store the actual jobs. No database, no special installation, no special registration. Clean and easy. You can even easily chain the job executions and visualize the whole pipeline of multiple jobs.
Easy Upgrades
Jenkins has very quick release cycles, and statistics shows that there is a release for every 6.59 days. The release process page will state that an RC freeze is schedules for Monday, and then late Friday the RC is released. Also, there is a Long-term Support version available that is put together every 3 months and is suitable for more stable installations.The upgrade process itself is super easy. It does not matter if you are using Linux, Mac OS or Windows; there is a single, easy way for upgrades built into the product itself.
Scriptability
Jenkins provides different means to communicate with it. There is a web-based GUI that everyone is accustomed to, the command line interface and also a Rest API for Python, XML and JSON. You can feel that this Jenkins plugin is a tool from developers for developers. For example, to iterate through all jobs available in a Jenkins installation, all you need in Python is 3 lines of code.
import urllib

obj = eval(urllib.urlopen("http://ci.jenkins-ci.org/api/python").read());
for job in obj['jobs']:
   print job['name']
To generate a graph relationship of all your jobs in your installation, you don’t need much more code (mind the configurability and usability sections).
View Filters
Once you get a large number of jobs in your installation (we have about 200 defined), you will want to organize them so that the right people can get a quick grasp of the current status of the builds in which they are interested. This is where the little plus sign (+) comes to work. You are able to construct views for your branches, projects and persons that will list only a subset of your jobs. The subset can be defined either by a regular expression or explicit project selection.
Amazon EC2
One of the little-mentioned Jenkins features, which I think is totally taken for granted, is its ability to scale out to a large number of nodes and distribute the workload between them. If your own infrastructure is not large enough, then this plugin lets you tap into the resources of the Amazon EC2 infrastructure. You can specify the AMIs to use, label them, provide connection credentials and test the connectivity.We use EC2 to run our JEE container tests. This means that to test WebSphere 7.0.1 we launch the specific AMI and start up WebSphere with our agent (XRebel or JRebel) and go through the test suite. This is orchestrated by Jenkins using this plugin and then copying back the results.
Maven 2 Project
This plugin allows you take advantage of Maven’s features. Jenkins reads your project’s dependencies from your POM and, if those are also built on Jenkins, sets up triggers in such a way that a new build in one of those dependencies will automatically start a new build in this project. Jenkins understands all kinds of dependencies in POM, namely:
- parent POM
- <dependencies> section of your project
- <extensions> section of your project
- <reporting> section of your project
This process takes versions into account, so you can have multiple versions/branches in your project on the same Jenkins instance and it will correctly determine dependencies. Of course, there are over 20 plugins listed under the Maven section of the Jenkins Plugins Page.
HTML Publisher
This plugin is handy with built-in copy to master functionality. Imagine that you have some files generated through your builds that are not actual artifacts. Let’s say logs, debug info, obfuscation maps and whatnot. This plugin lets you to copy them to a master and provide an easy HTML file that will have links to these special files of yours for really quick access.
Copy Artifact
If you are not using a dependency management system, your build jobs become isolated as they do not know anything about each other. This Jenkins plugin helps to solve this problem by allowing you to copy needed files from one job to another. So it may be handy to copy a resulting artifact from one build job into another job that will run tests against it. It does sound a bit hackish, but it is way better than referencing your artifacts from one job folder to another.
Jenkins Throttle Concurrent Builds
I am pretty sure that you have some jobs running in Jenkins that should not interfere with each other. This plugin allows you to group jobs, and allow only some defined number of jobs run concurrently (in most cases, it is one) in the same environment. Take test jobs that use some container instances preinstalled on your master/slaves, for example: this plugin allows you to configure your jobs so that they will run on different slaves or wait for another job to finish before starting.
Join
This plugin allows a job to be run after all the immediate downstream jobs have completed. In this way, the execution can branch out and perform many steps in parallel, and then run a final aggregation step just once after all the parallel work is finished. This plugin is useful for creating a diamond shape project dependency. This means there is a single parent job that starts several downstream jobs. Once those jobs are finished, a single aggregation job runs. Unfortunately, more complex interactions are not possible with this plugin.Your time is too valuable to sit around waiting for your code to redeploy.
Green Balls
Historically Jenkins has used the blue color to denote successful builds. So, all status messages throughout the GUI use blue as the color of success. I don’t know the history of this, but closest thing that comes to mind is the The Matrix, where the blue pill was designated as the safe choice. If you are like me and feel that green is the way to go (Green Hornet, Green Lantern, Gumby, traffic lights, etc) then you can change your preference to green with the Green Balls plugin.
-Major Features of Jenkins :
Easy installation: Just run java -jar jenkins.war, deploy it in a servlet container. No additional install, no database. Prefer an installer or native package? We have those as well.
Easy configuration: Jenkins can be configured entirely from its friendly web GUI with extensive on-the-fly error checks and inline help.
Rich plugin ecosystem: Jenkins integrates with virtually every SCM or build tool that exists.
Extensibility: Most parts of Jenkins can be extended and modified and it’s easy to create new Jenkins plugins. This allows you to customize Jenkins to your needs.
Distributed builds: Jenkins can distribute build/test loads to multiple computers with different operating systems. Building software for OS X, Linux and Windows? No problem.
Azure
Installation Instructions For Ubuntu
Note : How to find PublicDNS in Azure
Step 1) SSH Connection: To connect to the deployed instance, Please follow Instructions to Connect to Ubuntu instance on Azure Cloud
1) Download Putty.
2) Connect to the virtual machine using following SSH credentials:
- Hostname: PublicDNS / IP of machine
- Port: 22
Username: Your chosen username when you created the machine ( For example: Azureuser)
Password: Your Chosen Password when you created the machine ( How to reset the password if you do not remember)
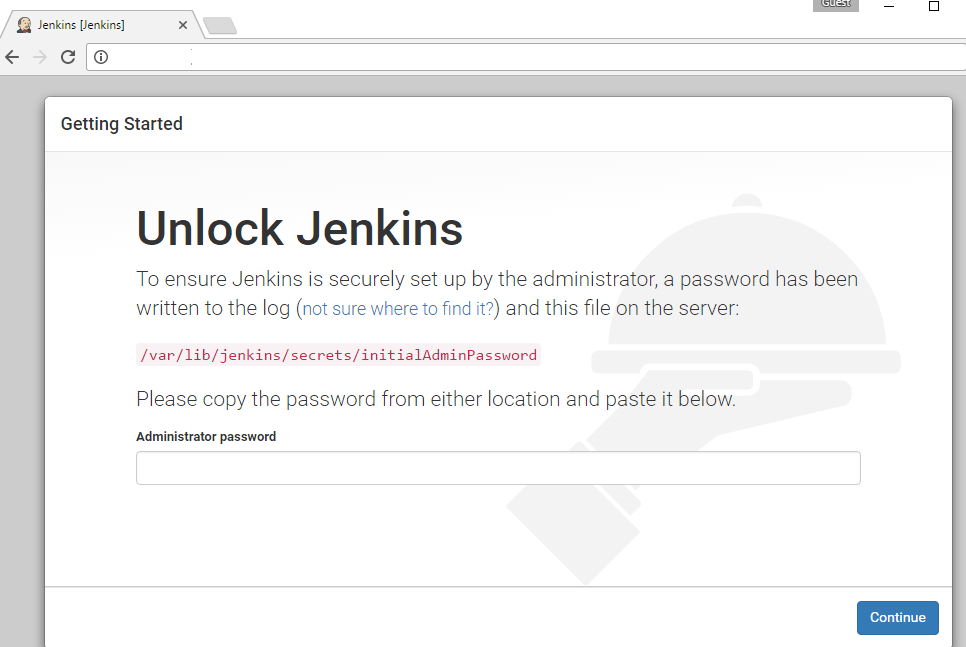
Step 2) Application URL: Access the Web Interface via a browser at http://<your ip>:8080
Note: Get Admin password with cat/var/lib/jenkins/secrets/initialAdminPassword
Step 3) Other Information:
1. Default installation path: will be in your web root folder “/var/www/html/”
2. Default ports:
-
- Http: 8080
Configure custom inbound and outbound rules using this link
3. To access Webmin interface for management please follow this link
Installation Instructions For Centos
Note : How to find PublicDNS in Azure
Step 1) SSH Connection: To connect to the deployed instance, Please follow Instructions to Connect to Ubuntu instance on Azure Cloud
1) Download Putty.
2) Connect to the virtual machine using following SSH credentials:
- Hostname: PublicDNS / IP of machine
- Port: 22
Username: Your chosen username when you created the machine ( For example: Azureuser)
Password: Your Chosen Password when you created the machine ( How to reset the password if you do not remember)

Step 2) Application URL: Access the Web Interface via a browser at http://<your ip>:8080
Note: Get Admin password with cat/var/lib/jenkins/secrets/initialAdminPassword
Step 3) Other Information:
1. Default installation path: will be on your web root folder “/var/www/html/”
2. Default ports:
- Http: 8080
Configure custom inbound and outbound rules using this link
3. To access Webmin interface for management please follow this link
Step by Step Screenshots:
- Installation Instructions For Windows
- Installation Instructions For Redhat
- Installation Instructions For Ubuntu
Installation Instructions For Windows
Step 1) VM Creation:
1.Click the Launch on Compute Engine button to choose the hardware and network settings.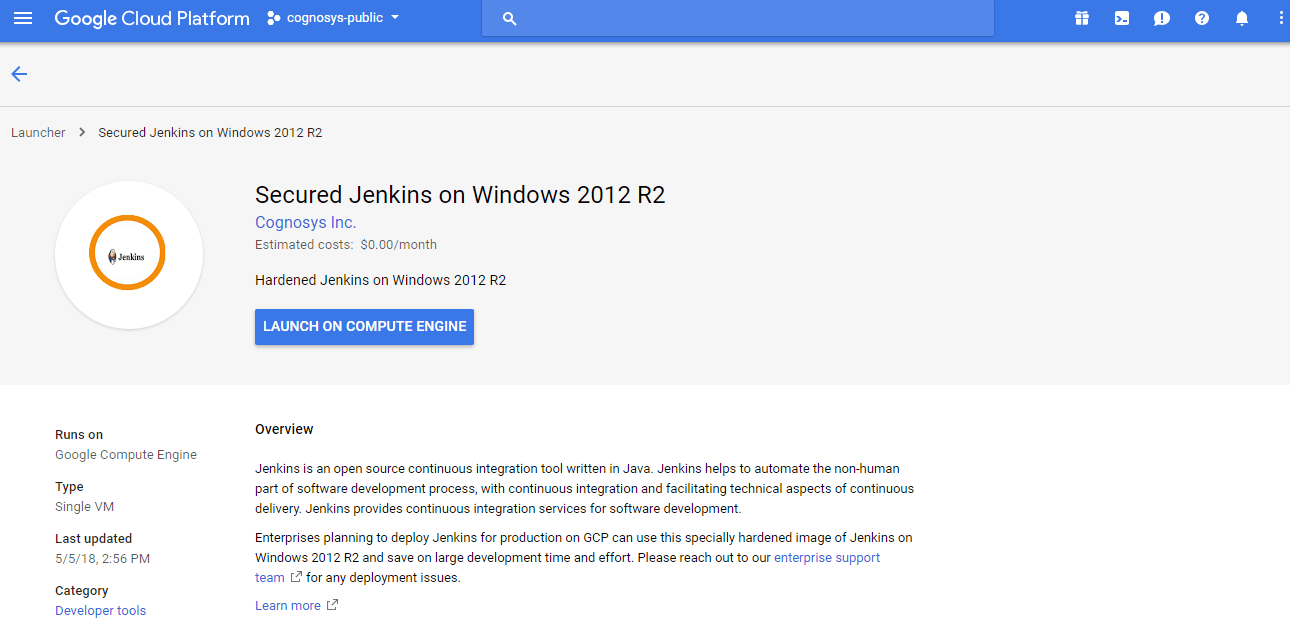
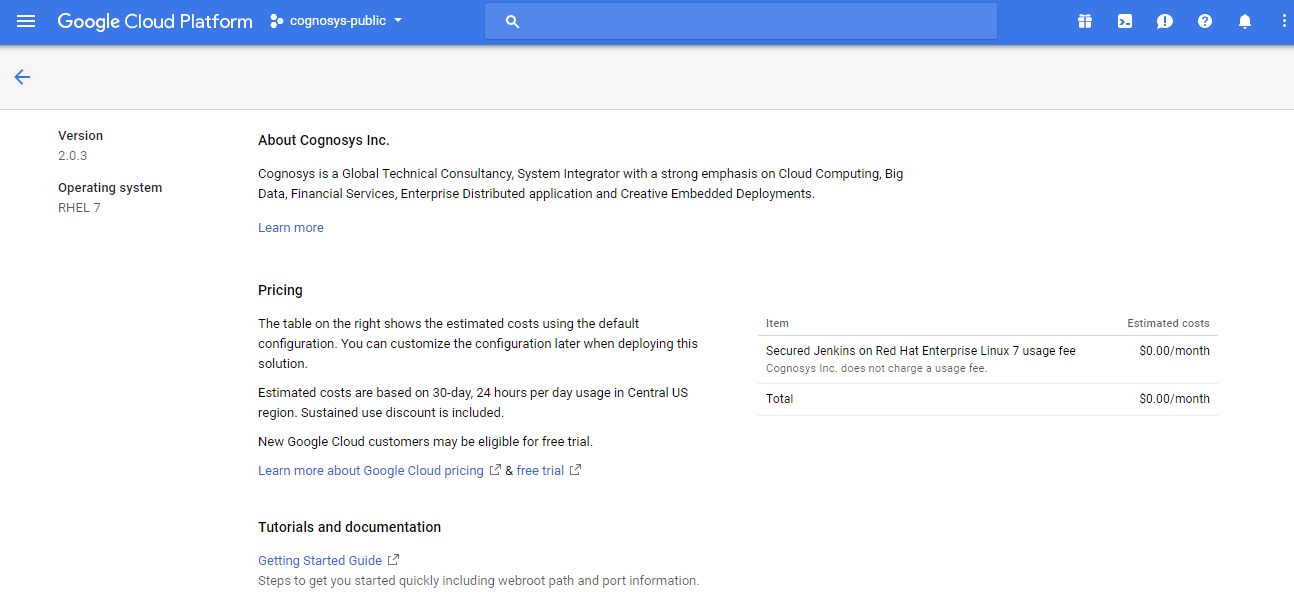
2.You can see at this page, an overview of Cognosys Image as well as some estimated costs of VM.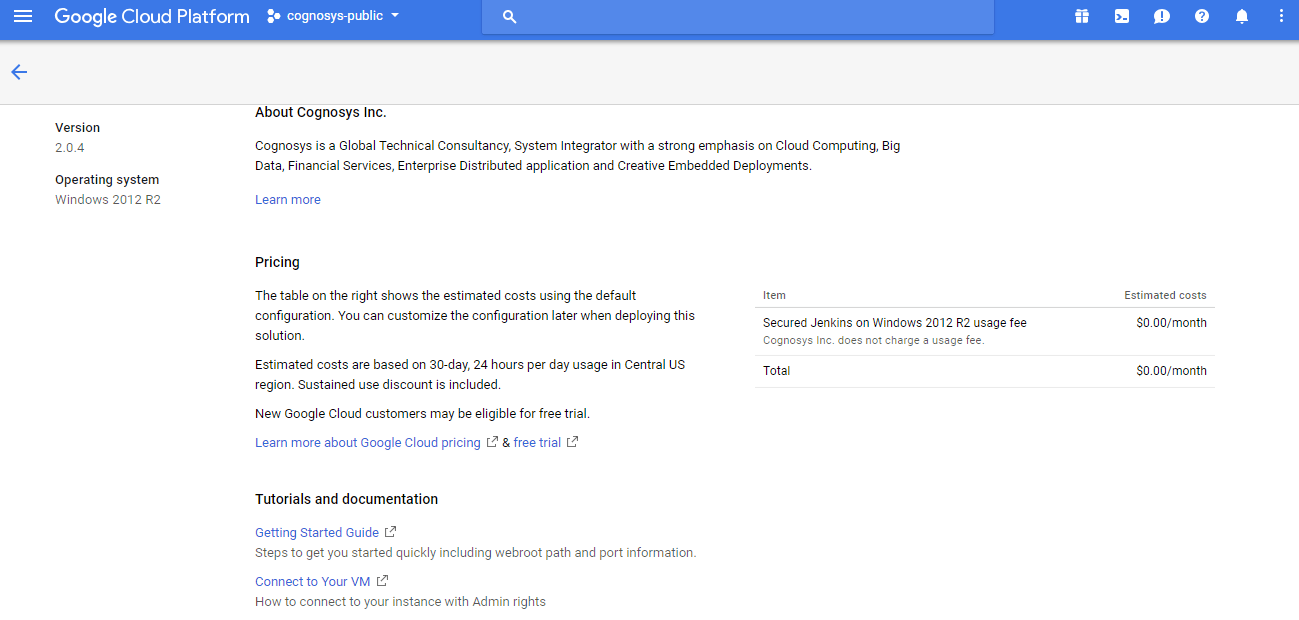
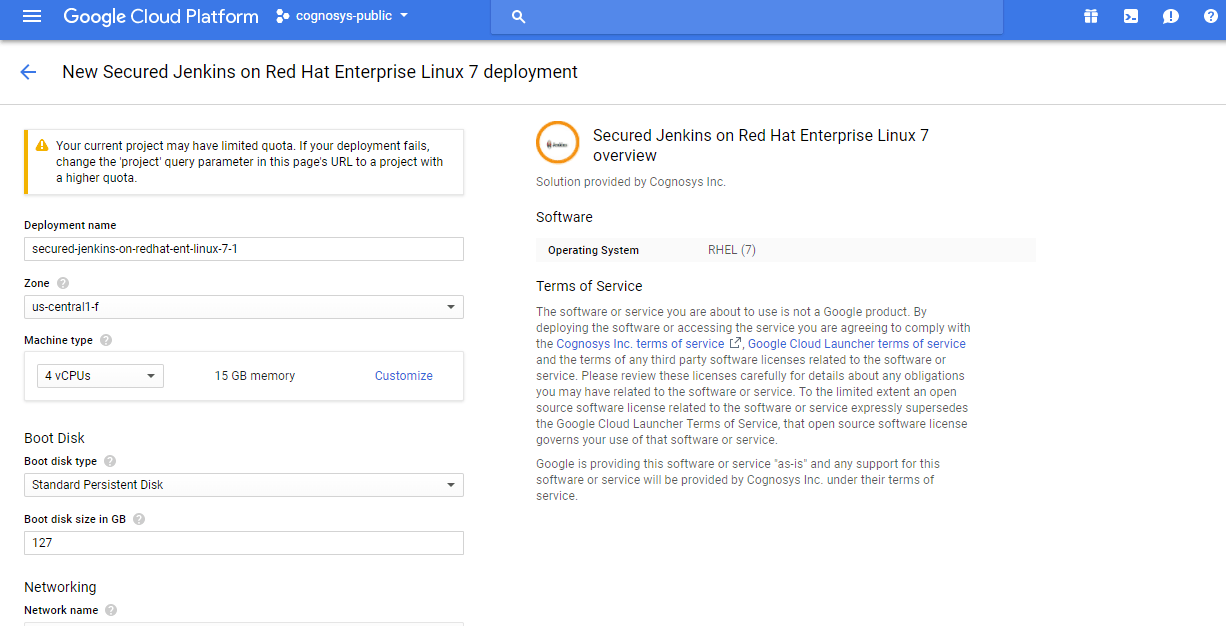
3.In the settings page, you can choose the number of CPUs and amount of RAM, the disk size and type etc.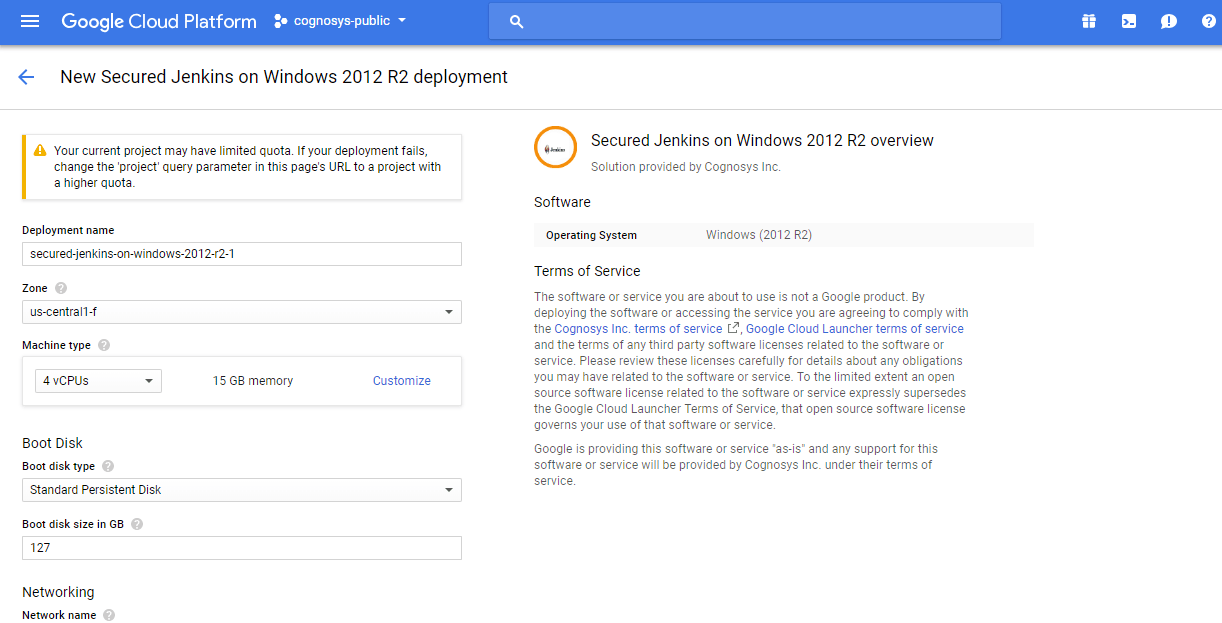
Step 2) RDP Connection: To initialize the DB Server connect to the deployed instance, Please follow Instructions to Connect to Windows instance on Google Cloud
Step 3) Database Login Details:
The below screen appears after successful deployment of the image.
For local MySQL root password, please use the temporary password generated automatically during image creation as shown above.
i) Please connect to Remote Desktop as given in step 2 to ensure stack is properly configured and DB is initialized.
ii) You can use MySQL server instance as localhost, username root and password as shown above.
If you have closed the deployment page you can also get the MySQL root password from VM Details “Custom metadata” Section
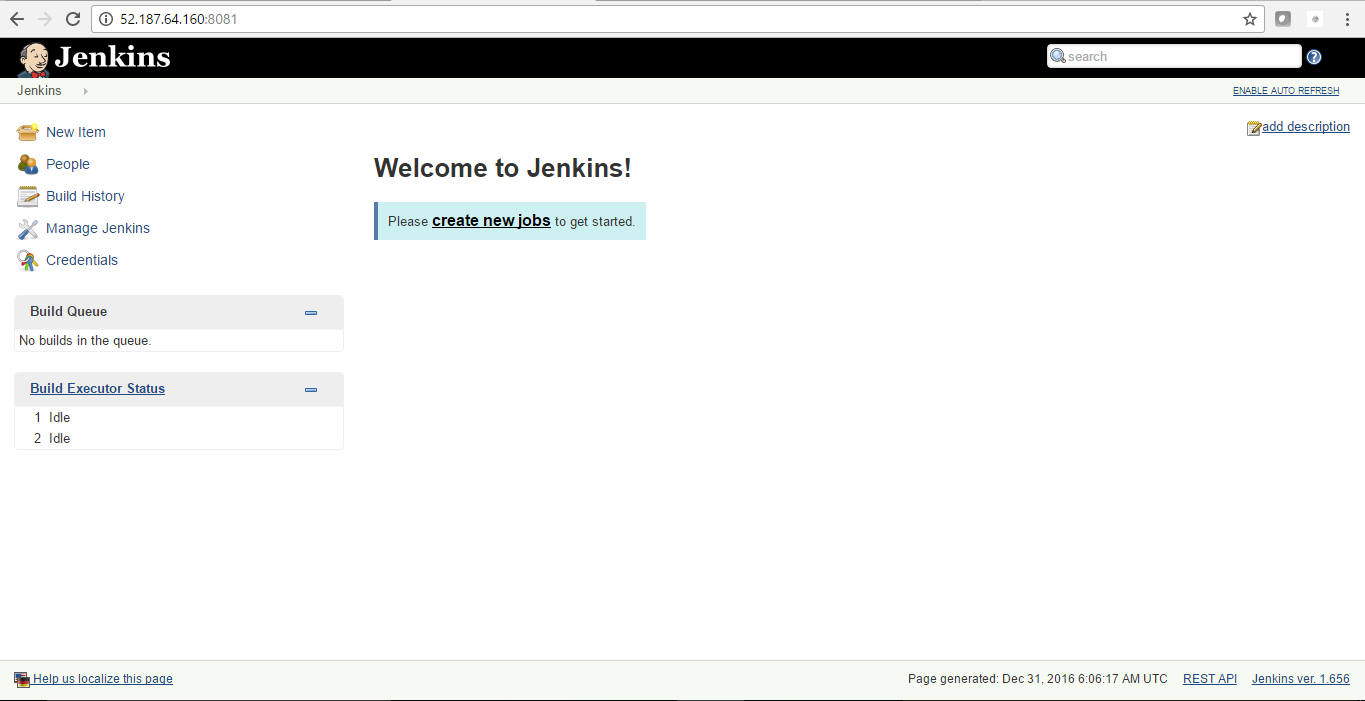
Step 4) Application URL: Access the application via a browser at http://<yourip>/jenkins
A) You will see the page where you can configure your site data with site name, jenkins admin name etc.
B) On next page you will see configuration success message.
C) You can login to the jenkins admin portal with the jenkins username and its generated password from point A shown above.
D) You can access the configured site at http://yourIP/jenkins
Installation Instructions For Redhat
Step 1) VM Creation:
- Click the Launch on Compute Engine button to choose the hardware and network settings.

- You can see at this page, an overview of Cognosys Image as well as some estimated costs of VM.

- In the settings page, you can choose the number of CPUs and amount of RAM, the disk size and type etc.
 Step 2) SSH Connection: To connect to the deployed instance, Please follow Instructions to Connect to Ubuntu instance on Google Cloud1) Download Putty.2) Connect to the virtual machine using SSH key
- Hostname: PublicDNS / IP of machine
- Port : 22
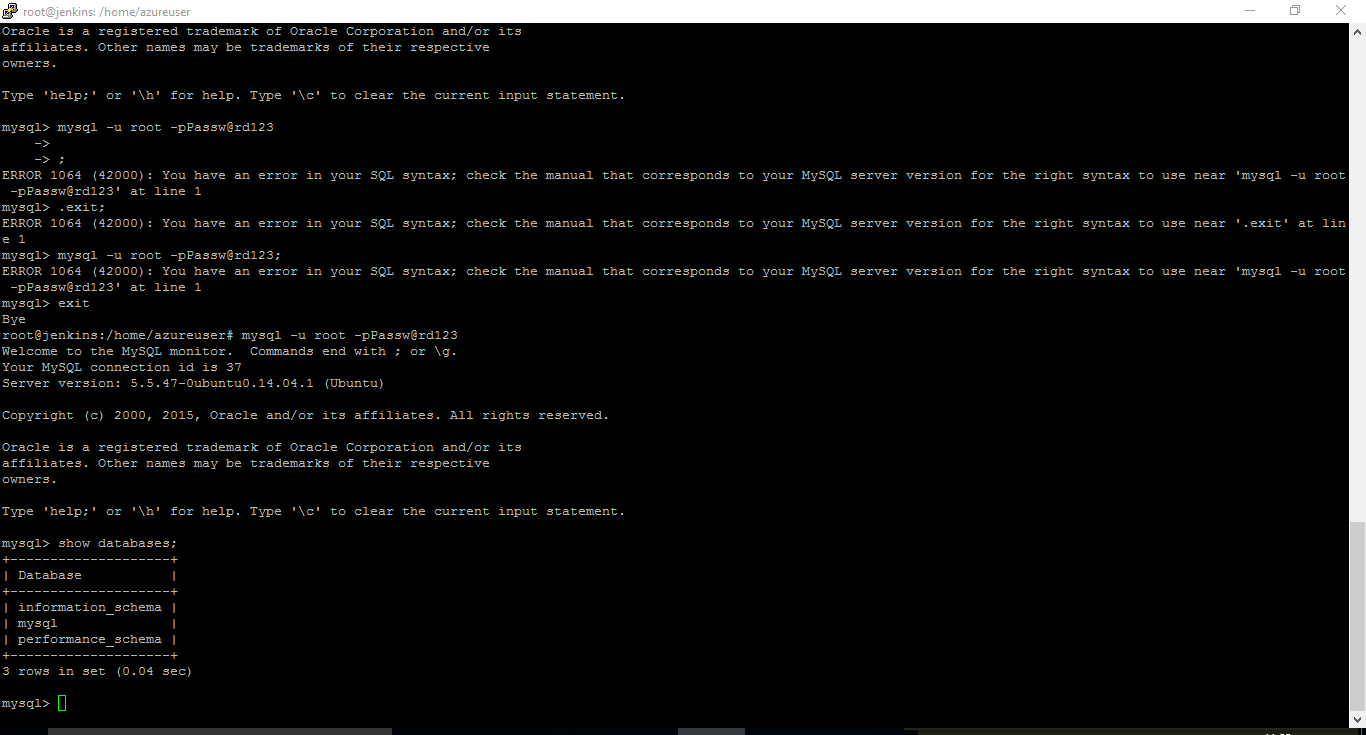
Step 3) Database Login Details:
The below screen appears after successful deployment of the image.
For local MySQL root password, please use the temporary password generated automatically during image creation as shown above.
i) Please connect to Remote Desktop as given in step 2 to ensure stack is properly configured and DB is initialized.
ii) You can use MySQL server instance as localhost, username root and password as shown above.If you have closed the deployment page you can also get the MySQL root password from VM Details “Custom metadata” Section
Step 4) Application URL: Access the application via a browser at http://<yourip>/jenkins
A) You will see the page where you can configure your site data with site name, jenkins admin name etc.
B) On next page you will see configuration success message.
C) You can login to the jenkins admin portal with the jenkins username and its generated password from point A shown above.
D) You can access the configured site at http://yourIP/jenkins
Step 5) Other Information:
1.Default ports:
- Linux Machines: SSH Port – 22
2. To access Webmin interface for management please follow this link
Videos
Secured Jenkins on Ubuntu 14.04 LTS
How to Install Jenkins (Deploying, Upgrade, Apache, Nginx Proxy) in Ubuntu Server 15.10/14.04


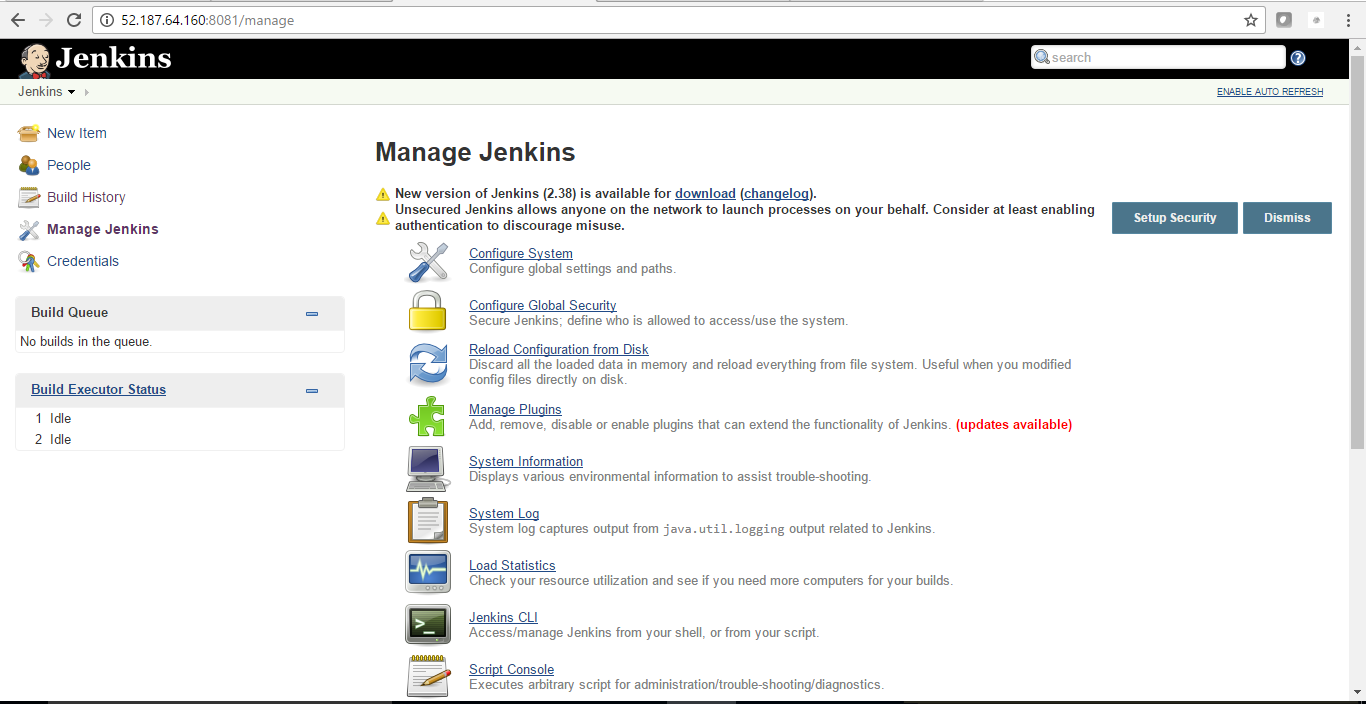
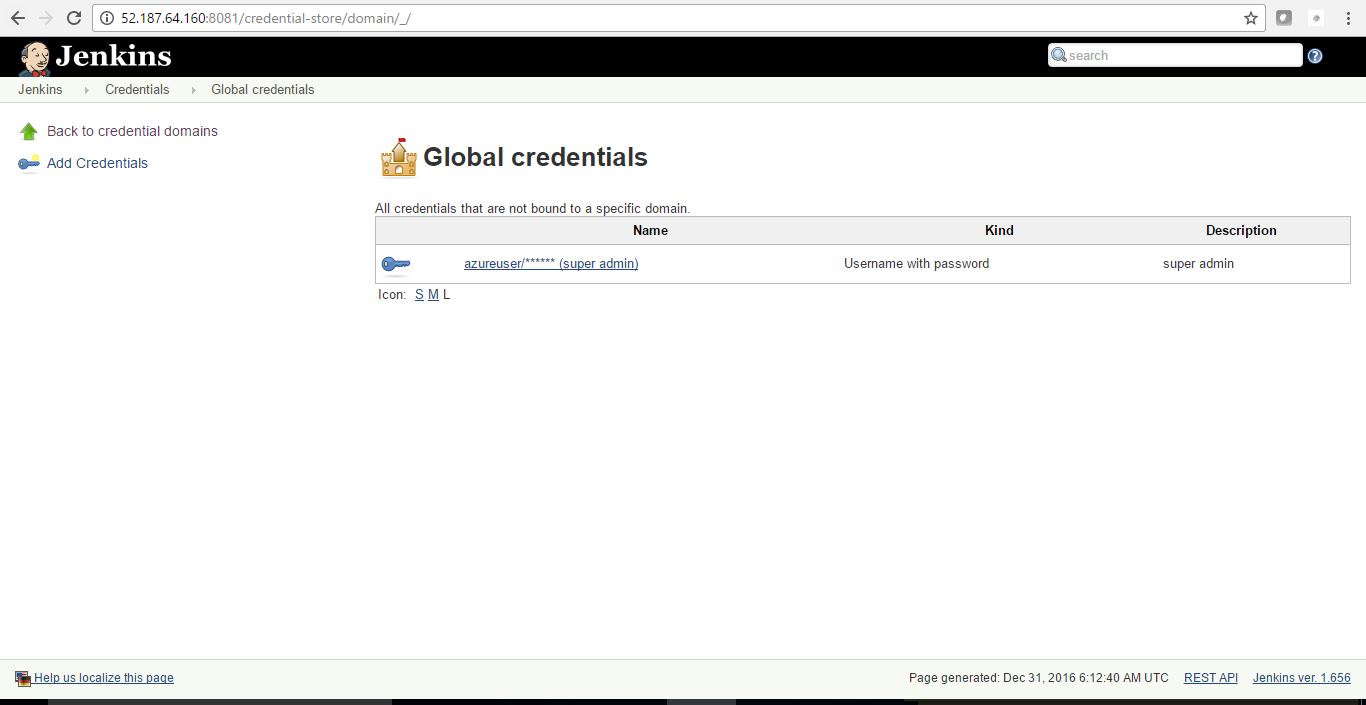
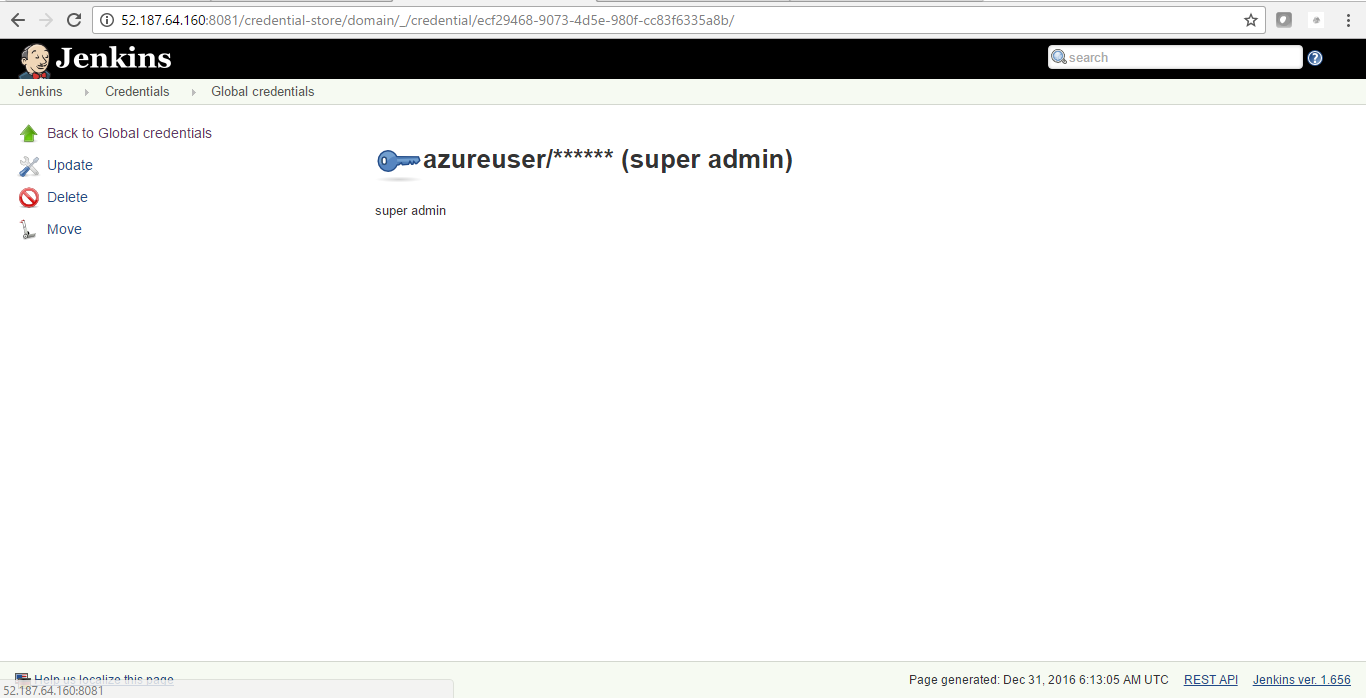
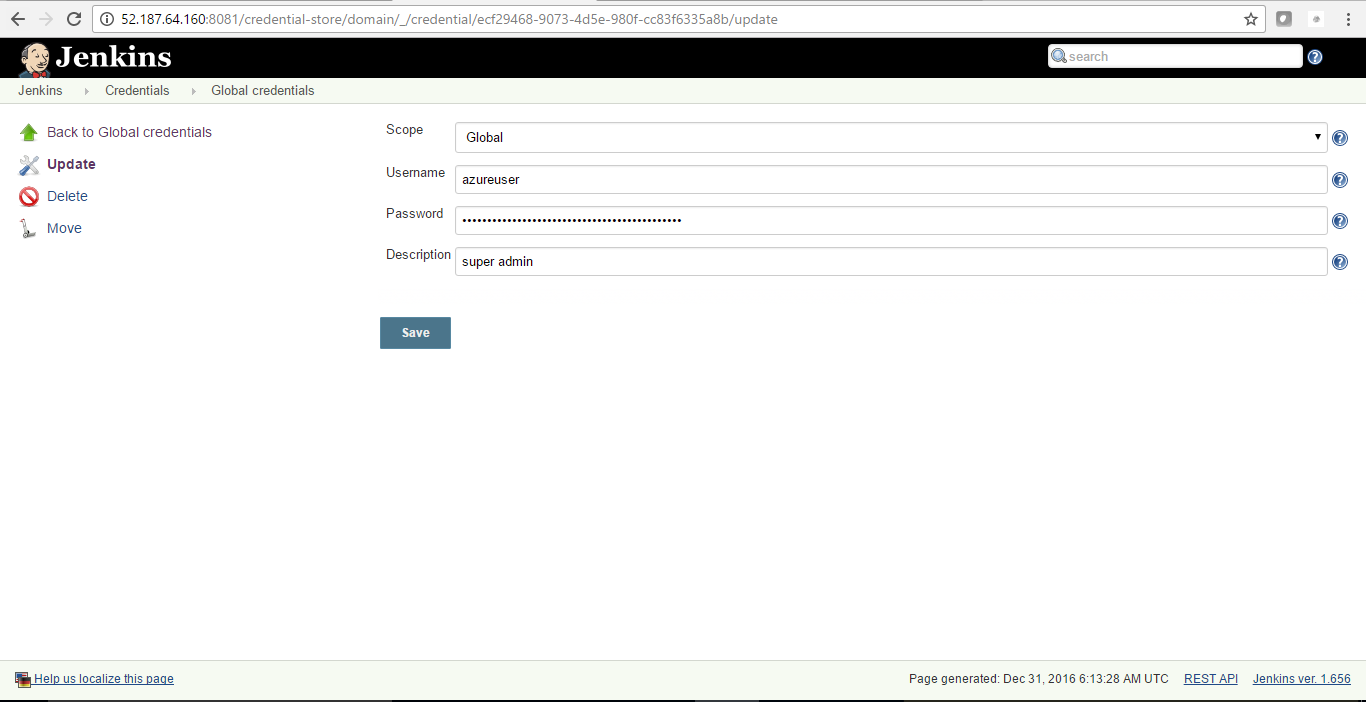


 Step 2) SSH Connection: To connect to the deployed instance, Please follow