
1-click AWS Deployment 1-click Azure Deployment 1-click Google Deployment
Overview
Ghost is an open source, professional publishing platform built on a modern Node.js technology stack — designed for teams who need power, flexibility and performance. Every day Ghost powers some of the most-read stories on the internet, serving hundreds of millions of requests across tens of thousands of sites.
Architecture
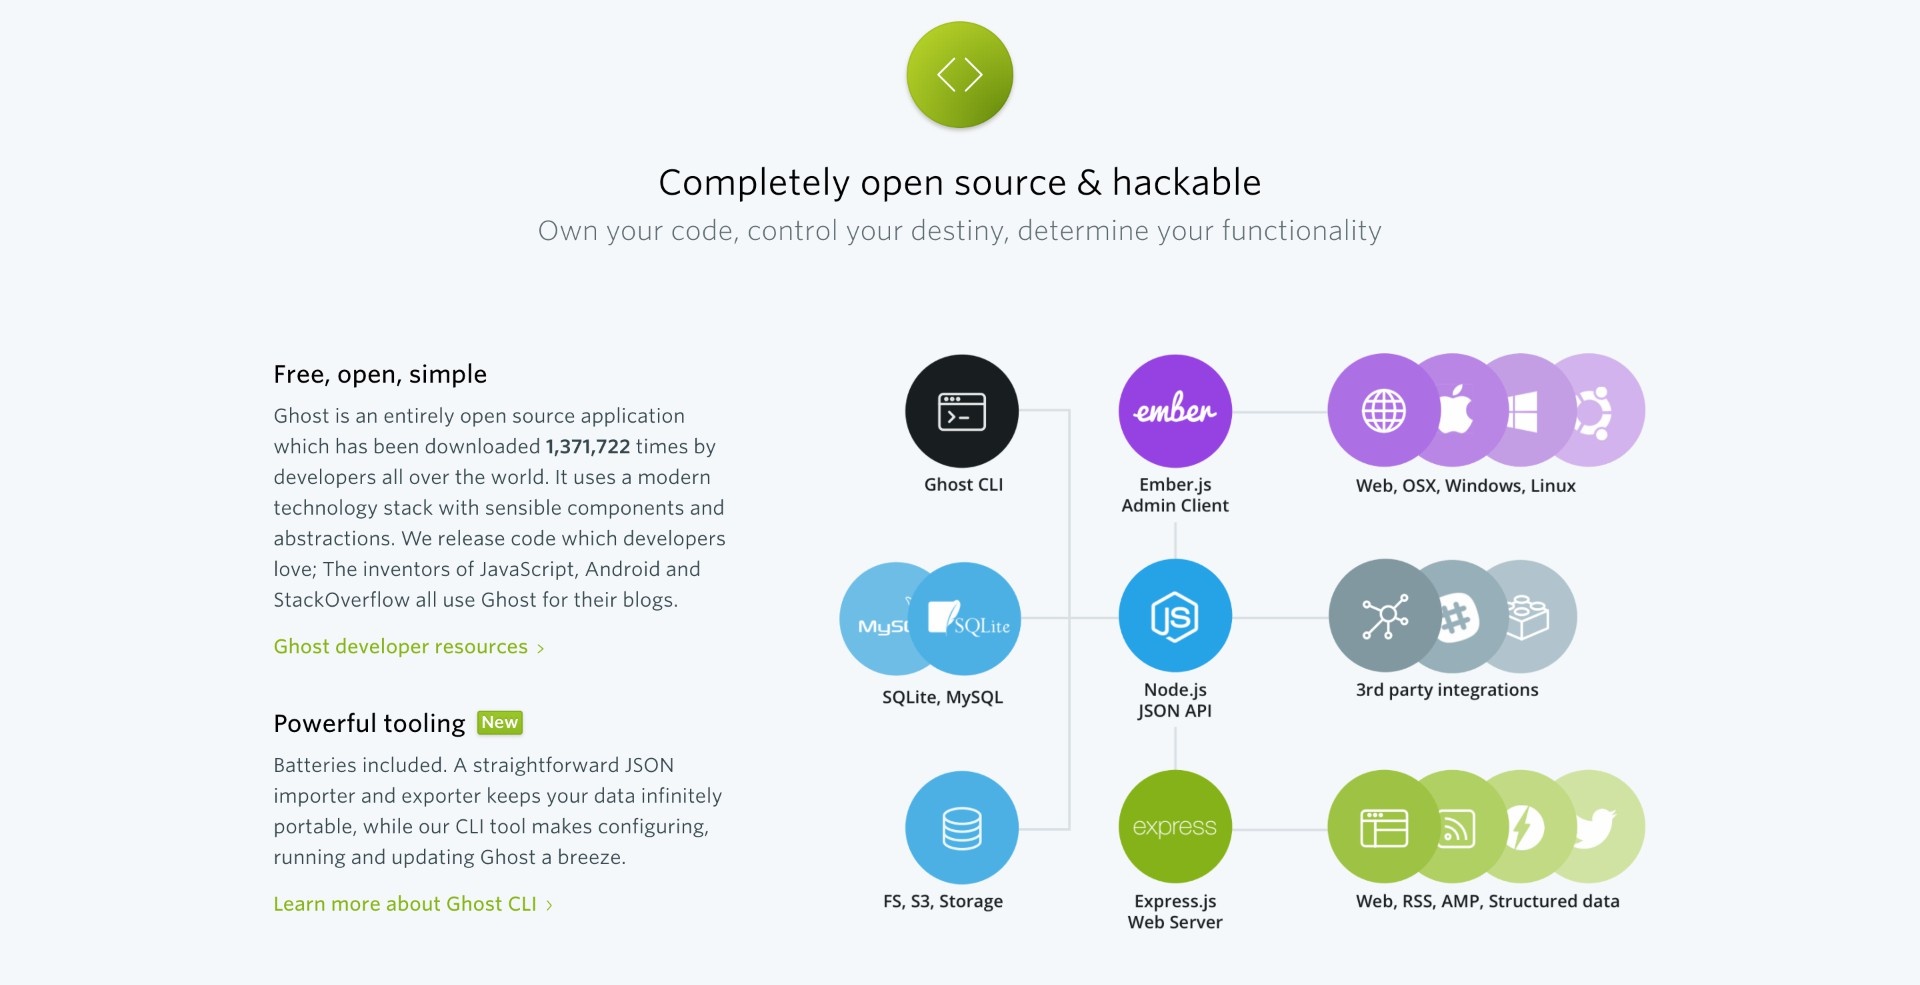
At its core Ghost is a self-consuming, RESTful JSON API with decoupled admin client and front-end. Ghost comes with a default Handlebars.js frontend for getting a site running as quickly as possible, as well as detailed documentation for working with the API directly or using provided SDKs and headless front-end framework integrations.For editors, Ghost has the rich editor which every writer wants, but under the hood it delivers far more power than you would expect. All content is stored in a standardised JSON-based document storage format called MobileDoc, which includes support for extensible rich media objects called Cards.
Because Ghost is completely open source, built as a JSON API, has webhooks, and gives you full control over the front-end: It essentially integrates with absolutely everything. Browse a large directory of integrations with instructions, or build any manner of custom integration yourself by writing a little JavaScript and Markup to do whatever you want.
Data & Storage
Ghost ships with the Bookshelf.js ORM layer by default allowing for a range of databases to be used. Currently SQLite3 is the supported default in development while MySQL is recommended for production. Other databases are available, and compatible, but not supported by the core team.
Additionally, while Ghost uses local file storage by default it’s also possible to use custom storage adapters to make your filesystem completely external. There are fairly wide range of pre-made storage adapters for Ghost already available for use.
Example Customers
Hitting the right balance of needs has led Ghost to be used in production by organisations including Apple, Sky News, DuckDuckGo, Mozilla, OpenAI, Square, CloudFlare, Tinder, the Bitcoin Foundation and many more.
Try Ghost
Ghost is completely free an open source, released under the MIT license, stewarded by a non-profit foundation. It can be downloaded and self-hosted just about anywhere, or spun up in a few moments using the Ghost(Pro) managed PaaS, which comes with a 14 day free trial.
How To Change Themes and Adjust Settings in Ghost
Introduction
Ghost is a great new blogging platform that focuses on content creation and presentation over the superfluous bells and whistles that dominate other platforms. It provides a clean, easy-to-use interface and can produce very polished results.
How To Change Ghost Themes
The main aesthetic adjustment that you can make to your blog is the theme. A theme controls how all of the pieces are presented visually and how the elements are drawn together.
There are a number of different themes you can get for Ghost. Some are free and some you must purchase.
We will apply one of the free themes from the Ghost Marketplace called “N’Coded”.
You can see this theme by visiting:
marketplace.ghost.org
Click on the “N’Coded” theme to be taken to the theme’s GitHub page.
Log into your Ghost VPS and navigate to the Ghost themes directory:
cd /var/www/ghost/content/themes/
We will use git to install the theme into this directory. Install git if it is not already present in the system:
apt-get update && apt-get install git-core -y
Now, we can clone the project from the GitHub page:
git clone https://github.com/polygonix/N-Coded.git
Change ownership of the files to the Ghost user and group:
chown -R ghost:ghost N-Coded
Restart Ghost to allow it to see the new theme folder:
service ghost restart
Open your web browser and navigate to the general settings page:
your_domain_name/ghost/settings/general
Scroll down to the bottom and you will see a “Theme” area. Change the theme to “N-Coded”:

Click the “Save” button in the upper right corner.
Navigate to your blog to see the new theme:

How To Change Ghost Settings
You can change most of your blog’s settings by navigating to the “settings” page of your blog:
your_domain_name/ghost/settings
You will be taken to the general settings page:
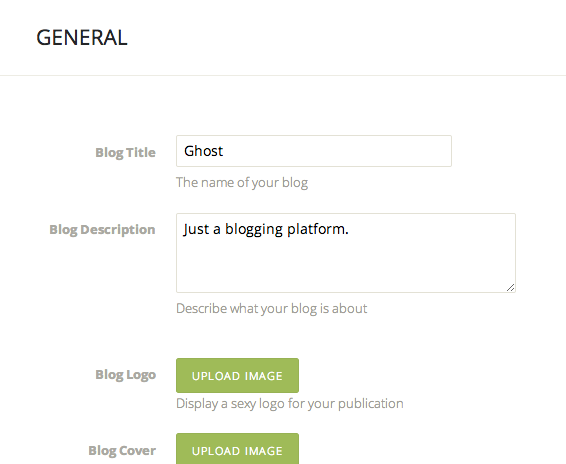
Here, you can adjust items like the title and description of your blog, and update the logo and cover images.
To change details for your user, click on the “User” tab on the left-hand side:
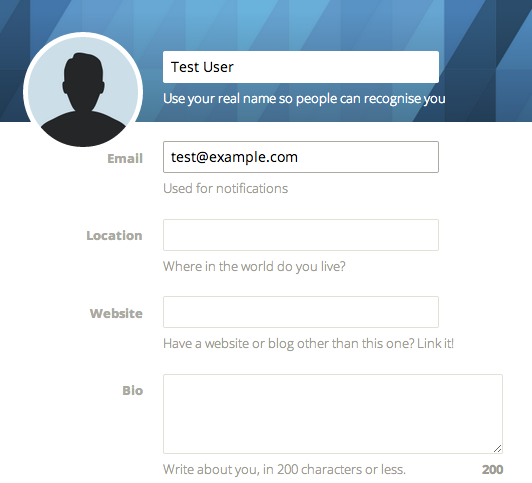
Here, you can adjust settings for your profile. These details include your user name and email, as well as a short biography and a link to a personal external site.
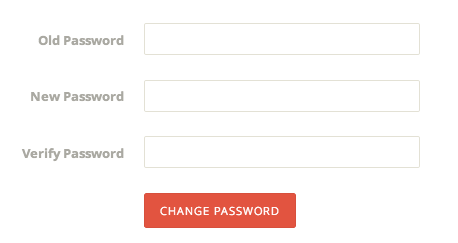
If you scroll to the bottom of the page, you can change your personal password by typing in your current password and supplying/confirming a replacement:
How To Configure and Maintain Ghost from the Command Line
How To Control the Ghost Service
The Ghost application is implemented on a daemon on our Droplet. This means that we can start, stop and restart it easily using Ubuntu’s service command.We can control the Ghost service like any other service:
Start Ghost:
sudo service ghost start
Stop Ghost:
sudo service ghost stop
Restart Ghost:
sudo service ghost restart
Sometimes, after we’ve made changes to our configuration, it may also be helpful to restart nginx (our web server) as well:
sudo service nginx restart
You shouldn’t have to use these commands often, but they are helpful to know if you are not too familiar with a Linux environment.
How To Back Up Ghost
Backing up Ghost is trivial, so you should do it often.
Ghost stores most of its data in a database called ghost.db.
If you would like to copy this directly, you can do so, but you should stop the Ghost service first:
sudo service ghost stop
You can copy this to your own computer by typing into your local terminal:
scp root@your_ghost_IP_address:/var/www/ghost/content/data/ghost.db .
This will copy it into your current local directory.
To copy themes, issue this command:
ssh -n root@your_ghost_IP_address 'tar zcvf - -C /var/www/ghost/content/themes .' | cat - > ghost_themes.tar.gz
This will create an archive file called ghost_themes.tar.gz with all of your themes in your current local directory.
To back up your images, you can run a similar command, which will create a file called ghost_images.tar.gz:
ssh -n root@your_ghost_IP_address 'tar zcvf - -C /var/www/ghost/content/images .' | cat - > ghost_images.tar.gz
Don’t forget to restart Ghost after you’ve downloaded the data:
sudo service ghost start
Perhaps an easier way of doing this is through the web interface by visiting this page of your site:
domain_name/ghost/debug
You can click the “Export” button to download a copy of your blog content and settings:

If you need to redeploy, you can always visit this page again and import the data file you just downloaded.
How To Upgrade Ghost
It is important to keep your Ghost installation up-to-date in order to keep yourself secure. You can find the official Ghost upgrade guide, which is updated regularly.
When a new version is released, you can get it from the Ghost website. You will probably have to create an account or sign in.
Search for a download link to the latest version and copy the link by right-clicking or control-clicking on the “Download Now” button and selecting “Copy Link Address” or “Copy Link Location”.
Currently, the URL for the latest version is always here, although that may change in the future:
http://ghost.org/zip/ghost-latest.zip
Log into your Ghost droplet as root. Before upgrading, back up the database to your home computer as we discussed above.
We will need the build-essential package in order to complete the Ghost upgrade. You can install it on your system by typing:
sudo apt-get update
sudo apt-get install build-essential
We will also want to stop the Ghost service before upgrading the files, so that no processes are modifying files as they are being overwritten:
service ghost stop
Change to the web root directory:
cd /var/www/
Type wget followed by the URL for the latest version of Ghost. If you copied the link location, you can paste that here:
wget url_to_ghost_download
Delete the current contents of the core directory before copying the upgraded files over:
rm -rf ghost/core
Extract the files to the correct location to update the Ghost installation:
unzip -uo ghost*.zip -d ghost
The “-uo” options extract newer versions of files and create new files where necessary. DO NOT forget them or you may wipe out your information!
Next, you have to give control over the files to the Ghost process. You can do that by typing:
chown -R ghost:ghost ghost/*
We will get new dependencies by changing into our ghost directory and using the npm command:
cd /var/www/ghost
npm install --production
To implement your changes, restart the Ghost service:
service ghost start
If you ran into problems, the best thing to do is to repeat the process from the beginning and check for errors in the output of the commands. Most of the time, you will be able to catch any mistakes by running through a second time.
How To Test Ghost Configuration Changes
Ghost executes using a number of pre-configured “environments”. Environments dictate which database to use, which URLs to respond to, and how to talk to the back-end server.
We usually run our instance of Ghost in the “production” environment. This is, for the most part, configured correctly to serve your blog on a public-facing site.
If we wish to experiment with some of the settings, we can do so safely by creating a new environment, and then specifying those environments while starting Ghost.
Environments are configured in the config.js file in the document root. Open this file with your text editor:
nano /var/www/ghost/config.js
Inside, you will see some code that looks like this:
var path = require('path'),
    config;

config = {
    development: {
        . . .
        . . .
    },

    production: {
        . . .
        . . .
    },

    otherEnvironments: {
        . . .
        . . .
    }
}
Each of the section titles in red defines an environment. If we want to test changes in a new environment, we can copy the “production” environment and make our modifications there.
To do this, we would copy everything between:
production: {
And the matching closing bracket (prior to the start of the next “testing” environment):
},
Directly under the production block that we just copied, we can paste the chunk.
production: {
    . . .
    . . .
},
production: {
    . . .
    . . .
},
Next, change the second “production” to the name of our temporary environment. We will use temporary.
production: {
    . . .
    . . .
},
temporary: {
    . . .
    . . .
},
Now, we have a new block to experiment with. You can adjust the settings here without worrying about messing up your regular site.
When you are done, save and close the file.
After we are done modifying the “temporary” block, we need to tell Ghost to use this new block. We will do this by adjusting the value in the init script that starts Ghost.
Open the Ghost init script by typing:
nano /etc/init.d/ghost
Find the line that specifies the production environment:
export NODE_ENV=production
Change this to reference your new “temporary” environment:
export NODE_ENV=temporary
Save and close the file.
Now, we can restart Ghost to use our new settings:
service ghost restart
Depending on the changes that you used, you may have to restart nginx as well:
service nginx restart
When you have thoroughly tested your new configuration, you should move your changes from your temporary environment into your production environment.
After that, re-open the init script and change the environment rule back to “production”:
nano /etc/init.d/ghost
export NODE_ENV=production
Again, restart Ghost:
service ghost restart
How To Configure Email for Ghost
Ghost doesn’t use email for very many things. At the time of this writing, it only uses it to send password reset emails. However, without this configured, you will see an annoying banner:

We need to configure email to get this to go away.
First, we can choose a provider. You can use a number of different email services. It is recommended that you create a new email address associated with the blog. You need to find the SMTP settings for your service. Use google to search:
your email choice SMTP
Some services have different login names and passwords for SMTP than for their regular services. Make sure you find out the information you need. For a Gmail account, for instance, you can use your normal login credentials.
Open the config.js file to input your mail settings:
nano /var/www/ghost/config.js
You need to find the line in the “production” section that deals with mail:
. . .
production: {
    url: 'http://example.com',
    mail: {},
    database: {
    . . .
Between the open bracket { and the closing bracket } of the mail line, you need to enter the following information:
mail: {
    transport: 'SMTP',
    options: {
        service: '',
        auth: {
            user: '',
            pass: ''
        }
    }
},
Now, you need to fill in the service, user, and pass fields with the appropriate values. For the service, use the name as it is referred to here.
mail: {
    transport: 'SMTP',
    options: {
        service: 'service_name',
        auth: {
            user: 'SMTP_login_name',
            pass: 'SMTP_password'
        }
    }
},
Save and close the file.
Restart Ghost to implement your changes:
service ghost restart
Now, if you log out and click the “forgot password” link, an email will be sent from the SMTP email you just configured to your account email.

How To Install and Configure Ghost on CentOS 7
Prerequisites
To complete this tutorial, you will need:
- One 1GB CentOS 7 server set up by following the Initial Server Setup with CentOS 7 guide, including a sudo non-root user.
- Node.js installed using the EPEL repository method explained in the tutorial: How To Install Node.js on a CentOS 7 server.
- Nginx installed on your server, as shown in How To Install Nginx on CentOS 7.
Step 1 — Installing Ghost
First, we need to install Ghost. We’ll place Ghost in the /var/www/ghost directory, which is the recommended installation location.
Download the latest version of Ghost from Ghost’s GitHub repository using wget:wget https://ghost.org/zip/ghost-latest.zip
wget https://ghost.org/zip/ghost-latest.zip:
- sudo yum update -y
- sudo yum install unzip -y
The -y flag in the preceding commands updates and installs packages automatically without asking for a confirmation from the user.
Once unzip is installed, unzip the downloaded package to the /var/www/ghost directory. First, create the /var/www folder, then unzip the file:
- sudo mkdir /var/www
- sudo unzip -d /var/www/ghost ghost-latest.zip
Switch to the /var/www/ghost/ directory:
- cd /var/www/ghost/
Then install the Ghost dependencies, but only the ones needed for production. This skips any dependencies which are only needed by people who develop Ghost.
- sudo npm install –production
Ghost is installed once this process completes, but we need to set up Ghost before we can start it.
Step 2 — Configuring Ghost
Ghost uses a configuration file located at /var/www/ghost/config.js. This file doesn’t exist out of the box, but the Ghost installation includes the file config.example.js, which we’ll use as a starting point.
Copy the example configuration file to /var/www/ghost/config.js. We’ll copy the file instead of moving it so that we have a copy of the original configuration file in case we need to revert your changes.
- sudo cp config.example.js config.js
Open the file for editing:
- sudo vi config.js
We have to change the URL that Ghost uses. If we don’t, the links on the blog will take visitors to my-ghost-blog.com. Change the value of the url field to your domain name, or to your server’s IP address if you don’t want to use a domain right now.
...

config = {
    // ### Production
    // When running Ghost in the wild, use the production environment
    // Configure your URL and mail settings here
    production: {
        url: 'http://your_domain_or_ip_address',
        mail: {},
...
The url value must be in the form of a URL, like http://example.com or http://11.11.11.11. If this value is not formatted correctly, Ghost will not start.
Ghost can function without the mail settings; they’re only necessary if you need to support password recovery for Ghost users. We’ll skip configuring this setting in this tutorial.
You can customize Ghost further by following the configuration details at the official site.
Save the file and exit the editor.
While still in the /var/www/ghost directory, start Ghost with the following command:
- sudo npm start –production
The output should be similar to the following:
> ghost@0.11.7 start /var/www/ghost
> node index

WARNING: Ghost is attempting to use a direct method to send email.
It is recommended that you explicitly configure an email service.
Help and documentation can be found at http://support.ghost.org/mail.

Migrations: Creating tables...
...

Ghost is running in production...
Your blog is now available on http://your_domain_or_ip_address
Ctrl+C to shut down
Ghost is listening on port 2368, and it’s not listening on the public network interface, so you won’t be able to access it directly. Let’s set up Nginx in front of Ghost.
Step 3 — Configuring Nginx to Proxy Requests to Ghost
The next step is to set up Nginx to serve our Ghost blog. This will allow connections on port 80 to connect through to the port that Ghost is running on, so people can access your Ghost blog without adding the :2368 to the end of the address. It also adds a layer of indirection and sets you up to scale out your blog if it grows.
If Ghost is still running in your terminal, press CTRL+C to shut down the Ghost instance before you continue.
Now let’s configure Nginx. Change to the /etc/nginx directory first:
- cd /etc/nginx/
If you installed Nginx from the CentOS EPEL repository as shown in the prerequisite tutorial, you will not have the sites-available and sites-enabled directories, which are used to manage web site configurations. Let’s create them:
- sudo mkdir sites-available
- sudo mkdir sites-enabled
Next, create a new file in /etc/nginx/sites-available/ called ghost:
- sudo vi /etc/nginx/sites-available/ghost
Place the following configuration in the file and change your_domain_or_ip_address to your domain name, or your servers IP address if you don’t have a domain:
server {
    listen 80;
    server_name your_domain_or_ip_address;
    location / {
    proxy_set_header HOST $host;
    proxy_set_header X-Forwarded-Proto $scheme;
    proxy_set_header X-Real-IP $remote_addr;
    proxy_set_header X-Forwarded-For $proxy_add_x_forwarded_for;
        proxy_pass         http://127.0.0.1:2368;
    }
}
This basic configuration sends all requests for this server to the Ghost blog running on port 2368, and it sets the appropriate HTTP headers so that when you look at your Ghost logs, you’ll see the original IP address of your visitors. You can learn more about this configuration in Understanding Nginx HTTP Proxying, Load Balancing, Buffering, and Caching.
Save the file, exit the editor, and enable this configuration by creating a symlink for this file in the /etc/nginx/sites-enabled directory:
- sudo ln -s /etc/nginx/sites-available/ghost /etc/nginx/sites-enabled/ghost
Nginx won’t use this new configuration until we modify the default Nginx configuration file and tell it to include the configuration files in the sites-enabled folder. In addition, we have to disable the default site. Open up the nginx.conf file in your editor:
- sudo vi nginx.conf
Include the following line inside the http block to include the configuration files in the sites-enabled folder:
http {
...
    # Load modular configuration files from the /etc/nginx/conf.d directory.
    # See http://nginx.org/en/docs/ngx_core_module.html#include
    # for more information.
    include /etc/nginx/conf.d/*.conf;
    include /etc/nginx/sites-enabled/*;
Then completely comment out the server block found inside the http block:
...

    # Load modular configuration files from the /etc/nginx/conf.d directory.
    # See http://nginx.org/en/docs/ngx_core_module.html#include
    # for more information.
    include /etc/nginx/conf.d/*.conf;
    include /etc/nginx/sites-enabled/*;


#    server {
#       listen       80 default_server;
#       listen       [::]:80 default_server;
#       server_name  _;
#       root         /usr/share/nginx/html;
#
#       # Load configuration files for the default server block.
#       include /etc/nginx/default.d/*.conf;
#
#       location / {
#       }
#
#       error_page 404 /404.html;
#           location = /40x.html {
#       }
#
#       error_page 500 502 503 504 /50x.html;
#           location = /50x.html {
#       }
...
...
Save the file and exit the editor. Test the configuration to ensure there are no issues:
- sudo nginx -t
You’ll see the following output if everything is correct:
nginx: the configuration file /etc/nginx/nginx.conf syntax is ok
nginx: configuration file /etc/nginx/nginx.conf test is successful
If you see any errors, fix them and retest the configuration.
With a working configuration file, restart Nginx to apply the changes:
- sudo systemctl restart nginx
Before we start Ghost again, let’s create a new user account to run Ghost.
Step 4 – Running Ghost as a Separate User
To improve security, we’ll run Ghost under a separate user account. This user will only have access to the /var/www/ghost directory and its home folder. This way, if Ghost gets compromised, you minimize the potential damage to your system.
Create a new ghost user with the following command:
- sudo adduser –shell /bin/bash ghost
Then make this new user the owner of the /var/www/ghost directory:
- sudo chown -R ghost:ghost /var/www/ghost/
Now let’s make sure this user can run Ghost. Log in as the ghost user:
- sudo su – ghost
Now start Ghost under this user and ensure it runs:
- cd /var/www/ghost
- npm start –production
You should be able to access your blog at http://your_domain_or_ip_address. Nginx will send requests to your Ghost instance.Things are working great, but let’s make sure Ghost continues to run well into the future.
Step 5 — Running Ghost as a System Service
Currently, Ghost is running in our terminal. If we log off, our blog will shut down. Let’s get Ghost running in the background and make sure it restarts when the system restarts. To do this, we’ll create a systemd unit file that specifies how systemd should manage Ghost. Press CTRL+C to stop Ghost, and log out of the ghost user account by pressing CTRL+D.
Create a new file to hold the definition of the systemd unit file:
- sudo vi /etc/systemd/system/ghost.service
Add the following configuration to the file, which defines the service’s name, the group and user for the service, and information on how it should start:
[Unit]
Description=Ghost
After=network.target

[Service]
Type=simple

WorkingDirectory=/var/www/ghost
User=ghost
Group=ghost

ExecStart=/usr/bin/npm start --production
ExecStop=/usr/bin/npm stop --production
Restart=always
SyslogIdentifier=Ghost

[Install]
WantedBy=multi-user.target
Save the file and exit the editor. Then enable and start the service:
- sudo systemctl enable ghost.service
- sudo sytemctl start ghost.service
Once again, visit http://your_domain_or_ip_address and you’ll see your blog.
How To Manage Content Using the Ghost Blogging Platform
Introduction
Ghost is an exciting new blogging platform that can be used to easily manage your posts, update themes, and edit content. A simple, yet powerful interface allows you to get to work immediately and publish beautiful results.
How to Navigate the Content Interface
Ghost’s content creation interface is incredibly simple. We can access our content by going to:
your_domain_name/ghost
You may have to sign in with the credentials you used to create the site. After that, you will be taken to the “content” tab, which is exactly where we want to be:

You will see the pre-configured sample post called “Welcome to Ghost”. Currently, it is the only post that we have on our blog.
As we add content, each new post will get a tab on the left-hand side. If we select any of these posts, a preview will be displayed on the right side. This represents how the content will be displayed on our site.
In the preview pane, we can see two buttons useful for editing.
How To Adjust Post Information
The gear is for adjusting the settings for the post:

If you click it, you can adjust the URL snippet that will be used to refer to the post. By default, this will be an adjusted string made from the post title.
You will also have the option to edit the post date. This date must be in the past and must be in the following format:
DD MMM YY
[08 Oct 13]
This is also where you can delete a post. Click on the “Delete” button:

You will be asked to confirm this action to avoid accidentally destroying a post:

How To Edit a Post
The pencil icon next to the gear is used to edit the current post. If we click it, we will be taken to the editing interface:

You will be taken to a screen where you can edit on the left side and see the results on the right side. Ghost uses markdown, a simple markup language, to create post content.
If you need some help with markdown syntax, you can either visit the markdown site linked to above, or click on the in-site shortcut button that ghost provides.
It is in the upper-right corner of the editing half (left pane) in the editor window:

A reference sheet will pop up with the appropriate way to style different elements in your page.

When you are done editing, click on the “Update Post” button in the lower-right corner:

You may notice that you also have a gear icon in this interface. It provides a consistent menu that mirrors the gears in the other screen.
If you wish to take a post down from the public site, but not delete it, you can unpublish it by clicking on the arrow to the right of the Update button:

The button will change to a red “unpublish” button. Click the button to confirm.

How to Create a New Post
To create a new post, you can either click the green box with a plus in it on the content page:

Or, you can click on the “New Post” button that is present in the top navigation bar on all pages:

You will be taken to the editor screen, just like when you edit a post. This time, all fields will be blank.
Choose a title and begin writing your post in the left-hand side.

You can save your progress in the lower-bottom corner by clicking the “Save Draft” button:

When you are ready to publish, click on the arrow to the right of the “Save Draft” button and select “Publish Now”:

Now, click the red “Publish Now” button to confirm:

Advantages of Ghost:
1. Simple Yet Elegant
The most noticeable thing about Ghost, i.e. the blogs hosted on it, is their design. These are extremely appealing to the eye due to their simple, clean, clutterless design and layout. There is no possibility of getting distracted, neither for the blogger nor for the readers.
2. Easy To Create Content
Ghost focuses mainly on content creation. True to its claim, it indeed powers blogs, magazines and journalists. You don’t have to worry about anything, just focus on creating content. The user interface, i.e. the editor is extremely user-friendly, with barely anything to distract you.
3. Built-in SEO
Ghost has built-in Search Engine Optimization features. From XML Sitemaps to Canonical Tags, Meta Data to AMP Pages, everything is in-built in Ghost. You don’t need any additional plugin.
4. Built-in Social Sharing
Social sharing options are in-built in Ghost. You don’t have to install any plugin for social sharing buttons.
5. Affordable
Many people won’t agree that Ghost is affordable. After all, their paid plans, Ghost (Pro) start at $29 per month. But we have to keep in mind that with $29 per month, you are basically getting Managed Hosting with a CDN (Content Delivery Network).
6. Incredibly Fast
Ghost blogs are faster than your usual blogs. This is probably due to the use of CDN.
7. Free SSL
Ghost sites come with free SSL certificate.
8. Apps And Integrations
Ghost comes with the option to use various third-party services. There are more than 1000 third-party services that can be integrated with your Ghost site using Zapier. You can also connect various third-party apps and services by editing/customizing the theme or using the Ghost Public API.
Disadvantages of Ghost:
- Ghost is not the kind of platform to build a complete business website or e-commerce site.
- It doesn’t support plugins to have custom features.
- To have better control over your Ghost site, you need to have knowledge of coding.
- There is a limited number of themes.
- Ghost (Pro) is expensive for beginners.
- Ghost does not provide free hosting service.
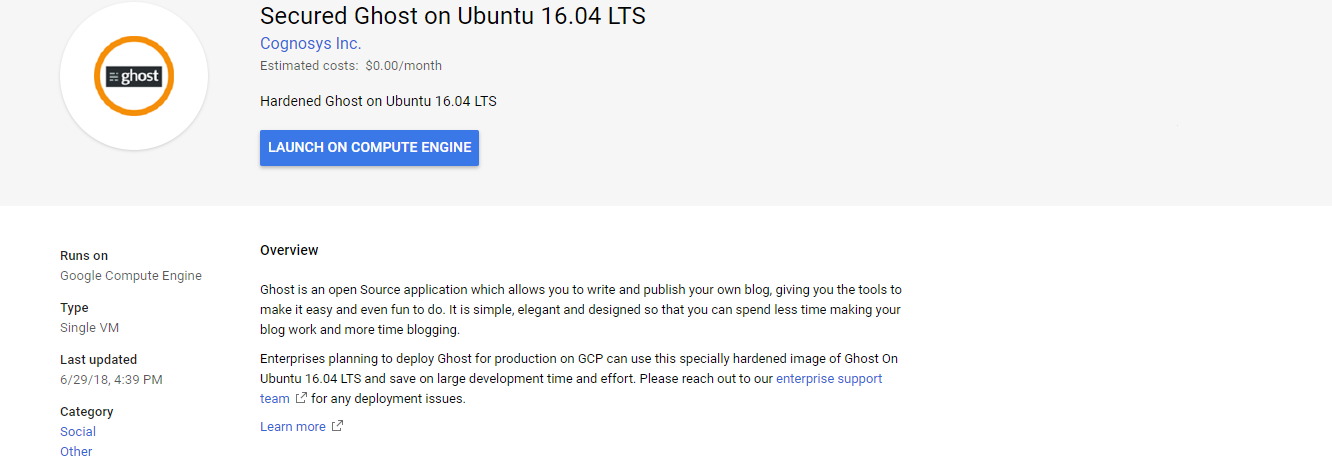
-Ghost is an Open Source application which allows you to write and publish your own blog, giving you the tools to make it easy and even fun to do. It’s simple, elegant and designed so that you can spend less time making your blog work and more time blogging.Ghost is owned by Ghost (https://ghost.org/) and they own all related trademarks and IP rights for this software.
Ghost on Cloud runs on Amazon Web Services (AWS) and Azure and Ghost on Cloud is designed to cater to the needs of small and large taxi, limo and ground transportation companies and everything in between.Cognosys provides hardened images of Ghost on all public cloud i.e. AWS marketplace and Azure.
Secured Ghost on CentOS 7.3
Features
Ghost Features
➡️ A familiar editing environment enables a seamless authoring experience that allows you to focus on creating content. Paragraph
➡️ Robust tagging functionality gives you fine-grained control over any type of category, section, format or flow to adapt to your needs – including custom homepages, URL structures, and multi-language content.
➡️ Multiples roles for authors, editors, and administrators. Invite your whole team to collaborate, with dedicated public user profiles for everyone.
➡️ Queue up your full editorial calendar ahead of time and set your posts to go live like clockwork. Ghost remembers to publish at the right time so you don’t have to.
➡️ Proper SEO built in directly, with semantic markup, permalinks, XML sitemaps, canonical tags and automatic metadata with manual overrides.
➡️ With integrated AMP support, your site will rank higher and load in a fraction of a second from Google mobile search results.
➡️ Every post published renders beautifully all over the web, with rich meta tags for Facebook Open Graph, Twitter Cards and Schema.org.
➡️ A straightforward JSON importer and exporter keeps your data infinitely portable, while our CLI tool makes configuring, running and updating Ghost a breeze.
➡️ Self-consuming JSON API for all your data.
➡️ Environment, install, updates, backups, optimizations, all taken care of on your behalf!
➡️ Isolated applications, SSL by default, firewalls and spam protection. All threats mitigated by Ghost team whenever needed.
➡️ All customer data is continuously backed up to an off-site location, ensuring that you never need to worry about losing content.
➡️ Ghost’s native apps provide all the beauty and power of Ghost, right on your device. It also means that you can easily switch between multiple sites on the fly. Available for Mac, PC, Linux, and Android.
-Major Features Of Ghost
Customize it Completely. It’s Yours : You can write themes for it so your blog can have its own design. You can write plugins for it to add your own functionality. You can host it on your laptop, or you can host it on a public server. The code is open and so is the MIT license. No restrictions.
It Works Where You Work : We know that inspiration can strike anywhere, not just when you’re sitting behind a computer. So, Ghost works where you work. Ghost is a fully responsive web application that works on all devices. Not just moderating comments or token functionality. The whole thing.
An editor for writers : A Markdown based editing environment allows for fast formatting and a seamless authoring experience which places the focus entirely on the content being created. A live side-by-side allows you to always see how the post will render.
Simple content management : All your content is available in an easily searchable archive which can be scanned through at speed.
AWS
Installation Instructions For Ubuntu
Note: How to find PublicDNS in AWS
Step 1) SSH Connection: To connect to the deployed instance, Please follow Instructions to Connect to Ubuntu instance on AWS Cloud
1) Download Putty.
2) Connect to virtual machine using following SSH credentials :
- Hostname: PublicDNS / IP of machine
- Port : 22
Username: To connect to the operating system, use SSH and the username is ubuntu.
Password: Please Click here to know how to get password .
Step 2) Database Login Details:
- MYSQL Username : root
- MYSQL Password : Passw@rd123
Note: Please change the password immediately after the first login.
Step 3) Application URL: Access the application via a browser at http://PublicDNS/Ghost
Step 4) Other Information:
1. Default installation path: will be in your web root folder “opt/Ghost”
2. Default ports:
- Linux Machines: SSH Port – 22
- Http: 80 or 8080
- Https: 443
- Mysql ports: By default these are not open on Public Endpoints. Internally Mysql server: 3306
Configure custom inbound and outbound rules using this link
AWS Step by Step Screenshots
Stack Name-This will be your Current stack.
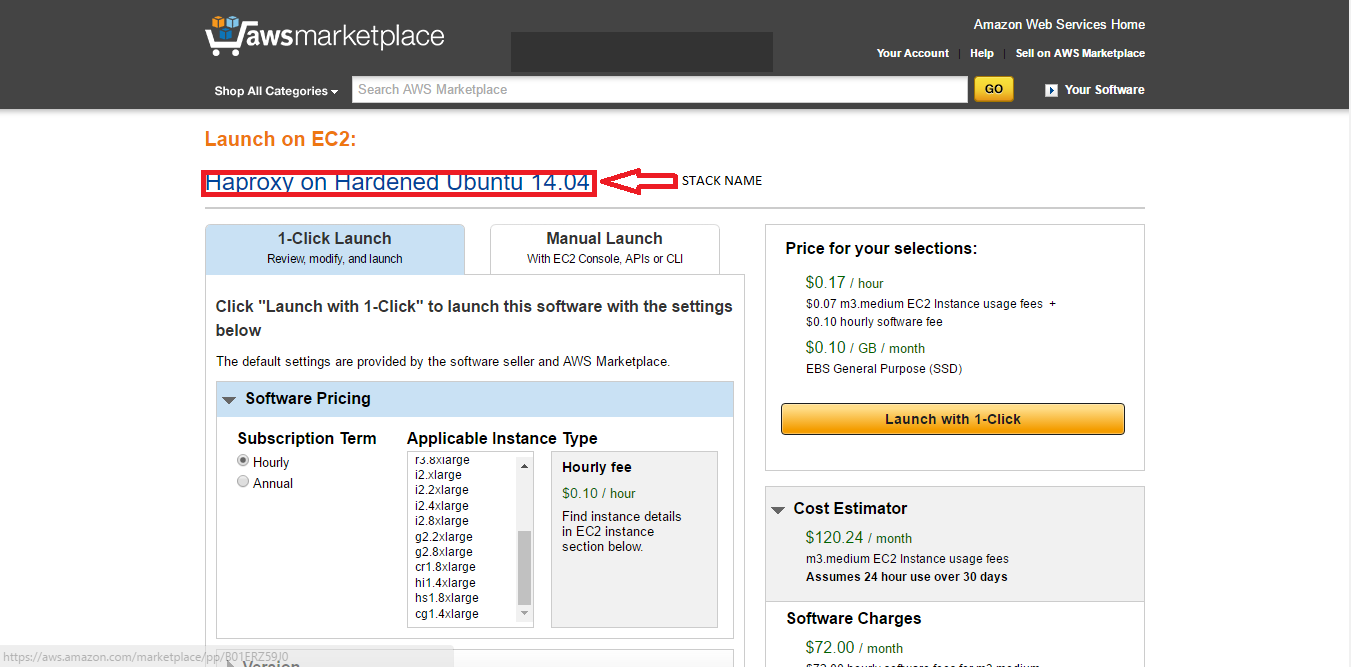
Choose Software Pricing
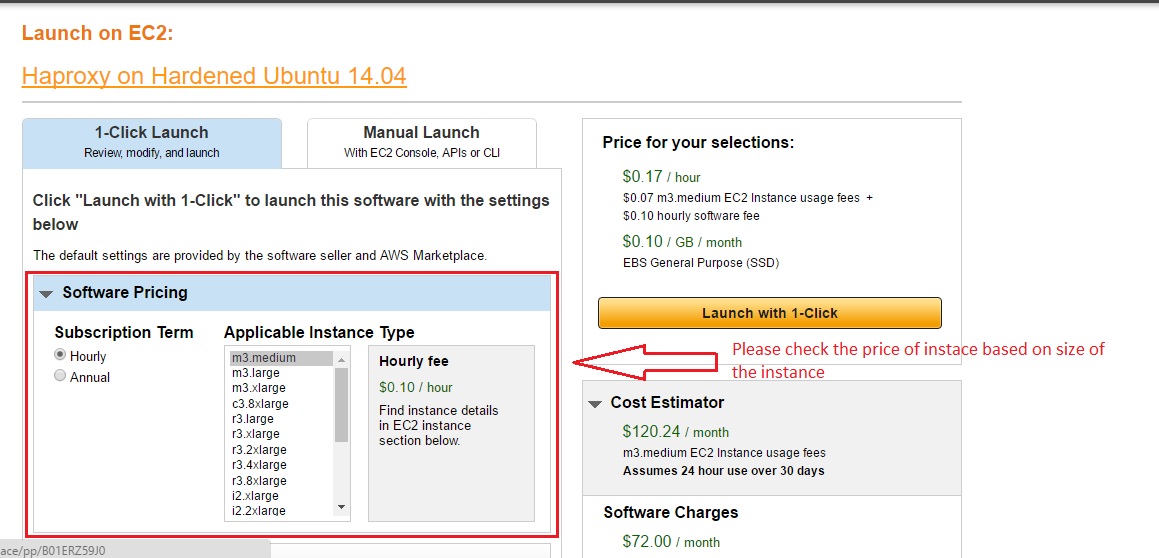
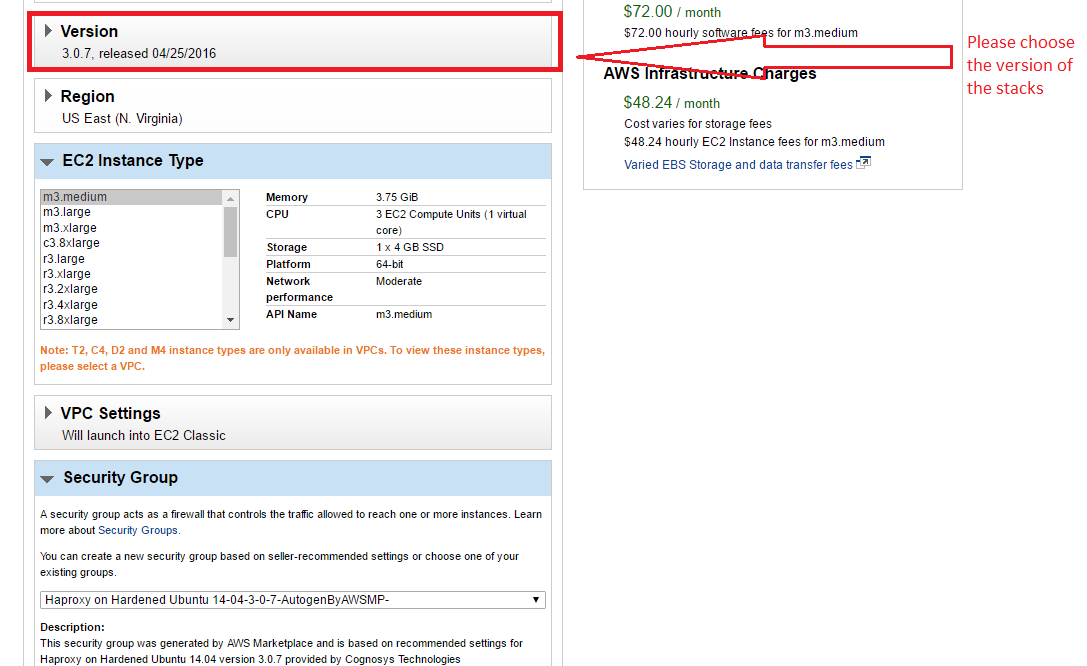
Choose your Version
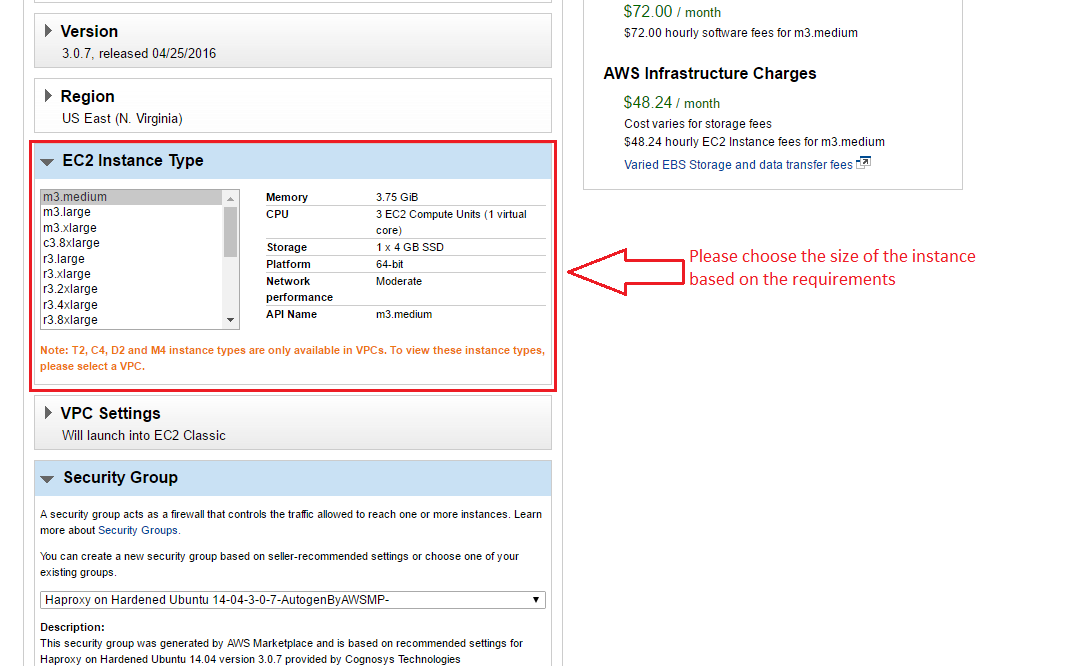
Choose your EC2 Instance Type
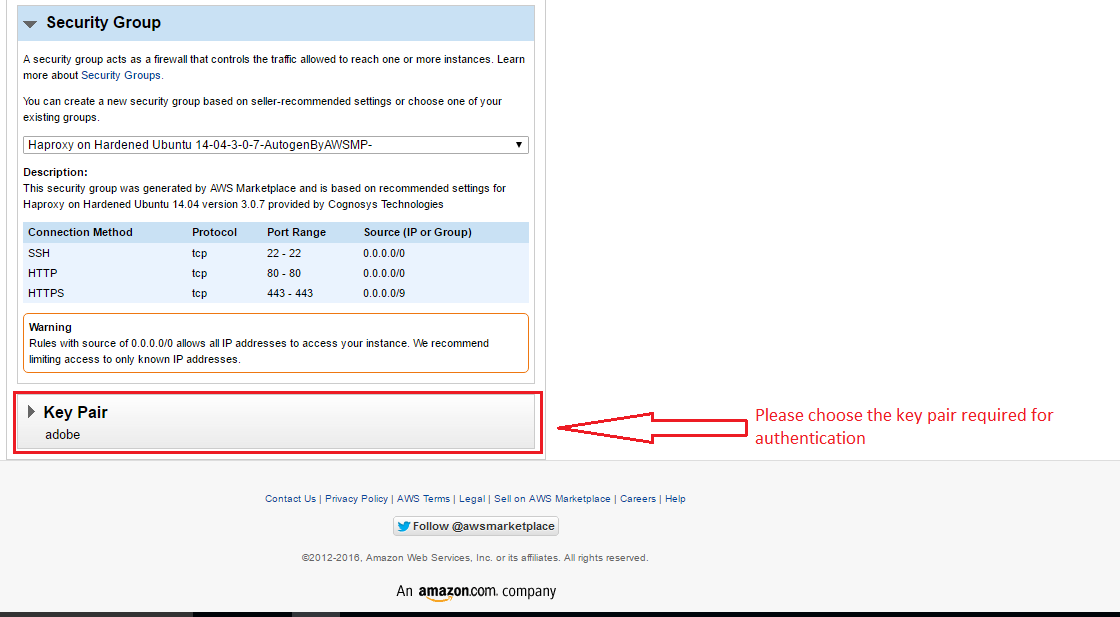
Choose Your Key Pair
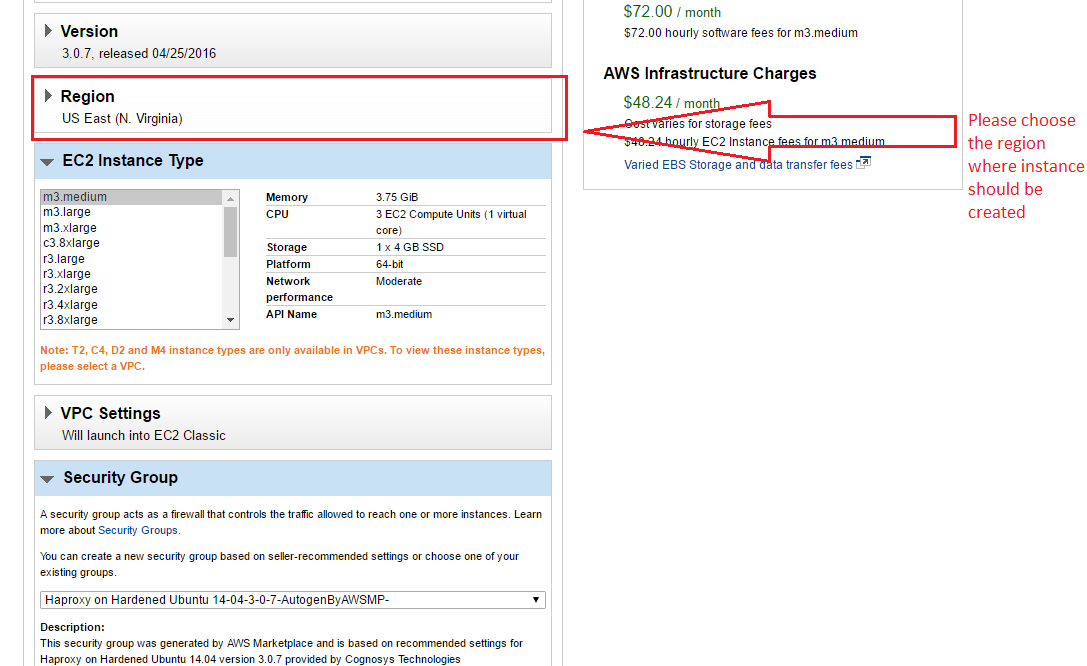
Choose your Region
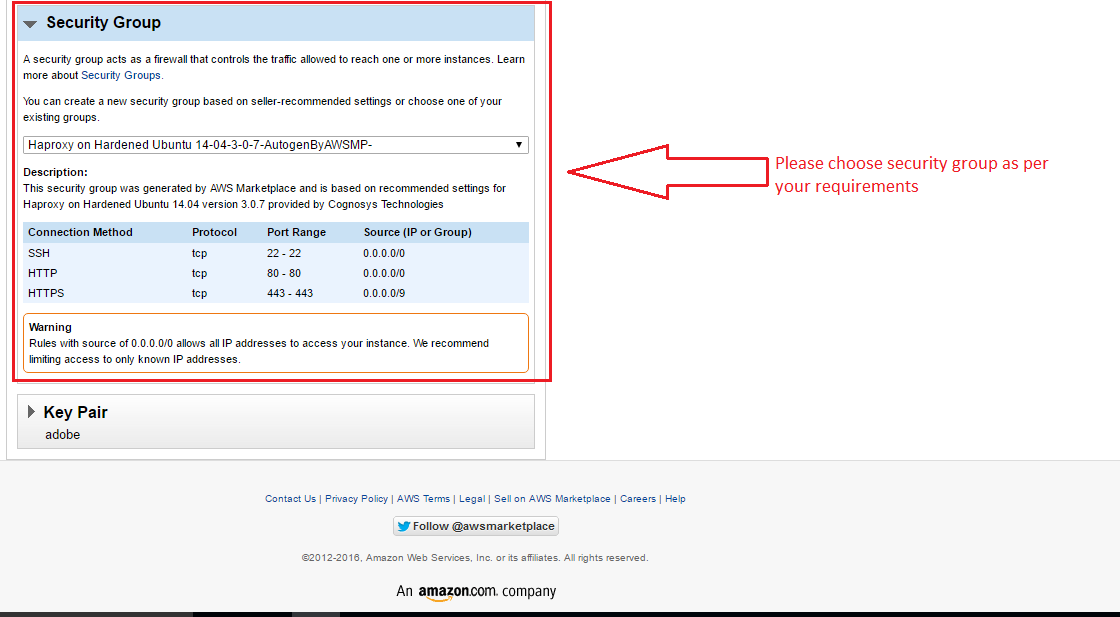
Choose your Security Group
Change VPC Settings

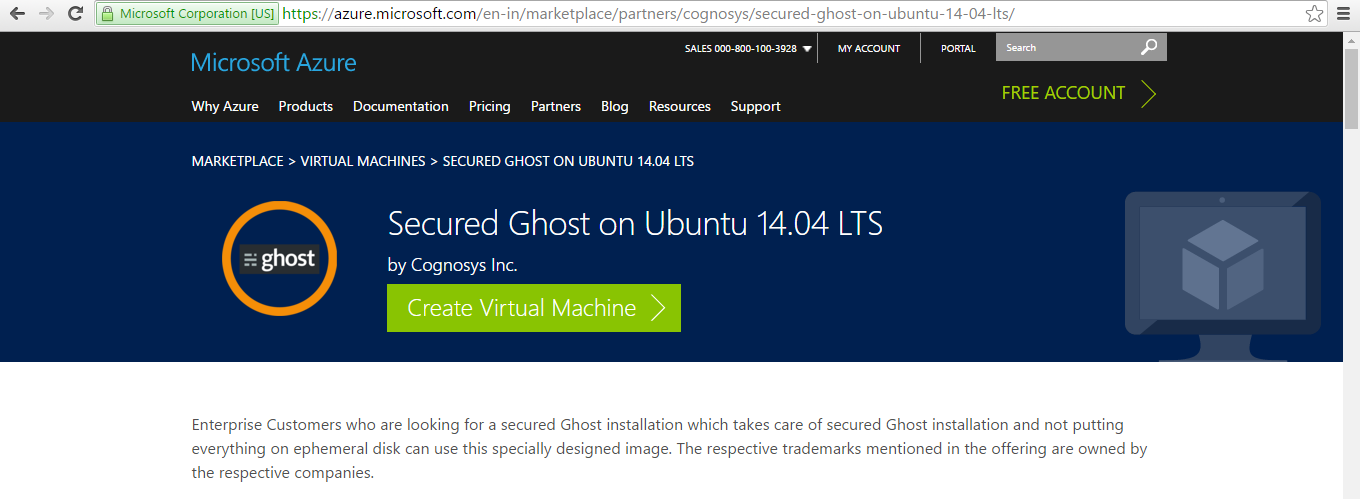
Azure
Installation Instructions For Ubuntu
Note : How to find PublicDNS in Azure
Step 1) SSH Connection: To connect to the deployed instance, Please follow Instructions to Connect to Ubuntu instance on Azure Cloud
1) Download Putty.
2) Connect to the virtual machine using following SSH credentials:
- Hostname: PublicDNS / IP of machine
Step 2) Application URL: Access the application via a browser at http://PublicDNS/
Step 3) Other Information:
1. Default installation path: will be on your web root folder “/var/www/ghost/”
2. Default ports:
- Linux Machines: SSH Port – 22
- Http: 8o
Note: –Ghost is running on port 2368. A proxy has been used to divert from 80 to 2368. Open http://YourIP to access Ghost site
Use below commands to manage the service
-
- service ghost stop
- service ghost start
- service ghost status
- echo “Use below commands to manage the service”
- echo “service ghost stop”
- echo “service ghost start”
- echo “service ghost status”
Configure custom inbound and outbound rules using this link
Installation Instructions For Centos
Note : How to find PublicDNS in Azure
Step 1) SSH Connection: To connect to the deployed instance, Please follow Instructions to Connect to Centos instance on Azure Cloud
1) Download Putty.
2) Connect to the virtual machine using following SSH credentials:
- Hostname: PublicDNS / IP of machine
Step 2) Application URL: Access the application via a browser at http://PublicDNS/
Step 3) Other Information:
1. Default installation path: will be on your web root folder “/var/www/ghost/”
2. Default ports:
- Linux Machines: SSH Port – 22
- Http: 80
Note: –Ghost is running on port 2368. A proxy has been used to divert from 80 to 2368. Open http://YourIP to access Ghost site
Use below commands to manage the service
- service ghost stop
- service ghost start
- service ghost status
Configure custom inbound and outbound rules using this link
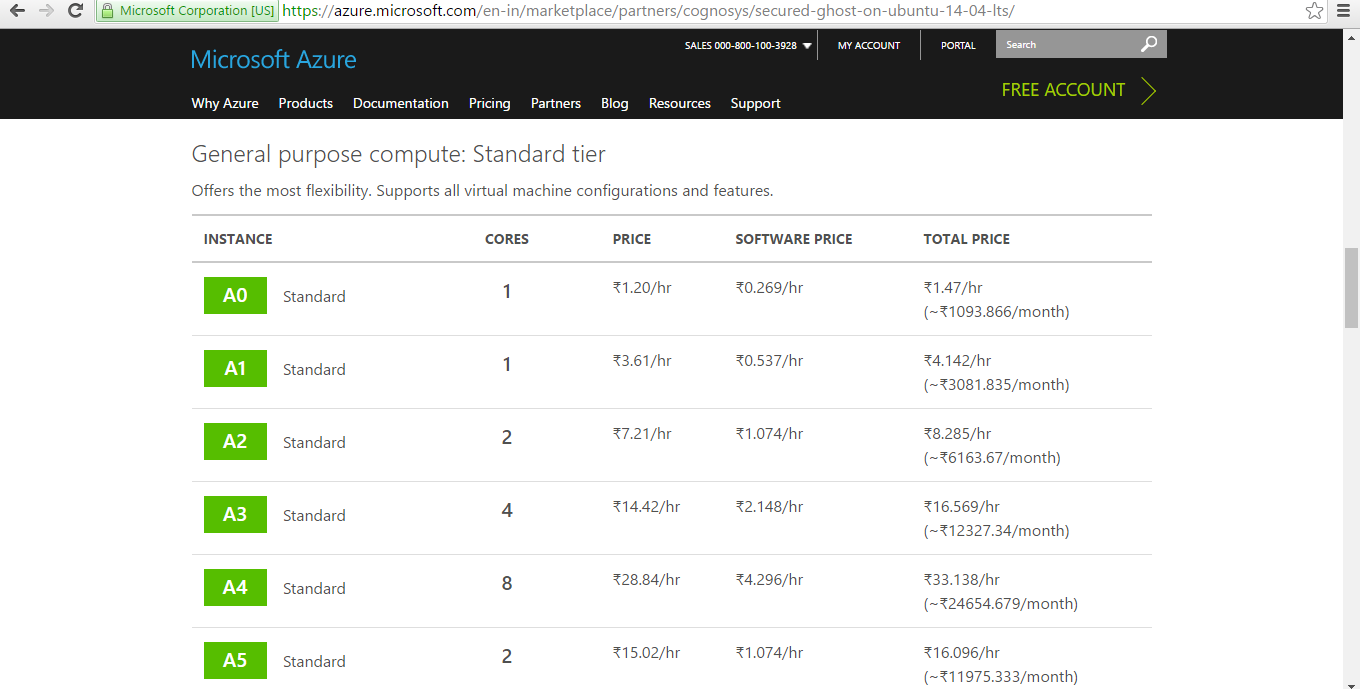
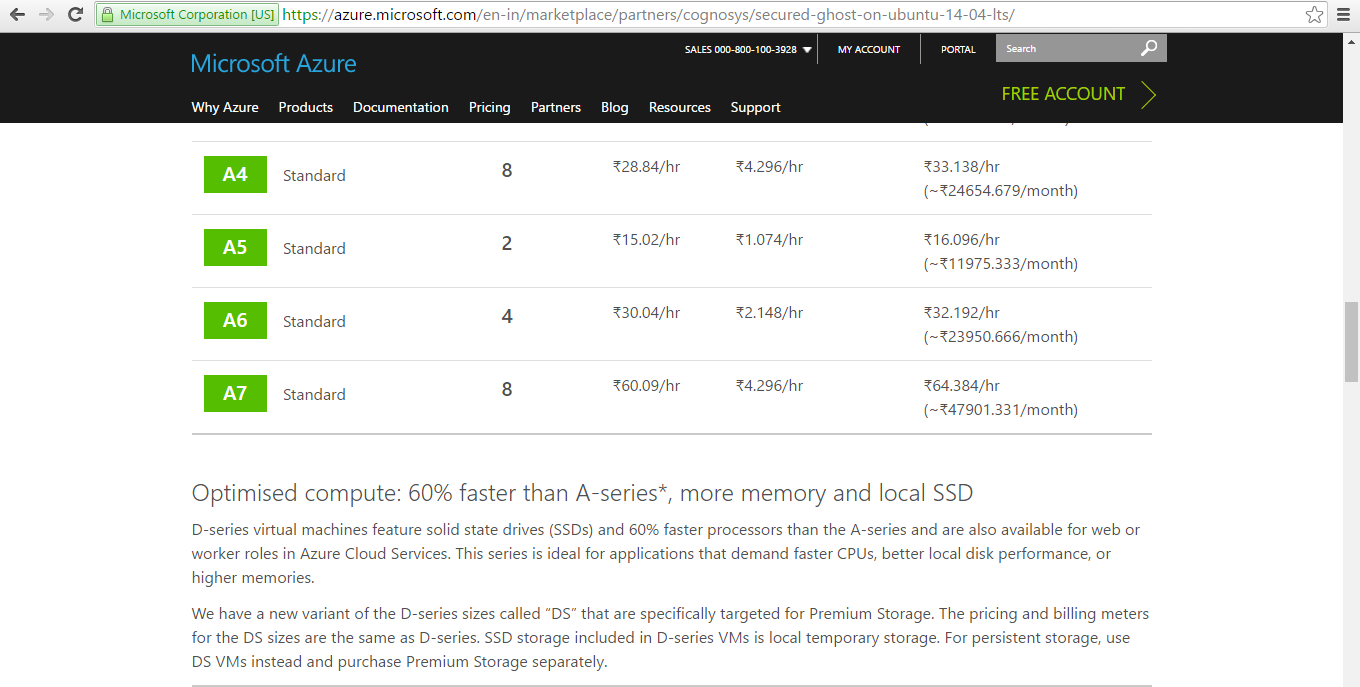
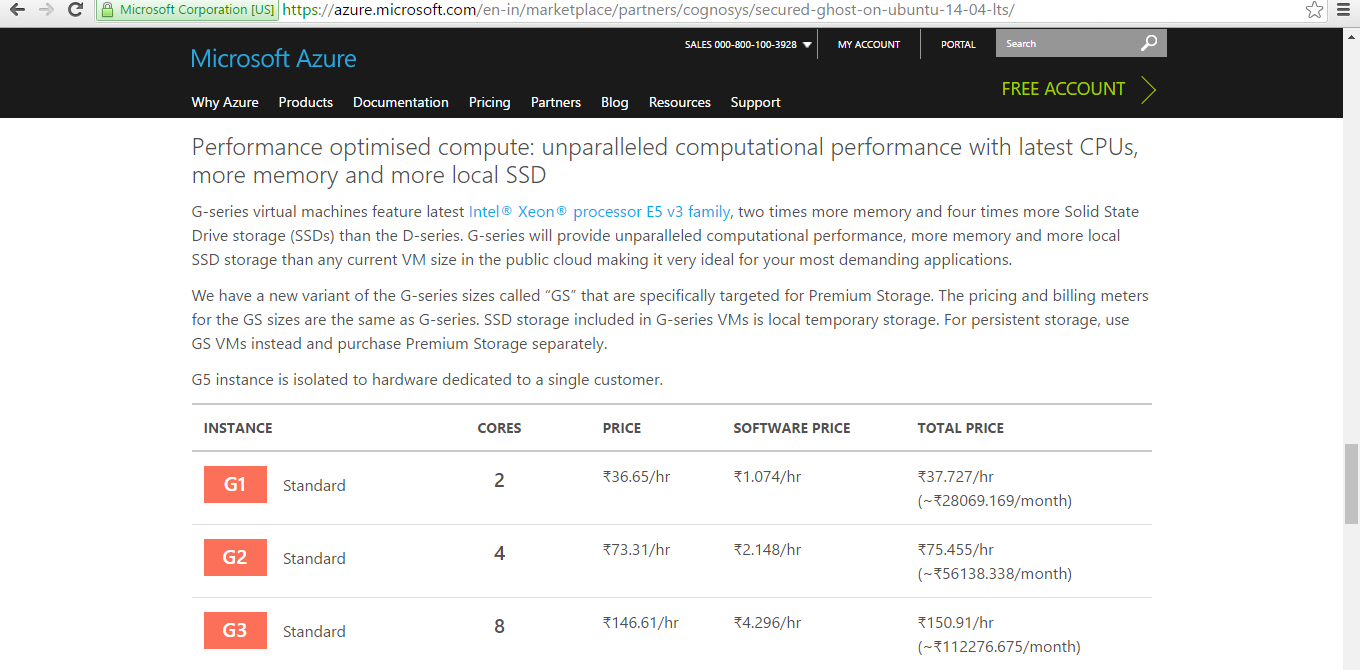
Azure Step by Step Screenshots
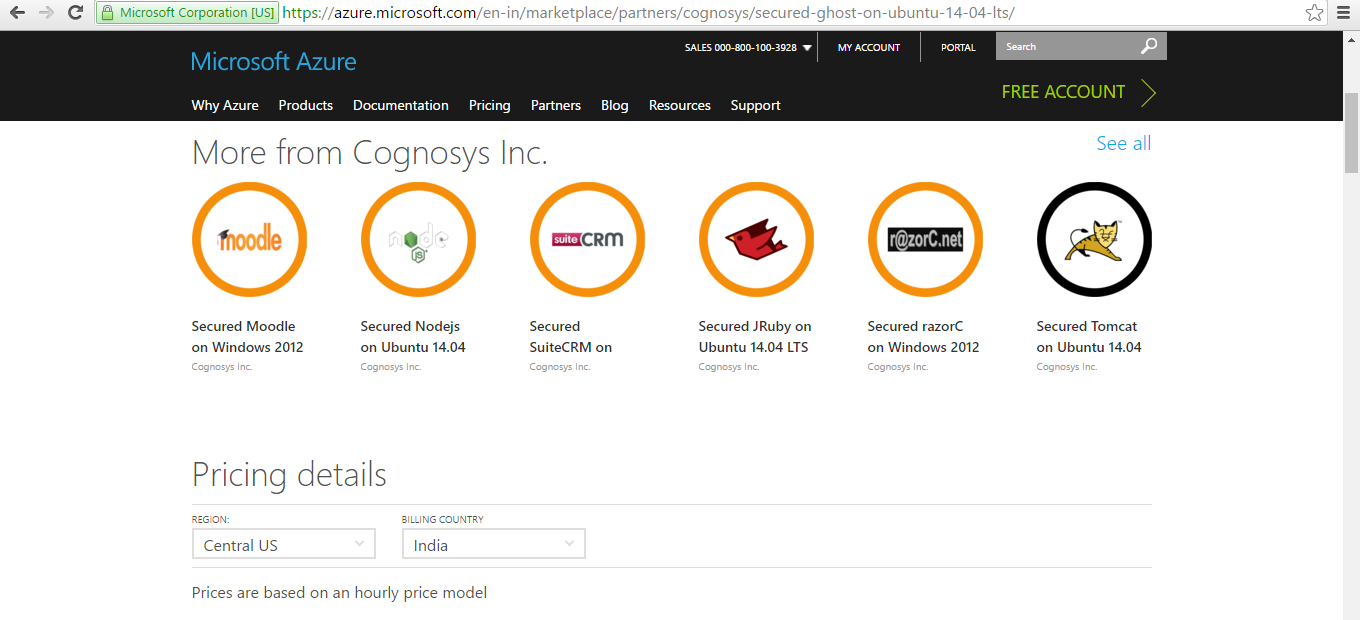
Product name
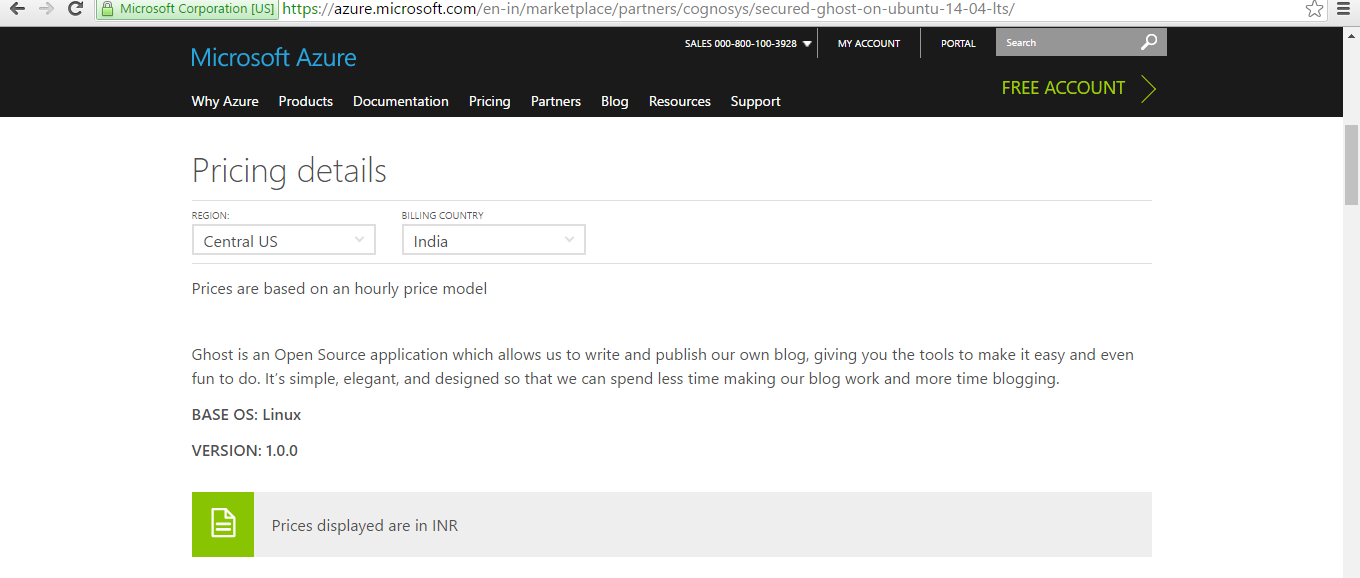
Pricing Details


Installation Instructions For Ubuntu
Installation Instructions for Ubuntu
Step 1) VM Creation:
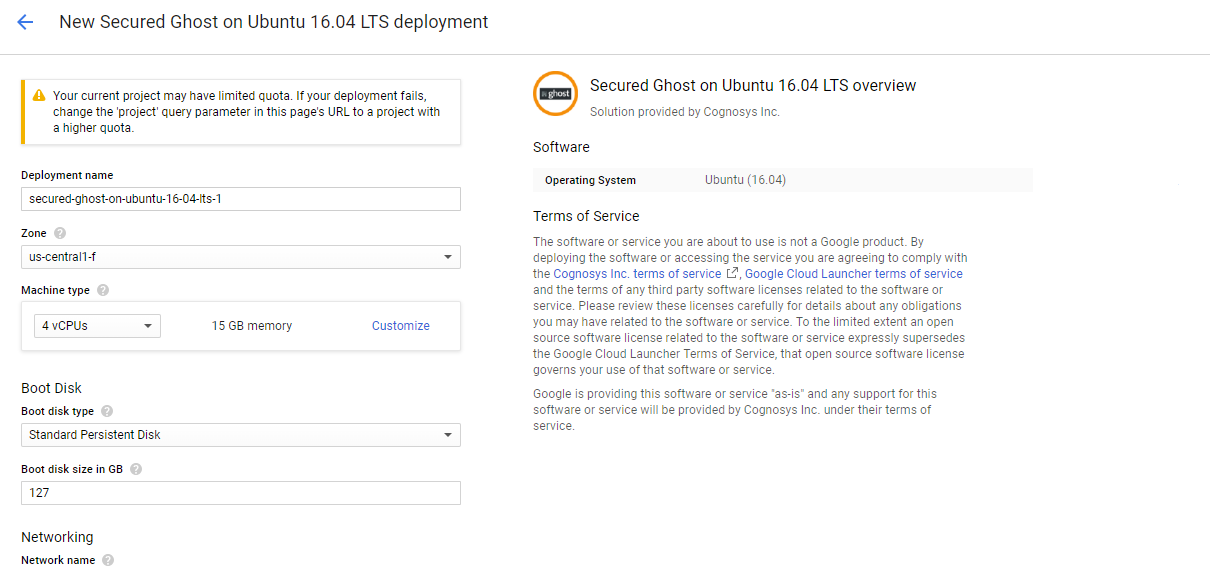
- Click the Launch on Compute Engine button to choose the hardware and network settings.

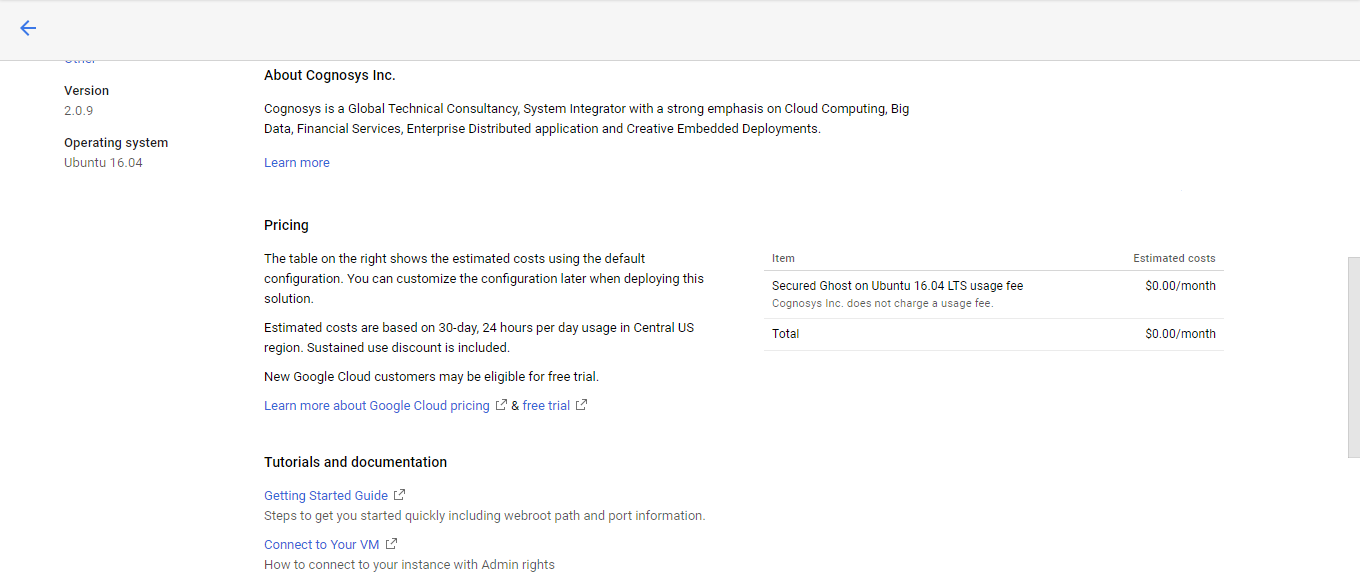
- You can see at this page, an overview of Cognosys Image as well as estimated cost of running the instance.

- In the settings page, you can choose the number of CPUs and amount of RAM, the disk size and type etc.

Step 2) SSH Connection:To initialize the DB Server connect to the deployed instance, Please follow Instructions to Connect to Ubuntu instance on Google Cloud
Step 3) Database Login Details:
The below screen appears after successful deployment of the image.

For local MySQL root password, please use the temporary password generated automatically during image creation as shown above.
i) Please connect to Remote Desktop as given in step 2 to ensure stack is properly configured and DB is initialized.
ii) You can use MySQL server instance as localhost, username root and password as shown above.
If you have closed the deployment page you can also get the MySQL root password from VM Details “Custom metadata” Section.
Step 3) Application URL: Access the application via a browser at http://PublicDNS/Ghost
Note: –Ghost is running on port 2368. A proxy has been used to divert from 80 to 2368. Open http://YourIP to access Ghost site
Use below commands to manage the service
- service ghost stop
- service ghost start
- service ghost status
Step 4) Other Information:
1. Default installation path: will be in your web root folder “opt/Ghost”
2. Default ports:
- Linux Machines: SSH Port – 22
- Http: 80 or 8080
- Https: 443
- Mysql ports: By default these are not open on Public Endpoints. Internally Mysql server: 3306
