
1-click AWS Deployment 1-click Azure Deployment
1-click Google Deployment
Overview
Drupal 8 is the latest release of the world’s most widely used enterprise web CMS. It’s fast, flexible and ideal for Rapid Application Development. Drupal 8 taps into the concentrated innovation from its open source community. Now with Drupal 8, it is much easier to drive value to the web application development for successful digital experiences. Apart from being free of licensing cost, Drupal comes inherently with the necessary functionalities.
Drupal is a supple CMS based on the LAMP stack, with a modular design letting features to be added and removed by installing and uninstalling modules, and allowing the whole look and feel of the website to be changed by installing and uninstalling themes. The base Drupal download, known as Drupal Core, contains the PHP scripts needed to run the basic CMS functionality, several optional modules and themes, and many JavaScript, CSS, and image assets. The operating system can be Windows or Mac OS instead of Linux.
- The web server can be Nginx or IIS instead of Apache.
- The database can be PostgreSQL or SQLite instead of MySQL, or a MySQL-compatible replacement such as MariaDB or Percona.Other operating systems, web servers, and databases can also be made to work; though, the scripts that the software uses are written in PHP, so that cannot be changed.
The structure of Drupal 8
Drupal 8 is here. And it’s a revolution! Not an evolution like Drupal 7 compared to Drupal 6, but a completely different architecture and coding methodology! We believe that the shift towards object orientation will appeal to developers and will improve the overall software quality. We are thankful for the Drupal core developers for their braveness and work on this!
Here we’ll have a look at the general structure of the Drupal 8 framework, especially in relation to the Symfony2 components. We’ll see which Symfony2 components are used in Drupal and how.
Symfony2
The Symfony2 framework is designed to enable a developer to build custom web-based applications. Symfony is not a CMS, as it can’t be used to administer a site. Instead, code must be written to create an application. Symfony provides a way to do that efficiently. In theory, a CMS could be written on top of Symfony. But in practice, the default approach of Symfony was found not flexible enough for Drupal.
Instead, for Drupal 8 it was opted to just use the (excellent) core layers of Symfony and extend it to provide support for Drupal modules. This has resulted in a well-balanced system, that uses a good (and unmodified) part of the Symfony core, but extends it with a very flexible CMS layer. The best of both worlds!
Components
The Symfony framework consists out of several components. Some are vital to the system, such as the Http Foundation component that understands HTTP and offers a nice request and response object used by the other components. Others are merely helper components, such as the Validator, that helps to validate data (is it a valid email address/url/number/etc?). At the heart of the system is the Kernel component. This Kernel is basically the ‘main class’ that manages the environment (services and bundles) and has the responsibility of handling a http request. A developer may extend a system by extending the kernel, such as AppKernel extends Kernel, and adding his own bundles in there. These bundles can be used to create ‘coherent’ pieces of functionality, much like modules in Drupal.
Drupal uses only a some of Symfony’s components, which can be seen in the image below.

How Drupal 8 extends Symfony2
Drupal does not extend Kernel, like a Symfony2 web app would. It offers the same type of functionality however by implementing the Kernel Interface. This is because Drupal does not share the ‘bundle’ approach of Symfony. Bundles provide a great way to build custom web applications, but are less suited for building a CMS that must be very flexible and extendible. The DrupalKernel loads the environment (available services and modules) in a slightly different (but similar) way than Kernel, but delegates request handling to the HttpKernel, just like Symfony’s Kernel does.Furthermore, Drupal 8 brings its own (3rd party) components and core code. A schematic overview is shown in the following image.

The Service Container
Symfony uses a service container that can be used to efficiently manage services in the application. This concept is also known as Dependency Injection.This Service Container is a global object that is created and contained by the Kernel before a request is handled. It can be used later in code to fetch services, lazy-loaded on the fly. Services are global objects that can be used to fulfil specific tasks, such as a Mailer service, or a database connector. A service corresponds to exactly one class. The service container is very important as it contains the available services, knows about their relations and configurations, and even constructs them!
Dependencies and arguments
A service may depend on other services. The Symfony documentation uses the example of a NewsletterManager service that needs a Mailer service to actually send the emails. These dependencies are also managed in the Service Container. When creating a service, his dependencies are supplied via arguments in the class constructor. Interfaces are used to define which methods the dependent services should provide, so that the service implementation can be swapped with another one when necessary.
Configuration
The services in the service container can be configured in several ways: via code (known as Extensions), via XML, via YAML, etc. Symfony uses a combination of these but leaves most of the core service configuration to the Framework Bundle’s code. Drupal’s service configuration is different, and mostly based on YAML-files. It uses services.core.yml for everything core-related. This configuration can be extended by modules and ServiceProvider classes. The latter is similar to Symfony’s Extensions. The loading of these configurations is handled by the Kernel.
YAML provides a readable and flexible syntax. An example in Drupal 8 (taken from services.core.yml):
services:
  ...
router_listener: class: Symfony\Component\HttpKernel\EventListener\RouterListener tags: - { name: event_subscriber } arguments: ['@router'] ... router: class: Symfony\Cmf\Component\Routing\ChainRouter calls: - [setContext, ['@router.request_context']] - [add, ['@router.dynamic']] ...
Here the router_listener service is defined. The corresponding class is required to be able to load the listener. The arguments property defines that the first argument of the RouterListener constructor (the url or request matcher) should be ‘@router’, which defines the service with the service id ‘router’. This router is also defined in the configuration, and has a different ‘class’ than used in Symfony, as I have just explained.
Tagged services
Tags are used to load certain ‘tagged’ services. In practice, these are sometimes used in a ‘hooky’ way in Drupal. In the example below (node.services.yml) the node module adds an access checker for the ‘add node’ page that is based on the access_check services pattern, which is used after routing to find out if access should be granted:
services:
  ...
access_check.node.add: class: Drupal\node\Access\NodeAddAccessCheck arguments: ['@plugin.manager.entity'] tags: - { name: access_check } ...
Compiler passes
How does Drupal understand these tags and know what to do with them? Well, Symfony has yet another method of dynamically configuring the service container: compiler passes. The service container is actually compiled directly after building it from the static configuration. At several points during this phase, it allows objects implementing the CompilerPassInterface to modify the configuration. In Drupal, the CoreServiceProvider registers some important compiler passes, such as the RegisterAccessChecksPass, which attempts to find all services tagged with access_check (see previous example) and adds it to the AccessManager (by using the addMethodCall container service directive). When, in the routing phase, the AccessManager service is asked to check for access, it will amongst others, check the NodeAddAccessCheck. There are several other compiler passes in the Drupal core, such as for converting route parameters to objects and translating strings. In practice you will sometimes need to use these tagged services in your module to add custom access checks and convert path parameters!
Swapping services
The service container makes flexible service configuration possible. Drupal 8 makes use of service arguments to alter the way that Symfony is functioning for its own purposes. For example, Drupal needs a different url routing mechanism than Symfony. It does so by providing an alternative ‘router’ service (Symfony\Cmf\Component\Routing\ChainRouter) compared to the one used by Symfony (Symfony\Bundle\FrameworkBundle\Routing\Router). This can be done without having to change any line of code in the router_listener service (Symfony\Component\HttpKernel\EventListener\RouterListener) itself! This is possible because both routers implement the RequestMatcherInterface, which is the one requirement for the RouterListener’s first argument.
Routing
Flow of control
Now we have learned about the Drupal 8, We’ll have a look at what happens when a request enters Drupal 8:
- Bootstrap configuration:
- Read the settings.php file, generate some other settings dynamically, and store them both in global variables and the Drupal\Component\Utility\Settings singleton object.
- Start the class loader, that takes care of loading classes.
- Set the Drupal error handler.
- Detect if Drupal is actually installed. If it is not, redirect to the installer script.
- Create the Drupal kernel.
- Initialize the service container (either from cache or from rebuild).
- Add the container to the Drupal static class.
- Attempt to serve page from static page cache (just like Drupal 7).
- Load all variables (variable_get).
- Load other necessary (procedural) include files.
- Register stream wrappers (public://, private://, temp:// and custom wrappers).
- Create the HTTP Request object (using the Symfony HttpFoundation component).
- Let the DrupalKernel handle it and return a response.
- Send the response.
- Terminate the request (modules can act upon this event).
The interesting part now is what happens during the request handling phase. To understand this, you will have to know about event subscribers first.
Event subscribers
Previously we have had a look at compiler passes. One particularly important usage of tagged services are the event_subscriber-tagged services. These services should implement the EventSubscriberInterface, and are basically event listeners. The event subscribes have method getSubscribedEvents that defines which events should be mapped to which methods. A priority can be set to define in what order the actions should be executed. In Drupal core only a handful of events are being used:
- kernel.request
Occurs at the very beginning of request dispatching. - kernel.response
Occurs once a response was created for replying to a request. - routing.route_dynamic
Is fired to allow modules to register additional routes. - routing.route_alter
Is fired on a route collection to allow changes to routes. This is used in core to add some checks and parameter conversions.
Any Drupal developer should know about event subscribers. Especially the kernel.request is important as it basically takes over the role of hook_init. Another important event is the routing.route_dynamic event. Because the usual routing configuration is static in Drupal 8 (in YAML), this event was introduced to be able to create dynamic routes. Previously this was all done in hook_menu, but that hook is now only used to generate menu items. For example, the block module uses the routing.route_dynamic event to register menu routes for the (per-theme) blocks configuration page in \Drupal\block\Routing\RouteSubscriber.
You might wonder why these event listeners are not just implemented using module hooks. The reason for this is that this solution is way more efficient as the available listeners is compiled into the service container configuration, which is cached! Also, it was attempted to make the Drupal core as object-oriented as possible.
From request to response
When a request enters Drupal, the system is bootstrapped and the DrupalKernel is booted. The handle method of the DrupalKernel is called, which delegates the call to (Symfony2’s) HttpKernel, which further handles the request.
The HttpKernel dispatches the ‘kernel.request’ event. Several subscribers listen to this event in the following order:
- AuhtenticationSubscriber
Loads the session and sets the global user. - LanguageRequestSubscriber
Detects the current language. - PathSubscriber
Converts the url to a system path (url aliases, etc). - LegacyRequestSubscriber
Allows setting a custom theme and initializes it. - MaintenanceModeSubscriber
If in maintenance mode, show the maintenance page. - RouteListener
Gets the a fully loaded router object. - AccessSubscriber
Checks if client has access to the router object.
The RouterListener is where the routing work happens. It asks the router service to get the active route properties. Drupal uses a different router service than Symfony: the DynamicRouter that was provided the Symfony CMF (http://cmf.symfony.com/) extension. The main difference with Symfony’s regular router is that DynamicRouter supports enhancers, which are described in the following section. The DynamicRouter then delegates the task of finding the active route (Drupal 7’s equivalent of the current_path) to the NestedMatcher, which in turn delegates it to the RouteProvider. The RouteProvider finds a collection of matching routes in the ‘router’ table, which contains a cached list of all existing routes in the CMS. The table is filled by the route builder, which will be described later. The selected routes are ordered by path length: the longest the matching path is deemed the most important. Then, the NestedMatcher asks the UrlMatcher to select the one specific route in the collection to be used as the active one. In practice, the UrlMatcher does this by selecting the first (so longest matching) route in the collection that have the correct method (get/post) and scheme (http/https) as required by the route. More about route requirements later. In practice there is usually just one matching path so the UrlMatcher is of limited importance. The end result is the id of the active route, such as node.add_page.
These route filters, which can be added as service with the tag ‘route_filter’, are called by the NestedMatcher and can filter the route collection directly after they were returned by the RouteProvider. The Drupal core only uses this mechanism to filter routes that do not respond in the MIME type as requested in the request HTTP headers (MimeTypeMatcher), but only if the ‘_format’ route requirement is explicitly specified!
After finding the active route, the DynamicRouter continues by calling the route enhancers. These will finalize the router properties and convert route parameters. This process is described in the next section. Then, the found router properties are returned to the RouterListener, which sets the properties in the request object. After that, the access checking is performed (AccessSubscriber) and, finally, the controller method is called with the correct arguments. The response returned by the controller method is sent back to the client.
Now that we know about the request handling process, we’ll take a detailed look at routes.
Routes
In Drupal 7, hook_menu was used to register page callbacks along with their titles, arguments and access requirements. In Drupal 8, the routing process of Symfony has been adopted, which is much more flexible.. and complex!
In Drupal 8 page callbacks are no longer functions. Instead, they are methods in controller classes. The available routes are now configured in a file called {module}.routing.yml in the module folder. For example, the user logout page route configuration looks like this:
user.logout:
  path: '/user/logout'
defaults:
_controller: '\Drupal\user\Controller\UserController::logout' requirements: _user_is_logged_in: 'TRUE'
Notice that every route has an id (user.logout) and a path. The path defines when may contain parameters, but we’ll look at that later. The ‘defaults’ section is very important as it can be used to control what needs to be done in case the request matches the path. The ‘requirements’ section defines if the request should be handles at all. The latter usually contains information related to access checks, the Symfony alternative to the Drupal 7 ‘access arguments’ and ‘access callback’.
Available ‘defaults’ keys:
- _controller
The specified method is simply called with the specified route parameters, and is expected to return a response. - _content
If specified, the _controller is set based on the request’s mime type, and fills the content of the response with the result of the specified method (usually a string or render array). - _form
If specified, the _controller is set to HtmlFormController::content, which responds with the specified form. This form must be a fully qualified class name (or service id) that implements FormInterface and usually extends FormBase. Indeed, form building has also become object oriented! - _entity_form
If specified, the _controller is set to HtmlEntityFormController::content, which responds with the specified entity form (specified as {entity_type}.{add|edit|delete}). - _entity_list
If specified, the _controller is set to HtmlFormController::content, and _content to EntityListController::listing, which renders a list of entities based on the entity type’s list controller. - _entity_view
If specified, the _controller is set to HtmlFormController::content, and _content to EntityViewController::view, which renders the entity based on the entity type’s view controller. - _title
The title of the page (string). - _title_callback
The title of the page (method callback).
As you can see, route keys are altered during the routing process based on other route keys. This makes it easy to simply output an entity without having to set the _controller, _content and other keys; this is done automatically. This feature is implemented using route enhancers, which are services tagged with ‘route_enhancer’. They implement the RouteEnhancerInterface. There are a handful of important enhancers in the Drupal core. If you’d like to explore them, have a look at ContentControllerEnhancer, FormEnhancer and EntityRouteEnhancer. It seems unlikely that you need to add your own custom enhancers.
Available ‘requirements’ keys:
- _permission
The current user must have the specified permission. - _role
The current user must have the specified role. - _method
The allowed HTTP methods (GET, POST, etc). - _scheme
Set to https or http. The request scheme must be the same as the specified scheme. This property is also taken into account when generating urls (Drupal::url(..)) rather than routing. If set, urls will have this scheme set fixed. - _node_add_access
A custom access check for adding new nodes of some node type. - _entity_access
A generic access checker for entities. - _format
Mime type formats.
Most (but not all) of the requirements listed above are checked by access checkers that we’ll describe shortly. In practice you may find that you need create a custom access checker, because Drupal 7 ‘access callback’ is no longer available. The requirement key ‘_node_add_access’ for example, is listened to by NodeAddAccessCheck, a custom access check added by the node module.
Access checking is performed by the AccessManager, which subscribes to the kernel.request event. It invokes the access checks, which must be classes implementing AccessInterface. We have seen before that they are registered as services with the access_check tag. The access checks have an access method which is used to test if the client should have access to the specified (active) route. If access is denied, an exception is raised which is handled by showing the ‘access denied’ page.
Path parameters
In practice you often need parameters (a.k.a placeholders) for your page callbacks. In the sample route definition below, the path contains one parameter named ‘node’. Parameters are identified by the accolades around them in the route path. For every route certain options are stored. The controller method receives these parameters as arguments. The parameters are mapped to the arguments with the same name. So in this case, the page method of the NodeController has one argument: $node. There may be multiple parameters in a route, but their names should be unique.
node.view:
  path: '/node/{node}'
defaults: _content: '\Drupal\node\Controller\NodeController::page' _title_callback: '\Drupal\node\Controller\NodeController::pageTitle' requirements: _entity_access: 'node.view'
The value that is passed as the argument is by default the value in the url (a string), but is often converted using a parameter converter. In the sample above, the NodeController will not get the node id, but a fully loaded node entity. Parameter conversion is performed by the ParamConverterManager, which subscribes to the kernel.request event. It contains registered implementations of ParamConverterInterface (services with tag paramconverter). When handling a request, the ParamConverterManager (which also is an enhancer) traverses the active route’s parameters and calls the convert method of the parameter converter. If possible, a ‘string’ parameter value is then replaced with a full object. Notice that if the controller method’s argument is not explicitly type hinted, the unconverted parameter is passed.
The EntityConverter is the only parameter converter in Drupal core, but also used extensively! If a parameter has a name which matches an entity type (‘node’, ‘user’, etc), it is automatically converted to a full entity object!. The value is regarded as the entity id. A 404 is automatically given if the conversion failed (the entity does not exist).
You can make a parameter optional by specifying a value for it in the defaults section. This only works for parameters that are not converted. Optional parameters may only occur after required parameters, not vice vera.
Route building
Routing is, obviously, done during a request. But then it makes use of a previously built ‘router’ table. The RouteBuilder service is responsible for filling the table when it is necessary to do so (when clearing the cache, for instance). During a request this router table is used to find the active request and complete it. This separation was done for performance reasons. The RouteBuilder works by collecting all of the configured (static) routes (yml-files, described below) and creating a collection containing them. It also calls the route.route_dynamic event, in which event subscribers may register additional routes (see the example above for the block module). Then the routing.route_alter event is called for the routes. There are several subscribers to this event. Some especially important operations here are related to access checks and parameter conversion.
We have just mentioned access checks. When handling a request, they test for a specific route if the client has access. In reality, not all available access checks are tested for every route. Instead, during the route building phase, it is determined per route which access checks apply. This is done by the AccessManager, which listens to the router.route_alter event. There are static and dynamic access checkers. The StaticAccessCheckInterface has a method appliesTo method, which returns an array of requirement keys that it applies to. Dynamic access checkers are tested per route by the applies method. The AccessManager adds an option ‘_access_checks’ to the route in the router table. This information is used when actually checking access of the active route when handling a request. Notice that at least one access check should apply for a route, otherwise the route will never be accessible!
We have also mentioned parameter converters. It was described that a parameter is converted by a parameter converter. Per parameter, there may be just one (or none) applicable parameter converter. Just like with the access checks, this applicable parameter converter is found during the route building phase by the ParamConverterManager. This service checks for every existing route parameter the applies method of all existing parameter converters, and adds an option ‘converter’ to the route parameter definition in the router table. This information is used when actually converting the parameters of the active route when handling a request.
Configuration
The configuration system has changed in an exciting way in Drupal 8. Most notably, configuration is now stored in a lot of YAML-files in the ‘/sites/{name}/files/config_{HASH}/active’ directory. The filenames define what is configured in the file. For example, ‘node.settings.yml’ contain settings of the node module, while ‘views.view.content.yml’ contains a complete definition of the view with machine name ‘content’! Drupal does this by using config prefixes.
You may think that configuration files are very inflexible. But in practice, you can build associative arrays of information using YAML-syntax. Furthermore, Drupal provides a Config object which can be used to change the configuration files on the fly, without ever having to edit such a file manually! When you create a new field, node type, block type or view via the Drupal UI a new file will be created. Content (nodes) and data are still stored in the database because otherwise you wouldn’t be able to build fast queries.
A module may ship with a conf subdirectory. When a module is enabled, all configuration files from that directory are copied to the site’s configuration directory. When files are added here (and the cache is cleared) they are auto-discovered and applied directly. In this way, a module can provide additional new node types, image styles, views, etc. without having to implement some hook like hook_node_info in Drupal 7.
Configuration files can be easily copied to another location. This has the advantage that you can now finally stage configuration changes!Configuration files may also have an associated schema, that describes in detail what a view / block / image style / etc. configuration should look like. Because of this, configuration can be validated and translated better.
Entities
Drupal 7 introduced entities. These were generalized objects with the same functionality. For example, fields could be attached, access methods were generalized, they could be referenced in views, etc. The entity concept was found to be extremely powerful. In Drupal 8, the concept has become even more central to the CMS. Not only content data (nodes, taxonomy terms, users) are now entities, but also non-fieldable data such as views, actions, menus, image styles, etc. are all extending the Entity class. And also bundles such as node types and vocabularies are now entities. The reasoning behind this is that, even though these object types are not fieldable, some other generalized functionality is handy, such as generalized storage in configuration files or automatic route parameter conversion based on the entity name.
The properties of an entity are defined using attributes. For example, it can be specified here whether or not an entity is fieldable or if it should serve as a bundle for another entity. An entity may or not be saved in configuration files, depending on the controller. If the controller is or extends ConfigStorageController, these will be saved as configuration files. Although configuration files have benefits, it means that you cannot use database queries on them. If you want to search them, you will have to load all items and use a PHP ‘for loop’. If database storage is preferred, for example in the case of nodes and users, the FieldableDatabaseStorageController can be used. This is the case for nodes, users, taxonomy terms, etc. The end result is, of course, that this content can’t be transferred via configuration files. To me, it is yet unclear if it is possible to have a fieldable config storage controller!To get an understanding of the entity properties I suggest that you have a look at the (annotations of the) ImageStyle class, which is a pure configuration-based entity, the (taxonomy) Term, which is a fieldable and database-stored entity, and Vocabulary, which is a bundle entity.
Plugins
Plugins can be seen as the object-oriented version of hooks. They can be used to modularly include custom blocks, image effects, etc.A great example of a plugin is the abstract BlockBase class. To add a new custom block, this class should be extended, such as done by the ActiveTopicsBlock of the forum module. Some methods can or must be overridden for access checks, building the view, altering the block form, etc.A plugin manager is used to define a plugin type. A list of namespaces and a subdirectory are specified to define where the plugins can be found. In this way, any module can add plugins. An annotation class is set to be able to identify the plugins.Furthermore, several configuration properties must be specified in the annotations, depending on the plugin type.
Drupal class
The Drupal 8 core code is mostly object-oriented. However, the code in module hooks is still mostly procedural. This presents challenges because Symfony is completely object-oriented! In Symfony, if you would need to create some functionality that depends on another service, you would create a new service and define the required dependency in the service container. But if you need a particular service in a Drupal hook, you can’t use this mechanism as you are not working in a class in the first place! For this situation, the static Drupal class is created. It can be used to get services in a procedural context by using Drupal::service(‘{service id}’), or using specific service accessors like Drupal::request(), Drupal::currentUser(), Drupal::entityManager(). The latter have the advantage of providing better code-completion in your editor. Furthermore, it provides some handy helper functions such as Drupal::url(), which is the equivalent of the Drupal 7 url() method.
An example of the node_access function in node.module using the Drupal class:
function node_access($op, $node, $account = NULL, $langcode = NULL) {
  $access_controller = \Drupal::entityManager()->getAccessController('node');
  ...
  return $access_controller->access($node, $op, $langcode, $account);
}
How to Create a Custom Block in Drupal 8
‘Blocks’ in Drupal are pieces of content that can be placed anywhere throughout the site. They are an integral part of Drupal and the way it displays information. While Drupal has a variety of useful blocks out of the box for most scenarios, there might be times when custom blocks are required.
There are two ways in which you can create a custom block:
- Through Drupal’s own GUI, or
- Programmatically.
Via Drupal GUI
This method is pretty straightforward and easier than creating a block programmatically. However, it also is less flexible and customizable than programmatically creating a block.
- Go to admin -> structure -> block layout -> custom block library.
- Click ‘block types’ tab. Once here, click on the ‘Add custom block type’ button.
- Enter block label and description.
- Now, you can add fields, manage display type, manage display etc. for your custom block. Customize the block to your liking and click save.
- Now, go back to custom block library and click the blue ‘Add custom block’ button, to add the block to your library.
- The next step is to simply place the block into your desired region by navigating to admin -> structure -> block layout.
Programmatically Creating Block
This method requires a little more understanding of the way Drupal works, however, once you get the hang of it, it gets pretty easy.
Create a module
In Drupal 8, it is necessary to create an info.yml file that contains the metadata for every custom module, theme or plugin you create. Similarly, for our custom block, we will need to create an info.yml file in the ‘modules/custom’ directory. Note that if the custom folder isn’t already created, you will need to create it. For creating a custom block, we will need to make a custom module.Now create an ‘info.yml’ file such as ‘custom_block_example.info.yml’. Inside this file enter following:
name: Custom Block Example
type: module
description: Define a custom block.
core: 8.x
package: Custom
dependencies:
– block
You can now go to your Drupal dashboard and enable the custom module we have just created.
Create Class
Now, in order to define the logic of the block, we need to create a class which will be placed under the modules/custom/custom_block_example/src/Plugin/Block directory.
The class file should contain annotation as well. The annotation allows us to identify the block. Apart from the annotation, this class will contain 4 methods:
- build() – Returns a basic markup by rendering a renderable array.
- blockAccess() – Defines a custom user access logic.
- blockForm() – Defines a custom block configuration form using the Form API.
- blockSubmit() – Used to save a configuration, defined on the blockForm() method.
Now, this is what the class file should contain in the end:
<?php
namespace Drupal\my_block_example\Plugin\Block;
use Drupal\Core\Access\AccessResult;
use Drupal\Core\Block\BlockBase;
use Drupal\Core\Form\FormStateInterface;
use Drupal\Core\Session\AccountInterface;
/**
* Provides a block with a simple text.
*
* @Block(
* id = “my_block_example_block”,
* admin_label = @Translation(“My block”),
* )
*/
class MyBlock extends BlockBase {
/**
* {@inheritdoc}
*/
public function build() {
return [
‘#markup’ => $this->t(‘This is a simple block!’),
];
}
/**
* {@inheritdoc}
*/
protected function blockAccess(AccountInterface $account) {
return AccessResult::allowedIfHasPermission($account, ‘access content’);
}
/**
* {@inheritdoc}
*/
public function blockForm($form, FormStateInterface $form_state) {
$config = $this->getConfiguration();
return $form;
}
/**
* {@inheritdoc}
*/
public function blockSubmit($form, FormStateInterface $form_state) {
$this->configuration[‘my_block_settings’] = $form_state->getValue(‘my_block_settings’);
}
}
Now, go back to your site, and you should be able to see the block you have just created. Simply assign the block to a region of your choice and it should become visible.
Drupal 8 has largely fixed that problem by tackling the different types of data that may need to be stored, each with their own dedicated APIs. Of course, moving from one big blob of data (aka, arbitrary SQL) to structured APIs requires changing the way you think about arbitrary data. So let’s review the different ways to store stuff in Drupal 8, and where each of them is useful.
State
The simplest option is the Drupal State API. The State API is a simple key/value pool for values that are, by design, specific to a single Drupal install. Good examples here include the timestamp of the last cron run, generated optimization lookup tables (which should not get cleared as often as the cache does), the currently active theme, and so on. These are all values that are not user-provided configuration, and would make no sense to deploy from staging to production or vice versa.State can store values of any type, as they will be serialized and unserialized automatically. However, not all object types can be serialized. In particular, any object that has a dependency on a service should never be serialized. Only serialize value objects.
Note that every read of a state value is a new hit against the underlying database. If you’re loading multiple values out of state for some reason, use the getMultiple() method.The state API is a single namespace, so be sure to namespace your state entry key names with your module name, like “mymodule.last_person_hugged”.
Key/Value
The State API is itself just an abstraction layer on top of the Key/Value API. The Key/Value API allows the storing of any arbitrary serializable value, with the keys namespaced to a “collection”. The “state” is simply one collection.
It’s also possible to use your own collection, directly accessing the Key/Value API. However, if you’re going to do that it’s helpful to define your own class that composes the Key/Value factory service, much the same way that the State API does. At the moment there aren’t many tools to quickly replicate that functionality, but the process is straightforward and the State class itself is readily copy-pasteable. Most of the non-trivial code in it is simply to cache loaded values so that the Key/Value store is not hit multiple times per request for the same value.
Content
Content in Drupal 8 means the Entity API. Drupal Entities are much more rigidly structured than in an ORM like Doctrine. There are three layers to the Entity API, conceptually:
- Entity Types define different business logic for different objects. What that logic is varies on the Entity Type. Generally a new Entity Type involves writing a new PHP class. Examples includes Nodes, Users, Taxonomy Terms, Comments, and Custom Blocks.
- Entity Bundles are different configurations of the same Entity Type, with a different Field configuration. Creating one involves setting up configuration, which in (nearly) all cases involves an administrator pushing buttons. “page nodes”, “article nodes”, and “event nodes” are examples of different bundles of the “node” Entity Type.
- Fields are the smallest basic unit of Drupal content. A field is a single rich-value. Rather than “string” or “int” it is a value like “email address”, “formatted text”, or “telephone number”. It can also be a reference to another entity. All entity objects can be viewed as a collection of Fields, each of which may be single- or multi-value. (As far as the code is concerned Fields are always multi-value, but may be configured to only bother storing one value.)
The key aspect of Content is that it is generally user-generated and of potentially infinite cardinality. (That is, there’s no limit on how many entity records a user can create.) Unlike in previous Drupal versions, however, the Entity API is robust enough that it is reasonable to use for nearly all user-provided data rather than just a select few types.If you want users to be able to enter data into the system, and there’s no hard-coded low limit to how many entries they can make, Entities are your tool of choice. Building a custom entity is also much more viable than in past versions, so don’t be afraid to define your own Entity Types. There’s no need to just piggy-back on nodes anymore.Content Entities are also translatable into different languages. The capability is baked into all Field types, making multi-lingual content a breeze.
Configuration
The most important new data system in Drupal 8, though, is the Configuration system. The Configuration system replaces the variables table, the features module, half of the ctools module suite, and the myriad custom tables that various modules defined in previous versions with a single, coherent, robust way to store, manage, and deploy administrator-provided configuration.
That last part is key. The Configuration system is your go-to tool if:
- Users on the production site should not be changing these values. If they should be changing values on production, you probably meant for it to be Content.
- If you have a staging site, you will typically be editing on the staging site and then deploying to production en masse.
- Affects the business rules of the module or site.
For the Drupal 7 users, pretty much anything for which you ever thought “this should really be in a Feature module” now belongs in Configuration. The configuration system is modeled as a namespaced key-value store (although it does not use the Key/Value system internally, as the implementations are quite different). The keys are dot-delimited strings, and the values are specifically “Configuration objects”. Config objects have get() and set() methods to manage properties on the object, among other features we won’t go into here.
Most importantly, config objects can be safely serialized to YAML and unserialized from YAML. That’s what differentiates the Configuration system from the other data storage systems: It’s canonical form is not in SQL, but YAML that can be loaded into the system or exported from it. Modules can provide default configuration files in YAML, which will get imported into the site when they’re installed. A site can also export some or all of its configuration files to a known directory on disk. That could be hundreds of files, but that’s fine. Once in that directory the files can be easily checked into Git, checked out on another server, and imported from files back into config objects in Drupal. Configuration deployment: Solved!
You will also run across something called “Configuration Entities”. This seemingly mixed concept is a way of providing CRUD behavior using the basic Entity API but backed by the Configuration API. Configuration Entities do not have Fields, but otherwise use essentially the same API. Configuration Entities are useful for cases where a user or administrator may be making multiple instances of a given configuration object. They’re also the storage mechanism underlying most Plugins, in practice.Configuration objects are also translatable, which allows sites to make string value configuration available in the language of their users.
Tempstore
Tempstore is a bit of an odd duck of Drupal 8’s data storage world. It’s provided not by core but by the user module, and there’s actually not one but two different tempstores: one private, one shared.A tempstore is for data that needs to be persisted between requests without being saved back to the canonical storage (such as an entity or configuration object). If that sounds like PHP’s native session handling, it should; the use case is very similar. The main difference is the shared tempstore is, as the name implies, shared between users, whereas sessions are, by design, not.
The quintessential (and original) example of that behavior is Views. A View is stored as a configuration entity. You don’t want the View to be incrementally updated every time a single field is changed, though; you want to make a series of changes and then save the changes all at once. Instead, a temporary copy of the View config entity is saved to the shared tempstore every time a setting is changed. That allows changes to survive a browser restart, or a lunch break, without affecting the live copy of the View. It can even be picked up by another user if the first user gets delayed or goes on vacation and forgets to hit save. When the View is saved then the temporary copy is written back to the configuration system and the temporary version cleared.
The private tempstore works the same way, but its values are not shared between users. That makes it more appropriate for wizard-type interfaces or multi-step forms.Both tempstores are backed by the Key/Value API internally. The Key/Value API offers a variant called “expirable”, where values will get cleared out eventually, say if a View is left mid-edit for several days, which tempstore uses. In practice, unless you’re building complex multi-step UIs you won’t run into tempstore very often.
Cache
And finally, we have the cache system. Drupal 8’s cache system is actually far more robust than its predecessors, and is heavily leveraged by the rendering system. That’s a topic for another time, though. For now, we’re just looking at cases where you’ll use it directly.The general rule for caching something is “is it more expensive to compute this value than to look up an old version from the database?” Database calls are not cheap. (Even if not using SQL, you’re still making some kind of I/O call which is the most expensive thing you can do in a program). Don’t cache something in the cache system until and unless you know it’s going to be helpful to do so. Often, that is other I/O intensive calls, like a web service call or a complex set of queries.
Another important rule for caching is that it should be for performance only. If the cache is wiped clean of all data, your code should still run. It may run slower, the site may run too slowly to be usable, but no irreplaceable data has been lost. Never, ever store data in the cache that you cannot recreate on-demand if needed. Similarly, don’t store generated and regeneratable data elsewhere. That belongs in the cache.
What to choose?
With so many options, how do you know where to put your data? While the lines are not always crystal clear, the following pointers should cover most cases:
- Is it purely a performance optimization, and the data can be regenerated if needed? If yes, Cache.
- Should it be configured on staging and pushed to production? If yes, use the Configuration system. If there will be an arbitrary number of them, use Config Entities.
- Was it in the variables table before, but not something to push from staging to production? If so, it likely belongs in State.
- Is it user-generated content on the live site? Most likely it should be a Content Entity.
- Is it large amount of unstructured data that will only need to be looked up by ID, and is not something that will be deployed from staging to production? Consider a custom Key/Value collection.
- Is it a session-like place to temporarily store one of the other values above? That’s what tempstore is for.
What, no database?
You’ll probably note the lack of “an SQL table” in the above list. That’s because in Drupal 8 you will rarely if ever interact with the database directly. In fact, a given site may not even be using an SQL database! These more robust, abstracted tools should cover the vast majority of data storage cases. If you need to use SQL for performance reasons, though, there is a supported way to make even that flexible.
-Drupal on cloud is content management software. It’s used to make many of the websites and applications you use every day. Drupal has great standard features, like easy content authoring, reliable performance and excellent security. But what sets it apart is its flexibility; modularity is one of its core principles. Its tools help you build the versatile, structured content that dynamic web experiences need.
It’s also a great choice for creating integrated digital frameworks. You can extend it with any one, or many, of thousands of add-ons. Modules expand Drupal’s functionality. Themes let you customize your content’s presentation. Distributions are packaged Drupal bundles you can use as starter-kits. Mix and match these components to enhance Drupal’s core abilities. Or, integrate Drupal with external services and other applications in your infrastructure. No other content management software is this powerful and scalable.
The Drupal project is open source software. Anyone can download, use, work on and share it with others. It’s built on principles like collaboration, globalism and innovation. It’s distributed under the terms of the GNU General Public License (GPL). There are no licensing fees, ever. Drupal will always be free.
How to Manually Install Drupal 8
Prepare the Files
To manually Install Drupal 8 you will need to first download an archive of the installation from the official Drupal website.
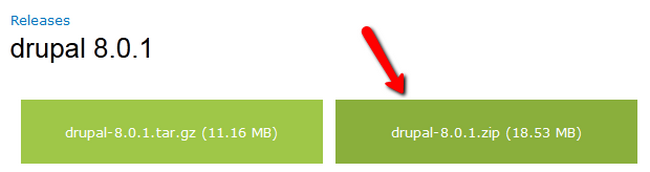
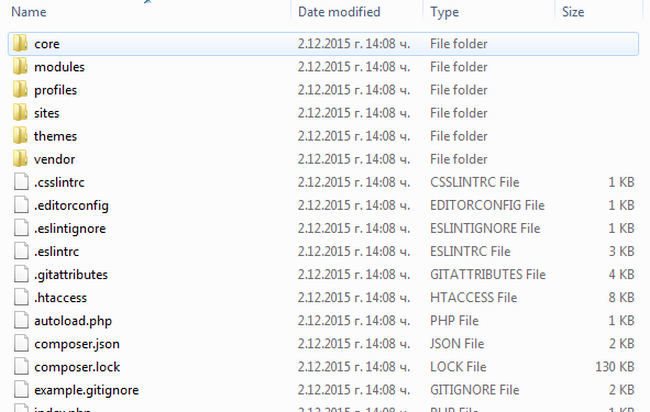
Once completed, please extract the archive on your personal computer.
Upload Files
There are two ways of uploading your files to the server – using an FTP client, or uploading directly through your cPanel account → File Manager,Now you can decide where to place your files. If you want to have Drupal 8 accessible via your domain (example.com) place them in the public_html/ directory of your account.However, if you wish to install Drupal 8 in a subfolder, you need to create it first. If you Place the files in a folder public_html/drupal it will be accessible via example.com/drupal where example.com is your domain.
Configure the Install
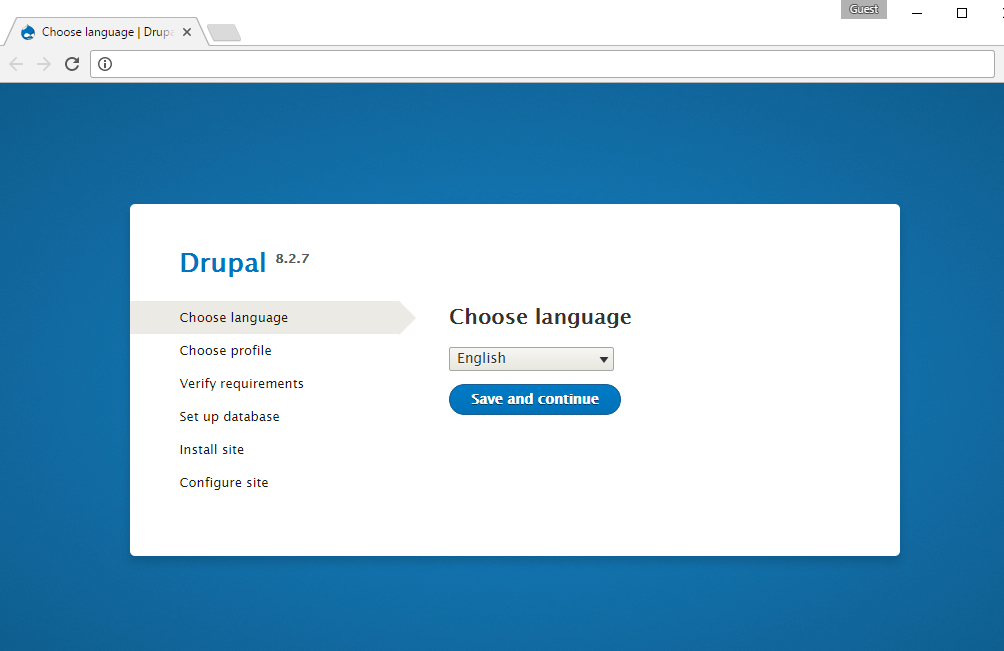
When all of the files have been successfully uploaded to the server, you only need to open your preferred browser and navigate to their location. This will initiate the Drupal Web Installer which will guide you through the rest of the Installation process.
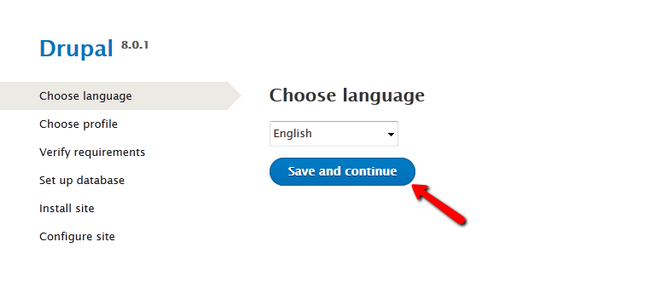
The first part will be to choose the language for your website. Click the Save and Continue button to proceed.
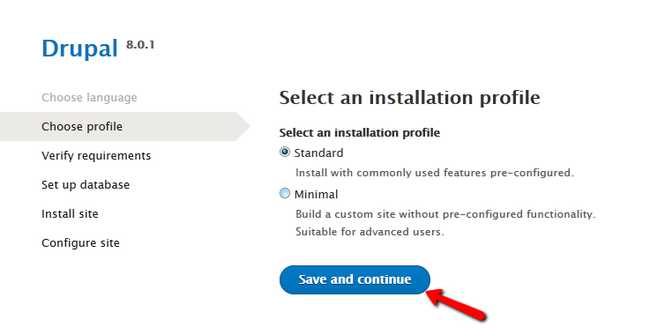
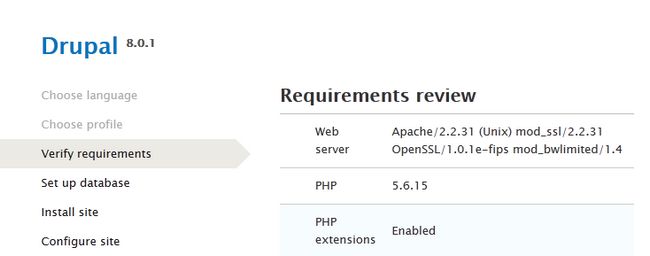
Then you will have to select between two different installation profiles. Choose one, depending on your site building skills.In the next step you will see all of the requirements for the application and Drupal will have to verify them before you can continue.
Configure the Database
For this next Installation step you will need to have an existing Database.
Create MySQL Database
You will have to fill out the Database Name, Username and Password so Drupal can connect to it.
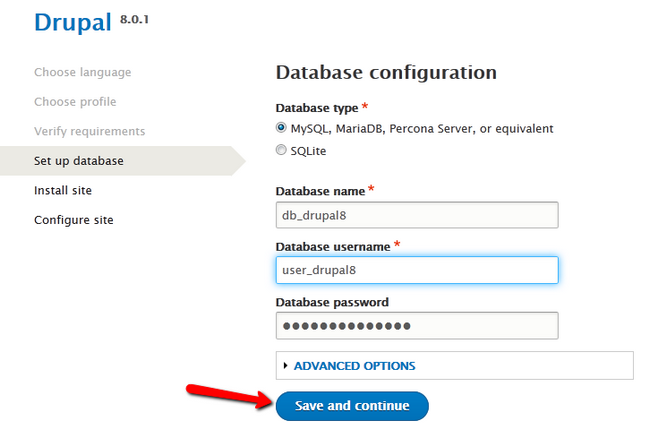
Hit the Save and Continue button to proceed.
Complete the Installation
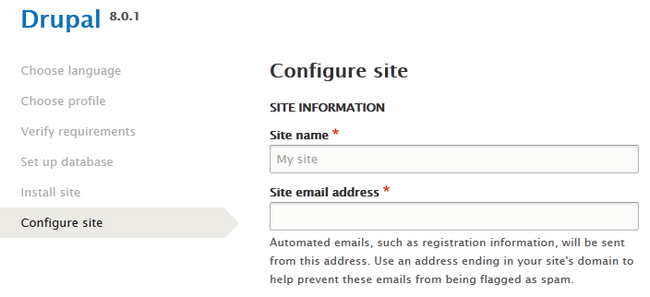
In this final step, you will have to fill out your Site’s details.
Site Information:
- Site Name – The name of your new Drupal 8 website
- Site Email Address – The email address which will be used for sending out automated messages to your visitors.
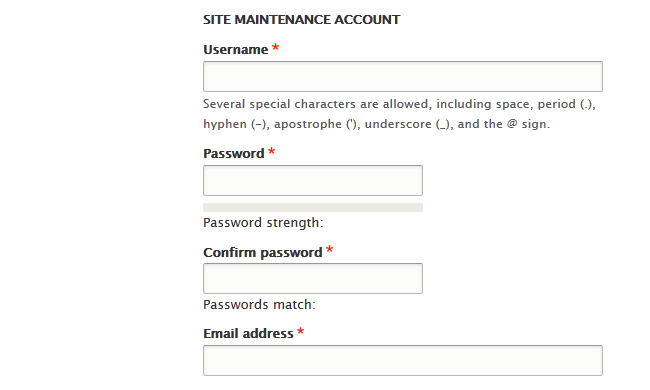
You will also have to setup an Administrators account. This will be your access credentials for your website’s back-end.
Lastly, you will have to choose a country and time zone for your website and whether or not you wish to receive email notifications for new updates. Click on the Save and Continue button to install Drupal 8.
Congratulations, you have successfully installed Drupal 8 manually.
Acquia Drupal is owned by Acquia Drupal (https://www.drupal.org/) and they own all related trademarks and IP rights for this software.
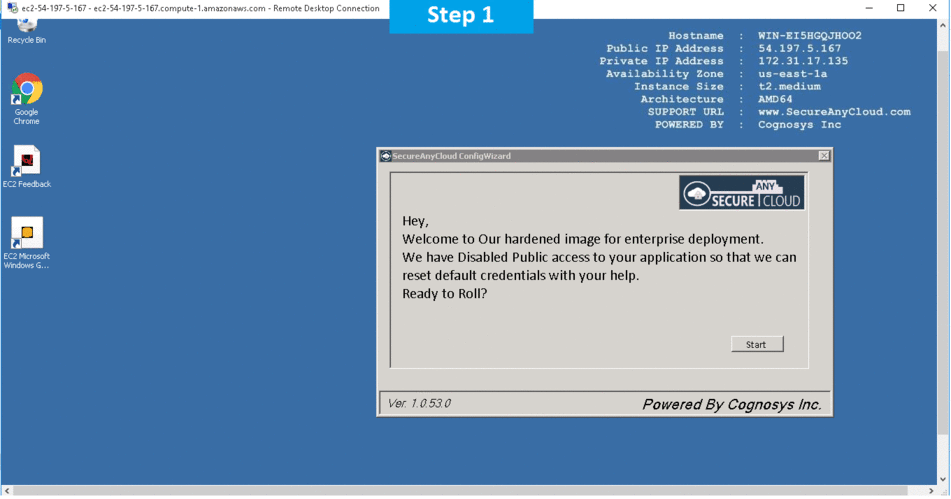
Cognosys provides hardened and ready to run images of Drupal 8.2.7 on all public cloud ( AWS marketplace and Azure).
Deploy your Drupal 8.2.7 websites securely on cloud i.e. AWS marketplace and Azure with Reliable Services offered by Cognosys at one-click with easy written and video tutorials.
Drupal 8.2.7 on CentOS
Drupal on cloud for Azure
Drupal on cloud for AWS
Features
Drupal 8 Features Worth Knowing:
-
New Theme Engine
Drupal 8 includes a brand new theming engine called Twig, which is PHP-based, flexible, fast, and secure. It’s much easier to create beautiful and more functional Drupal websites using Twig, as its templates are written in a syntax that’s less complex than a PHP template or others while being more secure.
-
Mobile First From The Get-Go
Drupal 8 is mobile first in its approach. All the built-in themes that come with Drupal 8 are responsive, along with an admin theme that adapts to different screen sizes, and a ‘Back To Site’ button to go back to the front page. Tables fit into any screen size without a hitch, and the new admin toolbar works well on mobile devices.
-
More HTML5 Power To You
HTML5 is now more or less the de facto standard when it comes to writing web markup. The same is now available natively in Drupal 8, giving you access to input fields like date, e-mail, phone, etc., and even more functionality and compatibility with mobile and handheld devices.
-
Multilingual Ready
Drupal 8 boasts extensive multilingual features right out of the box. The admin interface has built-in translations. You can also create pages with language-based Views filtering and block visibility. Translation updates from the community are automatically facilitated.
-
Manage Your Configuration
Drupal 8 has configuration management built into it at the file-system level so that carrying over configuration elements (like content type, views, or fields, etc.) from local development to the server is a breeze. You can use a version-control system to keep track of configuration changes. Configuration data is stored in files, separate from the site database(s).
-
Easy Authoring
New Drupal 8 features bring unprecedented power into the hands of the Content Editor, with WYSIWYG editor CKEditor now bundled with the core. However, the most touted improvement remains the in-place editing capability that Drupal 8 will afford users, a result of the Spark Initiative.Site and content creators or editors can edit text on any page without having to switch to the full edit form. Drafts are now much easier to create, and web security is now better implemented as a result.
-
Quick Edits
There’s something great about seeing something that needs changing and having the ease of access to change it—directly and quickly. Now Quick Edit is a backport of the Drupal 8 in-place editing for Fields. So if you’re logged into Drupal content is in front of you, edit the text directly for quick fixes and additions from the front-end.
-
Views Now Part Of Core
Views sit high up in the Drupal module hierarchy, as it is an integral part of most website projects, and a lot is pretty much impossible without it. Site designers have used use this hitherto-contributed module to output galleries, maps, graphs, lists, posts, tables, menus, blocks, reports, and what-have-you. With this Drupal 8 feature, Views is part of and firmly integrated with the core.The front page and several administration pages are now Views, and users will now be able to quickly create pages, blocks, admin sections, etc., and modify existing ones just as effortlessly.
-
Better Support For Accessibility
Drupal 8 has excellent support for industry standard accessibility technologies, like WAI-ARIA. ARIA Live Announcements API and TabManager are significant improvements in Drupal 8, which provide control for rich Internet applications. Bells and whistles like better font sizes, tweaked color contrasts, jQuery UI’s autocomplete, and modal dialogs go a long way towards making Drupal 8 a breeze to use.
-
Web Services Built-In
Drupal 8 now makes it possible to use itself as a data source, and output content as JSON or XML. You can even post data back to Drupal 8 from the front end. Hypertext Application Language (HAL) is implemented in Drupal 8 and makes exploitation of web service capabilities less painful.
-
Fields Galore
Drupal 8 ships with bucket-loads of field types in the core, thus taking its content structure capabilities up a notch. New field types like entity reference, link, date, e-mail, telephone, etc., aid content creation, and now you can attach fields to more content types, as well as create custom contact forms by attaching fields to them.
-
Guided Tour
Now the descriptive text is right under the help link. Users can click and then take the tour; pop-ups appear, explaining how this all works, one of the most helpful Drupal 8 features to newcomers. This user-friendly boost is well-received as it’s making the CMS easier for everyone to understand.
-
Loading Speed
Drupal 8 caches all entities and only loads JavaScript when necessary. When a page is viewed, its content doesn’t need to be reloaded again. Previously viewed content is quickly loaded from the cache. Once configured and enabled, caching is completely automatic.
-
Industry Standards
Drupal 8 aligns with the latest PHP 7 standards like PSR-4, namespaces, and traits, and uses top notch, outstanding external libraries like Composer, PHPUnit, Guzzle, Zend Feed Component, Assetic to name a few. Meanwhile, underlying Drupal 8 features modern, object-oriented code that’s the order of the day, by Symfony 2.
-
JavaScript Automated Testing
Automated testing is not possible for front-end, so JaveScript (JS) automated testing is now possible with Drupal 8.1. Now QA’ers can test the JavaScript front-end automatically, saving time and making continuous integration that much easier.
-
Big Pipe In Core
With Big Pipe part of Drupal core, developers can optimize the site load performance for the end-user significantly. While this feature has nothing to with actual performance and is only perceived, it’s a great feature to have since the end user is able to see a difference in site load times.
-Major Features of Acquia Drupal:
- Acquia Cloud- Build digital experiences faster and manage them easily on a secure, scalable and reliable solution.
- Acquia Cloud Site Factory- Deliver and govern multiple sites in record time.
AWS
Installation Instructions For Ubuntu
Note: How to find PublicDNS in AWS
Step 1) SSH Connection: To connect to the deployed instance, Please follow Instructions to Connect to Ubuntu instance on AWS Cloud
1) Download Putty.
2) Connect to virtual machine using following SSH credentials:
- Hostname: PublicDNS / IP of machine
- Port : 22
Step 2) Database Login Details:
Username : root || Password : Passw@rd123
Note: For Stack Database: DB drupal with user drupalusr and password Passw@rd123 has already been created.Please use this database for you Stack Configuration.
Note: Please change the password immediately after the first login.
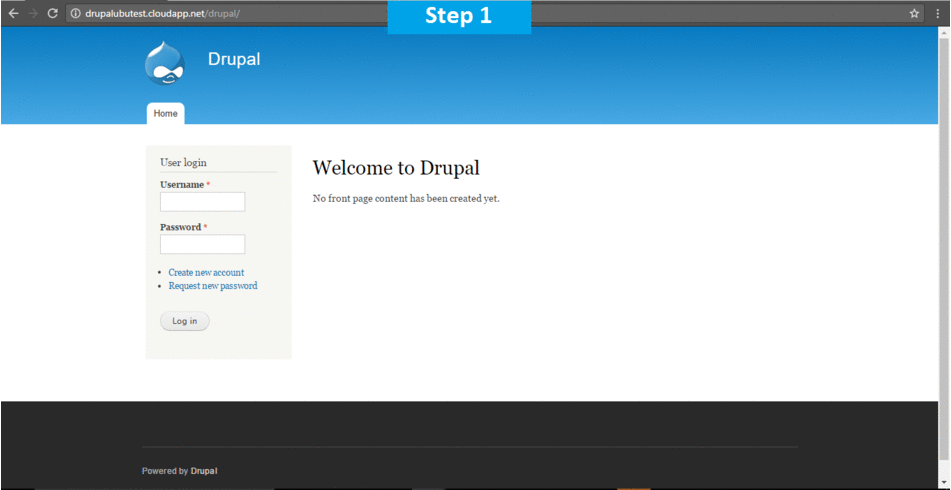
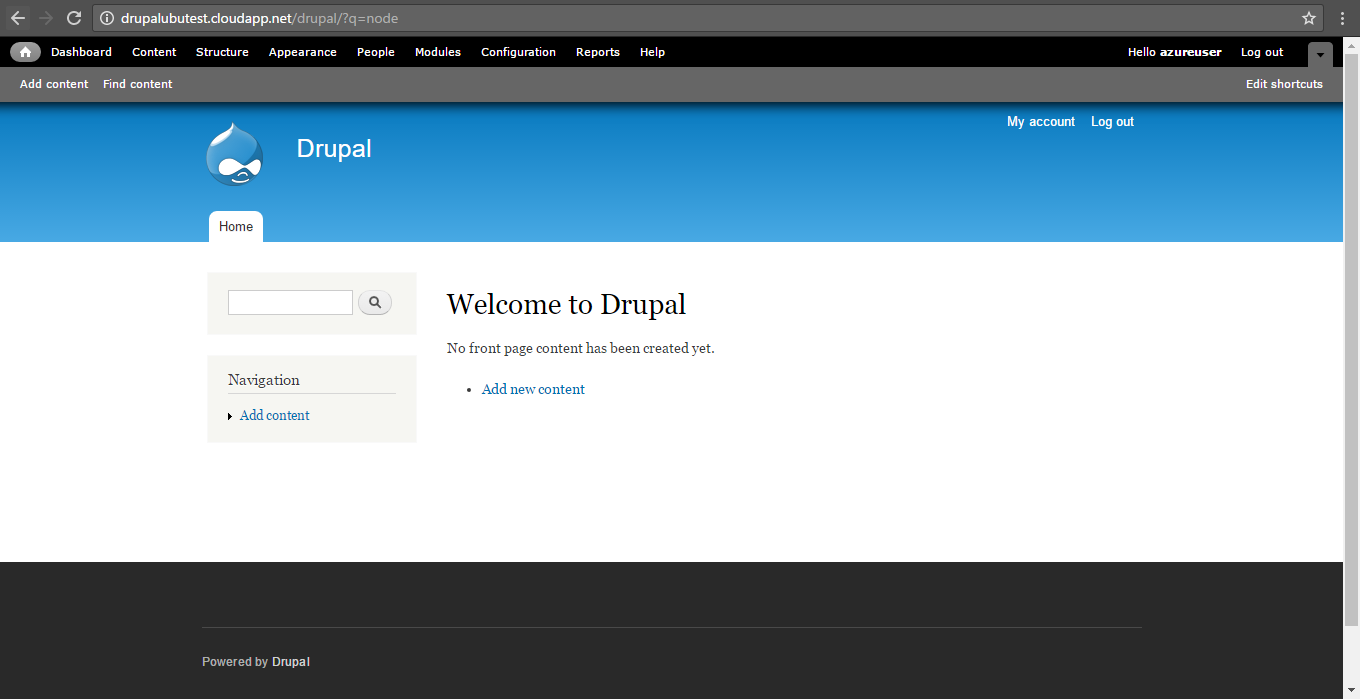
Step 3) Application URL: Access the application via a browser at “http://PublicDNS/”
Step 4) Other Information:
Version: DRUPAL 8.2.7
1.Default installation path: will be in your web root folder “/var/www/html/”
2.Default ports:
- Linux Machines: SSH Port – 22
- Http: 80
- Https: 443
- MYSQL ports: By default, these are not open on Public Endpoints. MYSQL: 3306
Configure custom inbound and outbound rules using this link
3. To access Webmin interface for management please follow this link
Installation Instructions For Centos
Note: How to find PublicDNS in AWS
Step 1) SSH Connection: To connect to the deployed instance, Please follow Instructions to Connect to Centos instance on AWS Cloud
1) Download Putty.
2) Connect to virtual machine using following SSH credentials:
- Hostname: PublicDNS / IP of machine
- Port : 22
Step 2) Database Login Details:
Note: For Stack Database: DB drupal with user drupalusr and password Passw@rd123 has already been created.Please use this database for you Stack Configuration.
Username : root || Password : Passw@rd123
Note: Please change the password immediately after the first login.
Step 3)Application URL: Access the application via a browser at “http://PublicDNS/”
Step 4)Other Information:
Version: DRUPAL 8.2.7
1.Default installation path: will be in your web root folder “/var/www/html/”
2.Default ports:
- Linux Machines: SSH Port – 22
- Http: 80
- Https: 443
- MYSQL ports: By default, these are not open on Public Endpoints. MYSQL: 3306
Configure custom inbound and outbound rules using this link
3. To access Webmin interface for management please follow this link
Azure
Installation Instructions For Ubuntu
Note: How to find PublicDNS in Azure
Step 1) SSH Connection: To connect to the deployed instance, Please follow Instructions to Connect to Ubuntu instance on Azure Cloud
1) Download Putty.
2) Connect to virtual machine using following SSH credentials:
- Hostname: PublicDNS / IP of machine
- Port : 22
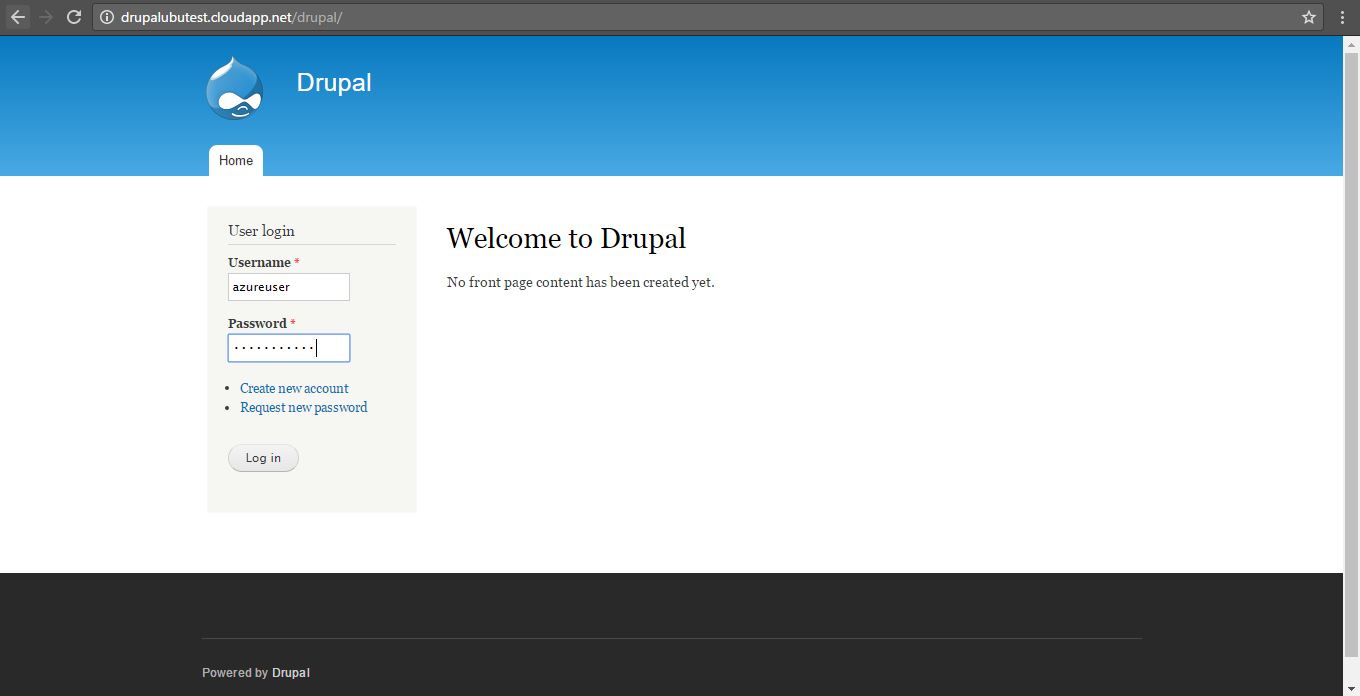
Username: Your chosen username when you created the machine ( For example: Azureuser)
Password : Your Chosen Password when you created the machine ( How to reset the password if you do not remember)
Step 2) Database Login Details:
Username : root || Password : Passw@rd123
Note: For Stack Database: DB drupal with user drupalusr and password Passw@rd123 has already been created.Please use this database for you Stack Configuration.
Note: Please change the password immediately after the first login.
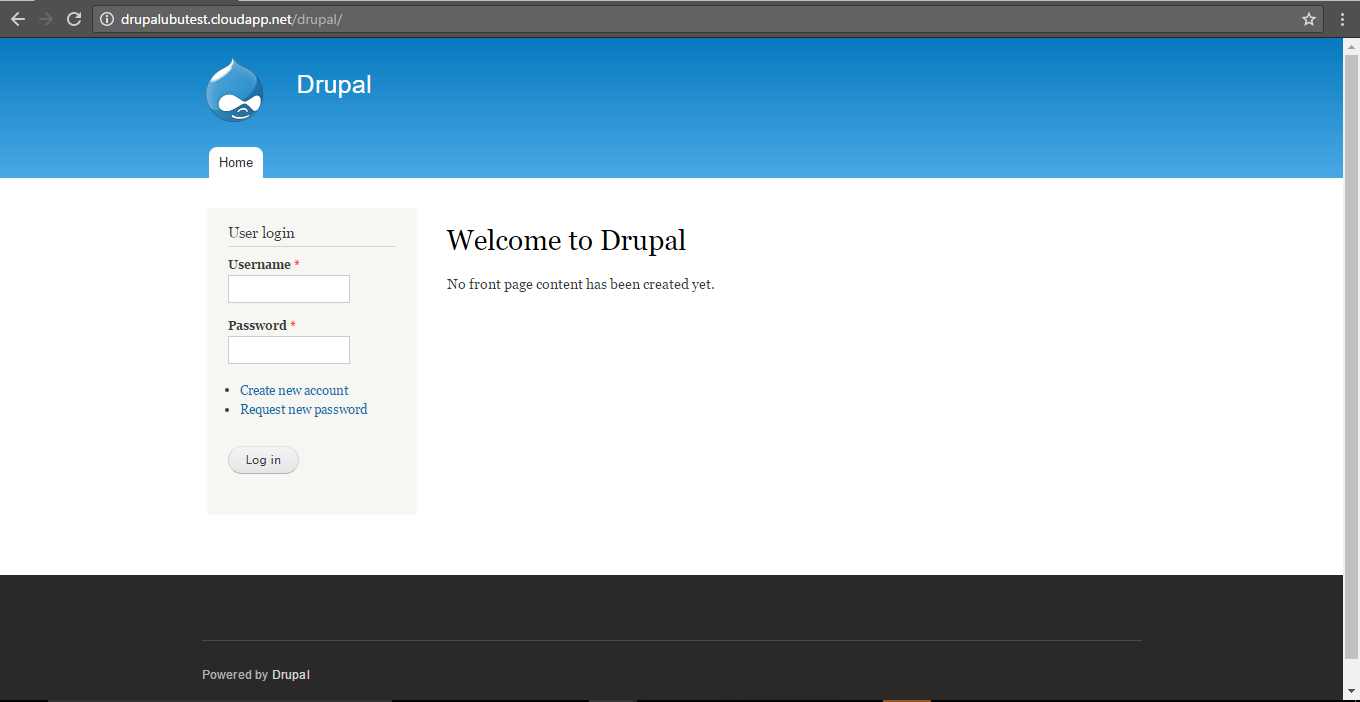
Step 3) Application URL: Access the application via a browser at “http://PublicDNS/”
Step 4) Other Information:
Version: DRUPAL 8.2.7
1.Default installation path: will be in your web root folder “/var/www/html/”
2.Default ports:
- Linux Machines: SSH Port – 22
- Http: 80
- Https: 443
- MYSQL ports: By default, these are not open on Public Endpoints. MYSQL: 3306
Configure custom inbound and outbound rules using this link
3. To access Webmin interface for management please follow this link
Installation Instructions For CentOS
Note: How to find PublicDNS in Azure
Step 1) SSH Connection: To connect to the deployed instance, Please follow Instructions to Connect to CentOS instance on Azure Cloud
1) Download Putty.
2) Connect to virtual machine using following SSH credentials:
- Hostname: PublicDNS / IP of machine
- Port : 22
Username: Your chosen username when you created the machine ( For example: Azureuser)
Password : Your Chosen Password when you created the machine ( How to reset the password if you do not remember)
Step 2) Database Login Details:
Username : root || Password : Passw@rd123
Note: For Stack Database: DB drupal with user drupalusr and password Passw@rd123 has already been created.Please use this database for you Stack Configuration.
Note: Please change the password immediately after the first login.
Step 3)Application URL: Access the application via a browser at “http://PublicDNS/”
Step 4)Other Information:
Version: DRUPAL 8.2.7
1.Default installation path: will be in your web root folder “/var/www/html/”
2.Default ports:
- Linux Machines: SSH Port – 22
- Http: 80
- Https: 443
- MYSQL ports: By default, these are not open on Public Endpoints. MYSQL: 3306
Configure custom inbound and outbound rules using this link
3. To access Webmin interface for management please follow this link
Step by Step Screenshots :


Installation Instructions For CentOS
Installation Instructions For CentOS
Step 1) SSH Connection: To connect to the deployed instance, Please follow Instructions to Connect to CentOS instance on Google Cloud
1) Download Putty.
2) Connect to virtual machine using following SSH credentials:
- Hostname: PublicDNS / IP of machine
- Port : 22
Username: Your chosen username when you created the machine
Password : Your Chosen Password when you created the machine ( How to reset the password if you do not remember)
Step 2) Other Information:
1.Default ports:
- Linux Machines: SSH Port – 22
2. To access Webmin interface for management please follow this link
