

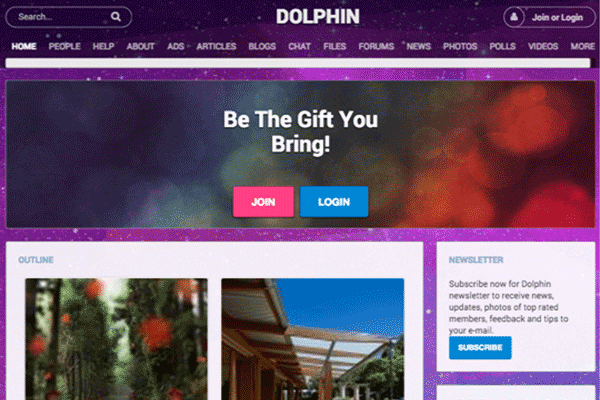
Overview
Dolphin is an open-source community building software. It can be used for development of dating sites and social network portals. It provides various features which will allow the webmasters to build web sites similar to Facebook, Youtube, MySpace, Flickr and others.The Dolphin Emulator is among the most popular, if not the most popular, on the scene. This is because of an unprecedented level of accuracy, performance features, and enhancement capabilities. What started as a humble GameCube emulator became the premiere GameCube and Wii emulator before the latter system’s console cycle was even finished!Dolphin is an open-source, cross-platform project, which means it’s available on all kinds of hardware. More recent versions only support 64-bit Windows, Mac OS X, Linux and Android operating systems, though.
Dolphin Installation
Extract the archive on your computer. Then you should upload the extracted files through an FTP Client.
Place the Dolphin installation files at the exact location where you would like your site to be accessible. If you want to open it directly through your domain name you should place the content of the extracted package straight under the public_html folder of your account.
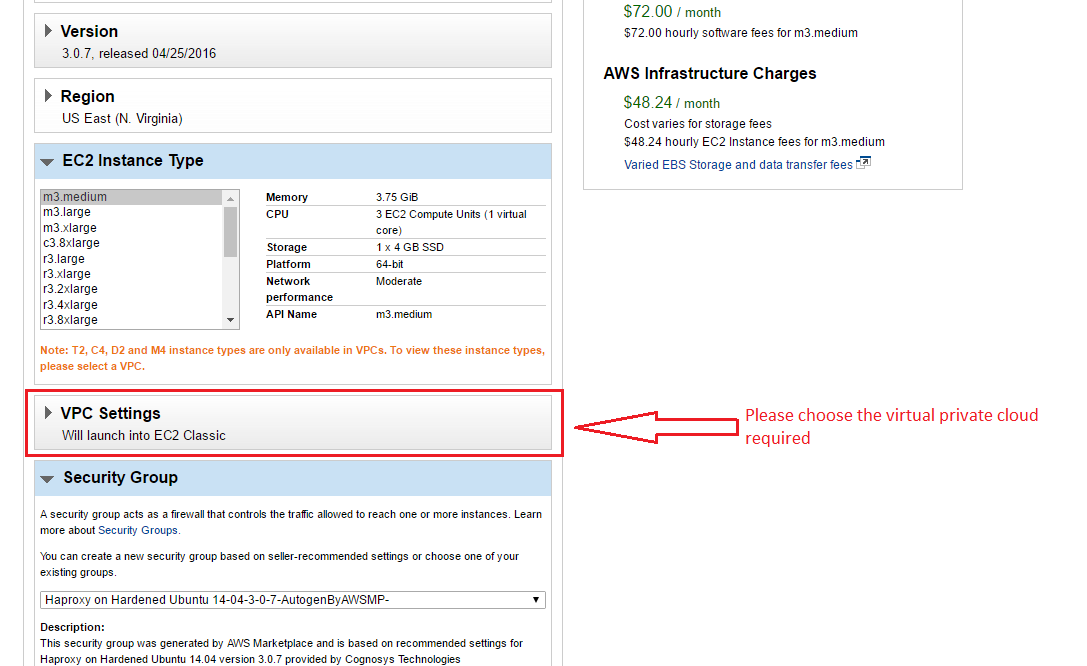
You need to create a new database and assign a database username to it with full privileges. You can follow our detailed tutorial on Creating MySQL database and user.
In order to initiate the Dolphin installation, open the folder where you have uploaded it via your web browser. For example, if you have placed the files in the public_html/Dolphin folder, enter http://www.yourdomainname.com/Dolphin in your web browser. Substitute www.yourdomainname.com with your actual domain name.
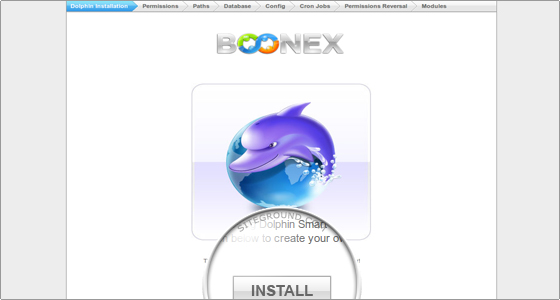
You should click on the Install button to proceed with the script installation.
On the next screen the script will perform a system requirements check. The FastWebHost hosting servers are optimized for the best Dolphin performance and the system requirements are met.
If your account is hosted on another server and there are problems, they will be reported by the script. Fix them and click on the Check button to verify. If all the requirements are met click on the Next button.
On the third screen a script paths check is performed. The paths to the dependencies are automatically detected by the script.
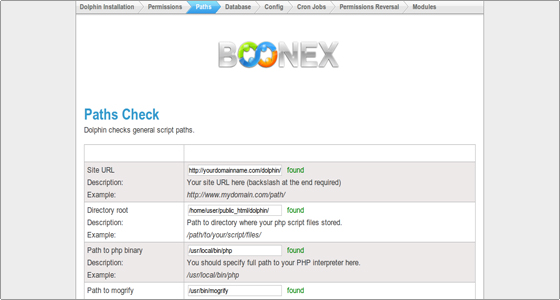
Click on the Next button to continue.
On the new screen you will be prompted for the MySQL database details. You should enter the MySQL database name, the database username and the password. The other fields values are default and you can leave them unchanged.
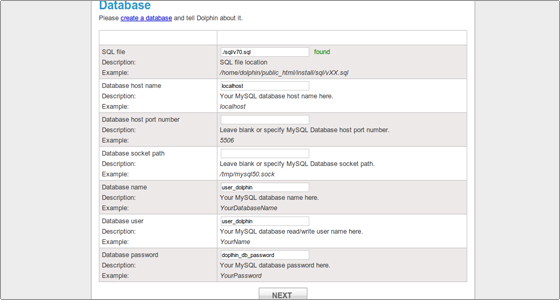
Again, click on the Next button to continue.
On the Configuration screen enter the admin login details and the e-mail for correspondence.
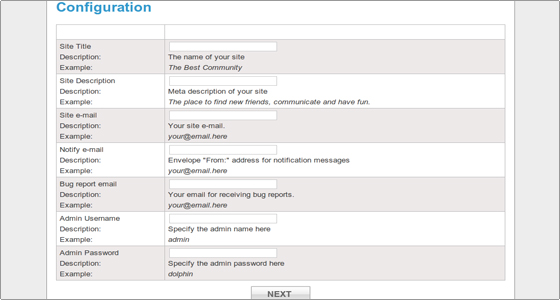
Click Next to proceed.
On the next screen the cron jobs will be listed.
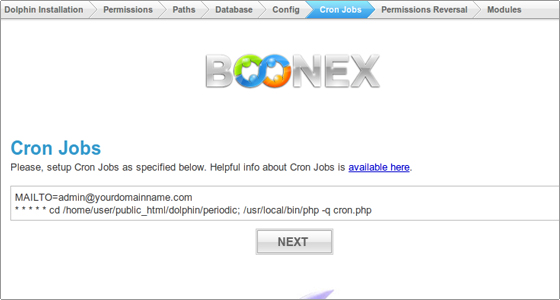
You should set them following our comprehensive cPanel tutorial.
Click Next to continue.
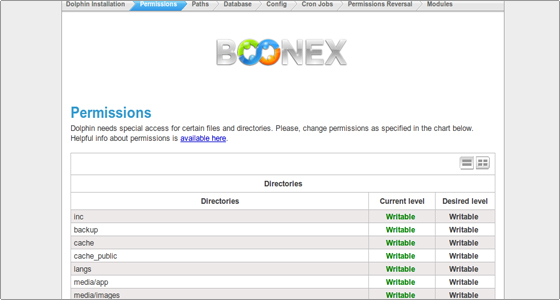
On the last screen you will see a list of files. Due to security reasons you should revert their file permissions. Check the following tutorial on how to change the file permissions.
After the fixing of file permissions click on the Next button to complete the Dolphin installation.
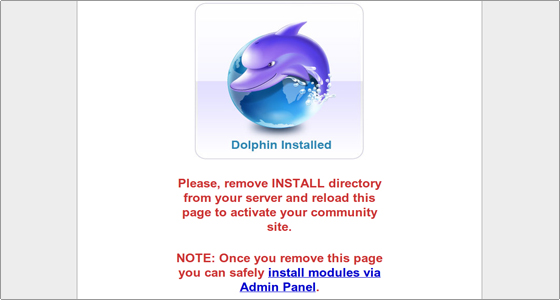
The last action which should be performed is to remove the installation folder and reload the final page.
You are ready to build your community.
Enabling reCaptcha human verification
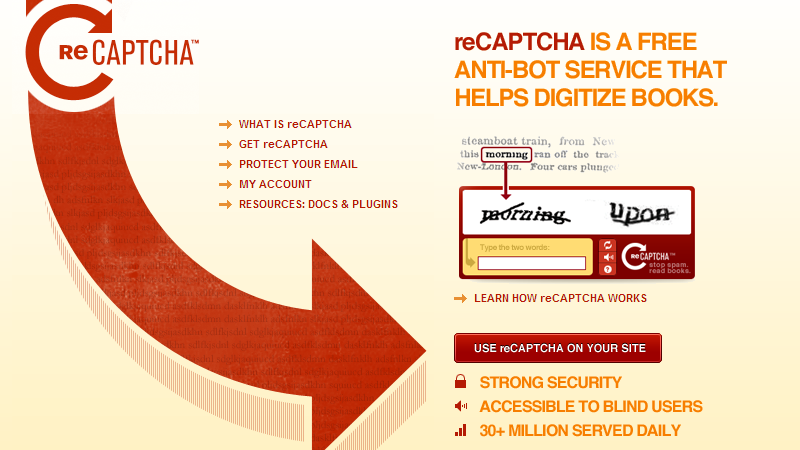
In order to increase the security and to prevent spam bots to create fake profiles on your Social Community you will need to take advantage of the reCaptcha human verification service. Boonex Dolphin comes fully integrated with that service and the only thing you will need to do is to enable it.
To enable reCaptcha in Dolphin, you will need to:
- Step 1: Generate the Required Keys
- Step 2: Activate reCaptcha in Dolphin
Step 1 Generate the Required Keys
First before you can begin configuring the feature you will need to have the appropriate keys issued. When we say keys we mean two randomly generated strings called Public and Private key. These should be generated at:
https://www.google.com/recaptcha
There you should click on the “USE reCAPTCHA ON YOUR SITE” button and then on the next page the “Sign up Now” button which will lead to the “Create a reCAPTCHA key” page.
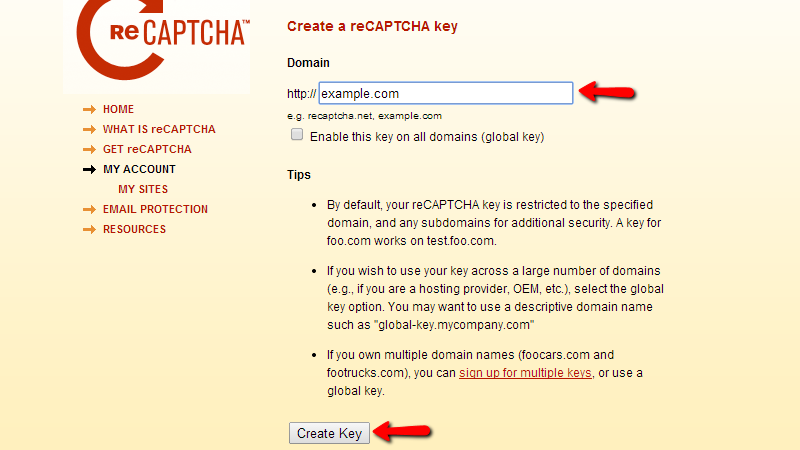
On this page you should enter the domain name of your Social Community and press the Create Key button at the bottom of the form.
This action will generate the required keys which you will be presented with on the next page.
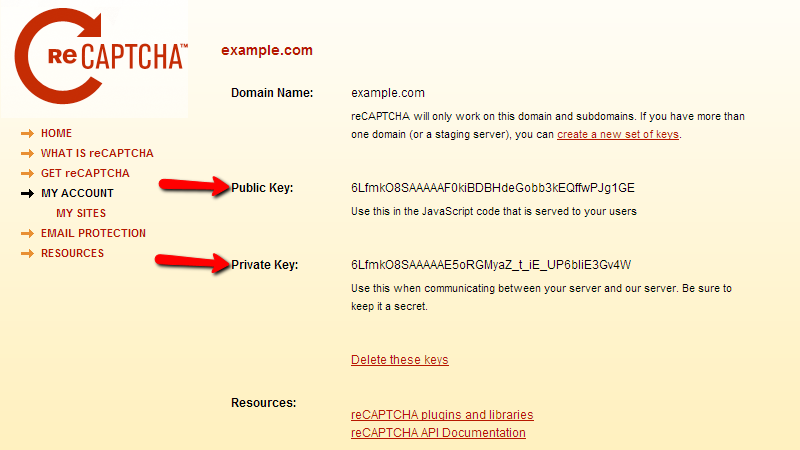
Please copy these keys on a save location for further use.
Step 2 Activate reCaptcha in Dolphin
Now that you have the keys generated it is time to activate those. In order to do so you will need to login into the administration area of your website and navigate to Settings>Advanced Settings.
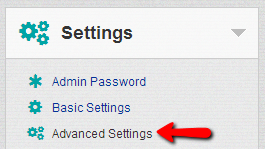
On that page under the Security section you will notice the two fields “ReCAPTCHA Public Key” and “ReCAPTCHA Private Key”.
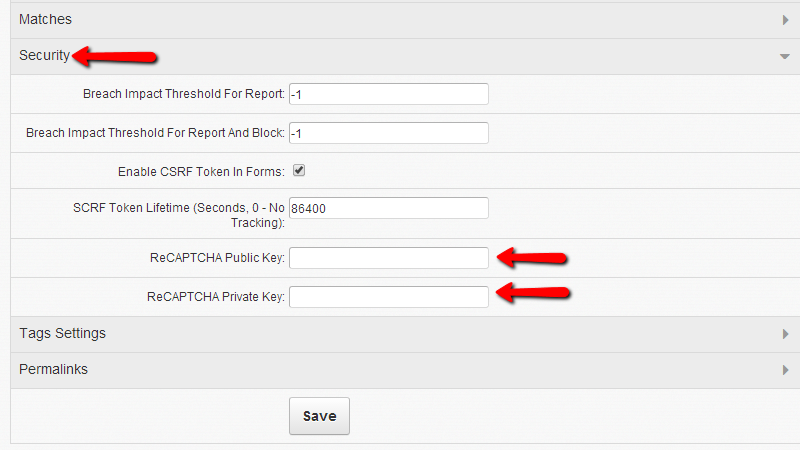
You will need to fill those fields with the keys you have generated earlier and once you are ready to click the Save button.
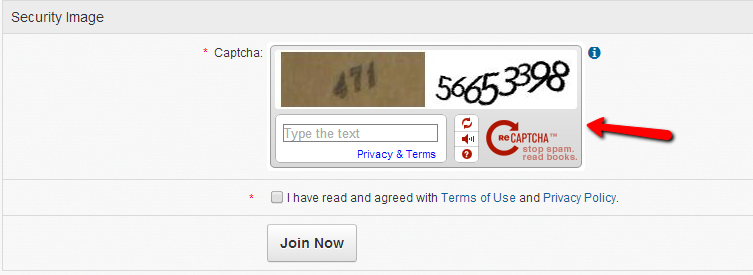
That’s it! You have now fully functional reCAPTCHA human verification enabled and you should be able to verify the feature on the Sign Up page of your Social Community.
Configuring the profile privacy settings
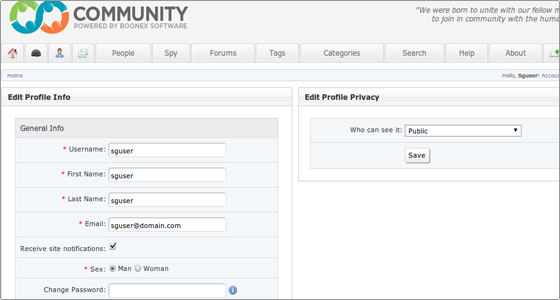
Securing your profile is maybe the most important thing not only for the members of your social community but also to you as administrator of the website. The security offered by the Boonex Dolphin platform is actually a simple restriction to the other members of the website to view your profile and it can be successfully used if you would like to hide a specific piece of information or if you would like to provide concrete group of users only with the option to view that information.Since this is a profile setting you will need to edit your profile. This can be achieved if you login into the frontend of your Social Community and navigate to Profile > Edit.

On the right side of the Edit Profile Info page you should be able to notice the Edit Profile Privacy block. In that block there is a single drop down menu containing the user levels allowed to see your profile:
- Me Only – Your profile will be visible only for you and for no one else
- Public – Your profile will be globally visible to both registered and not registered members
- Members – Your profile will be visible only for members of your social community
- Friends – Your profile will be visible only to users included in your Friend list
Once you select the desired privacy level please use the Save button in order to save the changes for your Profile.

Congratulations! Now you know how to edit the privacy settings for your profile.
Dolphin user account
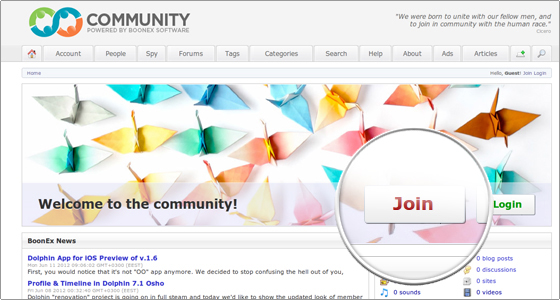
A new Dolphin user can be registered by clicking on the Join link, located on the main page.
Next, the visitor should fill in all the required details regarding the future profile.
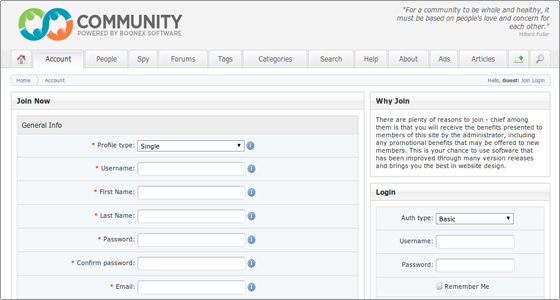
Once the above step is completed, the future member should click on the Join Now button to finish the registration.
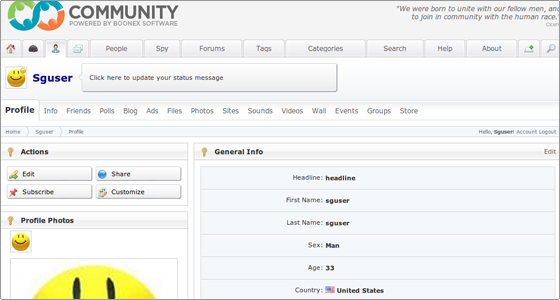
Click on the Login link. Next, enter the login details and start customizing your profile in the Dashboard area.
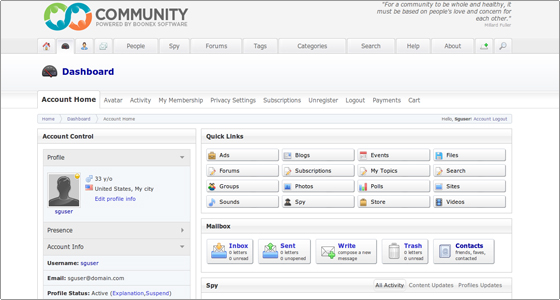
In order to edit the account details navigate to Account Home->Edit Profile Info.
Once you are ready, click on the Save button to keep the changes.
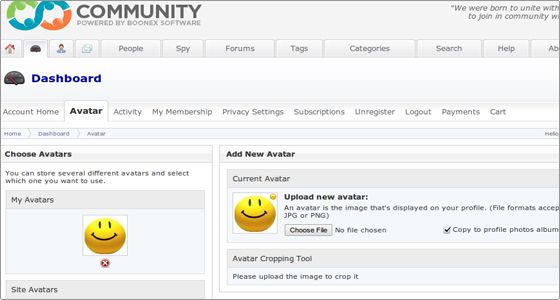
The profile photos can be uploaded and changed from the Avatar section.
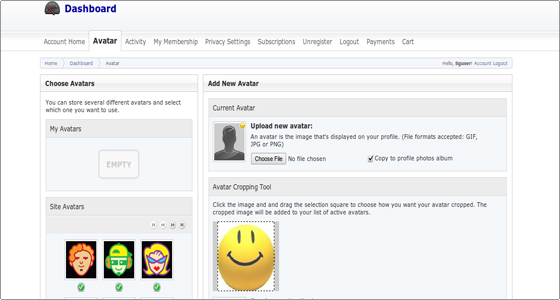
Browse the avatar image, crop it if necessarily and click on the Add Avatar button.
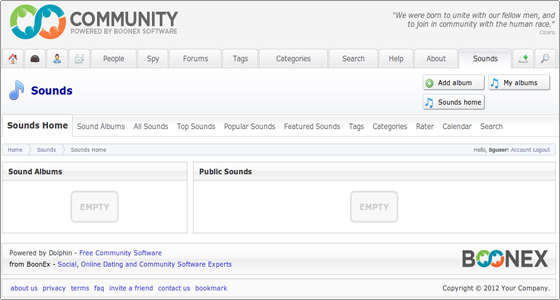
In the Sounds section you can upload an audio file (for example a .mp3 file) and it will be associated with your profile.
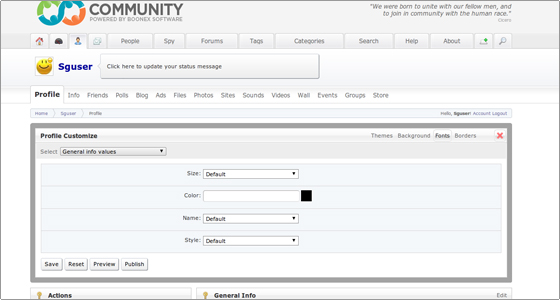
In the Profile section you can customize your profile by clicking on the Customize button.
You have the option to tune the used fonts, the borders, the background color and upload a background image.
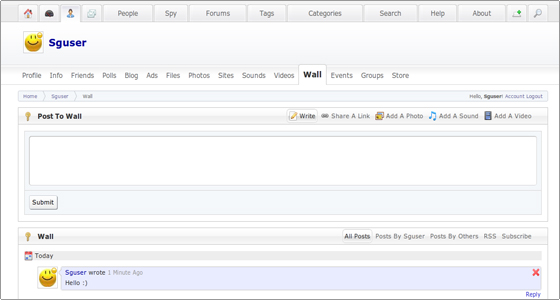
The Wall section allows you to post entries that will be visualized in your profile.
Dolphin User Search
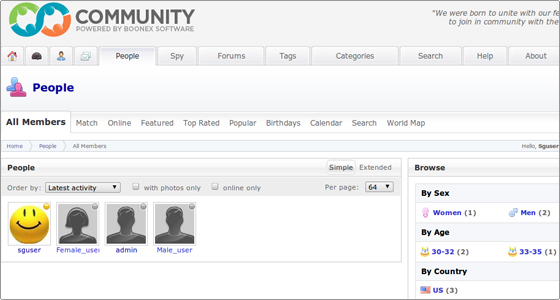
Once you create a new user account you will want to search for other users with similar interests.Login as a member and navigate to the People -> All Members area.
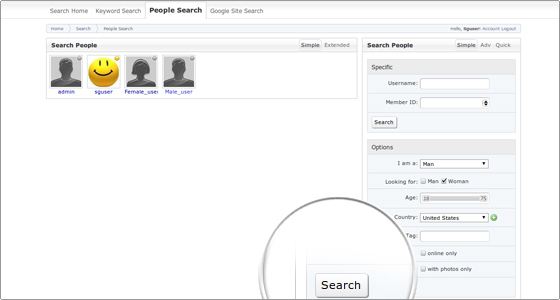
Start your search for the matching members with the the preferred profile characteristics from People -> Search. You can perform simple, advanced and quick searches.
Besides listing all the users and searching for the ones that match your criteria you can get only the online members from the People ->Online area.
In the Profile -> Friends area you can find a list with your virtual friends.
Once you find your match you can add her/him to your friends list by opening the member’s profile and clicking on the Befriend link. You can rate the members’ profiles using the Rate Profile option.
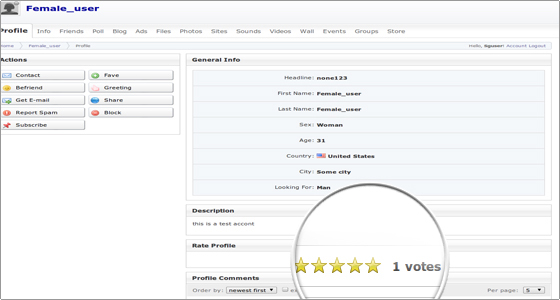
Additionally you can send a letter to your friend through the corresponding tool. You can add the user to the hot list by clicking on the Fave link. Also, you can send a greeting, get an e-mail with the other user’s contact information, check the profile photos, videos and music, share the profile details with another friend, report the member, block him/her or subscribe for the activities of this member.
In this page of our Dolphin tutorial you will learn how to manage the content as a member of a Dolphin community web site.
User Content Management
Let us start with the ways the users upload their content.Once a user logs in the Dolphin web site, he/she can upload photos, video and music, add blogs, articles, events, polls and posts in the forum. Also, the user can draw a picture on the board.
Photos
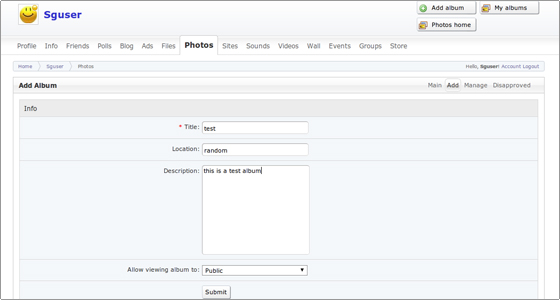
We will start with the Photos tools.First, you need to upload photos. This can be completed in the Photos tab.
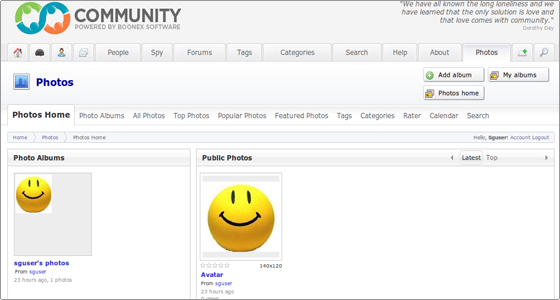
Create a new album through Add album.
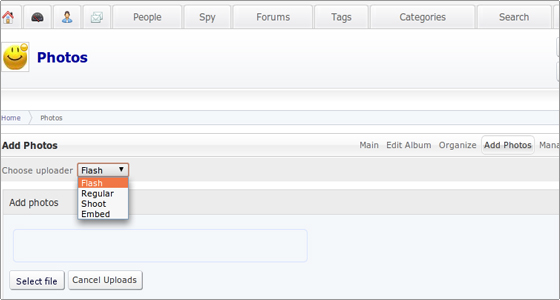
Then you can proceed with the photo upload. Pick the uploader option from the corresponding drop-down menu.
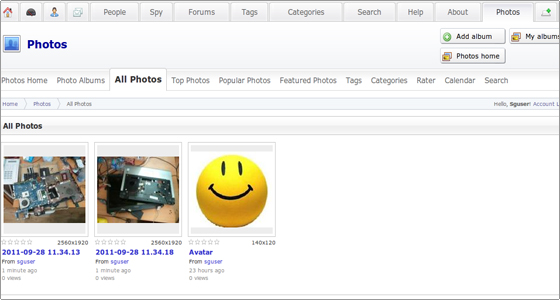
If you want to list the photos uploaded through your profile, navigate to the All Photos tab.
The most popular and the top rated photos can be found in the Popular Photos and the Top Photos tabs.
Videos
The tools located in this category have the same functionality as the above ones. However, instead of images they work with video files.

Once you upload a video file, you can play it.
Sounds
The Sounds tools also work in the same way as the Photos and the Videos tools.
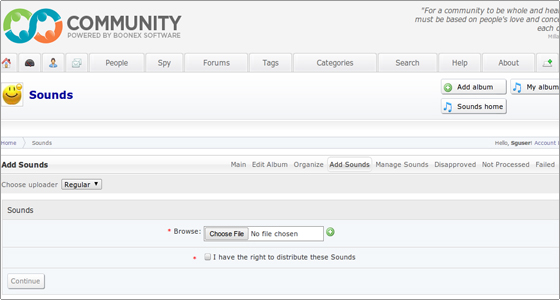
After the uploading the audio file can be played.
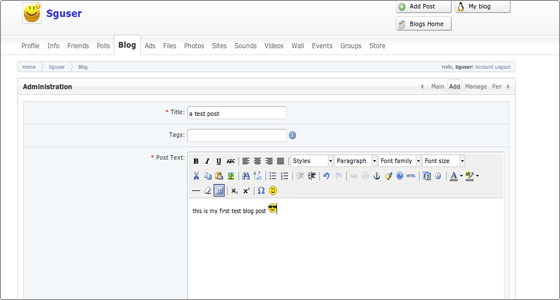
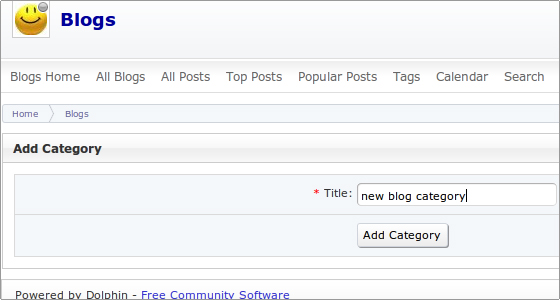
Blogs
In the Blog area you can list all the blogs and posts, check the top ones, create and manage your blog, add categories and posts.
Using the Add Category tool you can add a new category to your blog.
A new post can be added through the Add Post tool.
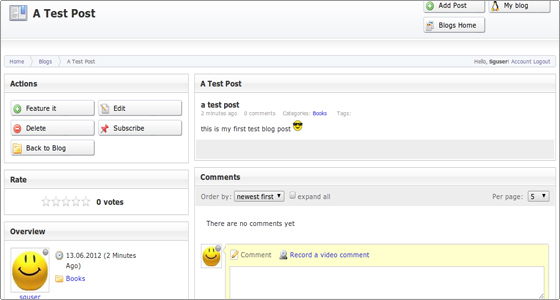
With this tool you can create and manage your blog. You can add, edit and delete posts, alter the description, manage the categories and tags.
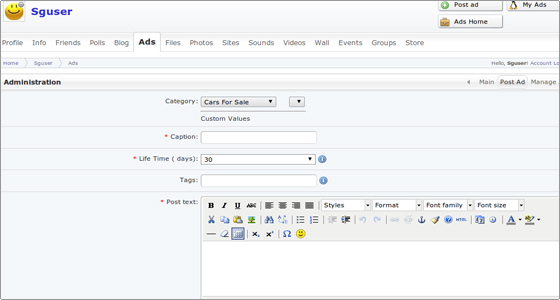
Ads
In the Ads section you can add, delete, view and manage advertisements.
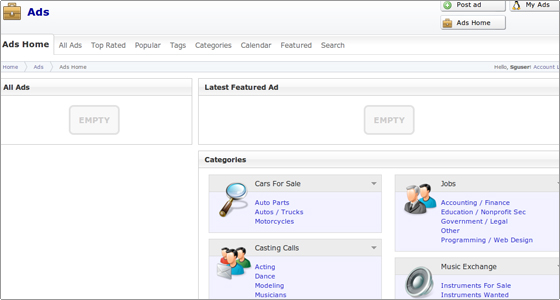
The classified advertisements are separated in different categories. You can add new advertisement through the Post ad button.
In the Manage Ads -> My Ads area you can view all the entries made through your user’s account.
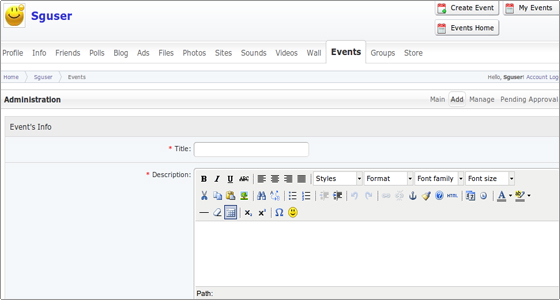
Events
In the Events area you can set different events, manage them, check the calendar for upcoming events, search and list all the events.You can add a new event using the Create Event button. There you enter the title, the tags and the description. You define the place where the event will be held and the exact date. Additionally, you can attach an event photo.
In the Calendar section you will find a calendar with all the events. You can use the Search tool to show all the events or the ones filtered by a country.
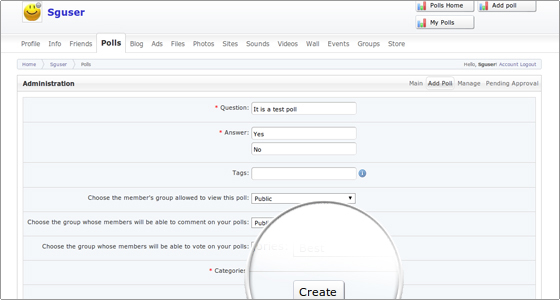
Polls
In the Polls -> All Polls section you can list all the polls created by the web site members. The Add Poll section allows you to create your own polls, entering the question and the possible answers. Also, you can manage and delete polls.
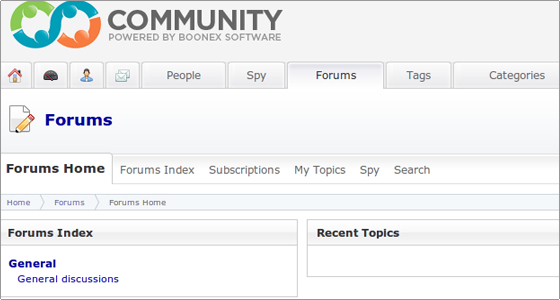
Forums
In the Forums section you can use the Search tool to look for a defined topic.
In the Forums section you can enter forum topics or post under other forums entries.
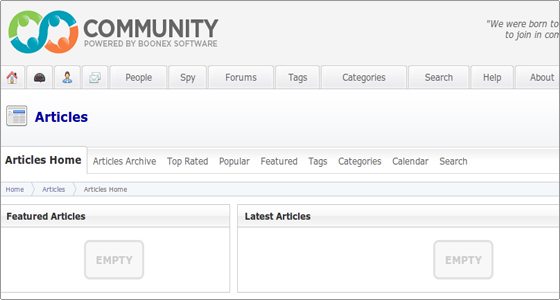
Articles
In the Articles section you can list and manage the existing articles or add new ones.
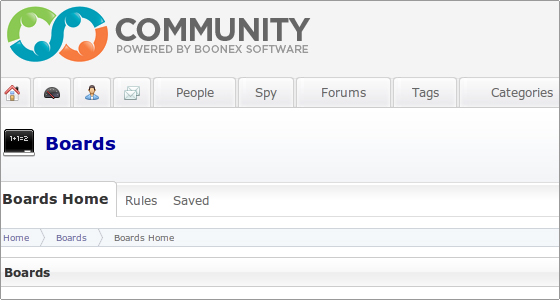
Board
In the Boards section you can draw a picture and share it with the other members who are logged in the same board area.
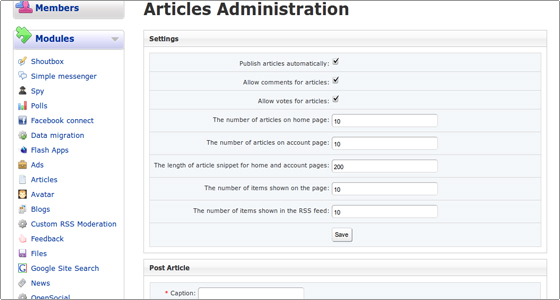
Administrator Articles Management
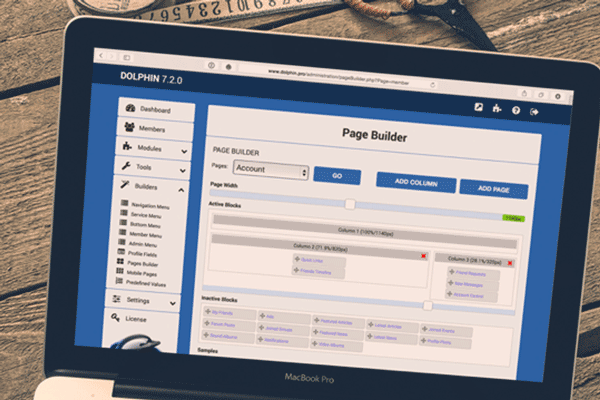
From the administrator point of view the web site articles can be managed through the Dolphin Admin area -> Modules -> Articles.
-Dolphin is the world’s most advanced community software. Open-source, independent, downloadable, scalable, customizable, full-featured, free software for building social networks, dating sites and web-communities.
Home
Page builder
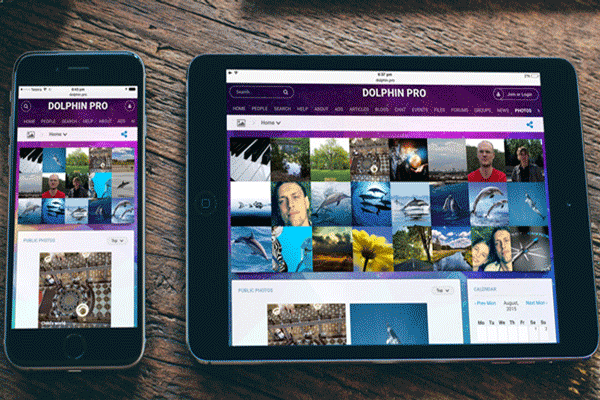
Home page Mobile view

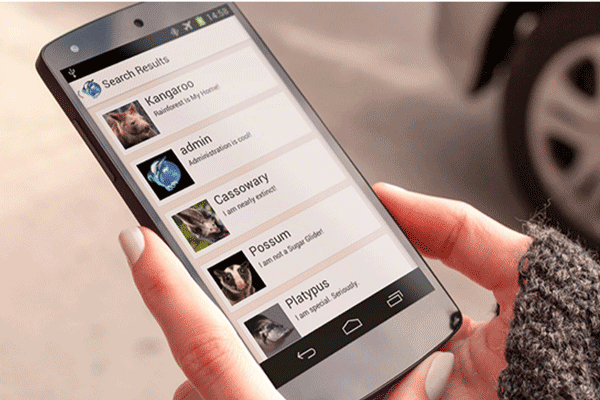
Search Result
Tablet view
Loaded with video chat, recorder, video player, forums, groups, events, video messenger, mailbox, desktop app, video sharing, photo sharing, iPhone app and much more. Build your own business or advance your hobby with Dolphin!Dolphin is free software. This work is licensed under a Creative Commons Attribution 3.0 License.
Features
Dolphin Management Features
- On-premises and cloud-based
- Data and images connection
- Multiple offices support
- Data and image conversion
- Customizable reports
- Treatment cards
- Scheduling
- Remote multi-location connectivity
- Windows Terminal Services and Citrix MetaFrame support
- Remote pre-training
- Data conversion verification
- Automatic software updates
- Fingerprint and location based security
- Form sharing
- Patient database
- Appointment reminders
- E-signatures
- Document organizer
- Patient tracking and correspondence
- Referral analysis
-Create Your Own Community Website
The power-packed features offered by Dolphin enable you to create a great community website on your own terms. You can create a community website with biggies like YouTube, MySpace, Flickr and Facebook. Dolphin is fully customizable and you get complete control over it. If you are working with Dolphin, there can be no limitations to your imagination. Dolphin community builder is free and open source through which you can create any type of online community.
-A Variety Of Features In One Software
Dolphin offers online dating software, social networking software and advanced content management system all in one. Therefore, with Dolphin, you can create any type of website you want. Dolphin comprises of all the features of dating scripts.
-Open Source
As the Dolphin software is open source, you get access to a huge community. Dolphin offers simple and sophisticated tools for building your own community website. With Dolphin, you have the freedom to enhance your imagination and explore the complete potential of a huge community with over 50,000 members.
-Create Various Types Of Websites
With Dolphin you can create forums, photo galleries, video galleries, music database, blogs, polls, events, groups, chats, messenger boards, design templates and design languages. Dolphin is one of a kind when it comes to the features offered. Dolphin offers powerful builders and admin tools through which you can enhance your website features and make it more impressive. You can also add extensions from third party providers.
-Major Features of Dolphin
Create your own kick-ass community site!
YouTube, MySpace, Odeo, Flickr, Match and Facebook – all in one, customizable and under your full control. You’re limited only by your imagination – not by software. Dolphin Smart Community Builder is a universal, free, open source software that allows you to build any kind of online community. With a huge variety of features & options, you can quickly launch your very unique and successful website.
Online dating software, social networking software and an advanced CMS – all in one, all finely tuned.
Create dating sites, social networks, video sharing portals – you name it. Dolphin includes all the features of dating scripts and adds more. You just build the site of your dreams and deploy it instantly with the ease and elegance that only Dolphin can provide. For Free.
Open source. Open community. Open borders.
Dolphin provides simple yet sophisticated tools to build your own community site, but you can go further with the power of open source and a large, helpful and active community with over 50,000 members – BoonEx Unity.
Forums, Photos, Video, Music, Blogs, Polls, Events, Groups, Chat, Messenger, Boards, Design Templates and Languages!
When it comes to features, nothing comes close to Dolphin. Moreover, with our renowned “Builders” and powerful admin tools you can mix’n’twist site features, navigation, design and text to make it truly unique. You can go further by adding Extensions from 3rd party providers available at BoonEx Unity.
videos
Dolphin
External embedded media removed for production hardening.
