1-click AWS Deployment 1-click Azure Deployment 1-click Google Deployment
Overview
Apache is the most extensively used web server software. It is developed and preserved by Apache Software Foundation; Apache is an open source software available for free. It is debauched, consistent, and secure. It is highly customised to meet the requirements of many different environments by using extensions and modules. Most WordPress hosting providers use Apache as their web server software. Though, WordPress can run on other web server software also.
What is Apache Web Server?
Apache HTTP Server is a free and open-source web server that delivers web content through the internet. It is commonly referred to as Apache and after development, it quickly became the most popular HTTP client on the web. It’s widely thought that Apache gets its name from its development history and process of improvement through applied patches and modules but that was corrected back in 2000. It was revealed that the name originated from the respect of the Native American tribe for its resiliency and durability.
What is a Web Server?
File servers, database servers, mail servers, and web servers use different kinds of server software. Each of these applications can access files stored on a physical server and use them for different purposes.
The job of a web server is to serve websites on the internet. To achieve that goal, it acts as a middleman between the server and client machines. It pulls content from the server on each user request and delivers it to the web.
The biggest challenge of a web server is to serve many different web users at the same time — each of whom is requesting different pages. Web servers process files written in different programming languages such as PHP, Python, Java, and others.
They turn them to static HTML files and serve these files in the browser of web users. When you hear the word web server, think of it as the tool responsible for the proper server-client communication.
A web server is like a restaurant host. When you arrive in a restaurant, the host greets you, checks your booking information and takes you to your table. Similar to the restaurant host, the web server checks for the web page you have requested and fetches it for your viewing pleasure. However, A web server is not just your host but also your server. Once it has found the web page you requested, it also serves you the web page. A web server like Apache, is also the Maitre D’ of the restaurant. It handles your communications with the website (the kitchen), handles your requests, makes sure that other staff (modules) are ready to serve you. It is also the bus boy, as it cleans the tables (memory, cache, modules) and clears them for new customers.
So a web server is the software that receives your request to acess a web page. It runs a few security checks on your HTTP request and takes you to the web page. Depending on the page you have requested, the page may ask the server to run a few extra modules while generating the document to serve you. It then serves you the document you requested.
How Does Apache Web Server Work?
Although we call Apache a web server, it is not a physical server, but rather a software that runs on a server. Its job is to establish a connection between a server and the browsers of website visitors (Firefox, Google Chrome, Safari, etc.) while delivering files back and forth between them (client-server structure). Apache is a cross-platform software; then, it works on both Unix and Windows servers.
When a visitor wants to load a page on your website, for instance, the homepage or your “About Us” page, their browser sends a request to your server and Apache returns a response with all the requested files (text, images, etc.). The server and the client communicate through the HTTP protocol and Apache is responsible for the smooth and secure communication between the two machines.
Apache is highly customizable, as it has a module-based structure. Modules allow server administrators to turn additional functionalities on and off. Apache has modules for security, caching, URL rewriting, password authentication, and more. You can also set up your own server configurations through a file called .htaccess, which is an Apache configuration file supported with all Hostinger plans.
Web Application Architecture
Apache is just one component that is needed in a web application stack to deliver web content. One of the most common web application stacks involves LAMP, or Linux, Apache, MySQL, and PHP.
Linux is the operating system that handles the operations of the application. Apache is the web server that processes requests and serves web assets and content via HTTP. MySQL is the database that stores all your information in an easily queried format. PHP is the programming language that works with apache to help create dynamic web content.
While actual statistics may vary, it’s fair to say a large portion of web applications run on some form of the LAMP stack because it is easy to build and also free to use. For the most part, web applications tend to generally have similar architecture and structure even though they serve many different functions and purposes. Most web applications also benefit from Firewalls, Load Balancers, Web Servers, Content Delivery Networks, and Database Servers.
Firewalls help protect the web application from both external threats and internal vulnerabilities depending on where the firewalls are configured. Load Balancers help distribute traffic across the web servers which handle the HTTP(S) requests (this is where Apache comes in) and application servers (servers that handle the functionality and workload of the web app.) We also have Database Servers, which handle asset storage and backups. Depending on your infrastructure, your database and application can both live on the same server although it’s recommended to keep those separate.
Web Server Landscape
The internet is comprised of many different technologies and not all of them are the same. While Apache is arguably one of the most popular web servers out there on the net, there are many other players and the landscape is always changing. Back in the late 90s and early 2000s, Apache’s dominance was very strong, serving over 50% of the internet’s active websites. Microsoft’s IIS (Internet Information Services) was also an option but not nearly as popular.
Today, Apache still serves a large portion of the active websites but their share of the field has shrunk from 50% to just under 40% as of 2018 and NGINX, a relatively new player to the web server playing field, is in second place with roughly 35% and Microsoft IIS hovering around 8-10%. Every year there’s a new crop of web applications with new stacks and servers so the landscape is always changing.
Why Apache?
Apache is considered open source software, which means the original source code is freely available for viewing and collaboration. Being open source has made Apache very popular with developers who have built and configured their own modules to apply specific functionality and improve on its core features. Apache has been around since 1995 and is responsible as a core technology that helped spur the initial growth of the internet in its infancy.
One of the pros of Apache is its ability to handle large amounts of traffic with minimal configuration. It scales with ease and with its modular functionality at its core, you can configure Apache to do what you want, how you want it. You can also remove unwanted modules to make Apache more lightweight and efficient.
Some of the most popular modules that can be added are SSL, Server Side Programming Support (PHP), and Load Balancing configs to handle large amounts of traffic. Apache can also be deployed on Linux, MacOS, and Windows. If you learn how to configure Apache on Linux, you can administer Apache on Windows and Mac. The only difference would be directory paths and installation processes.
How does Apache Work?
Apache functions as a way to communicate over networks from client to server using the TCP/IP protocol. Apache can be used for a wide variety of protocols, but the most common is HTTP/S. HTTP/S or Hyper Text Transfer Protocol (S stands for Secure) is one of the main protocols on the web, and the one protocol Apache is most known for.
HTTP/S is used to define how messages are formatted and transmitted across the web, with instructions for browsers and servers on how to respond to various requests and commands. Hypertext Transfer Protocol Secure is usually through port 443 with the unsecured protocol being through port 80.
The Apache server is configured via config files in which modules are used to control its behavior. By default, Apache listens to the IP addresses configured in its config files that are being requested. This is where one of Apaches many strengths come into play.
With the Listen directive, Apache can accept and route specific traffic to certain ports and domains based on specific address-port combination requests. By default, Listen runs on port 80 but Apache can be bound to different ports for different domains, allowing for many different websites and domains to be hosted and a single server. You can have domain1.com listening on port 80, domain2.com on port 8080 and domain3.com on port 443 using HTTPS all on Apache.
Once a message reaches its destination or recipient, it sends a notice, or ACK message, basically giving acknowledgment to the original sender that their data has successfully arrived. If there’s an error in receiving data, or some packets were lost in transit, the destination host or client sends a Not Acknowledged, or NAK message, to inform the sender that the data needs to be retransmitted.
Apache Pros and Cons
An Apache web server can be an excellent choice to run your website on a stable and versatile platform. However, it also comes with some disadvantages you need to pay attention to.
Pros:
- Open-source and free, even for commercial use.
- Reliable, stable software.
- Frequently updated, regular security patches.
- Flexible due to its module-based structure.
- Easy to configure, beginner-friendly.
- Cross-platform (works on both Unix and Windows servers).
- Works out of the box with WordPress sites.
- Huge community and easily available support in case of any problem.
Cons:
- Performance problems on extremely traffic-heavy websites.
- Too many configuration options can lead to security vulnerabilities.
Apache operation starts in two phases: start-up and operational. System start-up takes place as root, and includes parsing the configuration file(s), loading modules, and initialising system resources such as log files, shared memory segments, and database connections. For normal operation, Apache relinquishes its system privileges and runs as an unprivileged user before accepting and processing connections from clients over the network. This basic security measure helps to prevent a simple bug in Apache (or a module or script) from becoming a devastating system vulnerability, like those exploited by malware such as “Code Red” and “Nimda” in MS IIS.
This two-stage operation has some implications for applications architecture. First, anything that requires system privileges must be run at system start-up. Second, it is good practice to run as much initialization as possible at start-up, so as to minimize the processing required to service each request. Conversely, because so many slow and expensive operations are concentrated in system start-up, it would be hugely inefficient to try to run Apache from a generic server such as inetd or tcpserver.
One non-intuitive quirk of the architecture is that the configuration code is, in fact, executed twice at start-up (although not at restart). The first time through checks that the configuration is valid (at least to the point that Apache can successfully start); the second pass is “live” and leads into the operational phase. Most modules can ignore this behavior (standard use of APR pools ensures that it doesn’t cause a resource leak), but it may have implications for some modules. For example, a module that dynamically loads new code at start-up may want to do so just once and, therefore, must use a technique such as setting and checking a static flag to ensure that critical initialization takes place just once.
Operational Phase
At the end of the start-up phase, control passes to the Multi-Processing Module The MPM is responsible for managing Apache’s operation at a systems level. It typically does so by maintaining a pool of worker processes and/or threads, as appropriate to the operating system and other applicable constraints (such as optimization for a particular usage scenario). The original process remains as “master,” maintaining a pool of worker children. These workers are responsible for servicing incoming connections, while the parent process deals with creating new children, removing surplus ones as necessary, and communicating signals such as “shut down” or “restart.”Because of the MPM architecture, it is not possible to describe the operational phase in definite terms. Whereas the standard MPMs use worker children in some manner, they are not constrained to work in only one way. Thus another MPM could, in principle, implement an entirely different server architecture at the system level.
Shutdown
There is no shutdown phase as such. Instead, anything that needs be done on shutdown is registered as a cleanup, When Apache stops, all registered cleanups are run.
Multi-Processing Modules
At the end of the start-up phase, after the configuration has been read, overall control of Apache passes to a Multi-Processing Module. The MPM provides the interface between the running Apache server and the underlying operating system. Its primary role is to optimize Apache for each platform, while ensuring the server runs efficiently and securely.As indicated by the name, the MPM is itself a module. But the MPM is uniquely a systems-level module Also uniquely, every Apache instance must contain exactly one MPM, which is selected at build-time.
Basic Concepts and Structures
To work with Apache as a development platform, we need an overview of the basic units of webserver operation and the core objects that represent them within Apache. The most important are the server, the TCP connection, and the HTTP request. A fourth basic Apache object, the process, is a unit of the operating system rather than the application architecture. Each of these basic units is represented by a core data structure defined in the header file httpd.h and, like other core objects we encounter in applications development, is completely independent of the MPM in use.
How to Install Apache Web Server on Windows
Step 1: configure IIS, Skype and other software (optional)
If you have a Professional or Server version of Windows, you may already have IIS installed. If you would prefer Apache, either remove IIS as a Windows component or disable its services.Apache listens for requests on TCP/IP port 80. The default installation of Skype also listens on this port and will cause conflicts. To switch it off, start Skype and choose Tools > Options > Advanced > Connection. Ensure you untick “Use port 80 and 443 as alternatives for incoming connections”.
Step 2: download the files
We are going to use the unofficial Windows binary from Apache Lounge. This version has performance and stability improvements over the official Apache distribution, although I am yet to notice a significant difference. However, it is provided as a manually installable ZIP file from www.apachelounge.com/download/ .You should also download and install the Windows C++ runtime from Microsoft.com. You may have this installed already, but there is no harm installing it again.As always, remember to virus scan all downloads.
Step 2: extract the files
We will install Apache in C:Apache2, so extract the ZIP file to the root of the C: drive.
Apache can be installed anywhere on your system, but you will need to change the configuration file paths accordingly…
Step 3: configure Apache
Apache is configured with the text file confhttpd.conf contained in the Apache folder. Open it with your favourite text editor.
Note that all file path settings use a ‘/’ forward-slash rather than the Windows backslash. If you installed Apache anywhere other than C:Apache2, now is a good time to search and replace all references to “c:/Apache2”.
There are several lines you should change for your production environment:
Line 46, listen to all requests on port 80:
Listen *:80Line 116, enable mod-rewrite by removing the # (optional, but useful):
LoadModule rewrite_module modules/mod_rewrite.soLine 172, specify the server domain name:
ServerName localhost:80Line 224, allow .htaccess overrides:
AllowOverride AllStep 4: change the web page root (optional)
By default, Apache return files found in its htdocs folder. I would recommend using a folder on an another drive or partition to make backups and re-installation easier. For the purposes of this example, we will create a folder called D:WebPages and change httpd.conf accordingly:
Line 179, set the root:
DocumentRoot "D:/WebPages"and line 204:
<Directory "D:/WebPages">Step 5: test your installation
Your Apache configuration can now be tested. Open a command box (Start > Run > cmd) and enter:
cd Apache2bin
httpd -t
Correct any httpd.conf configuration errors and retest until none appear.
Step 6: install Apache as a Windows service
The easiest way to start Apache is to add it as a Windows service. From a command prompt, enter:
cd Apache2bin
httpd -k install
Open the Control Panel, Administrative Tools, then Services and double-click Apache2.2. Set the Startup type to “Automatic” to ensure Apache starts every time you boot your PC.
Alternatively, set the Startup type to “Manual” and launch Apache whenever you choose using the command “net start Apache2.2”.
Step 7: test the web server
Create a file named index.html in Apache’s web page root (either htdocs or D:WebPages) and add a little HTML code:
<html>
<head><title>testing Apache</title></head>
<body><p>Apache is working!</p></body>
</html>
Ensure Apache has started successfully, open a web browser and enter the address http://localhost/. If all goes well, your test page should appear.
In general, most problems will be caused by an incorrect setting in the httpd.conf configuration file
—
This version of Apache is latest GA release of the new generation 2.4.x branch of Apache HTTPD . The Apache HTTPD package contains an open-source HTTP server.
Apache 2.4.x is the most widely used web server software. Developed and maintained by Apache Software Foundation,
Apache 2.4.x is an open source software available for free. It runs on 67% of all web servers in the world. It is fast, reliable, and secure. It can be highly customized to meet the needs of many different environments by using extensions and modules. Most WordPress hosting providers use Apache as their web server software. However, WordPress can run on other web server software as well.
PHP 5.6.x is a server scripting language, and a powerful tool for making dynamic and interactive Web pages. PHP 5.6.x is most commonly used PHP version and it comes tagged with some exclusive features and some backward incompatible changes for improvements.
PHP 7.1.x has introduced a new pseudo-type that is similar to callable. It can be used in parameter and return type. It accepts either, arrays or objects, that implement Traversable interface.
- PHP runs on various platforms (Windows, Linux, Unix, Mac OS X, etc.)
- PHP is compatible with almost all servers used today (Apache, IIS, etc.)
- PHP supports a wide range of databases
- PHP is free. Download it from the official PHP resource: www.php.net
- PHP is easy to learn and runs efficiently on the server side
- PHP can generate dynamic page content
- PHP can create, open, read, write, delete, and close files on the server
- PHP can collect form data
- PHP can send and receive cookies
- PHP can add, delete, modify data in your database
- PHP can be used to control user-access
- PHP can encrypt data
With PHP you are not limited to output HTML. You can output images, PDF files, and even Flash movies. You can also output any text, such as XHTML and XML.
PHP is a widely-used, free, and efficient alternative to competitors such as Microsoft’s ASP.
While Apache is a free and updated product, it doesn’t skimp on features. In fact, it’s one of the most feature-filled HTTP web servers available, which is another reason it’s so popular.
Modules are used to add more functions to the software; password authentication and digital certificates are supported; you can customize error messages; one Apache install can deliver multiple websites with its virtual hosting capabilities; proxy modules are available; it supports SSL and TLS, and GZIP compression to speed up web pages.
Features
Features
Apache is a powerful Web server program with features that compare to its high-priced competitors. The software includes an administration control panel, customizable error messages and authentication schemes. The virtual hosting module allows you to run multiple websites from the same server. In addition to the these and other standard features that are included in the installation package, such as Domain Name Service, Simple Mail Transfer Protocol (SMTP) and File Transfer Protocol (FTP), there are numerous third-party add-ons you can install to customize your Web server. The vibrant Apache developer community also produces frequent updates so you always have access to the latest features and security patches.
Price
Apache Web Server is open source software, which means it is available for anyone to download at no cost. Its source code can be modified to suit your individual needs. This gives Apache a significant advantage over almost all of its competitors without sacrificing any features. The open source status also eliminates the recurring license and support fees required to continue running other Web server programs
Compatibility
Apache is compatible with numerous hardware configurations and operating systems. It runs on Linux, Windows NT, MacOS, Unix and many other systems. Each installation can be tweaked to suit the technical capabilities of your hardware. Apache includes support for programming languages such as PHP, Perl and Python, among many others, along with SSL and TSL encryption for websites that require elevated security.
Technical Support
Technical support resources for Apache are available on multiple websites around the world. This allows server owners to access reference articles and live help whenever necessary. This gives Apache a major advantage over programs that only have a company website as a source of support. When a new bug is found, the open source user community typically creates a patch to fix it and posts the solution for free on forums and social media websites.
Apache features configurable error messages, DBMS-based authentication databases, content negotiation and supports several graphical user interfaces (GUIs).It supports password authentication and digital certificate authentication. Because the source code is freely available, anyone can adapt the server for specific needs, and there is a large public library of Apache add-ons
A more detailed list of features is provided below:
- Loadable Dynamic Modules
- Multiple Request Processing modes (MPMs) including Event-based/Async, Threaded and Prefork.
- Highly scalable)
- Handling of static files, index files, auto-indexing and content negotiation
- .htaccessper-directory configuration support
- Reverse proxy with caching
- Load balancing with in-band health checks
- Multiple load balancing mechanisms
- Fault tolerance and Failover with automatic recovery
- WebSocket, FastCGI, SCGI, AJP and uWSGI support with caching
- Dynamic configuration
- TLS/SSL with SNI and OCSP stapling support, via OpenSSL or wolfSSL.
- Name- and IP address-based virtual servers
- IPv6-compatible
- HTTP/2 support
- Fine-grained authentication and authorization access control[23]
- gzip compression and decompression
- URL rewriting[
- Headers]and content rewriting
- Custom logging with rotation
- Concurrent connection limiting
- Request processing rate limiting
- Bandwidth throttling
- Server Side Includes
- IP address-based geolocation
Major Features of Apache Web Server
- Apache server is an open source web server.
- It can be installed on all operating systems like Linux, Windows, Unix, FreeBSD, Solaris, Mac OS X etc.
- It is a powerful, flexible, HTTP/1.1 compliant web server.
- This server is highly configurable and extensible with third party modules.
- It provides complete source code and comes with an unrestricted license.
- Apache supports some of the capabilities like CGI (Common Gateway Interface) and SSI (Server Side Includes), URL redirection, loading modules support, user authentication, proxy caching abilities etc.
AWS
Installation Instructions For CentOS
Note: How to find PublicDNS in AWS
Step 1) SSH Connection: To connect to the deployed instance, Please follow Instructions to Connect to CentOS instance on AWS Cloud
1) Download Putty.
2) Connect to the virtual machine using SSH key Refer this link:
- Hostname: PublicDNS / IP of machine
- Port : 22
Note: To get started follow the instructions in the file /etc/httpd/conf.d/welcome.conf
You may add your website content to the directory /var/www/html/ or set up custom path
Get PHP info with php -v and php -m
Azure
Installation Instructions For Ubuntu
Note : How to find PublicDNS in Azure
Step 1) SSH Connection: To connect to the deployed instance, Please follow Instructions to Connect to Ubuntu instance on Azure Cloud
1) Download Putty.
2) Connect to virtual machine using following SSH credentials :
- Hostname: PublicDNS / IP of machine
- Port : 22
Username: Your chosen username when you created the machine ( For example: Azureuser)
Password : Your Chosen Password when you created the machine ( How to reset the password if you do not remember)
Step 2) Application URL: Access the application via a browser at http:/PublicDNS/
Step 3)Other Information:
1. Default installation path: will be on your web root folder “/var/www/html“
2.Default ports:
- Linux Machines: SSH Port – 22
- TCP : 8389
Note: Please allow 8983 port for remote access with http://<yourip>:8983
3. To access Webmin interface for management please follow this link
Configure custom inbound and outbound rules using this link
Installation Instructions For CentOS
Note : How to find PublicDNS in Azure
Step 1) SSH Connection: To connect to the deployed instance, Please follow Instructions to Connect to CentOS instance on Azure Cloud
1) Download Putty.
2) Connect to virtual machine using following SSH credentials :
- Host name: PublicDNS / IP of machine
- Port : 22
Username: Your chosen username when you created the machine ( For example: Azureuser)
Password : Your Chosen Password when you created the machine ( How to reset the password if you do not remember)
Step 2) Application URL: Access the application via a browser at “http:/PublicDNS”
Step 3) Other Information:
1. Default installation path: will be on your web root folder “/var/www/html/”
2.Default ports:
- Linux Machines: SSH Port – 22
- TCP : 8389
Note: Please allow 8983 port for remote access with http://<yourip>:8983
3. To access Webmin interface for management please follow this link
Configure custom inbound and outbound rules using this link
Installation Instructions
Ubuntu
Step 1) VM Creation:
- Click the Launch on Compute Engine button to choose the hardware and network settings.
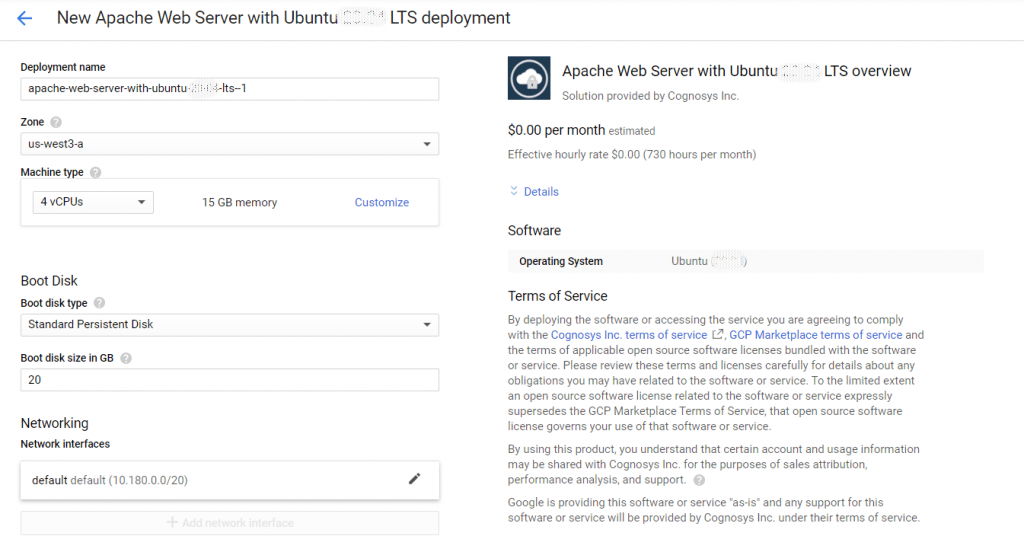
2. You can see at this page, overview of Cognosys Image as well as some estimated costs of VM.
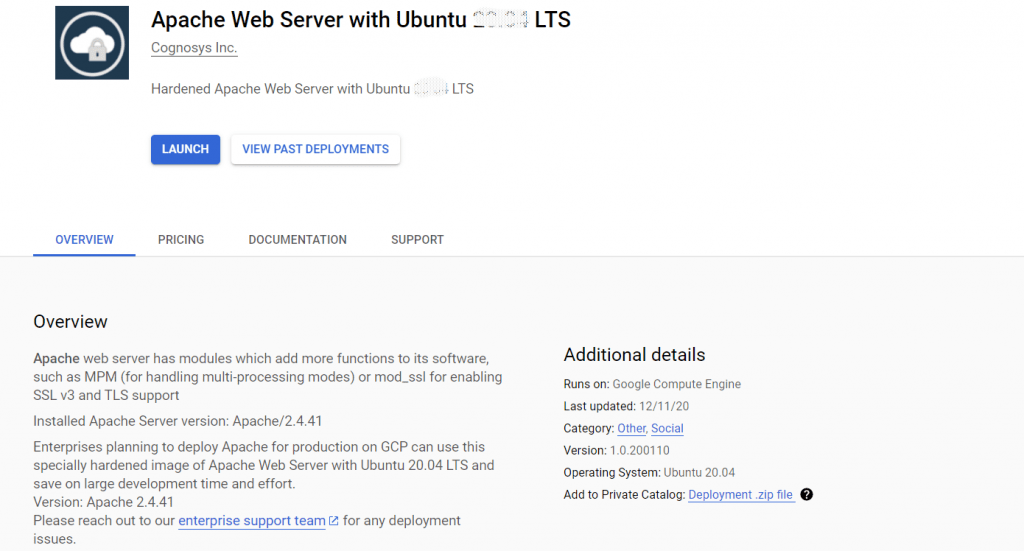 SSH Connection: To connect to the deployed instance, Please follow Instructions to Connect to Ubuntu instance on Google Cloud
1) Download Putty.
2) Connect to virtual machine using following SSH credentials:
- Hostname: PublicDNS / IP of machine
- Port : 22
Step 2) Other Information:
1.Default ports:
- Linux Machines: SSH Port – 22
Apache webroot /var/www/html
Apache configuration files: /etc/apache2/
Apache Default site config: /etc/apache2/sites-available/000-default.conf
To enable rewrite module use sudo a2enmod rewrite
Centos:
Step 1) VM Creation:
- Click the Launch on Compute Engine button to choose the hardware and network settings
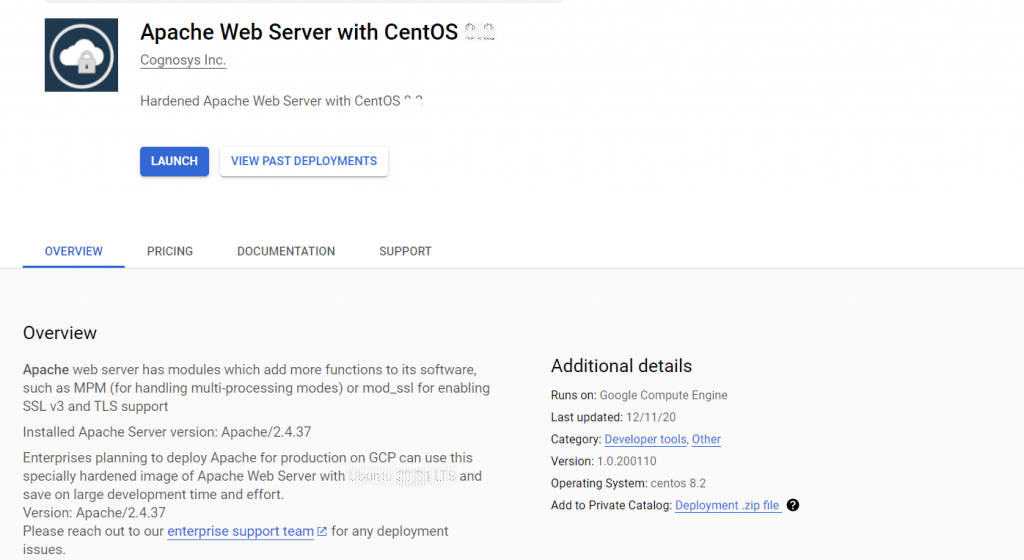
2. You can see at this page, overview of Cognosys Image as well as some estimated costs of VM.
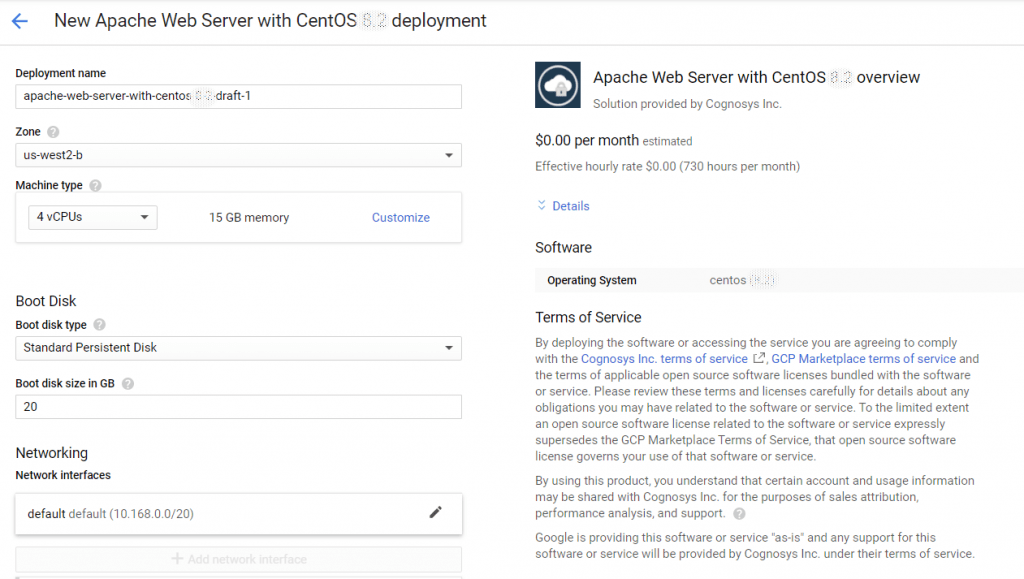
SSH Connection: To connect to the deployed instance, Please follow Instructions to Connect to CentOS instance on Google Cloud
1) Download Putty.
2) Connect to virtual machine using following SSH credentials:
- Hostname: PublicDNS / IP of machine
- Port : 22
Step 2) Other Information:
1.Default ports:
- Linux Machines: SSH Port – 22
Apache webroot /var/www/html
Apache configuration files: /etc/httpd/conf/
Apache Default site config: /etc/httpd/conf/httpd.conf
Videos
Apache Web Server

