1-click AWS Deployment 1-click Azure Deployment
Overview
What is MySQL?
MySQL is the most popular Open Source Relational SQL database management system. MySQL is one of the best RDBMS being used for developing web-based software applications.
MySQL is a fast, easy-to-use RDBMS being used for many small and big businesses. MySQL is developed, marketed, and supported by MySQL AB, which is a Swedish company. MySQL is becoming so popular because of many good reasons:
- MySQL is released under an open source license. So you have nothing to pay to use it.
- MySQL is a very powerful program in its own right. It handles a large subset of the functionality of the most expensive and powerful database packages.
- MySQL uses a standard form of the well-known SQL data language.
- MySQL works on many operating systems and with many languages including PHP, PERL, C, C++, JAVA, etc.
- MySQL works very quickly and works well even with large datasets.
- MySQL is very friendly to PHP, the most appreciated language for web development.
- MySQL supports large databases, up to 50 million rows or more in a table. The default file size limit for a table is 4GB, but you can increase this (if your operating system can handle it) to a theoretical limit of 8 million terabytes (TB).
- MySQL is customizable. The open-source GPL license allows programmers to modify the MySQL software to fit their own specific environments.
What is MYSQL, and why it is a popular choice?
MySQL is an open-source relational database management system (RDBMS) that is widely used for managing and organizing large amounts of structured data. It is one of the most popular database systems in the world and has a strong reputation for reliability, scalability, and ease of use.
Here are some reasons why MySQL is commonly used:
- Relational Database Management System: MySQL follows the relational database model, which allows you to define relationships between different data tables. This makes it easier to organize and retrieve data efficiently.
- Open Source: MySQL is an open-source database, which means it is freely available to use, modify, and distribute. This makes it an attractive option for both small-scale and large-scale projects, as it eliminates licensing costs.
- Performance: MySQL is designed to be fast and efficient. It can handle large volumes of data and perform complex queries quickly. With proper indexing and optimization, MySQL can deliver high performance even with heavy workloads.
- Scalability: MySQL offers excellent scalability options. It can handle increasing amounts of data and traffic without significant performance degradation. It supports replication, which allows you to create multiple copies of your database to distribute the load and improve availability.
- Flexibility: MySQL supports various platforms and operating systems, making it highly flexible. It has connectors and APIs for different programming languages, allowing developers to integrate it seamlessly into their applications.
- Wide Community Support: MySQL has a large and active community of developers and users worldwide. This means there are abundant resources, tutorials, forums, and online documentation available, making it easier to get help, find solutions, and stay updated with the latest developments.
- Compatibility: MySQL is compatible with various operating systems, including Linux, Windows, and macOS. It also supports multiple programming languages and offers standard SQL syntax, making it accessible and familiar to developers.
- Reliability: MySQL is known for its stability and robustness. It has undergone extensive testing and has a proven track record in handling critical data in production environments.
- Security: MySQL provides a range of security features to protect your data. It supports user authentication, access control, encryption, and other mechanisms to ensure the confidentiality and integrity of your data.
How to Install MySQL in Windows Server 2012
Introduction
In this how-to we will walk you through Installing MySQL in Windows Server 2012 using the Microsoft Web Platform Installer (Web PI).
MySQL is database management system that is widely used all over the world for its High-Availability and efficiency, in a number of cloud based companies including Atlantic.Net.
Web PI is tool offered by Microsoft at no cost, facilitating the latest web applications in a single Web Gallery.
Prerequisites
– A Server with Windows Server 2012.
– Microsoft Web Platform Installer (Web PI) Download the latest version in here: http://www.microsoft.com/web/downloads/platform.aspx.
Installing MySQL in Windows Server 2012
Launch the Web PI application by running the wpilauncher.exe file that you downloaded in the preceding section.
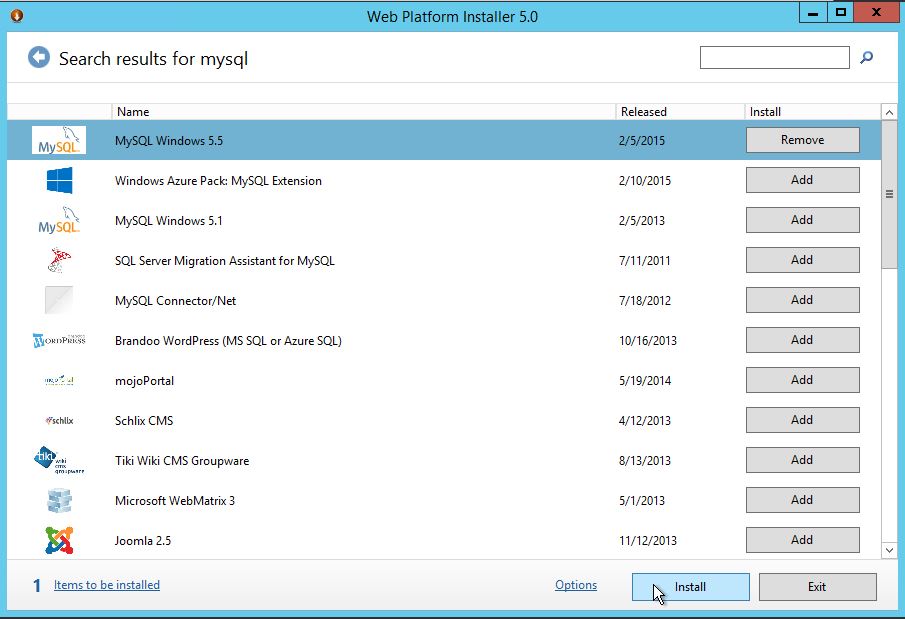
In the Web Platform Installer window, search for MySQL in the search box.
Select the most current version of MySQL Windows or MySQL Windows 5.1 , click Add, and then click Install to start the installation.
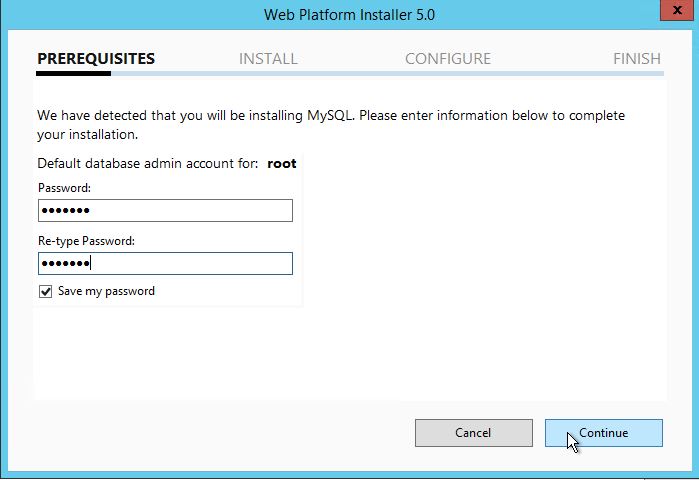
Provide a password for the root account of the MySQL server.
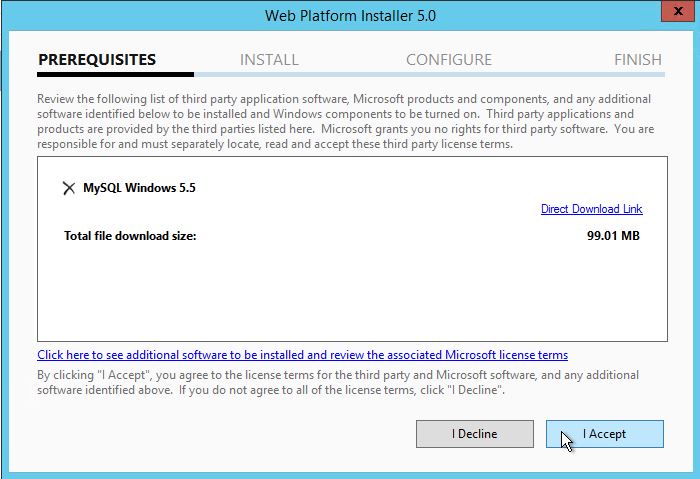
Review the licensing agreement and click I Accept.
After the installation is completed, click Finish.
You can launch MySQL by running the mysqld.exe command from the installation directory. By default this is set to C:\Program Files\MySQL\MySQL Server 5.5\bin.
Congratulations! You have just Installed MySQL in Windows Server 2012 .
What Is IIS ?
IIS (which stands for Internet Information Services or Internet Information Server) also known as Windows web server is available on most versions of Microsoft Windows operating systems and takes second place in overall usage behind Apache HTTP Server on the internet.
It will host websites, web applications and services needed by users or developers. Many versions have shipped as far back as IIS 1 on Windows 3 and with nearly every new Windows OS a new IIS version follows.
Versions and History
Microsoft Windows Server 2003 or IIS 6 is the oldest version you would want to run for anything outside of a hobby or testing, which does supports IPV6 as well as modern security measures.
However in a professional environment IIS 8.5 or 10 (Still in Beta) will receive official software updates for years to come and support more modern applications and needs.
- IIS 6 or Windows Server 2003 is no longer receiving any updates from Microsoft but supports IPV6 and most security measures needed for simple hosting needs on a budget.
- IIS 7 shipped with Windows Vista and has better support for the .NET framework and some security enhancements over IIS 6.
- IIS 7.5 Shipped with Windows 7 and added support for TLS 1.1 and 1.2. Extended support will end in 2020 this is the oldest version receiving any support officially from microsoft.
- IIS 8 also known as Microsoft Web Server 2012 began supporting SNI or associating SSL to hostnames instead of IP addresses and multicore scaling. Support will last until 2023.
- IIS 8.5 shipped with Windows 8.1 and has new features such as Enhanced logging capabilities and Dynamic Site Activation.
- IIS 10 is currently in beta and will support modern technology such as HTTP/2 and powershell 5.0.
If you are a business owner consider purchasing the newest version your hardware can run.
IIS 8.5 is currently the most stable and secure version as of this writing, however once out of beta ISS 10 will become your best bet. If you are hosting a basic website on your own and cannot afford a newer version consider Apache Server instead of anything older than IIS 6.
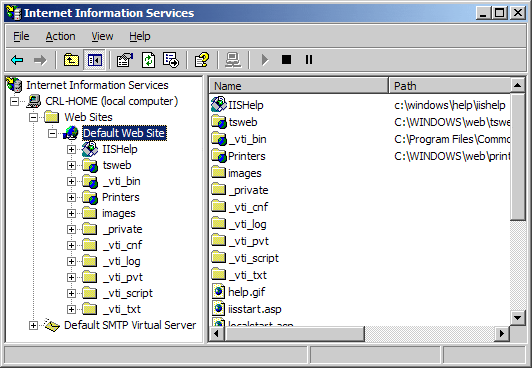
Virtual Directories
IIS allows you to create sites, applications, and virtual directories to share information with users over the Internet or internally on an intranet such as a home network.
This concept did exist in older versions of IIS, but several changes took place in IIS 7 and changed the definition and functionality of this concept.
A virtual directory is a name that you specify in IIS and that maps to a physical directory on a server similar to how DNS maps a URL to an IP address.
The directory name becomes part of the application allowing users to navigate to a website or application and gain access to the content hosted on the server.
This content could be a website itself or media such as photos or videos within a web application or site.
In IIS 6.0, virtual directories and applications were considered to be separate objects even though they were the same thing.
An application was not a physically separate object from a virtual directory instead an app was really just a virtual directory on its own with one of the following properties in its metabase: AppFriendlyName, AppRoot, AppIsolated, and AppPoolID.
The only issue was creating a system where applications in one pool would not be allowed to communicate with applications in another pool on the same server.
In IIS 7.0 and above virtual directories and applications are separate objects and functioned in that manner.
They exist in a hierarchical relationship such as a website may contain one or more applications, an application contains one or more virtual directories, and a virtual directory maps to a physical directory on a computer.
Features
Major Features of MYSQL on cloud
- Partitioning to improve performance and management of very large database environments
- Row-based/Hybrid Replication for improved replication security
- Event Scheduler to create and schedule jobs that perform various database tasks
- XPath Support
- Dynamic General/Slow Query Log
- Performance/Load Testing Utility (mysqlslap)
- Improved! Full Text Search (faster, new dev templates)
- Improved! Archive engine (better compression, more features)
- Improved! User session and problem SQL identification
- Improved! MySQL embedded library (libmysqld)
- Additional INFORMATION_SCHEMA objects
- Faster data import operations (parallel file load)
- ACID Transactions to build reliable and secure business critical applications
- Stored Procedures to improve developer productivity
- Triggers to enforce complex business rules at the database level
- Views to ensure sensitive information is not compromised
- Information Schema to provide easy access to metadata
- Pluggable Storage Engine Architecture for maximum flexibility
- Archive Storage Engine for historical and audit data
- Relational Database Management System (RDBMS): MySQL is a relational database management system.
- Easy to use: MySQL is easy to use. You have to get only the basic knowledge of SQL. You can build and interact with MySQL with only a few simple SQL statements.
- It is secure: MySQL consist of a solid data security layer that protects sensitive data from intruders. Passwords are encrypted in MySQL.
- Client/ Server Architecture: MySQL follows a client /server architecture. There is a database server (MySQL) and arbitrarily many clients (application programs), which communicate with the server; that is, they query data, save changes, etc.
- Free to download: MySQL is free to use and you can download it from MySQL official website.
- It is scalable: MySQL can handle almost any amount of data, up to as much as 50 million rows or more. The default file size limit is about 4 GB. However, you can increase this number to a theoretical limit of 8 TB of data.
- Compatibale on many operating systems: MySQL is compatible to run on many operating systems, like Novell NetWare, Windows* Linux*, many varieties of UNIX* (such as Sun* Solaris*, AIX, and DEC* UNIX), OS/2, FreeBSD*, and others. MySQL also provides a facility that the clients can run on the same computer as the server or on another computer (communication via a local network or the Internet).
- Allows roll-back: MySQL allows transactions to be rolled back, commit and crash recovery.
- High Performance: MySQL is faster, more reliable and cheaper because of its unique storage engine architecture.
- High Flexibility: MySQL supports a large number of embedded applications which makes MySQL very flexible.
- High Productivity: MySQL uses Triggers, Stored procedures and views which allows the developer to give a higher productivity
Cognosys provides hardened and ready to run images of MYSQL 5.6 on all public cloud ( AWS marketplace and Azure).
Deploy your MYSQL 5.6 securely on cloud i.e. AWS marketplace and Azure and Google Cloud Platform (GCP)
AWS
Installation Instructions For Ubuntu
Note: How to find PublicDNS in AWS
Step 1) SSH Connection: To connect to the deployed instance, Please follow Instructions to Connect to Ubuntu instance on AWS Cloud
1) Download Putty.
2) Connect to the virtual machine using SSH key Refer this link:
- Hostname: PublicDNS / IP of machine
- Port : 22

Step 2) Database Login Details:
Please use MySQL root password Passw@rd123 for the MySQL configuration.
After your login with SSH you can login to MySQL using
SSH shell> mysql -u root -p
You shall be prompted for password where you can enter the password: Passw@rd123
Once you are connected to the MySQL server, a welcome message is displayed and the mysql> prompt appears
Note : Please change the password immediately after first login.
You can reset your root password with the following statement:
mysql> ALTER USER ‘root’@’localhost’ IDENTIFIED BY ‘new_password’;
You can come out of mysql Prompt with “exit” command.
Step 3) MySQL Information:
Server version: 5.6.33 MySQL Community Server
MySQL Services:
Using your Unix Login you can perform below actions on MySQL service
- To start MySQL Service: sudo service mysql start
- To stop MySQL Service: sudo service mysql stop
- To restart MySQL Service: sudo service mysql restart
- To get status of MySQL Service: sudo service mysql status
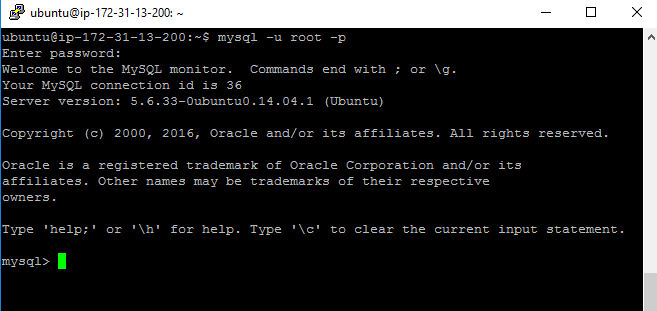
Step 4) Other Information:
1.Default ports
- MYSQL: 3306
Default ports: MySQL Port: 3306 this is by default not allowed on cloud firewall for security.
Configure custom inbound and outbound rules using this link
2. To access Webmin interface for management please follow this link
Installation Instructions For Redhat 7.3
Note : How to find PublicDNS in AWS
Step 1) SSH Connection: To connect to the deployed instance, Please follow Instructions to Connect to Redhat instance on AWS Cloud
1) Download Putty.
2) Connect to the virtual machine using SSH key Refer this link:
- Hostname: PublicDNS / IP of machine
- Port : 22
Step 2) Database Login Details:
Please use MySQL root password Passw@rd123 for the MySQL configuration.
After your login with SSH, you can log in to MySQL using
SSH shell> Mysql -u root -p
You shall be prompted for password where you can enter the password: Passw@rd123
Once you are connected to the MySQL server, a welcome message is displayed and the mysql> prompt appears
Note: Please change the password immediately after the first login.
You can reset your root password with the following statement:
mysql> ALTER USER ‘root’@’localhost’ IDENTIFIED BY ‘new_password’;
You can come out of MySql Prompt with “exit” command.
Step 3) MySQL Information:
Server version: 5.6.36 MySQL Community Server
MySQL Services:
Using your Unix Login you can perform below actions on MySQL service
- To start MySQL Service: sudo systemctl start mysqld
- To stop MySQL Service: sudo systemctl stop mysqld
- To restart MySQL Service: sudo systemctl restart mysqld
- To get status of MySQL Service: sudo systemctl status mysqld
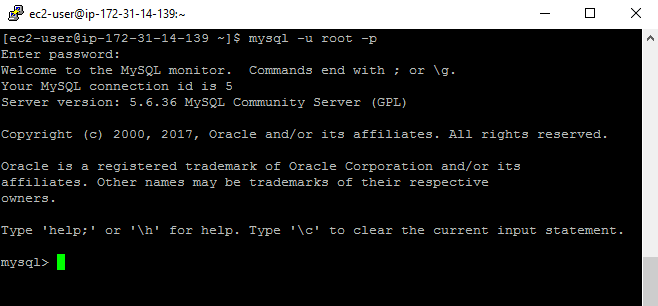
Step 4) Other Information:
1.Default ports:
- MYSQL: 3306
Default ports: MySQL Port: 3306 this is by default not allowed on cloud firewall for security.
Configure custom inbound and outbound rules using this link
2. To access Webmin interface for management please follow this link
Azure
Installation Instructions For Ubuntu
Note: How to find PublicDNS in Azure
Step 1) SSH Connection: To connect to the deployed instance, Please follow Instructions to Connect to Ubuntu instance on Azure Cloud
1) Download Putty.
2) Connect to the virtual machine using following SSH credentials:
- Hostname: PublicDNS / IP of machine
- Port : 22
Username: Your chosen username when you created the machine ( For example: Azureuser)
Password: Your Chosen Password when you created the machine ( How to reset the password if you do not remember)
Step 2) Database Login Details:
Please use MySQL root password Passw@rd123 for the MySQL configuration.
After your login with SSH, you can log in to MySQL using
SSH shell> Mysql -u root -p
You shall be prompted for password where you can enter the password: Passw@rd123
Once you are connected to the MySQL server, a welcome message is displayed and the mysql> prompt appears
Note: Please change the password immediately after the first login.
You can reset your root password with the following statement:
mysql> ALTER USER ‘root’@’localhost’ IDENTIFIED BY ‘new_password’;
You can come out of MySql Prompt with “exit” command.
Step 3) MySQL Information:
Server version: 5.6.33 MySQL Community Server
MySQL Services:
Using your Unix Login you can perform below actions on MySQL service
- To start MySQL Service: sudo systemctl start mysqld
- To stop MySQL Service: sudo systemctl stop mysqld
- To restart MySQL Service: sudo systemctl restart mysqld
- To get status of MySQL Service: sudo systemctl status mysqlds
Step 4)Other Information:
1.Default ports:
-
- MYSQL: 3306
Default ports: MySQL Port: 3306 this is by default not allowed on cloud firewall for security.
Configure custom inbound and outbound rules using this link
2. To access Webmin interface for management please follow this link
Installation Instructions For Centos
Note : How to find PublicDNS in Azure
Step 1) SSH Connection: To connect to the deployed instance, Please follow Instructions to Connect to Centos instance on Azure Cloud
1) Download Putty.
2) Connect to the virtual machine using following SSH credentials:
- Hostname: PublicDNS / IP of machine
- Port : 22
Username: Your chosen username when you created the machine ( For example: Azureuser)
Password: Your Chosen Password when you created the machine ( How to reset the password if you do not remember)
Step 2) Database Login Details:
Please use MySQL root password Passw@rd123 for the MySQL configuration.
After your login with SSH you can login to MySQL using
SSH shell> mysql -u root -p
You shall be prompted for password where you can enter the password: Passw@rd123
Once you are connected to the MySQL server, a welcome message is displayed and the mysql> prompt appears
Note : Please change password immediately after first login.
You can reset your root password with the following statement:
mysql> ALTER USER ‘root’@’localhost’ IDENTIFIED BY ‘new_password’;
You can come out of mysql Prompt with “exit” command.
Step 3) MySQL Information:
Server version: 5.6.33 MySQL Community Server
MySQL Services:
Using your Unix Login you can perform below actions on MySQL service
- To start MySQL Service: sudo systemctl start mysqld
- To stop MySQL Service: sudo systemctl stop mysqld
- To restart MySQL Service: sudo systemctl restart mysqld
- To get status of MySQL Service: sudo systemctl status mysqld
Step 4)Other Information:
1.Default ports: MySQL Port: 3306 this is by default not allowed on cloud firewall for security.
Configure custom inbound and outbound rules using this link
2. To access Webmin interface for management please follow this link
- Installation Instructions For Windows
- Installation Instructions For Ubuntu
- Installation Instructions For Redhat
Installation Instructions For Windows
Step 1) VM Creation:
1.Click the Launch on Compute Engine button to choose the hardware and network settings.
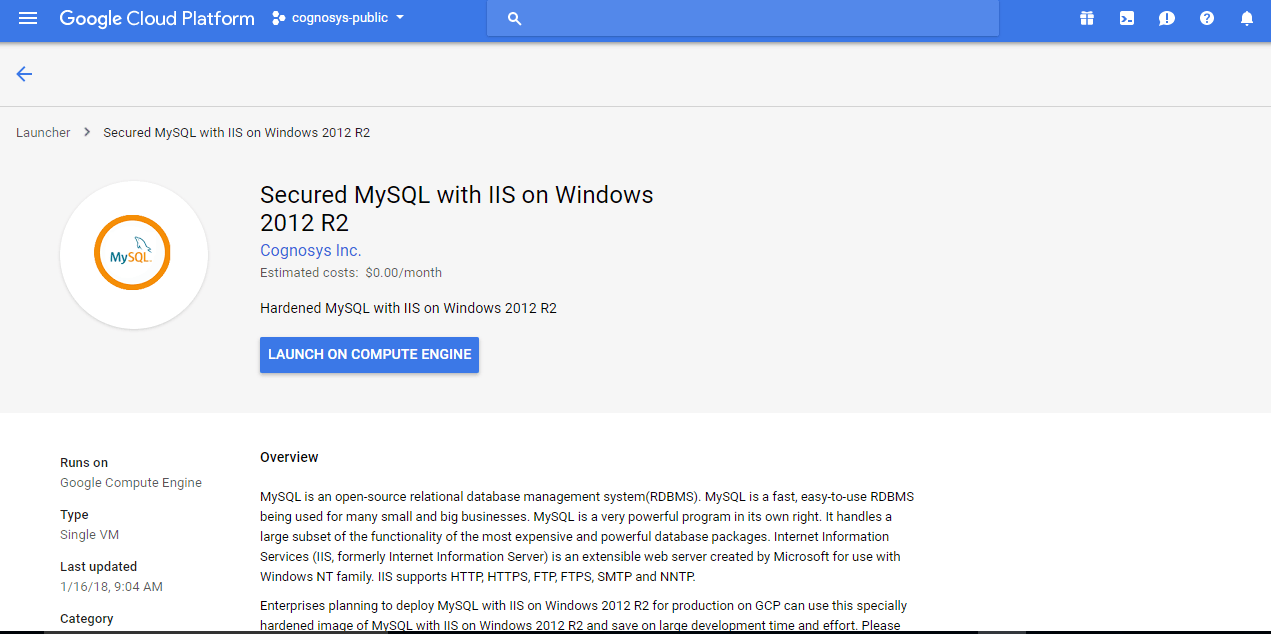
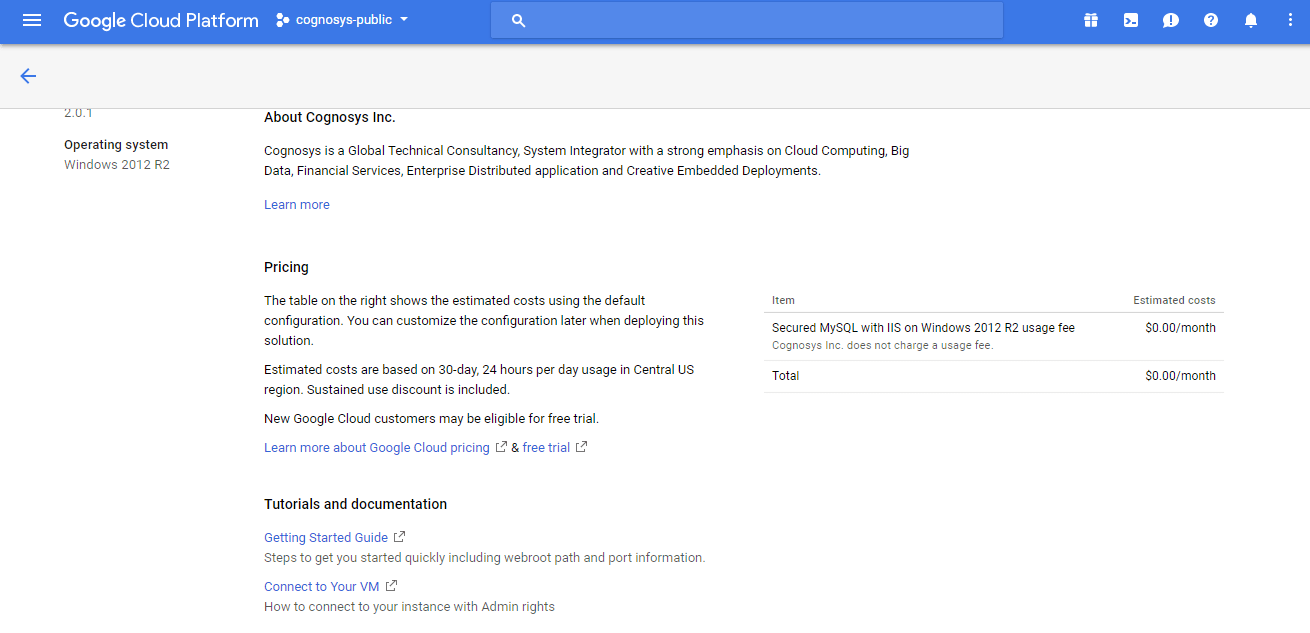
2.You can see at this page, an overview of Cognosys Image as well as some estimated costs of VM.
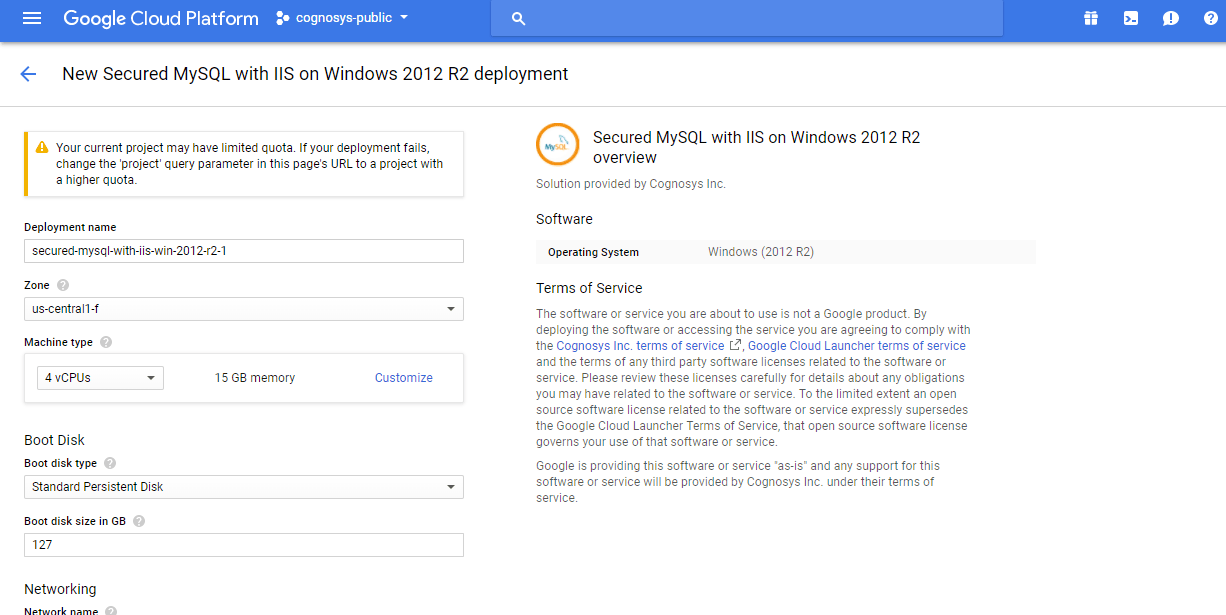
3.In the settings page, you can choose the number of CPUs and amount of RAM, the disk size and type etc.
Step 2) RDP Connection: To initialize the DB Server connect to the deployed instance, Please follow Instructions to Connect to Windows instance on Google Cloud
Step 3) Database Login Details:
The below screen appears after successful deployment of the image.
For local MySQL root password, please use the temporary password generated automatically during image creation as shown above.
i) Please connect to Remote Desktop as given in step 2 to ensure stack is properly configured and DB is initialized.
ii) You can use MySQL server instance as localhost, username root and password as shown above.
If you have closed the deployment page you can also get the MySQL root password from VM Details “Custom metadata” Section
Step 4) MySQL Information:
Server version: 5.6.33 MySQL Community Server
MySQL Services:
Using your Unix Login you can perform below actions on MySQL service
- To start MySQL Service: sudo systemctl start mysqld
- To stop MySQL Service: sudo systemctl stop mysqld
- To restart MySQL Service: sudo systemctl restart mysqld
- To get status of MySQL Service: sudo systemctl status mysqlds
Step 5) Other Information:
1.Default ports:
- Windows Machines: RDP Port – 3389
- Http: 80
- Https: 443
- MYSQL: 3306
Installation Instructions For Ubuntu
Step 1) SSH Connection: To connect to the deployed instance, Please follow Instructions to Connect to Ubuntu instance on Google Cloud
1) Download Putty.
2) Connect to the virtual machine using SSH key
- Hostname: PublicDNS / IP of machine
- Port : 22
Step 2) Database Login Details:
The below screen appears after successful deployment of the image.
For local MySQL root password, please use the temporary password generated automatically during image creation as shown above.
i) Please connect to Remote Desktop as given in step 2 to ensure stack is properly configured and DB is initialized.
ii) You can use MySQL server instance as localhost, username root and password as shown above.
If you have closed the deployment page you can also get the MySQL root password from VM Details “Custom metadata” Section
Step 3) MySQL Information:
Server version: 5.6.33 MySQL Community Server
MySQL Services:
Using your Unix Login you can perform below actions on MySQL service
- To start MySQL Service: sudo systemctl start mysqld
- To stop MySQL Service: sudo systemctl stop mysqld
- To restart MySQL Service: sudo systemctl restart mysqld
- To get status of MySQL Service: sudo systemctl status mysqlds
Step 4) Other Information:
1.Default ports:
- Linux Machines: SSH Port – 22
- MYSQL: 3306
2. To access Webmin interface for management please follow this link
Installation Instructions For Redhat
Step 1) SSH Connection: To connect to the deployed instance, Please follow Instructions to Connect to Redhat instance on Google Cloud
1) Download Putty.
2) Connect to the virtual machine using SSH key
- Hostname: PublicDNS / IP of machine
- Port : 22
Step 2) Database Login Details:
The below screen appears after successful deployment of the image.
For local MySQL root password, please use the temporary password generated automatically during image creation as shown above.
i) Please connect to Remote Desktop as given in step 2 to ensure stack is properly configured and DB is initialized.
ii) You can use MySQL server instance as localhost, username root and password as shown above.
If you have closed the deployment page you can also get the MySQL root password from VM Details “Custom metadata” Section
Step 3) MySQL Information:
Server version: 5.6.33 MySQL Community Server
MySQL Services:
Using your Unix Login you can perform below actions on MySQL service
- To start MySQL Service: sudo systemctl start mysqld
- To stop MySQL Service: sudo systemctl stop mysqld
- To restart MySQL Service: sudo systemctl restart mysqld
- To get status of MySQL Service: sudo systemctl status mysqlds
Step 4) Other Information:
1.Default ports:
- Linux Machines: SSH Port – 22
- MYSQL: 3306
2. To access Webmin interface for management please follow this link
Videos

