1-click AWS Deployment 1-click Azure Deployment 1-click Google Deployment
Overview
What is SharePoint?
So, what is SharePoint? You may have asked this question before. SharePoint allows individuals in an organization to easily create and manage collaborative business solutions.
SharePoint can be used for many things: storing documents, collaborating with colleagues on projects, publishing departmental information, and even managing common processes like time off requests and expense reports. It is hard to define since it offers many capabilities, but generally it provides a flexible platform to enable you and your colleagues to get work done. The great part is that all you need is a web browser and you can begin.
There are two types of SharePoint: one that is run on your company’s servers, and one that is hosted by Microsoft through Office 365. Microsoft offers two versions of their web-based platforms: Office Online for consumers, and Office 365 for businesses. You may have an email address from @outlook.com or @live.com or even @hotmail.com; this is the Office Online consumer experience. For Office 365, you log in using your work email and may have access to more functionality, such as SharePoint Online and instant messaging.
From your perspective, there is little difference between SharePoint Server and SharePoint online in Office 365; they both offer great ways to collaborate, and they both are accessed through a web browser. When there are differences, they will be pointed out.
Working on a document store in SharePoint
In SharePoint, documents are stored in Libraries, which have many useful features that are not available in a local folder or file share.
You have three options when opening a document. You can read the document in the browser, you can choose to edit it in the browser, or you can choose to edit it with Office installed locally on your computer.
If you choose the edit it locally, it will act exactly like a local document, but your changes will be saved to SharePoint.
Often before publishing a document, you will work together with colleagues on it. As opposed to emailing the document around, with SharePoint you can all work off of the same document at the same time. This is called simultaneous co-authoring, and it is made possible by Office using the features to track changes and comments.
 SharePoint provides the added benefit of storing the document in a place where anyone can retrieve it from any device at any time. All you need is a web browser.
SharePoint Document Library
If we look at the SharePoint Document Library more closely, we will find some more helpful features for managing our document. The ribbon (or fluid UI in Microsoft-speak) at the top of library, much like in Office, contains features to help you manage the files stored in the library as well as the configuration of the library itself.
At the top, the Browse tab will hide the ribbon, showing the SharePoint navigation below; the Files tab will show relevant actions to the file(s) selected in the document list below, and the Library tab shows actions that affect how the library itself looks and behaves.
The Files tab is most relevant to us while we work on these documents. From left to right, the New section of the ribbon allows us to add new documents to this library by creating them directly in SharePoint or uploading them from the computer.
In the Open and Check Out group, we find the Check Out and Check In functions. These are useful while co-authoring a document. If you wish to be the only one able to edit a document while you have it open working on it, you can choose Check Out to lock others out. Once you are done with your edits, you can Check In to allow others to see your edits and make their own. The purpose is to prevent conflicts while editing a document, which is often helpful for larger teams or once the document is in the final stages before publishing.
In the Manage group on the ribbon, you will find Version History. SharePoint allows you to enable version controls on your library so you can keep, review and restore previously saved versions of a document. When you click on the Version History button, you will see all the versions of this document saved by SharePoint and have the ability to view, restore and delete old versions.
In the Share & Track group of the ribbon, there is the very important Share button. This allows you to invite your colleagues to view or edit the document along with you.
 After clicking Share, Rob will get an email just like the one you received that started your journey in SharePoint.
Searching for documents
Document libraries tend to grow large as projects progress, so having the ability to search for the document you are looking for is very handy. Use the search box directly above the list of documents in the library.
Also, you can see in the upper right that there is a second search box that says, “Search this site”. The library we have been working in (“Documents”) lives in a SharePoint Site that may contain other libraries, lists of data, calendars, web pages, wikis and more. In this way, it is different from a typical internet web site that would only contain pages. The search box allows you to extend your search beyond just this library to find what you are looking for.
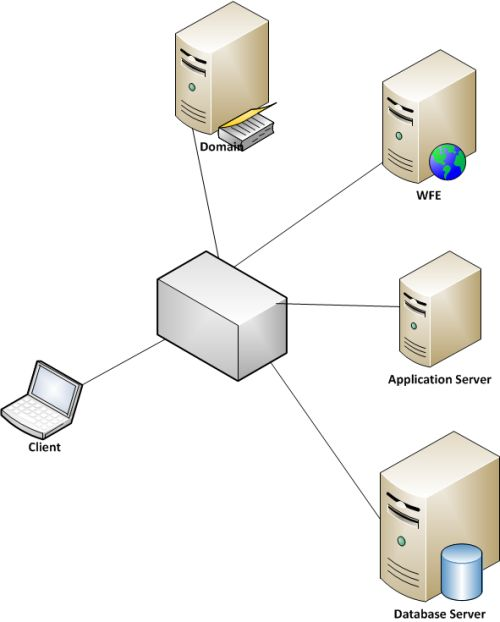
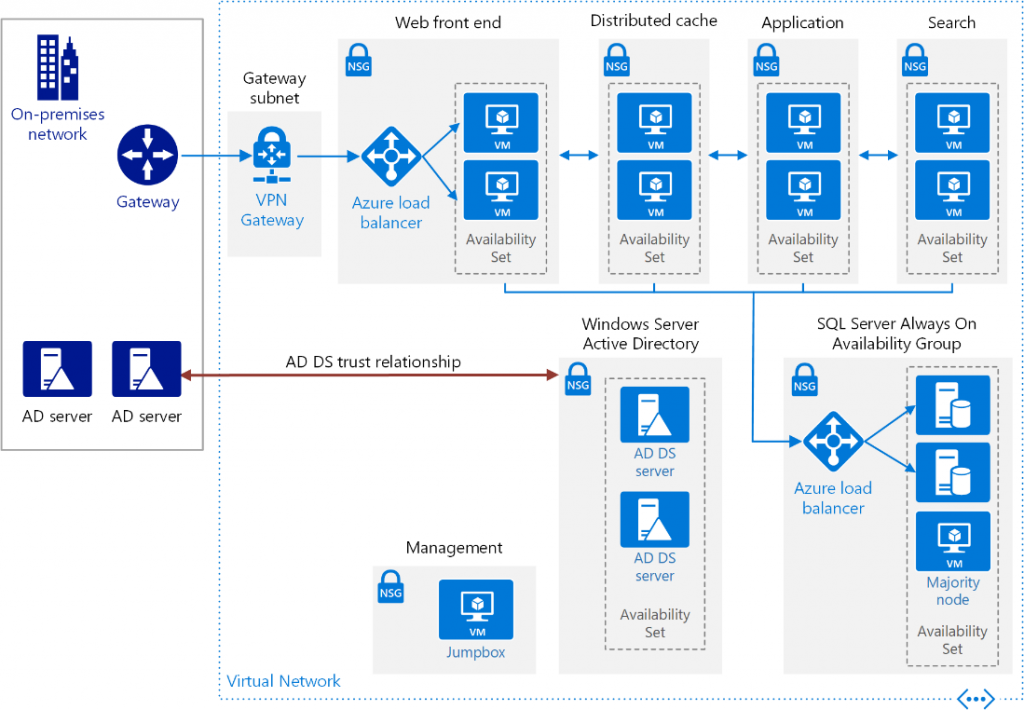
What Are SharePoint Farms and How Does SharePoint Architecture Work?
In this chapter, we will setup the development environment for SharePoint. As you already know that there are three different options of SharePoint. They are −
- SharePoint Foundation
- SharePoint Server
- Office 365
In this chapter, we will be using the Office 365, which is cloud-based version.
Step 1 − You can easily create a free trial account here https://products.office.com/en/business/office-365-enterprise-e3-business-software.
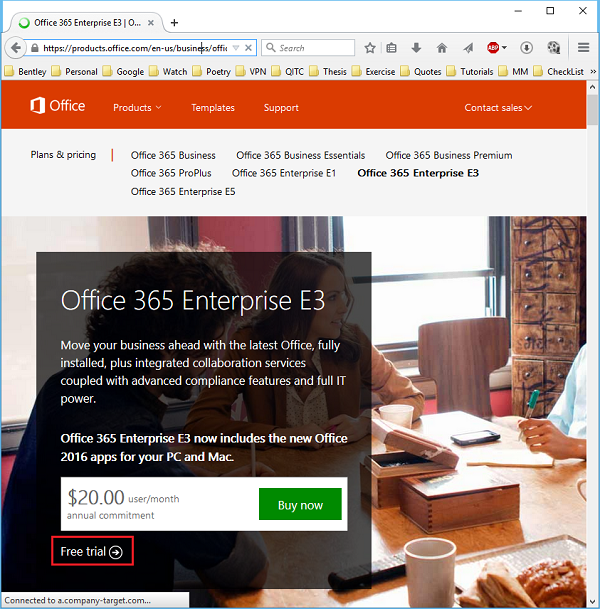
Step 2 − Click the Free trial option. A new page will open.
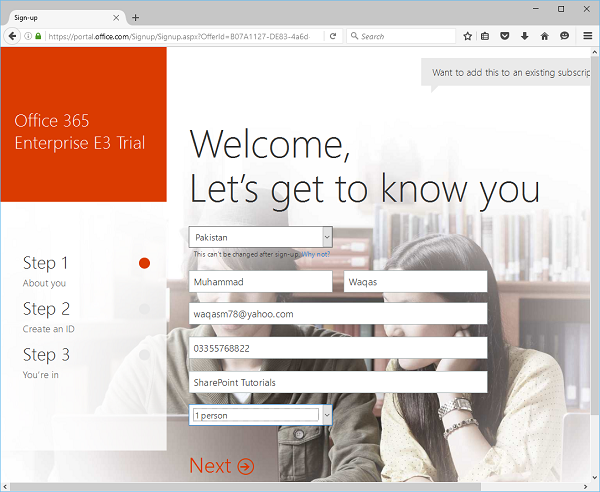
Step 3 − Enter the required information and click Next and you will see the following page.
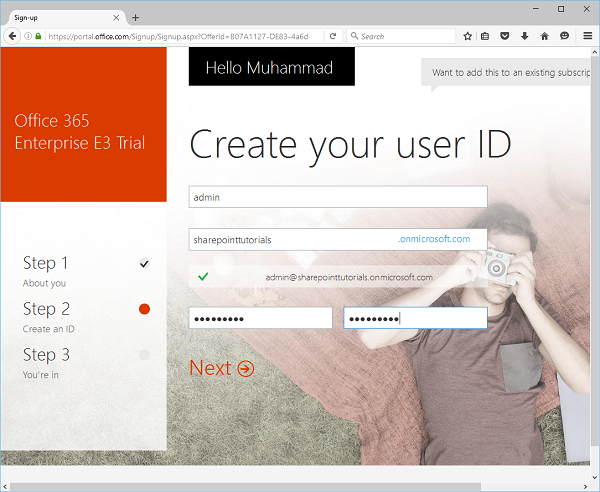
Step 4 − Enter the username, company name and password and click Next. It will send you a verification code. Once the verification is completed then it will start creating the account.
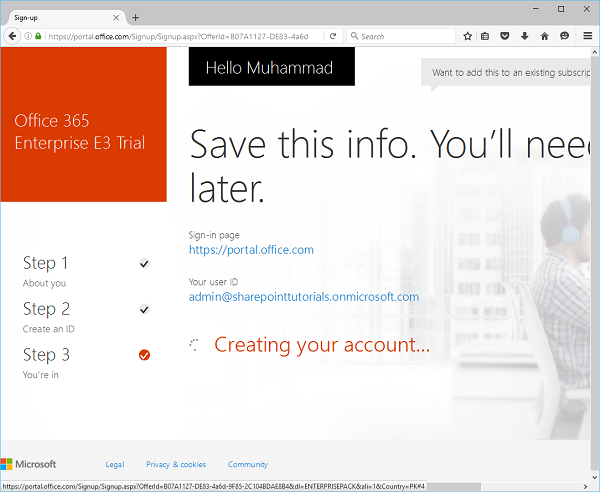
Step 5 − Once your account is created, you will see the following page.
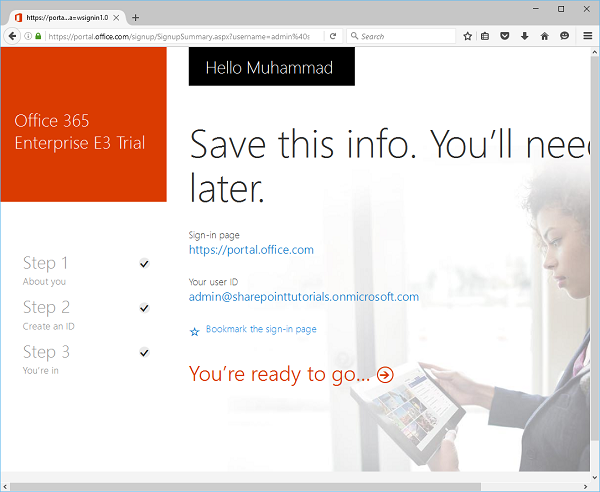
Step 6 − Click You’re ready to go and you will see the following page −
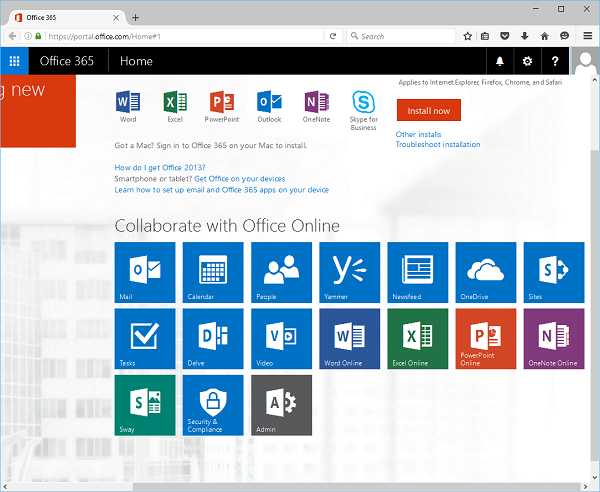
Now your environment is ready and you can start share point development but you will also need to install visual studio.
Microsoft provides a free version of visual studio, which also contains SQL Server and it can be downloaded from https://www.visualstudio.com/en-us/downloads/download-visual-studio-vs.aspx.
Installation
Following steps will guide you to install SharePoint.
Step 1 − Once downloading is complete, run the installer. The following dialog will be displayed.
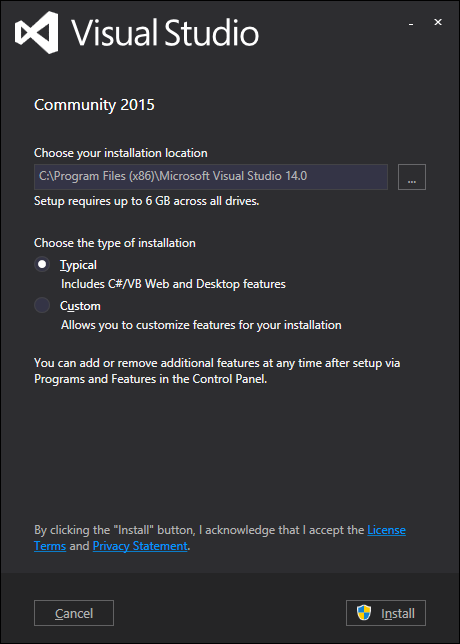
Step 2 − Click Install and it will start the installation process.
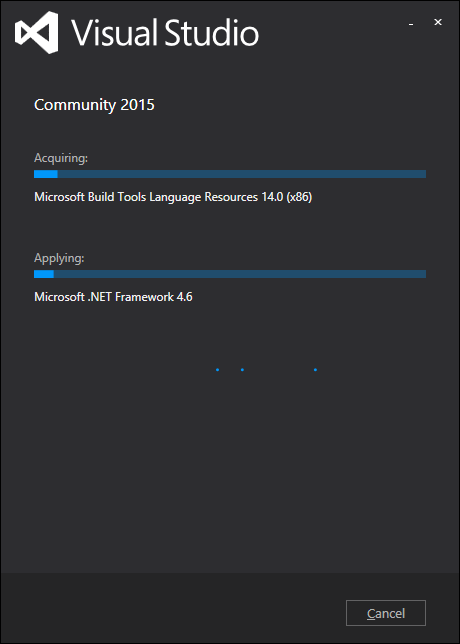
Step 3 − Once the installation process is completed successfully, you will see the following message −
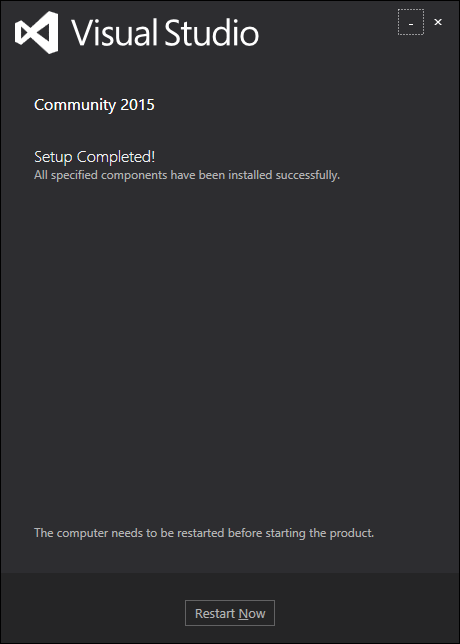
Step 4 − Restart your computer if required. Now open Visual studio from the Start Menu. It will open the following dialog box and it will take some time for preparation.
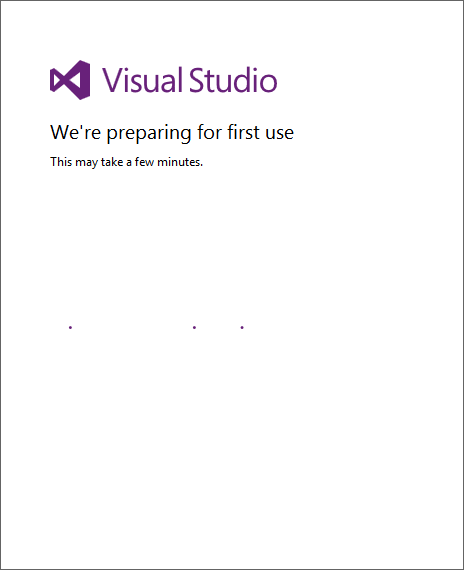
Step 5 − Once all is done, you will see the main window of Visual studio.
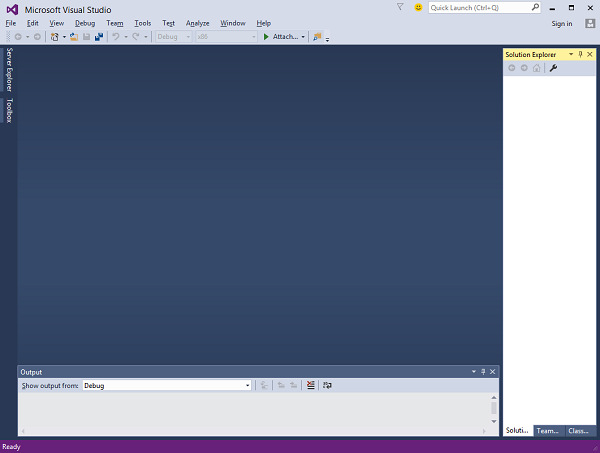
You are now ready to start your application.
Step 6 − Select File → New → Project menu option.

Step 7 − Select Office/SharePoint in the left pane under Templates → Visual C#. Doubleclick Install Office Developer Tools.
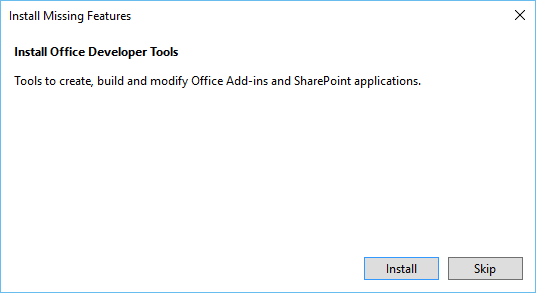
Step 8 − Click Install and close all Visual Studio instances. A new page will open. Click Next.
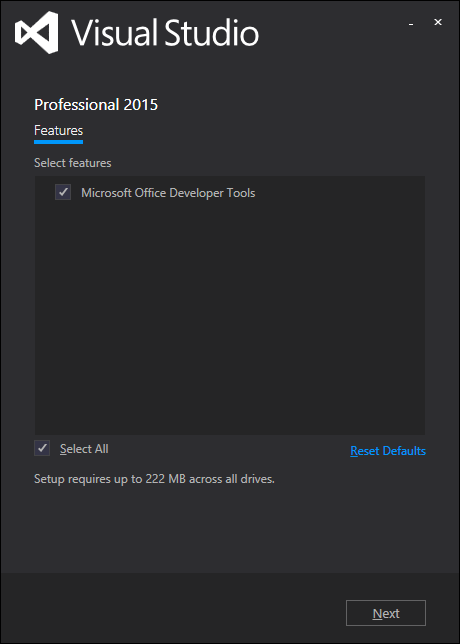
Step 9 − A message box will appear. Click Update.

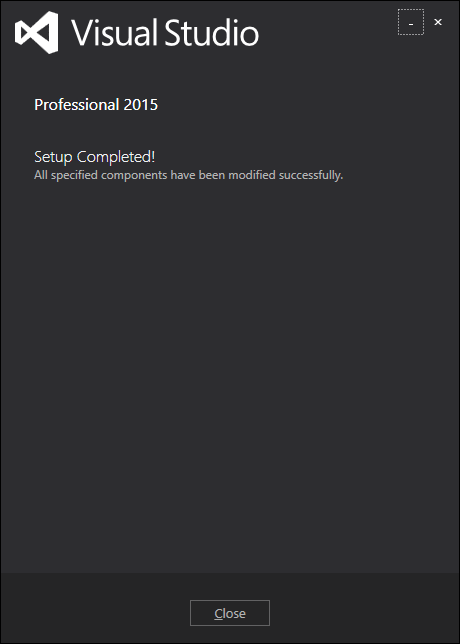
Step 10 − Once it is updated, you will see the message as follows −
SharePoint 2013 is a collaboration environment that organizations of all sizes can use to increase the efficiency of business processes.
SharePoint 2013 sites provide secure environments that administrators can configure to provide personalized access to documents and other information.
SharePoint 2013 introduces new ways to work together in today’s cloud, social, mobile business environment. With SharePoint 2013, you can share, build, organize, manage, and discover better.
Applications can be developed for the SharePoint 2013 platform in different ways, for example, as:
- Apps for SharePoint
- SharePoint Publishing Sites
- SharePoint Farm Solutions
- Mobile Apps for SharePoint
- Reusable Components for SharePoint
Adding these capabilities to your application (of any type mentioned alongside) helps users do things better and faster:
- Workflows
- Social & Collaboration Features
- Location & Mapping Features
- Search
- Business Connectivity Services
- Office 2013 & SharePoint 2013 Application Services
SharePoint Online is a collection of Web-based tools and technologies that help your organization store, share, and manage digital information. Built on Microsoft SharePoint Server 2013, this hosted service is ideal for working on projects, storing data and documents in a central location, and sharing information with others.
SharePoint 2013: Installation Step by Step
Software Prerequisites
- Wnidows Server 2008 R2 64bit with service pack or Wnidows Server 2012
- SQL Server 2008R2 or SQL Server 2012
- Windows Identity Foundation v1.1
- Microsoft Information Protection and Control Client
- Microsoft WCF Data Services
- Windows Management Framework 3.0
- Application Server Role
- Web Server (IIS) Role
- Microsoft .NET Framework 4.0
- Update for the .NET Framework 4 (KB2468871)
- Microsoft SQL Server 2008 Native Client
- Windows Identity Foundation (KB974405)
- Microsoft Sync Framework Runtime v1.0 (x64)
- Windows Server AppFabric
Steps
1. Download and unzip the files ISO file the SharePoint Server 2013 setup
7. Once the installation is complete, you can choose to run the Configuration Wizard as shown below. Now you Configuration Wizard screen will appaear, click Close to continue.
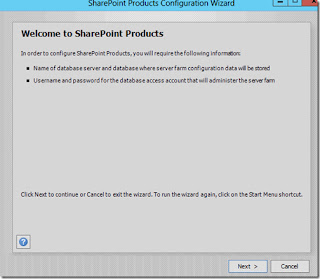
8. Now welcome screen will be appear click next to continue
9. After that an warning message may be viewable that make you update that at time of configuration listed service will restart or not.
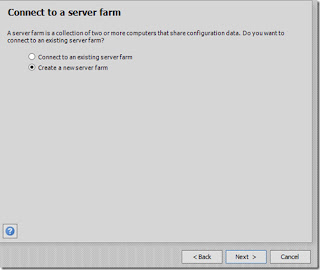
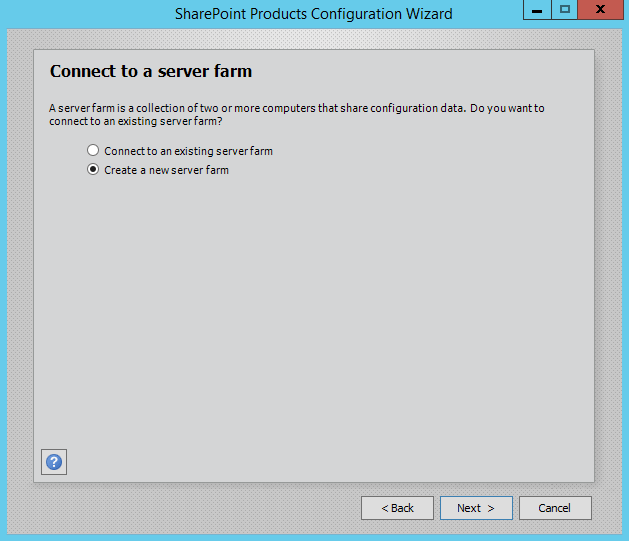
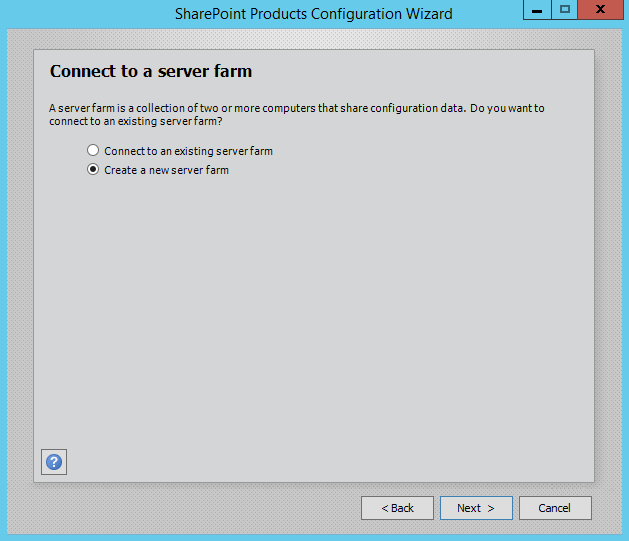
10. If you already have any server farm then click ‘Connect to an existing server farm’ or click on ‘Create a new server farm’
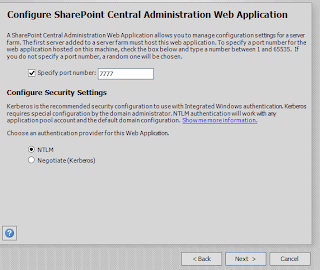
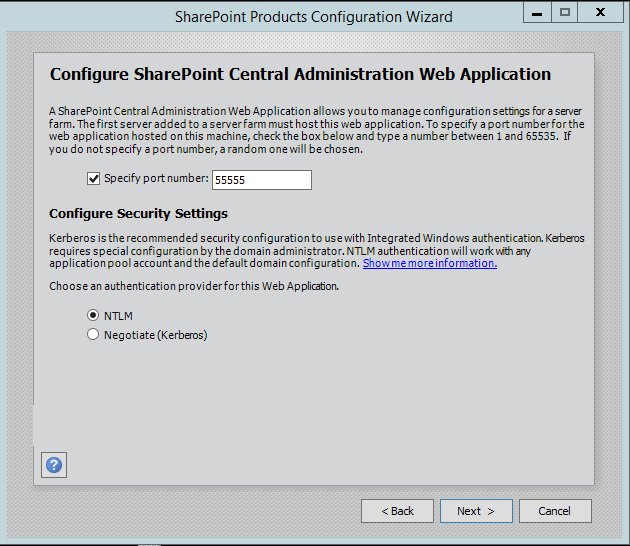
13 Here I like to specify an alternate more memorable port number.
14. Now Click on next
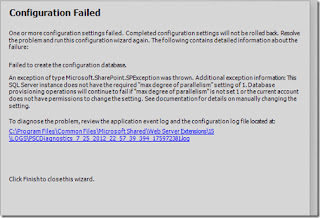
Now this error indicate SQL Server instance does not have the required ”max degree of parrallelism” setting of 1. We need to run the following script on our SQL 2012 server.
sp_configure 'show advanced options', 1; GO RECONFIGURE WITH OVERRIDE; GO sp_configure 'max degree of parallelism', 1; GO RECONFIGURE WITH OVERRIDE; GO
It’s an important issue that SQL under databases that the SharePoint_Config database had been created. We need to delete the SharePoint_Config DB otherwise we would have to specify a new name when re-running the SharePoint Configuration Wizard.
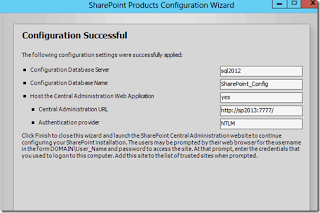
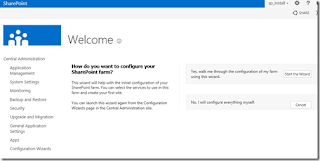
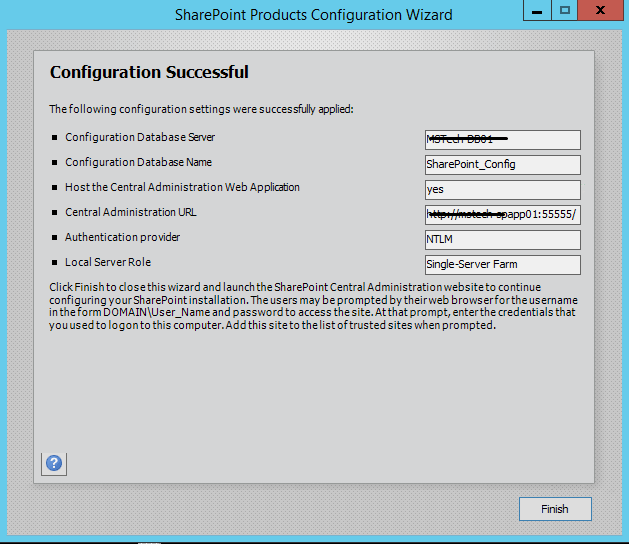
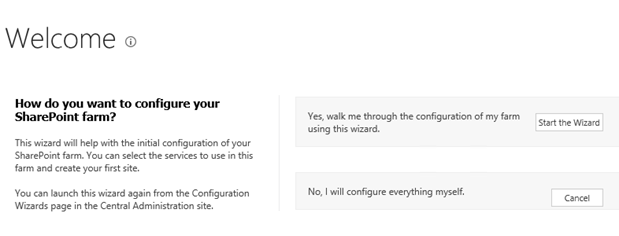
17. Central Administration will launch automatically and you will be greeted with the Initial Farm Configuration page.
Cognosys Provides Hardened images of SharePoint on the cloud ( AWS marketplace, Azure and Google Cloud Platform).
Deploy SharePoint securely on cloud i.e. AWS marketplace, Azure and Google Cloud Platform (GCP)
SharePoint 2013 Enterprise on Cloud for AWS
Features
Major Features of Sharepoint 2013 Enterprise
1. Authentication
- OAuth support. This web authorization protocol means that a user or web app can request authorization to get temporary access to specific network resources.
- Default claims-based authentication for new web apps. A new Windows PowerShell cmdlet, Convert-SPWebApplication, helps you migrate from Windows classic-mode authentication to claims-based authentication.
- Distributed Cache Service for login tokens. A dedicated cache helps avoid the need for additional configuration and makes for less memory utilization in the web front-ends.
- Enhanced logging.
2. Business Connectivity Services (BCS)
- OData support. With this web protocol, you can now connect to an external data source.
- Event listener. This includes an event subscriber, enabling SharePoint users and custom code to receive notifications of events that occur in the external system.
- Support for apps for SharePoint. Lets you add self-contained apps for SharePoint that don’t make any changes to the underlying code on the computer running SharePoint Server, enhancing safety and easing installation and removal.
- External list enhancements. Users can now filter, sort, or export external lists that display content from BCS content types; performance improvements reduce the load on SharePoint farm database servers.
3. eDiscovery
- SharePoint eDiscovery Center. Site template creates a new portal for managing holds and cases, including abilities to search, place holds, and export content.
- Improvements to in-place holds. Includes site-level preservation, Exchange mailbox preservation, ability to set permissions for users to access original versions of preserved content.
- eDiscovery export. Ability to export the results of an eDiscovery search for later import into a review tool.
- Enterprise-wide eDiscovery. Ability to manage eDiscovery across multiple SharePoint farms, Exchange servers, and file shares.
4. Mobile
- Optimized viewing across different mobile platforms.
- One site, multiple renderings. Ability to render a single published SharePoint site in multiple designs to accommodate different devices.
- Push notifications. Works for Windows Phones.
- Geolocation field type. For mobile app development.
- Ability to view business intelligence content.
- Office Web Apps. Ability to view Word, Excel, and PowerPoint documents.
5. Records Management
Site-level retention policies. Ability to create and manage retention policies in SharePoint Server 2013 that apply to SharePoint sites and any associated Exchange Server 2013 team mailboxes.
6. Business Intelligence
- In-Memory BI Engine (IMBI) or Vertipaq engine. Near instant analysis of millions of rows.
- Power View Add-in for Excel. Visualize and interact with modeled data via visualizations, animations, and smart querying.
- PivotChart reports. Create them without having to include a PivotTable report on the same page.
- Ability to explore and analyze data in Excel Services reports. For reports that use SQL Server Analysis Services data or PowerPivot data models.
- View and display items in PivotChart and PivotTable reports. Support for users in Excel Services to view and change display of items in Excel Services-published PivotChart reports and PivotTable reports.
- Calculate measures and members. Support for Excel-created calculated measures and members in Excel Services.
- Timeline controls. Improved Excel Services timeline controls.
- Dashboard migration. PerformancePoint Services dashboard migration.
- PerformancePoint Services filters. Enhanced PerformancePoint Services filter UI and filter search.
- Cleaner BI Center.
- Support for Analysis Services Effective User.
- PerformancePoint support on Apple iPad.
- Visio Services Maximum Cache Size.
- Updated Visio Health Analyzer rules.
- Windows PowerShell cmdlets. Updated PowerShell cmdlets for Visio.
- Visio commenting. Ability to add comments to a Visio drawing on the web in full page rendering mode.
7. Social Computing
- New and updated policy settings. For the User Profile service application and My Sites in Central Administration.
- Privacy and people. New privacy settings and updated people settings.
- Microblogging. New microblogging ability on Newsfeed page in My Site.
- My Sites. Improved My Sites saving, synchronization, sharing, and moving of content.
- New site templates. Community Site and Community Portal. Community Site offers a forum-like experience. Community Portal is a page that surfaces SharePoint site collections and sites.
8. Web Content Management
- Word to HTML. Ability to copy content from Word, paste it into a Web Part, and obtain an HTML-correct display.
- Drag and drop. Ability to drag and drop menu items directly to a page.
- Video upload. Improved video upload process.
- Dynamic content. Ability to insert an iframe element to embed dynamic content from other sites.
- Support for image renditions. Allows display of different-sized versions of an image on different pages.
- Integrated translation service.
- Language detection. Ability to redirect visitors to a site in an appropriate language based on the language setting of their web browser.
- Cross-site publishing. When you make changes to content, those changes are displayed on all site collections that are reusing this content.
- Catalog. Designate any library or list as a catalog. Enables content to be reused on publishing site collections.
- Managed navigation. Ability to define and maintain navigation on a site by using term sets, in addition to site structure-based navigation.
- Category pages. Page layouts that are used for displaying structured content such as catalog data.
- User-friendly URLs.
- New Web Part. Content Search Web Part displays crawled and indexed content.
- Refiners and faceted navigation. Enables users to refine and narrow searches while browsing different pages.
- New analytics processing component. Ability to analyze user actions for content managers. Ability to make recommendations and offer choices to users.
- Branding changes. SharePoint Designer or Visual Studio knowledge no longer necessary. Can design a site by using HTML, CSS, and JavaScript, in tools such as Adobe Dreamweaver, Microsoft Expression Web, or other HTML editors.
- Device-specific publishing. Ability to create channels that allow a single publishing site to be rendered in multiple ways on multiple devices.
9. Workflow
New SharePoint Designer 2013 workflow functionality includes the following:
- Visual workflow. Develop workflow visually using Visio 2013 add-in.
- No-code web service calls. New action enables no-code web service calls from within a workflow.
- Task actions. New actions for creating a task and starting a task process
- Coordination actions. New coordination actions between workflows built on SharePoint 2010 and SharePoint 2013
- New dictionary type.
- Stage, Loop, and App Step workflow building blocks.
- New enterprise features in Workflow Manager.
- New PowerShell cmdlets. Cmdlets that manage workflow via Workflow Manager service.
10. Search
- Search UI improvements.
- Search result relevancy improvements.
- Continuous crawl.
- Improved flexibility of search schema.
- New search architecture.
AWS
Installation Instructions for Windows
Step 1) RDP Connection: To connect to the deployed instance, Please follow Instructions to Connect to Windows instance on AWS Cloud
Connect to virtual machine using following RDP credentials :
- Hostname: PublicDNS / IP of machine
- Port : 3389
Username: To connect to the operating system, use RDP and the username is Administrator.
Password : Please Click here to know how to get password .
Step 2) Application Access Instructions:-
Note : Users need to reach out to us for CAL license providing number of CAL required.
If you face any issue in running this image or activating license, Please reach out to support@secureanycloud.com
- Sharepoint Server has already been installed.
- Sharepoint configuration should be completed by the user.
- Please join a domain and have a SQL Server instance ready before starting the Sharepoint Configuration.
1. Default Login Credentials for SharePoint Access are same as your RDP Credentials,
- User Name: Administrator
- Password: Retrieved from Console
Step 3) Other Information:
1.Default installation path: will be in your root folder “C:\Program Files\Common Files\microsoft shared\Web Server Extensions\15\BIN”
2.Default ports:
- Windows Machines: RDP Port – 3389
- Http: 80
- Https: 443
Configure custom inbound and outbound rules using this link
Note: Click on the link to view detailed account permissions and security settings of SharePoint 2013.
Installation Step by Step Screenshots
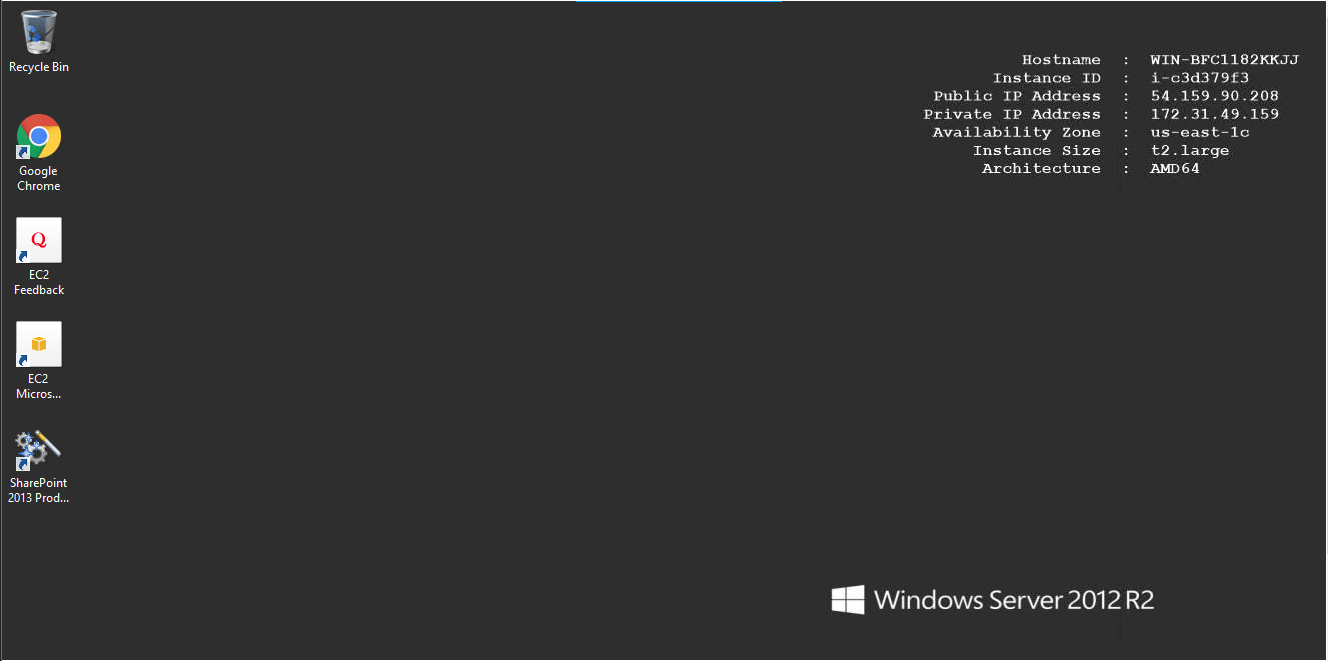
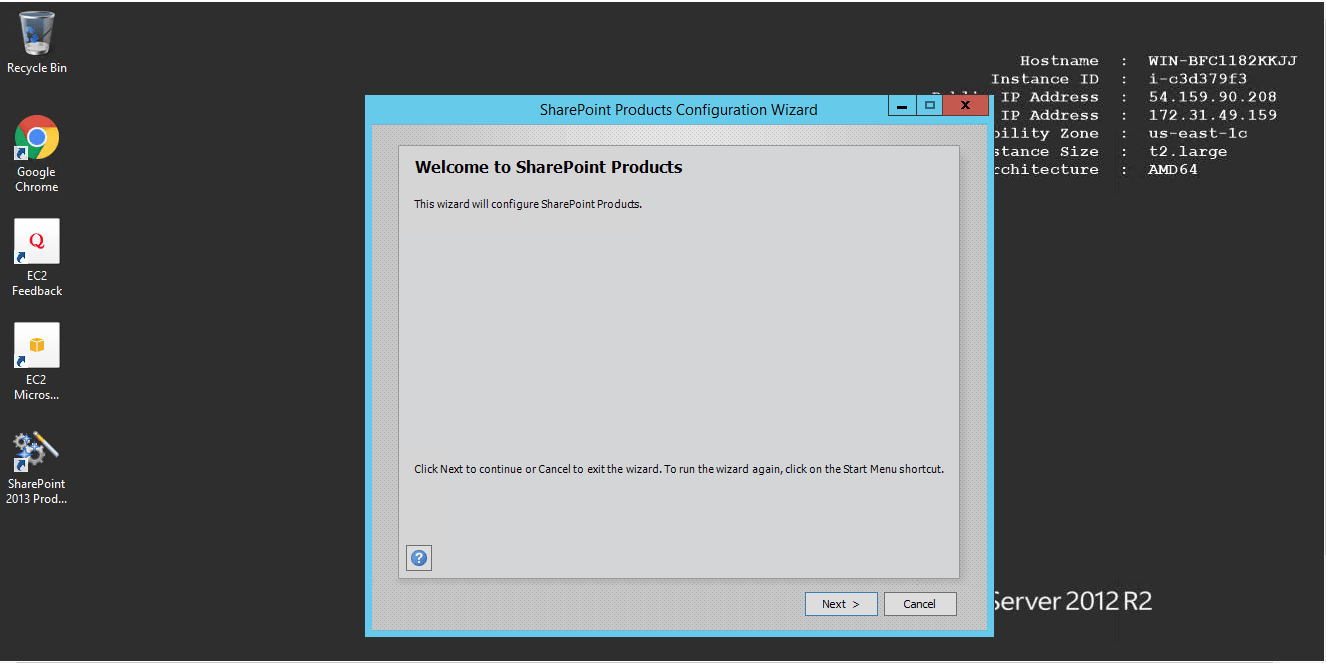
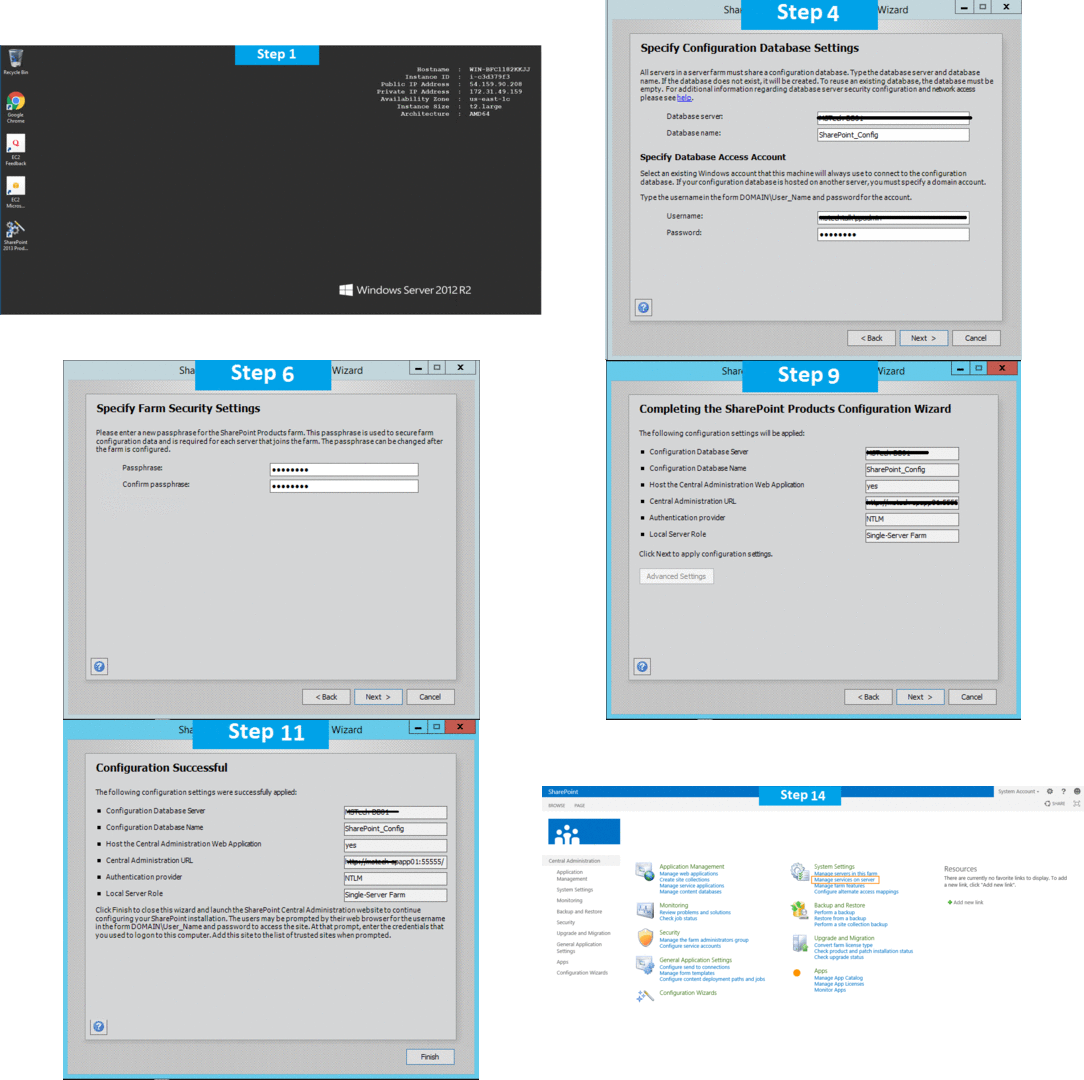
Step 1. Open SharePoint 2013 Application using desktop icon
Step 2.Welcome Page sharepoint
Step 3.Select Create a new server farm option from the next step as shown in below screen, if you are already have installed a new farm and doing a MinRole installation then select the first option to connect to an existing server farm.
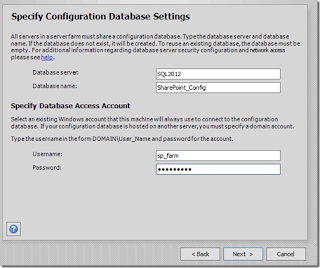
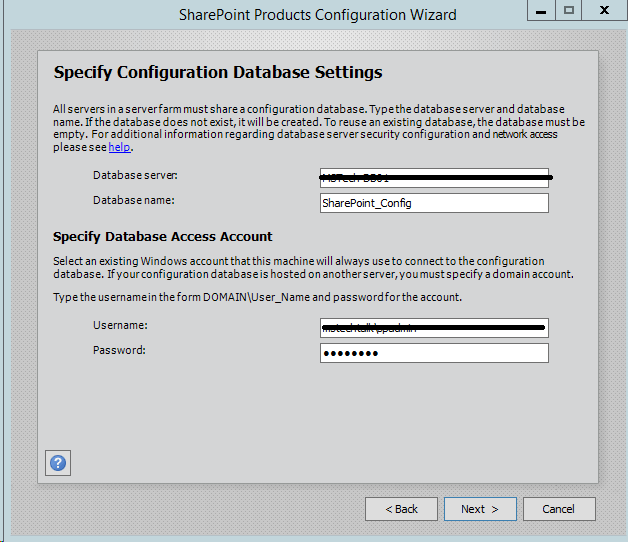
Step 4.Enter the database server details and database access account details, use a separate user for this but I am using the same SPAdmin user for the preview installation. I have assigned it below rights in DB server:
- Dbcreator
- SecurityAdmin
- SysAdmin
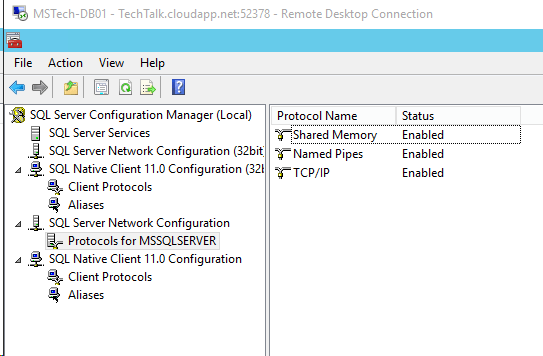
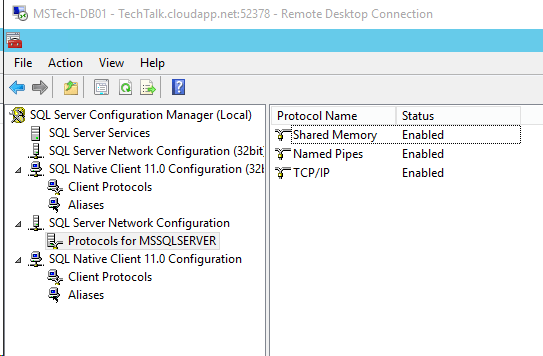
Step 5. If you are facing issues in connecting to SQL Server then make sure TCP/IP is enabled in SQL Server Configuration Manager. If you still getting the error then turn off the firewall on SQL server machine.
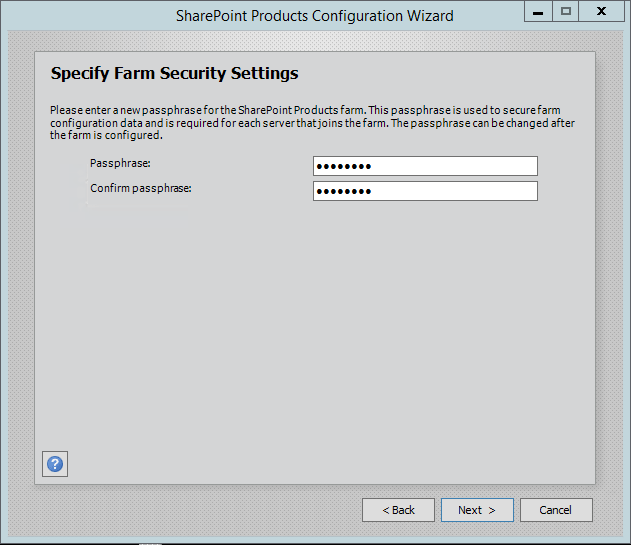
Step 6. After completing the database settings, press next which will take to you on Farm security settings page. Enter passphrase here which is required to secure the farm configuration data and is required for each server that joins the farm.
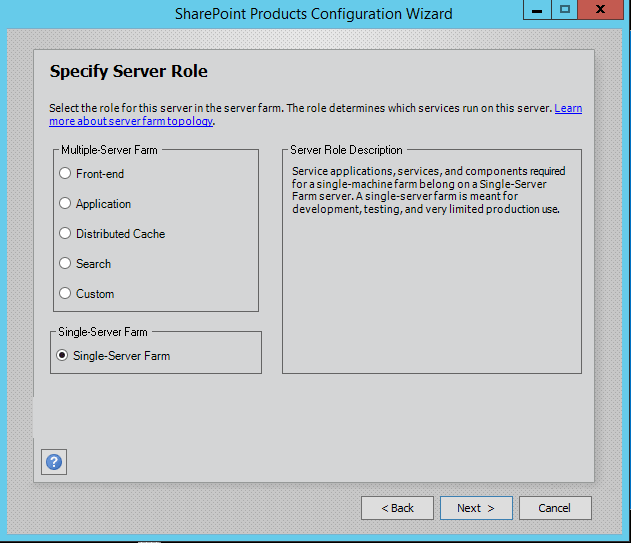
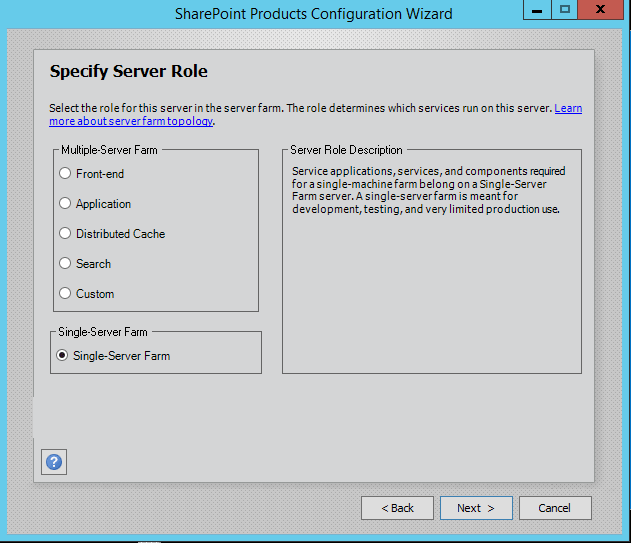
Step 7. Server Roles or the MinRoletopology
Here comes the MinRoles, SharePoint Server 2013 has six types of server roles:
- Front-end
- Application
- Distributed Cache
- Search
- Custom
- Single-Server Farm
You can either select single-server farm or can do a multi-server installation using MinRolestopology. If you have selected Single-Server Farm then you cannot extend to Multi-Server environment, so if you plan to extend to multi-Server farm in future then select the Custom MinRole or Application.
I am using single-server farm installation so will go with the last option.
Step 8.On next screen, you can specify port for Central Admin or can use the default which is selected randomly. I have never used the default port, I always an easy one which I can remember like 5555. Select NTLM installation mode at this phase and press next.
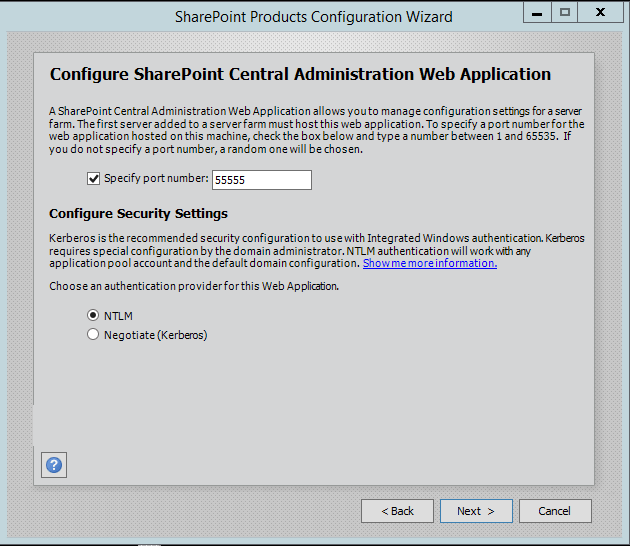
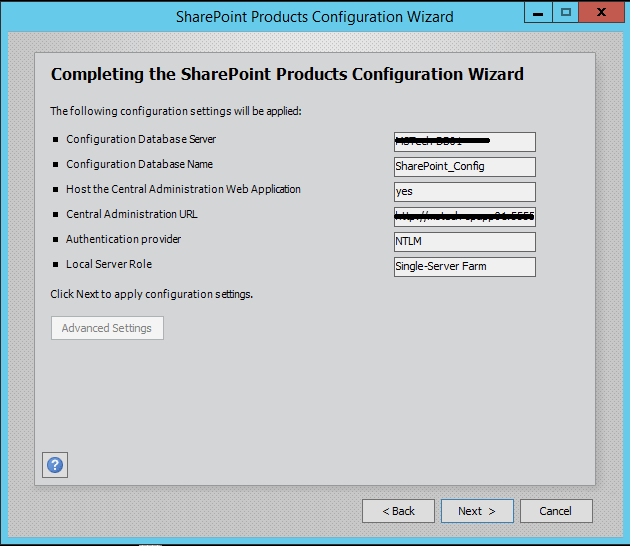
Step 9. Verify the settings in configuration wizard, press next to start the wizard. Advance option is not enabled for Single-Server installation.
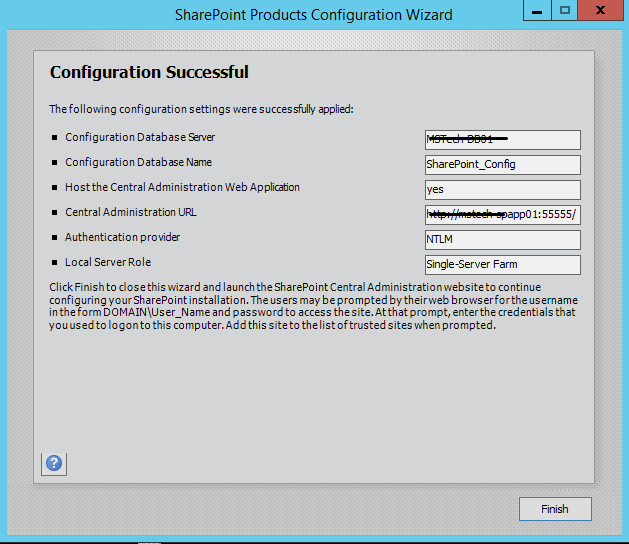
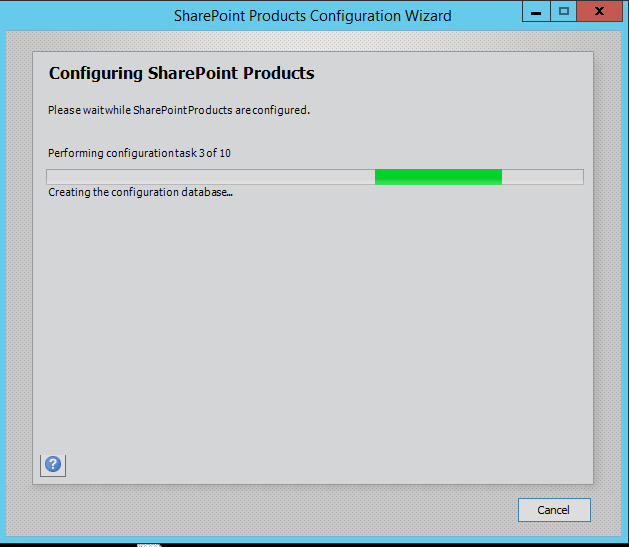
Step 10. Press Next button, it will start the configuration of SharePoint farm. This is similar to what we do in past with MOSS 2007, SharePoint 2010 and SharePoint 2013 or even with SharePoint Foundation which is no more part of SharePoint 2016.
Step 11. The wizard can take some time and if you get some errors then you have to verify the roles of the user in SQL Server.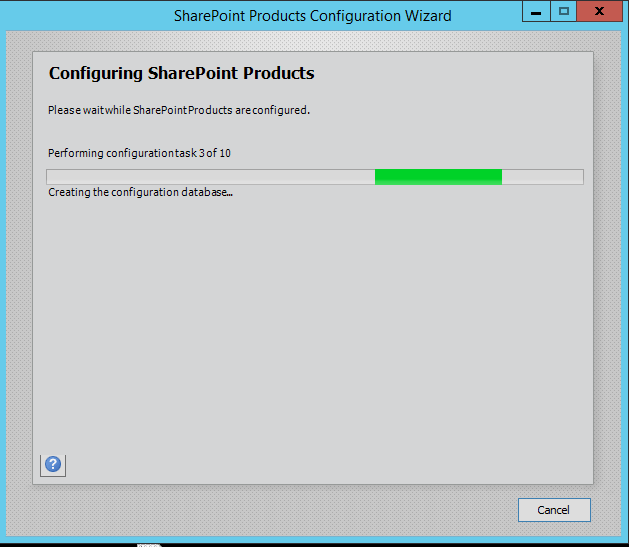
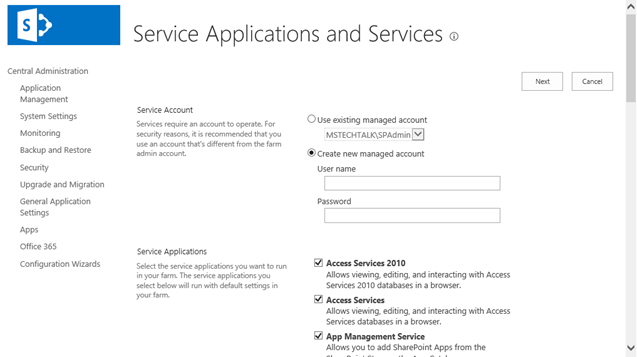
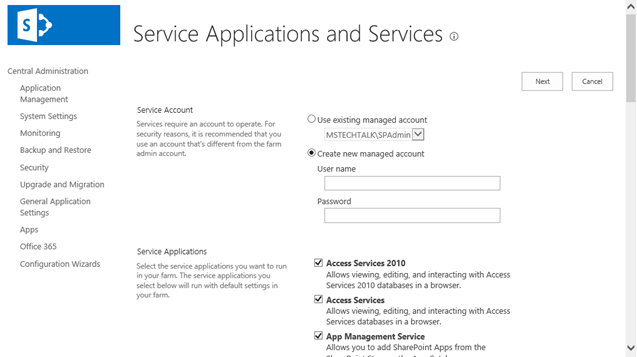
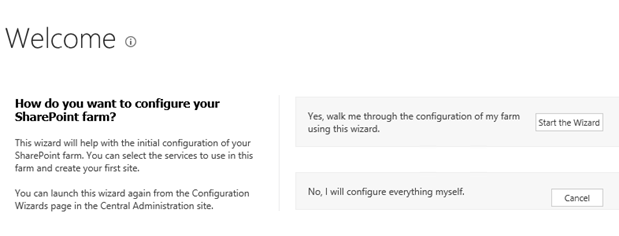
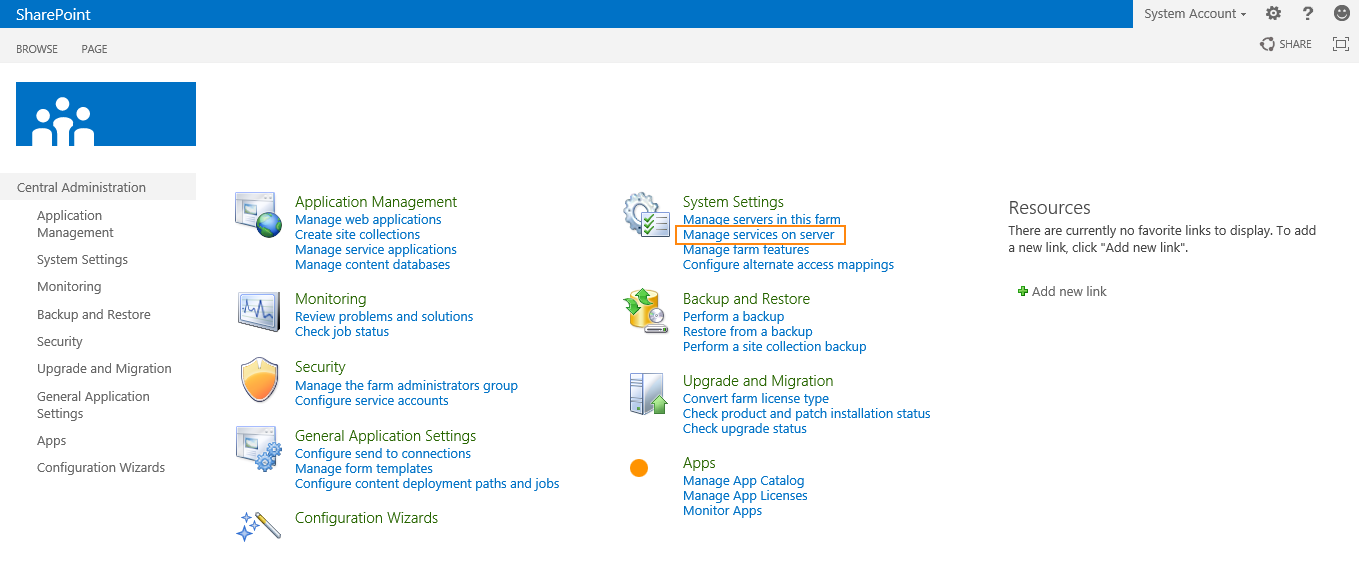
Step 12. After the installation, run the services wizard from Central Administration, setup will take you to the service configuration wizard page, you can either configure them through wizard and can also configure them manually.
Step 13.As this is test environment, so I will prefer configuring services using wizard. We can define a separate account for services but I am using the same SharePoint Admin account for all services.
Step 14.This will complete the services wizard for me and now I am ready to explore SharePoint.
Installation Instructions for Windows
Step 1) VM Creation:
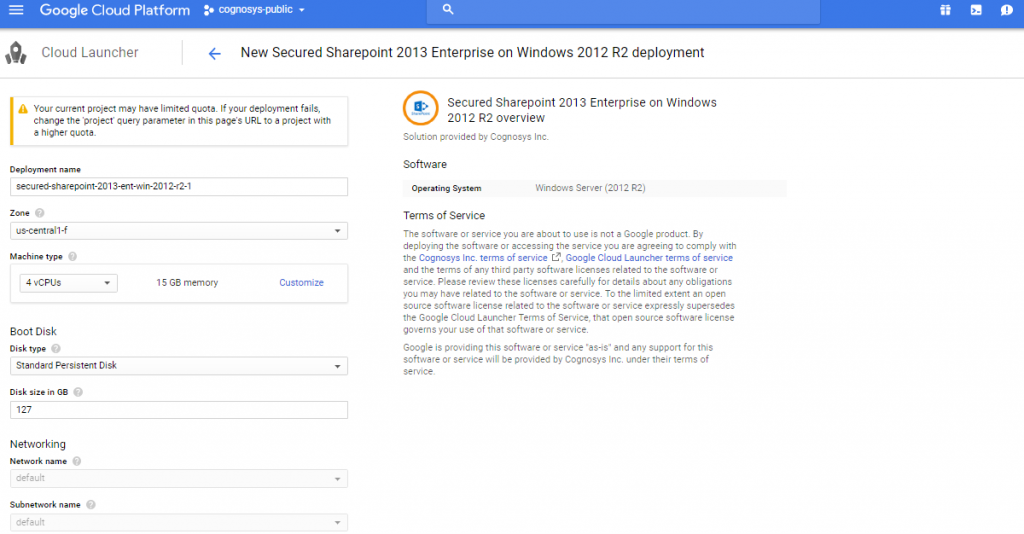
- Click the Launch on Compute Engine button to choose the hardware and network settings

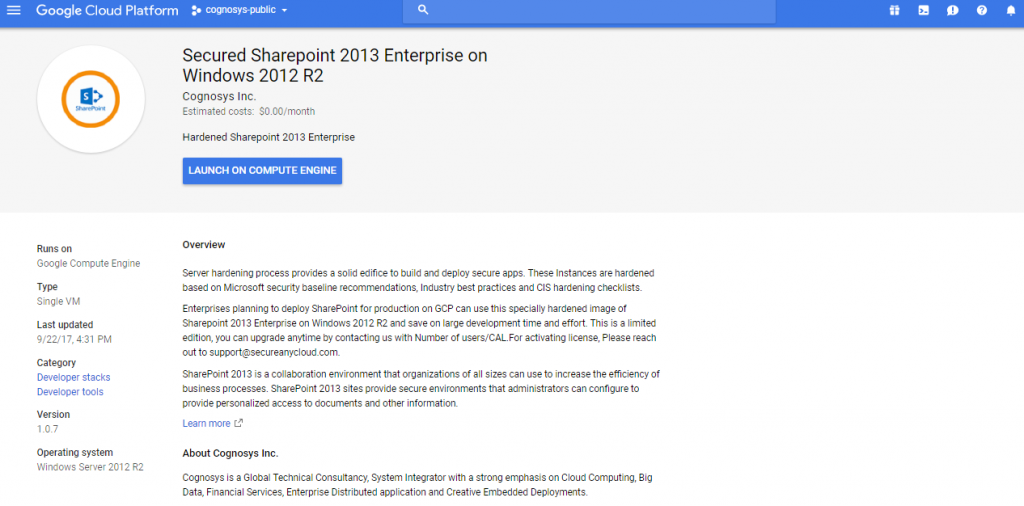
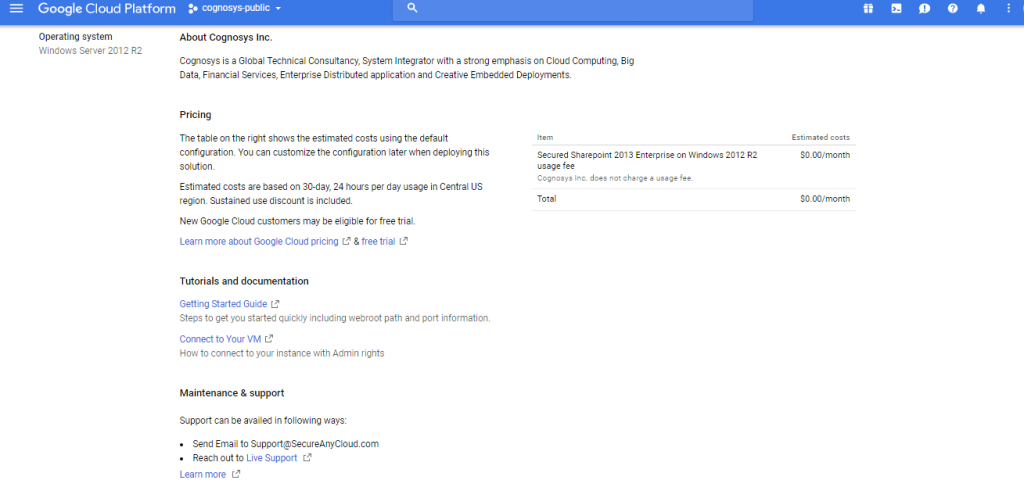
- You can see at this page, an overview of Cognosys Image as well as some estimated costs of VM.
3.In the settings page, you can choose the number of CPUs and amount of RAM, the disk size, and type, etc.
Step 2) Application Access Instructions:-
Click the Windows “Start” button and select “All Programs” and search for Sharepoint
Step 3) Other Information:
1.Default ports:
- Windows Machines: RDP Port – 3389
- Http: 80
- Https: 443
Installation Step by Step Screenshots
Step 1. Join the Computer to Active Directory and with Domain login open SharePoint Product Configuration
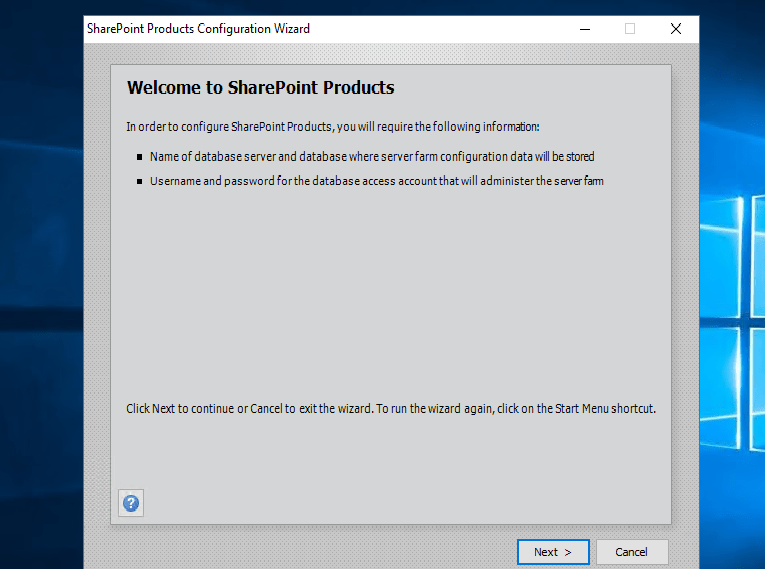
Step 2.Welcome Page SharePoint
Step 3.Select Create a new server farm option from the next step as shown in below screen if you are already have installed a new farm and doing a MinRole installation then select the first option to connect to an existing server farm.
Step 4.Enter the database server details and database access account details, use a separate user for this but I am using the same SPAdmin user for the preview installation. I have assigned it below rights in DB server:
- Dbcreator
- SecurityAdmin
- SysAdmin
Step 5.If you are facing issues in connecting to SQL Server then make sure TCP/IP is enabled in SQL Server Configuration Manager. If you still getting the error then turn off the firewall on SQL server machine.
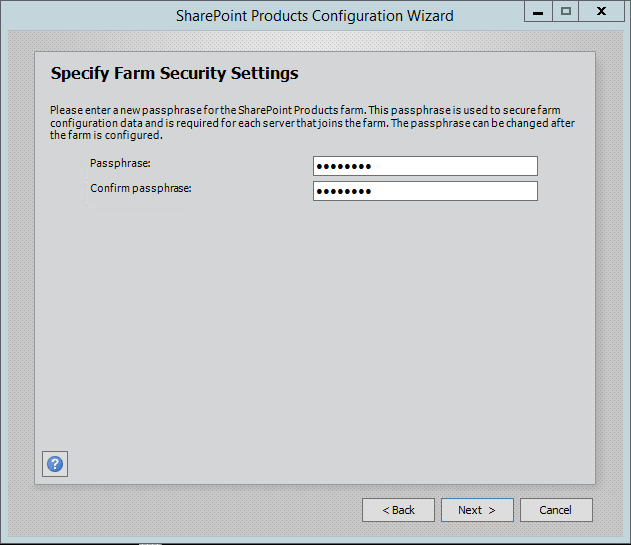
Step 6. After completing the database settings, press next which will take to you on Farm security settings page. Enter passphrase here which is required to secure the farm configuration data and is required for each server that joins the farm.
Step 7. Server Roles or the MinRoletopology
Here comes the MinRoles, SharePoint Server 2016 has six types of server roles:
- Front-end
- Application
- Distributed Cache
- Search
- Custom
- Single-Server Farm
You can either select single-server farm or can do a multi-server installation using MinRolestopology. If you have selected Single-Server Farm then you cannot extend to Multi-Server environment, so if you plan to extend to multi-Server farm in future then select the Custom MinRole or Application.
I am using single-server farm installation so will go with the last option.
Step 8.On next screen, you can specify the port for Central Admin or can use the default which is selected randomly. I have never used the default port, I always use an easy one which I can remember like 5555. Select NTLM installation mode at this phase and press next.
Step 9. Verify the settings in configuration wizard, press next to start the wizard. The advance option is not enabled for Single-Server installation.
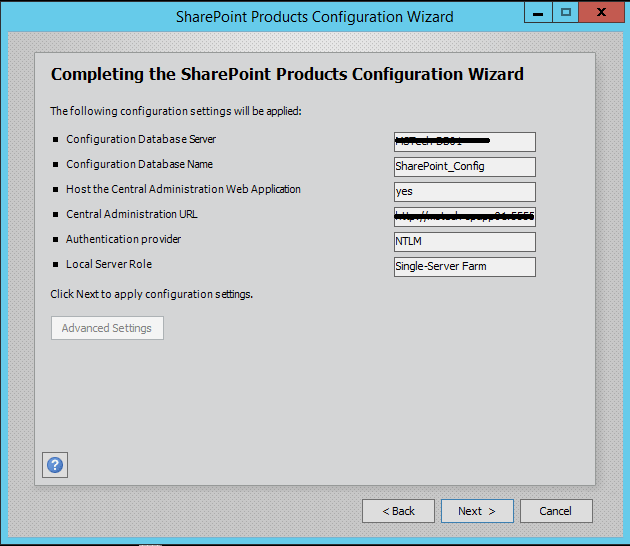
Step 10. Press Next button, it will start the configuration of SharePoint farm. This is similar to what we do in past with MOSS 2007, SharePoint 2010 and SharePoint 2013 or even with SharePoint Foundation which is no more part of SharePoint 2016.
Step 11. The wizard can take some time and if you get some errors then you have to verify the roles of the user
Step 12. After the installation, run the services wizard from Central Administration, setup will take you to the service configuration wizard page, you can either configure them through the wizard or you can also configure them manually.
Step 13.As this is test environment, so I will prefer configuring services using the wizard. We can define a separate account for services but I am using the same SharePoint Admin account for all services.
Step 14.This will complete the services wizard for me and now I am ready to explore SharePoint.
Videos

