1-click AWS Deployment 1-click Azure Deployment
Overview
Vtiger is one of the best CRM software that is built on Linux Apache Mysql (PHP) LAMP, with excellent built-in solutions that range from project and activity management to email marketing and a one-stop management solution provider for most enterprises globally. Vtiger CRM is an Open Source Customer relationship management Software that is suitable for all types of enterprises.With this Vtiger CRM one can manage enterprises with activities related to Inventory that includes marketing automation and salesforce, procurement and customer service and support. The add-ons and tools will assist in enriching your enterprises productivity. Some of them include Thunderbird Integration and MS office, MS Outlook, RSS, Customer Portal and others. The user friendly features are one of the advantages of VTiger CRM and the installation is available for both Linux and Windows and is very simple.
VTiger CRM is a great open source script for customer relationship management (CRM). It is one of the most popular CRM applications worldwide with more than four million downloaded copies by its users as it is an ideal product for small and medium-sized businesses and their needs.There are different versions of the software – a free one and a variety of paid option with multiple additional features, which you can check out and choose on the dedicated section of the official website of vTiger CRM .
The script was created by a group of Indian developers, who were previously working for SugarCRM but decided to build their own platform, based on their shared experience and functionalities but also extend the concept even more towards the inclusion and improvement of catalog management, interface, documentation as well as the integration of telephony.
VTiger offers its users extensive capabilities and features in order to meet the vast needs and specification of the different businesses it servers. There is even a dedicated team in the vTiger family, which can provide you with special customization services, if you need a specific and not currently available functionality to be added.The installation of vTiger CRM is done very easily as all of the needed components are contained within a single executable file and moreover, it is available for the two most widespread operating systems on the market today – Windows and Linux.
The CRM platform also offers to their clients an enterprise level business productivity enhancement add-ons, Outlook Plugin for the users of Microsoft Outlook, Customer Portal, various Office Plugins for the mail users of Thunderbird and all of those are 100% open source .
History of vtiger CRmeM
As you may already know, vtiger CRM is a fork of another CRM package called SugarCRM. SugarCRM was originally released under the SPL or “SugarCRM Public License”. It’s a modified version of the Mozilla Public License 1.1.
In 2004, Sridhar Vembu, CEO of AdventNet, created vtiger. SugarCRM was starting to “close” some of its source code for commercial gain. Vembu and the vtiger team created vtiger under the “honest open source” label based on SugarCRM’s own SPL.
SugarCRM was openly upset by this movement. They called vtiger CRM “a lie” and claimed they were not living up to “the spirit” of open source. However, the vtiger team claimed full compliance with the SPL and openly admitted that it was a fork. They also sent a letter to Eric Raymond, a well-renowned advocate of open source.
vtiger CRM states that they will protect the CRM to stay free with no dual versioning. Until now, vtiger has remained 100 percent open source and free. With the current version of vtiger — version 5 — vtiger has lost almost all SugarCRM code.
The technical components of vtiger CRM
vtiger CRM is built on Apache, PHP, and MySQL. We’ll review briefly each of these components below. Installation details follow in the next chapter.
Apache is another open source software project. Apache is a web server. A web server allows you to “host” a website. When you browse the Internet, Apache is what sends the content you’re viewing to your screen. Of the roughly 255 million websites that existed in 2010, Apache hosted about 152 million of them.vtiger CRM uses the Apache web server by default, although it can be configured to work with other web servers.Make sure you have a working installation of Apache 2.0.40 or above. Little experience with Apache is necessary for the use of vtiger.
PHP is another open source software project. It is a sophisticated scripting language that benefits from the contribution of developers all over the world. PHP allows you to process data among many other things.vtiger CRM is built on PHP. Over the last decade, PHP has become the scripting language of choice for many open-source and commercially hosted software packages. With vtiger CRM 5.2, PHP 5.3.x is recommended. If you have significant experience in PHP, you will have more potential for automation and more power in customizing vtiger CRM for your organization’s needs.
MySQL is a free, open source database management engine. It allows you to store, process, and retrieve relational data. vtiger CRM uses MySQL to store all of its CRM data.To run vtiger well, MySQL 5.1.x is recommended. Like PHP, significant MySQL skill will unlock the true potential for customization that vtiger has.
Smarty is a template engine designed for PHP. The result it that it separates the application logic (PHP) from the presentation or what you see on the screen. vtiger CRM uses Smarty to display its data, such as leads, accounts, and contacts.
You don’t have to worry about installing Smarty or its version, as it installs along with vtiger. Smarty is a PHP-based templating system that allows vtiger to create its various views and layouts and merge them with vtiger’s data layer, MySQL.
CSS (Cascading Style Sheets) is the standard by which colors and background images are applied in vtiger. If you are proficient in CSS, you can significantly change the look and feel of vtiger CRM and even make important usability improvements specific to your organization.So, if you have experience with Apache, PHP, MySQL, and CSS, vtiger is a perfect fit for you and your organization.
Getting started with the vTiger administration
It is not a coincidence that vTiger is one of the most popular CRM platforms on the market today with more than four million downloads. In fact, one of the main factors, contributing towards that, is the fact that it contains a lot of amazing features and offers its users great functionality and flexibility.
Here, we are going to start with some general overview of the vTigerCRM dashboard. You can access it by typing down your website’s URL on a web browser, click enter and sign in. Once you are at the Home Page, you will see that the main options, which you can choose from, are featured in the main menu at the top of the screen. We will cover them one by one:
Calendаr – in this section you will find the options to have a personal calendar and a shared one as well.
Leads – those are your unqualified customers, who you can target and with effort can be converted into regular clients.
Organizations – these are the institutions or just regular companies, that your business is associated with and that have certain significance for you.
Contacts – they are also known as your qualified sales leads, which contain valuable information about the person or organization.
Opportunities – comprises of your strategies to generate future revenue, represent potential sales and the ways to engage prospective customers.
Products – the goods and services, currently at stock in your Inventory.
Documents – all the files you have saved on your vTiger CRM application.
Tickets – request, generated by your customers, after the sale is made, most commonly for support.

You can also find all of the main options, together with the other ones, arranged in different categories, by clicking the All button at the top:
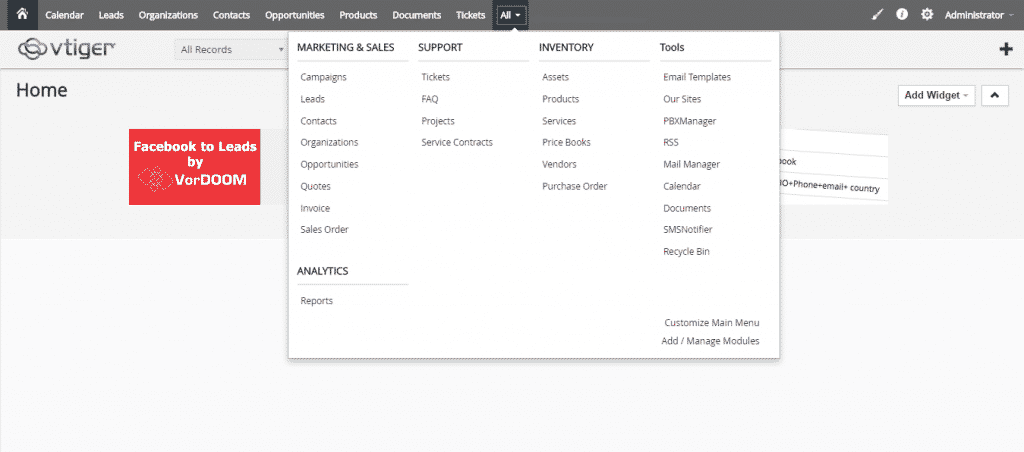
Next, on the Administrator button, you can find the My Preferences option, where you will be able to find the various personal preferences:

On the gear icon, are residing two options, which you can select, namely CRM Settings where you can manage all of your script’s main settings and the Manage Users where you can add/edit/delete new ones:

When you click on the “i” button you will be presented with three main options, which are:
Documentation, which will lead you to a specially dedicated Wiki section of vTiger’s official website Video Tutorial, which can be viewed on the same website as well .Feedback, where you can send your comments directly to the developers of the script:

On the left of it, you will see a brush icon, where you can choose the main colour of the menu of your website:

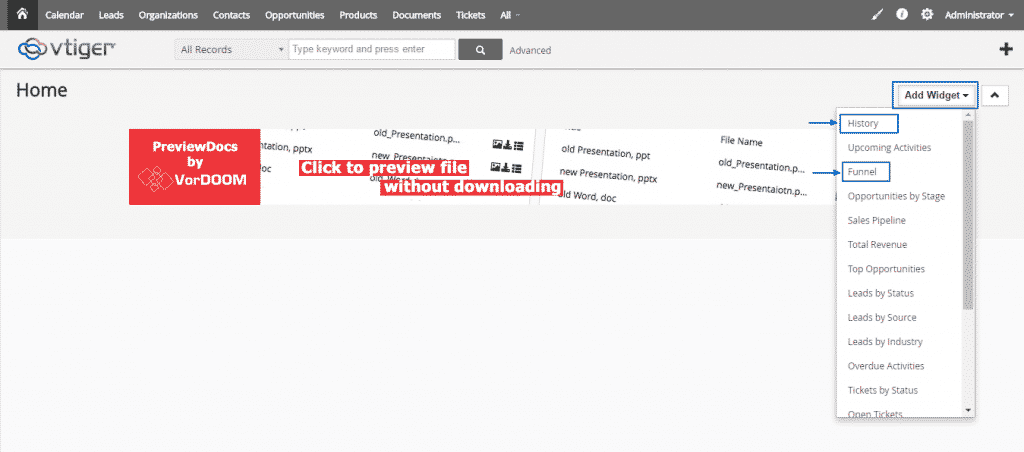
A great functionality built within the vTiger CRM is the Add Widget option, where you can add a list of selected widgets to your Administration Panel home page. As an example, in this tutorial, we will enable History and Funnel:
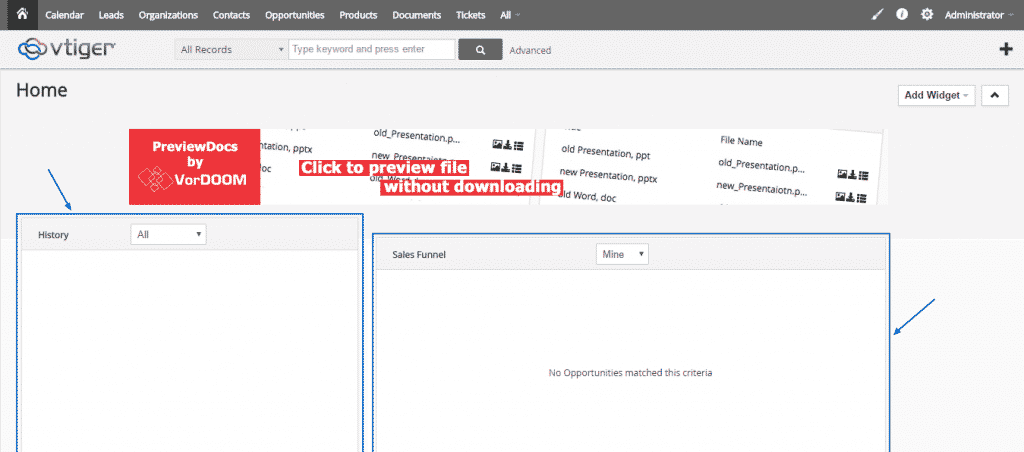
Here, on this screenshot, you can see how the two options are now appearing on the home page, where you can move, rearrange and resize them, according to your needs:
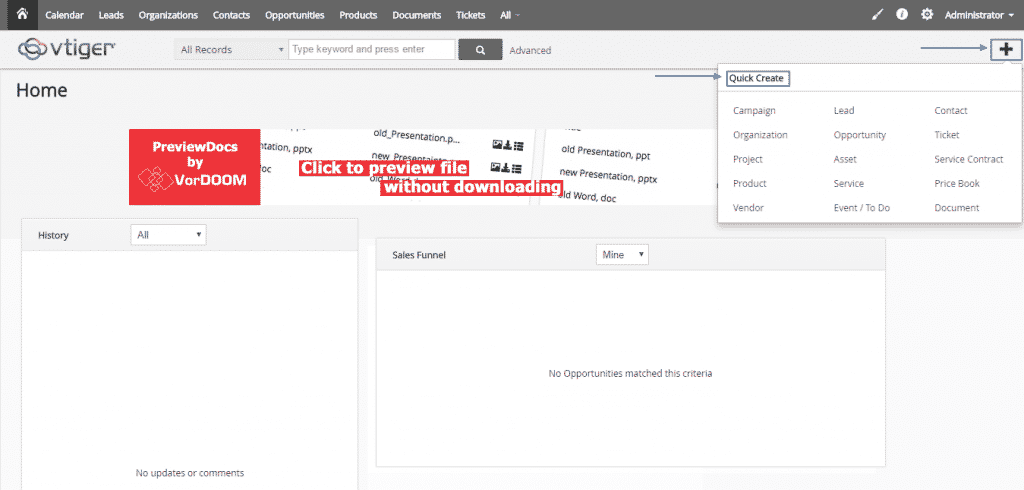
You can use the Plus button on the right, to create Campaigns, Tickets, Projects and many others in a quick and easy manner:
At the top of the screen, you are able to type keywords and then press the button on the right to initiate a search:

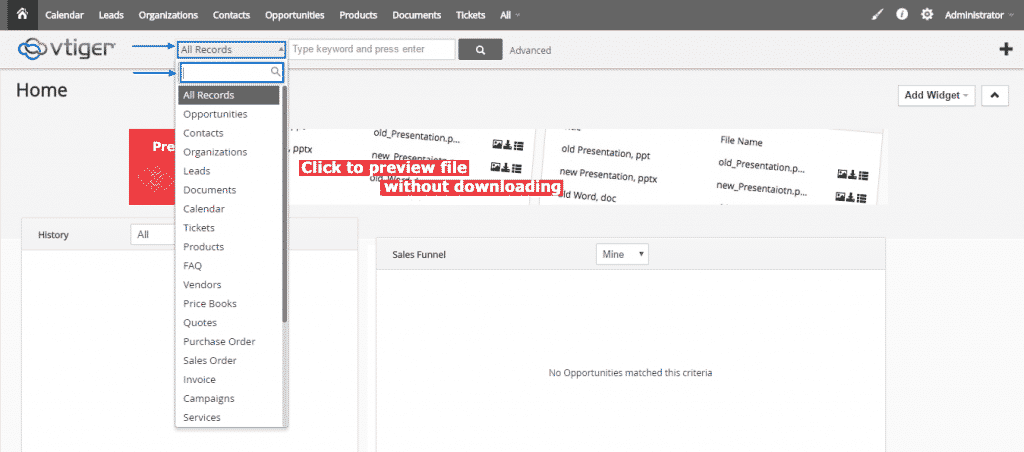
There is also option for searching in certain records, if you do not want to use the default All Records search process:
In the middle of your screen, you will also see a banner:
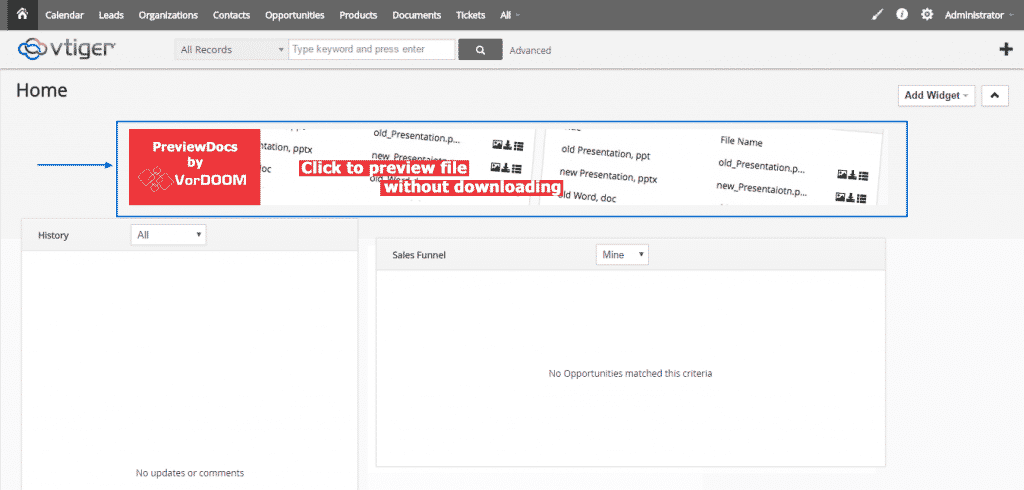
If you click on it, you will be redirected to the Settings page with the Extension Store for vTiger CRM:
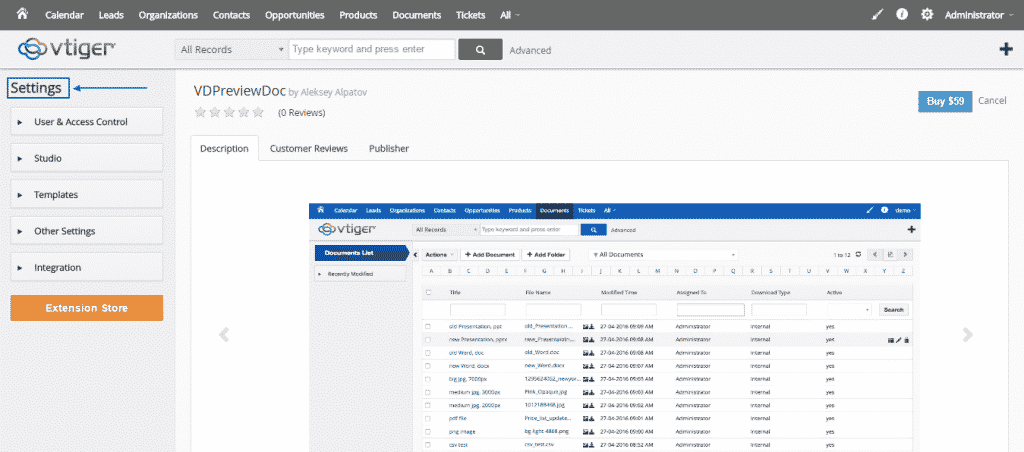
Back on the home page, if you click on the arrow at the right, you will make the banner disappear and when you click on it again – to reappear:

These are the basic options of vTiger CRM’s Dashboard .
How to install vTiger Manually:
VTiger CRM, being one of the most popular scripts of its kind on the market today with more than four million downloads, has a big community of active users, who can help you out with advice at any given point. The latest version of this platform offers amazing functionalities for your small or medium-sized business and it is just one install away with our special vTiger hosting packages.
As mentioned before, there are two ways in which you can install your vTiger CRM – automatically or manually. In this section of the tutorial, we are going to focus on the latter. Here are the steps, which you need to follow to perform a manual installation of vTiger CRM by yourself.
First, you have to download the most recent version of the application from the official website of vTiger CRM on your computer. When you do that, you should then unzip its content. Afterwards, you must upload the already unzipped content into the root directory of the script via FTP.
Before you proceed further, have in mind that you will also need an empty database. Make sure you have one available, or if you don’t – just create new one through your cPanel.Then, you will just need to access the root folder of your vTiger CRM by typing the URL in your browser:yourdomain.com
Make sure that you include the subfolder’s name in the URL. If, for example, there is a subdirectory named “vtiger” in your public_html folder and the script’s files are uploaded in it, your URL should look like this:
yourdomain.com/vtiger
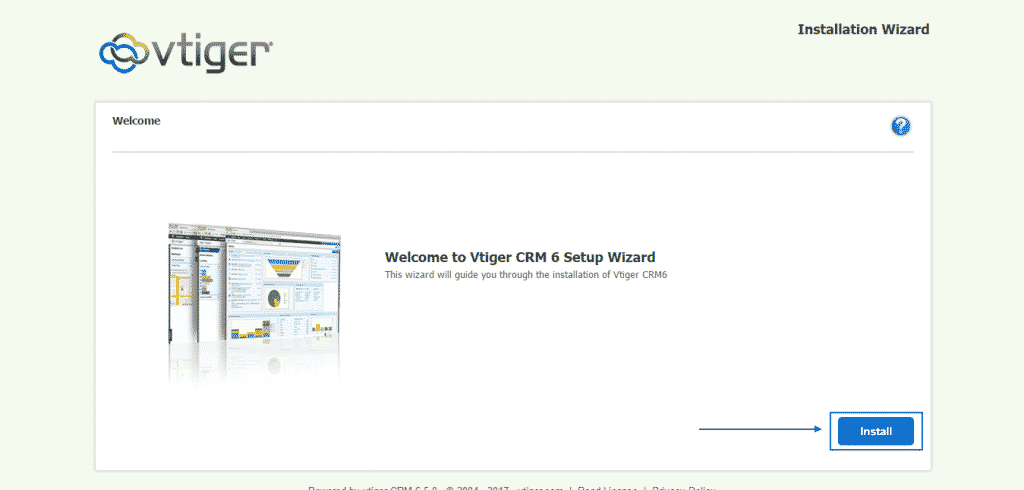
As soon as you type down the right URL and press Enter, you will be redirected to vTiger’s Installation Wizard, where you need to select the Install button:
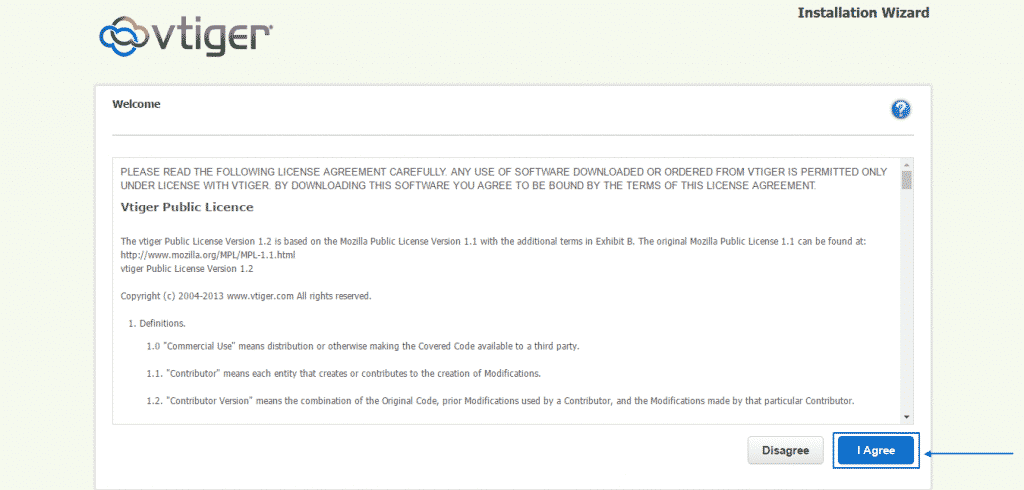
Then, you will see the full Terms & Conditions. You can read them and then click on I Agree:
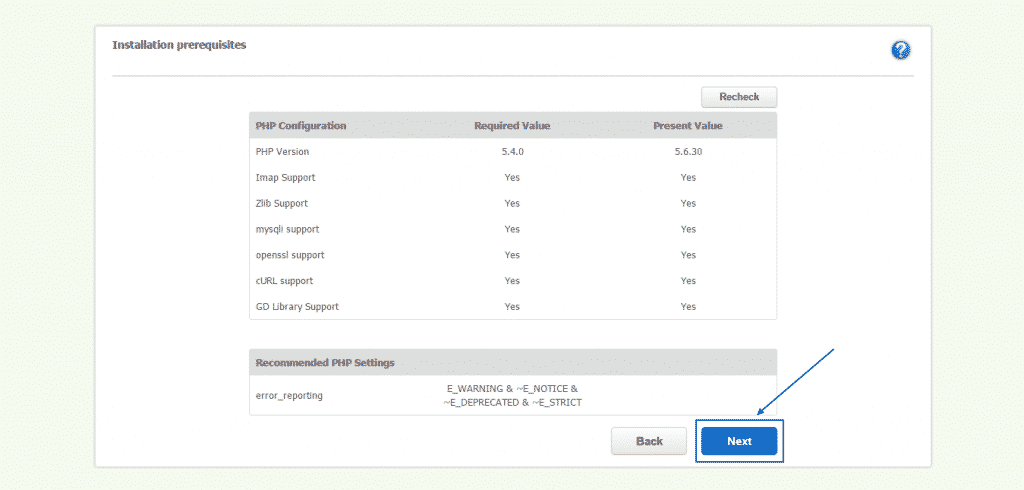
Next, you are going to see the PHP Configuration and recommended PHP Settings and then press on Next:
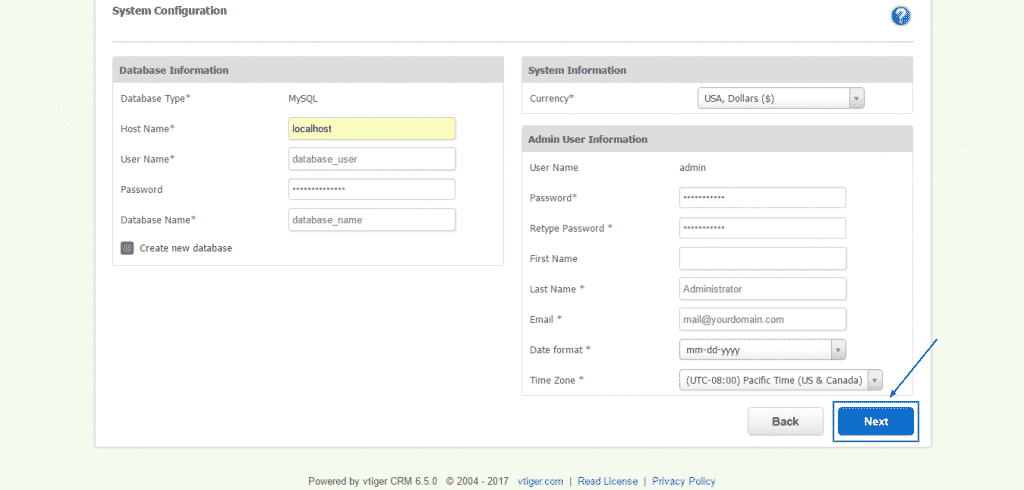
Afterward, in the System Configuration section, you will be able to fill in all the details of the newly created database, to set the preferred currency as well as to add all the needed user information, including the date format and time zone. When you are sure that all of the details are correct, simply click on the blue Next button at the bottom:
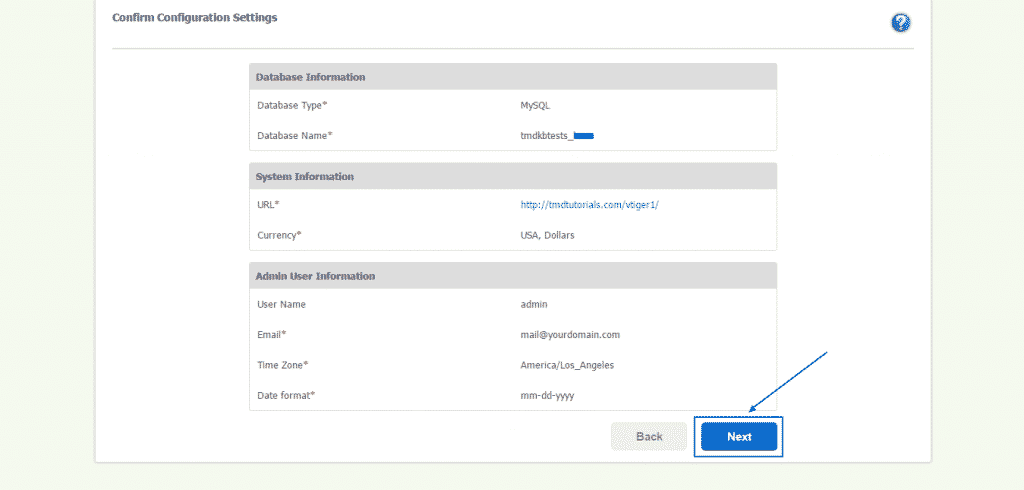
You will then see a confirmation page of the main information, you have just filled in and you need to press on Next again if everything is alright after the double checking:
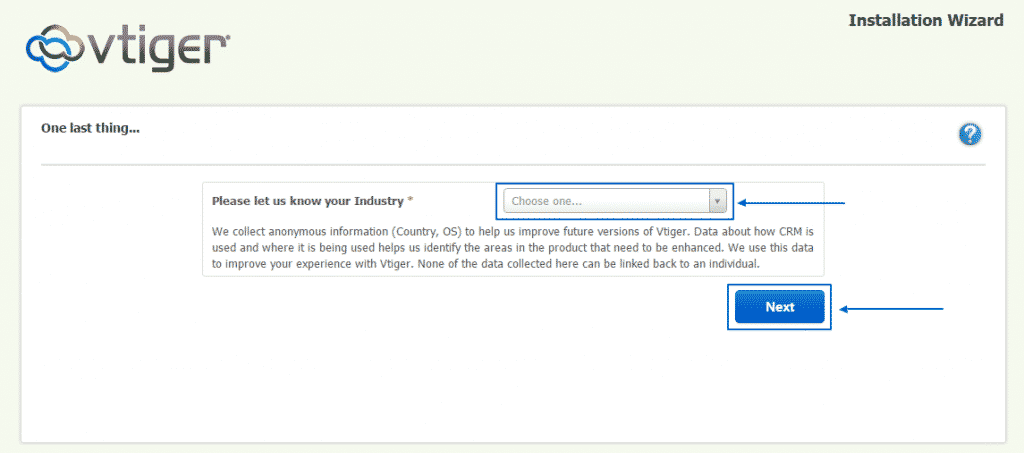
Then, vTiger is going to ask for the industry in which you are operating. You just have to select the proper one from the drop-down menu and select the Next:
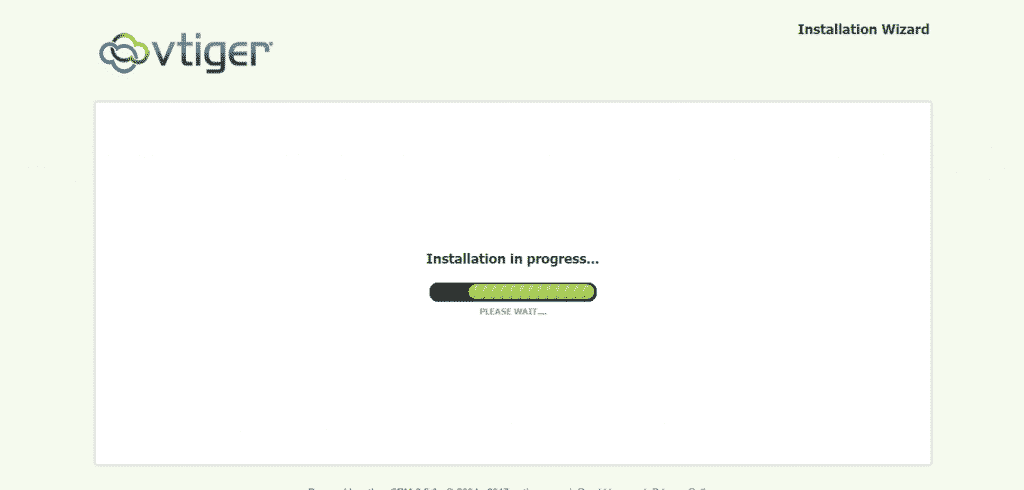
The installation will take some time, during which you will see the screen below, with the moving installation bar:
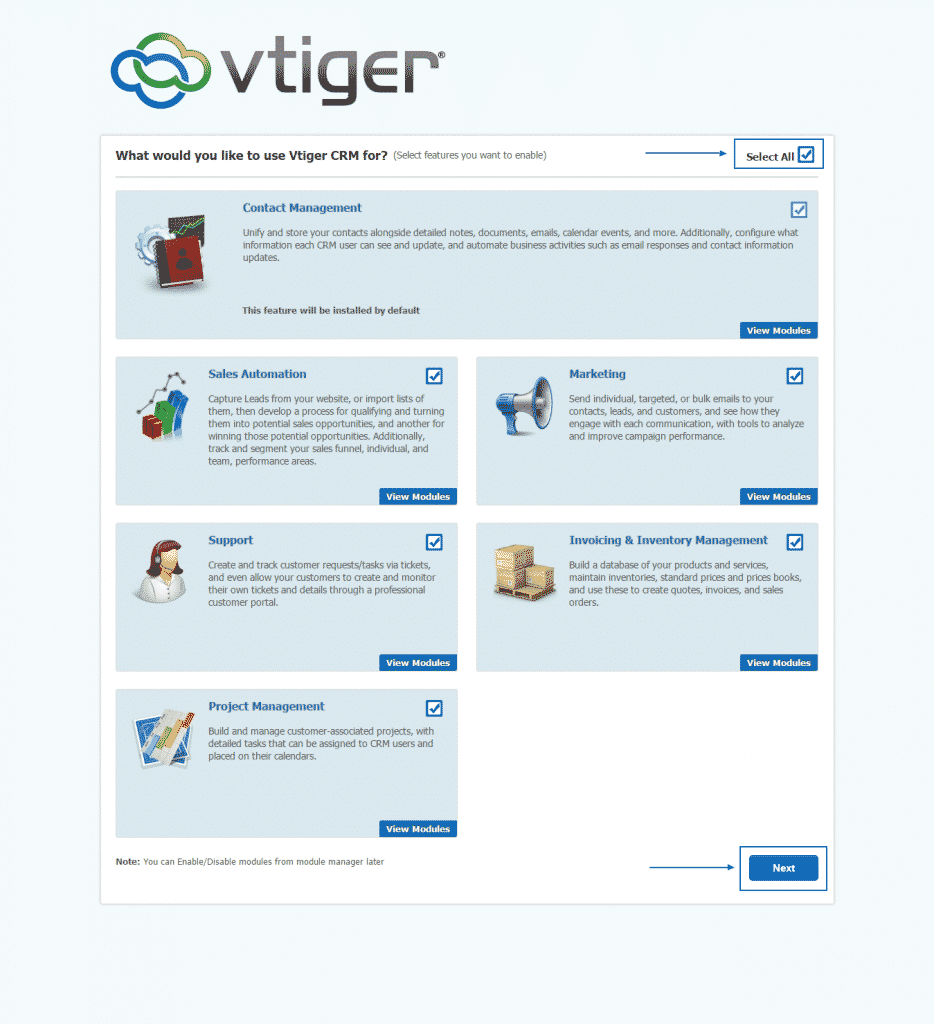
Once the installation process of vTiger CRM has been completed, you will be redirected to a page, where you can select the features, you want to enable, based on your needs. For the purposes of this tutorial, we have selected all of the options. After you are done with the selection, click on the Next button one final time:
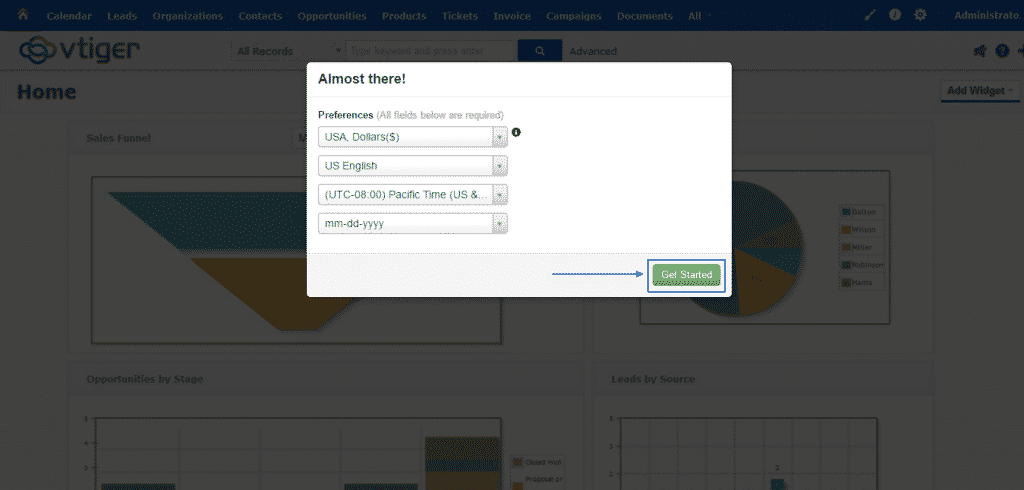
Finally, you will be presented with the opportunity to set key preferences, such as the currency, the language and the timezone of your vTiger CRM installation and then just select the green Get Started button to get into and start working on your online project:
vTiger Themes
Changing the theme/template with Vtiger is quite an easy task. Generally, you will just have to download the theme archive, extract it to your local computer and upload it to your ‘Vtiger/themes’ folder. Note that once you have chosen the desired theme you will need to download it locally for your computer and extract the archive.
The theme can be uploaded using an FTP connection via your favorite FTP client. Navigate to your Vtiger folder, enter the themes folder (themes) and upload the whole extracted directory. This will create a new sub-folder with the theme name.
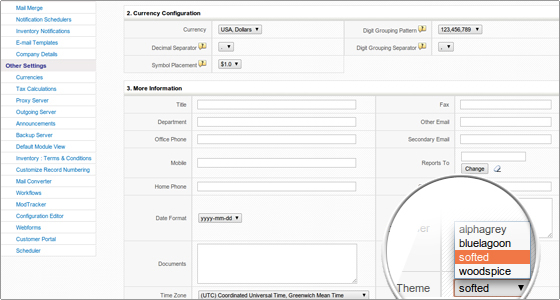
Once uploaded, the theme will be available for use with your vTiger web site. You will be able to choose the desired theme for the chosen user from the drop-down menu under the vTiger admin area -> CRM Settings -> Users -> Edit:
How to use vTiger CRM:
How to create contacts in Vtiger CRM:
Contacts are people related to sales accounts. There is a tab Contacts which brings you to a list with all the contacts. You can add contacts from this page.
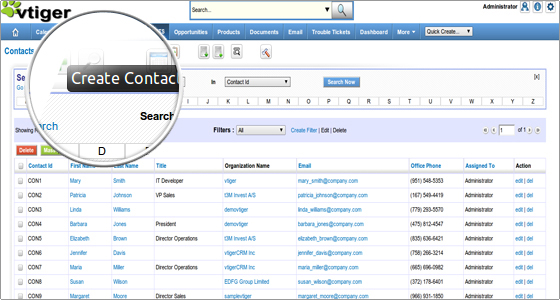
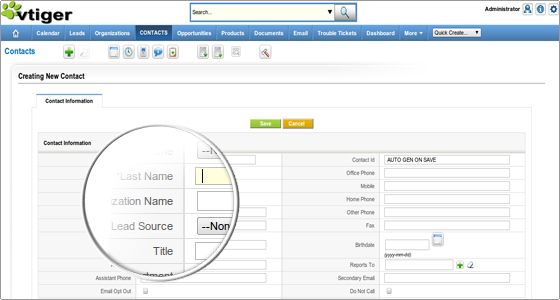
By clicking on the Create Contact link on the top-level menu you are taken to a page with numerous fields. There you can store quite detailed information about your contact. You don’t have to fill all the fields, but Last Name is mandatory.
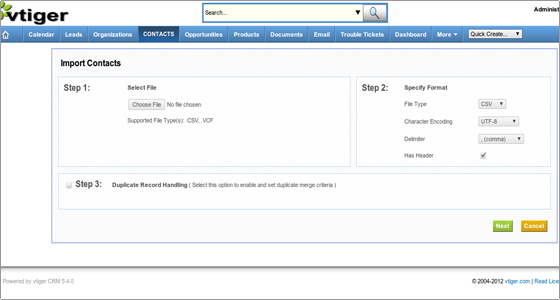
Another way to add a new contact is by the Import Contacts shortcut in the Contacts menu. There is a possibility to import a contact from a vCard or a .csv file.
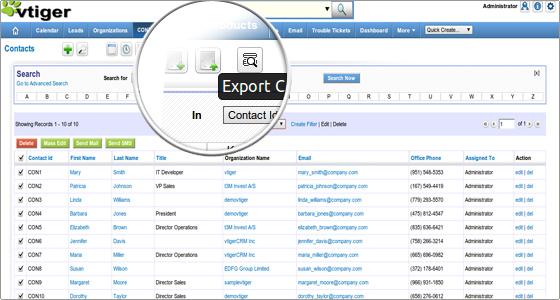
It is useful to know that Contacts can be exported to a .csv file. This can be done by checking the box next to the contact’s record and clicking on the Export icon in the Contacts menu.
How to create documents in Vtiger CRM?
For managing your documents click on the Documents tab. Creating documents is just as easy as everything else in this very user friendly application. You have a link for creating documents on your top shortcuts menu.
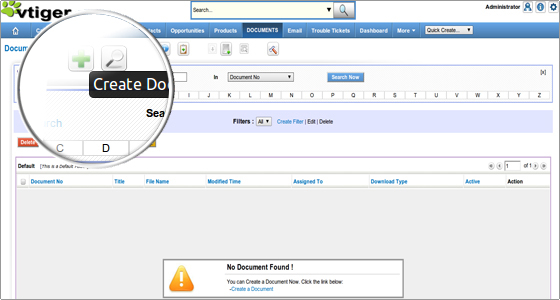
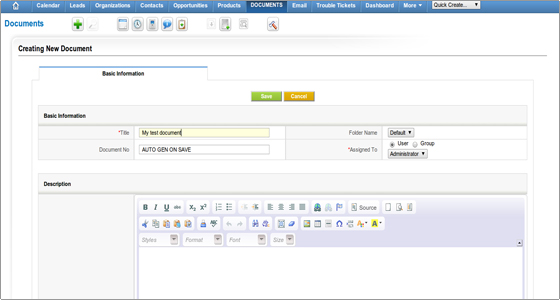
It is recommended to fill in as much information as you have so that everyone can benefit from it. The only mandatory field is the document Title. Once you are ready save the new document.
Creating Leads, Opportunities, Products or Invoices is similar to the mentioned above. Just follow the links on the top-level shortcuts menu on the home page. Click on the corresponding tab for more details and operations.
How to create contacts in vTiger CRM?
It is actually an extremely easy thing to do. As with other features – it is designed to be executed effortlessly and intuitively. You just need to follow a couple of steps. The first thing you need to do is to access your vTiger CRM’s Administration Panel. Once you are there, simply locate the Contacts option at the top of the page and click on it:

It will lead you to the Contacts main page, where you will just need to select the Add Contact button, with the plus sign in front of it, in order to proceed further:

Afterwards, you will be redirected to the Creating New Contact area of your vTiger CRM. You will see, that there are multiple sections, where you can put information about the new contact, namely: Basic Information, Customer Portal Details, Address Details, Description Details and Profile Picture, where you have the option to upload a file from your computer. Which sections you decide to fill in is totally up to you, but make sure you do have input in the Last Name and Assigned to rows, as they are mandatory to be filled in:
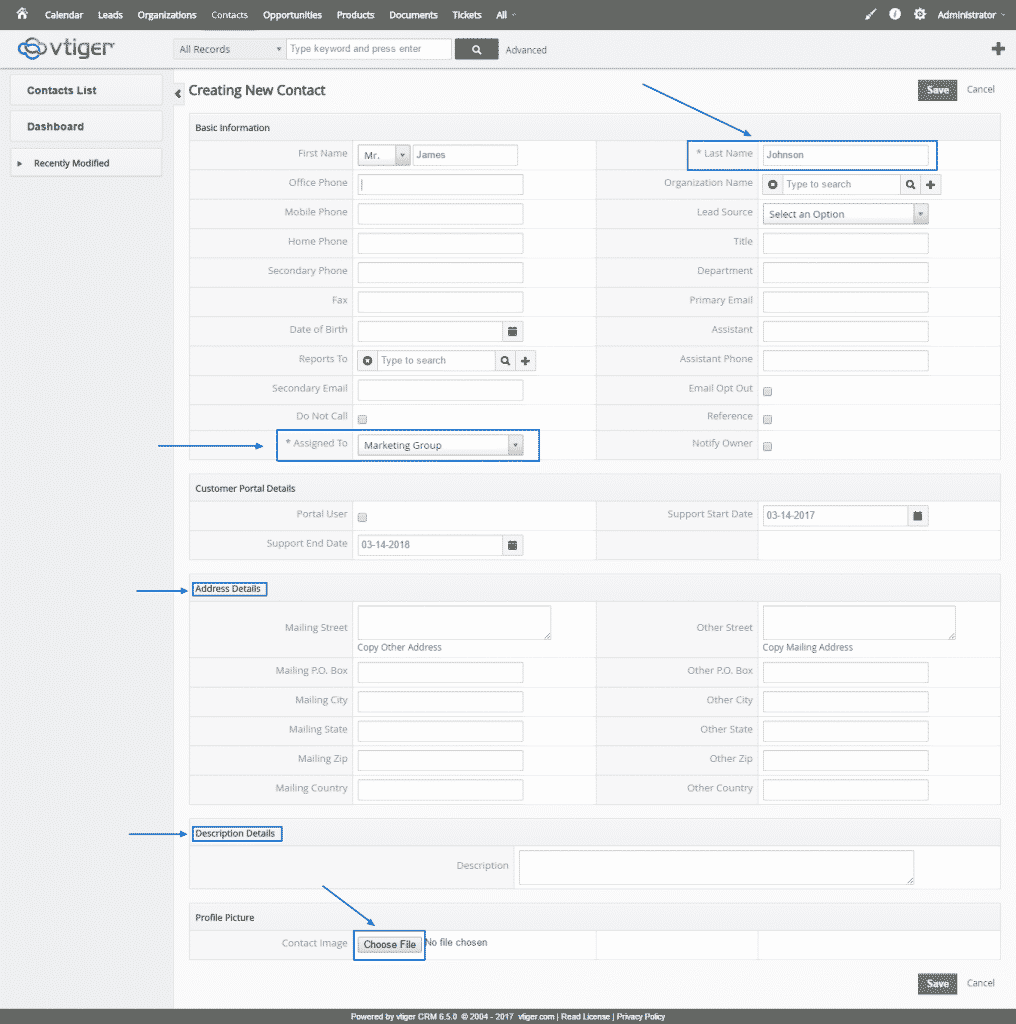
Finally, when you make sure that everything is filled in correctly, your only step needs to be to click on the green Save button, either at the top or at the very bottom of the page and the process of creating a new contact in vTiger CRM would be successfully complete:

vTiger Email Setup
The vTiger users can setup an email for their accounts and have their messages checked directly through the vTiger application.
To access the webmail functionality open the vTiger admin area and navigate to More -> Mail Manager.
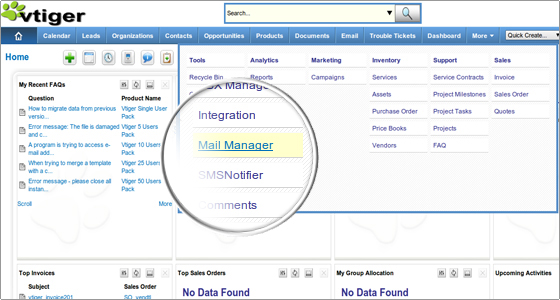
If the email account is still not setup you should enter the corresponding details. Pick the mail server type from the corresponding drop-down menu.
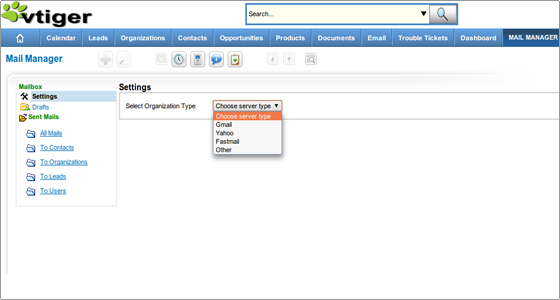
Note also that each user can setup separate email account that will be checked.
Incoming mail server configuration
There are several settings that are mandatory for the vTiger webmail client configuration.
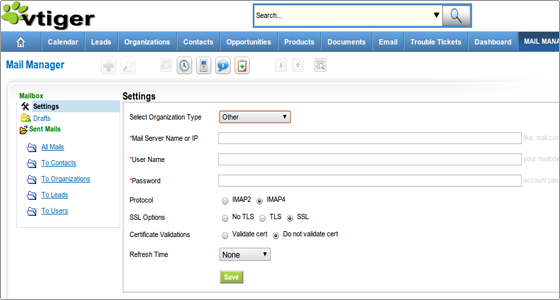
You have to enter all configuration data as described below.
Mail Server Settings
- Mail Server Name or IP – You must enter the address of your mail server. You may use the host/domain name or the IP address. For example: mail.yourdomainname.com
- User Name – You must enter the user name you use to access the mail server. Most commonly this is again your full email address. For example: username@yourdomainname.com
- Password – The password for the email account you want to use.
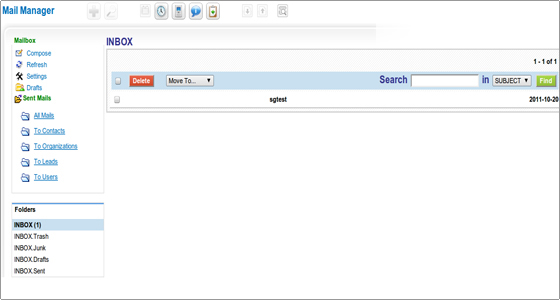
.Those are all the necessary settings. All other options can be left as they are or adjusted according to your needs. If the settings were properly entered you can check your email through vTiger.
Outgoing mail server configuration
The Outgoing mail server configuration can be set through the vTiger admin area -> CRM Settings -> Other Settings -> Outgoing Server.
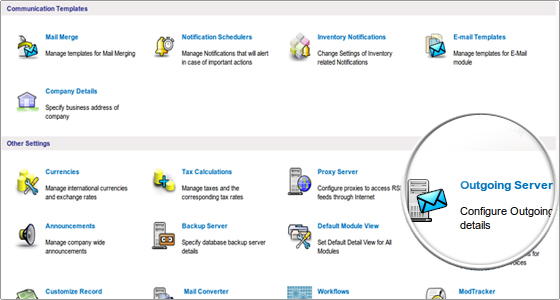
Click on the Edit button.
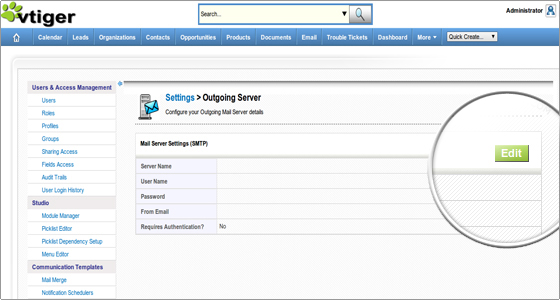
There are just a few options you need to enter here:
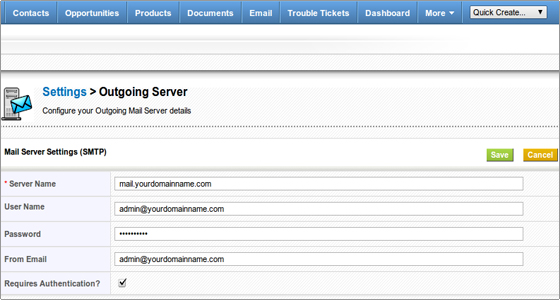
- Server Name – You can use the mail server name or your domain. For example: mail.yourdomainname.com
- User Name – Again you should use the complete email address. For example: username@yourdomainname.com
- Password – make sure that this is the correct password for the email account.
- From Email – You can use the same e-mail address that you have entered in the User Name field.
- Check the Requires Authentication box.
That is all. The vTiger email settings are now successfully configured and you can use vTiger to check your email and send messages.
How to add extra languages to your vTiger CRM:
vTiger CRM is one of the most popular scripts of its kind with over 4 million downloads worldwide. And one of the reasons for its popularity is the fact that it is available on 16 of the most used languages, thus covering the majority of users.
An additional factor for its popularity is also the ease of use of the script. While using many other ones, you must go through a rigorous and lengthy process just for changing the language. With vTiger CRM this procedure is effortless and requires very few simple steps.
First of all, you need to enter your Administration Panel. When you have logged in, select Administrator and then press on My Preferences at the top right corner of the page:
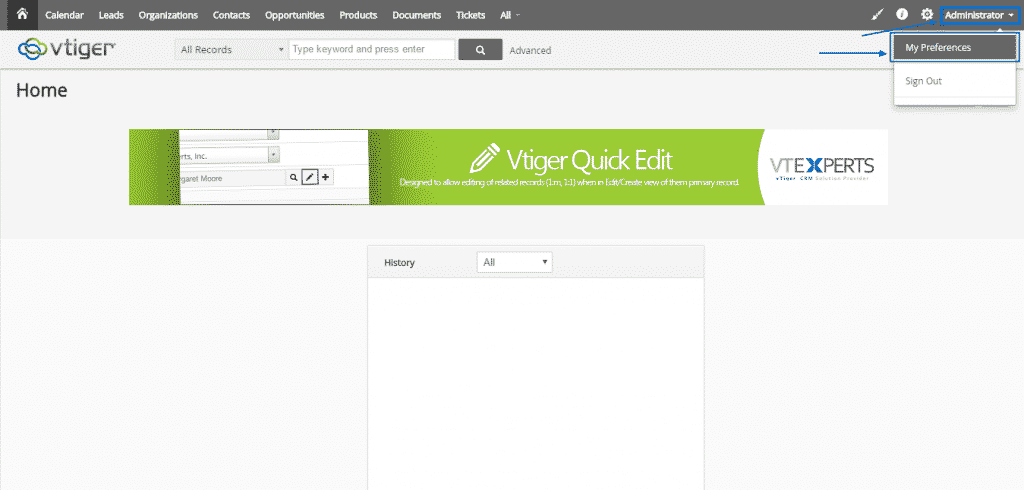
Once you land on the My Preferences page, simply click on the Edit button at the right corner:

After you have enabled the Edit option, you have to scroll down to the More Information section, where you will be able to locate the Language row. The default language is set to US English. If you want to change it, simply press it:
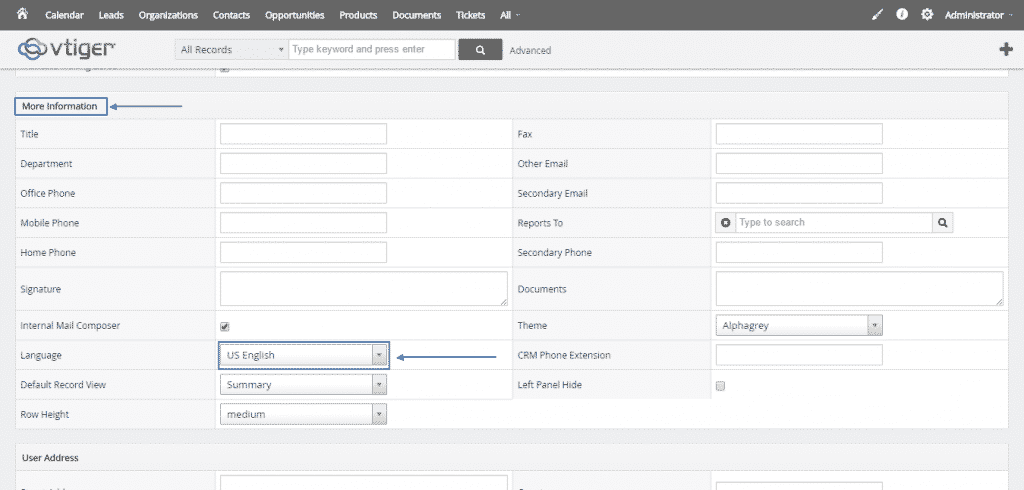
A drop-down menu will appear, where you can browse through and choose your preferred language. For the purposes of this tutorial, we are going to select ES Mexico (Spanish):
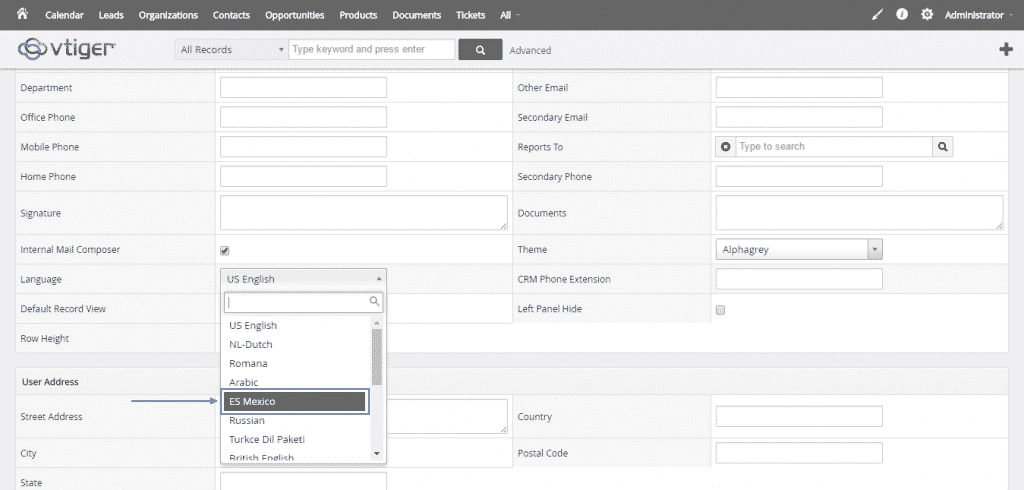
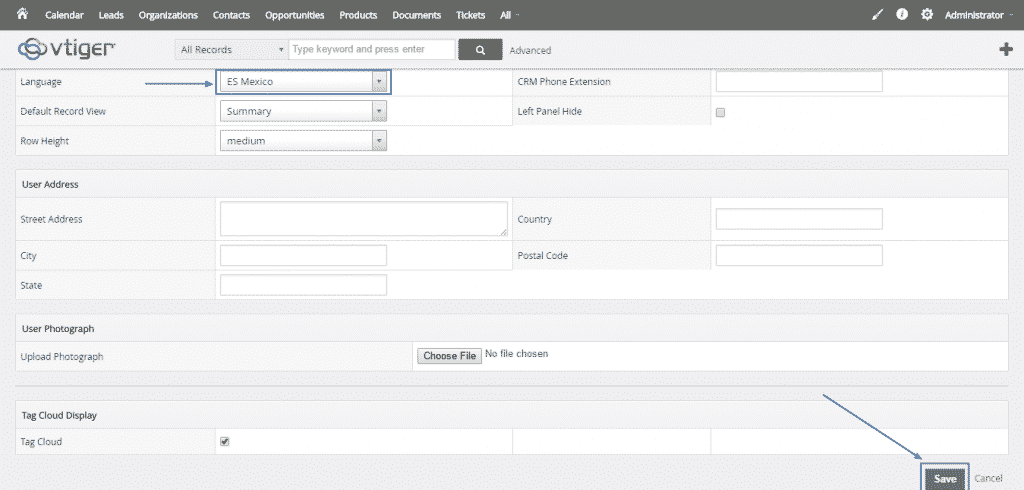
Finally, after you make sure that the proper language is selected, simply scroll down to the bottom of the page and click the green Save button on the right, thus, completing successfully the change of the language:
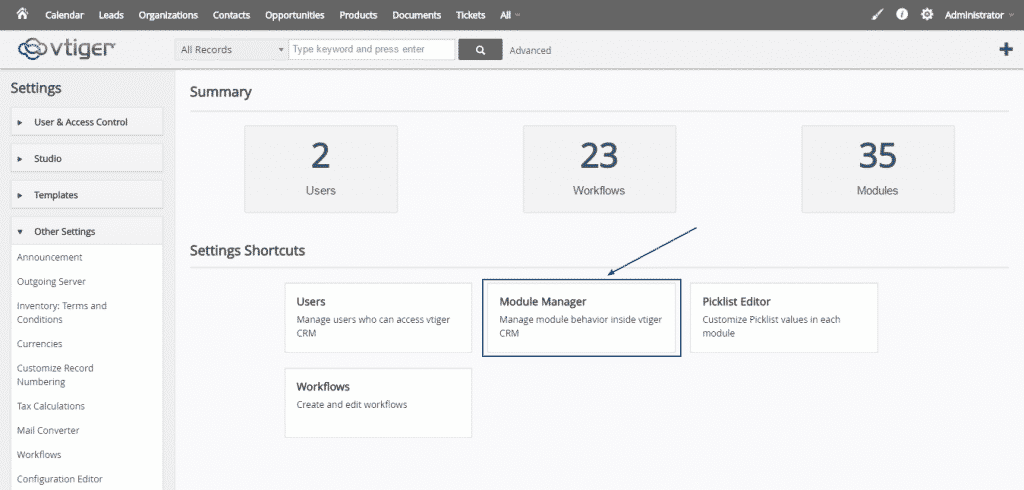
Alternatively, if the language you wish to use is not present in the default installation of your vTiger CRM, you can add another language pack as well. To do that, you need to go to the gear button and select CRM Settings:

Once the Settings page is loaded, choose the big Module Manager bar:
Here, you simply have to press on the Extension Store button at the right corner:
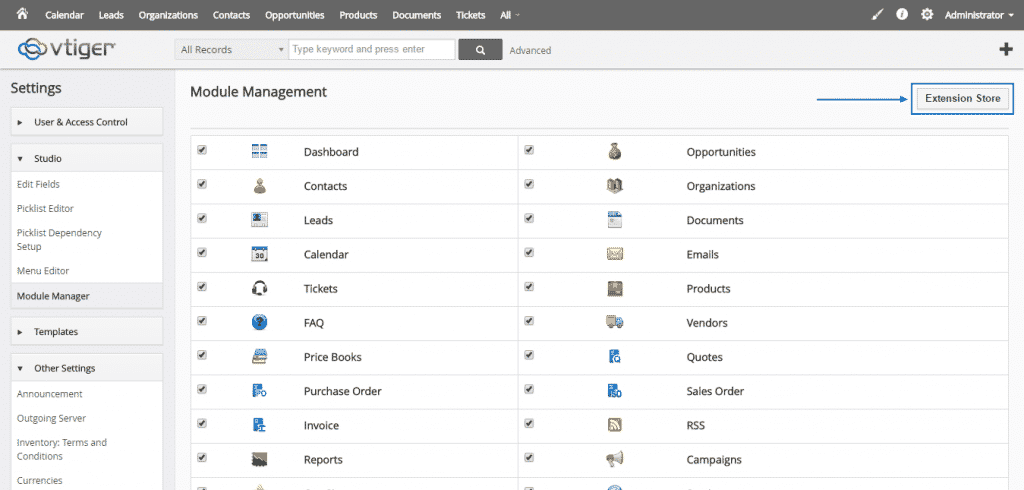
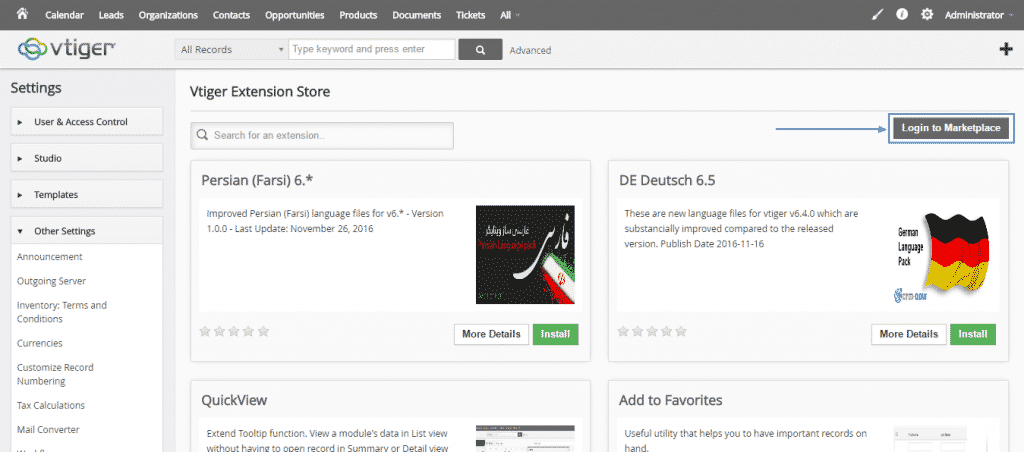
As soon as you enter the vTiger Extension Store, you must login into the Marketplace:
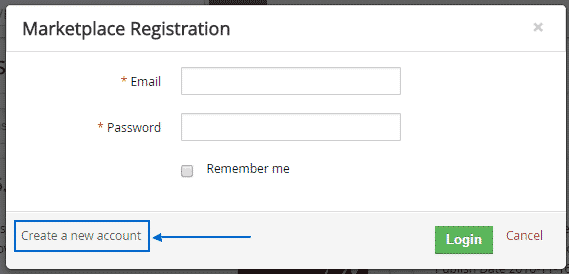
It will ask you for the email and password you have registered with. If you do not have a registration yet, you can create one easily through the Create a new account option at the bottom left corner:
After you are logged in, you just need to find the language pack you want and click on the green Install button:

Just before the installation actually starts, a message will appear and you only need to confirm you wish to continue with the process:

vTiger Backups
There is no backup tool included in the application.In order to create a full backup of your Vtiger web site you need to export the database and download the files from the server.
The database backup can be generated through cPanel -> PhpMyAdmin. Open PhpMyAdmin and choose your Vtiger CRM database. Then click on the Export tab. Next, select all the tables. Also, check the Add DROP TABLE option from Structure options and then click Go. You will download the sql dump file on your computer.
You can restore your backup by importing the mentioned sql file into a database for Vtiger. Open again your cPanel -> PhpMyAdmin and choose the vTiger database. Click on the Import tab, browse for the sql file on your PC and click Go. The database will be populated with the backup data.
After the database backup procedure continue with the files. The easiest option is to copy the whole folder with Vtiger from the server to your local PC using an FTP Client. Later, when you want to restore your old Vtiger just copy back the files from your PC to the server in the proper folder.
The benefits of the Vtiger CRM :
1.The user interface is very easy and simple.
2.It provides rich user-experience with excellent customer support and product customization and allows post-sales and pre-sales activities can be integrated in a single application.
3.Vtiger CRM software is web based and integrated with set of over 40 tools.
4.Licensing cost is zero and only support and customization charges are applicable.
5.Helps in enhancing customer relationship by providing modules related to file attachments and email notification and to manage customer details.
6.Helps in identifying the customers that are lucrative that will help in increasing sales by anticipating the needs of the prospective customers and in turn helps in better marketing efforts.
7.The innovative options in the Vtiger CRM help in reporting the issues of the customers and helps in increasing customer satisfaction.
8.To enhance work-flow and communication Vtiger effectively integrates with other Microsoft plug-ins.
9.Apart from these benefits, there are Email Marketing, Calendar and Task Management, Document and File Management, Inventory Management, Teams and Access Control, Integrations and Extensions and Reporting that makes Vtiger one of the best CRM.
-Vtiger CRM is a full-featured CRM software ideal for small and medium businesses, with low-cost product support available to production users that need reliable support.Vtiger CRM helps you bring the full potential to life in marketing, sales, and overall customer service.
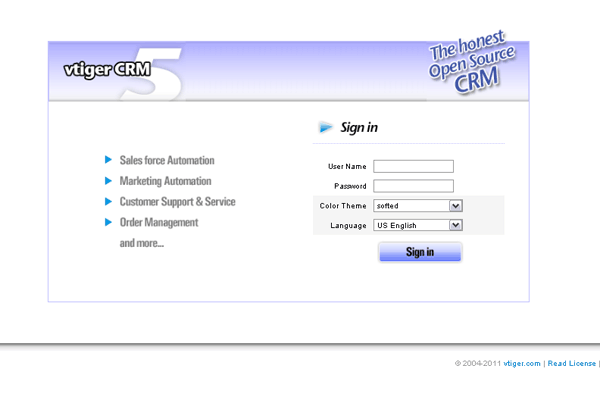
Login Page
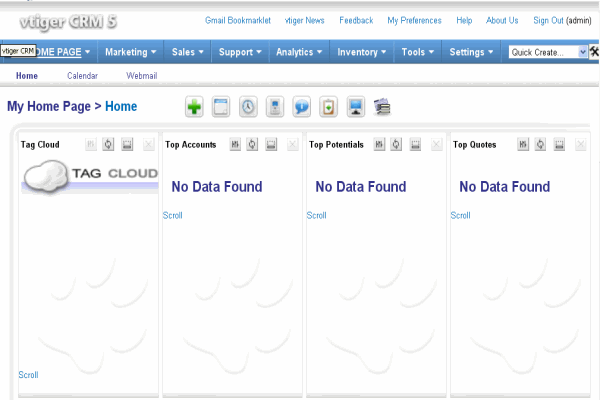
Home Page
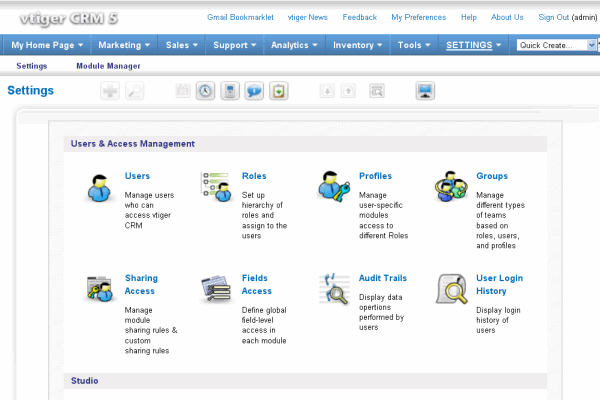
Setting
Vtiger Public License 1.1 (VPL 1.1) is based on the Mozilla Public License (MPL 1.1), and provides free use to anyone using it under the provisions of the license, covering the following add-ons: Vtiger Outlook Plug-in, Vtiger Thunderbird Extension, Vtiger Office Plug-in, Vtiger Customer Portal.
Features
Features of Vtiger:
Lead Management, Sales Force Automation, Activity Management, and Customer Service are at the core of vtiger. However, there are plenty of other features that extend this core. There are also billing, inventory, email integration, and calendaring features that really start to build out the full-featured CRM that vtiger is.There won’t be an extensive consideration of all of vtiger’s features in this chapter, but we’ll get an overview of the core features that have to do with sales force automation. Few of the features are mentioned below:
First, here are some brief definitions of the terms that vtiger CRM uses. A Lead represents a company or a representative of a company that may have an interest in your products or services. A Potential is a lead that does have an interest in your products or services. An Account is either a customer or a prospect that has an attached Potential. A Contact is a person that is connected to an Account.
Multi-channel lead and account management is an integral part of CRM and is firmly supported by vtiger. You can capture leads from your website, enter them after a conference, etc. and vtiger will help you work on those leads and track them until they become business opportunities and then paying accounts.
Notice the default view of leads in the following screenshot. You can filter the lead view with custom filters so you can have visibility to specific segments of your lead pool, such as location, number of employees, revenue, sales stage, and so on:
vtiger CRM also features an easy and secure web lead form (see Chapter 10 for more) that you can place on any website and it will insert new leads directly into your vtiger CRM system.
The lead details screen tells you everything you need to know about the lead on one page:
You can also incorporate a product-based selling process at the lead stage with integrated products. You can indicate any products that the lead is interested in.
Once you have identified a lead as having potential for business, you can click on the Convert Lead link while viewing a lead to convert into a Potential and/or Account. We’ll get into more detailed information about how to manage your sales process in vtiger CRM, but for now, you can see the power of vtiger CRM beginning to unfold and what it means for your sales process.
vtiger CRM allows your team to manage their appointments on a shared calendar as well as schedule and assign tasks:
You can choose to see your appointments on a calendar view or you can look at them in list fashion if you prefer. With extensions, you can synchronize this with Microsoft Outlook and perhaps in the near future, with Mozilla Thunderbird.
Of course, a critical piece of CRM is customer service/support. Full support for this is built into vtiger. Two features in particular contribute to a successful customer relationship: email management and ticket management.
Have you ever tried to find all of the emails regarding one client in Microsoft Outlook? It’s a ridiculous endeavor unless you use folders, and even that can be more work than it’s worth. vtiger CRM has a nice feature where you can send emails directly from the CRM and they’ll be recorded in the lead/account details. There is even a mail converter available in the vtiger Extensions Marketplace that will scan an inbox for emails and match the recipient email addresses to your current leads/accounts and automatically attach them.
Resolving customer questions and issues is also a key to CRM success. Therefore, vtiger CRM features a trouble ticket module that provides full help desk or call center functionality. There is also an optional customer portal module that will allow your customers to login, create support requests, and view their status. This portal also shares much more information with the customer
While vtiger CRM features canned reports, it also features a very powerful custom reporting tool that allows you to slice and dice your CRM data. And if you’re good with MySQL, you can take that to the next level.
There is also a dashboard feature which uses visualizations to show data. These dashboards are all canned, but can be customized with some PHP and MySQL knowledge. Some dashboards are also featured on the home page.
Sales people love attachments. Well, at least it seems like they do. Did you ever get an email from a sales rep and there are about 12 PDF’s attached? vtiger tries to make their life a little easier by incorporating document management. Any user who is given access can create their own folders and upload any file type for storage on the vtiger server. They can even attach documents to outgoing emails to customers. This can help with document versioning and unify a sales team’s efforts.
-Major Features of Vtiger CRM
- Sales Force Automation
- Customer Support & Service
- Marketing Automation
- Inventory Management
- Activity Management
- Productivity Add-ons
- Reports & Dashboards
- Product Customization
- Security Management
- E-mail integration
- Extensibility
- Customization and Configurability
Videos
How To Install VTIGER CRM

