1-click AWS Deployment 1-click Azure Deployment
Overview
Apache Tomcat is a webcontainer which allows to run servlet and JavaServer Pages (JSP) based web applications. Most of the modern Java web frameworks are based on servlets, e.g. JavaServer Faces, Struts, Spring.Apache Tomcat also provides by default a HTTP connector on port 8080, i.e., Tomcat can also be used as HTTP server. But the performance of Tomcat is not as good as the performance of a designated web server, like the Apache HTTP server.Apache Tomcat is a long-lived, open source Java servlet container that implements several core Java enterprise specs, namely the Java Servlet, JavaServer Pages (JSP), and WebSockets APIs.
An Apache Software Foundation project, Tomcat was first released in 1998, just four years after Java itself. Tomcat started as a reference implementation for the first Java Servlet API and the JSP spec. While it’s no longer the reference implementation for either of these technologies, Tomcat remains the most widely used Java server, boasting a well-tested and proven core engine with good extensibility.
What kind of server is Tomcat?
The Java ecosystem supports several kinds of application server, so let’s disambiguate them and see where Tomcat fits in:
A servlet container is an implementation of the Java Servlet specification, used primarily for hosting Java servlets.
A web server is a server designed to serve files from the local system, like Apache.
A Java enterprise application server is a full-blown implementation of the Java EE (now Jakarta EE) specification.
At heart, Tomcat is a servlet and JSP container. A Java servlet encapsulates code and business logic and defines how requests and responses should be handled in a Java server. JSP is a server-side view rendering technology. As the developer, you write the servlet or JSP page, then let Tomcat handle the routing.
Tomcat also contains the Coyote engine, which is a web server. Thanks to Coyote, it’s possible to extend Tomcat to include a variety of Java enterprise specs and capabilities, including the Java Persistence API (JPA). Tomcat also has an extended version, called TomEE, that includes more enterprise features.
Why is Tomcat said to be a Web Server but not an Application Server?
1)When packaging an application, it can either be packaged as a .war or .ear Tomcat is categorized as a web server since it can handle only .war files.
2)A web server is responsible to process servlets and JSP’s, whereas an application server should be able to process sturts, EJB’s(Enterprise Java Beans), JSF (Java Server Faces) along with servlets and JSP’s. Tomcat can process only servlet’s and JSP’s, thus making it a web server.
3)A web server is often said to be a part of an application server since an application server exhibits all the features that a web server possesses and in addition to it also contains attributes such as load balancing, data persistence, messaging to name a few. However, vice versa does not apply.
4)Web servers can operate only over HTTP protocol, whereas application servers can operate over various CGI protocols and may also include HTTP protocol. Application servers are mostly used to handle large enterprise edition applications. Since tomcat operates only on the HTTP protocol, it falls under the web server.
Why we need to use Apache Tomcat?
Web pages by itself are static HTML files. Hence a client cannot interact with a static web page. In order to facilitate our web pages with dynamic capabilities, a web server is required. To be able to interface one’s application with the webserver, predefined API’s (Application Programming Interfaces) are provided. Servlet is one such API provided by the Java Platform Enterprise Edition designed to work along with web servers. Monitoring the server for incoming client requests is not the job of a servlet but that of a web server.
How does Apache Tomcat work?
Tomcat is widely used by web developers when working on web application development. From a high-level perspective, apache tomcat is responsible to provide a run-time environment for the servlets. It provides an environment in which one could run their java code.
On a more detailed aspect, tomcat is responsible for:
1.Listen to all incoming requests from clients.
2.Load the respective servlet classes using the servlet mappings (from web.xml file) to handle incoming client requests.
3.Execute the servlet class and.
4.Finally, unload the servlet class.
5.From the point the servlet class is loaded to the point it’s unloaded, the servlet is responsible for handling the client request by carrying out its various life cycle methods and providing the necessary response back to tomcat as JSP pages. Tomcat then returns the response back to the client by rendering the JSP.
How to Get Started With Apache Tomcat
Getting started with Apache Tomcat is simple. However, before you begin, you need to install the Java Development Kit (JDK) if you don’t already have it.Once you have done so, you’re ready to jump in. To start, head to the Apache Tomcat homepage and find the Download button.Clicking on it will take you to the Apache Tomcat Download Page:
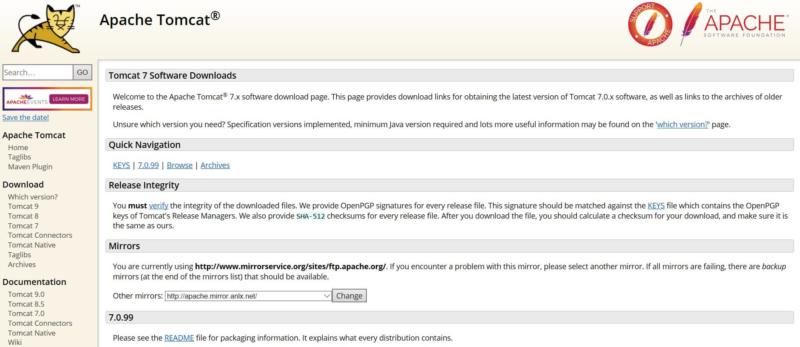
Once you’re there, scroll down and find the latest Windows Service Installer:
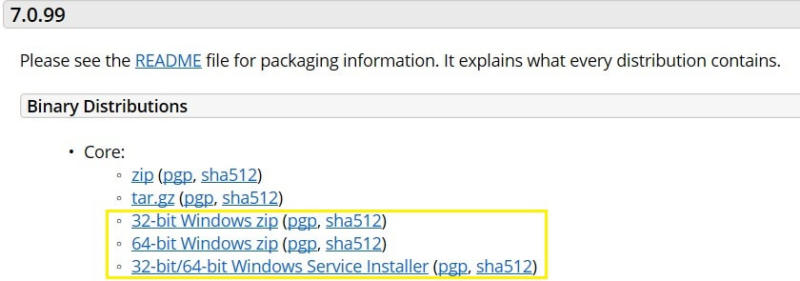
Next, select either Run or Save, depending on when you’d like to finish the installation. When you do run the application, the Setup Menu will appear:
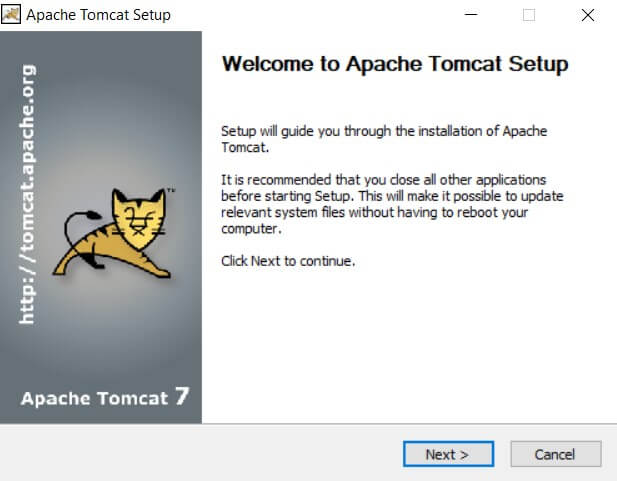
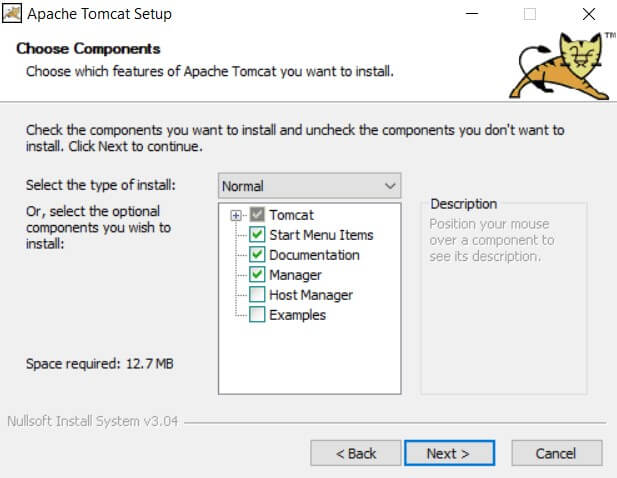
The steps listed here will walk you through your options. First, you’ll be able to choose which components you want. These include a startup menu button, the Manager, and the Host Manager:
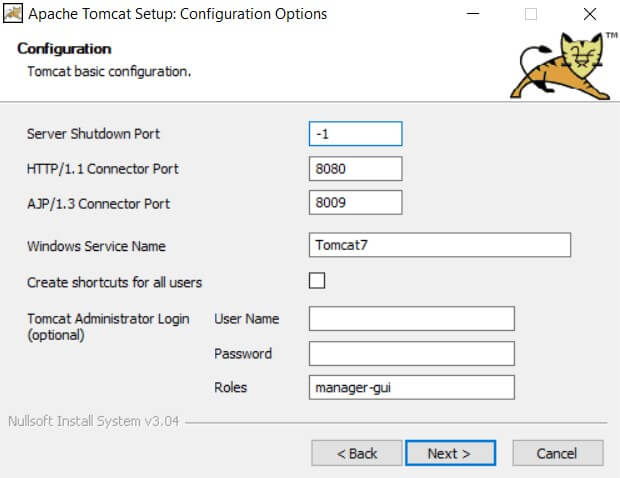
You’ll also be taken to a Configuration Menu. Here, you’ll be able to confirm your service name and shutdown port:
Finally, find the location of your JDK installation path:
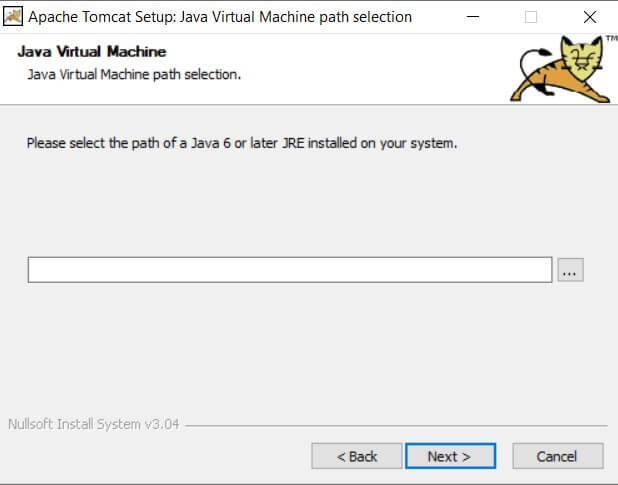
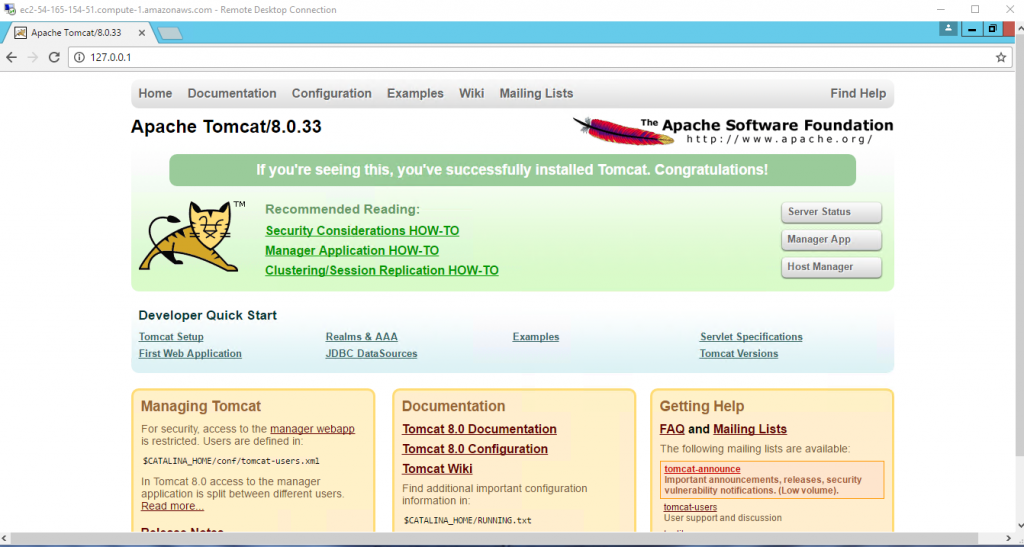
hen, you’re finally ready to complete the installation. To test and ensure it worked flawlessly, go to http://localhost:8080/ using any web browser on your computer to establish that Tomcat is up and running.
It should look like the example shown below:
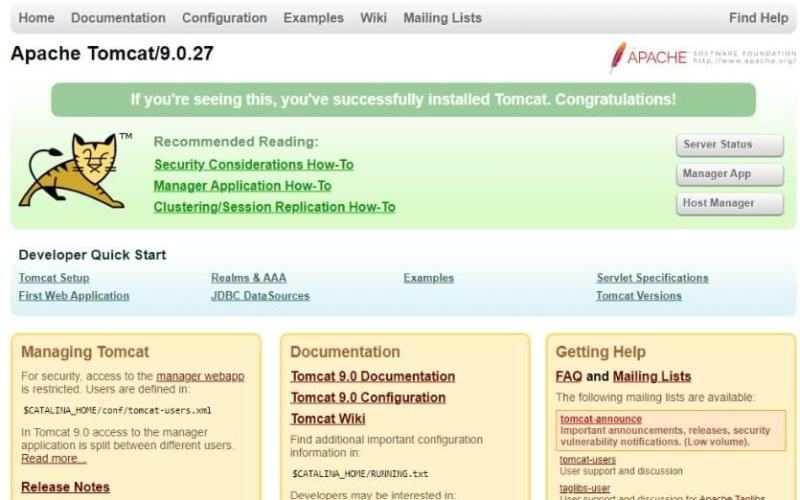
We can get started on your next project from here. Of course, setting Tomcat up for local development isn’t a complete solution if you want to deploy live sites on it. Luckily , A2 Hosting offers several Apache Tomcat hosting solutions that can be adapted to your needs. Plans start at $5 per month and scale up to $15 per month. They supply anywhere from 20–50 GB storage, as well as our money-back guarantee and Guru team support.
How to Deploy a Web Application Using the Apache Tomcat Manager (Windows)
To deploy a web application to Apache Tomcat, you can copy a WAR file to the application base directory, e.g., c:/Tomcat8/webapps. This operation of course presupposes we know the application base directory. We could consult server.xml and look up the Host element to determine the directory name. To learn how to deploy a web application using the Apache Tomcat manager web application, follow these 12 steps:
1)Stop the Tomcat server.
2)You will need to edit CATALINA_BASE/conf/tomcat-users.xml, e.g., c:/Tomcat8/conf/tomcat-users.xml to add credentials to access the Tomcat manager web application.
3) Add the following XML statements immediately before the root end tag, i.e., </tomcat-users>:
<role rolename=”manager-gui”/>
<user username=”your name” password=”your password” roles=”manager-gui”/>
</tomcat-users>
Replace “your name” and “your password” with a user name and password of your choosing (no embedded spaces).
4)Save your changes.
5)You’ll need to create a WAR file so that you will have web application to deploy. The instructions for creating a WAR file were contained in steps 1 and 2 in How to deploy a WAR file in Apache Tomcat (Windows). Complete only steps 1 and 2. If you have already completed that project, delete the WAR file (DemoWebsite.war) and the unpacked folder (DemoWebsite) from CATALINA_HOME/webapps.
6)Start the Tomcat server.
7)In the address area of your browser, type http://localhost:8080/manager/html and submit that address to the browser.
8)You will be challenged for credentials. Provide the user name and password you specified in tomcat-users.xml

Click OK
9)The manager web page is now displayed. Scroll down until you see the Deploy section:

Note that Context Path is already provided here (/DemoWebsite) and the WAR URL ((c:/DemoWebsite/DemoWebsite.war) in the text boxes. Fill in the text boxes. Then click Deploy.
10)The manager will indicate that the web site has been deployed:

11)In a separate tab in your browser, type http://localhost:8080/DemoWebsite/DateJSP.jsp and submit that address to the browser.
12)The web page will be displayed verifying successful deployment:

Advantages of Apache Tomcat
1.The biggest advantage of apache tomcat is that it’s open-source. There is no need to shell out money in order to use this software. One could easily download it over the internet and configure it, and start working with it.
2.The Apache software foundation provides regular updates to make it compatible with other software versions and providing bug fixes thus making it easier for developers to use.
3.Tomcat supports SSL( Secure Socket Layer) and therefore can be configured using an SSL certificate to secure sensitive data by providing a secure connection.
4.Tomcat can also be configured to run multiple web applications on different ports. For example, it could be running three applications on 8080, 8081, 9090 port numbers. By default, Apache tomcat makes use of port number 8080.
5.It’s also cross-platform compatible, that is can be used on Windows, Mac OS, Linux operating systems.
6.It’s said to be lightweight. That is it consumes less in terms of memory and resource utilization, thus allowing the application to run smoothly on most systems without specific system requirements.
Apache Tomcat, often referred to as Tomcat, is an open-source web server developed by the Apache Software Foundation (ASF). Tomcat implements several Java EE specifications including Java Servlet, JavaServer Pages (JSP), Java EL and WebSocket and provides a “pure Java” HTTP web server environment in which Java code can run.The Apache Tomcat project is intended to be a collaboration of the best-of-breed developers from around the world.
Apache Tomcat software powers numerous large-scale, mission-critical web applications across a diverse range of industries and organizations.
Apache Tomcat is owned by Apache Tomcat (http://tomcat.apache.org/) and they own all related trademarks and IP rights for this software.
Cognosys provides hardened images of Tomcat on the cloud ( AWS marketplace, Azure and Google Cloud Platform).
Deploy Tomcat securely on cloud i.e. AWS marketplace,Azure and Google Cloud Platform (GCP)
Secured Tomcat on Ubuntu 14.04 LTS
Tomcat on Cloud For AWS
Secured Tomcat on CentOS 7.3
Features
Features of Apache Tomcat:
1.It’s Incredibly Lightweight
Even with JavaEE certification, Tomcat is an incredibly lightweight application. If offers only the most basic functionality necessary to run a server, meaning it provides relatively quick load and redeploy times compared to many of its peers, which are bogged down with far too many bells and whistles. This lightweight nature also allows it to enjoy a significantly faster development cycle.Of course, if you’re looking for a feature-rich application server, then Tomcat might not be the best choice for you. If you just want a quick-and-easy means to run your applications, though? Go with Tomcat – you won’t regret your choice.
2.It’s Open-Source
For me, open-source always counts as a win. Tomcat’s free, and the source code for the server is readily available to anyone who’d care to download it. What this means is that – assuming you’re willing to tinker with the moving parts of your server – you’ve got an incredible degree of freedom insofar as what you want to do with a Tomcat installation.
3.It’s Highly Flexible
Thanks to its lightweight nature and a suite of extensive, built-in customization options, Tomcat is quite flexible. You can run it in virtually any fashion you choose, and it’ll still work as intended. The fact that it’s open-source helps as well, since you can tweak it to fit your needs, provided you’ve the knowledge to do so.
4.Your Server Will Be More Stable
Tomcat is an extremely stable platform to build on – and using it to run your applications will contribute to your server’s stability, as well. This is because Tomcat runs independently of your Apache installation – even if a significant failure in Tomcat caused it to stop working, the rest of your server would run just fine.
5.It Offers An Extra Level Of Security
Many organizations choose to position their Tomcat installation behind an extra firewall, accessible only from the Apache installation. In short, depending on how you implement your Tomcat installation, it can add an extra layer of security to your server – which is never a bad thing.
6.It’s mature
Tomcat has existed for nearly 20 years, allowing it to mature over time. As open-source software maintained by the open source community, new releases and updates come out regularly. Tomcat’s maturity has turned it into one of the most stable application servers for software development and deploying Java applications. It is a stable option that has grown with great community support.
7.It’s well-documented
Tomcat has a variety of good documentation available, including a wide range of online tutorials that can be viewed or downloaded. This makes it a popular choice to fill the role of an application server in almost all Java web applications. Whether you are looking for startup settings, hardening and security guides, installation instructions, or server configuration notes, Tomcat has you covered.
8.It’s the most widely used Java application server
Tomcat is estimated to hold over 60 percent of the market share of all Java application server deployments, making it the most popular application server used with Java web applications. Technically, it does not implement all the features required of a Java EE application server, but it does enable you to run Java EE applications. Tomcat acts as a “webserver” or “servlet container,” However, that’s more of a terminology stipulation than anything else.
9.It’s geared towards Java-based content
In contrast to Apache HTTPS Server, Tomcat was developed to offer the JSP functionality not available through Apache HTTPS Server. The latter is better suited for handling both static and dynamic (and usually PHP-based) web content but does not have the ability to manage Java Servlets and JSP. The best part is that both can be run side by side for projects involving both Java and PHP-based content. In that case, Apache can handle static and dynamic content and Tomcat can handle the JSP. For sites entirely built on JSP, Tomcat is the best bet.
As a Java Servlet container that provides extended functionality to interact with Java Servlets, Tomcat is a powerful option to execute Java servlets and render web pages that use Java Server page coding. Tomcat enables a pure Java web server environment, bringing together Java-based technologies to run applications built on Java programming language. While its flexibility and interoperability enable Apache Tomcat to behave as a web application server under certain conditions, its true identity is primarily as a Java servlet container.
As a lightweight, highly flexible option, Tomcat enables quick load and redeploy times without sacrificing built-in customization options. In addition to providing stability, it also offers extra security for organizations that choose to position their Tomcat installation behind an extra firewall. Developers looking to run applications that operate seamlessly and fast should consider Tomcat as an option.
Some important features of Apache Tomcat:
1)Tomcat is simply an HTTP server and a Java servlet container. .
2)Tomcat has a lighter memory footprint.
3)Tomcat has a memory of 60-70 MB, while these Java EE servers weigh in hundreds of Megs.
4)Tomcat is very popular for simple web applications.
5)Tomcat server administration is easier since there are fewer moving parts in Tomcat.
6)Tomcat has a unique license. Tomcat uses the Apache license .
Read more at: https://www.freelancinggig.com/blog/2017/06/05/whats-difference-glassfish-apache-tomcat/
-Major Features of Tomcat :
- Use of a nonce to prevent cross-site request forgery (CSRF) attacks
- Changing the jsessionid on authentication to prevent session fixation attacks altogether
- Memory leak detection and prevention
- Use of aliases to store static content outside the war file 5. Servlet 3.0, JSP-EL 2.2 support
- Easier to embed Tomcat in your applications, e.g. in JBoss
- Asynchronous logging.
AWS
Installation Instructions For Windows
Note: How to find PublicDNS in AWS
Step 1) RDP Connection: To connect to the deployed instance, Please follow Instructions to Connect to Windows instance on AWS Cloud
Connect to the virtual machine using following RDP credentials:
- Hostname: PublicDNS / IP of machine
- Port : 3389
Username: To connect to the operating system, use RDP and the username is Administrator.
Password: Please Click here to know how to get password .
Step 2) Application URL: Access the application via a browser at http://PublicDNS/
- User Name: ec2-user
- Password: Passw@rd123
Steps to access the Admin Panel:
- To login to Tomcat Administrative Panel, you need
to open your browser and navigate to http://PublicDNS/manager/html
Note : Manager should not be allowed access from outside RDC.
- Enter username and password in the given fields and click on the“Login” button to access the Admin Panel.
- After successful login to the Admin Panel, you will get access to Tomcat Application.
Step 3) Other Information:
1.Default installation path: will be in your root folder “C:\Program Files \Tomcat”
2.Default ports:
- Windows Machines: RDP Port – 3389
- Http: 80
- Https: 443
Configure custom inbound and outbound rules using this link
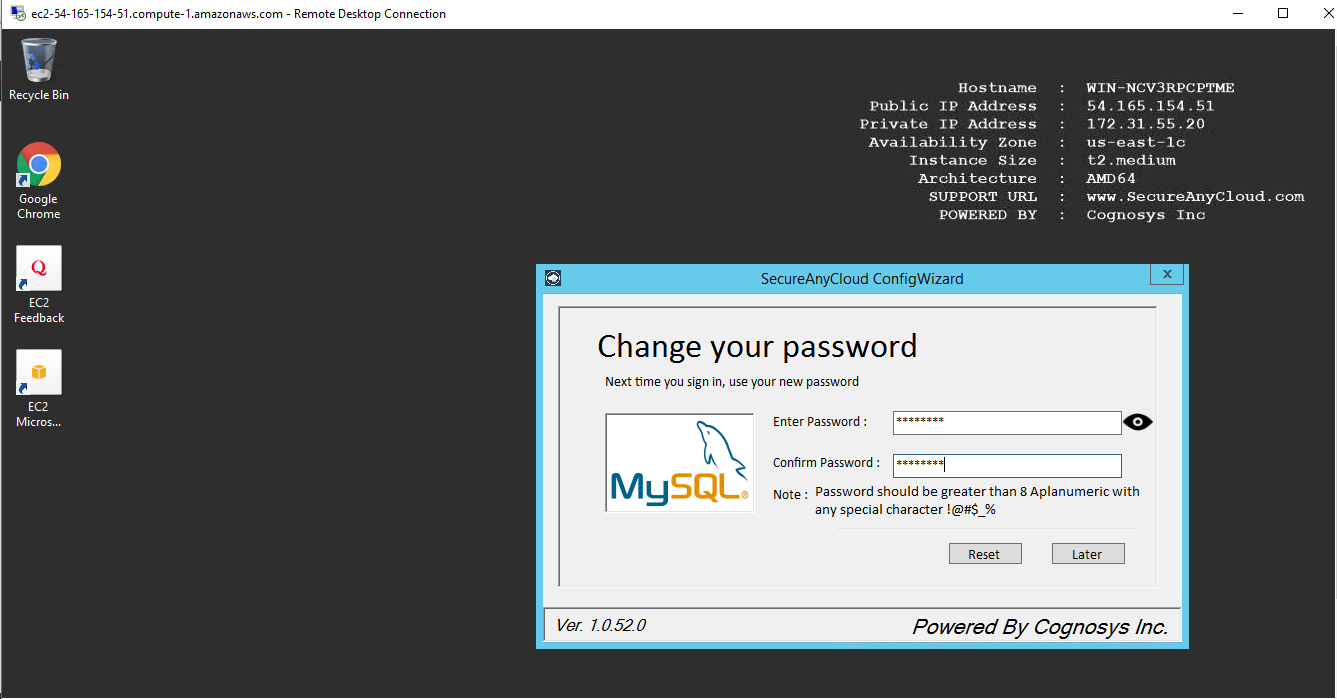
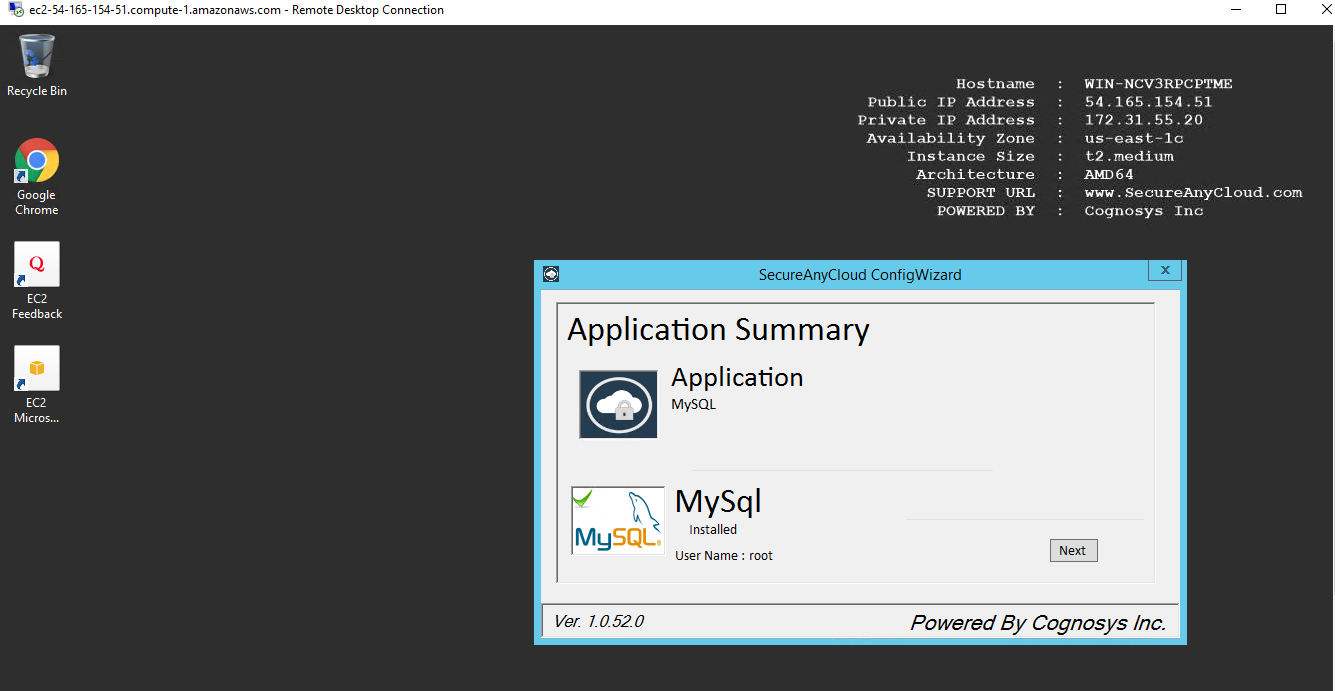
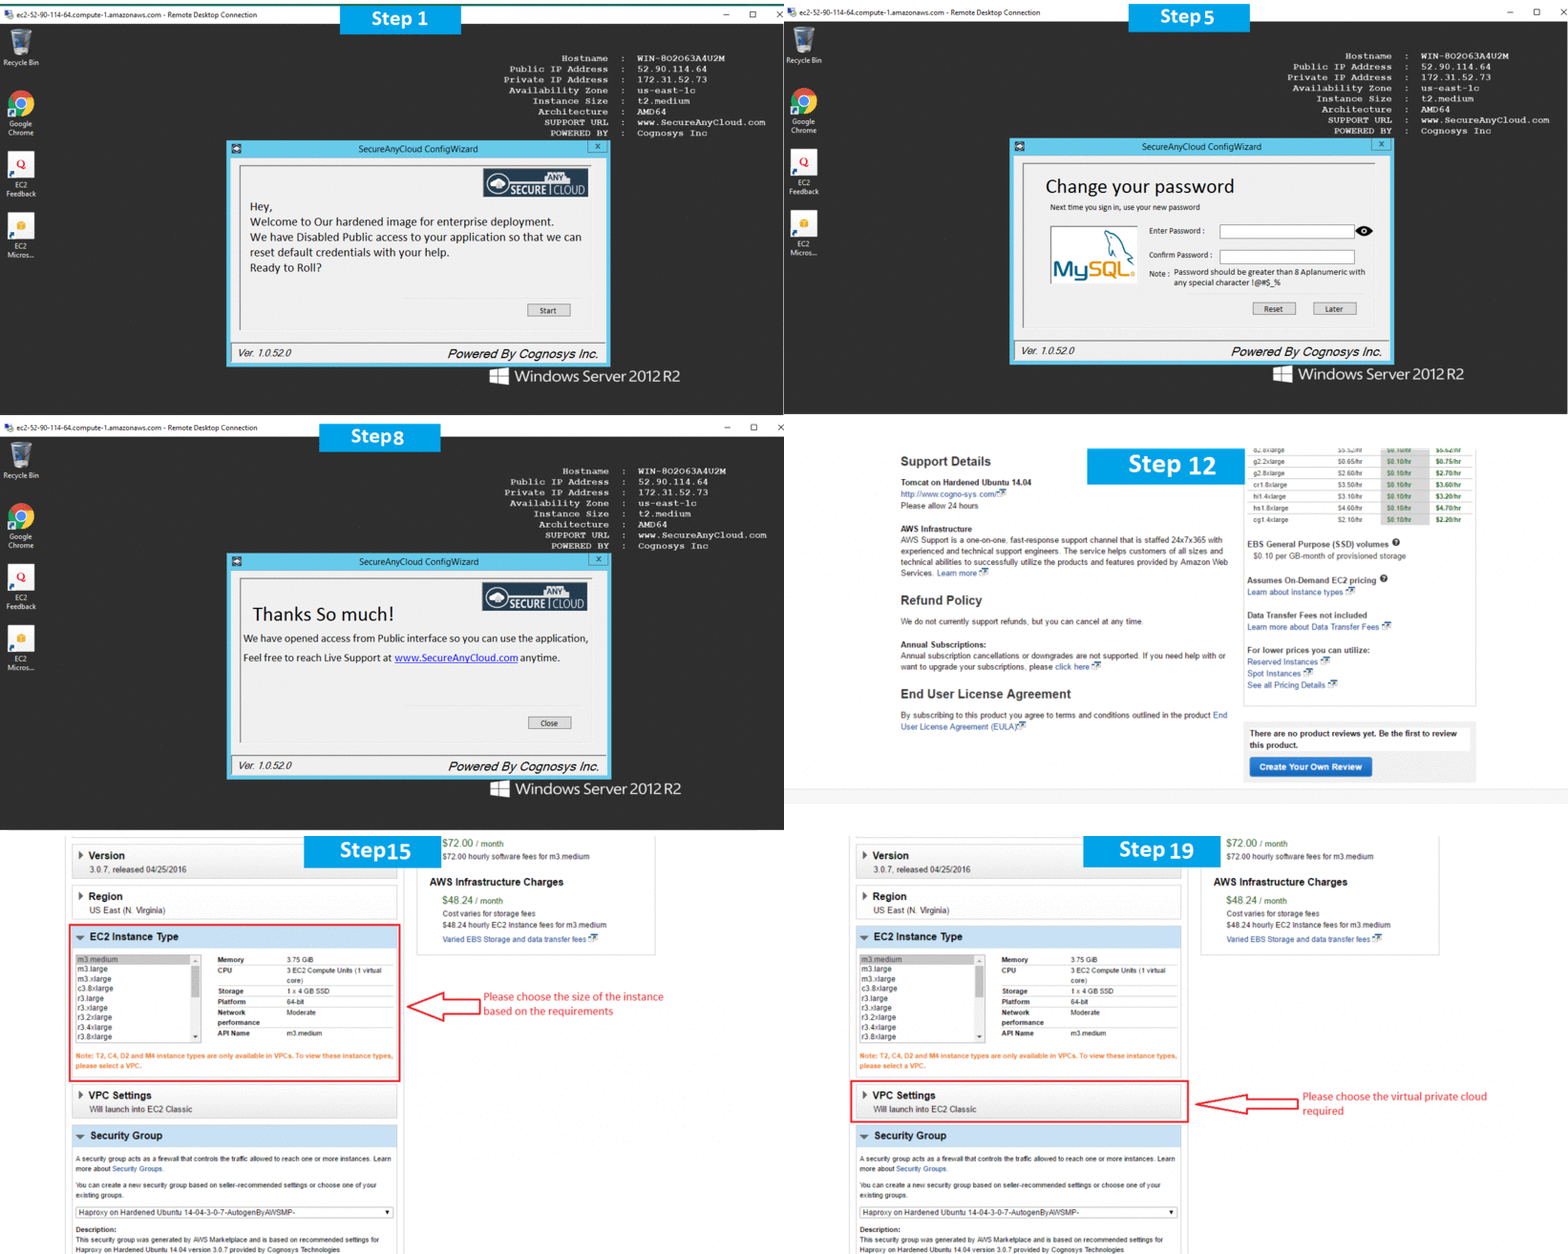
AWS Step by Step Screenshot
Installation Instructions For CentOS
Note: How to find PublicDNS in AWS
Step 1) SSH Connection: To connect to the deployed instance, Please follow Instructions to Connect to CentOS instance on AWS Cloud
1) Download Putty.
2) Connect to the virtual machine using SSH key Refer this link:
- Hostname: PublicDNS / IP of machine
- Port : 22
Username: To connect to the operating system, use RDP and the username is Administrator.
Password : Please Click here to know how to get password .
Step 2) Application URL: Access the application via a browser at http://PublicDNS/
- User Name: ec2-user
- Password: Passw@rd123
Step 3) Other Information:
Note: Please do the initial setup with http://YourIP/
Version: Magento 2.1.6
1.Default installation path: will be in your web root folder “/var/www/html/”
2.Default ports:
- Linux Machines: SSH Port – 22
- Http: 80
- Https: 443
- MYSQL ports: By default, these are not open on Public Endpoints. MYSQL: 3306
3. To access Webmin interface for management please follow this link
Configure custom inbound and outbound rules using this link.
Azure
Installation Instructions For TomCat 8 on Ubuntu
Note: How to find PublicDNS in Azure
Step 1) SSH Connection: To connect to the deployed instance, Please follow Instructions to Connect to Ubuntu instance on Azure Cloud
1) Download Putty.
2) Connect to the virtual machine using following SSH credentials:
- Hostname: PublicDNS / IP of machine
- Port : 22
Username: Your chosen username when you created the machine ( For example: Azureuser)
Password: Your Chosen Password when you created the machine ( How to reset the password if you do not remember)
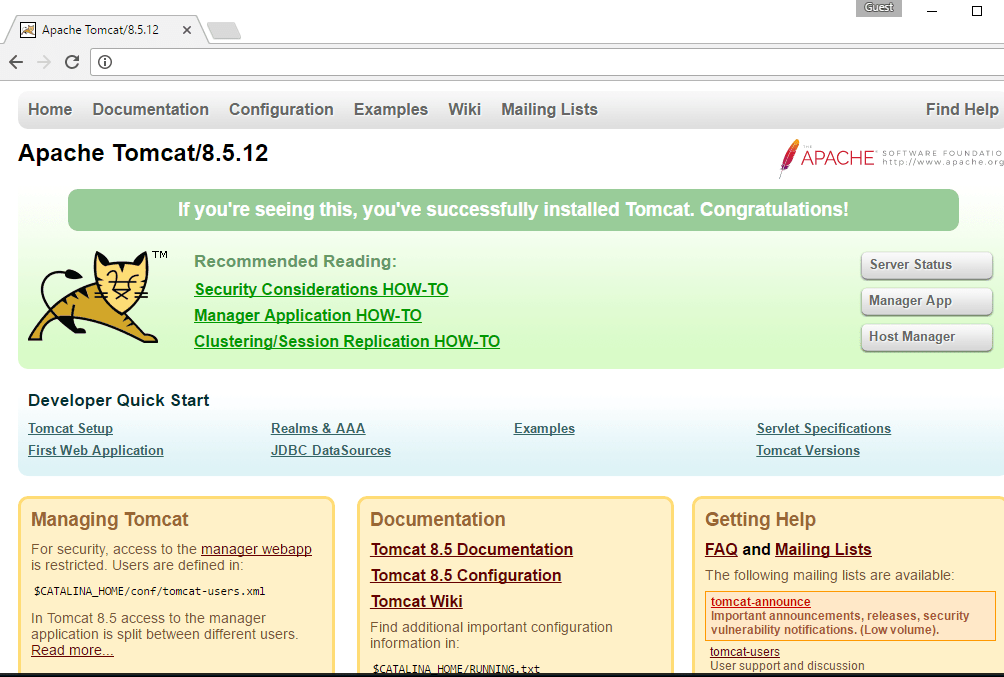
Step 2) Other Information:
Version : TomCat 8
Note Open http://your_server_ip:8080 for TomCat server
1. Default installation path: will be in your web root folder “/var/www/html/”
2. Default port:
- Http: 8080
Configure custom inbound and outbound rules using this link
3. To access Webmin interface for management please follow this link
Installation Instructions For TomCat 8 on Centos
Note: How to find PublicDNS in Azure
Step 1) SSH Connection: To connect to the deployed instance, Please follow Instructions to Connect to CentOS instance on Azure Cloud
1) Download Putty.
2) Connect to the virtual machine using following SSH credentials:
- Hostname: PublicDNS / IP of machine
- Port : 22
Username: Your chosen username when you created the machine ( For example: Azureuser)
Password: Your Chosen Password when you created the machine ( How to reset the password if you do not remember)

Step 2) Other Information:
Version : TomCat 8
Note Open http://your_server_ip:8080 for TomCat server
1. Default installation path: will be in your web root folder “/var/www/html/”
2. Default port:
- Http: 8080
Configure custom inbound and outbound rules using this link
3. To access Webmin interface for management please follow this link
- Installation Instructions For Ubuntu
- Installation Instructions For Redhat
- Installation Instructions For CentOS
Installation Instructions For Ubuntu
Step 1) VM Creation:
- Click the Launch on Compute Engine button to choose the hardware and network settings.
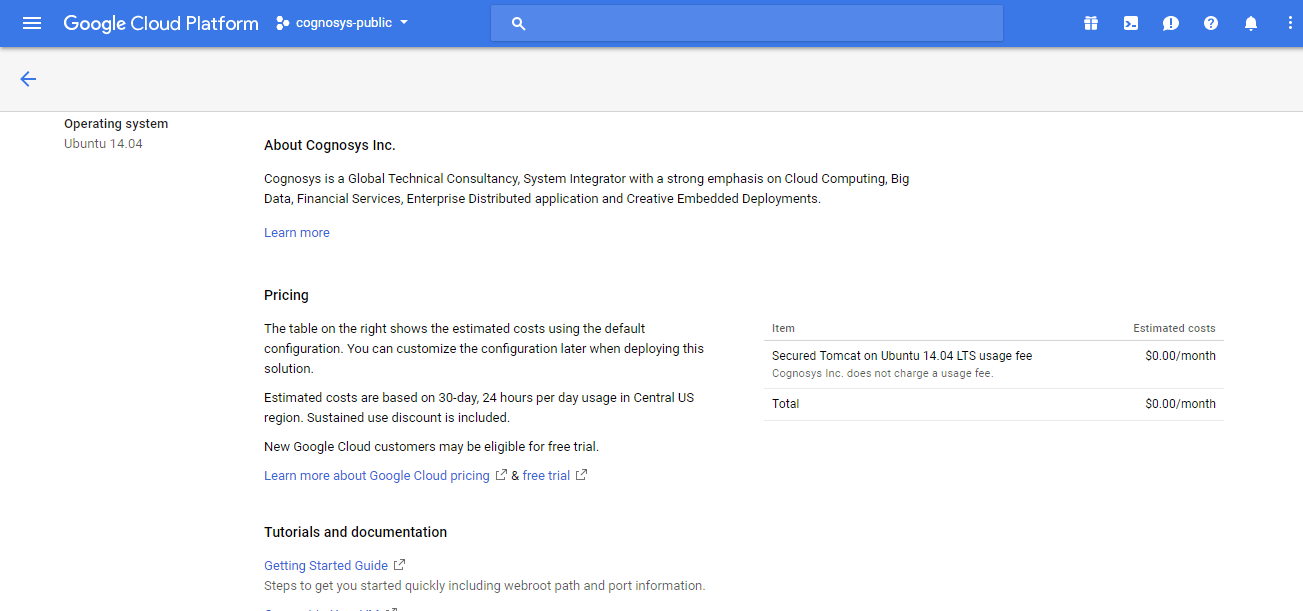
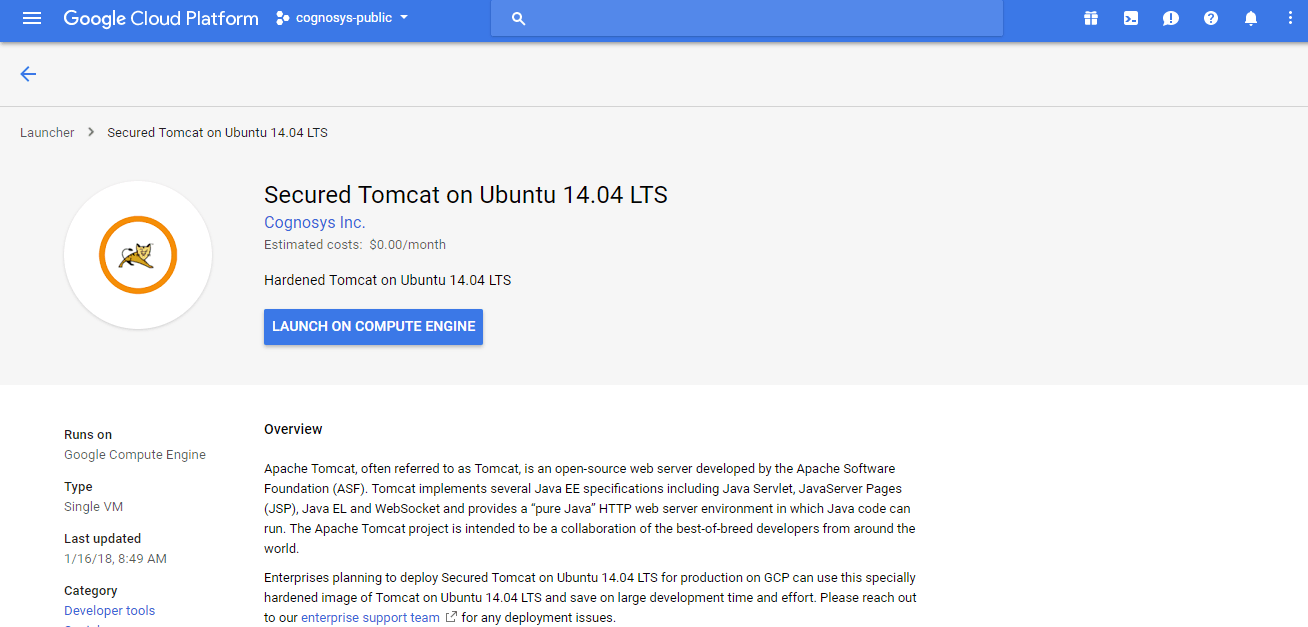 2.You can see at this page, an overview of Cognosys Image as well as some estimated costs of VM.
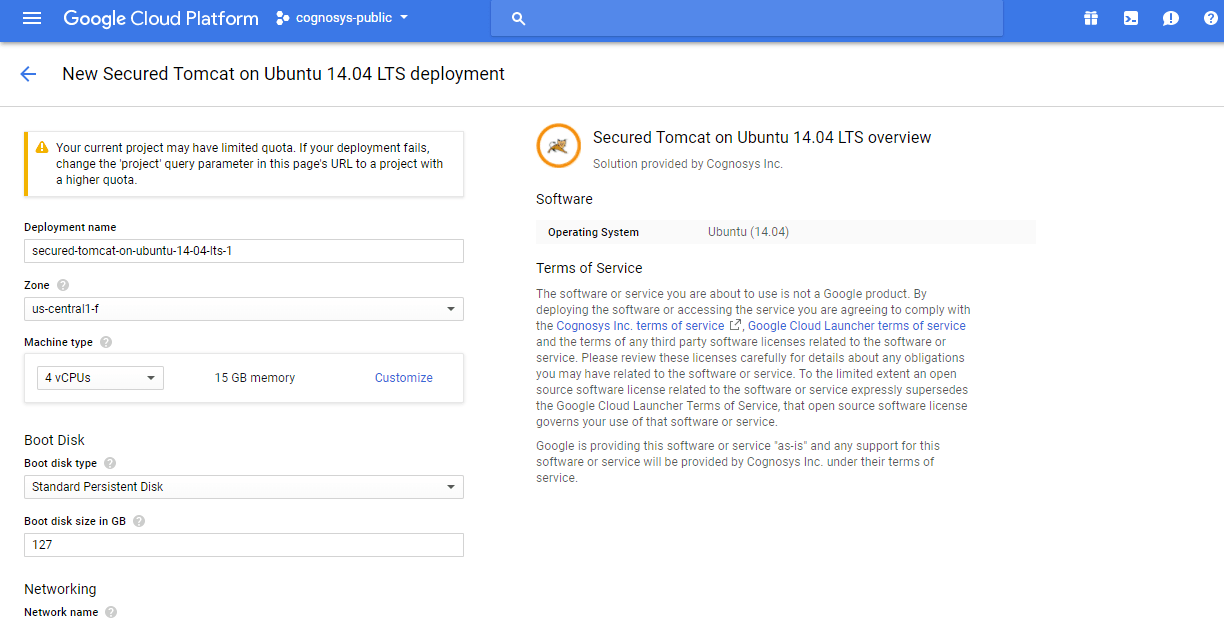
 3.In the settings page, you can choose the number of CPUs and amount of RAM, the disk size and type etc.
Step 2) SSH Connection: To connect to the deployed instance, Please follow Instructions to Connect to Ubuntu instance on Google Cloud
1) Download Putty.
2) Connect to the virtual machine using SSH key
-
- Hostname: PublicDNS / IP of machine
- Port : 22
Step 3) Database Login Details:
The below screen appears after successful deployment of the image.
For local MySQL root password, please use the temporary password generated automatically during image creation as shown above.
i) Please connect to Remote Desktop as given in step 2 to ensure stack is properly configured and DB is initialized.
ii) You can use MySQL server instance as localhost, username root and password as shown above.
If you have closed the deployment page you can also get the MySQL root password from VM Details “Custom metadata” Section
Step 4) Other Information:
1.Default ports:
- Linux Machines: SSH Port – 22
2. To access Webmin interface for management please follow this link

Installation Instructions For Redhat
Step 1) VM Creation:
- Click the Launch on Compute Engine button to choose the hardware and network settings.
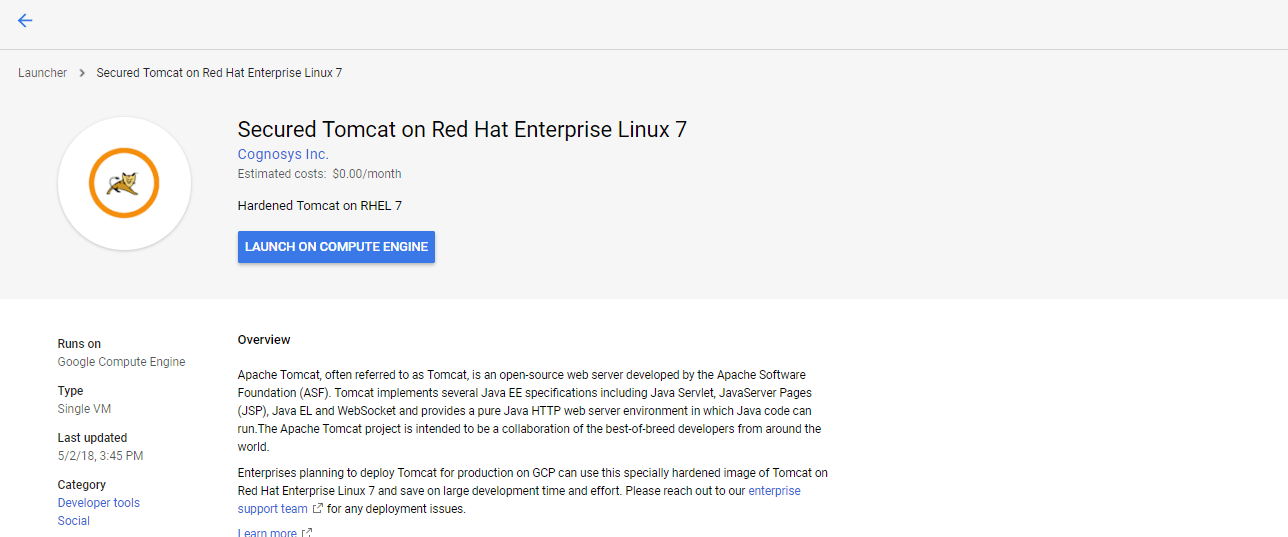
2.You can see at this page, an overview of Cognosys Image as well as some estimated costs of VM.
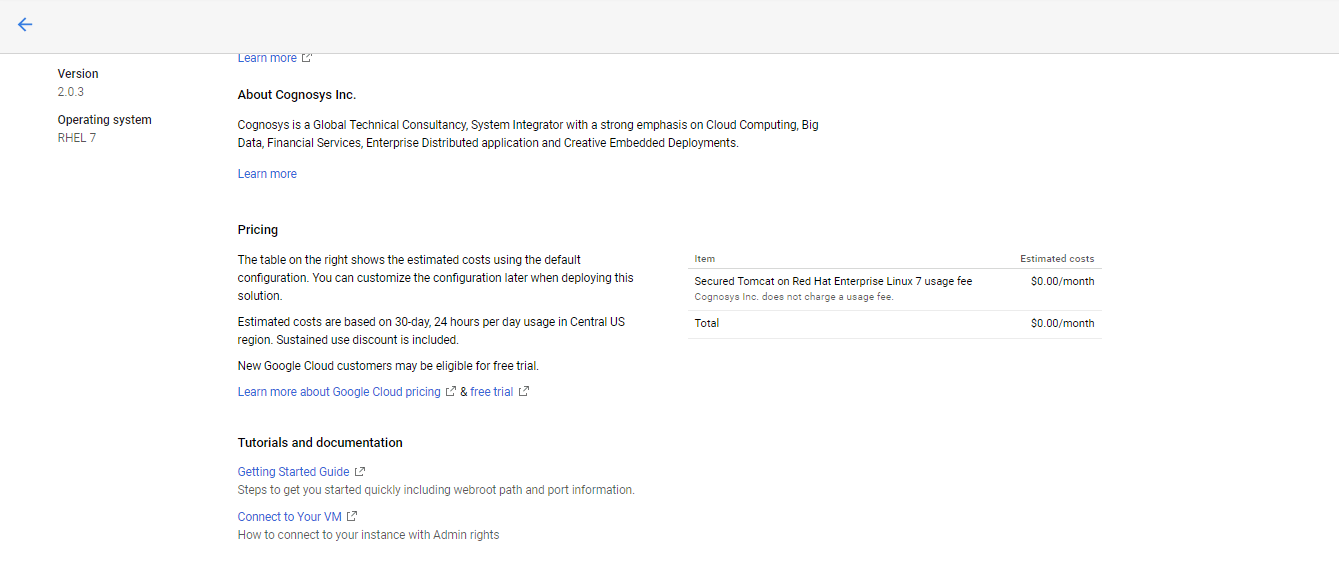
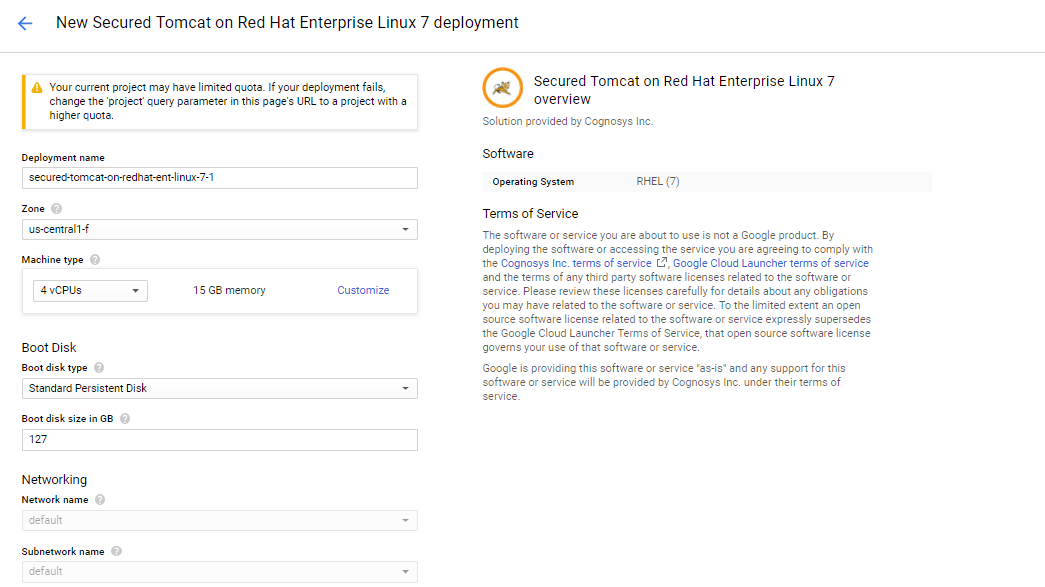
3.In the settings page, you can choose the number of CPUs and amount of RAM, the disk size and type etc.
Step 2) SSH Connection: To connect to the deployed instance, Please follow Instructions to Connect to RedHat instance on Google Cloud
1) Download Putty.
2) Connect to the virtual machine using SSH key
- Hostname: PublicDNS / IP of machine
- Port : 22
Step 3) Database Login Details:
The below screen appears after successful deployment of the image.
For local MySQL root password, please use the temporary password generated automatically during image creation as shown above.
i) Please connect to Remote Desktop as given in step 2 to ensure stack is properly configured and DB is initialized.
ii) You can use MySQL server instance as localhost, username root and password as shown above.
If you have closed the deployment page you can also get the MySQL root password from VM Details “Custom metadata” Section
Step 4) Other Information:
1.Default ports:
- Linux Machines: SSH Port – 22
2. To access Webmin interface for management please follow this link

Installation Instructions For CentOS
Step 1) SSH Connection: To connect to the deployed instance, Please follow Instructions to Connect to CentOS instance on Google Cloud
1) Download Putty.
2) Connect to virtual machine using following SSH credentials:
- Hostname: PublicDNS / IP of machine
- Port : 22
Username: Your chosen username when you created the machine Password : Your Chosen Password when you created the machine ( How to reset the password if you do not remember)
Step 2) Other Information:
1.Default ports:
- Linux Machines: SSH Port – 22
2. To access Webmin interface for management please follow this link
Videos
Secured Tomcat on Ubuntu 14.04 LTS


