1-click AWS Deployment 1-click Azure Deployment
Overview
Thelia is an e-commerce script, which will allow you to set up your online store in minutes. It is open-source and you do not need a license to use it. Thelia is also easy to use, fast and with its beautiful design, it is one of the best options for the development of your website.
Fundamentals
Thelia 2 is built on some popular tools:
- Symfony2, a modern PHP framework which you will also find in ezPublish CMS and (in components of) Drupal 8.Symfony2 is using the MVC model
- Bootstrap 3, a CSS framework for building responsive websites, on which Syed Fazle Rahman wrote an excellent article.
- Smarty 3, for its templating engine, a smart move because it makes adaptation easier.
They obviously have their fundamentals covered, but using popular techniques doesn’t necessarily make a great e-commerce platform. So, let’s have a look at how it comes all together.
Front end
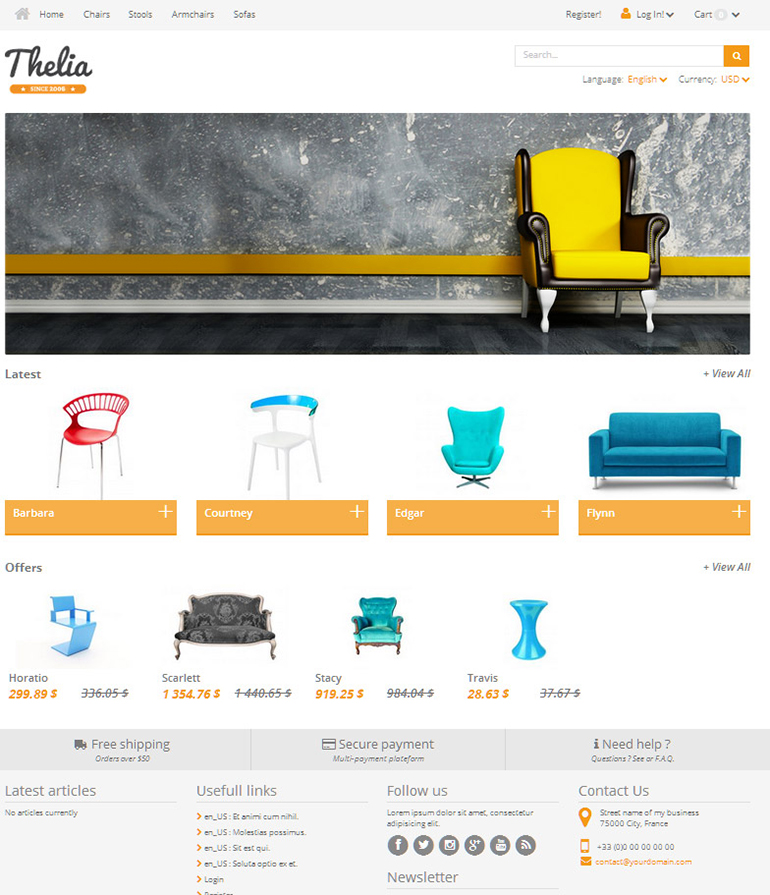
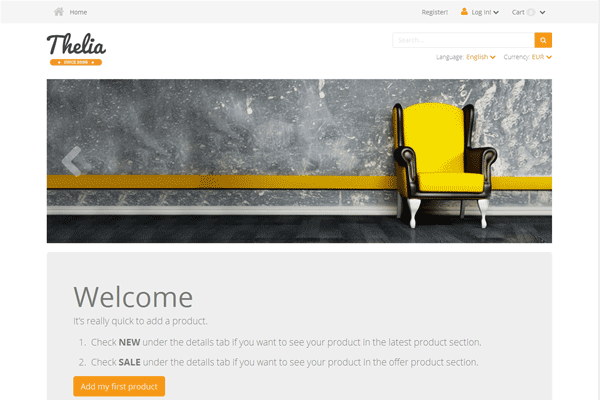
The homepage has the modern look used in most e-commerce tools these days, with a nice twist on the roll-over part. It looks clean, and a Yslow score of 91 means their code is pretty clean as well.
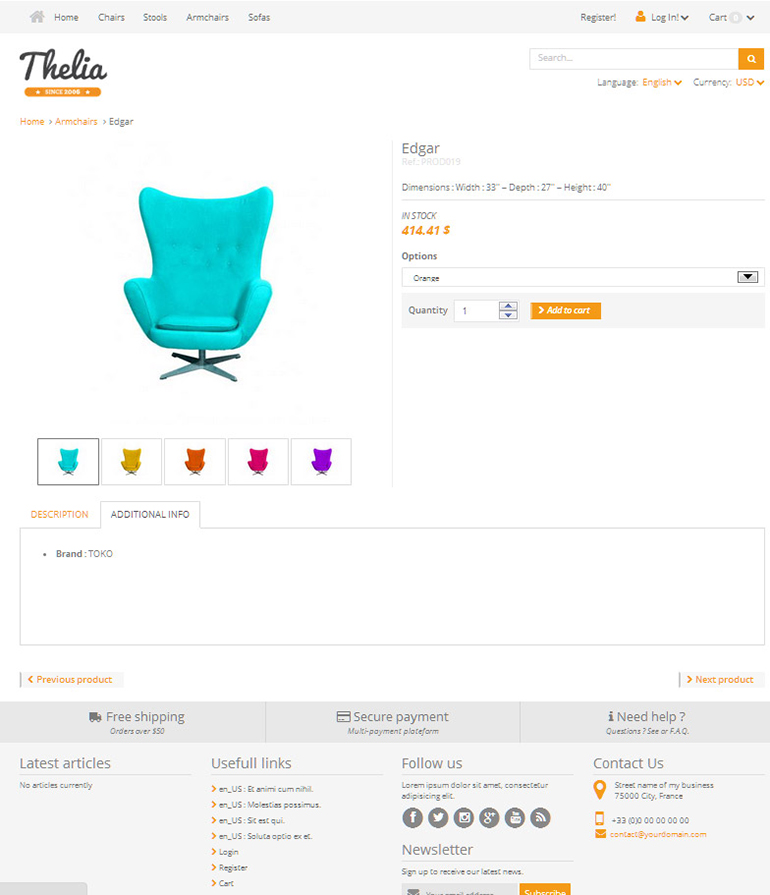
Same goes for a product page, all crisp and clean – but nothing special. The basics are here: multiple products images, information tabs and product attributes (options). But this doesn’t set Thelia apart from all of the other modern e-commerce tools, so let’s dive in the back end to see what’s hidden here.
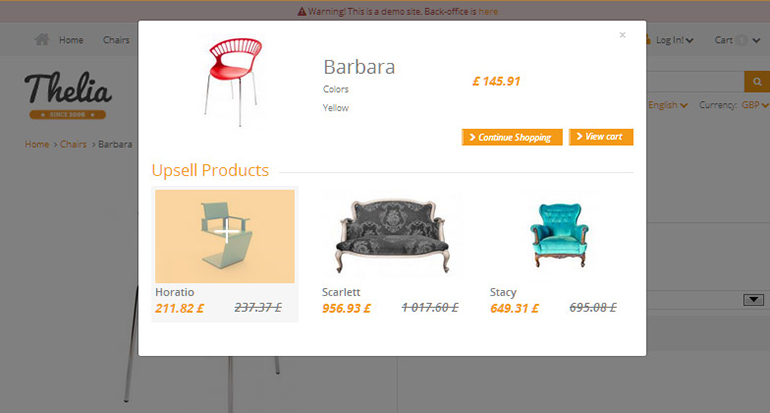
A clever front end touch is given to the oh-so important upsell: it’s right there after you add a product to your shopping cart. That’s how it should be done, right when the customer is in a shopping mood.
Back end
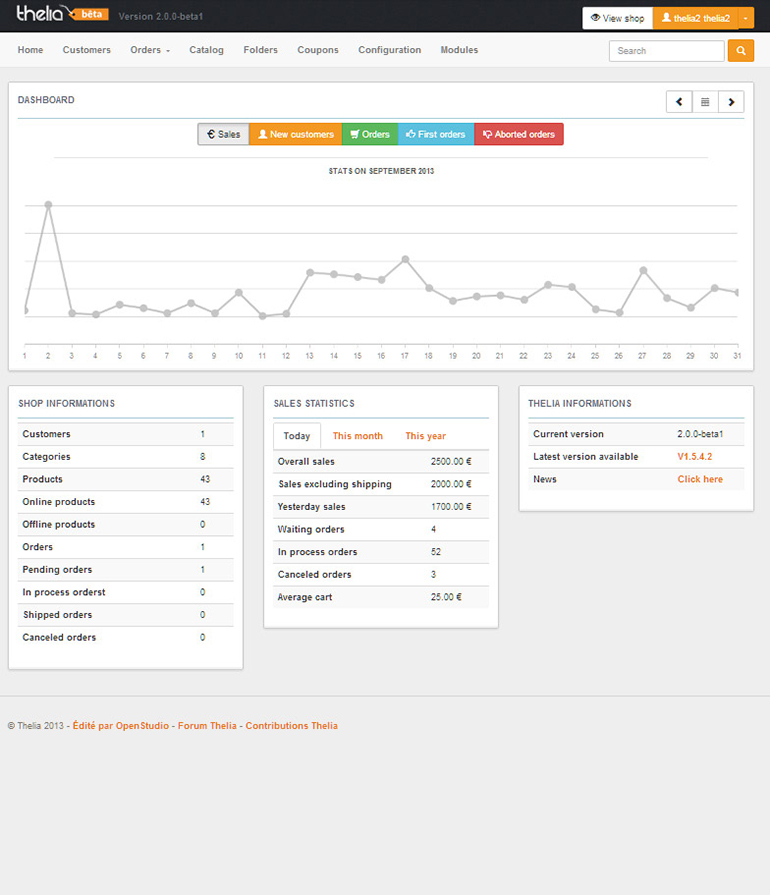
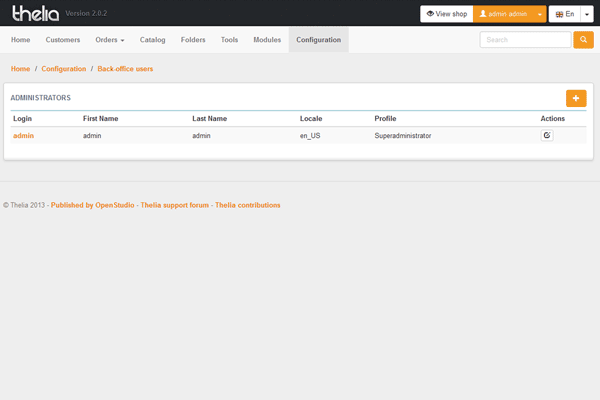
On top you will find the navigation bar, and when you compare this with a beast like Magento it certainly is again, clean. But there’s a reason Magento’s navigation is extensive – there’s a lot to set up and manage in an e-commerce store.
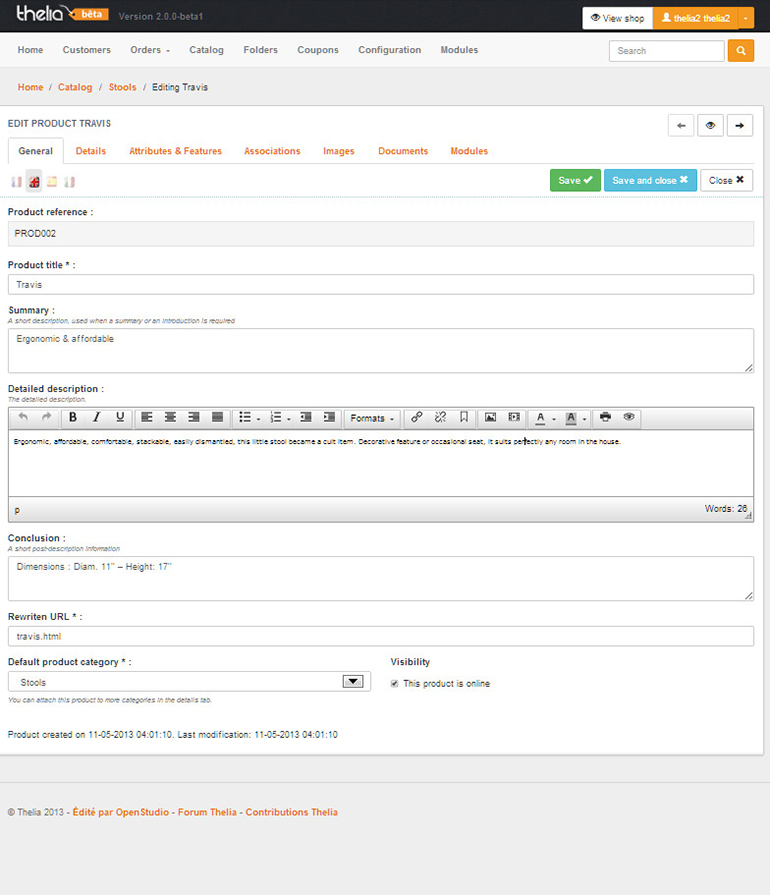
When you start editing a product, Thelia finally comes alive. It’s very easy to set up a multi-language store, and you can edit each translation by clicking on the flags. This keeps it very convenient.
Then you open the “Details” tab.
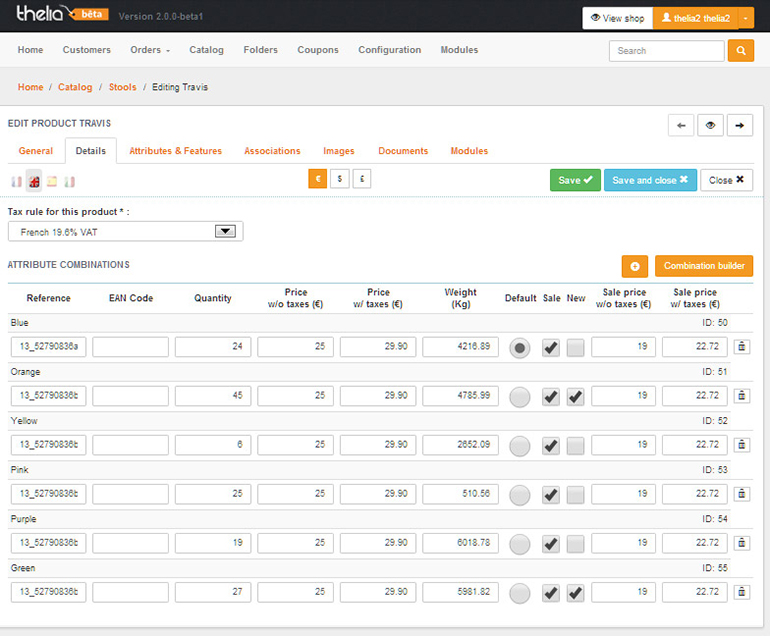
What you are seeing here are the quantities and pricing of the different variations of the product.
To make it even further confusing, they call them “attribute combinations”, but there’s also a tab called “Attributes & features”. This only confuses, but since it’s still in beta it might be on the list to improve.
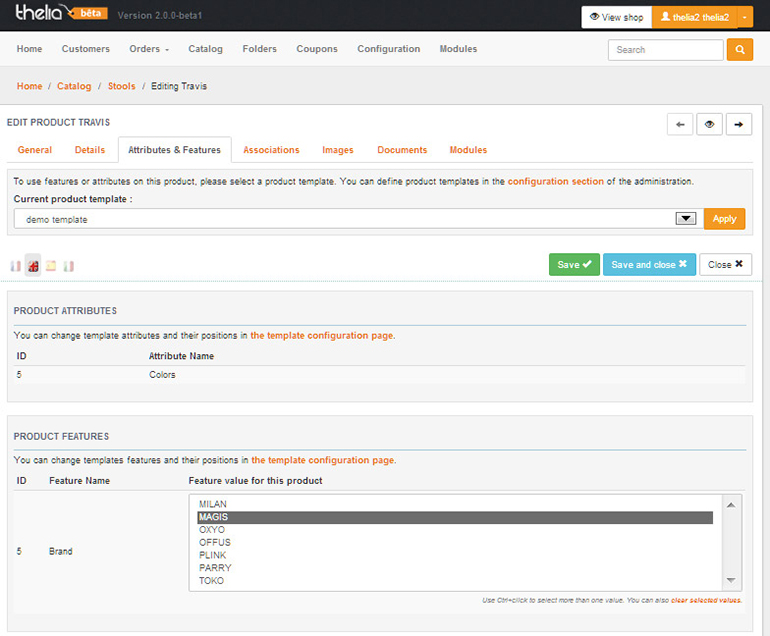
Speaking of attributes, let’s see how Thelia handles this. Attributes are very important in managing consistency throughout your store, but can be a bit overwhelming. So it’s important to make this hassle free. Unfortunately, Thelia doesn’t convince here, either.
Instead of assigning attributes to a product, you first need to make a template that contains one or more attributes. And this template is assigned to your product. While this initially seems just a different approach, this can quickly become very annoying when you have lots of attribute combinations.
You have to make a lot of different templates, and since it’s in a drop-down list you have to make up tons of unique and identifiable names. A simple check-box list would be much easier. Also, these type of choices aren’t really attributes, but product options.
Product features are listed in a tab called “Additional info” on the front end. These are the real products attributes, and not features. Using selection fields isn’t a bad choice though.
All in all this is a very confusing part of the editing, and out of sync with what’s common in webstore terminology.
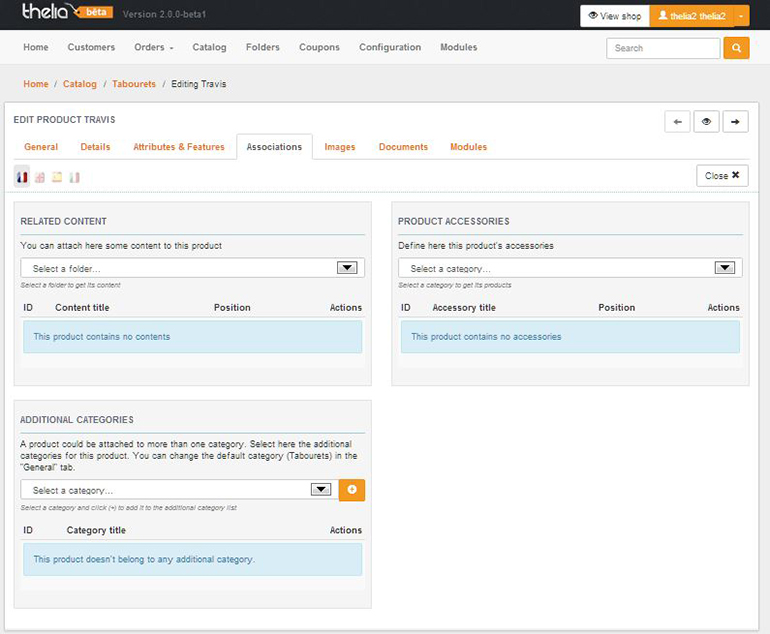
The cross-sell part, called product accessories, makes a bit more sense. But, by calling it accessories you are limited to selecting actual accessories related to the product. This means it has to complement your feature product, instead of offering a different choice or brand. It does come down to how you define cross-sell, but it does remove the option to use it for upselling. That is, when you don’t edit it in the code yourself.
The images and documents tabs use simple drag-and-drop, and look fine. The only limitation in here is that you don’t use a central repository, but a per-product image/document library instead.
The modules section didn’t load, but is used for adding shipping and payment options. The configuration of these modules didn’t work either, so I can’t say anything about it.
So the product editing doesn’t come out very well: it’s confusing, not using proper naming and the features aren’t that advanced. And this does count for other parts of the system as well. There is:
- No layered navigation (product filtering)
- Discount only work by offering coupons
- Reporting is limited
- No product comparison or wish-lists
- No social sharing on product-level
- No extensions currently offered
How to Manually Install Thelia:
Here we will review the process of installing Thelia manually on your account. This allows you more control over the installation process than the automated Thelia installation via Softaculous.
Automated Installation
There is an easier way to install Thelia, which is fully automated. For more details on that, check out our tutorial on the Softaculous Thelia installation.
To manualy install Thelia, you need to:
Download Thelia
The first step of the process is to download the latest stable release of the script on your local computer. You can achieve that via the official Thelia website.

Once you download the script’s archive on your local computer, you need to extract it’s contents. You can do so using any available software, such as WinRar.
Prepare and Upload the Files
Up until this moment, you will have the extracted files and folders of Thelia on your local computer. It is time to upload them on your account on the server. Also, it is important to make sure that you upload the contents of Thelia into the correct directory, where you want to install the script. When you extract the Thelia archive on your local computer, this will create a folder called:
Thelia_x.x.x
The x.x.x part is the actual Thelia version that you have downloaded. Within this folder, you will notice all of the contents of the script and you need to upload them all to the location on the server, where you would like to install the script. There are three available options for that and we will review them all so you can see which one suits your needs and then proceed further.
For the purpose of our examples, we are assuming that your domain name is called example.com. However, you can substitute that with your actual domain so you can get the same result using your details.
- Install Thelia in ROOT – The first option is to upload Thelia directly within the public_html/ directory of your account. This will make all of it’s files accessible directly via your domain.
- Install Thelia in subfolder – This option is for the uploading and installing Thelia in a subfolder of your account. For example, if you would like to install and access your website via the following:
example.com/thelia/
This means that you need to create a /thelia subfolder within the public_html/ directory of your account. Then, you need to upload the contents of your installation within the new subfolder.
- Install Thelia on subdomain – This option is for uploading and installing Thelia on a subdomain of your account. For example, if you would like to install and access your website via the following:
thelia.example.com
This means that you first need to create that subdomain. You can do that via your cPanel. Locate the Domains section and then click on the Subdomains icon.

Now, you will have to enter the new subdomain that you want to use. The system will auto-generate the path to the directory used for that subdomain. This is usually a folder of the same name within the public_html/ directory of your account.

This will create a folder with that name within the public_html/ directory of your account and you need to upload the Thelia contents in it.
Upload Files
There are two ways of uploading your files to the server – using an FTP client, or uploading directly through your cPanel account → File Manager.
Initiate the Installation
Once you complete the uploading of your script to the directory, where you wish to install it, you can initiate the installation of the script. To start the install script, you need to access the location of the script, followed by web/install/. For example, if you have uploaded Thelia to the public_html/ directory of your account and your domain is example.com, you need to access the following:
example.com/web/install/
The first screen will display a welcome message. Click on the Continue button to proceed.

The second screen of the installation process is a system requirements check. Thelia will check if the server meets all of the requirements for the new installation and display the result on the screen. As our servers are fully optimized for the script, you will not have any issues on this step. Click on Continue to proceed.

The next step is a Database Connection. This will request the database details that will be used for the new installation. Enter the following details:
- Host – Enter “localhost” without the quotes
- Username – Enter the database user that you have created
- Password – Enter the password that you set for it
- Port – Enter the default 3306 port.
MySQL Configuration
You can create a new database and a user assigned to it via cPanel.

The next step is the Database Selection. The system will use the details you have entered in the previous step and then pull up the database, for which the user has privileges. Then, those databases will be displayed in this step, allowing you to choose the one that you would like to set for your website. Select your database and click on Continue to proceed.

The next step is called General Information and it will allow you to create the administrative user on your website and set some of the basic information for it. Edit the following:
- Administrator Login – Enter the username for the main administrator on your website
- Administrator Password – Enter the password for it
- Administrator Password Verification – Enter the password again for verification
- Administrator Preferred Locale – Enter the preferred locale for the admin user
- Contact Email – Enter your email address
- Company Name – Enter your company name
- Website URL – This option will be pre-defined by the system. However, check to see if this is the correct URL before proceeding
When you enter the details above, simply click on Continue to proceed. Make sure that you take a note of the admin login details for your website as you will need them to manage your website after the installation.

Complete the Installation
The Thelia installation is now completed. You need to remove the web/install/ directory from your account for security reasons. For example, if your website is located within the public_html/ directory of your account, you need to remove the following:
public_html/web/install/
Then, you can proceed to the administrative area of your website by clicking on the Go to back office button on the screen.

Congratulations! You have successfully installed Thelia .
Locating Thelia’s Main Configuration File:
The configuration file of a certain application is something that you need to be aware of. Even if you are not a developer, the configuration file of Thelia is a place, where you can search for the details about the database set on your website. This comes handy if you are generating or restoring a backup of your website.
To locate the main configuration file of your Thelia installation, you first need to access the directory, where you have installed it. This is just outside of the web/ directory of Thelia. You can do so using your favourite FTP client or directly via the File Manager service within your cPanel account.
FTP Configuration
There are two ways of reviewing your files on the server – using an FTP client, or reviewing them directly through your cPanel account > File Manager.
Once you access your Thelia directory, you need to navigate to local/config/ folder. In it, you will notice a file called database.yml. Select that file and click on the View button at the top menu, if you are using the File Manager service to review it.

The file will display sensitive information, such as the database name for your website, the user that is assigned to it and the password used.
database:
  connection:
    driver: mysql
    user: testuser_dtla
    password: p4ssw0rd
    dsn: mysql:host=;dbname=testuser_dtla;port=3306
How to enable SSL in Thelia:
Thelia is an e-commerce software that will allow you to build up your online store. This means that you are about to start selling products online and there will be transactions going through your website. You can make such transactions protected with the use of SSL certificate, installed on your domain. This allows better security for the money transactions going through your website and it will make it look more professional in front of your customers.
First, you will need to get a valid SSL certificate issued for your domain. If you purchase a GLobalSign certificate, the rest of the process will be handled by our technical support team. The other option will be to opt for a Free Let’s Encrypt SSL which can be easily activated via your cPanel.
We will also describe the steps you need to complete in order to force the use of SSL on your domain. This means that each time someone attempts to access your website, they will be redirected and the connection will be established over the secured HTTPS protocol, even if they do not enter it in the first place.
First you need to access your cPanel account and then the File Manager service.

Select the Home Directory and Show Hidden Files (dotfiles) options. Then click on the Go button to proceed.

Access the directory, where you have installed Thelia. This is just outside the web/ directory of your website. Then, simply locate the .htaccess file, select it and click on the Edit button at the top menu.

Enter the following code:
RewriteEngine On
RewriteCond %{SERVER_PORT} 80
RewriteRule ^(.*)$ https://www.example.com/web/$1 [R,L]
Where you only need to change example.com with your actual domain name. Once you complete that, click on the Save Changes button at the top-right corner of the screen.
How to configure SMTP in Thelia
The use of SMTP for the mail service of your Thelia website will ensure the properly delivered emails to your clients. This will also allow you to configure the mail service with a specific domain, which will make emails look more professional.
To get SMTP mail service to work with Thelia, you need to:
Create an Email Account
Email Accounts
Our SSD Thelia Hosting package allows you to create unlimited email accounts.
The first step of the process is to prepare the email account you will be using for the mail service on your website. If you do not have such an email account, you can simply create one via your cPanel account. You need to locate the Mail section and then Email Accounts.

Edit the following details:
- Email – Enter the name of your new email account. Note that if you have any parked/addon or subdomains, you will be able to select them here
- Password – Enter the password of your new email account
- Password (again) – Enter the password again for verification
- Mailbox Quota – Set the limit for the mailbox quota in MB or choose unlimited for no limitations
When you enter the details above, simply click on the Create Account button to proceed.

Configure SMTP in Thelia
The next step is to configure your Thelia installation with SMTP. You need to access the administrative area of your website and then click on the Configuration button at the top menu.

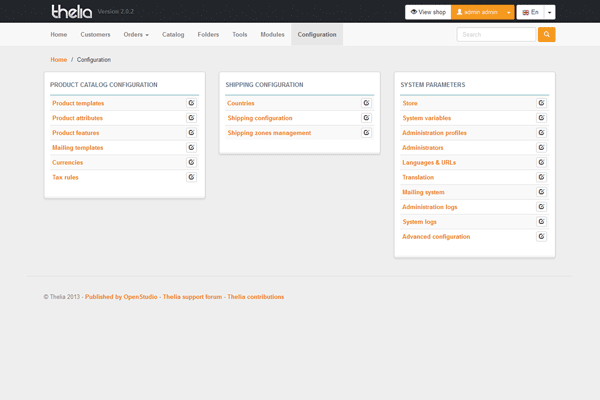
Locate the System Parameters tab and click on Mailing System.

Edit the following options:
- Enable remote SMTP use – Yes
- Host – mail.domain.com (where domain.com is your actual domain name)
- Port – The port on which the SMTP connection will be established. Set this to 25 or 2525
- Encryption – Leave this field blank
- Username – Enter the email account that you created during the previous step
- Password – Enter the password for your email account
- Auth Mode – Set that to “login” without the quotes

When you edit the details above, simply click on the Save button to keep the changes.
How to Edit Store Information in Thelia:
To edit the basic information for your website, you need to access the administrative area of your Thelia installation. Then, click on the Configuration button at the top menu.

Locate the System Parameters tab and then click on Store.

Edit the following details:
- General – Enter the name of your store, phone number, Business ID, email address, etc.
- Store Address – Enter the address of your store, the city, country, etc.

When you are ready with the changes, simply click on the Save and close button to keep them.
How to change logo in Thelia:
Firstly, you will have to get your own logo. You can pay a web designer to develop such a logo for your company or you can create it yourself using a large number of programs, such as Photoshop, Paint, etc. Either way, we suggest that the size of your logo is 135×75 pixels and that you name the file: a0433b2.gif .
After that, change the actual logo on your website. For that purpose, you need to upload your new logo to the exact same directory, where the default one is located. First, access the directory, where your Thelia website is installed. Then, you need to navigate to web/assets/frontOffice/default/0/img/. You will notice a file called “a0433b2.gif” and you need to rename that file first. Simply select it and click on the Rename button at the top menu, which will allow you to give it another name.

Once you rename the default Thelia logo, simply upload your own logo with the same name to the directory we have specified above.
When you complete that, simply refresh the front-page of your Thelia store.

The new logo will be displayed properly at the top-left corner of the screen.
How to Change the default Language in Thelia:
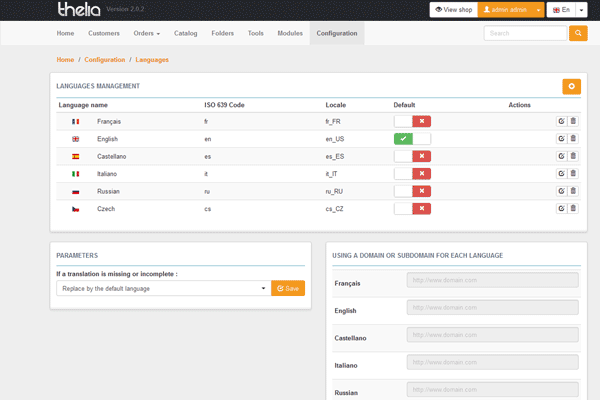
Thelia is translated into 6 languages by default – English, French, Spanish, Italian, Russian and Czech. This allows Thelia users to easily configure the language they would like to use. Also, there is the option to add additional languages if you do not find yours into the list of default ones.
To change the Default Language in Thelia, you need to:
Add a new Language
To add a missing language that you wish to use for your Thelia website, you need to access the admin area first. Then, click on the Configuration tab at the top menu.

Locate the System Parameters tab and then Languages & URLs.

Click on the plus-sign at the top-right corner of the new page to add a new language.

Enter the following details:
- Language Name – Enter the name of the new language.
- ISO 639-1 Code – Enter the ISO code for the new language.
- Language locale – Enter the new language locale.
- Date Format – Enter the date format for the new language.
- Time Format – Enter the time format for the new language.
- Separator Decimal – Enter the decimal separator for the new language.
- Decimal Places – Enter the amount of decimal places after the separator.
Once you are ready, scroll down and click on the Create This Language button.

The new language is created and you can now start the translation of all system strings into it. To do so, you need to once again access the Configuration tab at the top menu. Locate the System Parameters section and then Translation.

Select your language, the items and the template that you wish to translate. You will notice a list of the strings and you will be able to put a translation into your own language.

When you are ready with the translation, simply click on the Save or Save and Close button to keep the changes.
Configure the Default Language Settings:
To change the default language on your Thelia website, you need to access the administrative area of your website and then navigate to the Configuration tab at the top menu.

Locate the System Parameters tab and then Languages & URLs.

You will notice a list of all available languages on your website. Select that language by clicking on the button available in the Default section.
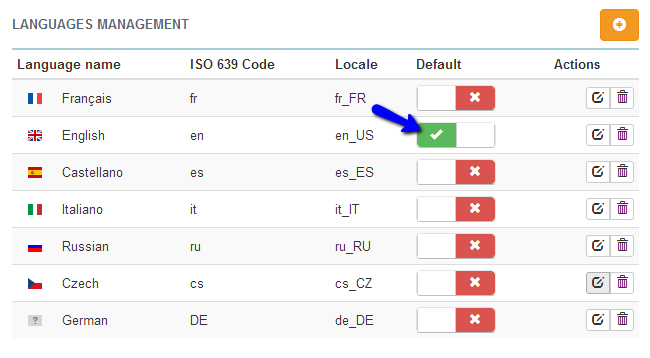
This will enable the language globally on your website.
How to create a full backup of Thelia:
It is important to create a full backup of your Thelia website before you make major changes on it. This way, if something goes wrong with your website, you can always reverse the changes back to a functional state.
The Thelia backup process includes the following two steps:
Backup your Files
The first step is to back up the files and folders of your Thelia website. For that purpose, you need to locate the actual directory, where you have installed the application. For example, if your website is accessible via example.com, the directory of your website would be the public_html/ directory of your account. To back up that directory, you can simply download it on your local computer via FTP.
Download Files
There are two ways of downloading your files to the server – using an FTP client or downloading directly through your cPanel account → File Manager.
Backup the Database
The second step is to generate a backup of the database set on your website. To complete that, you need to review the main configuration file of your Thelia website, which will allow you to get the name of the database you are using.
Configuration File
We recommend reviewing our tutorial on how to locate and edit the Thelia Configuration File.
Once you get the name of your database, you will have to access your cPanel account. Then, simply navigate to the Databases section and click on the phpMyAdmin service.

You will notice a list of all databases on your account. Click on the one that is set for your Thelia website.

This will open up the database and display all of the tables in it. Click on the Export button at the top menu to proceed with the backup.

Click on the Go button to export a dump backup file of your database on your local computer.
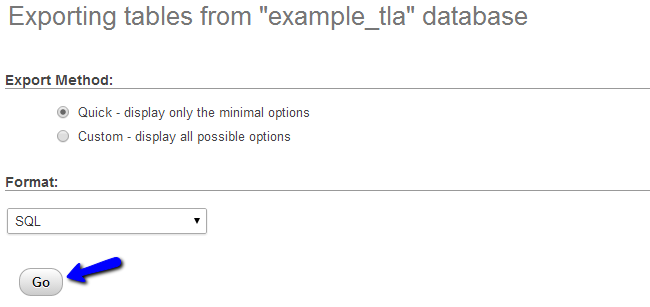
With this you have completed the backup process for your Thelia installation.
How to restore a full backup of Thelia:
The restore of a full backup of your Thelia website may be required if there is an issue with it and you wish to restore it to a working state.
To Restore Thelia from a full Backup you will need to:
Restore the Files
The first step of the actual process is to restored the files of your Thelia installation on the server. Make sure that the directory, where you would like to restore the backup is empty and then simply upload all of the files of your Thelia backup to it.
FTP Configuration: We have to configure FTP files then.
.STEP
Restore the Database
The second step is to restore the backup of your database. For that purpose, you need a clean database on your account.
MySQL Configuration
You can create a new database and a user assigned to it via cPanel.
Once the new and empty database is created, you can proceed further with the restore of your Thelia database. Access your cPanel account again and click on the phpMyAdmin service.

Select the new database you created from the list on the left-side of the screen.

Click on the Import button at the top menu.

Select the database dump backup file of your Thelia database from your local computer. Then simply click on the Go button to proceed with the import.
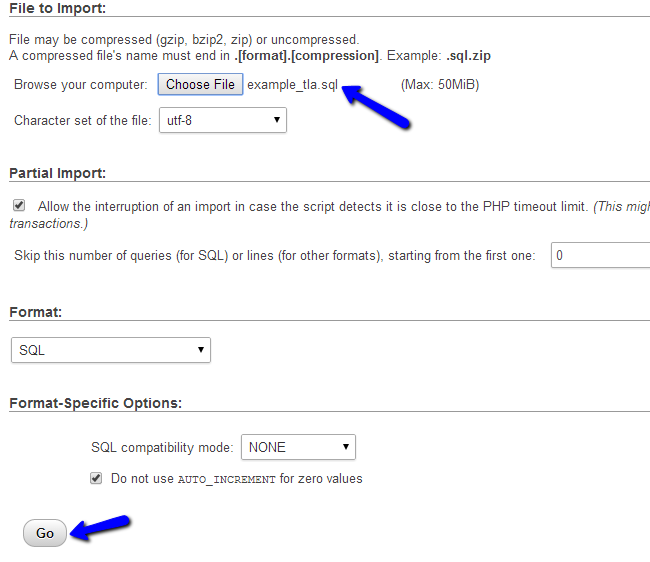
Link the Files and Database
Up until this moment, you have a location on your account, where you have restored the files of your Thelia website. You also have a database on your account, where you have restored the backup of your Thelia database. Now, it is time to link them together, which will complete the restore process for your website.
For that purpose, you need to locate and edit the configuration file of your Thelia website and enter the new database details for the database name, database user and the password.
Configuration file
We recommend reviewing our tutorial on how to locate and edit the Thelia Configuration File.
Once you edit the file and set the correct new database details, simply save it. All done, your website is now restored to the exact same state it was when you created the backup.
Advantages
- Easy to use – Thelia is an easy to use script. It will take up to a couple of hours to review most of it’s features and get the hang of it. Also, with the assistance of our tutorials on how to manage it’s features, you will be able to complete the development of your website faster.
- Beautiful Design – The design of Thelia is all you will need for the development of your online shop. It does not require much tweaks as it provides the required features, placed properly on the homepage or any other page of your website. It is intuitive, which will allow your users to find what they need with ease.
- Lots of features – Thelia has a lot of built-in features, designed especially for an e-commerce website. There is the option to add multiple attributes or features for your products, currencies, languages, countries management and much more.
Disadvantages
- Lack of themes – The default theme of Thelia is what you get. There are a few options for additional themes that you can use for it, but if you need something special, you need to get a developer of your own.
- Lack of modules – The default Thelia features are the ones that you will have enabled on your website. If you need any extra features, you will have to hire a developer that will be able to complete the job for you.
- Support Language – Thelia is actively being developed in French. Thus, most of the support and information that you will find for it will be in that language.
-Thelia 2 E-commerce software, useful to create and manage online stores, published under a free license.
Welcome Page
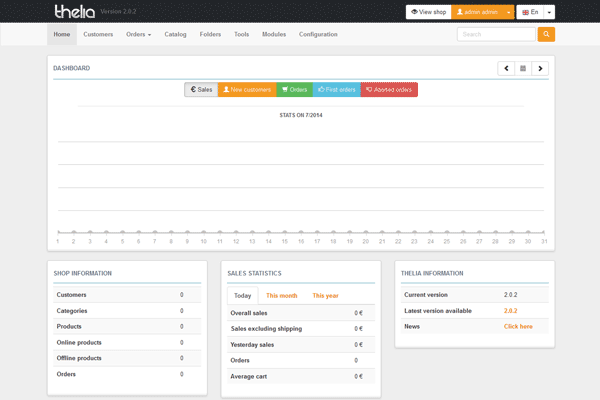
Home
Configuration
Configuration-Language
Configuration-Language-Back Office user
Developed in accordance to web development standards and based on Symfony 2, Thelia meets the following objectives : performance and scalability. Thanks to its features, Thelia helps merchants to improve the management of their business, their sales and turnover.Thelia 2 is released under the GNU LESSER GENERAL PUBLIC LICENSE Version 3.
Features
Some of its basic features are:
• It has multilingual administration
• It supports multi currency
• Thelia is interfaced with multiple payment solutions
• PDF invoices are available
• It can create pages of information with the help of HTML editor
• Cart management
• Inventory management
• A thorough and fast search of products
• It has the feature of automatic update of rate of exchange through the administration
• You can add, delete and edit categories, products, customers and manufacturers
• Customers can view the order tracking status and order history
• It incorporates the principle of meta-language
Thelia is primarily used by web designers and integrators. It is flexible and easy to customize. The main objectives of Thelia are performance and scalability.
Thelia 2 has also been released which is functionally richer. It uses Symfony 2 components and template engine Smarty. Thelia 2 incorporates Symfony, HTML, Bootstrap, PHP Unit, Smarty, Travis, Propel and Semantic microdata. The current version of Thelia is the version 2.2.
Thelia is a comprehensive tool which provides efficiency and security to enhance the user’s experience. It helps the merchants to improve their sales and business turnover. In short Thelia is a product for managing and creating a complex web store and providing commercial support.
-Major Features of Thelia 2:
Performance
Thelia 2 has been developed in accordance to web development standards. The core is based on Symfony 2 components and meet the following objectives : performance and scalability.
Functional
New significant technological choices such as interoperability, css preprocessor or REST API, in addition to relevant added features allow merchants to improve the management of their business, their sales and turnover.
Ergonomic
Both back and front-office have been thought to be more efficient. Powered by the template engine Smarty and integrated with the unavoidable Bootstrap 3 and the standard HTML 5, they are fully adaptable.
Shipping Fees Estimation
Bringing the ZIP code, the city and the country of delivery in the cart to estimate shipping fees.
Coupons, Vouchers And Promotions
Add the possibility to :
– Available the promotion on a category of products only.
– Offer shipping from such amount in the cart or any category of product or if the order contains a specific product.
– Offer shipping for a defined transporter.
– Define the countries where the promotion is available. The country taken into account here is the country of the default address.
– Assign a starting date, in order to activate the offer by itself.
– Promotion : Apply a discount percentage to a product or an entire category of products. Discount price is automatically calculated.
Front-Office Hooks
Hooks integration in the front-office layout.
Rest API
To make interactions between clients and services easier.
Videos
Installing Thelia 2 with Softaculous in cPanel


