
Overview
SQL Power Doc is a collection of Windows PowerShell scripts and modules that discover, document, and diagnose SQL Server instances and their underlying Windows OS & machine configurations. SQL Power Doc works with all versions of SQL Server from SQL Server 2000 through 2014, and all versions of Windows Server and consumer Windows Operating Systems from Windows 2000 and Windows XP through Windows Server 2012 R2 and Windows 8. SQL Power Doc is also capable of documenting Windows Azure SQL Databases.
SQL Power Doc on Cloud for AWS

Features
Major Features of SQL Power Doc
- Baselines – know what your SQL Server environment looked like last week, last month, etc.
- Security Audits
- Licensing Audits
- Provide a complete look at how your servers are configured without having to grant access
- Troubleshooting
- Comparing servers and databases
- Creating a runbook that you can give to your operations team
- Planning upgrades – see what hidden features are in use on an instance
AWS
Installation Instructions For Windows
Note: How to find PublicDNS in AWS
Step 1) RDP Connection: To connect to the deployed instance, Please follow Instructions to Connect to Windows instance on AWS Cloud
1) Connect to the virtual machine using following RDP credentials:
- Hostname: PublicDNS / IP of machine
- Port : 3389
Username: To connect to the operating system, use RDP and the username is Administrator.
Password: Please Click here to know how to get password .
Step 2) A) Click the Windows “Start” button and select “All Programs” and then point to SQL POWER DOC ON CLOUD.
Step 3) Other Information:
1.Default installation path: will be in your root folder “C:\SQL Power Doc v1.0.2.2”
2.Default ports:
- Windows Machines: RDP Port – 3389
- Http: 80
- Https: 443
Configure custom inbound and outbound rules using this link
Set Execution Policy
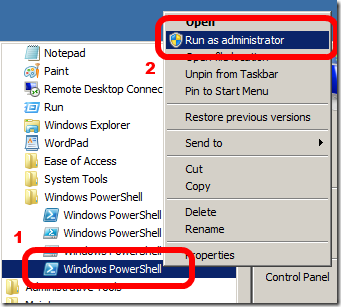
1. Open a PowerShell console in elevated mode:
Start -> All Programs -> Accessories -> Windows PowerShell -> Windows PowerShell (right click, choose “Run as Administrator”)
2. Set the execution policy to allow for remotely signed scripts.
![]()
![]()
3. Exit the PowerShell console.
Configure Windows PowerShell Directory
1. Open a new PowerShell console (but not in elevated mode as when you set the execution policy):
Start -> All Programs -> Accessories -> Windows PowerShell -> Windows PowerShell
2. Create PowerShell and PowerShell modules directory in your “My Documents” folder

3. Exit the PowerShell console.
Start by opening a PowerShell console on the machine that will be collecting the information from your SQL Servers and set your current location to the WindowsPowerShell folder:

You’re going to execute the script .\Get-SqlServerInventoryToClixml.ps1 to do all the work but it requires a few parameters to know what to do.
The following examples demonstrate how to combine all the parameters together when running the script.
Example 1:

Collect an inventory by querying Active Directory for a list of hosts to scan for SQL Server instances.
The list of hosts will be restricted to private IP addresses only.
Windows Authentication will be used to connect to each instance.
Database objects will NOT be included in the results.
The Inventory file will be written to your “My Documents” folder.
No log file will be written.
Generate A SQL Inventory Report
Once the inventory collection phase is complete you’ll want to copy the output file to the machine where you’ll create the inventory reports (Excel workbooks).
To create an inventory report, start by opening a PowerShell console and set your current location to the WindowsPowerShell folder:

This time you’re going to execute the script .\Convert-SqlServerInventoryClixmlToExcel.ps1 and supply the following parameters:
–FromPath
The literal path to the output file created by Get-SqlServerInventoryToClixml.ps1.
-ToDirectoryPath
Optional. Specifies the literal path to the directory where the Excel workbooks will be written. This path must exist prior to executing the script. If this parameter is not provided the workbooks will be written to the same directory specified in the FromPath parameter.
-ColorTheme
Optional. An Office Theme Color to apply to each worksheet. If not specified or if an unknown theme color is provided the default “Office” theme colors will be used.
-LoggingPreference
Optional. Specifies how much information will be written to a log file (location specified in the LogPathparameter). Valid values are None, Standard, Verbose, and Debug. The default value is None (i.e. no logging).
Example :

Writes Excel files for the Database Engine and Windows Operating System information contained in “C:\Inventory\SQL Server Inventory.xml.gz” to “C:\Inventory\SQL Server – Database Engine.xlsx” and “C:\Inventory\SQL Server – Windows.xlsx”, respectively.
The Office color theme and Medium color scheme will be used by default.
