1-click AWS Deployment 1-click Azure Deployment
Overview
SEOTOASTER is an easy to use, free and open source CMS. It is also a very intuitive E commerce website builder with a fully integrated shopping cart & B2B quote engine. Finally, SEOTOASTER features an unique content management system or CMS architecture that grows with your business, and makes piloting SEO execution and marketing for multiple websites from a central automated web marketing location possible. SEO Toaster represents a serious alternative to Yahoo Stores for small e-commerce websites or WordPress when used by small businesses as a corporate CMS.SEO Toaster enables the entrepreneur, e-tailer, or local small business owner or marketer to quickly establish their Web marketing presence with a single overarching objective:
Acquire top website rankings, generate leads and sales.
SEO Toaster use an easy, front-end SEO CMS, where you log-in and simply surf your live website and edit content right onto the page itself, and building, importing or customizing a website theme takes as little as 30 minutes for a web designer. Unique search engine optimization features include automated re-directs; onsite SEO, onsite optimized linking, link sculpting using Java script, and even point and click links silo building and everything is ready and easy-to-use out of the box.It also builds products pages using micro-formats, and web, news and product XML sitemaps.
SEO Toaster is also the first cloud CMS and offers a foundation to scale successful web businesses with a one-click subscription to the internet marketing software SEO Samba. When you reach the point where you want to take your website to the next level of visibility, can’t afford the time to pilot each of your websites individually, or have already standardized your network of franchise or affiliate websites on SEOTOASTER, push one button, and all your websites come together under an unified SEO software interface. Your entire portfolio of websites is now ready to receive and execute your orders such as modifying all pages URL’s, creating optimized links across your websites, landing page experiments, Google news ready articles and press releases…” These are advanced unseen functionalities that no CMS, whether open source such as Joomla, or Drupal, nor proprietary CMS and web marketing software provides.SEOTOASTER supports multiple languages, as of August 1st 2010, it addition to English, seotoaster supports French, Spanish, Portuguese, Russian, Italian, and German.
SeoToaster includes 3 products in one. SeoToaster Ecommerce, SeoToaster CRM and SeoToaster CMS offer a comprehensive website builder, a shopping cart, and a Customer Relationship Management system with sales and marketing automation. It combines a powerful click and edit CMS, a private member area, a Google News compliant blog, a mobile wireframe, but also an advanced shopping cart with support for digital download, a B2B web quoting tool, and an impressive SEO & marketing feature set. SeoToaster CRM sales automation features include email drips, leads tracking with advanced visitor analytics, inbound phone calls and chat conversations lead creation, workflows and a lot more. SeoToaster powered websites can be combined and managed along with WordPress sites from the SambaSaaS marketing cloud with a free account, giving access to search rankings, social marketing calendar, centralized blogging, newsletter marketing and more under one roof.
SeoToaster Users’ roles
Here is a short description of the roles and screenshots of admin panels to illustrate the difference:
Admin:
These users access and interact with all system areas.
Sales Person:
Like copywriters, these users are restrained to fewer control panel items in relation to their function. Sales Persons can access PAGES, MEDIA, and STORE Dashboard menus. They can not edit the STORE dashboard layout.
Copywriter:
These users are restrained to fewer control panel items in relation to their function. Copywriters can access PAGES and MEDIA menus. They can see all types of containers and are able to edit their content.
Member:
Users who register through the membership sign-up form. These users have access to their own profile page, and any page that is set as protected from the page properties screen.They can’t see containers and formatting options.
Customer:
(screen looks the same as member’s ) Users who make a purchase through your shopping cart. All buyers get an account automatically created for them in order to expedite the buying process. You can then elect to configure the action email facility to email them their credentials if you wish to make them aware of the existence of their account. These users get access to a customer profile page which details shipping addresses they have used, view their orders, access shipping tracking information and invoices pdf for their purchase. No credit card information is accessible from there. However, you are free to add any amount of information to their private area, including videos, pdf files or anything else.
How to create and edit a page
Creating and editing a page for your website is easy
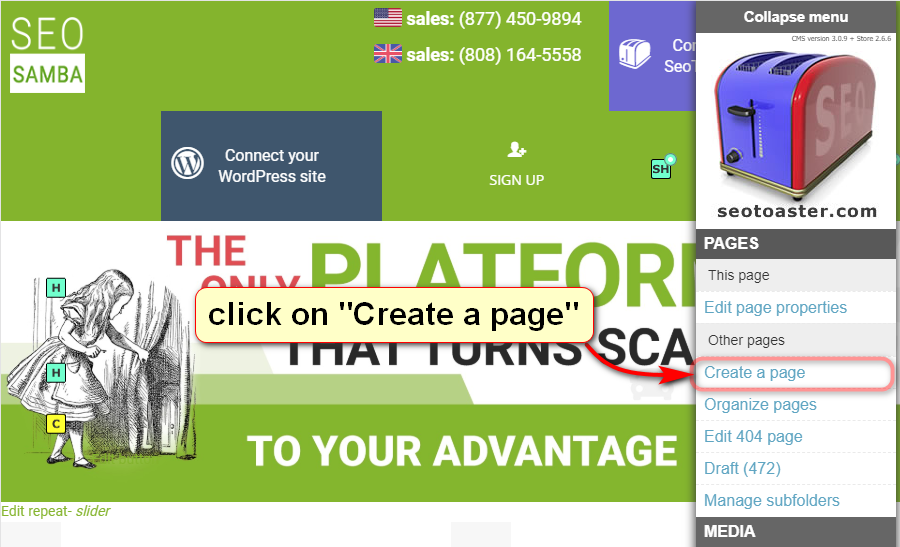
- Click on “Create a page” in the control panel on the left of your screen.
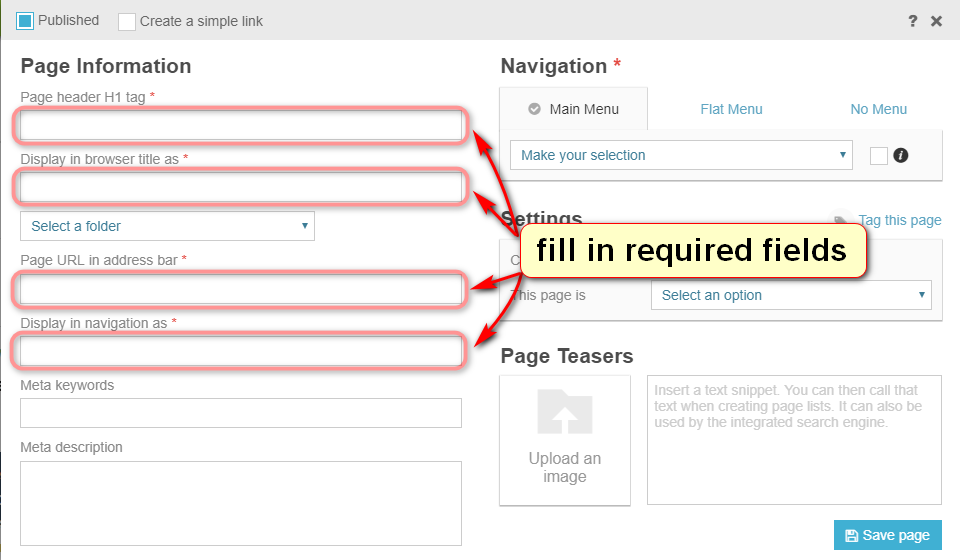
- Fill in the required fields.
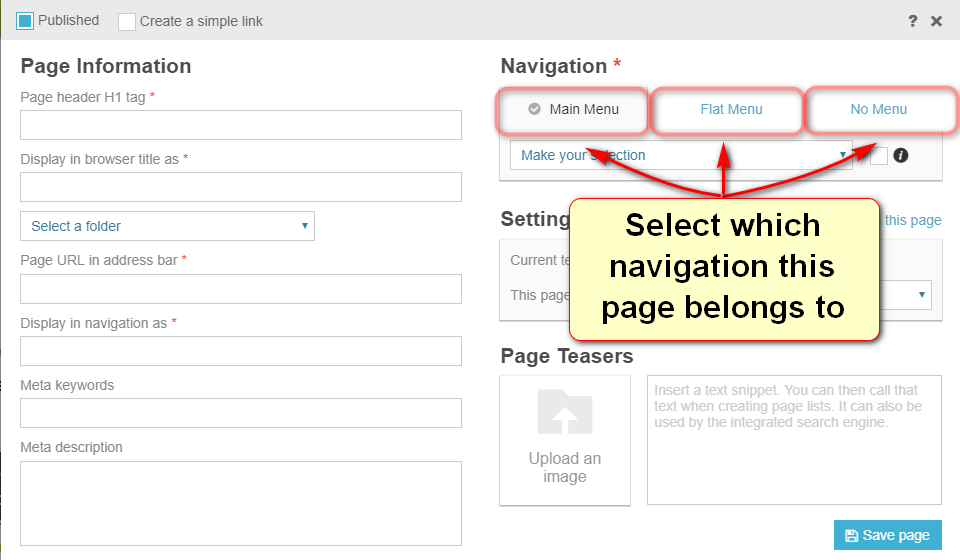
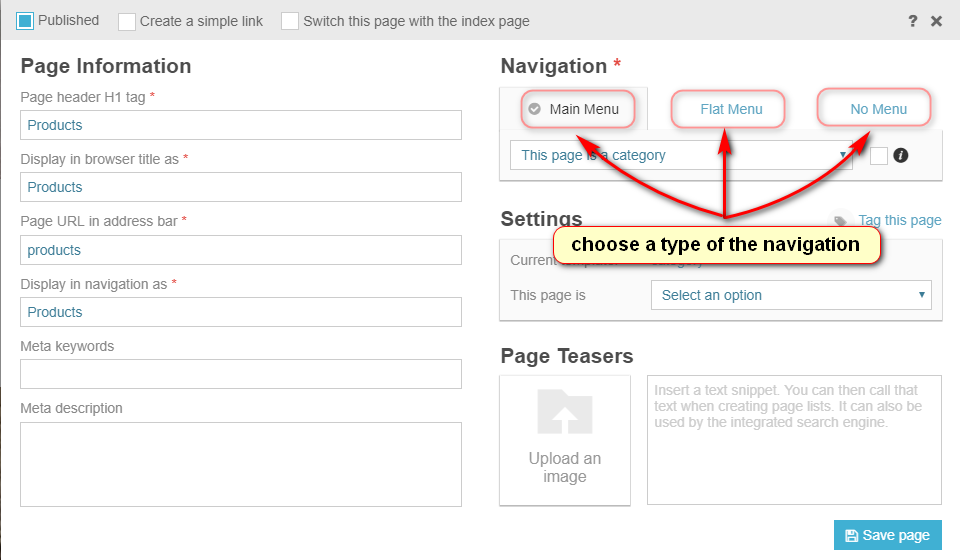
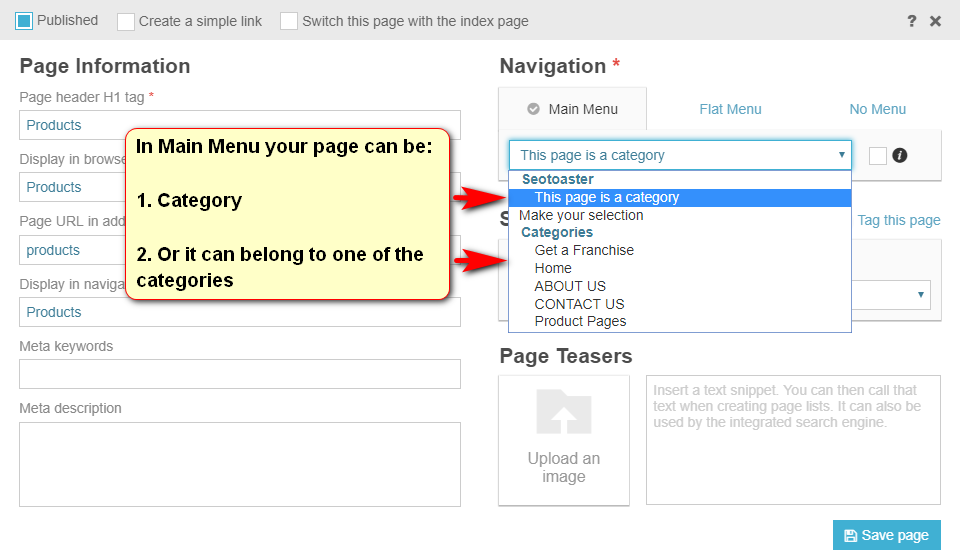
- Select which navigation this page belongs to.
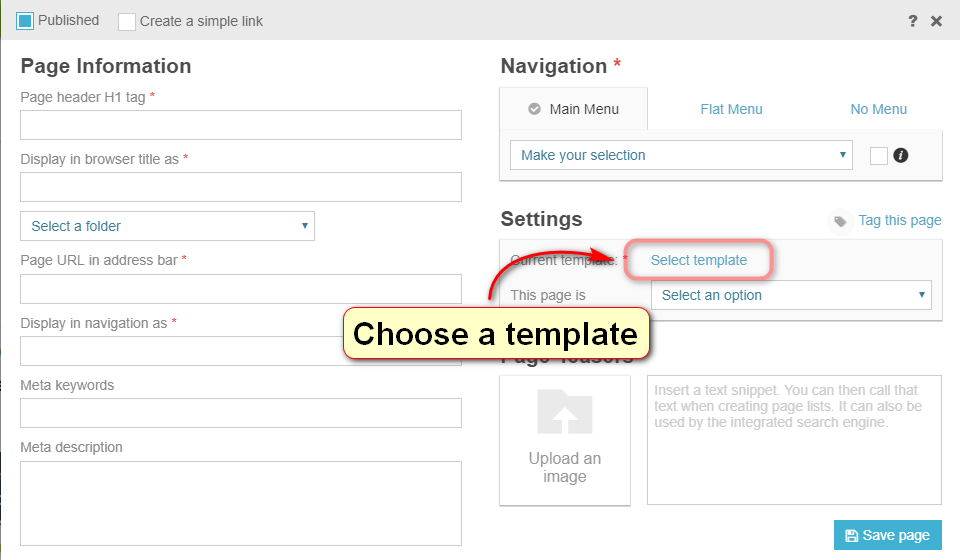
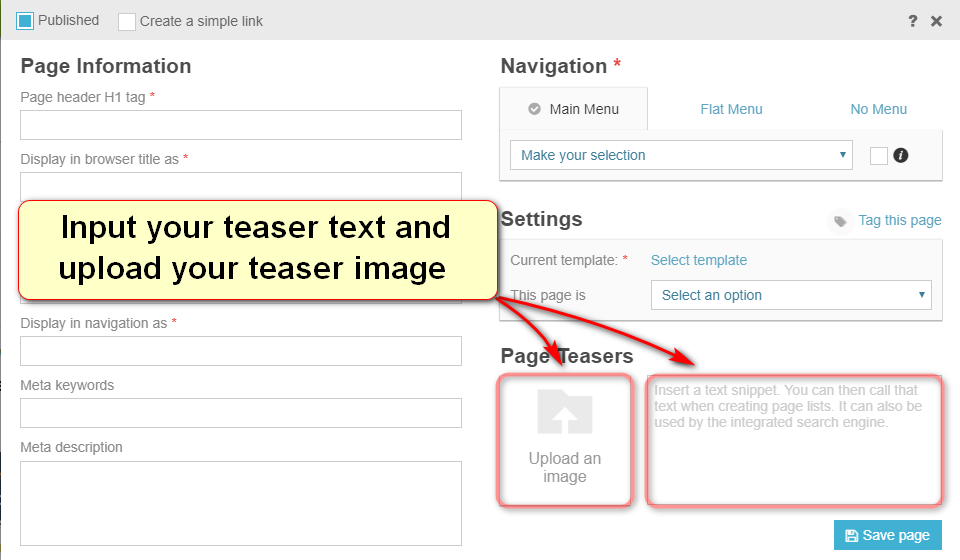
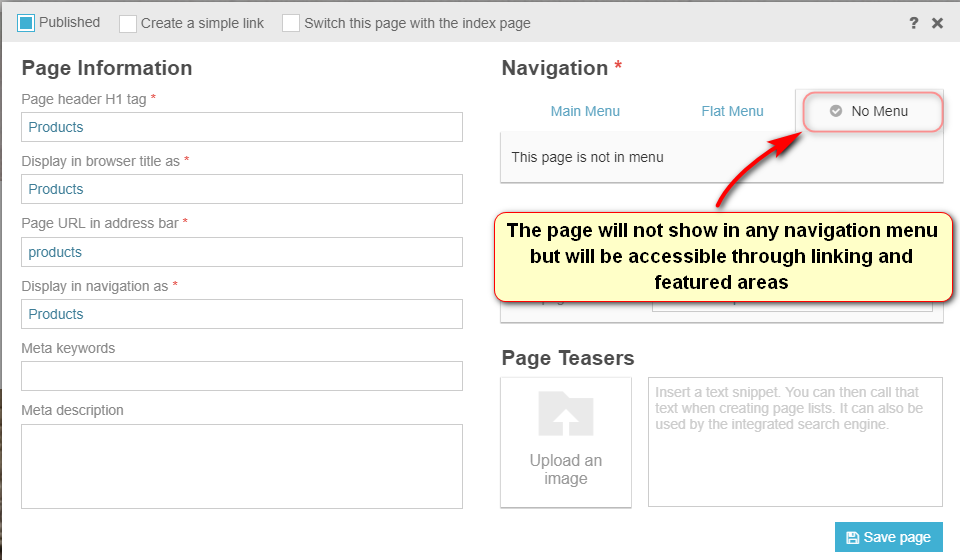
- Input your teaser text and upload you teaser picture for later use in a featured area or search result.
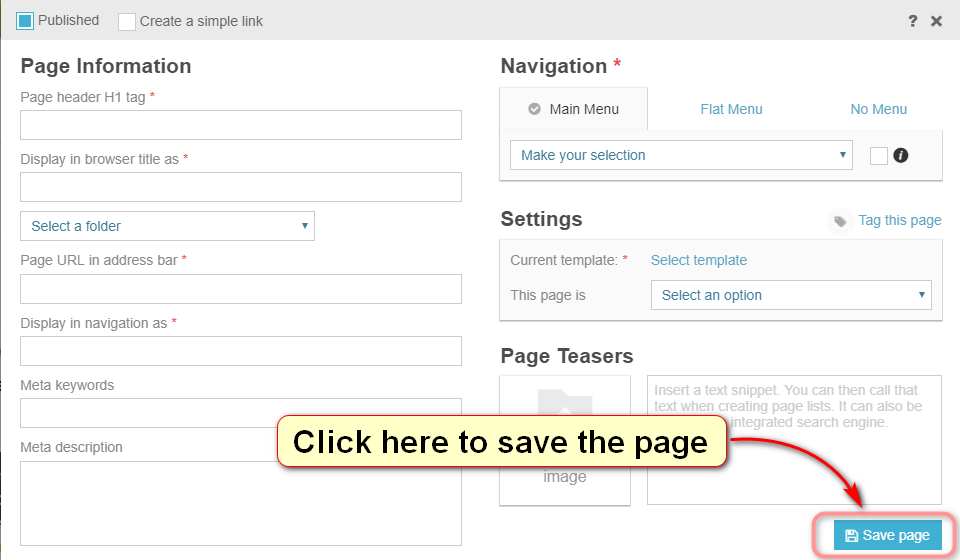
- Click done, and voila, your page is ready to be edited.
How to update/delete a page
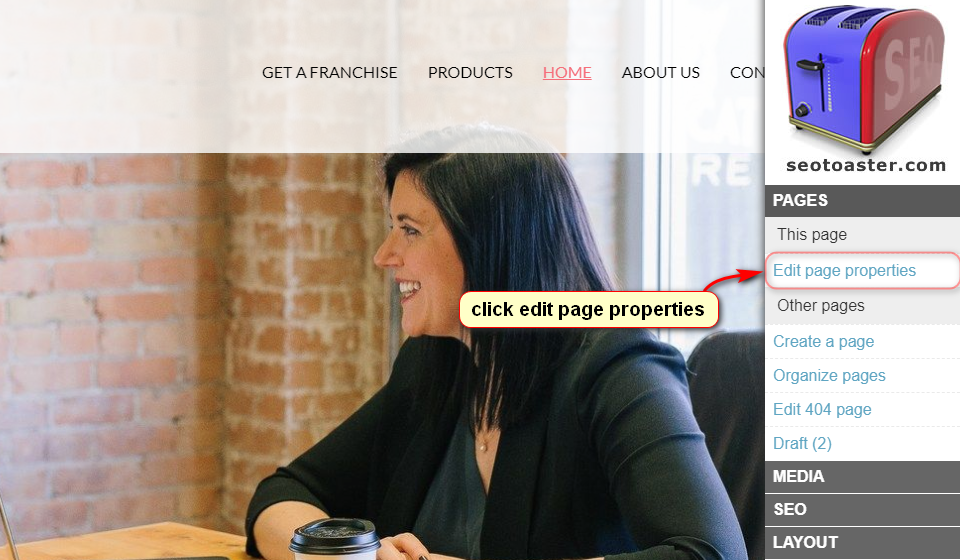
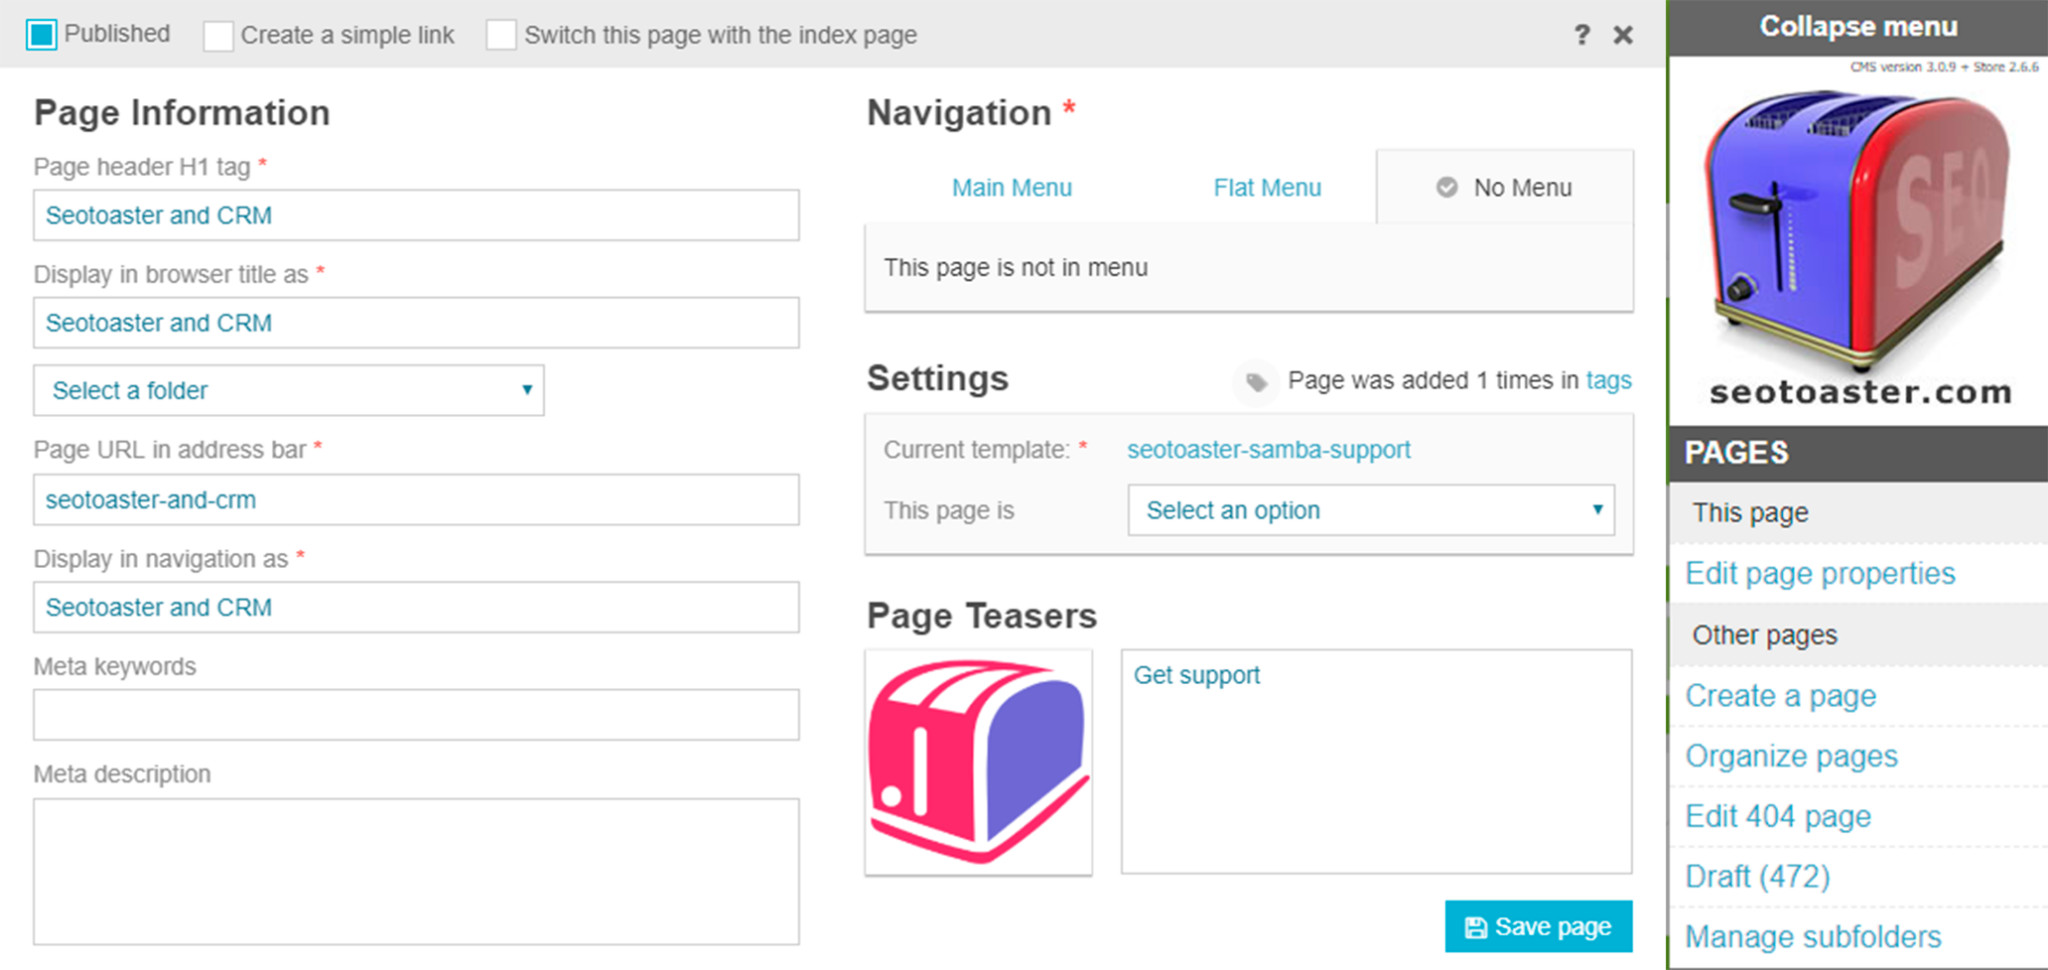
- To change a page’s properties, go to the page you want to change and click “Edit page properties” in the control panel on the left of your screen.
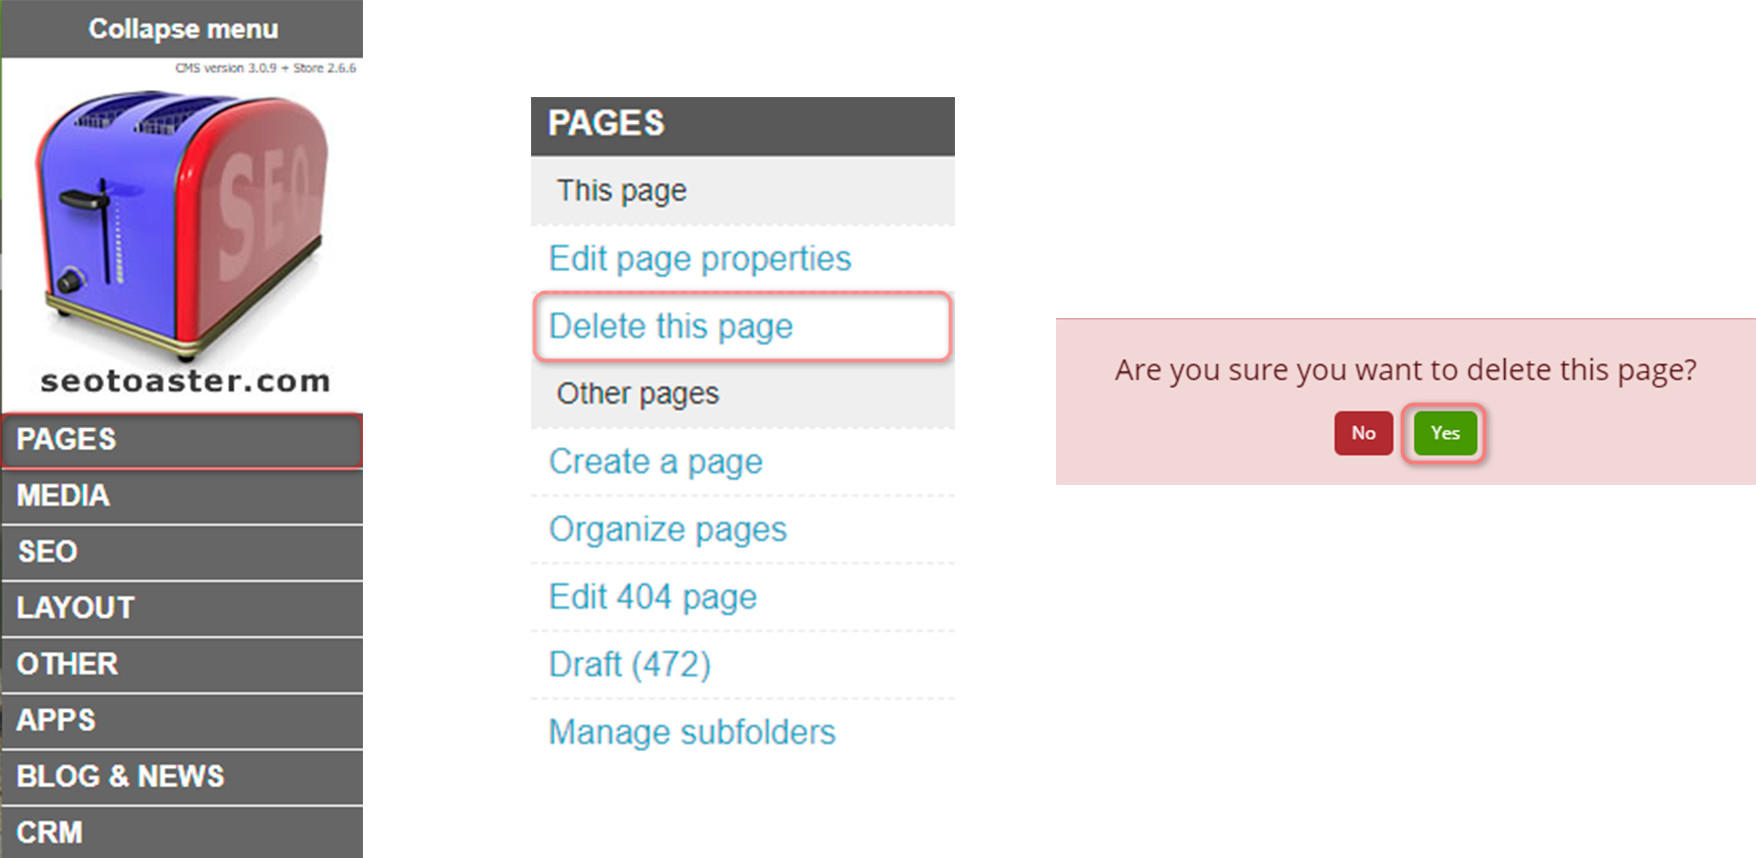
- To delete a page, simply go to the page you want to delete and click “Delete this page” in the control panel on the left of your screen.
Text and image teasers. Use them!
Text and images teasers are very important and allow for great flexibility in your design.
You will use them in the following context:
- Show a list of your categories landing pages with their respective images and text.
- Shows a list of pages in the current categories. Same thing it will show a nice list of those pages accompanied by their teaser images and text.
- Featured areas (floating menus): You can place very good looking floating menus throughout your site in a few clicks.
- Brings the main menu (Categories/pages) with all pages featuring their images.
Add and edit content
Inline Edition
Website Builder is a “— Front-End — Inline Edition —” SEO CMS. It means that your CMS ALWAYS lets you edit the content of your web site right there as you browse it, and never sends you to an admin panel. You always edit the content right where it appears on the page.
 Edit Content, at THIS place for THIS page
{%%content:param} Edit content at THIS place and it will show on ALL pages that are using a common template
 {%%content:param:static} Edit a header
{%%header:param} Edit this header at THIS place and it will show on ALL pagesare using a common template
 {%%header:param:static}
Icons Explained in Details
 Edit Content icon
- How many content areas can I put on a template?You can create as many content widget as you want in a template
- How can I create Content Areas?To create a content widget simply put:
{%%content:name-of-content-area} - Where do I put these content areas?anywhere you want to be able to add content for this page.
- Give me some code example to add these content areas to my templates:
{%%content:left-top}or{%%content:1}or{%%content:xyz}etc…
 Edit static content
- Why do you call it “static” content?Whatever you put in this content widget will appear on EVERY PAGE that uses this static content widget.
- Why would I use this for? Same content on every page?A good example would be your footer text. it appears on every page.
- Give me some code example to add these content areas to my templates:to add a footer just add:
{%%content:footer:static}
 Edit Header
- Why did you create a header widget when we already have the content widget?The content widget opens a very fancy editor allowing for HTML editing and all. We wanted the header to W3C compliant every time, so this is why we added this widget that opens a one-line text field, nothing else than text can be added.
- Give me some code example to add these header areas to my templates: to add an h2 header for example just add:
<h2>{%%header:xyz}</h2>
 Edit Static Header
- Why would I need a static header widget?You set it on a template and can use it throughout pages. this is very convenient.
- Give me some code example to add these static headers to my templates.To add an h2 header for example just add:
<h2>{%%header:xyz:static}</h2>
How to add text
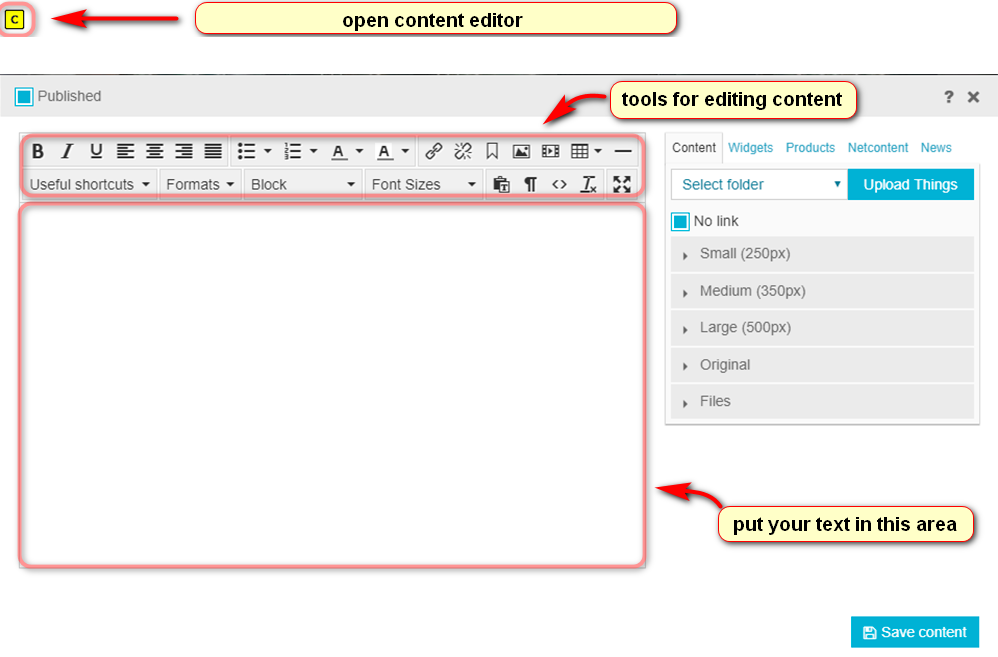
How to add a header

How to add a link

How to add an image
How to add a file
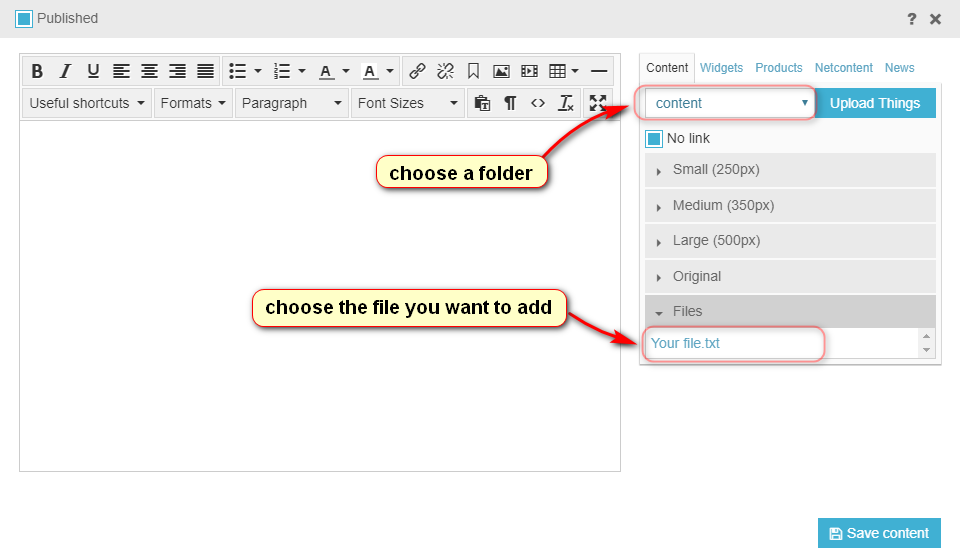
How to upload things
Uploading images and files to the system is a simple matter
Whenever you need to use images, show videos, link to files on your website, look for the “Upload things” link. You will not have to look for it much, as we made sure it would be available to you anytime you need it. As a reminder, your CRM is a front end edition software, there is NO admin area, all features are administrable from the front, therefore very easy to learn.
SEO Feature: All images automatically open to their original size when clicking on the thumbnail for a better user viewing experience. In addition, the “alt” tag is automatically generated based on the name of the file and added to the image for a better experience for users reading from text-based browsers. Make sure you name your images appropriately!
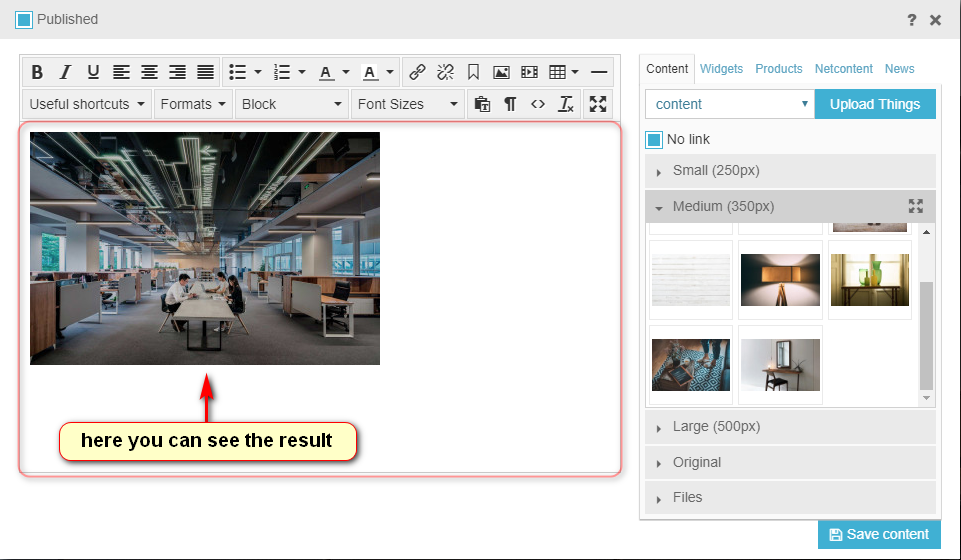
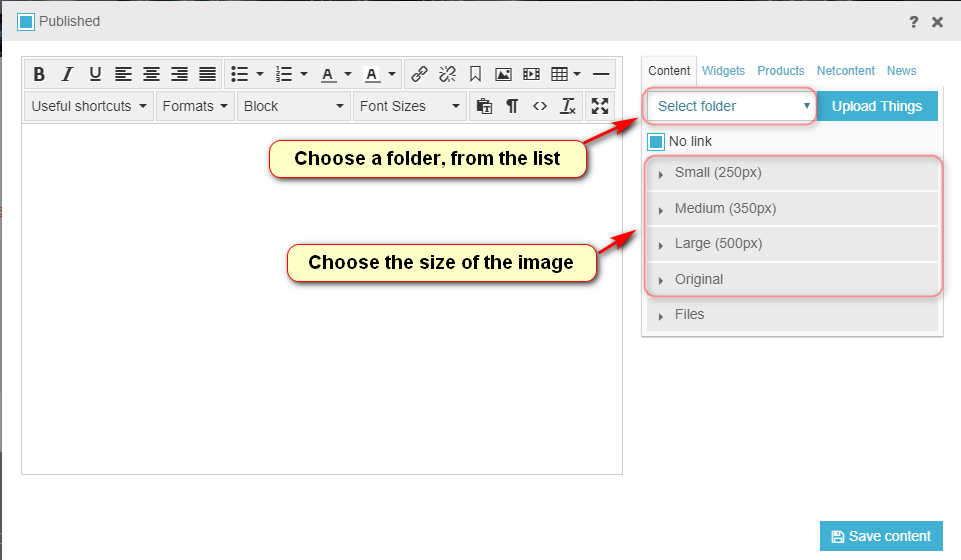
So, to upload an image or file, go to Media – Upload Things. Choose a folder from the dropdown list or create a new one. Click the button “choose and upload file” and upload your image or file.
How to organize pages
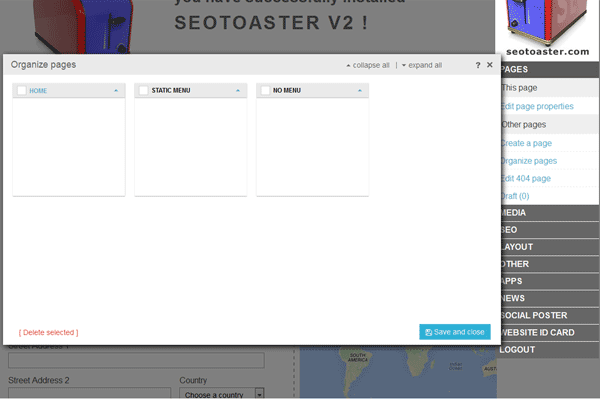
Your CMS is a very easy-to-use website builder that makes sorting pages a piece of cake. Just drag and drop pages and/or whole categories of pages where you wish to see them appear. Move your pages from one menu to another, or from one category to another.
To organize the pages on the site, you need to click on the appropriate item on the panel:
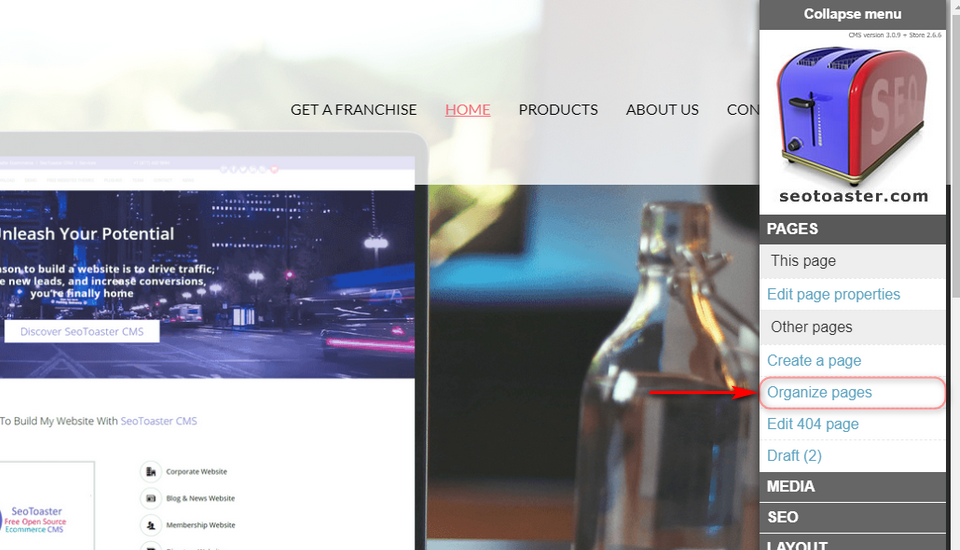
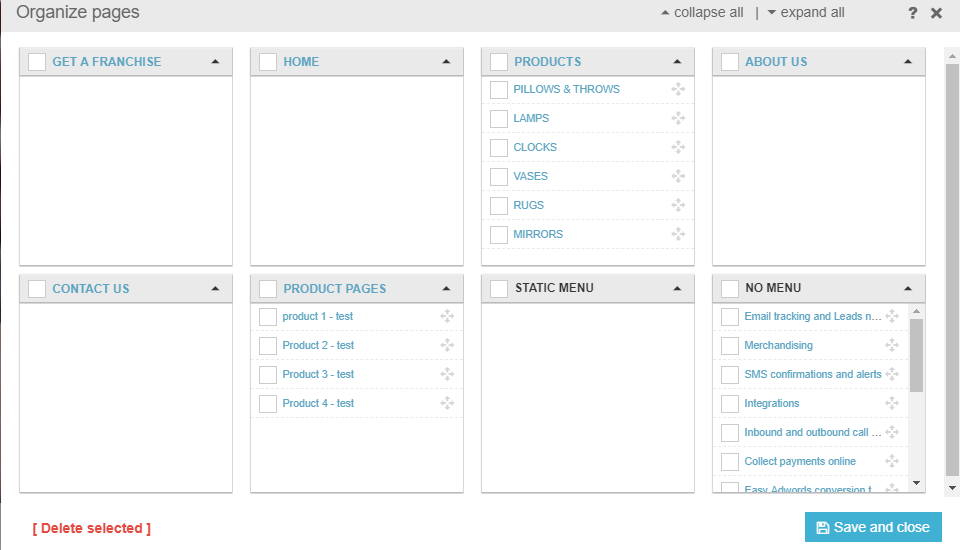
You can expand and collapse all categories for quick search of the necessary:
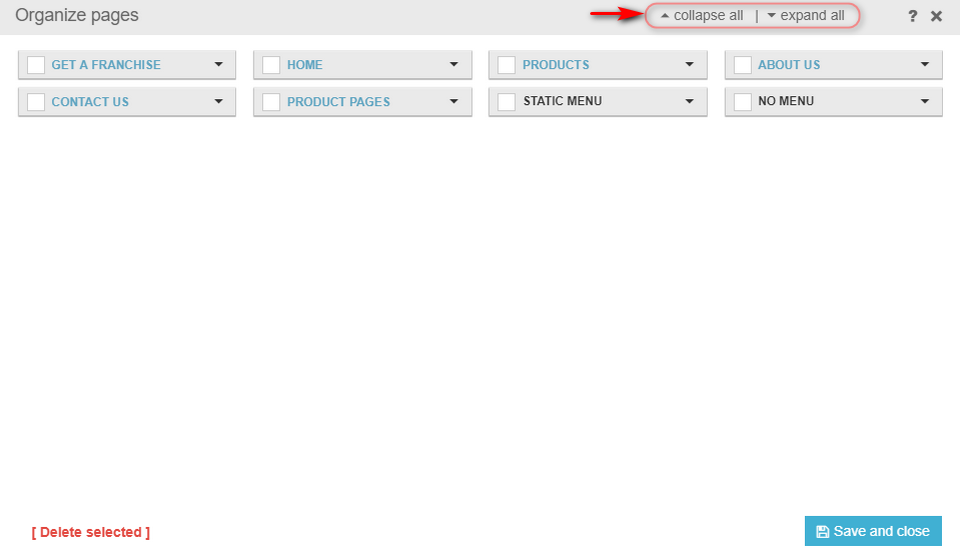
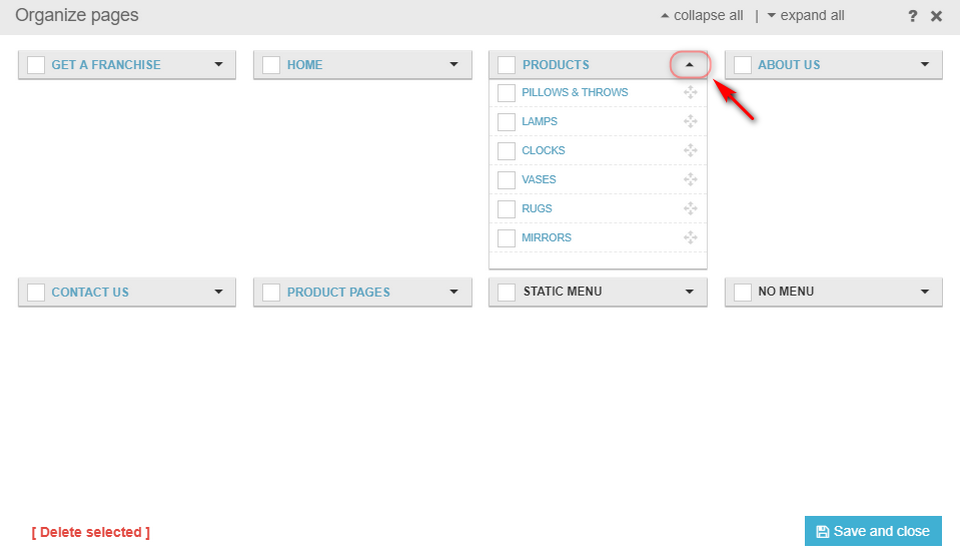
Or expand / collapse only one of all categories on the site:
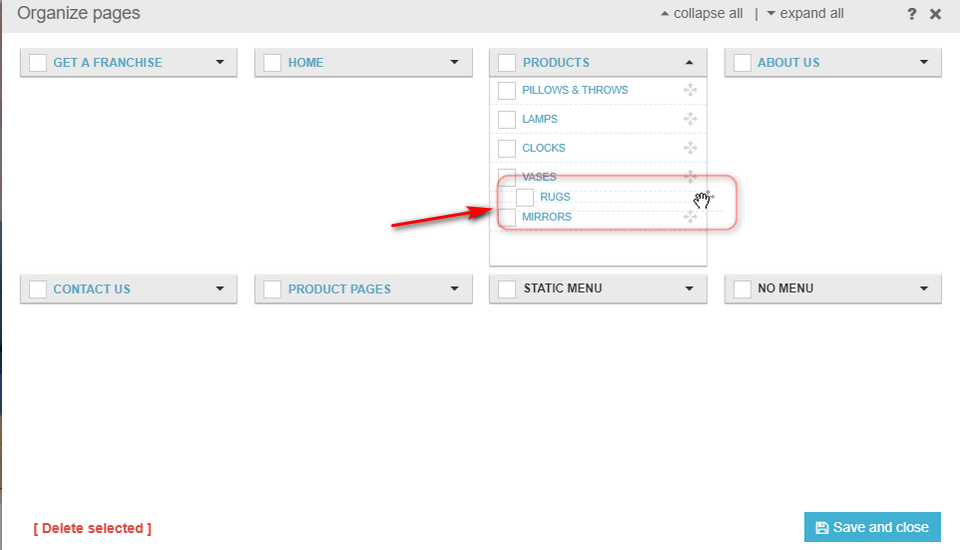
If you want to change the order of the pages in the category of places, you just grab the mouse pointer over the icon and start to drag to the desired position:
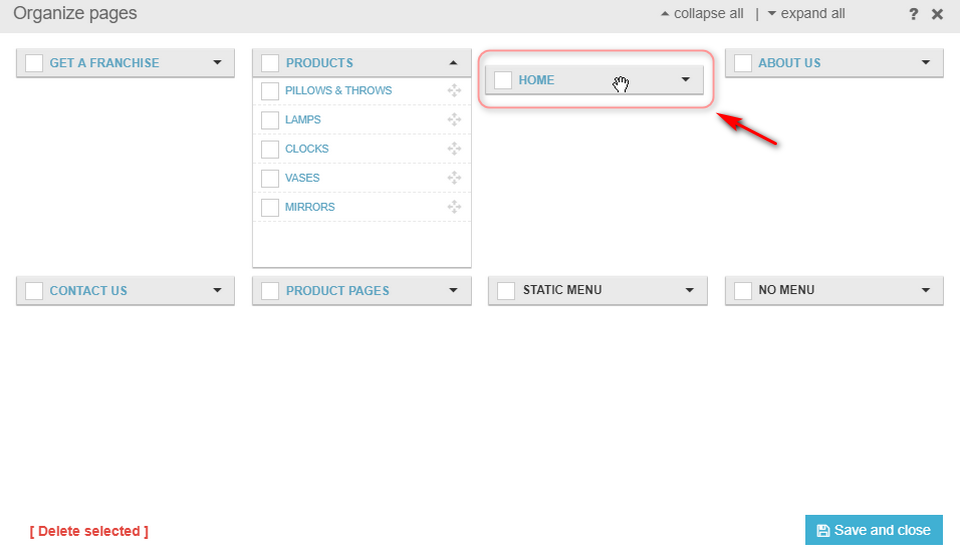
In the same manner, you can also drag categories grabbing the mouse pointer in the left corner:
How to work with navigation menus
Endless navigation menus capabilities
Website Builder CMS has a very comprehensive list of menus options. If you have an idea of a menu system, you will be able to create it with Website Builder. Here are a few examples of what you can do:
First of all, the code used to generate Website Builder’s navigation menus is simple, and w3c compliant. Search engine bots/crawlers and any browsers for vision impaired users (brail keyboards / text to speech systems) will not have any difficulties crawling through your links as the code is not cluttered by bad and unnecessary code.
In addition to this, we added all the necessary information a search engine would need to index your pages properly, and for the web developers to create astonishing styles that make the web better.
Simple rules and common sense for a better website
- Categories have a class named “category”
- Pages have a class named “page” (Not too difficult so far.. isn’t it?)
- All navigation menu links have the target page’s H1 tag as a link title (on-mouse hover browser pop-up)
- All images used in navigation menus also feature the target page’s h1 tag as an alternative tag.
Available Navigation Menus Out Of The Box
There are 3 main types of navigation menus in Website Builder that can be used right out of the box.
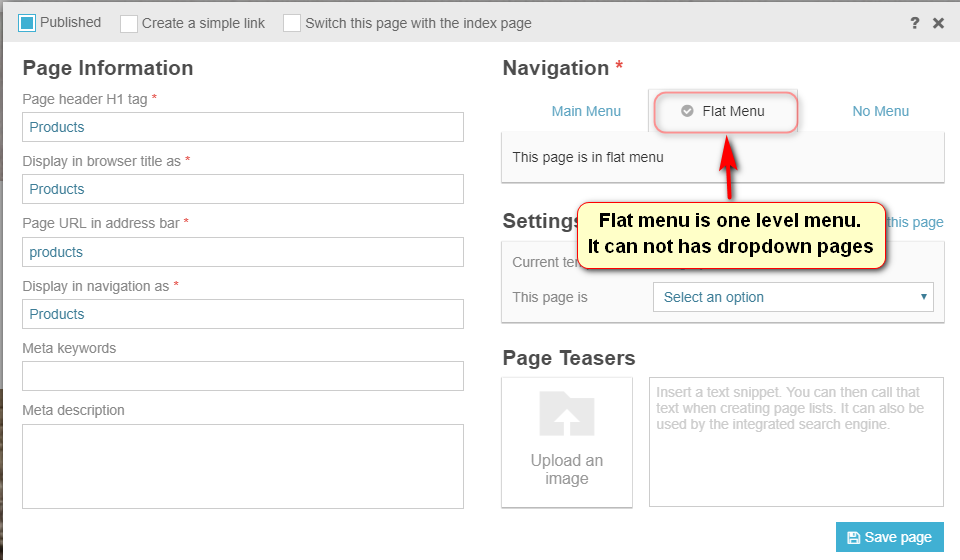
{%%menu:main}– this is your main menu that will display your categories/pages list. When creating a page, you tell the system that you want this page to be in the main menu under XYZ category or simply tell the system that the page you are creating IS a category.{%%menu:main:img}– same as above but uses the teaser text and images (you should use them!) and displays the image and text describing your page.{%%menu:flat}– this is a one level menu frequently used for common information links such as ” About us | contact us” etc.
There are also list classes you can use to create automated listings of categories, images, and pages anywhere on your website.
{%%list:categories}– just a list of all your categories in your website.{%%list:categories:img}– same as above but uses the teaser text and images (You should use them!) and displays the image and text describing your page. It is up to you to create an amazing design for it.{%%list:pages}– lists all pages within this very category{%%list:pages:img}– same as above but also uses the teaser text and images for an enhanced experience for the user. You would use those 2 types of the menu above in a “category” template, for example, that way when somebody clicks on a category link, they see a small blab about the category, then a list of pages for this very category.
How To Work With Navigation Menus
How To Create Featured Areas
Website Builder’s Secret Weapon: The “Featured Areas” (Floating menus)
Featured Areas are tags-based “floating menus” that you can instantly throw in any content on your web pages in it, then pull those pages from anywhere.
- When creating or updating a page, under the template selector link, there is a link that says: “This page is featured: Not yet”… Click on it.
- The featured area system appears, and allows you to add one of those “floating Menus”. Name it the way you want, something pertinent you will recognize: Ex: “Beach homes”.. click add.
- Now check the box next to the floating menu to tell Website Builder that you want this page to be part of the “beach homes” menu.
- Now that you have this “Beach homes” featured area (should have named this feature “Floating menus”… Darn!), you can go and edit the properties of any pages and add pages into the “Beach homes” floating menu.
- Please note that when you create a page, you are not obliged to put it in a static menu or a category.. You can simply select “no menu” but add it to one of your featured areas for later retrieval.
How To Display Featured Areas
- In any page, go to one of your content editors.
- Go to the widgets Maker
- The first widget in the list is the “Featured area”
- Select your Featured Area to set up the options below
Available Options For Featured Areas
max resultsMax number of pages to display.. (Maybe you do not have room to display more than 4 links out of 20 you have in “Beach home’max charactersMax character to display from the teaser text of your page (located in create/edit page screen)use image?You can also upload a nice teaser image for your pages, so you can show a thumbnail or preview image along with each menu itemrandomIf you check this box, Website Builder will randomly display the max results of pages (e.g. 4 out of 20) you have put in this menu.
Feature Area Sample Code
Once you’re done configuring your Featured Area through the widget, the code in your content should look like this:
{%%featuredarea:Name of the featured area:max pages result:Max teaser text characters:Random or not}
If you checked the box “Use images”, then the code will appear as follows:
{%%featuredareaimg::Name of the featured area:max pages result:Max teaser text characters:Random or not}
How to set a page as a draft
If you need to hide a page from public view, for instance, because you want to keep working on it before publishing it, you can easily set it as a “draft”.
Doing this will hide the page from public view, remove it from associated navigation, sitemaps or tagged lists.
The owner and anyone else who knows the direct link / URL address of the page will still be able to view it, and of course, edit the page when logged into the system.
You can find all your unpublished pages in the CMS Control Panel by selecting PAGES – Draft.
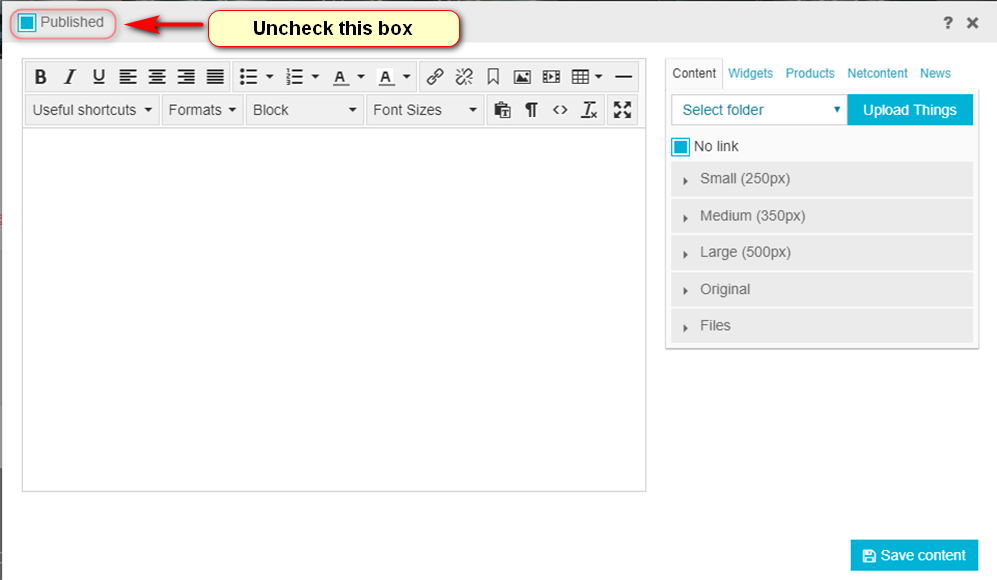
Go to the page that is not ready for prime-time yet. In order to set it with a draft status, just click “Edit page properties” and un-check the top left corner box “Published”.
Set individual content containers on a page as a draft
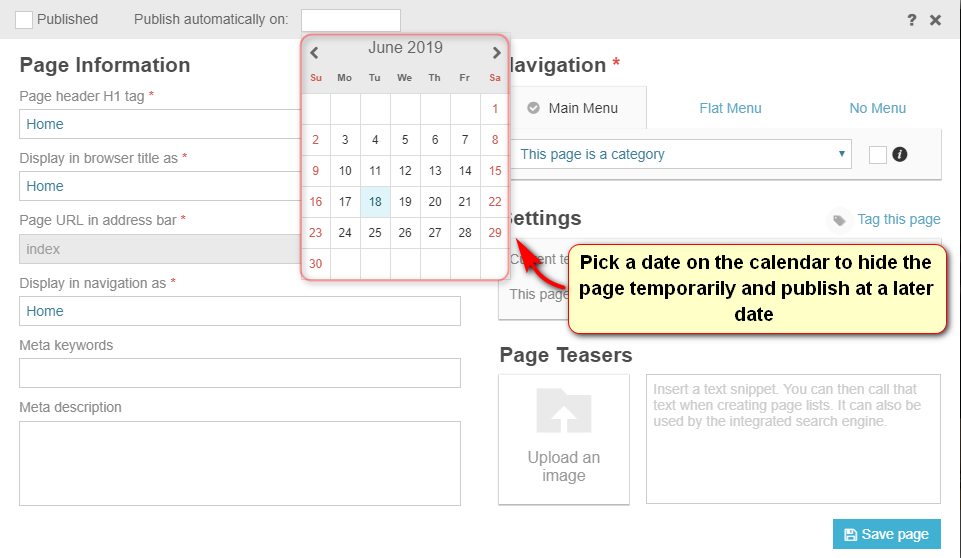
Publish a page while keeping any section invisible or scheduled for future publishing
Thanks to individual container’s scheduling capabilities, you can easily retain part of your website pages from your visitors’ sight, allowing you to release content on a step by step basis. You can even schedule these containers to appear on your website at a given date. How do you say flexible again?
How to add and edit templates
Adding & managing templates
Adding and managing templates in your CRM is very simple. You can add a template in a few clicks and find it back whenever you need it.
Creating templates is also very easy. It uses simple HTML and Content Widgets to add a content area to the page.
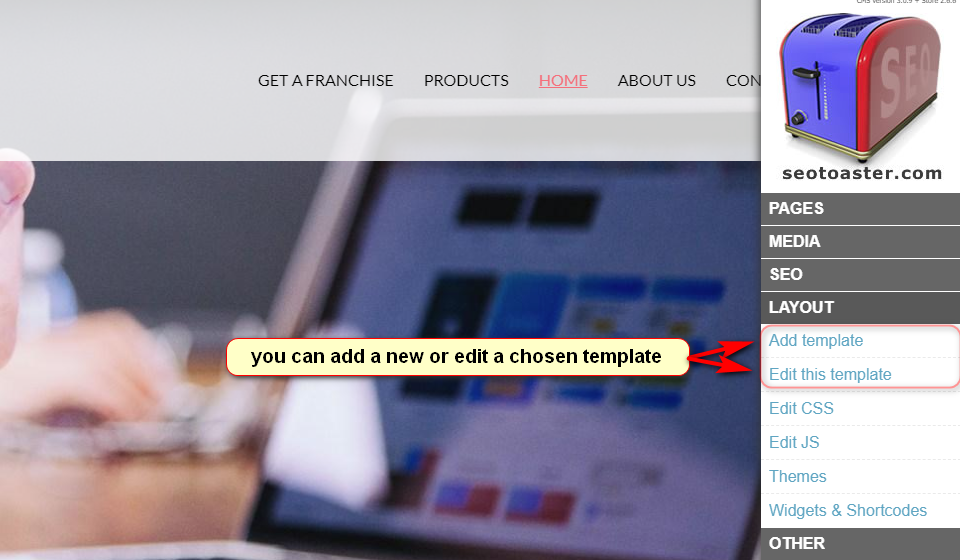
If you want to add a new template to your website, click on Layout – Add template on the admin panel.
Type a name for your new template and choose a type of the template from the dropdown list. Paste your HTML code and click “Save”.
If you need to edit this template go to Layout – Edit this template.
If you want to edit another template, click “other templates” and you will see the list of all your templates.
How to add plugins
Extend your CMS easily & rapidly
Plug-ins are vetted by a committee before being offered to you for extending Website Builder’s capabilities. A new field of ready-to-use functionalities become instantly available on your website, from mobile versions to payment gateways and more.
How to upload and install a plugin
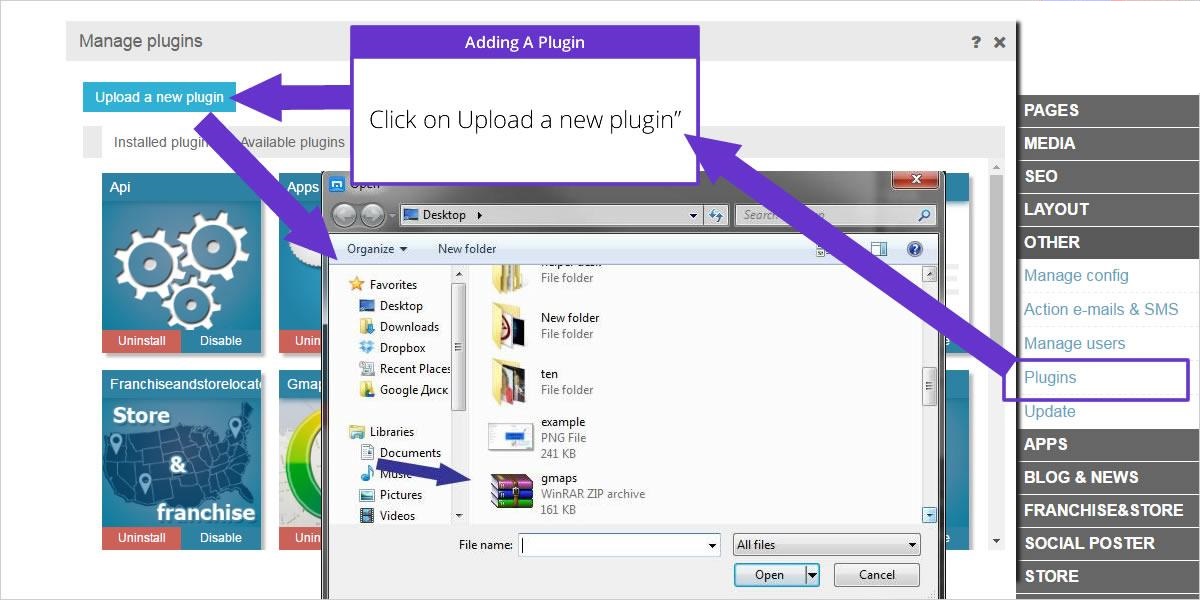
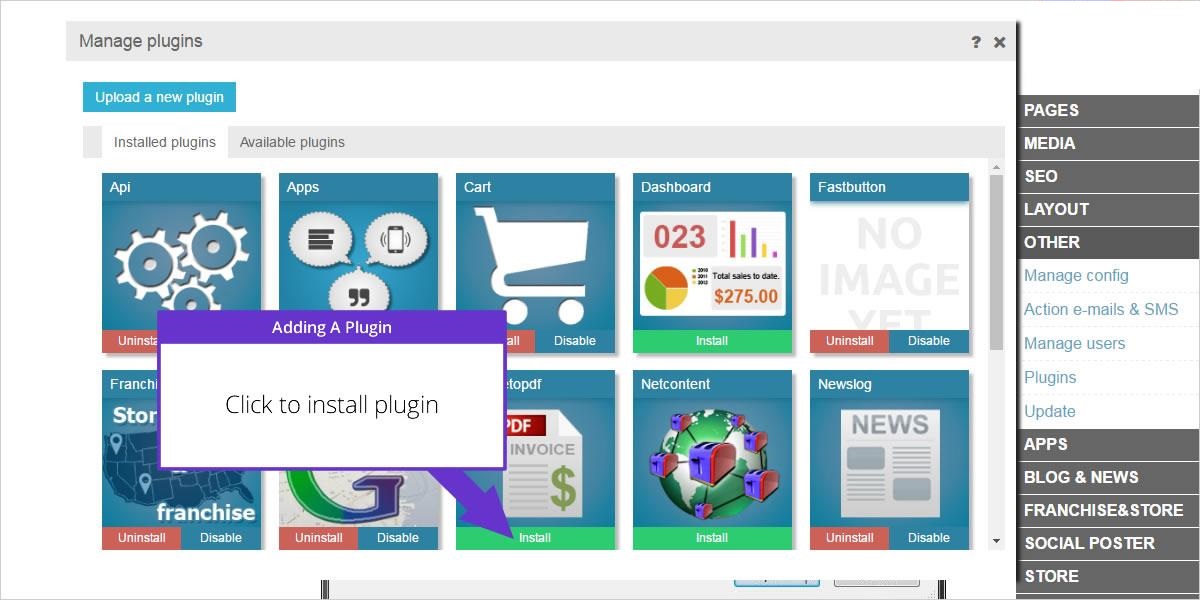
Start with downloading a plug-in. Then go to your Website Builder install, and click Others – Plug-ins and click “Upload plugin”.
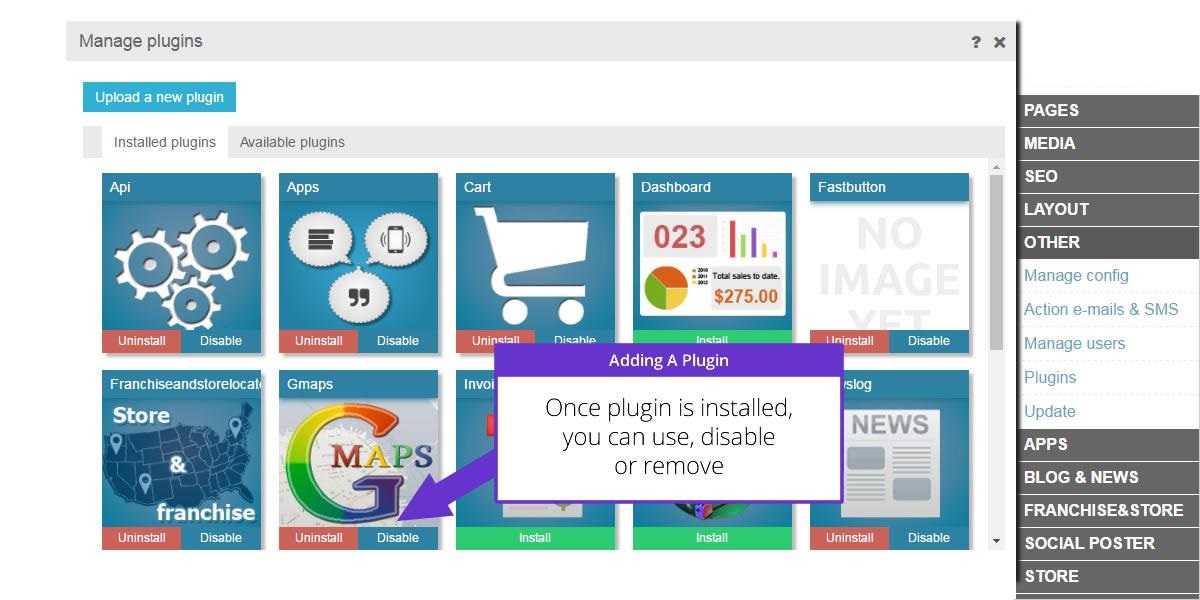
When the plug-in is on your web server, click the button “Install”. Go to the config menu, retrieve your plug-in code snippet from there or from our plug-in code list, then add it to your page. If the plug-in is free then you’re good to go.
In the event the plug-in is fee-based, a link will appear in order to proceed to payment and properly license it. Most plug-ins can be licensed on a monthly basis or for a one-time fee at your discretion.
- Provides ability to access a library of ready-to-use themes to jump-start your presence online
- Customize and integrate open source shopping cart and other applications
- Building one, two and more money-making websites for free is possible with SEO Toaster
- SEO friendliness: In-built all latest SEO techniques right into their website from the get-go helps in achieving high rankings with Google and other search engines: No blog to read or SEO expert fees to pay
- Much easier to use than WordPress and has scope of scalability
- Seotoaster is easy for content writers, and website administrators featuring complete front-end edition
-SeoToaster CMS is the most advanced SEO & marketing website building & management system that can be used right out of the box, with no plug-ins required. SeoToaster combines in one package a full blown CMS, but also a private area membership system, a blog that complies with Google News & Yahoo News requirements, and a responsive mobile wireframe for building websites.
Organised Pages
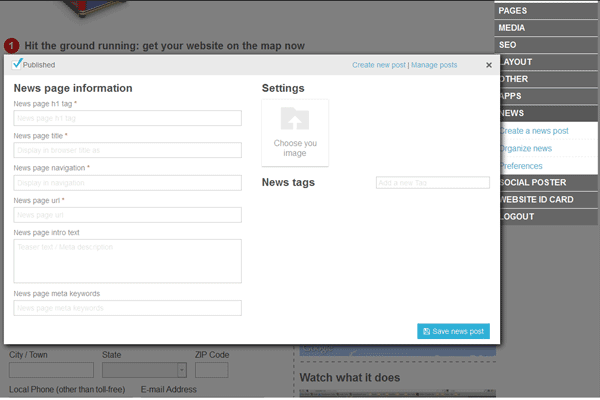
News Page
Add/Edit
Installed
SeoToaster CMS features a uniquely intuitive content management system interface, combined with powerful automated marketing such as web-to-call, automated SMS and email marketing.SeoToaster CMS is released under GENERAL PUBLIC LICENSE V3.
Features
Innovative Features for Everyone :
Everything you need to build, manage & market your store :
Your store comes with a powerful CMS to manage your pages, a Google News compliant blog, and a web quote tool for B2B, phone or POS sales.
Inline product lists building :
no need to call your web designer or alter templates to add/edit automated products lists to your web pages.
Integrated Email & SMS remarketing :
configure Email & SMS remarketing in less than a minute for cart abandonment but also quote requests, account anniversaries or order shipping notifications.
Built-in merchandising :
group pricing, couponing, promotions, cross-selling…it’s all in there already.
Unmatched SEO :
automated optimized landing page creation, native microdata widgets, automated canonicalization and strict W3C compliance to help you secure the highest search engine rankings.
Connected & social :
Automated Google webmaster tools, real-time analytics, brand monitoring & social network marketing with a free cloud based SeoSamba account.
Centralized management for multi-stores owners :
Pilot your SEO & marketing, while sharing product catalog & inventory for any number of web stores from the a centralized interface in the cloud.
No design limit :
Unleash your creativity with full HTML support, front-end CSS and JS edition, developer mode.
Mobile responsive wireframe :
The ultimate tool to streamline website building with SeoToaster for web designers & web developers.
-Major Features of SeoToaster
Simplified yet powerful website edition :
Click and edit content right on your web pages. Your content is saved automatically.
Integrated membership system :
Protect access to private information in 1 click. Great for non-profit & membership organizations.
Integrated blog system :
SeoToaster helps you get your site featured in Yahoo news & Google news by meeting all technical requirements.
Native SEO, Mobile, Local & Social functions :
SeoToaster generates geo-localization file for mobile & local search, and let you publish your updates to Twitter, LinkedIn and Facebook wall & pages in 1 click.
Built-in tripwire web form protections :
to prevent bots to spam your email without interfering with conversion objectives, as sometimes Recaptcha does.
Connected & social :
Automated Google webmaster tools, real-time analytics, brand monitoring & social network marketing with a free cloud based SeoSamba account.
Centralized management for multi-websites owners :
Manage & automate SEO, social networking and online marketing across any number of websites through a centralized interface.
Mobile responsive wireframe :
The ultimate tool to streamline responsive website building with SeoToaster for web designers & web developers.
Strict W3C compliance :
Get maximum website performance with search engines as SeoToaster and all marketplace vetted plug-ins produce strictly W3C-compliant code.
APPS :
A cloud-based service that connect web forms with functionalities such as email marketing. An entirely new way to add functionalities from the cloud and switch services provider with no plug-in tinkering.
Built-in media servers :
providing up to five-times faster web serving leveraging modern web browser parallel download capabilities.
Specialized inline editor types :
Build unbreakable website themes by defining website areas functions (imageonly, textonly, videonly etc…). Great to minimize headaches and support calls.
Videos
How to Install Seotoaster ecommerce v2.0.5 cms _ v2.0.0 on your server.

