
Overview
RockMongo is a MongoDB administration tool which is used to manage server, databases, collections, documents, indexes, and many more. It offers a very user-friendly way for reading, writing, and creating documents and is similar to PHPMyAdmin tool for PHP and MySQL.
RockMongo – The flexible and extensible
RockMongo is a browser-based management application written in PHP. It requires at least PHP 5 to execute. Beyond that, it’s only other dependency is the php_mongo driver.RockMongo is not a single PHP file; it unpacks to a directory tree of JavaScript files, themes, and other application components. Nevertheless, the installation is pretty simple.
You can configure RockMongo to use either the authentication provided by MongoDB itself or a hard-coded administrator name/password pair in the application’s config.php file. (MongoDB authentication, which is disabled by default, stores user credentials in a special “system” collection in the database. Each document in this collection maps user names to user roles.) You have to modify config.php in any case to set parameters such as the GUI’s theme and the IP address and port of the MongoDB server.
RockMongo’s interface is easy. To create a database, click the database menu item, select ‘Create a New Database’, enter a name, click ‘OK’, and there you go. This is in keeping with MongoDB’s simple mechanism for creating databases or collections. There are few parameters to adjust. You just create a database, put a collection in it, and start filling that collection with documents.
Install RockMongo
RockMongo is a web-based database management tool, written using PHP 5 programming language. In order to install this, make sure you have installed a web server and PHP 5, and some additional dependencies. RockMongo will not work in PHP 7 version. So, we recommend you to use PHP 5.
Let us Install a web server (Apache), php 5, and some required dependencies. For the purpose of this guide, we will be using CentOS 7 64 bit server. Do not forget to set SELinux mode as permissive or disabled mode. Otherwise, you can’t access the RockMongo dashboard from any remote system’s browser.
On RHEL / CentOS:
$ sudo yum install httpd gcc php php-gd php-pear php-devel openssl-devel unzip wget
Start and enable the Apache service using the following command:
$ sudo systemctl start httpd
$ sudo systemctl enable httpd
Allow Apache webserver service through your firewall.
$ sudo firewall-cmd --permanent --add-service=http
$ sudo systemctl restart firewalld
Then, Install the php_mongo extension using command:
$ sudo pecl install mongo
Sample output:
[...]
Build process completed successfully
Installing '/usr/lib64/php/modules/mongo.so'
install ok: channel://pecl.php.net/mongo-1.6.14
configuration option "php_ini" is not set to php.ini location
You should add "extension=mongo.so" to php.ini
Edit /etc/php.ini file,
$ sudo vi /etc/php.ini
And the following line:
extension=mongo.so
Save and close the file. Restart Apache service to take effect the changes.
$ sudo systemctl restart httpd
Verify the extension is added or not using command:
$ php -m | grep -i mongo
You should see the following output:
mongo
Well, we have installed required prerequisites. Now, download the latest RockMongo version from the releases page.
Or, use the following command to download latest RockMongo version.
$ wget https://github.com/iwind/rockmongo/archive/master.zip
Extract the downloaded zip file using command:
$ unzip master.zip
Move the extracted folder to the web root folder as shown below.
$ sudo mv rockmongo-master/ /var/www/html/rockmongo
Restart httpd service:
$ sudo systemctl restart httpd
Access RockMongo web console
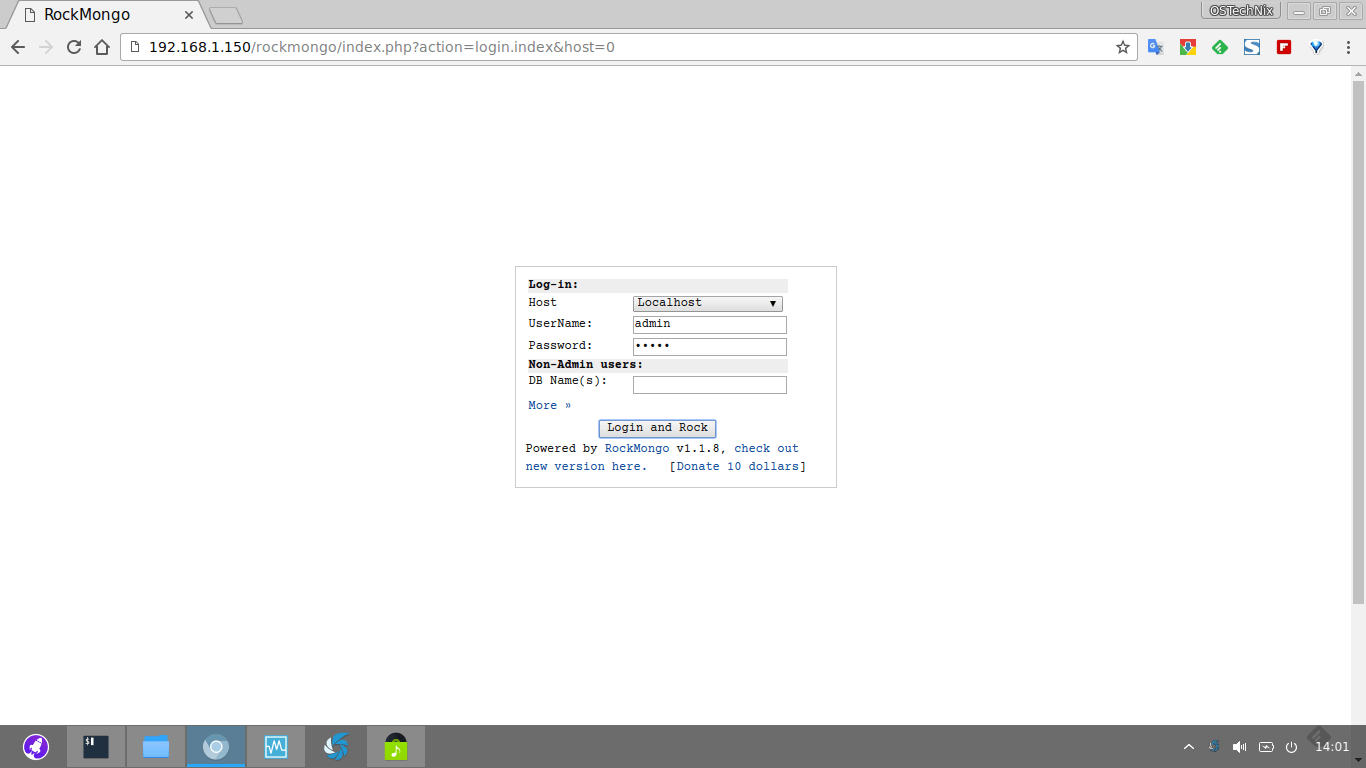
Open the web browser, and navigate to http://IP-Address/rockmongo. You should see the following screen.
Enter the username and password. The default username and password is admin/admin.
Here it is how RockMongo dashboard looks like.
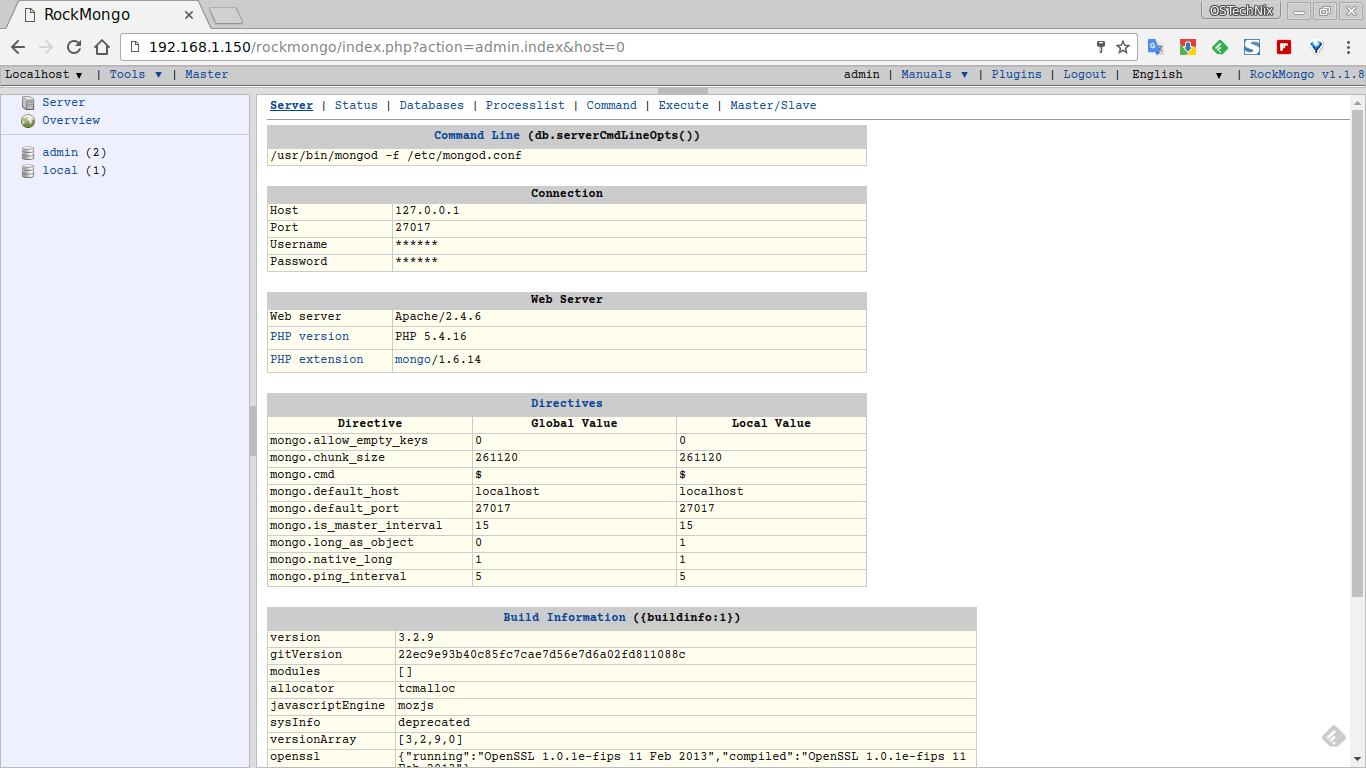
From here, you can create, rename, edit, delete databases, users, tables and more.
You can change the default username and password from the RockMongo config.php file.
To do so, edit config.php file:
$ sudo vi /var/www/html/rockmongo/config.php
Change the ports, host, and admins as per your liking.
How To Work With RockMongo Administration Tool:
How to Download the RockMongo tool?
We can procure and download the latest version of RockMongo tool from the following link. The RockMongo tool is a web application, which is written in PHP 5.https://github.com/iwind/rockmongo
How to Install RockMongo tool?
The following are the steps for the installation of the RockMongo tool.
Step 1: – The downloaded zip file can be unzipped on the web server root folder and we can rename the package according to our choice (say rock-mongo).
Step 2: – Make sure that your web server is running, then open the web browser and access the index.php page which is present inside the rock-mongo folder.
Step 3: – You may require php_mongo.dll file to be included under your ‘/php/ext’. It can be downloaded from the following link.
http://www.php.net/manual/en/mongo.installation.php
Step 4: – Add the following extension inthe /php/php.ini file.
|
DLL file |
|
extension=php_mongo.dll |
Step 5: – If you require to implement step 3 and 4 then you may require the web server restart. Otherwise, directly jump to step 6.
Step 6: – When your web server is up and running. You can browse the following URL in the web browser.
http://localhost/rock-mongo/
Step 7: – Enter the following default credentials in order to login into RockMongo tool.
|
Type |
Value |
|
username |
admin |
|
password |
admin |
This completed the procedure for the installation of the RockMongo tool.
RockMongo Tool Application
The RockMongo tool helps perform multiple DB operations in the similar way as PHPMyAdmin allows operations for MySQL database. Here, in this chapter we are going to discuss some of the basic database operations, which are very frequently used while working with MongoDB.
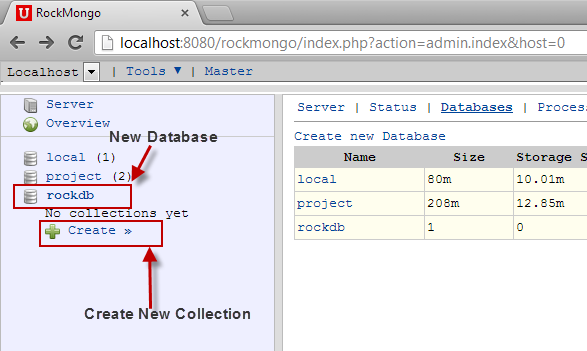
1. Creation of New database in MongoDB via RockMongo tool: – We can create a new database using the RockMongo tool by simply clicking on the Databases tab. Next, click on “Create New Databases” link. It will take you to a new screen where you need to provide the new database name that you want to create. Click on the Create link to finish new database creation in MongoDB. After this step, you can see that on the left panel of RockMongo console, a new database has been created.
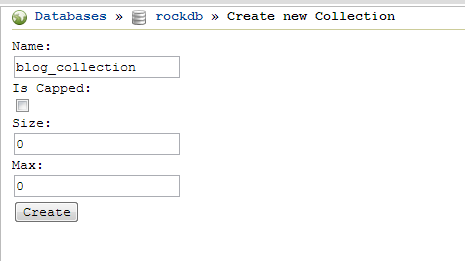
2. Creation of New Collection in MongoDB via RockMongo tool: – We can create a new collection inside a database using the RockMongo tool and by simply clicking on Database from the left panel. Next, click on the “New Collection” link present on the top. Next, you need to provide the new collection name which you want to create. Click on the Create link to finish new collection creation in MongoDB for the selected database. After this step, you can see that in the left panel of RockMongo console, a new collection has been created. You can configure collection fields such as Is Capped, Max, and Size, etc. later after the creation of the collection.
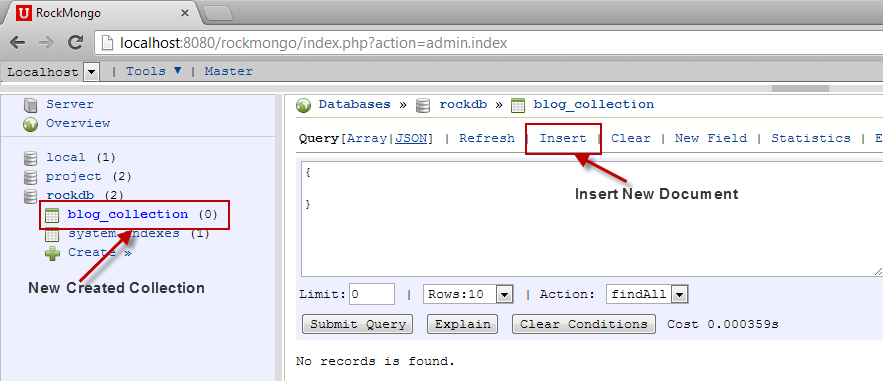
3. Creation of New Document in MongoDB via RockMongo tool: – We can create a new document inside a collection using the RockMongo tool by simply clicking on Collection on the left panel. When you click on a particular collection where you want to add a new document, you can see that all of the existing documents present in that collection listed down on the console. Now, simply click on the “insert” link present at the top in order to create a new document within the selected collection. You can insert the required data within the document either in an array format or JSON format. Next, click on the “Save” link to persist the data permanently.
4. Export and Import Data using RockMongo tool: – We can easily import and export data for any collection present in MongoDB via the RockMongo tool. We need to click on the collection present on the left hand panel for which we need to import and export data. Next, click on the “Export / Import” link present on the top panel. Now, you need to follow the given instructions in order to export the required data in zip format or import back the required data through an external zip formatted file.
Rockmongo for PHP-Powered MongoDB Administration:
By default, MongoDB provides the interactive JavaScript-based mongo shell which can be used for performing database operations. Although this shell may be the best approach to start with MongoDB queries, a GUI tool to administer the service is always useful.
There are many such GUI tools available, like Rockmongo, PHPMoAdmin, Fang of Mango, UMongo, MongoExplorer, and MongoVUE, to name just a few. When it comes to using MongoDB with PHP-based projects, Rockmongo and PHPMoAdmin are good options. In this article, we’ll take a look at Rockmongo.
Rockmongo is an open source MongoDB administration tool written in PHP5. You’ll become familiar with using Rockmongo to create databases, collections and documents, query collections, and import and export data. Ready?
Getting Started
The requirements for running Rockmongo are:
- a web server running PHP
- PHP 5.1.6 or higher with session support
- the php_mongo extension for MongoDB
Once you have the proper environment, go ahead and download the latest version of Rockmongo from its download page at rockmongo.com/downloads.
Installation instructions can be found on the Rockmongo Wiki, but in general you’ll need to unzip the downloaded package in a web-accessible directory on your server root of your site and rename it to rockmongo. Open your web browser and access the index.php page from the location where you have installed Rockmongo.
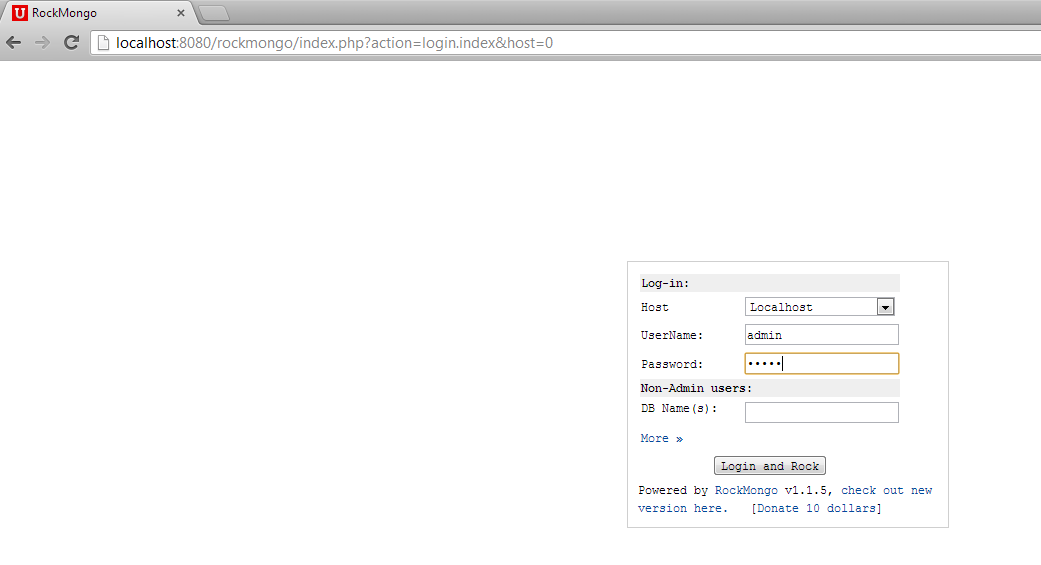
The default username and password is “admin” and “admin”. If you changed the password during installation, then enter the appropriate credentials. Click on “Login and Rock” and you’ll be redirected to the home page of the Rockmongo application.
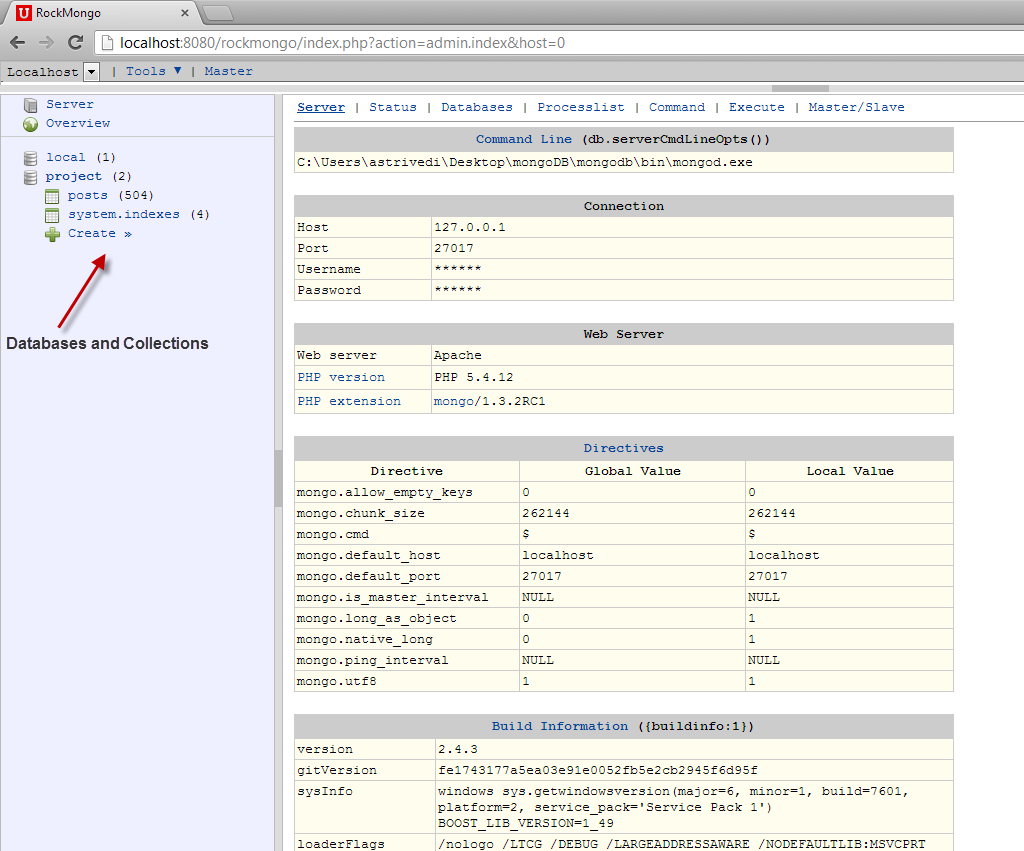
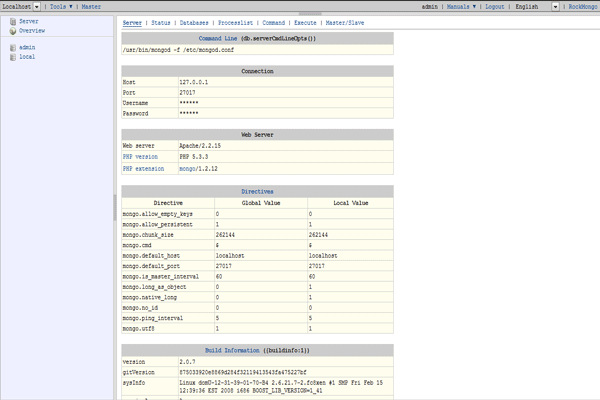
As you can see, the home page lists basic information about MongoDB Server location and connection, PHP Web Server and MongoDB settings. The left panel shows the list of databases and collections.
Creating Databases and Collections
The Databases tab lists all of the database available on the MongoDB server. To create a new database, click Create New Database on the Databases tab.
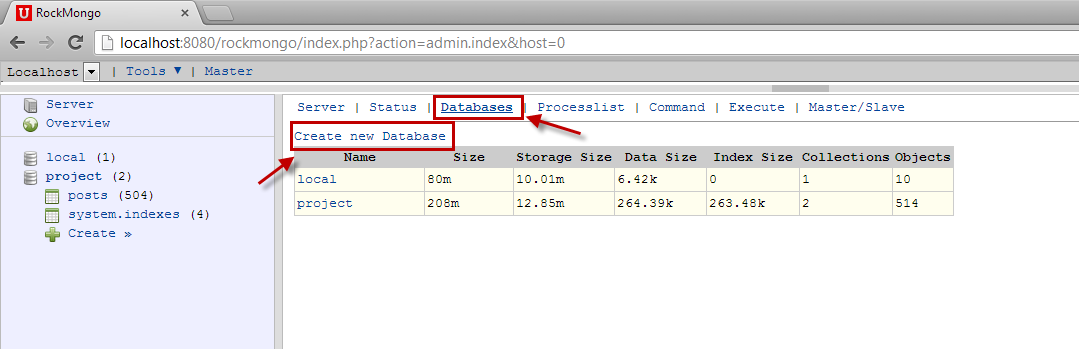
Then enter the name of the database and click Create (I’ll name mine “rockdb”). The newly created database will appear in the left panel.
To create a new collection, click on Create under the new database in the left pane and provide the desired name for the collection (I’ll use “blog_collection”).
When you provide the collection information, don’t worry about the Is Capped field. It’s safe to leave it unchecked.
The new collection will appear in the left panel under the database. You can click on the collection to list all of the documents in it. (Note that Mongo DB creates a default system.indexes collection when you create first collection in a database.)
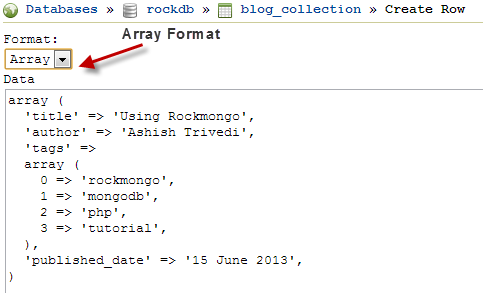
Inserting Documents
To insert documents, click on the Insert tab and then the name of the collection.
We can specify the new document structure either as JSON or a PHP array. Choosing either format doesn’t make any difference to the document formed, it’s just a matter of comfort for developers.
After specifying the document, click on Save. Similarly, go ahead and insert other documents.
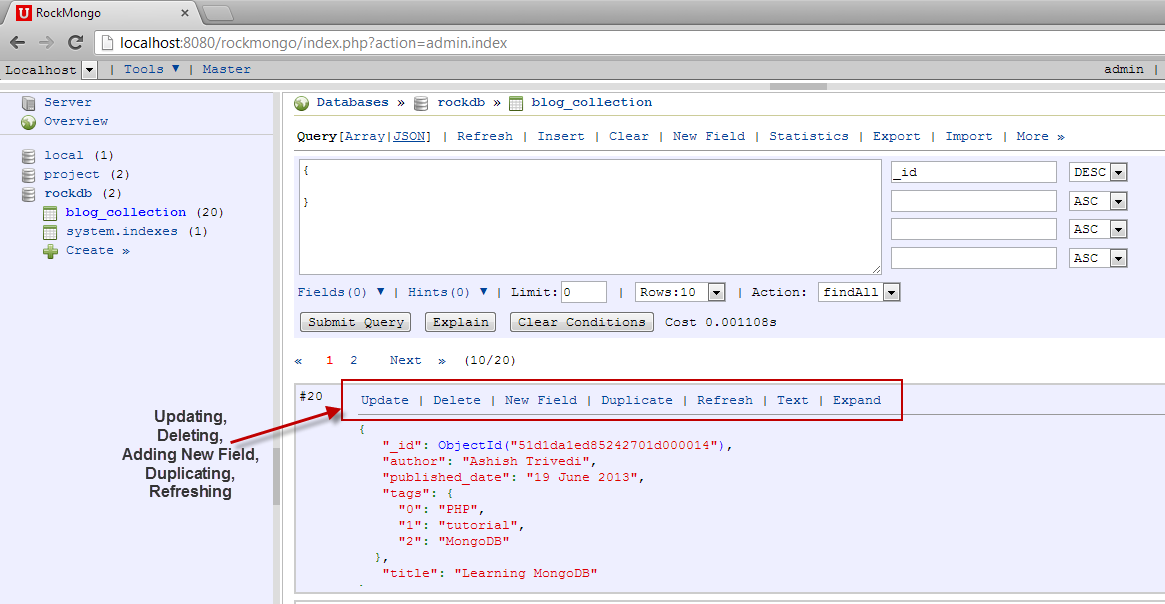
To view the documents inside a collection, click on the collection in the left panel and you will see a list of all of the documents in the content area. The records most recently inserted will appear first.
Updating, Deleting, and Duplicating Documents
You can update, delete or duplicate any document by clicking on the corresponding options provided on each document. Clicking on any of the links will take the document to edit mode where you can make changes in either JSON or PHP as you did earlier.
Querying Documents
Querying the database is one of the important functions of any database administration tool. Whenever you click on a collection, you will find a text area on the top of the page for running queries against it.
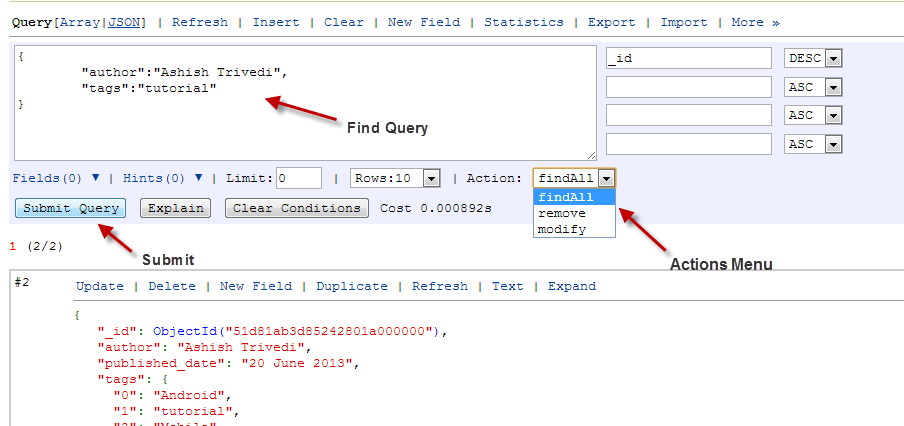
Like the documents, query expressions can also be specified either as JSON or a PHP array. There are three action options available in the drop down: findAll, remove, and modify.
- findAll: This is the default option. Specify the find condition and click on Submit Query. The matching documents will appear in the search results.
- remove: This is similar to modify in that you just have to specify the condition for selecting documents, but the action removes the matching documents from the collection.
- modify: When you click on modify, you will see two text sections. The first section is to specify the condition for matching documents and the other is to specify the update script. This feature can be used to do bulk-updates.
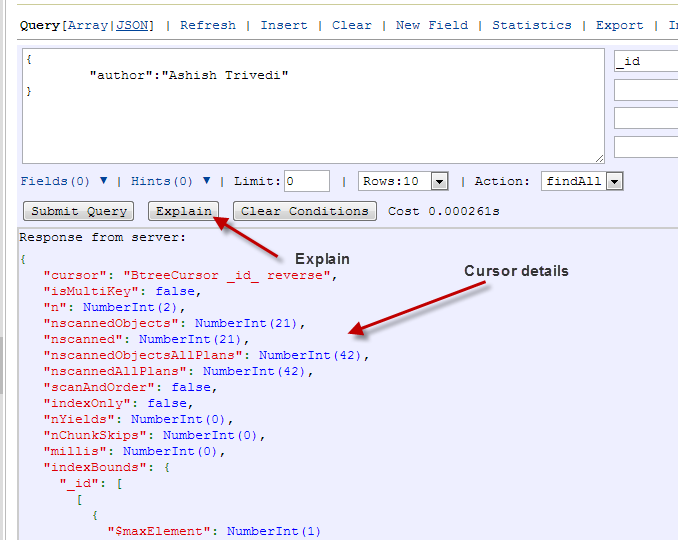
Using Explain
This is one of the most useful features and probably the one I like the most in Rockmongo. The explain query is frequently used to analyze queries and their index usages. As shown below, you can specify your find query and then click on the Explain button. This will give all the cursor details for the query.
Importing and Exporting Databases
Import and export features are useful for when you want to backup the database. The import/export functionality in Rockmongo does the same task as the mongoimport and mongoexport functions.
To export a database or collection, click the Export tab. Check all the checkboxes for the collections you want to export. Check the Download option as well, and then click on Export. It will give you a downloadable JavaScript file containing the entire exported database.
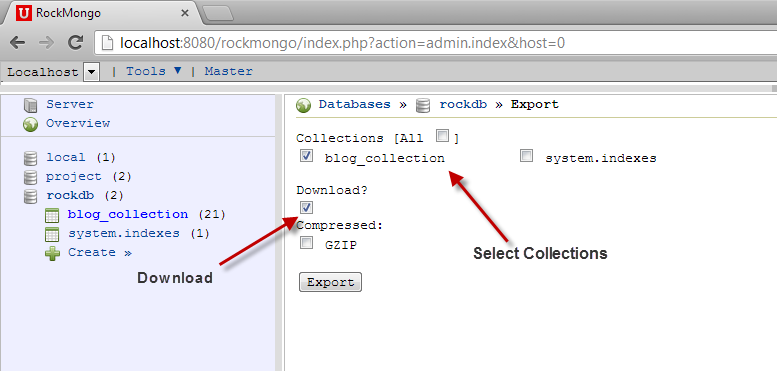
To import the data in another database, go to that database and click on the Import tab. Choose the JS file you just downloaded, and the entire dataset will be imported to the database.
ROCKMONGO PROS
Focused on MongoDB
There are plenty of good database admin tools out there, but few that are focused on MongoDB like this one is/was.
GUI
The graphical user interface helps to make it much easier to manage databases.
ROCKMONGO CONS
·Out of Date
This system hasn’t had an update since 2014.
-RockMongo is a MongoDB administration tool, written in PHP5, is Best in PHP world, more like PHPMyAdmin.
Create a new collection

Process list

Command
Server
RockMongo is released under the New BSD License.
Features
Main features:
- open source under New BSD License
- fast, easy to install
- multiple hosts, and one host can has multiple administrators
- password protection
- query dbs
- advanced collection query tool
- read, insert, update, duplicate and remove single row
- query, create and drop collection indexes
- clear all records in collection
- remove and change (only work in higher php_mongo version) a batch of criteria matched rows
- collection statistics
- additional features are documented in related resources.
Major Features of RockMongo
- Runs fast, and easy to install
- I18N (English, Chinese(English, Chinese, French, Japanese, British, Spanish, German, Russion, Italian)
- System
- Multiple hosts, and one host can has multiple administrators
- Switch among hosts freely
- Password protection
- Server
- Server info (web server, PHP, directives in PHP.ini …)
- Status
- Databases overview
- Replication status
- Database
- Query, create, drop, repair
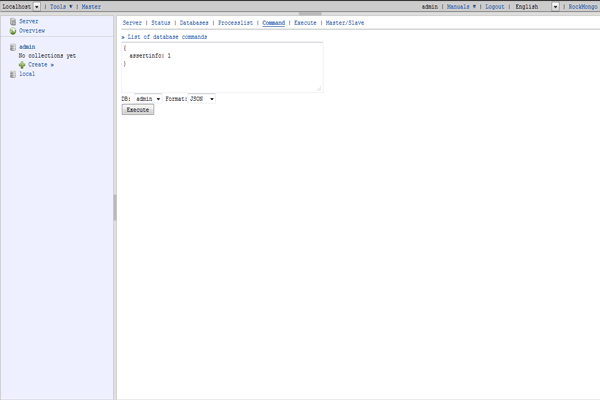
- Execute commands and javascript codes
- Statistics
- Profiling
- Users management
- Data transfer(clone)
- Export/import
- Collection
- Advanced query and explain tool
- Read, insert, update, duplicate and remove single row
- Query, create and drop indexes
- Validate collection
- Clear all records in collection
- Remove and change a batch of criteria matched rows
- Statistics
- Rename
- Modify properties (capped, size, max …)
- Data transfer(clone)
- Export/import
- Field
- Update/Remove/Clear operations
- GridFS
- View chunks
- Download file
Videos
Do mongoDb with rockmongo
