1-click AWS Deployment 1-click Azure Deployment
Overview
Pligg is a simple, open-source content management system (CMS), designed for the creation of social publishing networks or online social communities, similar to Facebook, Reddit, Twitter, and Digg.Pligg is written in PHP and uses standard MySQL databases. It is licensed under the GNU Affero Public License.
Pligg was created as a social networking CMS. While most content management systems are designed for only a handful of authors, Pligg CMS was designed to manage a site with an unlimited number of authors. All of these registered users are in control of the website’s content. The application itself is a user driven CMS that relies on the content of independent authors and participation to manage news articles.
Pligg started as a simple CMS to let users submit and vote on news articles, and that is still what this application does best. Vote on stories that interest you and articles that receive enough votes will appear on the homepage of your Pligg site. Pligg offers a 5 star system for voting or the more traditional numbered voting as seen on sites like Digg, Mixx, or Reddit.
Brief History
Pligg was launched in 2005 by its founder, Eric Heikkinen. Over the next few years, Pligg earned a good reputation and a relatively large user base. Pligg was offered as a one-click installation by many popular hosting companies, and is still used by many web developers to build social websites.After a decade of work on Pligg, Heikkinen got tired of maintaining it and wanted to move on to other projects. Also, with the lack of developer interest and direction, development of Pligg started slowing down and there was a fair amount of disarray among Pligg users and developers. In 2015, Pligg saw a sharp decrease in website traffic and sales, due to a lack of updates to the CMS.
In December 2015, Pligg was offered for sale by its founder and owner, Eric Heikkinen, together with the pligg.com domain name and credentials for Pligg’s GitHub account. The company was eventually sold on the cheap, for roughly $50,000.The pligg.com domain is now a download marketplace where you can purchase trusted downloads.The Pligg CMS was renamed to Kliqqi, and it is currently maintained by two of the primary developers of Pligg CMS. Kliqqi was announced as the official successor to Pligg shortly after the takeover. It’s a new open-source project forked from the original Pligg CMS engine. The new owners of the pligg.com domain offered their support and helped the new Kliqqi development community during the transition.
Pligg Features
Using Pligg, you can easily create a social network or an online social community. Pligg users are in control of the content, unlike many other CMS systems which are designed for only a couple of authors. Pligg was designed for a large number of contributors, submitting and moderating content, and that’s what made it attractive back when it was launched.
Pligg is easy to use and manage, and it can power small social networks or similar interactive communities with a lot of community-generated content.
When development was discontinued, Pligg CMS 2.0.2 was the latest version of the platform. It requires the Apache web server, PHP version 5.3 or higher, and MySQL version 5.1 or higher to run. Hardware requirements are modest and given the age of the CMS, it should have no trouble running on just about any server you can find today.
Pligg Templates
A range of professional Pligg templates were available for download from the official Pligg forum, and most of them were free. However, since the pligg.com domain was sold, they are hard to find now.
Unfortunately, work on many Pligg templates was discontinued, for two main reasons. First, Pligg templates have a huge codebase compared to other CMS systems, so coding templates required a lot of work. Second, Pligg templates had a tendency to break with every new release, so the workload of maintaining Pligg templates was simply too high and impractical for developers, especially those who contributed to the project free of charge.
Making matters even worse, Pligg templates do not work in Kliqqi without modification. In theory, they can be used, but the amount of work needed to tweak them for Pligg renders this approach impractical.
Pligg was a relatively successful CMS. While it wasn’t designed as an all-round CMS with mass market appeal (like WordPress), Pligg successfully catered to the needs of developers working on social network projects a decade ago.
Bear in mind that social networks were in their infancy back in 2005. They were seen as untapped markets by many entrepreneurs and developers, so Pligg appeared at the right time. It allowed developers to build a social network from the ground up in a matter of days rather than weeks or months.
One of the biggest drawbacks to Pligg was the way it handled templates. Pligg templates were cumbersome and required a lot of coding. Making matters worse, they were difficult to maintain and many needed to be tweaked for new Pligg releases.
Kliqqi is a worthy successor to Pligg, but unlike its predecessor, it did not appear at the right time. The social network frenzy wound down years before Pligg development was terminated. Demand went down, and developer interest in platforms like Pligg and Kliqqi waned.
This does not mean there is no market for Kliqqi or small, independent social networks in general, since a lot of developers are still working on them. However, demand is much lower than it used to be a decade ago.
Pligg Installation :
First you need to download the script from their official website. The package need to be extracted then uploaded under the desired directory for your web hosting account. If you would like the Pligg website accessible via URL of type http://mysite.com/pligg you should upload the extracted files under “public_html” folder for your account in a sub-folder “pligg”. You can upload the files from your computer to your hosting account using an FTP Client.
The second step is to create a new database that will be used for the Pligg installation and assign a user with privileges to it. This can be easily accomplished following our MySQL Tutorial.
These are all pre-installation steps you need to accomplish. You can now initiate the installation itself by visiting the location where you uploaded your Pligg installation package via a web browser. The first screen that will load will ask whether you have already setup Pligg.
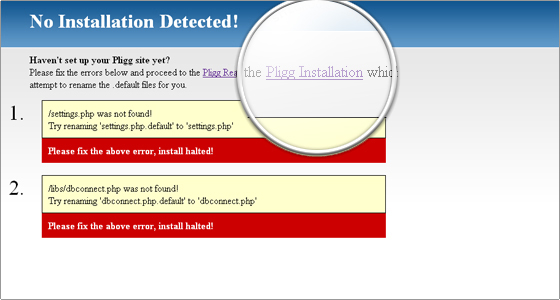
Click the Pligg Installation link that will be provided and you will be redirected to the installation Readme.
Here you can find the Pligg installation requirements as well as step by step instructions how to accomplish the installation. To continue click the Install tab.
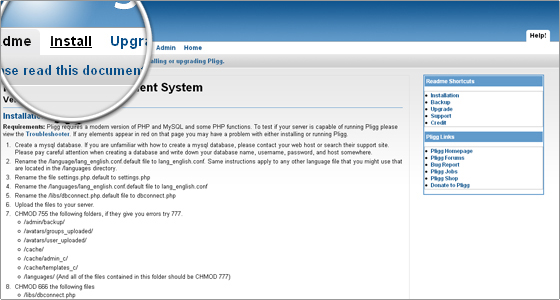
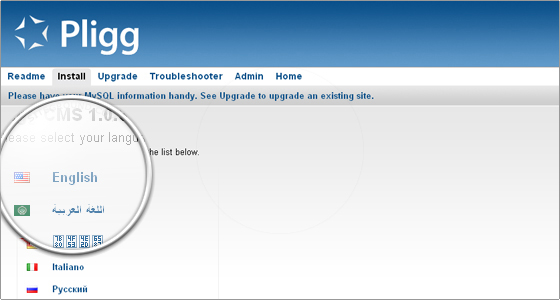
The next page will ask you to choose the desired language for the installation. In this case we will chose English.
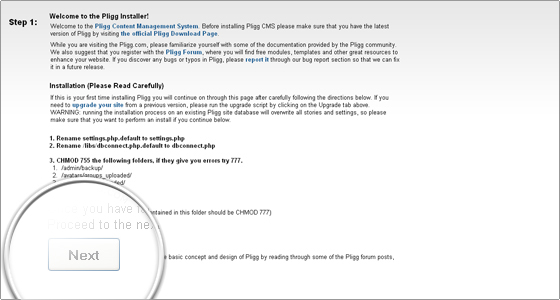
This is the first actual installation step. Here you will be advised to adjust files and folders permissions. Everything will be absolutely automatic and if you have correctly uploaded the files no changes are required at that point. You can click the Next button and proceed with the installation.
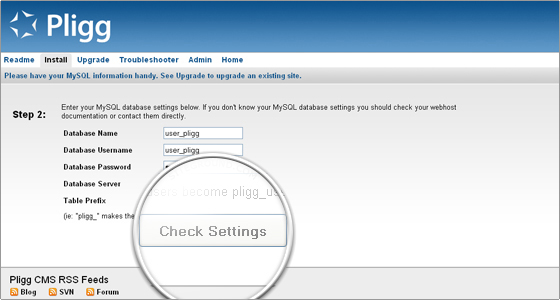
The new page that will load is where you should enter your database details. Use the details for the database you have setup according to the instructions in the beginning of this tutorial. Then click the Check Settings button.
If the details were correctly entered you will get the following confirmation.
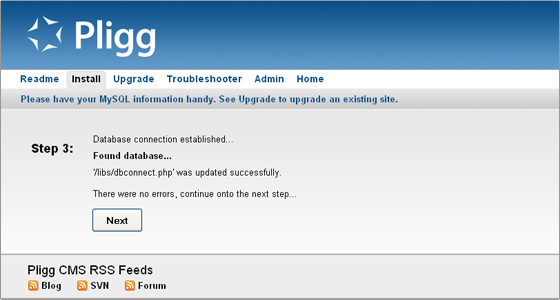
You can now click the Next button. This will create the tables for the Pligg installation in the provided database and you will be prompted to enter the desired administration login details. Once you have entered them click the Create Admin Account button.
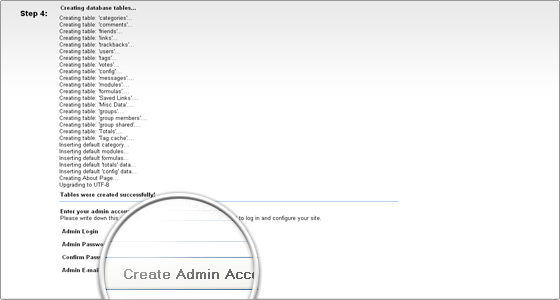
This will finalize the installation.
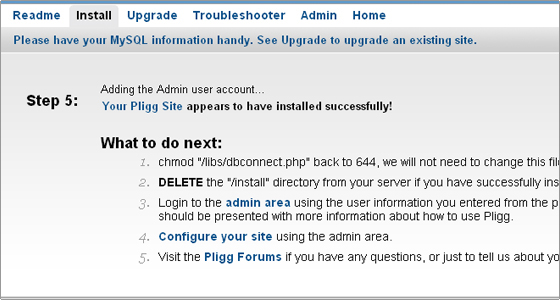
The next page that will load explains the next steps you should take. Step one should have been automatically completed and no actions are required. You should make sure the “install” directory is deleted. You can remove it via your FTP client or cPanel -> File Manager. The next three steps provide links to the newly installed Pligg Administration Home Panel, the Admin Configuration area and the official Pligg forums.
Pligg Administration
Once you have finalized the Pligg installation you should login with the chosen administrator login details from the front end of your newly installed Pligg. Once you are logged in as an administrator you will see a link in the main menu that leads to the administration area for the web site.
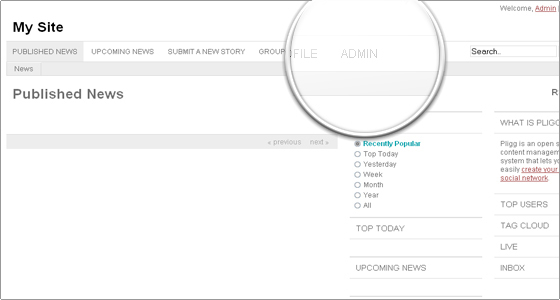
The Admin Home page will display a collection of links used for configuring your site. These links are often generated by modules that have been installed on your site and will point to module configuration and tool pages. There are also duplicate links for items that already exist in the main navigation bar at the top of the admin panel. Of course you can navigate to a certain page in other ways than going back to the main admin page each time. It depends on what is the exact functionality you would like to access.
You will also see general statistics for your Pligg web site such as number of members and groups, total posts, last post date etc. To the right you will see the latest news published on the official Pligg web site. Those will be displayed by default in most areas of the administration backend.
Pligg Administration Main Menu
Manage
Under the Manage tab of the Administration Main Menu you will see several sub-categories. This is the area where you can manage the news, users, submitted comments, categories, pages and groups for your Pligg web site.
Via the news area you can publish, queue for publish or discard news articles submitted for your website. This is the section you should use in order to publish created articles and submit them as news on your Pligg website front page.
You can add new users and manage existing ones by altering them if need. You can also delete existing users and there is a separate button for “KillSpam Selected” users.
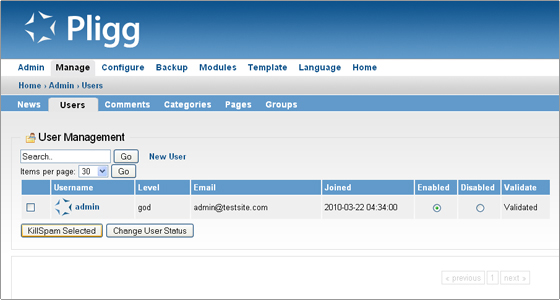
Via Comments section under the Manage tab of Main Menu you can alter all comments published for articles on your Pligg website. You have full control over the comments and you can publish, moderate, discard or completely delete them from the website.
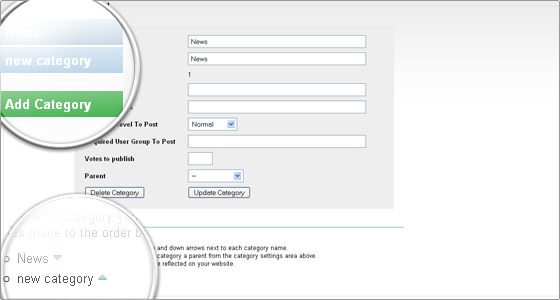
The categories section is one of the most important in this area. This is where you can create new categories and manage existing ones. The interface is as all other areas pretty intuitive and user friendly. A very nice option is the ability to adjust the ordering of the existing categories simply by clicking on the up and down arrows under Category Order section.
Via the Manage -> Pages section you can create new pages for your Pligg website that will be available for publishing once created. You can use this section for creating news articles or other specific pages according to your needs. An important functionality is that HTML is allowed when creating a new page here so you are not limited to simple text only.
Finally the Groups section will provide you with the needed functionality to manage Groups created on your Pligg website. You can create new groups on your own, manage existing ones and approve Groups created by website members.
Configure
This is the are for the general configuration of your Pligg website. Each area contains detailed and easy to follow instruction how to adjust your configuration. Making changes is easy by selecting the desired options from drop-down menus or typing on your own depending on the exact changes you are making.
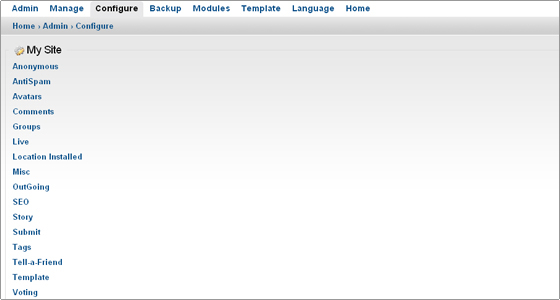
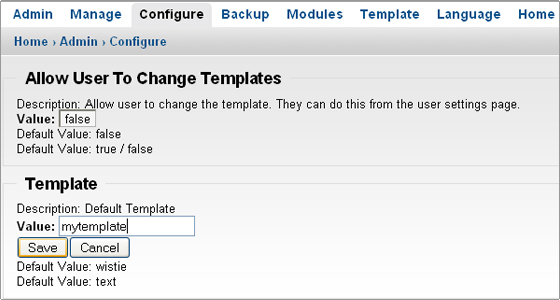
An important functionality of the Configure section is the ability to change the template for your Pligg web site. Prior to changing the template you should upload the template files under the “templates” directory for your Pligg installation. You can do so via an FTP client. Note that the new template directory should be placed directly under “templates”. After you have uploaded the template all you need to do is go to Pligg admin area -> Configure -> Template or simply choose Template from the main administration menu. Click on the template name (by default it is wistie) and enter the name of the new template. This should match the exact name of the template directory you uploaded. For example if you have uploaded the new template files under “plig_directory/templates/mytemplate” you should enter “mytemplate” in the text field. Than click the save button. This will change the template for your website and apply the newly chosen design for the frontend. Note also that here you can allow users to change the template for the website for themselves.
Backup
It is always important to perform regular backups for your web site. Especially when making major changes in the configuration or upgrading to a new version of the script. You can use the default cPanel functionality to create MySQL backups of your Pligg database. Also you can use cPanel -> FileManager or an FTP client to backup the website files. Pligg also provides you internal functionality that will allow you to create backups of the website files and database via the administration backend. Pligg proposes the following easy steps for creating the backup:
-
Click on the Backup All Files link. Once a link appears at the bottom of the page continue to the next step.
- Click on the Backup Avatars link. Once a link appears at the bottom of the page continue to the next step.
- Click on the Backup Database link. Once a link appears at the bottom of the page continue to the next step.
- Right click and “Save target as” (for Internet Explorer) “Save link as” (for Firefox) each of the three links just generated at the bottom of the page from the first three steps. Save all three of the files to your computer.
- Once all of your downloads have finished, click the “Remove all the backups listed below” link.
Modules
Under the Modules section you can enable or disable modules for your Pligg installation. Also here you can alter the settings for installed modules in case this is available as an option for the module in question.
The module installation itself is relatively easy. All you need to do is upload the module files under the “modules” directory for your Pligg installation. This can be done using an FTP client. Once the module files are uploaded you will see it under the modules section and you will be able to enable it for your website. This is done by clicking the Install link under the “Available (but not installed)” section.
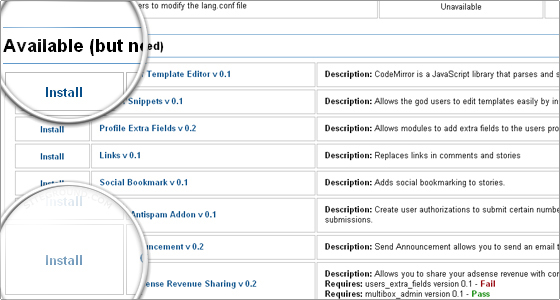
Once the module is installed it will appear in the upper section “Installed Modules” and you can enable it for your website by clicking the “Enable” link for it.
In order to uninstall a module you need to Disable it by clicking the corresponding link then click “Remove”. This will place the module under the “Available (but not installed)” section. In order to completely remove it from your system after that simply delete the module directory from your installation.
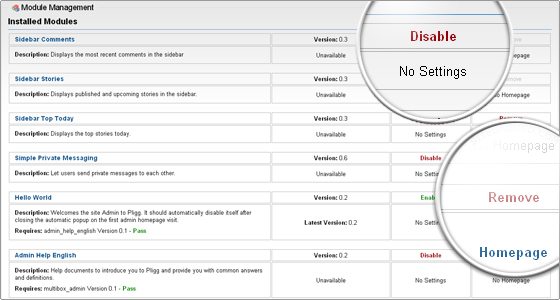
Note that it is always important to check whether disabling or removing a module will not break your website functionality especially if it was used on various areas of the website. It is advisable to perform backups before making such changes.
Language
Here you can manage the default texts for your Pligg website. This include the text of all links on your website such as Logout and Register URLs, Search fields, Page not found title and much more. You can use the filter search box to search for words or parts of words that you wish to change thus completely customizing the texts on your website.
Pligg Upgrade
The Pligg upgrade can be easily performed following these steps. You should make sure though that all steps are completed in order to successfully accomplish the upgrade.
-
First and most important – create a full backup of your Pligg installation. Backup creation can be performed following the instructions provided in the Pligg Backup or Pligg Administration tutorial.
-
If you have made modifications to one of the default templates – rename your template folder from any default names that might cause the data to be overwritten. If you have modified the template in the “wistie” directory it will be overwritten when upgrading.
-
Disable all modules from the admin area.
-
Delete all files and folders of the current installation except:
-
/templates/
-
/avatars/
-
/settings.php
-
/libs/dbconnect.php
-
/.htaccess
-
-
Upload the new files under your account in the place of the old installation.
-
Run the Pligg upgrade by visiting the following URL in your web browser:
http://mydomain.com/pligg/install/upgrade.php – where http://mydomain.com/pligg reflects the actual URL of your Pligg website.
-
Log in as administrator. If your template is compatible with the new version do not make any changes in this point. For this purpose check your web site and verify everything is properly displayed. If the design is broken you can:
-
Update your template with a new version that will work with the upgraded Pligg installation (if such version is available for the template you are using).
- Navigate to /admin/admin_config.php?page=Template and change the template name to “wistie”.
-
-
Reactivate all modules you have used for your installation. Note that if you had previously used custom modules that are not present in a default installation they will need to be re-uploaded under the modules directory.
How to create a backup of a Pligg CMS blog website:
You can easily create a backup of your Pligg website by simply downloading all of your Pligg files via FTP and export your database. You can access your Pligg files and download them via FTP following the instructions at:https://www.tmdhosting.com/tutorials/video/ftp.htmlYour CMS MySQL database can be easily exported via your cPanel -> phpMyAdmin following the instructions at:https://www.tmdhosting.com/tutorials/video/phpmyadmin/phpma-export.html
How to enable the search friendly URLs in Pligg:
We will show you in this tutorial in a few simple steps how to enable the search friendly URLs for your Pligg based website.
The first step is to login to the administrator back-end of the CMS:
https://yourdomain.com/admin/admin_index.php
The above is applicable if you have installed Pligg under the ‘www’ root folder of your hosting account. If you have installed it under a subfolder add the subfolder name before the /admin/ in the URL.
As soon as the admin is completely rendered navigate to the Configure > SEO submenu:
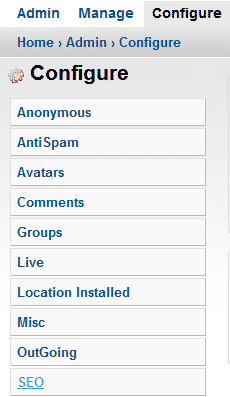
Now before you proceed check the IMPORTANT section at the bottom of this tutorial.
After the .htaccess file is set (the URL Method which is also shown on the previous image in this tutorial) to ‘2’ instead of ‘1’

you should save these changes. The other section in this tab is used in case you wish to separate the stories from the other content on your website. You could also add an extra section in the URL for the stories by editing the default configuration.
Note that the SEF URLs will only function properly if the correct .htaccess rewrite rules are in place. There is a file called “htaccess.default” which comes with the CMS distribution archive. If your Pligg website is accessible via yourdomain.com just rename this file to .htaccess using your FTP client. If your Pligg website is accessible via yourdomain.com/cms again rename the file but also edit the following line in it:
From – RewriteBase /
To – RewriteBase /cms/
If the above is not set for subfolder installations the URLs will load 404 error messages.
How to install a Widget in Pligg:
Put no limits on your Pligg functionalities by getting new features and widgets. As a part of our free premium support service we will install any Pligg widget on your website completely free of charge. Free Pligg Widgets Installation can be requested from the client’s area -> Get Support section -> Submit Support Ticket.
We will show you in a few simple steps how to install widgets on your Pligg website.
The first thing is to download the distribution archive of the widget you would like to install. After having your widget file download, please extract it on your local computer. The extracted files should be uploaded under your hosting account where Pligg is installed. If the CMS is accessible via yourdomain.com the new widget files should be uploaded under the public_html/widgets directory. If you have installed the CMS under a subfolder and it is accessible via yourdomain.com/cms the new widget should be uploaded under the public_html/cms/widgets/. This can be done via a FTP client by following the instructions in our great ftp video tutorial.
After the upload is completed login to your Pligg administrator area:
https://yourdomain.com/admin/admin_index.php
The above is applicable if you have installed Pligg under the ‘www’ root folder of your hosting account. If you have installed it under a subfolder add the subfolder name before the /admin/ in the URL.
When the administrator back-end is completely rendered navigate to Widgets > Uninstalled Widgets:

You should be able to see the new widget in the list. In case you cannot find it double check if the uploaded files are under the folder mentioned in the beginning of the tutorial. When you locate the widget, click the install button right on its name.
Note that depending on the widget you may need to edit some of the core Pligg details and template files in order to use the new functions on your website. If such modifications are required they should be provided on the widget download page or in the distribution archive.
How to create a category in Pligg:
Here we will show you in a few simple steps how to create a category in Pligg.
The first step is to login to the administrator back-end of the CMS:
https://yourdomain.com/admin/admin_index.php
The above is applicable if you have installed Pligg under the ‘www’ root folder of your hosting account. If you have installed it under a subfolder, just add the subfolder name before the /admin/ in the URL.
As soon as the admin is completely rendered navigate to the Manage > Categories submenu:
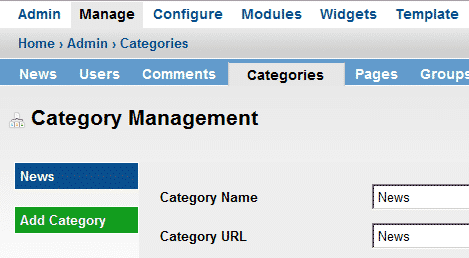
You will notice the “Add Category” link on the left side bar. Please click on that link. It will load a new frame right from the categories list where you could type in all the details for the new category.It is important to categorize your news. This way the visitors will be able to find the information they need in a fast and easy way.
PLIGG PROS
Social Focus
This CMS is focused on making social websites. While other CMS’s may have options to add these types of features, Pligg is one of the few that has this as a main focus.
Flexible
While the focus is on social sites, there is a lot of flexibility as to what this platform can look like and what it can be used for.
Updates
Pligg is regularly updated to fix security flaws and keep it up to date with the latest technologies.
PLIGG CONS
Not for a Typical Site
While the social focus is a good thing, you need to know that it also means that this platform is not a good choice for a regular blog or website.
Cost
The platform itself is free but there are a lot of premium themes or plugins that you may need to buy to get the performance you want.
-Pligg is an open source Content Management System. Pligg CMS provides social networking software that encourages visitors to register on your website so that they can submit content and connect with other users. Our software creates websites where stories are created and voted on by members, not website editors.Use Pligg content management system to start your own social networking community in minutes.Pligg is released under the Creative Commons Attribution 3.0 Unported Copyright.
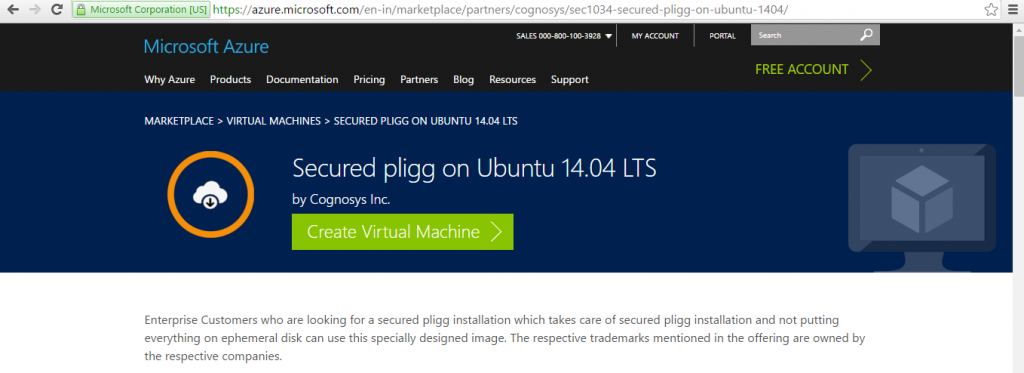
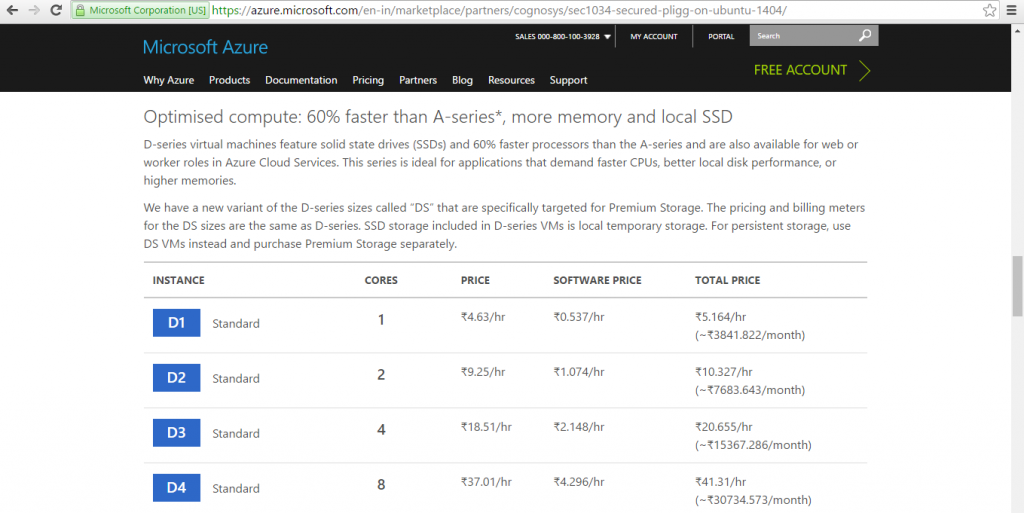
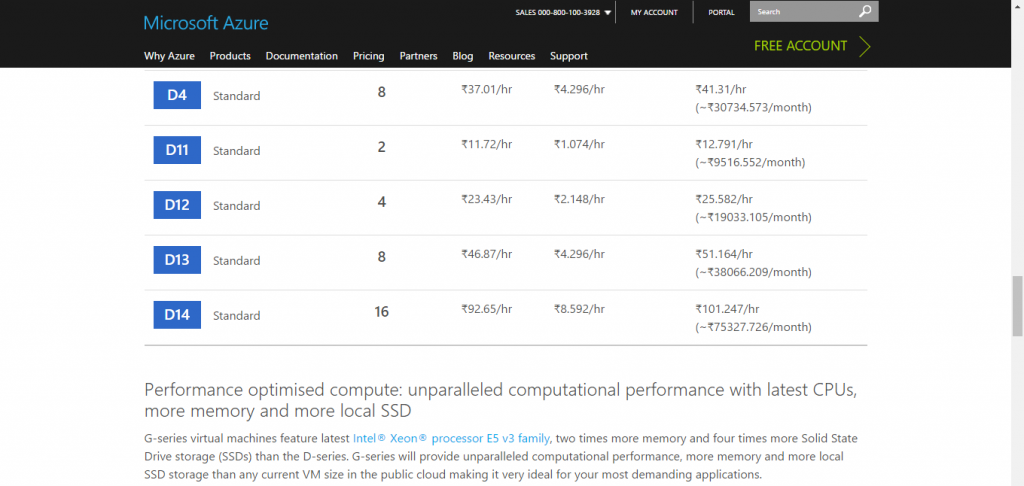
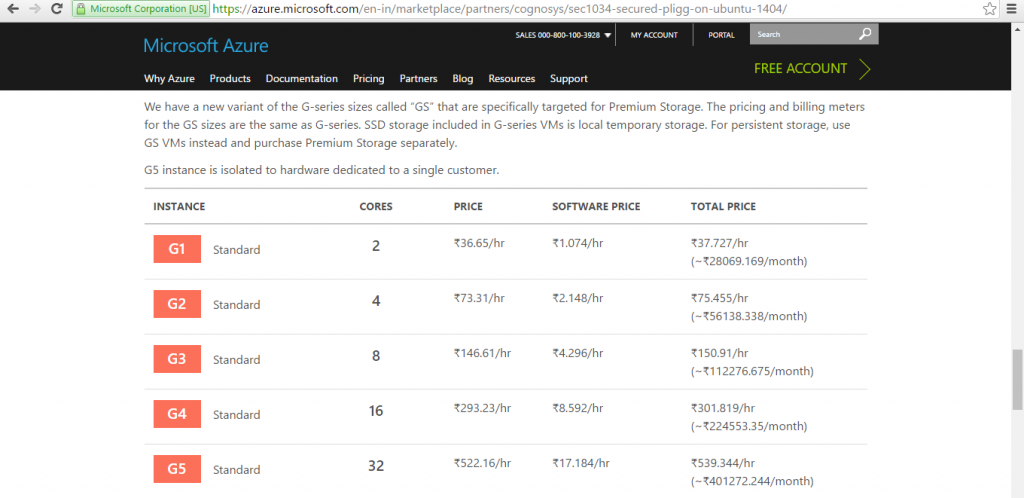
Cognosys provides hardened and ready to run images of Pligg on all public cloud ( AWS marketplace and Azure).
Deploy your Pligg securely on cloud i.e. AWS marketplace and Azure with Reliable Services offered by Cognosys at one-click with easy written and video tutorials.
Pligg CMS on cloud for Azure- Ubuntu
Features
Features of Pligg:
Voting
Pligg offers a variety of voting options for your Pligg site. The most popular one, similar to digg, lets users click on a vote button to vote for stories. The vote number increases as more users vote for the story.
The second method Pligg offers is called the “5 Star Voting” method. Users can vote for stories based on 5 stars. Once a user clicks on a star the vote count is increased and the average star rating for the total number of votes is automatically displayed.
Admin Panel
User Management
Admins can use the User Management feature to view and edit the users on their Pligg site. Have a user who seems to keep spamming your Pligg site? With one click of a button you can use the KillSpam feature under User Management to get rid of all traces of that user. Other features of User Management include: viewing a users’ submitted stories and comments, viewing the last IP address they used to log in, edit user information, set user status (“god”, “admin” etc), and help users by resetting their password.
Category Management
The Category Manager allows you to create categories and sub-categories using a nice AJAX interface. With a simple drag of the mouse an admin can easily create multiple sub categories.
Modify Language
Modify Language is one of the features of Pligg that makes setting up your own Pligg site easy and fast. Modify language lets an admin edit all of the text seen on their Pligg site within a single page. Don’t want to spend hours sifting through all the files finding that one line of text you want to change? Don’t worry, Modify Language has filtering capabilities that lets you enter particular text you want to change it will filter it, then allowing you to edit it to whatever you desire.
File and MySQL Backup
The File and MySQL backup feature in the admin panel gives an admin the ability to back up all their Pligg files without having to leave their Pligg site. Admins have the option to 1) backup files (including avatars) 2) back up MySQL database. The back-ups are conveniently stored on your server and you can download them any time you want by visiting the File and MySQL backup page on your Pligg site.
Modules
As of beta 9.0, Pligg introduced “modules”, or easy ways to add to features to Pligg and delete the ones you don’t want without having leftover code in the core and template files. Modules can be enabled and disabled in Admin Panel > Modules. Some of the most popular modules are Private Messaging and Adsense Revenue Sharing.
Configuration
One of the best features of any CMS is the ability to configure it to your liking. The Configuration menu lets you edit all of the functions of your Pligg site. Want to change the template? Easy, just go into Admin Panel > Configuration > Template and enter the name of the template you want to use in a convenient edit-in-place interface. This is just one example of the extensive list of configuration options given to you in the configuration menu,
RSS Importer
The RSS Importer is one of the core features that beginners love to use to get their Pligg site up and running which helps attract users. The RSS Importer feature is use to grab RSS feeds from your favorite site and automatically insert those feeds into your Pligg site. You set the number of fields you want to import and how many votes you want to give the stories and you’re all set. Use the RSS Importer as a cron job and you can populate your Pligg site without touching a key.
-Major Features of Pligg:
- Groups
- Private Messaging
- Advanced Comment System
- User Profiles
- Module System
- Smarty Templates
- Easy Upgrades
- RSS Feeds
- SEO Enhanced
- Future Support for Multiple Languages
Azure
Installation Instructions For Ubuntu
Note : How to find PublicDNS in Azure
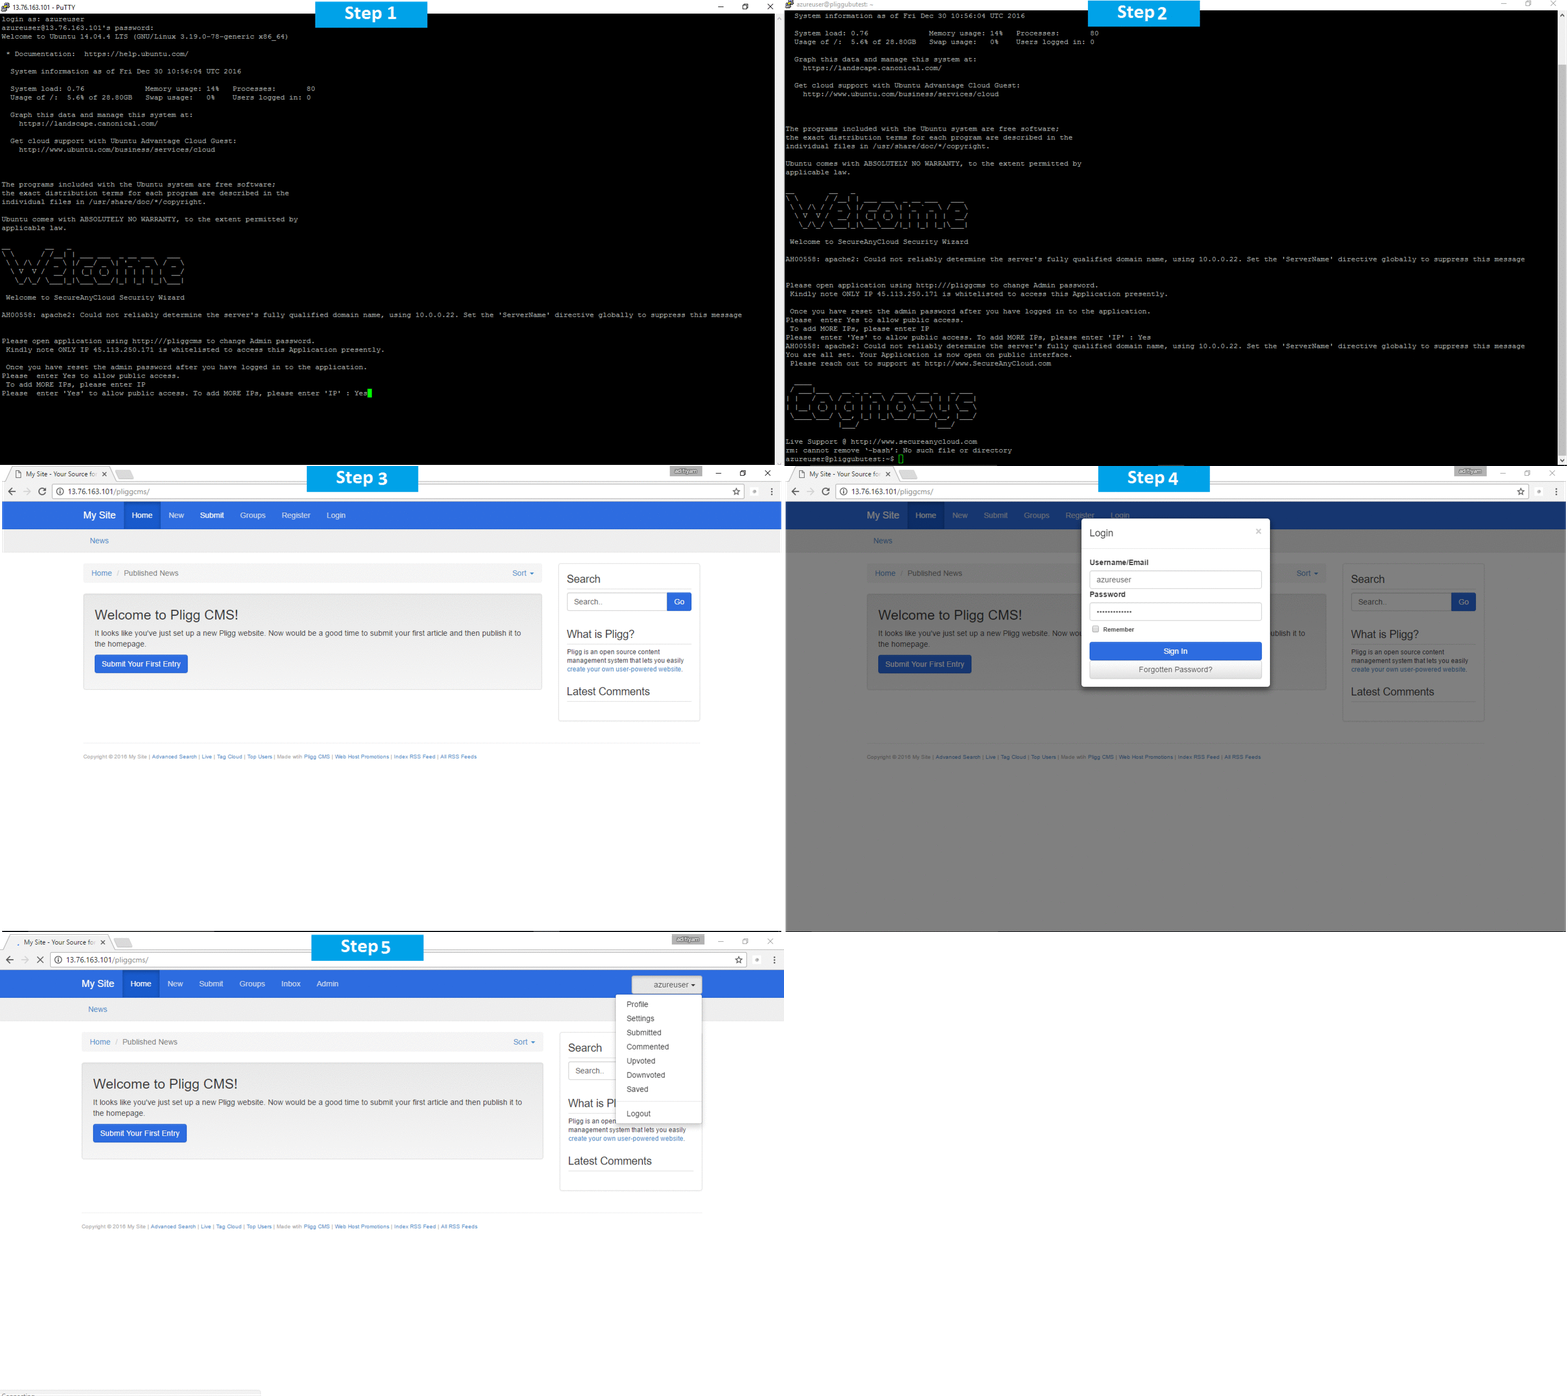
Step 1) SSH Connection: To connect to the deployed instance, Please follow Instructions to Connect to Ubuntu instance on Azure Cloud
1) Download Putty.
2) Connect to virtual machine using following SSH credentials:
- Hostname: PublicDNS / IP of machine
- Port : 22
Username: Your chosen username when you created the machine ( For example: Azureuser)
Password : Your Chosen Password when you created the machine ( How to reset the password if you do not remember)
Step 2) Database Login Details:
Username : root || Password : Passw@rd123
Note: Please change the password immediately after the first login.
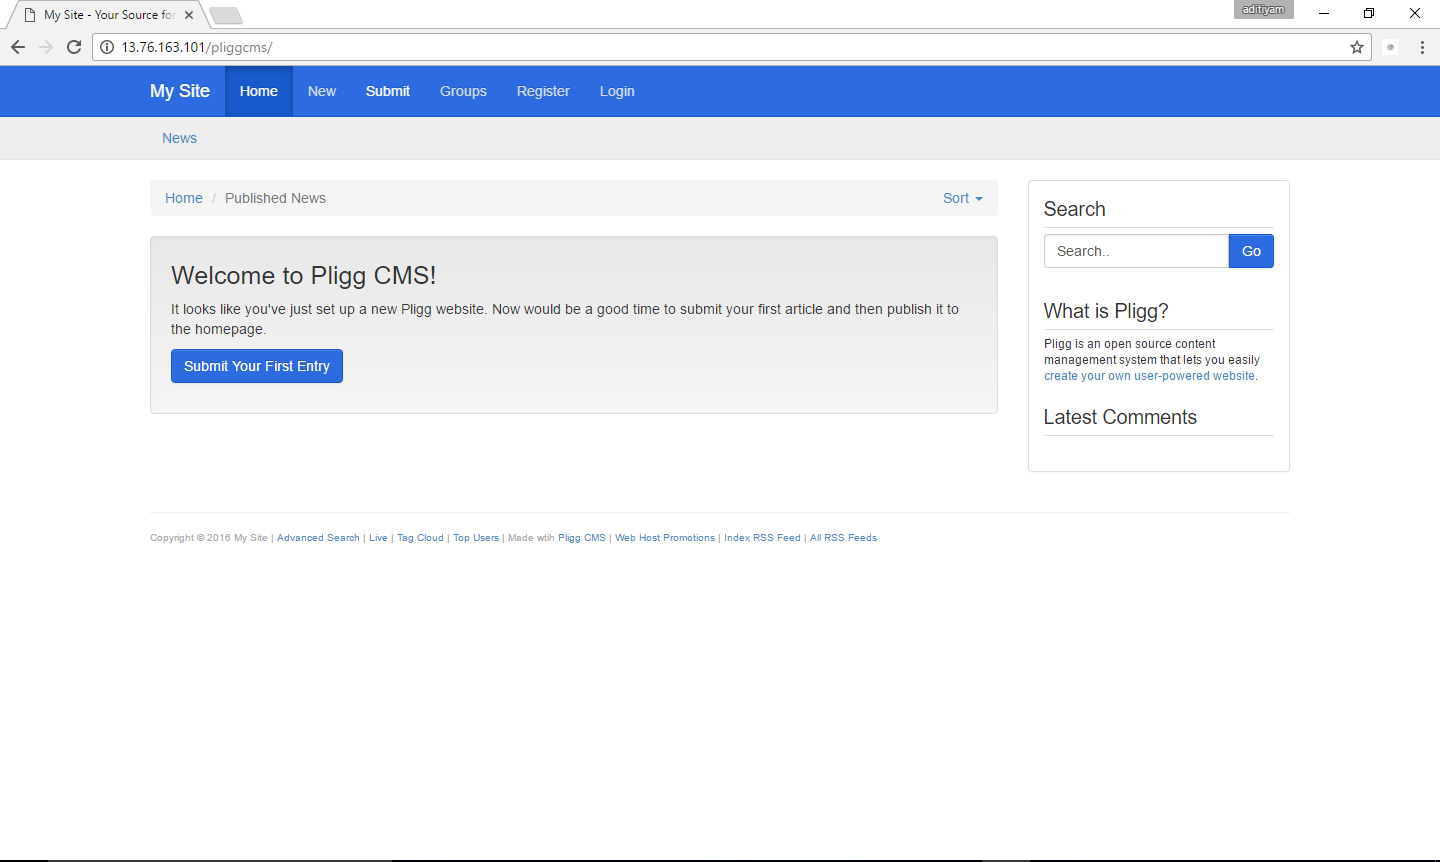
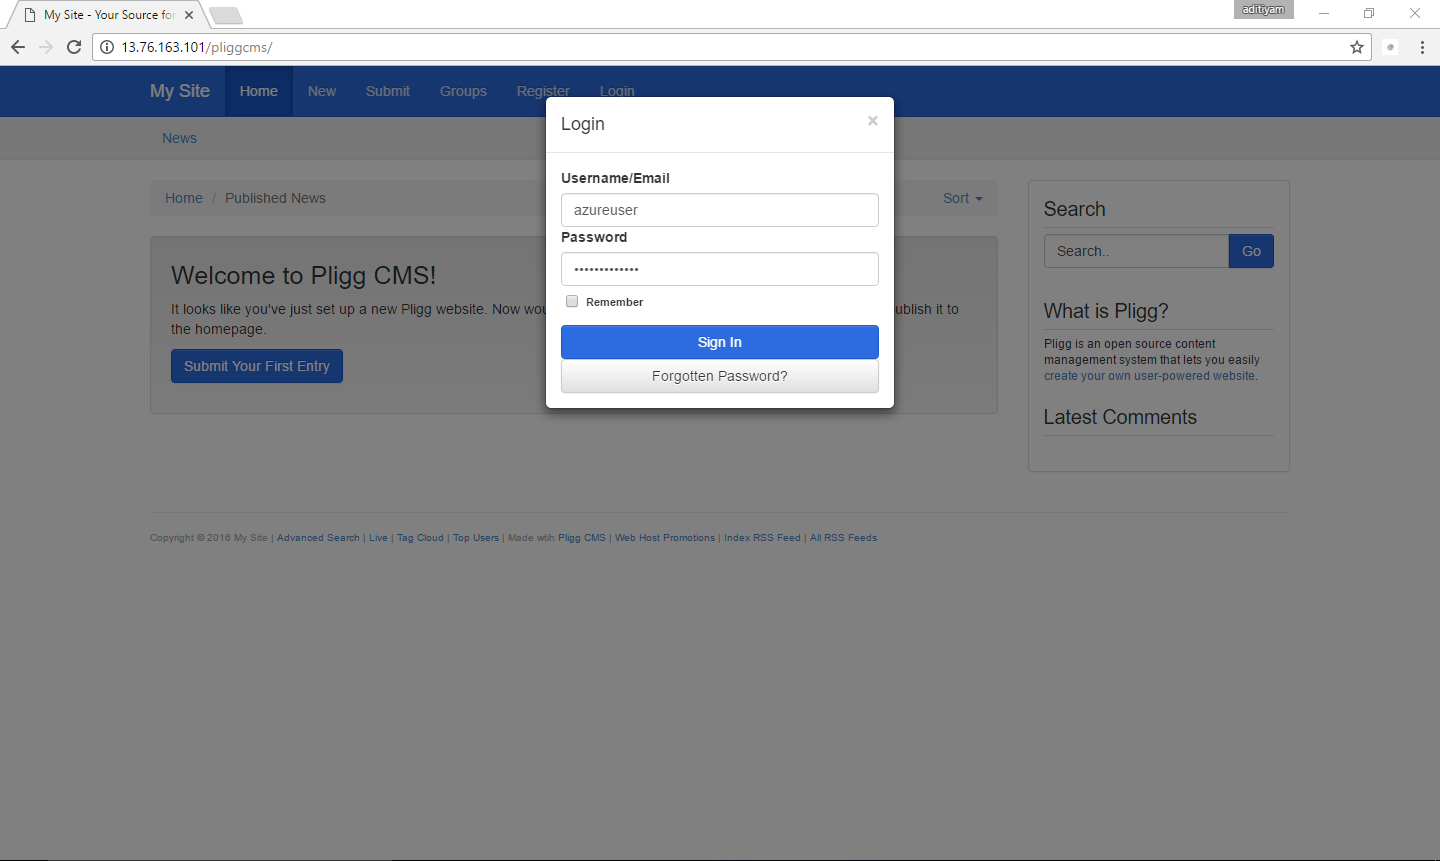
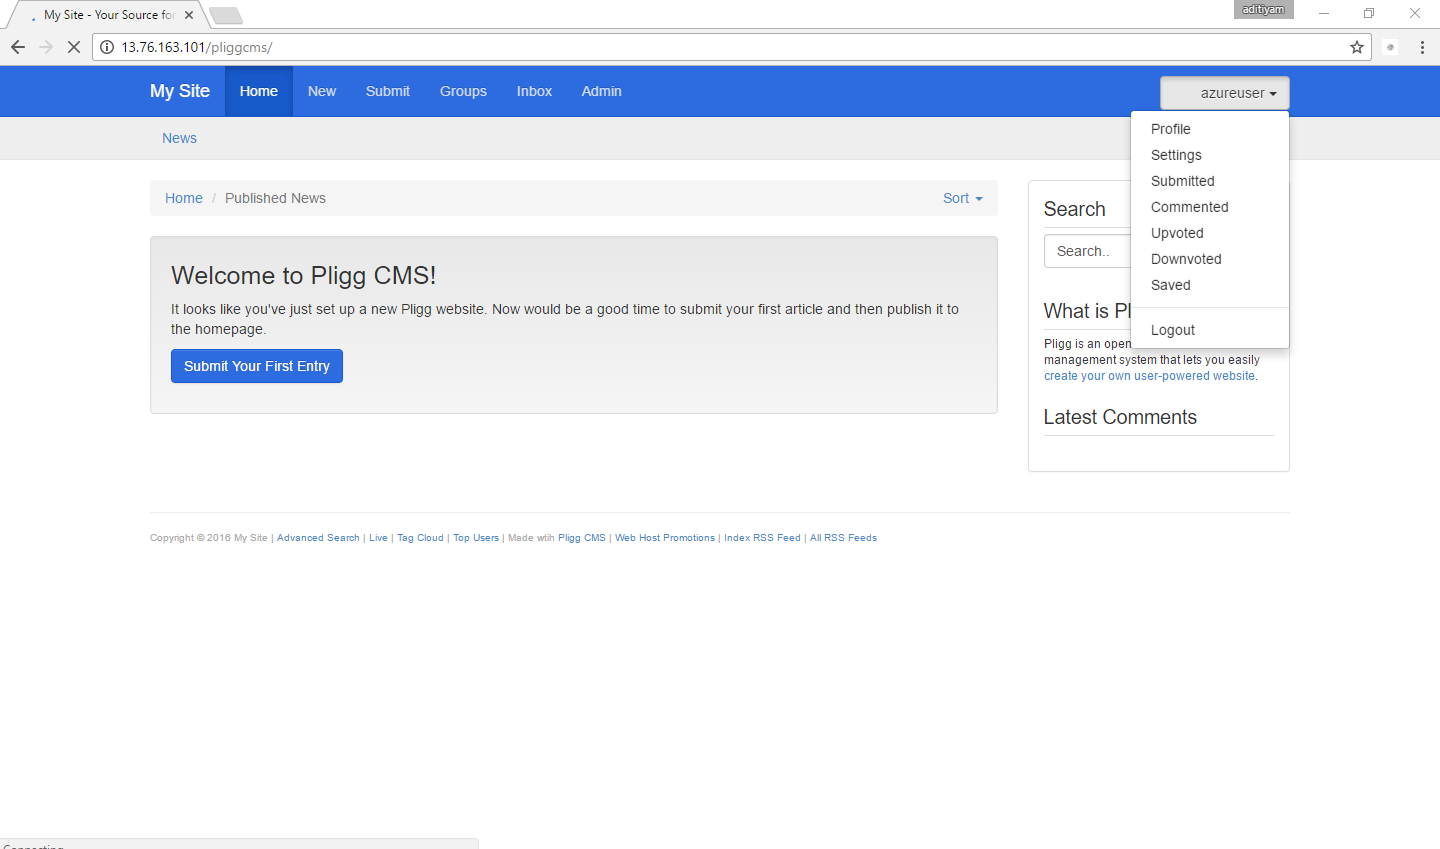
Step 3) Application URL: Access the application via a browser at http://ip/pliggcms/admin/
- Username : azureuser (Please create new user and delete this user)
- Password : Passw@rd123
Step 4) Other Information:
1. Default installation path: will be in your web root folder “/var/www/html/pliggcms”.
2. Default ports:
- Linux Machines: SSH Port – 22
- Http: 80
- Https: 443
- Mysql ports: By default these are not open on Public Endpoints. Internally Mysql server: 3306
Configure custom inbound and outbound rules using this link
3. To access Webmin interface for management please follow this link
Azure Step by Step Screenshots
Azure Screenshots
Product name
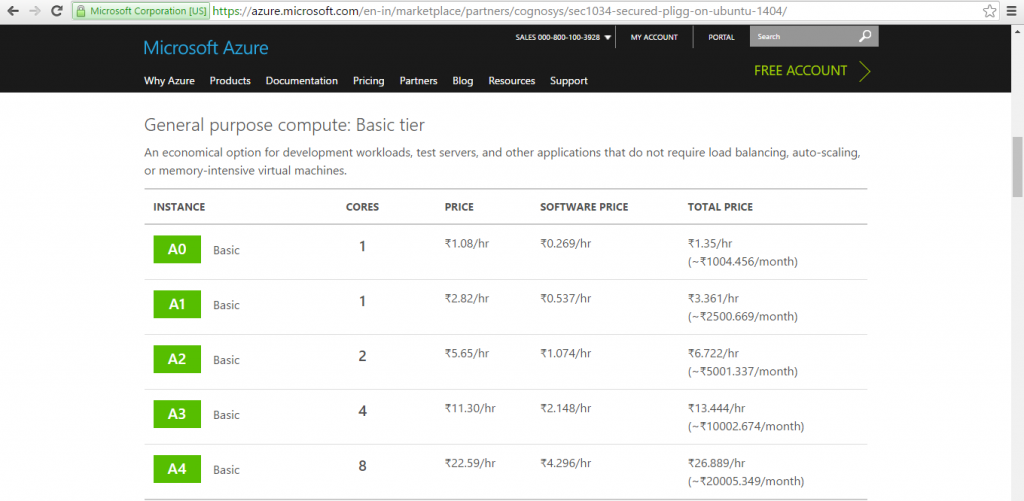
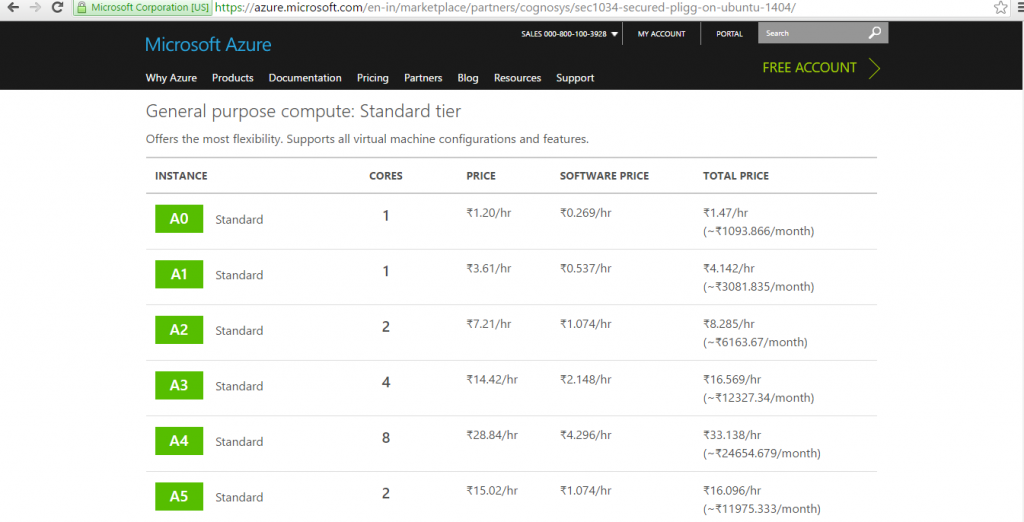
Pricing Details
Videos


