1-click AWS Deployment 1-click Azure Deployment
Overview
Pimcore is maybe one of the most structured and flexible content management system(CMS) currently existing out there on the vast amount of Opensource CMS platforms. With Pimcore you will be able to build every type of website you need to without the use of any additional modules to the base setup of the platform. This makes it the most dedicated and most security reliable platform you can find on the market these days.
Considering its purpose, it is often compared to platforms like WordPress, Magento or Shopify. Having familiarity with WordPress, I tried to compare them to get a better understanding of the Pimcore platform itself.
It resulted in a conclusion that, unlike WordPress, where you can build a basic site without a development notice, Pimcore is not an “out-of-the-box” solution. It is rather a platform, built for developers, to enable them a rapid application development by providing them a set of tools for building standard features of one CMS, DAM, PIM and Commerce solution.
For example, when creating an e-commerce system, usually you would build a data store to hold information about your products, you would provide an API on top of that, and, to allow managing the data, you would build an administration UI for the users.Well, software like Pimcore will already have that functionality provided for you (and much more) so you can focus on building other custom features of your application.
ANY data management
Pimcore stands out as a platform that can manage any digital data. Before stepping into the real examples, it’s important to know about the three main parts of the digital content you manage with Pimcore: Documents, Assets, and Objects.
Documents
In simple words, documents represent pages. Following the well-known MVC pattern, each document can be associated with the desired controller, action, and template.
Assets
The purpose of the assets is quite self-explanatory. They store digital files, such as images, videos, pdfs, and others, with their corresponding metadata.
Objects
Objects allow management of the structured data, such as products, categories, customers, blog posts, etc. With the familiarity of object-orientated programming, the concept of objects should be relatively easy to understand.Having a basic idea of the Pimcore platform, the next step was to try it out in practice.
Installing Pimcore manually
Pimcore is one of the best Content Management Systems(CMS) currently available under Opensource licenses. If you have chosen the application and you are wondering how to install it, in this tutorial we will cover the basic manual installation procedure in few easy to follow steps.
To complete the Pimcore Installation, please follow these steps:
Download and Prepare the Installation Files
As every Opensource product these days the code of the Pimcore platform can be found on their official download page. Once you land there please select the second (middle) package from the available for download packages.
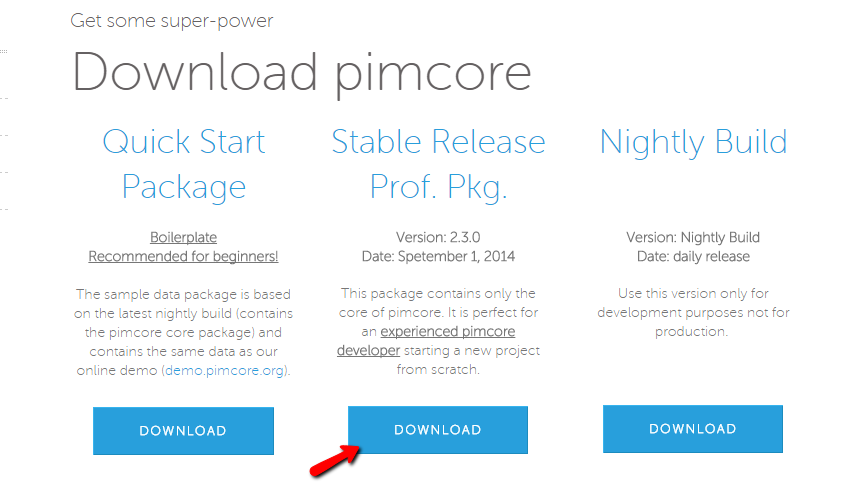
If you would like to install the Quick Start package simply download the first package from that list labeled the same way.
Once the package is downloaded please extract and upload the contents of the package on your hosting space using your favorite FTP Client.Pimcore can be installed only on domain or a subdomain. In other words the application should be uploaded either in the main folder of your primary domain (public_html) or in the subfolder of your subdomain (public_html/subdomainfolder).Once the files and folders of the Pimcore application are uploaded on your hosting space please access that location via your Internet Browser.
Initiate the Installation Process
Once you access the location where the files were uploaded via your Internet Browser you will be presented with the default installation screen of the Pimcore platform.
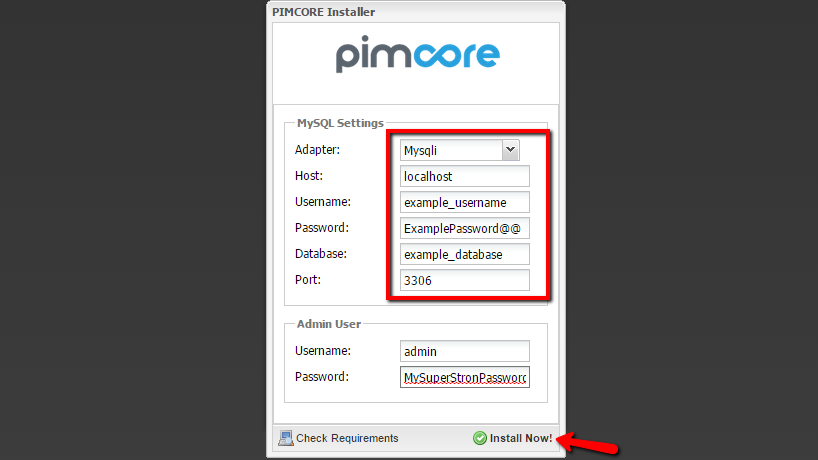
There you will need to configure few simple dependencies mostly related to the database of the application such as Database Adapter, Host, Username, Password, Database name and Database Port.
As an additional options under the Admin User section you should enter the isername and the password you would like to use.
All the information you need can be retrieved when you create a new database via your cPanel → MySQL database wizard. The default MySQL port is 3306 and you should leave it as it is or fill it with that value.
If you have created your database via your cPanel then most probably right after you click on the Install now button you will get an error message indicating that “Database Charset is not UTF-8“.
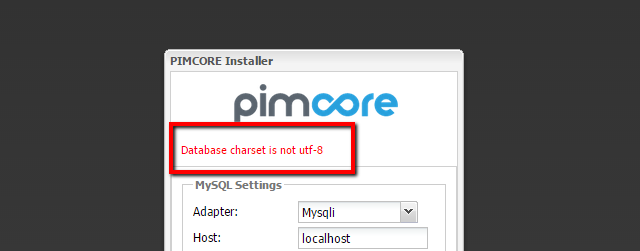
This mean that you will need to change the Character set of the database you have created and in the next step we will explain in details how this can be achieved.
Change the Character Set of a MySQL database
Assuming that you have created your MySQL database you will need to access the phpMyAdmin feature of your cPanel and to find the newly created database in the list of available databases for your cPanel account displayed in the left vertical menu of the phpMyAdmin feature.
Once you locate the database please click on the same so you can be presented with the tables view of the database. Don’t worry if that view is empty. Actually since this is a newly created database it should be empty. Then you will need to click on the Operation button in order for the available actions on the database can be presented for you.
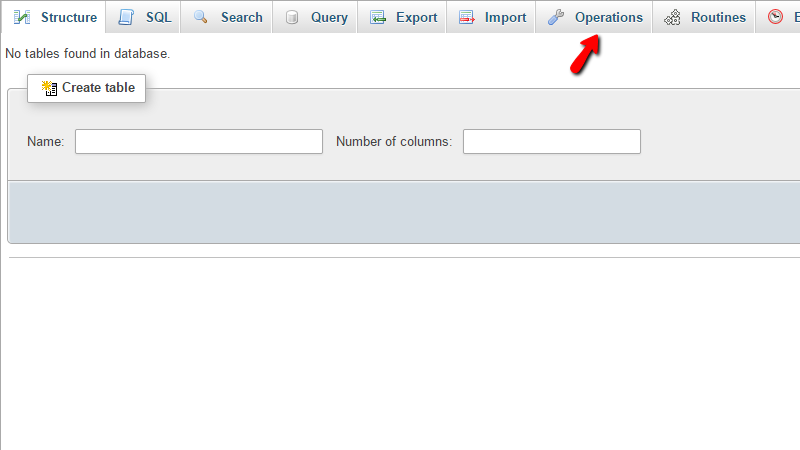
On the newly displayed page under the Collation section you will be able to find list of the available collations and from that list you will need to select utf8_general_ci as collation your database should be using.
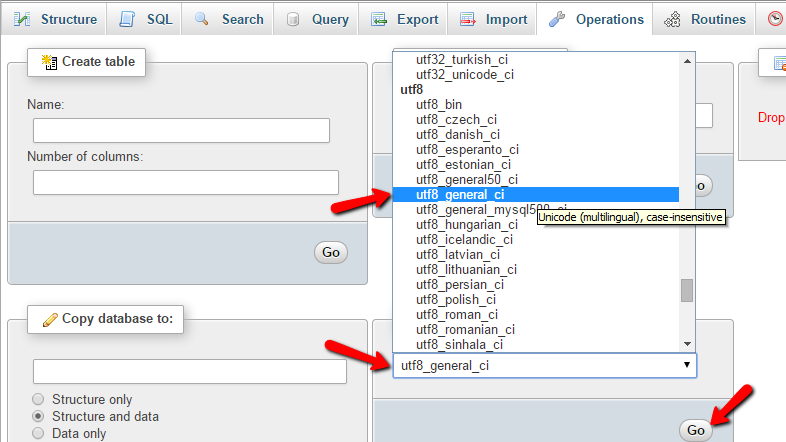
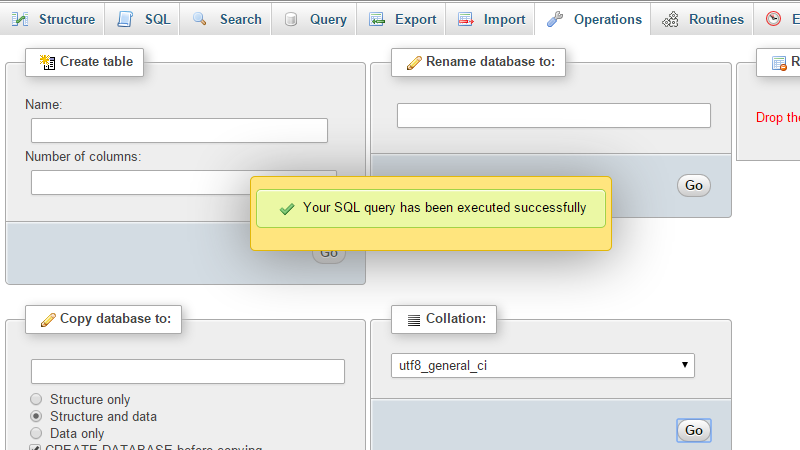
Once the correct collation is selected please press the Go button so you can apply the change. Then you will be presented with a message that the operation has been performed on your database successfully.
And finally if you go back to the installation page of your application and press the Install now button you will be able to have a fully functional installation of Pimcore in just few seconds.
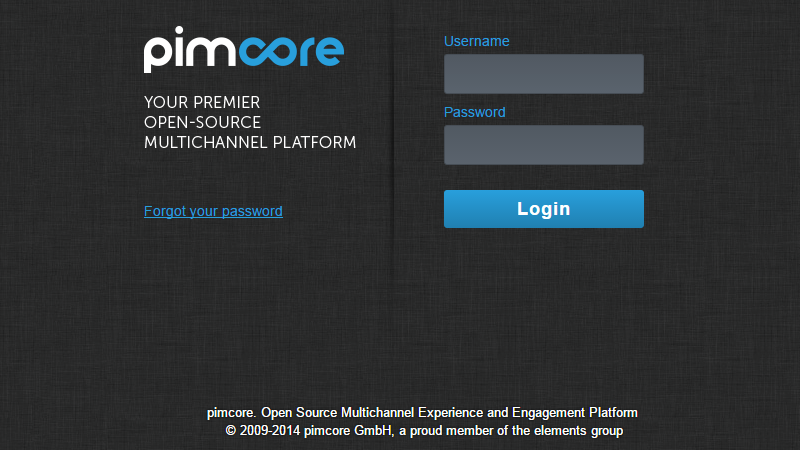
Once the Pimcore platform is installed you will be redirected to the admin area where you should enter the username and the password you have chosen earlier in the installation procedure.Congratulations! You have successfully installed the Pimcore application.
Configuring General and Localization Settings
As every other Opensource application Pimcore also provides many available settings you can configure whenever you need to. In this particular tutorial we will provide a brief explanation and guidance on how the General and the Localization settings should be configured.In order to access all the settings types provided by Pimcore you will need to navigate to Settings → System.
To configure the primary Pimcore options, please check the:
General Settings
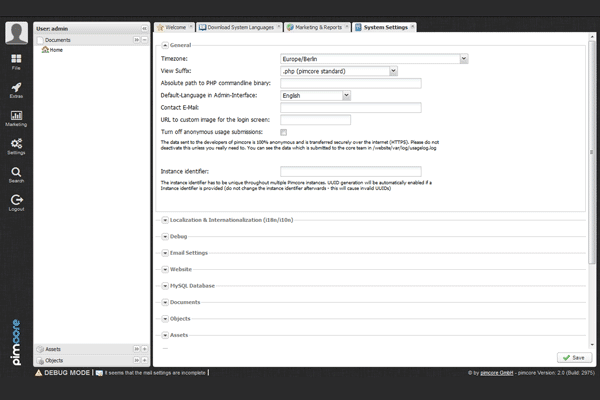
The General Settings section will be the first section in the large list of settings you will be presented with. That section contains the following settings:
- Timezone – here you can configure the time zone you would like your Pimcore application to use.
- View Suffix – here you can configure the suffix of the view files your Pimcore application will be using. The available suffixes are
.phpwhich is the standard extension and thephtmlwhich is Zend Framework standard extension. Please use the one which is most suitable for you. - Absolute path to PHP command line binary – here you should configure the native path to the php binary which in all our shared servers is
/usr/local/bin/php. - Default-Language in Admin-Interface – The default language which should be used for the Admin area.
- Contact E-Mail – The email address which can be used from your application for reports and other critical information.
- URL to custom image for the login screen – here you can specify any custom image you would like to have displayed on the login screen of the admin area. By default the image there is the Pimcore logo.
- Turn off anonymous usage submissions – By default all the data your application submits to the developers of Pimcore is submitted absolutely anonymously. If you would like this disabled please check this option.
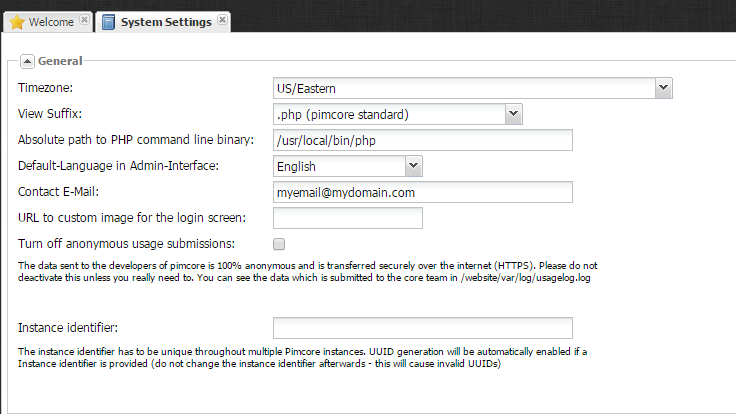
Once you are done with the configuration of these options please use the Save button which can be found at the bottom right corner of the page.
Localization Settings
The Localization settings section is the second section of the System Settings page and there you will be able to specify the content language for different type of components on your website.
The default language is English, however you can add as many as other languages you would like to and then to even import the language CSV file if you need to.
The process of adding a new language is relatively simple. The only thing you will need to do is to simply choose the language from the Add Language drop-down list and then to click on the plus (+) button next to that list.
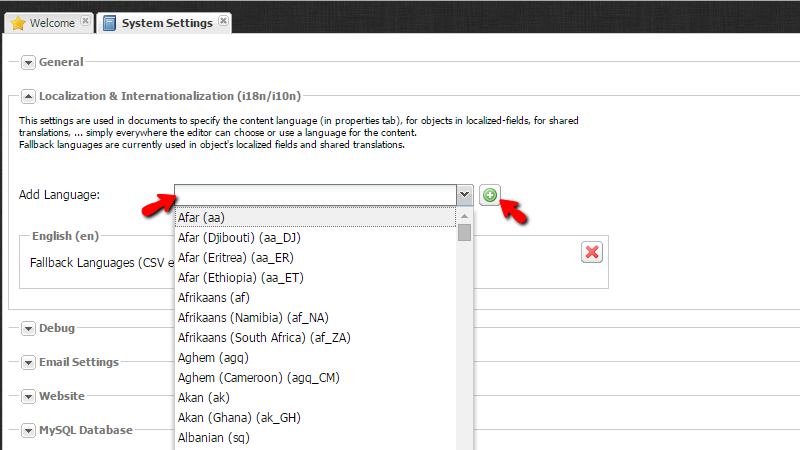
You will notice how the newly added language will appear as a separate smaller section just below that list and there you will be also able to specify the CSV file for that localization.Once you are ready with these changes please click on the Save button located at the bottom of the page so you can be able to save the performed changes.Congratulations! You can now configure the General and the Localization Settings of your Pimcore application!
Configuring Debug Settings
The Debug mode of your Pimcore website will enable you to receive detailed information on any errors in order for you to be able to Debug those and trace their source. Pimcore does not only provide you with such mode but it is flexible enough to fit all your Debugging needs.Let’s begin with accessing the Debug Settings. In order to access the Debug section of settings you will need to navigate to Settings → System → Debug.
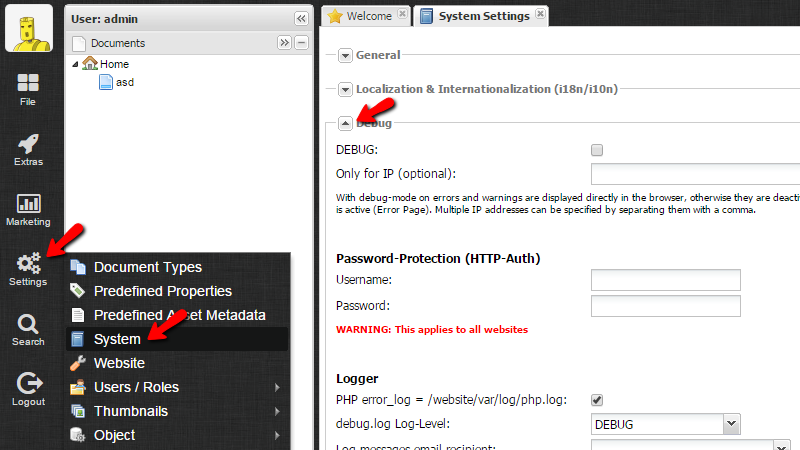
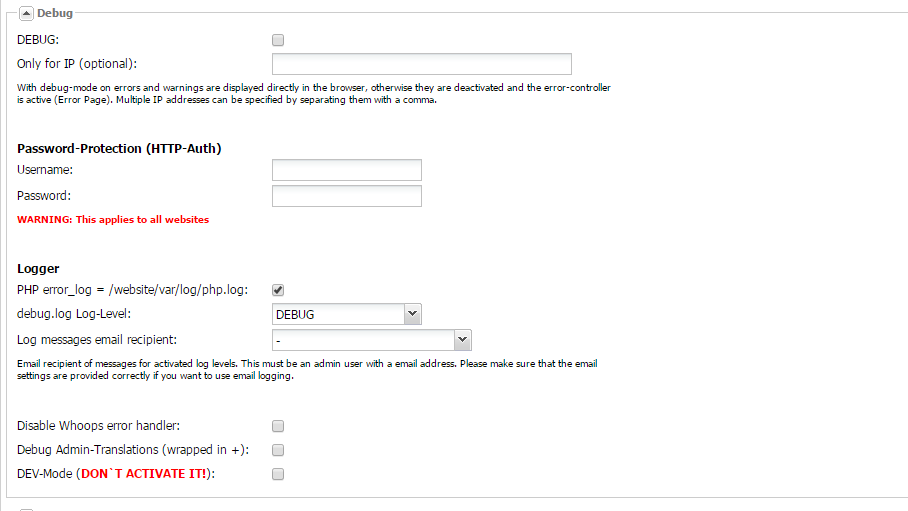
You will notice quite a lot of settings in that section and for this purpose we will explain each of these settings so you can be fully aware of their usage.
- DEBUG – The setting is quite self-explanatory. This is the main configuration setting which will enable or disable the Debug mode.
- Only for IP (optional) – Here you can specify a list of IP addresses which will have access to the debug mode.
- Password Protection (HTTP-Auth) – Here you will be able to specify the username and the password if you would like to password protect your website. Keep in mind that this will also password protect all the websites you have in the folder where Pimcore is installed.
- Logger – This set of settings contain information and configuration for the main log which will be used for logging errors and Warnings.
- PHP error_log – The location of the error log specified in that setting. If you are agreed with that location simple leave the checkbox checked.
- Debug.log Log-Level – The standard PHP debugging options
- Log messages email recipient – If the logs should be sent to some recipient.
The last three options are not a mandatory and you should use them in case of you would like to achieve some concrete Debug functionality provided by them.
When you are ready with all these configurations please use the Save button in order for these settings to be saved.Congratulations! You can now configure the Debug mode of your application based on your needs and personal likes.
Configuring Email Settings
The email system of your Pimcore application will allow you to easily send messages to users or basically anyone you would like to. Additionally the same system is used for notifications and other automatically generated information from the platform.In the next few lines of this tutorial we will show you how to configure the email settings of your Pimcore application and also we will explain each of these settings so you can be more familiar with them.
Let’s begin by accessing the Email Settings section. That section is located in the admin area of Pimcore and then under the Settings → System page.
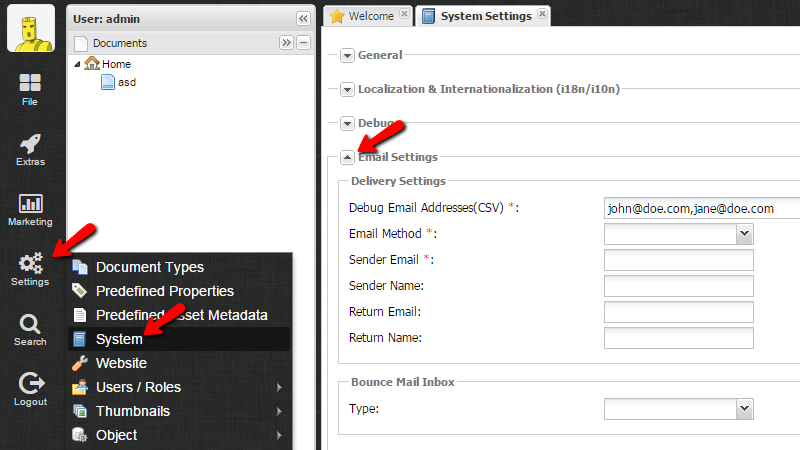
The contents of the Email Section which you should be configuring are:
- Debug Email Addresses(CSV) – The email addresses which should be used for debug notifications.
- Email Method – This is maybe the most important setting here. There are two options for this setting. The first one is called “sendmail” and as the name suggest this option will cause your Pimcore application to use the sendmail binary to send emails directly via the php mail() function. This is good method, however the one we are recommending is the second one which is the “smtp” method. This method will allow for all the outgoing messages sent from your script to be routed via the smtp protocol. If you choose the SMTP option you will be presented with few more options you will need to configure.
- SMTP Host – The hostname of the SMTP server – usually this is “mail.yourdomainname.com” where the substitution yourdomainname.com should be replaced with your actual domain name.
- SMTP Transport Security – Here you should choose none (-) if your mail server does not support security or the respectful security protocol – SSL or TLS.
- SMTP Port – Depending on the selected security method the port can be 25 (for no security); 465(for SSL/TLS security).
- SMTP Name – Your email account
- SMTP Authentication Method – The authentication method your SMTP server uses.For all our services this should be set to “LOGIN” and right after this method is selected you will be presented with two additional fields.
- SMTP Username – The username for your SMTP server. For all our services this should be your full email address (e.g. example@example.com) .
- SMTP Password – The password for your email account which you have used as username.
- Sender Email – The email address you would like displayed as sender. This should be the same as the SMTP username you have used previously.
- Sender Name – Your name or you can again specify the SMTP Username you have been using.
- Return Email – The email address the message should be returned to in case of bounce back.
- Return Name – The name of the sender for the return message.
- Bounce Mail Inbox – Here you will be able to configure the Inbox location of your bounced back emails.
Now that you have configured all these settings it is time to save them. In order to do that you should use the Save button at the bottom right corner of the same page.Congratulations! You now know how to configure the email settings for your Pimcore website!
Examining the directory structure
After the successful installation, we have a new project generated. First thing I wanted to check was the directory structure to be able to know how to navigate through the code. As Pimcore is based on a Symfony framework, it follows the best practices of the Symfony directory structure. Here’s the summary of the quick project structure overview:
/app/ – contains configuration files shared templates and translations. Here you can also find the main entry point of the Symfony application configuration which is the AppKernel class.
/bin/ – is the place for the executable files (e.g. /bin/console) where you can also store your own custom scripts.
/src/ – is where you will spend most of your time as this the place for your own PHP code (controllers, services, models, event listeners, etc.)
/var/ – contains private generated files (symfony cache, logs, versions, etc.). For example, when you create a data object class through the administration (which we’ll be shown later in the post), the Pimcore will generate the code for the class with getters and setters under the /var/classes folder.
/vendor/ – stores 3rdparty dependencies (like the one installed by the composer).
/web/ – is public document root (statics, assets) on which we pointed our host.
Examining the database
The next thing I was curious about was the database structure. The initial Pimcore installation counts around 200 tables, so I wanted to understand the structure to be able to find the correct data when needed.
Also, having the database knowledge, you will be able to know what is going on under the hood. The structure contained most of the default tables created during the Pimcore installation. Here are some tables that caught my attention:
classes – stores object classes with ID and class name.
objects – is a table for all objects in the system with their metadata like id, class name, parent, etc.
assets – stores assets (e.g., images) with system metadata.
documents – table for documents, folders, links, emails, and snippets of the document area with meta and configuration data.
dependencies – stores dependencies between objects, assets, and documents.
versions – stores versions of objects, assets, and documents while the actual data is serialized and written to disk under the /var/versions directory.
users – contains backend users. Here you will find your user information set in the Pimcore installation process.
cache – table for data, stored in a serialized form, used by the default Pimcore cache. Another table used by the cache to store tags for cache entries is cache_tags.
Furthermore, there are also dynamically created tables which get created and modified during the object data model configuration. For example, when you create a new object class in the Pimcore administration, several tables are added to the database. These tables have a numerical suffix which represents the number (id) of the object class. Some of the created tables/views are:
object_(id) – is actually a database view which joins object_store_(id) and objects table.
object_store_(id) – is the primary storage table of an object class. This table contains all data without any relations or external dependencies.
object_relations_(id) – table contains data of fields with their relations to the objects, assets, or documents.
object_query_(id) – is the table which should be used for retrieving data, including inherited data.
Pimcore works with this table.
Examining cache
Pimcore caches almost everything in order to boost performance.By the default settings, Pimcore uses the table caching system by reusing the Doctrine connection to write the cache into the cache and cache_tags tables in the database.
Every Pimcore element (document, asset, object) gets cached as a serialized object and written to disk under the /var/cache directory. As stated in the documentation, you can configure your cache to use Redis or implement a custom cache pool.
Let’s build something (finally)
After going through the Pimcore basics, I was ready to step into the administration and learn more by building something real. To be able to follow up with me, you should have Pimcore e-commerce skeleton installed. The selected skeleton already comes with an advance demo shop which showcases the main Pimcore’s e-commerce features.
To demonstrate some Pimcore features mentioned in this article, we will fit in with a simple example which should provide a solid ground for starting your Pimcore development journey.
Let’s say we have a webshop that sells products of multiple brands, the final goal of this example is to:
- display all brands in a menu dropdown
- on a brand selection, render a brand page having the brand products listed.
Let’s begin.
Creating a Brand class in Pimcore
To store Brand information, we need a data object, so the first thing we will do is to create a brand-new Brand class. In the Pimcore administration, do the following:
- Go to the Settings -> Data Objects -> Classes.
- Click “Add” and type the name of the class

A Brand class we’ll be created with an assigned unique identifier. Under the classes panel, click on the class to add some class properties. In Pimcore, the class structure is organized with panel types and other layout elements used for designing the user interface of object instances view.
To design our simple class, we will do the following:
- Right click on the General Settings -> Add Layout Component -> Panel. We’ll call it Layout as default.
- Next, right click on the Layout -> Add Data Component -> Text -> Input to add a first property “Name”.
- Our brand will have a logo, so we’ll add another property “Logo” by right clicking to Layout -> Add Data Component -> Media -> Image. A simple structure should look like this:

Now that we have the Brand class ready let’s go to the Product class to add a relation to it.In Pimcore e-commerce skeleton, the Product class already exists and, under the Base data panel, it has a “brand” property on it.
By clicking on the property, we see the following:

The type of the property is “many-to-one” relation type. If you scroll down, you will see that it allows only objects, but there is no specific object selected.
We will change that as follows:
- Select our previously created Brand class.
- To enable the property to be visible in the administration interface, uncheck the “Invisible” checkbox.
- Save the class.

Our simple class structure is now ready and we can create some brand instances.
First, we will prepare our brand logos by uploading images under the Assets so we will do the following:
- Create “brands” folder by right-clicking on the Assets -> Folder.
- Upload a brand logo by right-clicking to “brands” directory -> Upload Files. For this example, we recommend uploading the image of 250×250 pixels.
Having the logo ready, under the Data Objects section, we can create a brand instance:
- Create “brands” folder by right-clicking on the Home -> Folder.
- Create a brand by right-clicking to “brands” directory -> Add Object -> Brand and typing the name of the brand.

After the creation, we’ll do this:
- Populate the Name and logo properties (you can drag-and-drop the logo from the Assets)
- Save & Publish the brand.
Following the same principle, you can add a couple of more logos and brands, and name them as you wish. When you’re done, you should have something like this:

The last thing to do in the Object section is to assign our brands to the selected products. You can create your own products (like you created brands) or you can reuse some of the existing products that Pimcore e-commerce demo/skeleton already includes.For simplicity, we will select several unpublished products under the /products/products/apparel/running/fw12_13 directory and do the following:
- Assign them a brand by drag-and-drop the desired brand to the brand field.
- Save & Publish them.

Next, we need a document page which will render our brands and products. Under the documents section, you can do this:
Right click on the “en” document -> Add Page -> Contentpage. In the appearing pop-up, we will name it “Brands”.

Before saving and publishing we will add some document properties which will use us later in our code logic. Under the document Navigation & Properties tab do the following:
- In “Predefined Properties” dropdown, select the “Hide left navigation” option. This will add a “leftNavHide” property of the Boolean type set to true. Since we created our document as a content page, it will use the Pimcore layout which you can find under /app/Resources/views/ directory as the layout.html.php file. By default, the layout displays left side navigation, but for our page, we want to hide it, and we can do it using the leftNavHide property.
- Add a custom property “globalRootBrand” of the type object, and drag-and-drop the “brands” directory from the Object section into the value column.
- Add a custom property “templateType” and call it “brand”.
- Save & Publish the document.
The document properties should look like this:

Now we have the assets, objects, and document ready. Time has come to move to the code and fetch our brands to display them in a menu drop down.
Under /app/Resources/views/ directory, in the earlier mentioned layout.html.php file, find where the $mainNavigation is rendering and place the following code in its function parameter:
You can see that we are using previously set document properties by checking if the templateType is “brand” and if the globalRootBrand property is set.
Then, we are looping through the “brands” directory children, which are our brands, and we are dynamically creating brand pages while setting the name, identifier and the page uri.
We learned earlier that Pimcore documents follow the MVC pattern. Therefore, to render a brand document, we need to create a brand controller and a view for it. Starting from the controller, you can create a BrandController class under the /src/AppBundle/Controller directory and add the following code:
The BrandController class has detailAction which accepts the brand identifier as a parameter. In the action, we fetch a brand by its identifier and all products which have that specific brand set.
Then, we are passing products and brand to the view by setting them as properties to the $this-view object. Notice that we are using the Symfony set a dynamic route which will point to our action.
To create a view, under the /app/Resources/views directory create a “Brand” directory and a detail.html.php file in it. Following the Symfony naming convention, the detailAction of the Brand controller will expect the detail view under the Brand folder to render it. Place the following code to the view:
The view extends the layout.html.php where, among other things, the menu navigation is defined. Skipping the html and css parts, we will focus on explaining the main logic. We are rendering the brand logo by calling getThumbnail method on the asset object $logo.To render products, we are looping through the products and rendering the product.html.php template which, in Pimcore e-commerce demo/skeleton, exists under the /app/Resources/views/Shop/list/ directory.
Finally, if you navigate to your Pimcore local domain, you should see a Brands option in the menu. If you hover it, all the brands you created are listed as sub menu options. On brand selection, a brand page is rendered showing your brand logo and the associated products.
The final screen should be similar to this:

Backing up Pimcore manually
As every other web application Pimcore requires regular backup to be performed. The backup routine is something you should indeed consider as this will save your website in case of some issued due to the modifications you are implementing. The backup routine includes two steps which we will explain in details in the next few lines of this tutorial.
To backup a Pimcore website, you will need to:
Backup all Pimcore Files and Folders
There are few ways of backing up the files of your Pimcore platform, however the most effective one happens to be the use of the FTP service. In order to download all the files of your Pimcore website you will need to login into the FTP service for your account.
Usually the credentials of that service are provided in the welcome email we have sent to you when you have signed up for a service with us. Assuming you have those credentials at hand you should connect to your web hosting space using your favorite FTP client.
Once connected to your web hosting space you will need to access the folder where your Pimcore installation is deployed. Usually if you are accessing your Pimcore application via the primary domain of your package with us then you will be able to find its files into the public_html/ folder once logged into the FTP service for your account.
In case the Pimcore application is accessed via subdomain you should be able to find its files into the home folder of that subdomain. Usually that folder is located inside the public_html folder of your web hosting space. For example the home folder for subdomain pimcore.yourdomain.com should be located in public_html/pimcore/.
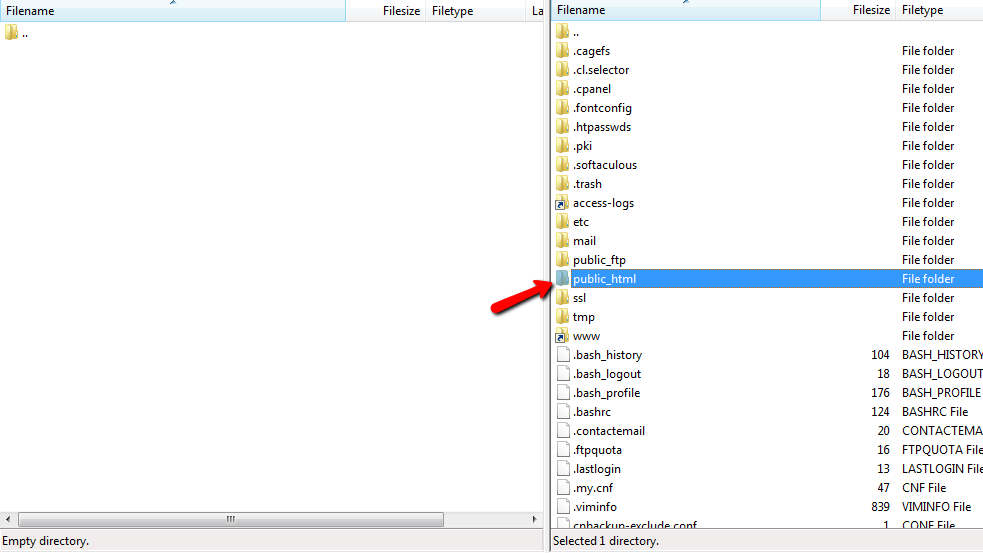
Now that you have accessed the folder where Pimcore is installed and where you are able to see the files of the platform it is time to download those. You can download the files either by selecting them all and then drag-and-drop those into the prepared folder on your local computer or by simply using the Download option from the right-click menu.
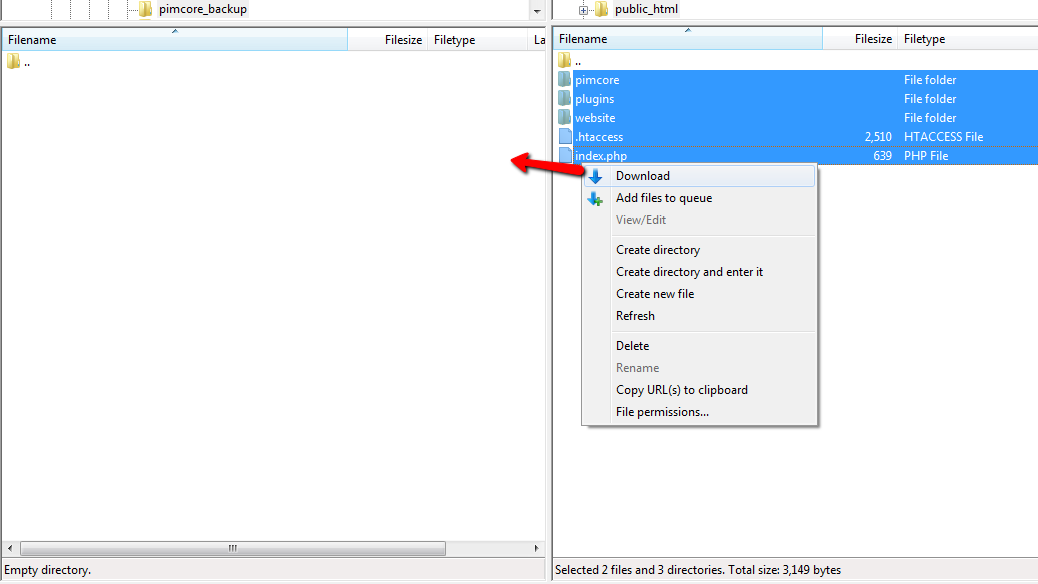
After few seconds or minutes depending on the size of your website the files will be downloaded on your local computer and the process of backing up the files of your Pimcore website is finished.
Backup the Database
Since Pimcore is php/MySQL driven application a key part from its functionality is the database of the application where most of the changes you are performing will be stored. In order to backup the database of your Pimcore application you will first need to know the name of that database.
The name of the database you have installed your Pimcore application with is located in one of the configuration files the platform uses. The concrete file is located in the website/var/config/ directory and it is called system.xml. In order to preview the code of this file you can simply use the Code Edit feature of the File Manager service provided in your cPanel.
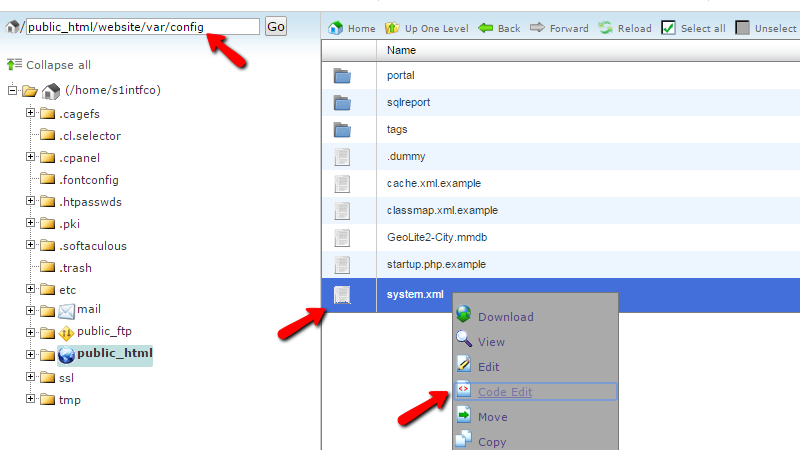
Then you should look near the 17th line of the presented code:
<dbname>s1intfco_pimc24</dbname>
In our case the name of the database we need to backup is s1intfco_database.
Another way of finding the database name is to login into the admin area of your Pimcore and to navigate to Settings → System → MySQL Database. And there you will be presented with the Database name you are looking for.
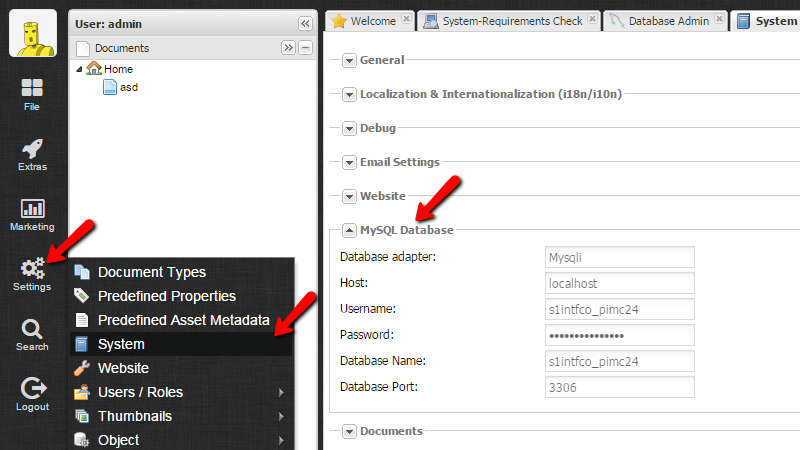
Now that you know the database name it is time to export the database. In order to do so you will need to login into the cPanel service for your hosting package and then access the phpMyAdmin application.
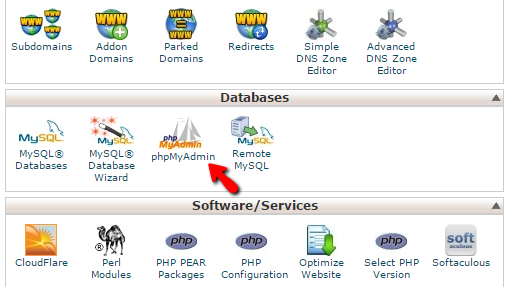
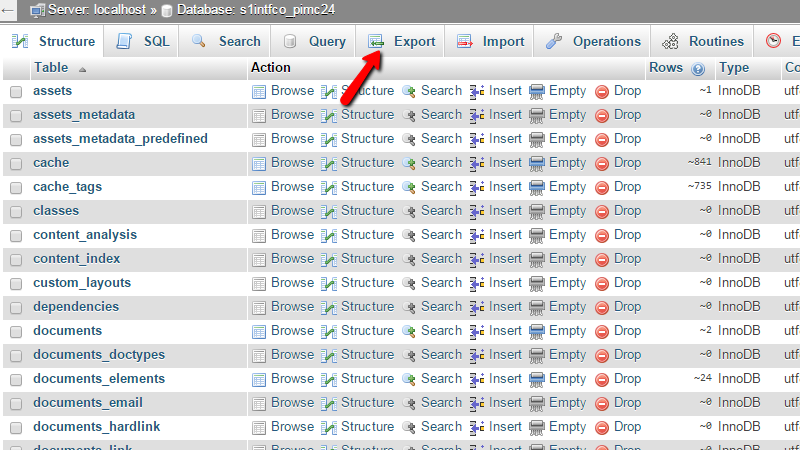
The database name should be displayed in the left vertical menu of the phpMyAdmin application along with all other databases associated with your cPanel account. Please find the database name and click on it so you can be presented with a table view for all of the tables contained in that database.
From there you will need to click on the Export link from the top horizontal menu.
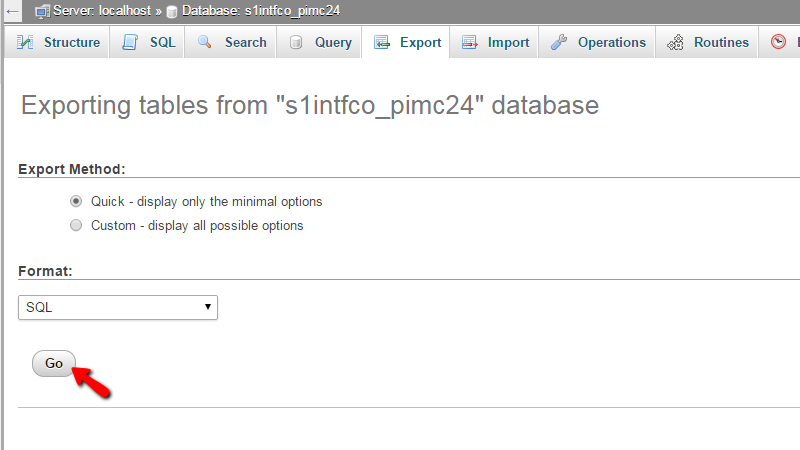
This action will redirect you to page where you will be able to configure the export options. For a simple export which will be sufficient to backup the entire database please leave those configurations as they are and press the Go button so the process can begin.
In few minutes or seconds depending on the size of the database you will be provided with a .sql file – result from the exporting process directly on your local Downloads directory or in any Internet Browser configured directory for your downloaded files.Congratulations! You can now backup your application fully whenever you need to.
Restore Pimcore Backup
If some of the implementations you have performed on your Pimcore website are resulting in some dramatic errors and other issues with the functionality of your Pimcore website then most probably you would like to restore a backup performed prior those changes so you can restore the normal operational rate of your website.
In order to Restore a Pimcore Backup, you will need to:
Restore the Files and Folders
Assuming that you have a copy of all the files and folders your Pimcore website was using, let’s upload those on your hosting space. But before you can do that, you will need to remove the new broken files. This can be done either via the FTP service or via your File Manager service. Since however you will be uploading the backed up files via the FTP service we will use it for this purpose also.
Now, please login into the FTP service for your hosting package. You should have received all the required information for the configuration of your FTP client in the welcome email you have received right after you have signed up with us.
Once your FTP client is connected to the FTP service of your web hosting account with us you should navigate to the folder where currently the files of your Pimcore are stored.
Then you should select all those files and from the right-click menu you should select the Delete option and after you confirm the deletion those files will be deleted.
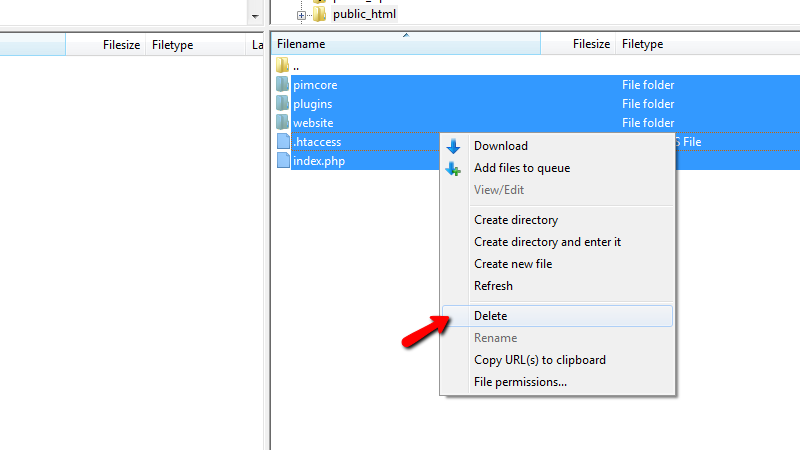
Ok great! Now you have cleared the old broken files and you are ready to upload the backup of the same files. In order to do so you will need to navigate to the backup folder on your local computer where you will be able to find all those files.
Once you have selected them all please right-click on them and select the Upload option from the menu you will be presented with.
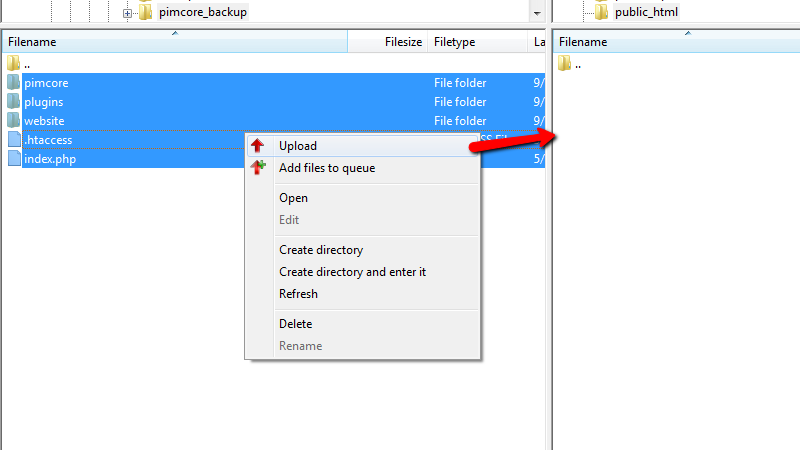
The upload process can take from few up to several minutes depending on the size of your website. Once the process is finished you will be able to access your website again if of course it was using the same database as the backup copy you have just uploaded.
Restore the Database
Now that you have uploaded all the files and folders it is time to also import the database backup you have into a new database and then reconfigure your Pimcore website with the new database.
Let’s begin with the importing process. In order to import the .sql file you have as backup on your local computer you will need to create a new database and add a user to the same. This can be easily achieved by using the MySQL Database Wizard feature of the cPanel service as there you will be able to create a new database and to add a new user to the same with few clicks.
Assuming that you have the database name and username at hand it is time to import the .sql file. For this purpose you will need to access the phpMyAdmin application via your cPanel service.
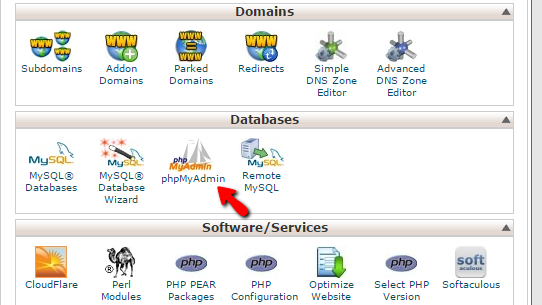
Then you will need to find the newly created database into the database list presented in the left vertical menu. In our case the database name which we will use is s1intfco_restore. Once you click on the database name you will notice that there are no tables in your new database which is normal and you should not worry about it.
Now, let’s import the database backup you have. Once you are in the table view of your new database please click on the Import link located in the top horizontal menu.
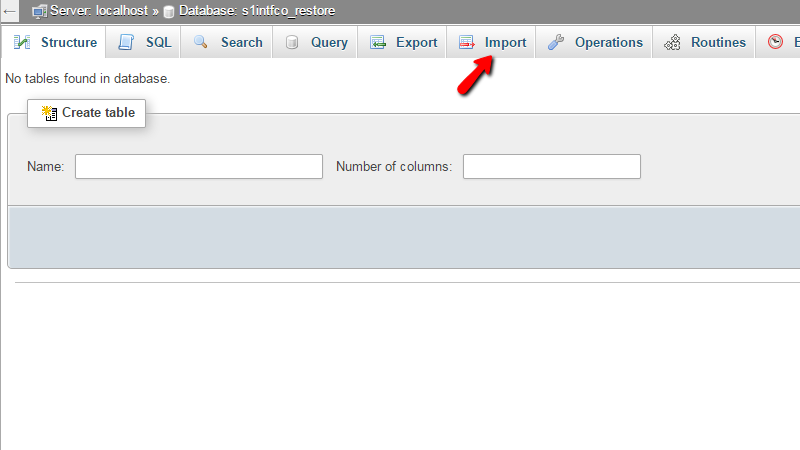
Then you will need to choose the .sql file from your local computer using the Choose File button and once this is done you will need to simply press the Go button on the same page.
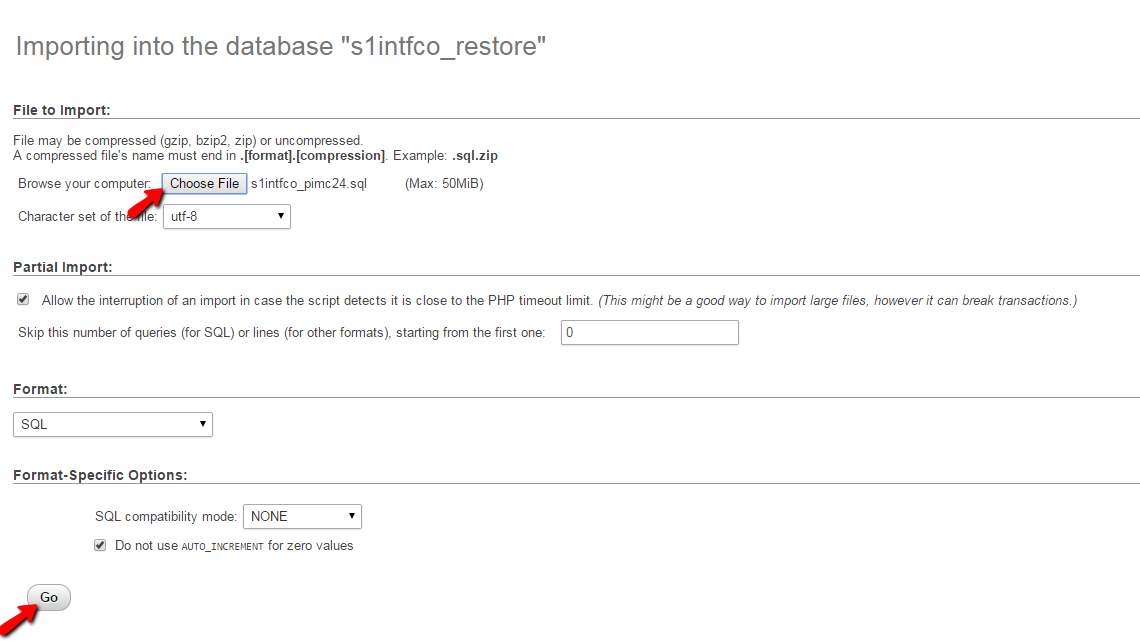
Alright! You have successfully imported the database and the only thing left is to configure your Pimcore application to use that new database.
Link the Database and Files
In order to do so you will need to edit the configuration file of the application with the credentials for the new database. This can be achieved easily via the File Manager feature of the cPanel service.
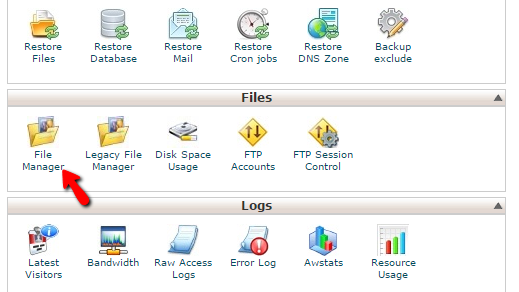
Once you access the File Manager feature please navigate to the folder where your Pimcore application is installed (the one in which you have just uploaded all the files and folders) and from there you will need to navigate again to the website/var/config/ folder where you will be able to find the system.xml file.
In order to edit the code of that file please right-click on the same and choose the Code edit option.
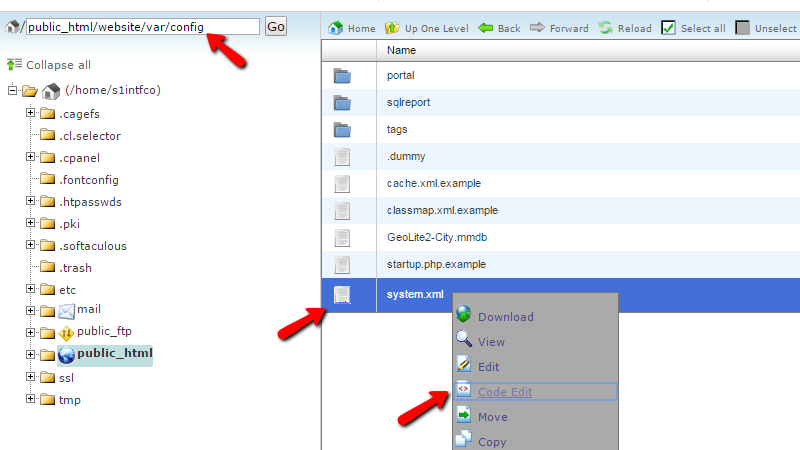
Between the 13th and the 20th line you will notice the following piece of code:
<params>
      <host>localhost</host>
      <username>s1intfco_pimc24</username>
      <password>pass123</password>
      <dbname>s1intfco_pimc24</dbname>
      <port>3306</port>
</params>
This is the code you will need to edit. The lines you will need to edit are the:
- 15th – username
- 16th – password
- 17th – dbname
With the respectful values – Database username, Database Username password and Database name. Keep in mind that here you will need to replace the old database credentials with those you have just created before you import the database earlier.Once the edit is finished please save that file using the Save Changes button located in the top right corner and refresh your website so you can ensure that the restore is successful.That’s it! Congratulations, you can now restore any local backup you have on your live website!
Activating Maintenance mode
No matter if you would like to deploy a major change in the content of your Pimcore website or if you would like to restore the website from a backup – the maintenance mode is the way how it every major change on your website should begin.
Let’s begin by logging into the admin are of your website. From there you will need to simply navigate to Extras → Maintenance Mode.
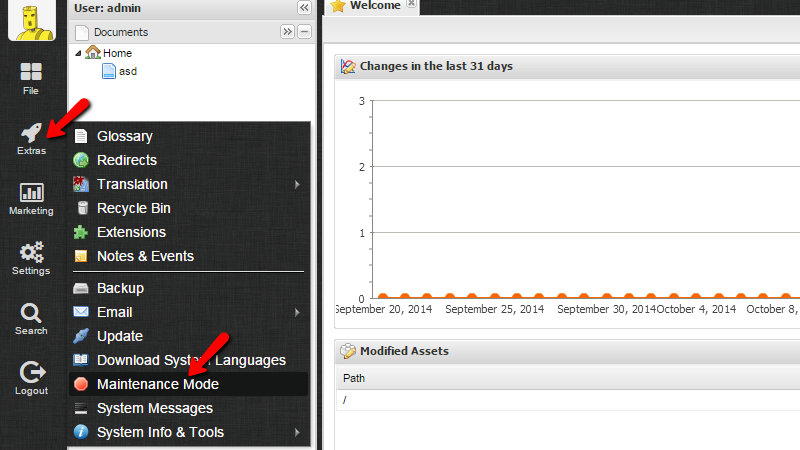
This action will trigger an event where you will need to confirm the activation of that mode. The warning message that will be displayed is basically informing that you will be the only one who will be allowed to access the admin area and the frontend area of your website.
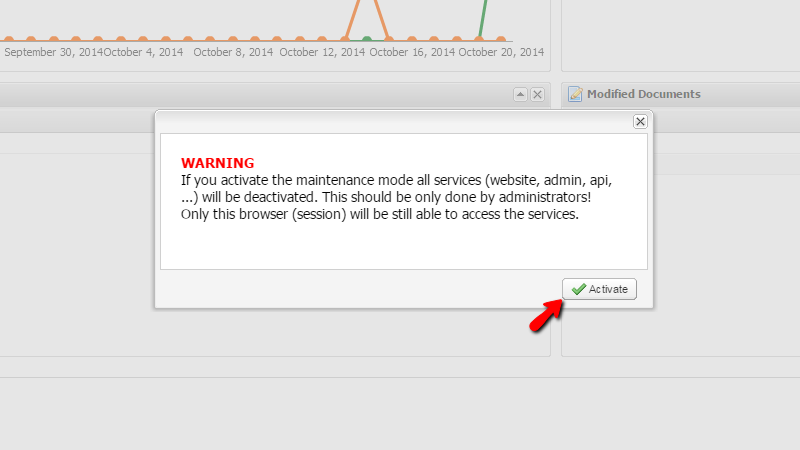
If you are agreed with these terms please click on the Activate button so the Maintenance mode can be activated. Once this is done your entire website will be displaying “503 Service Temporarily Unavailable” message to all the users except you.Congratulations! You now know how to activate the maintenance mode of your Pimcore based website!
Advantages of Pimcore
- Digitalize marketing. Since it is both a CMS and a marketing platform, it allows you to optimize engagement across all your online channels— social hubs, e-mail, print, and mobile to name a few.
- Create personalized experiences. Pimcore allows you to edit and manage content and marketing campaigns from multiple channels within a single interface. With it, you can create personalized experiences faster and more conveniently.
- Improve ROI. This platform enables its users to decrease the need for complex integrations. Teams can work simultaneously within a single platform. In the long run, it can reduce IT costs.
Disadvantages of Pimcore
- Small community. Without a robust community, you may not have the support you need that other platforms can offer when you’re starting out.
- Lack of plugins. The platform’s built-in collection of plugins isn’t diverse. Plus, the lack of support from the community means there are few plugins added. Thus, you might have to make your own if you need to extend its functionality.
- Set up and maintenance needs technical expertise. With not enough plugins available and the lack of community support, you might have to do a lot of manual programming to develop the platform you want.
-Pimcore is a powerful and robust Zend Framework based PHP content management system (WCMS) for creating and managing digital content and assets.Besides being a full-featured open-source WCMS system, pimcore is the first and premier PHP open source enterprise product information management framework (PIM) available.
Home Page
Login
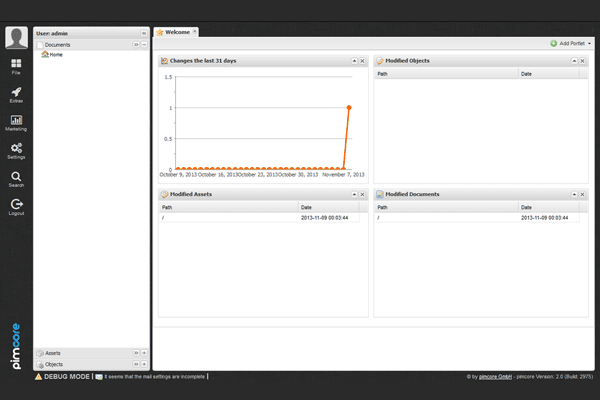
Dashboard
General Page
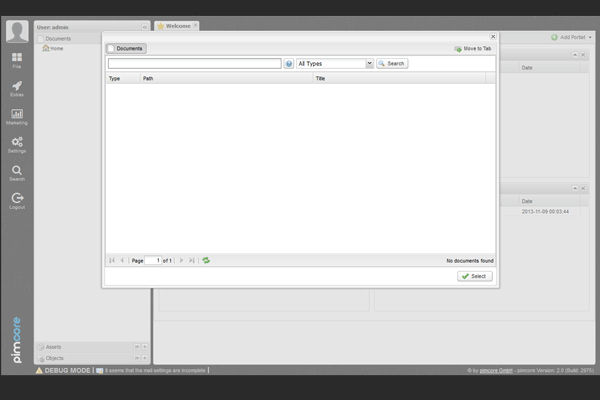
Documents Page
Features
Here are some of the key features the platform include and you will be provided with:
- Web Content Management – One place to manage them all. The flexibility of the platform offers outstanding digital experience whether you are managing your pages, assets or if you are building your own custom classes and contents. You have it all conveniently structure under the incredible admin interface of the platform.
- Digital Asset management – Wondering how to track all of your images and digital media contents on your website. Wonder no more, as Pimcore have it all – central repository for all the digital assets you have and their meta-data. Whether it is an Office document, pdf file, image or even a video you will be able to upload and manage it on every page you would like to.
- Integrated multi-channel E-Commerce – Pimcore is flexible to the point when you can even create your online store using the integrated tools and features.
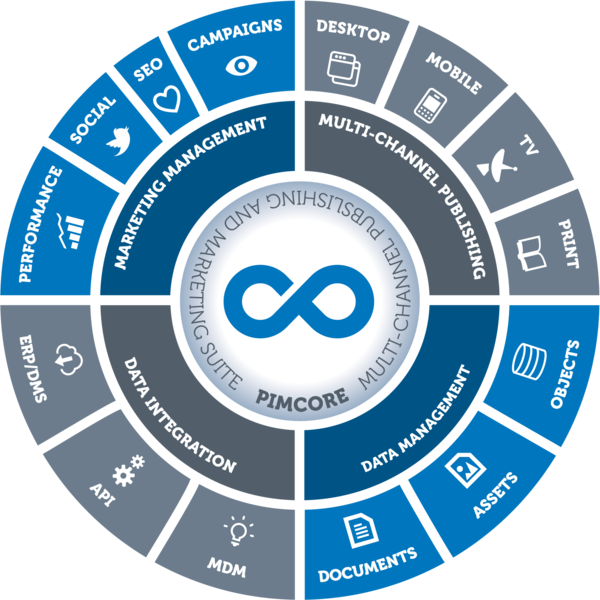
With Pimcore you can build your personal website in the way it will look professional using the included features and also the flexibility the code of the application provides. That is right, you can manage and manipulate the code of the application like controllers, actions views which are part of the MVC model the application fully supports.
This allows not only to build a website but to build an application which is using the structure of all the Enterprise level applications. No matter if you would like to build a blog, online shop or company website, no matter if you would like to sell a product or you would like to promote that product and represent it to the society, Pimcore has it all.
-Major Features of Pimcore
- Web-Content Management
The biggest challenge for a content management system is to make it really easy and user-friendly for the editors to manage web content. Within pimcore almost all editing is done by using the drag-and-drop features of the rich administration interface, which is powered by well-known ExtJS framework. - Asset Management
Managing digital assets within pimcore is really easy, flexible and intuitive. It is a web-based, open source digital asset management module which has been designed to give your editors easy and fast access to print as well as web ready assets for website embedding or for content distribution. - Product Information Management
Product Information Management is the base technology for providing product information in a multi-channel and cross-media environment. Pimcore is the first and premier PHP open source enterprise product information management framework (PIM) available.
Videos
How to use Pimcore


