1-click AWS Deployment 1-click Azure Deployment 1-click Google Deployment
Overview
Magento is a podium built on open source technology which provides online merchants with supple shopping cart system, as well as control over the look, content and functionality of their online store. Magento offers powerful marketing, search engine optimization, and catalog-management tools. Common Places uses the community-based Magento product for our ecommerce clients. Magento’s capability to scale permits shops with only a few products and simple needs to easily expand to tens of thousands of products and complex custom behavior without changing platforms. It offers a variety of plug-ins and themes which can easily improve a customer’s experience. There are a lot of aspects to the online store which need to be configured, and how well that is skillful is often dependent on business insight.
Magento opensource vs. Magento commerce
The difference between Magento Commerce and Magento Opensource is given below:
- Magento Opensource: Previously known as Magento Community, Magento Opensource, the free version of Magento that can be downloaded, customized, and self-hosted.
- Magento Commerce: Previously, Magento Commerce came in two versions, Magento Enterprise and Magento Enterprise Cloud. Those two versions have been unified, leaving us with Magento Commerce, a premium version of Magento Opensource that includes cloud-hosting as part of the subscription fee.
Magento Opensource is available for everyone to download free of charge. It’s an open source platform that is free to use and you’re able to extend and configure the platform as you please. Also, Opensource users have access to a vast range of extensions and themes and are supported by a growing community.
Magento Architecture:
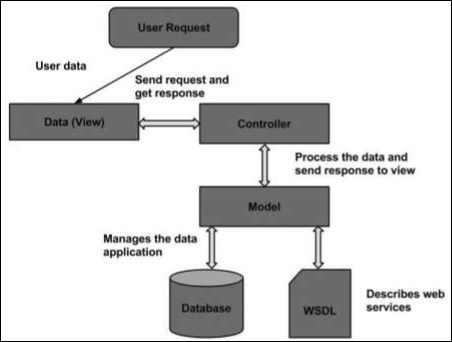
The Magento architecture comes with Models, Views and Controllers.
- User Request − The user sends a request to a server in the form of request message where web browsers, search engines, etc. act like clients.
- View − View represents the data in particular format. It is the user interface which is responsible for displaying the response for user request. It specifies an idea behind the presentation of the model’s data to the user. Views are used to reflect “how your data should look like”.
- Controller − The controller is responsible for responding to user input and perform interactions on the data model objects. It uses models to process the data and send responses back to the view.
- Model − The model is responsible for managing the data of the application. It contains logic of the data and represents basic data object in the framework. It responds to request from the view and to the instructions from the controller to update itself.
- Database − Database contains the information which is requested from the user. When the user requests data, view sends requests to the controller, the controller requests from the model and the model fetches the required information from the database and responds to the user.
- WSDL − WSDL stands for Web Services Description Language. It is used for describing web services and how to access them.
Magento Products
Products are the items or things that are sold in Magento. Product can be anything that is capable of satisfying the customer’s needs. This includes both physical products and services.
Product Types
Magento provides 6 different types of products. Appropriate selection of product type is essential for accessing the appropriate set of features required to sell the product. Following are the product types available in Magento.
- Simple Products
- Grouped Products
- Configurable Products
- Virtual Products
- Bundled Products
- Downloadable Products
Simple Products
These are general product type, which are the most used products. In this section, there are no options for selecting size or color of the product.
Example − Coffee cup, DVD’s, Camera lens, etc.
Grouped Products
This is a group of simple products. In this type, you cannot specify a specific price for a product; you can just specify the discount.
Example − Cell phone + Memory card + Ear phone
Configurable Products
In this type, customer can select products according to their color and size before purchasing.
Example − Cell phones obtained in different colors and sizes.
Virtual Products
Virtual products are those which do not have physical counterpart, i.e. these are used for virtual items. These products cannot be shipped or stocked.
Example − Online training course
Bundled Products
Bundled products are those products which cannot be sold separately and doesn’t give any choice to the end user.
Example − Consider you want to buy a cell phone which includes earphone, memory card, battery, charging cable, etc. These are together called bundled products. These products cannot be sold individually but can be sold within the bundle product.
Downloadable Products
Products which are available for download are known as downloadable products.
Example − MP3 file, ebook, documents, etc.
Product Attributes
Attribute describes the property of the product. Product attributes helps to set product properties such as color, size width, height, etc. and makes the product unique. You can add as many attributes to your product as required.
The following steps describe, how to set up the attributes for products in Magento −
Step 1 − Login to your Magento Admin Panel.
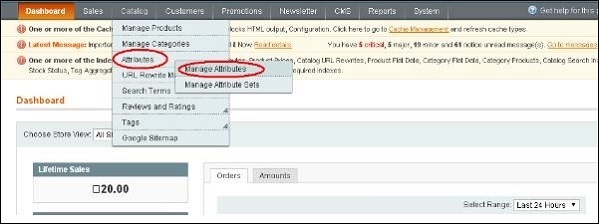
Step 2 − Go to Catalog and select Attributes from the dropdown menu and click on the Manage Attributes option.
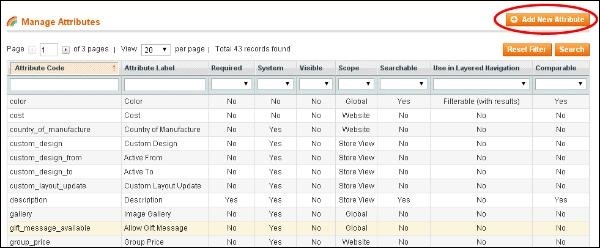
Step 3 − Under Manage Attributes section, you will find different attributes used in the system. For adding new attribute, click on Add New Attribute seen on the top right corner of the screen.
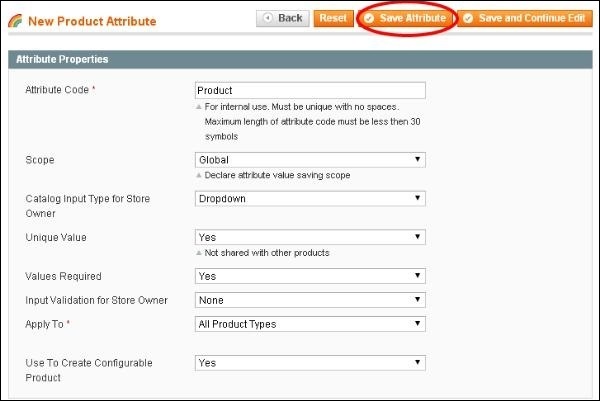
Step 4 − Now you need to set the attribute properties for your product. After setting up all the required attribute properties, click on Save Attribute button to store the product information
Magento – Installation
System Requirements for Magento
- Database − MySQL 5.1 +
- Web Server −
- Apache 2.x
- Nginx 1.7.x
- Operating System − Cross-platform
- Browser Support − IE (Internet Explorer 7), Firefox, Google chrome
- SSL (Secure Socket Layer) − A valid security certificate is required for HTTPS
- PHP Compatibility − PHP 5.4+
Download Magento
Step 1 − Open the link https://www.magentocommerce.com/products/downloads/magento/, you will get to see the following screen −

Step 2 − Click on the dropdown menu, the archive file is available in .zip, .tar.gz and .tar.bz2 for downloading.
Step 3 − Extract the Magento web files from the archive on your computer and upload it into your web server or localhost.
Step 4 − Magento requires MySQL database. So create a new empty database and user/password (for e.g. user as “root” and password as “root” or else you can set as per your convenience) for Magento.
Step 5 − Open your browser and navigate to your Magento file path (for e.g. http://localhost/magento) to start your Magento installation. Then you will get a screen of the Magento installer as shown in the following screenshot.
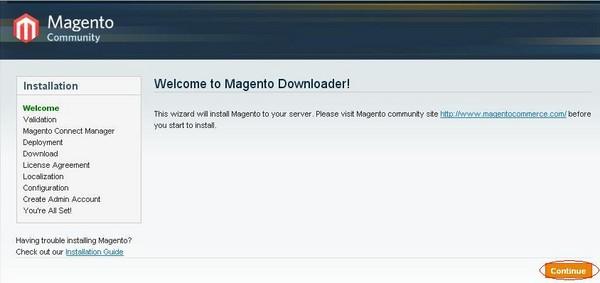
Step 6 − Click on Continue button and you will get Validation for Magento Downloader screen as shown in the following screen
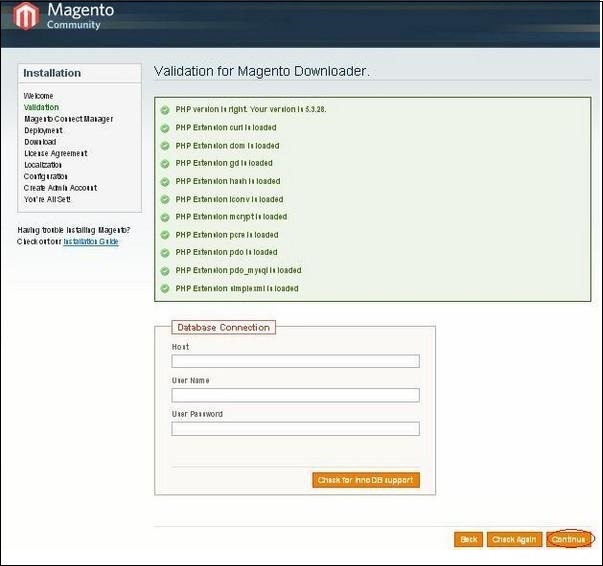
Here, enter the database details, if you want to check for InnoDB support for Magento. Otherwise, click on Continue button to proceed to the next step.
Step 7 − Next, you will get Magento Connect Manager Deployment screen.
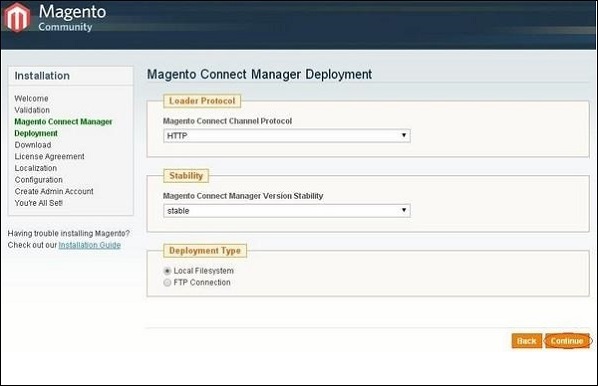
It gives protocol name (HTTP or FTP), stability version such as stable, beta, alpha and deployment type. Select proper options and click on the Continue button. It will start the downloading process for Magento.
Step 8 − Magento’s Installation Wizard screen pops up. Check the I agree to the above terms and conditions checkbox and click on the Continue button.
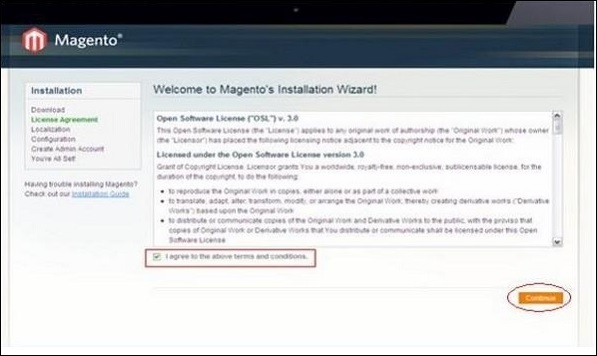
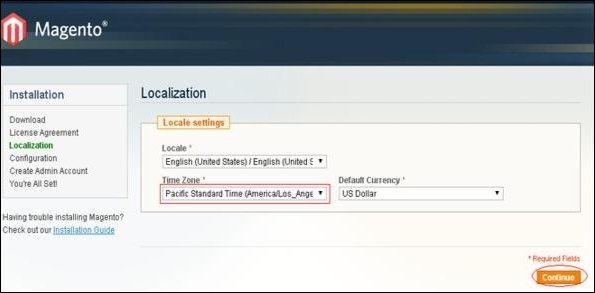
Step 9 − Next you will get the Localization screen for selecting the Locale, Time Zone and Currency as shown in the following screen.
Select proper locale name, time zone and currency and click on the Continue button.
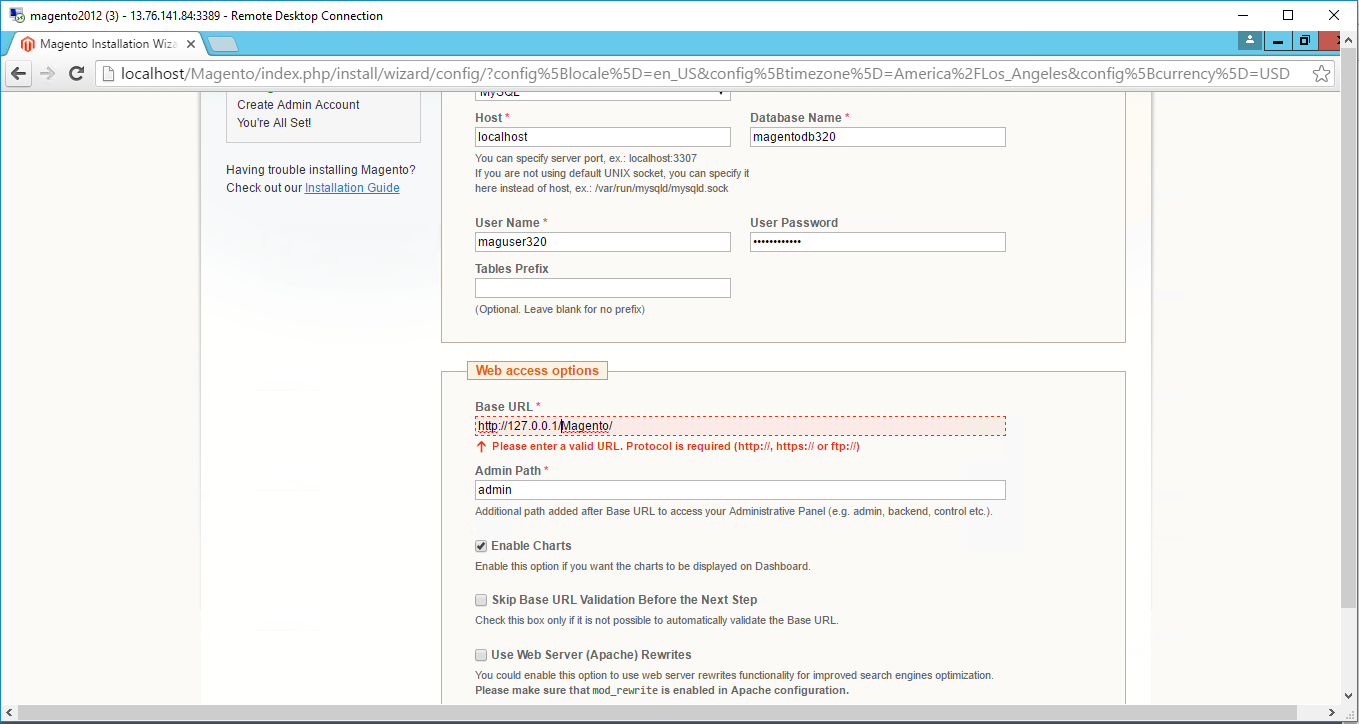
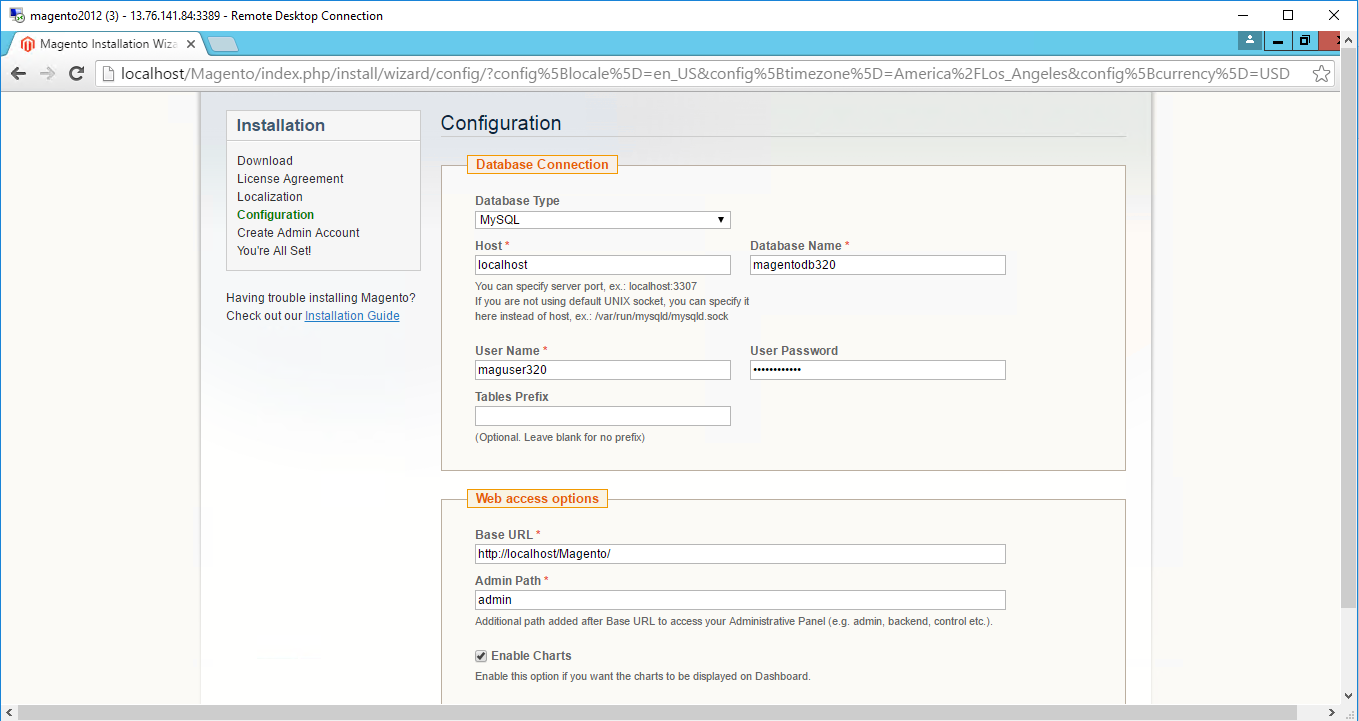
Step 10 − The next screen that pops up is the Configuration screen
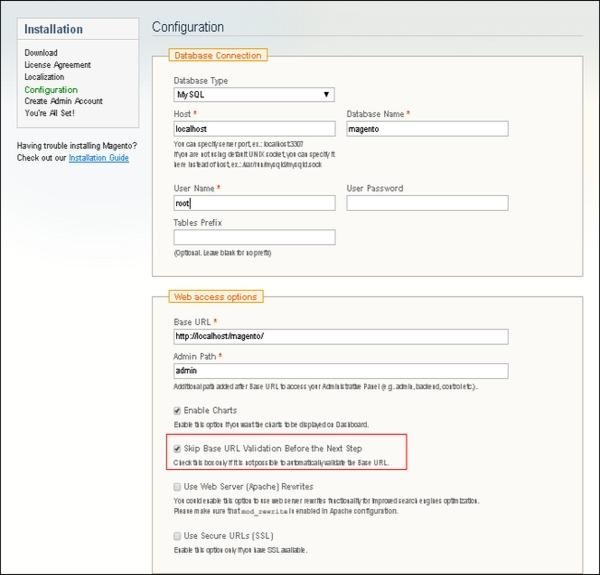
Fill the database information such as Database Type, Host, Database Name, User Name and User Password. If you do not want to validate the Base URL, then tick the Skip Base URL validation before Next Step checkbox and click on the Continue button.
In case the http://localhost/magento doesn’t work, use this as base url instead- http://127.0.0.1/magento
This step will take some time as Magento will be creating the Database Tables.
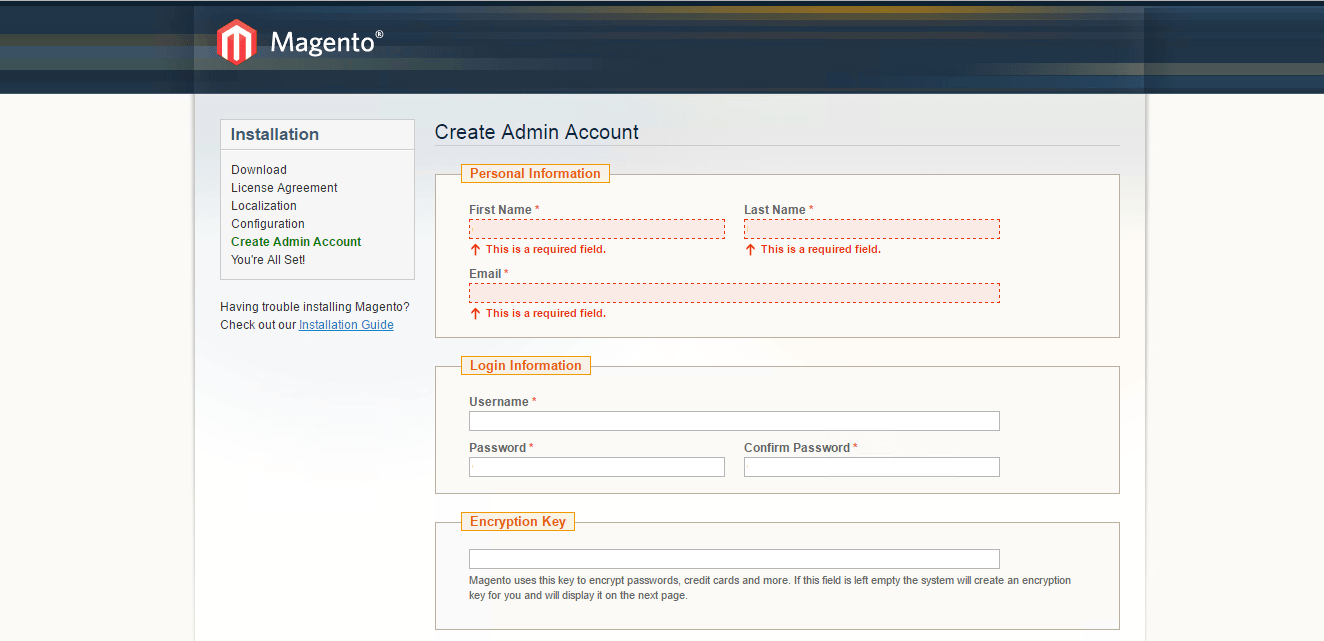
Step 11 − Now, go to the Create Admin Account screen.
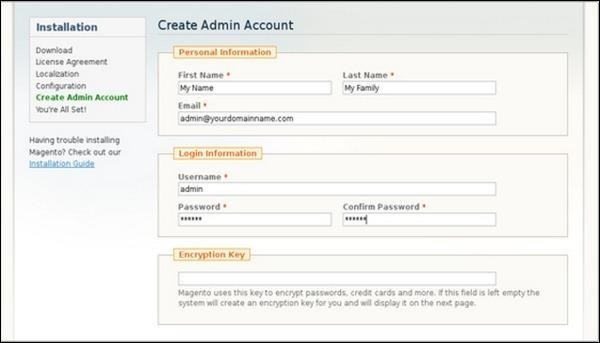
Here enter your personal information such as First Name, Last Name and Email and the Login Information such as Username, Password and Confirm Password for admin to use in backend. Need not worry about Encryption Key field as Magento will generate a key on the next page. After filling all information, click on the Continue button.
Step 12 − Copy the encryption key, which will be used to encrypt passwords, credit cards and other confidential information. Then you can select Frontend or Backend of new Magento website.
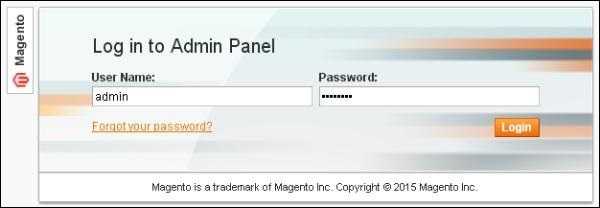
Step 13 − After successful installation of Magento, click on the Go to Backend button to login to admin panel.
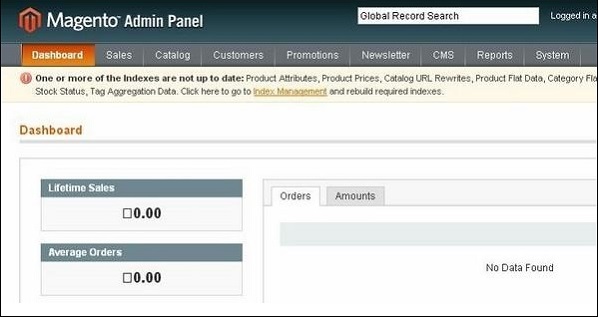
Step 14 − After logging in, you will get the Dashboard of Admin panel as shown in the following screen.
Disadvantages of Magento as an eCommerce platform:
1. Ongoing costs Magento regularly rolls out patches and security updates which needs to be manually installed. And believe me, the manual installation process is not as straightforward as you like it to be. You’re better off getting support to help you manage and install the updates, but this would come at a cost. You would need to hire Magento specialists or refer to official Magento support, which does not come cheap.
2. Needy technology If you’re using Magento Commerce edition, you’ll find that it’s based on an old approach of “download and customize”. Not only does that take time, but it also takes technical knowledge .This approach from Magento also saps your attention and energy away from the activities that will help you scale your business. Instead, you will be forced to worry about managing the technology and running updates as and when required.
3. The support sinkhole Magento has 1,300 open and ongoing support tickets. So if you run into issues, you may be waiting in line for fairly some time before you find a solution. If you want to bypass official Magento support your ongoing support costs will rise even further, as sovereign Magento support specialists charge substantial fees.
4.Magento is just an eCommerce solution Magento is a planetary eCommerce platform, but that’s pretty much all it is. But in today’s eCommerce climate, to even stand a slim chance against the eCommerce goliaths like Amazon, you need so much more than just an eCommerce platform. The modern consumer isn’t satisfied with just a product page and some on-site reviews. They want content in abundance before they even consider a purchase. They want walkthroughs, unboxing videos, documentation, third-party reviews, and more.
5. Updates and migrations Running Magento undergo an endless cycle of updates and running these maintenance procedures is not a forthright task. Also, you would ultimately have to migrate to the newest version of Magento, whenever they decide to roll that out. For example, currently, Magento 1 users are experiencing the pain of having to migrate to Magento 2.Magento 1 users have to either migrate to Magento 2 or replatform completely, as it was announced that Magento would not be providing support for Magento 1 after June 2022As you can imagine, the migration process isn’t easy or inexpensive. Many developers who have migrated to Magento 2 have commented on the difficulty of the move, as many Magento 1 themes and extensions are incompatible with Magento 2.
6. It’s open source As an open source platform, Magento gives users the ability to customize the code in any way they like. That may sound great at first, but when you consider issue #5 mentioned previously, having a highly-customized, bespoke back-end will make your life even more difficult when it comes to inevitably migration or replatforming. Also if you stray too far away from commonly used theme and extensions that aren’t peer-reviewed or tested for usability, you’ll risk breaking your entire eCommerce environment. If you opt for a closed source enterprise eCommerce solution, you can still build a custom site with the help of the software vendor or an agency, but it will be done within the limits of the software, avoiding breakage and future headaches. Plus, closed source platforms have a much healthier track record when it comes to security.
7. Magento isn’t built for the IoT era Magento Commerce has APIs to help deliver content to a wide range of channels, but as previously mentioned, Magento is just an eCommerce solution — it was never meant to manage a brand’s omnichannel strategy across all touchpoints. So, at best, you’ll get an inconsistent experience because you’ll have to draft in additional technology to plug the gaps left by Magento. Hardly ideal when brands like Amazon are providing seamlessly enjoyable shopping experiences.
Magento on cloud is an open source E-commerce software, created by Varien Inc., which is useful for online business. It has a flexible modular architecture and is scalable with many control options that is helpful for users. Magento uses E-commerce platform which offers organizations ultimate E-commerce solutions and extensive support network.
“Cognosys Provides Hardened images of Magento on the cloud ( AWS marketplace, Azure and Google Cloud Platform). Cognosys Provides Hardened images of Magento on the cloud ( AWS marketplace, Azure and Google Cloud Platform).”
Magento’s intuitive administration interface contains powerful marketing, search engine optimization and catalog-management tools to give merchants the power to create sites that are tailored to their unique business needs. Designed to be completely scalable and backed by an extensive support network, Magento offers companies the ultimate eCommerce solution.”
Magento is available under the Open Software License version 3.0
Magento is owned by Magento(https://magento.com/) and they own all related trademarks and IP rights for this software.
Cognosys Provides Hardened images of Magento on the cloud ( AWS marketplace, Azure and Google Cloud Platform).
Deploy Magento securely on cloud i.e. AWS marketplace, Azure and Google Cloud Platform (GCP)
Magento on Cloud runs on Amazon Web Services (AWS) Cloud and Azure. Magento on Cloud is built to power innovative e-commerce experiences with the rapid deployment of fully customizable, secure and scalable Web storefronts, combined with a leading hosting and managed services.
Secured Magento on Windows 2012 R2
Magento on Cloud for AWS -Windows
Magento on Cloud for Azure
Ubuntu
Magento on Cloud for Azure
Windows
Features
Magento Enterprise Exclusive Features
Customer Segmentation, Targeted Promotions & Merchandising Segment customers into groups and optimize marketing initiatives by identifying specific customer groups using specific characteristics (address, location, sex, etc.) and/or value (purchase history, on-site browsing, etc.). Advanced segmentation capabilities include the ability to identify unknown site visitors. Whether they’re new visitors or returning customers who have not logged in, you’ll now be able to identify and target them with special promotions to convert browsers into buyers.
Dynamic Rule Based Product Relations Dynamically target customers to present up-sells, cross-sells, and related products based on their specific product selections. Rules are easily administered through a condition-based tool, allowing marketers to easily manage specific product suggestions, shopping cart price rules and banners to any customer segment to encourage additional purchases.
Persistent Shopping
Customers are able to shop and maintain items of interest in their shopping cart, wish lists, recently viewed and recently compared items between browsing sessions and from device to device. Once a customer logs in to a site, a long-term cookie is established for that browser/ device combination and the customer can now view the contents of their shopping cart in subsequent sessions without logging in again.
Automated Email Marketing Reminder Increase customer retention by automating email reminders to customers with abandoned shopping carts and wish lists. Email reminder campaigns are configurable and customizable for a variety of parameters including frequency, cart value, quantity and more.
Private Sales Restrict your catalog to specific customers. Create invitations and events for limited time sales to select customers and allow customer-initiated invitations.
1. Catalog Management
Whether you are selling beauty products, electronics, clothing, or accessories – your catalog is the key component for the online shop. And Magento undoubtedly offers extensive catalog management features including –
- Supports virtual products
- Allows downloading digital products – music, videos, etc
- Effortlessly edit and delete product reviews
- Complete inventory management
- Import and export products for batch update offline.
- Attribute sets for quick product creation of different item types
- Highly customizable options such as resizing and watermarking
- RSS Feeds and lots more
Magento not only handles your online store effortlessly but also helps you with promotion, marketing, and conversion. It offers numerous tools to make your advertising easier. These tools include –
- Cross-sell products
- Promotional pricing restricted to selected products or categories
- Option to distribute coupon codes across email, newsletter and offline.
- Monitor coupon usage, manage newsletters and polls
- Offers free shipping and promote new products list.
- Allows price variation based on quantity and groups
- Landing page tools for PPC, new product promotional tools, URL tools,
#3. Fully SEO Centred
Magento features include a list of options to make search engine optimization smoothly for your online store/website. Magento SEO features –
- Generates Google Sitemaps
- Automatically sort popular searches and modifies
- Supports Search Engine Friendly URLs
- Easy to Meta-tag products and information
- Faster loading options such as less usage of minimizes .css and .js files
#4. Mobile Friendly Commerce
This is one of the coolest Magento features, wherein it allows browsing full site store catalogue or selected products particularly personalized for mobile users.
- Mobile HTML5 technology for creating online mobile friendly storefront
- Open for iPhone, Android, and Mobile Opera browsers
- Clear and user-friendly product display
- Supports media files such as audio and video
- Swipe, zoom, and multi-touch
- Drag and drop and more
#5. Order Management
Magento eCommerce development platform offers unparallel order management system. Users have lot options including –
- Viewing, creating, editing and fulfilling orders directly from admin panel
- Complete Call center support product configuration and change
- Allows creating one or more invoices, shipments and credit memos per orders
- Helps to print invoices, packing slips and shipping labels
- Email notification, RSS feed for fresh orders and more
#6. Complete Site Management
Magento being a great eCommerce web design company understands the importance of complete site management. In fact, it allows users to control multiple website and store within a single installation.
- Control sites from admin panel and share only required information
- Templates with fully customizable design
- Multiple language options and currencies
- Integration between Magento and third-party apps
- Tax rates based on location, product type, and group
- Captcha enabled websites and more
#7. Checkout, Shipping, and Payment
Shipping and payment are the biggest concern for users when choosing the best platform for the shopping cart. Magento brilliantly incorporates a plethora of alternatives for payment and shipping options.
- One-page checkout
- Ship to multiple orders in one order
- Complete SSL security support for front-end/back-end orders
- Estimates for shopping cart tax and shipping costs
- Integration with Paypal and Authorize.net
- Flat rate shipping, Free Shipping and Order tracking and more
#8. User Account
It’s pretty easy to manage user account with lots of capabilities and options.
- Simple to understand account dashboard
- Recent orders, history, and status
- Store unlimited address
- Save wish list with comments
- Newsletter subscription management
#9. Customer Service and International Support
Magento eCommerce development platform comprises of great back-end tools and community for customer support.
- Contact Us form
- Support for local and international currencies and tax rates
- Order tracking, history, and email updates
- Option for International site registration, shipping destination, and payment
- EU cookie notification and more
#10. Tracking, Analytics, and Reporting
Magento features include numerous options for tracking, analyzing and reporting.
- Google Analytics
- Sales and tax reports
- Abandoned shopping cart and low stock report
- Total sales and refunded invoice
- Product review report and more
Major Features Of Magento
- Marketing Promotions and Tools
- Analytic and Reporting
- Search Engine Optimization
- Site Management
- Catalog Management
- Catalog Browsing
- Product Browsing
- Mobile Commerce
- International Support
- Checkout
- Shipping
- Payment
- Customer Service
- Customer Accounts
- Order Management
AWS
Installation Instructions For Centos
Installation Instructions For Ubuntu
Note: How to find PublicDNS in AWS
Step 1) SSH Connection: To connect to the deployed instance, Please follow Instructions to Connect to Ubuntu instance on AWS Cloud
1) Download Putty.
2) Connect to virtual machine using following SSH credentials :
- Hostname: PublicDNS / IP of machine
- Port : 22
Username: To connect to the operating system, use SSH and the username is ubuntu.
Password : Please Click here to know how to get password .
Step 2) Database Login Details :
- MYSQL Username : root
- MYSQL Password : Passw@rd123
Step 3) Application URL: Access the application via a browser at http://PublicDNS/Magento
Step 4) Steps to access the Admin Panel:
- To login to Magento Administrative Panel, you need
to open your browser and navigate to http://PublicDNS/Magento/admin - Enter username and password in the given fields and click on the “Login”button to access the Admin Panel.
- After successful login to the Admin Panel, you will get access to Magento Dashboard.
Step 5) Other Information:
1.Default installation path: will be in your web root folder “/var/www/html/Magento”.
2.Default ports:
- Linux Machines: SSH Port – 22 or 2222
- Http: 80 or 8080
- Https: 443
- Mysql ports: By default these are not open on Public Endpoints. Internally Mysql server: 3306
Configure custom inbound and outbound rules using this link
Installation Instructions for Windows
Note : How to find PublicDNS in AWS
Step 1) RDP Connection: To connect to the deployed instance, Please follow Instructions to Connect to Windows instance on AWS Cloud
1) RDP credentials :
- Hostname: PublicDNS / IP of machine
- Port : 3389
Username: To connect to the operating system, use RDP and the username is Administrator.
Password : Please Click here to know how to get password .
Step 2) Database Login Details :
- MYSQL Username : root
- MYSQL Password : Passw@rd123
Step 3) Application URL: Access the application via a browser at http://PublicDNS/Magento
Step 4) Steps to access the Admin Panel:
- To login to Magento Administrative Panel, you need
to open your browser and navigate to http://PublicDNS/Magento/admin - Enter username and password in the given fields and click on the “Login”button to access the Admin Panel.
- After successful login to the Admin Panel, you will get access to Magento Dashboard.
- Step 5) Other Information:
1.Default installation path: will be in your web root folder “C:\inetpub\wwwroot\Magento”
2.Default ports:
- Windows Machines: RDP Port – 3389
- Http: 80
- Https: 443
- Mysql ports: By default these are not open on Public Endpoints. Internally Mysql server: 3306
Configure custom inbound and outbound rules using this link.
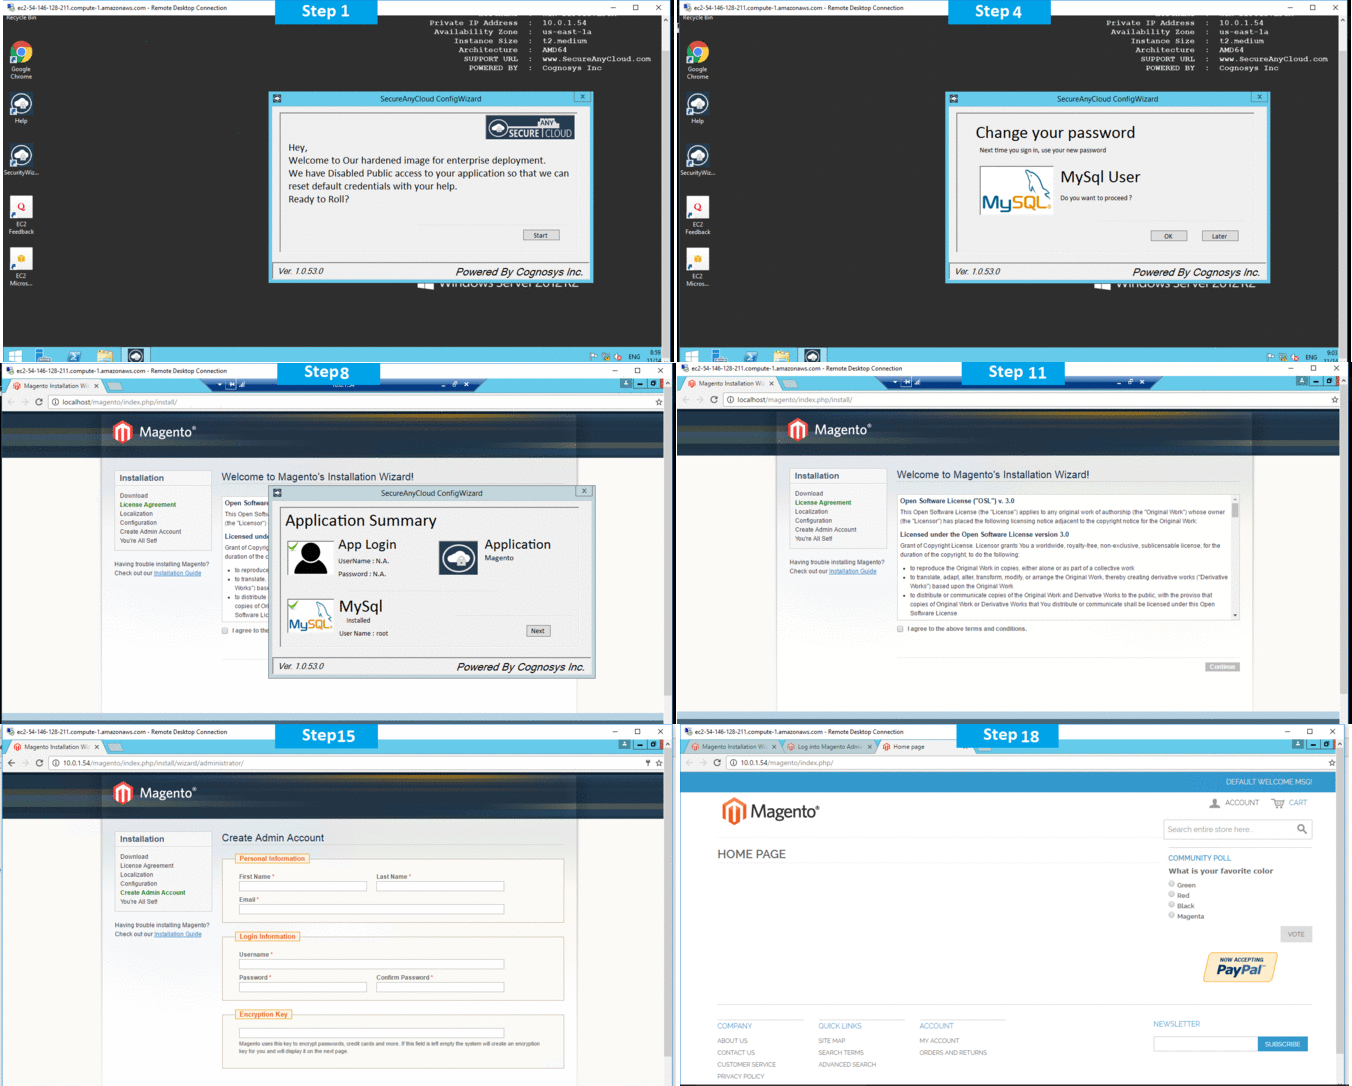
AWS Step by Step Screenshots
1.Welcome page
2. User can Configure Database
3. Create Admin Account
4. After successful login user will get Welcome wizard for Magento.
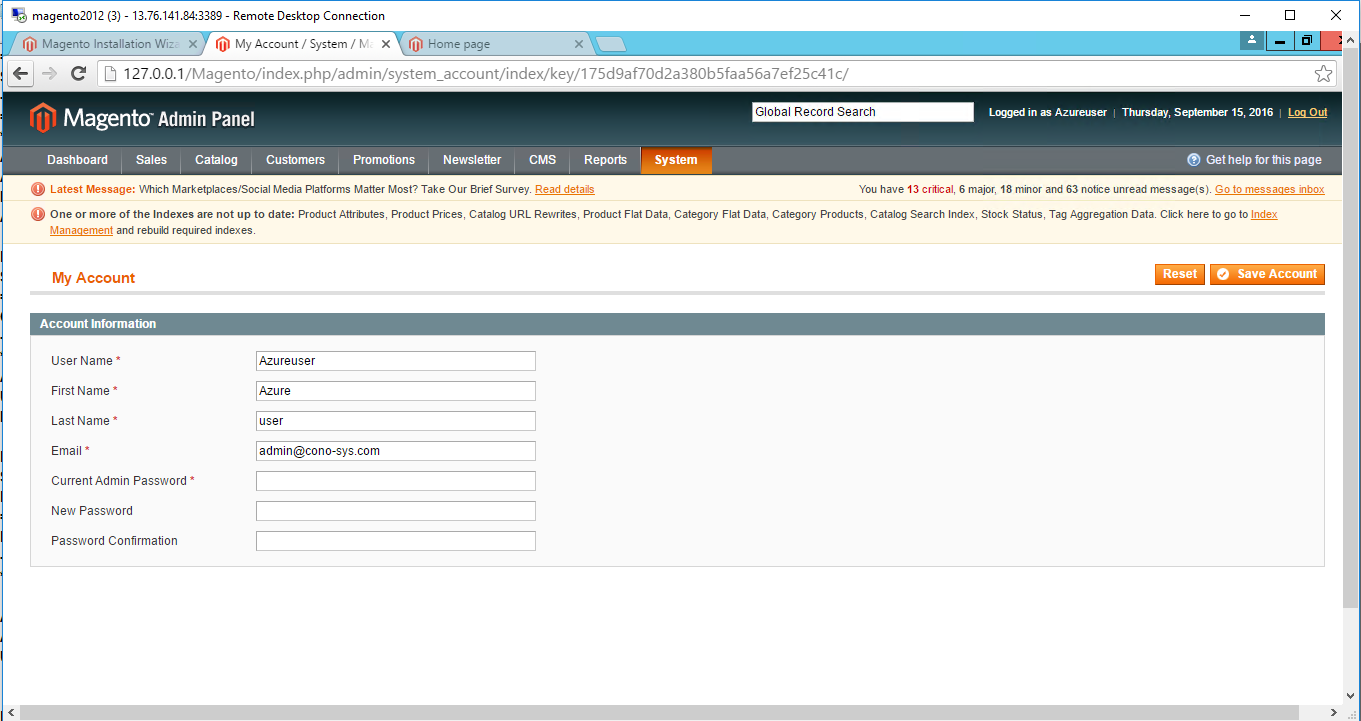
 5. User can create , change password and manage his profile.
Installation Instructions For Centos
Note: How to find PublicDNS in AWS
Step 1) SSH Connection: To connect to the deployed instance, Please follow Instructions to Connect to Centos instance on AWS Cloud
1) Download Putty.
2) Connect to the virtual machine using SSH key Refer this link:
- Hostname: PublicDNS / IP of machine
- Port : 22
Username: To connect to the operating system, use RDP and the username is Administrator.
Password : Please Click here to know how to get password .
Step 2 )Database Login Details:
For Stack Database: For Stack Database: MySQL DB magento with user magentouser and password Passw@rd123 has already been created.
Please use this MySQL database for you Stack Configuration.
Step 3) Other Information:
Note: Please do the initial setup with http://YourIP/
Version: Magento 2.1.6
1.Default installation path: will be in your web root folder “/var/www/html/”
2.Default ports:
- Linux Machines: SSH Port – 22
- Http: 80
- Https: 443
- MYSQL ports: By default, these are not open on Public Endpoints. MYSQL: 3306
3. To access Webmin interface for management please follow this link
Configure custom inbound and outbound rules using this link.
Azure
- Installation Instructions For Ubuntu
- Installation Instructions For Centos
- Installation Instructions For Windows
Installation Instructions For Ubuntu
Note: How to find PublicDNS in Azure
Step 1) SSH Connection: To connect to the deployed instance, Please follow Instructions to Connect to Ubuntu instance on Azure Cloud
1) Download Putty.
2) Connect to virtual machine using following SSH credentials :
- Host name: PublicDNS / IP of machine
- Port : 22
Username: Your chosen username when you created the machine ( For example: Azureuser)
Password : Your Chosen Password when you created the machine ( How to reset the password if you do not remember)
Step 2) Other Information:
1. Default configuration path: “/etc/haproxy/haproxy.cfg”
2. Default ports:
- Linux Machines: SSH Port – 22
Note: Open ports as required on cloud Firewall.
Configure custom inbound and outbound rules using this link
3. To access Webmin interface for management please follow this link
Installation Instructions For Centos
Note : How to find PublicDNS in Azure
Step 1) SSH Connection: To connect to the deployed instance, Please follow Instructions to Connect to Ubuntu instance on Azure Cloud
1) Download Putty.
2) Connect to virtual machine using following SSH credentials :
- Hostname: PublicDNS / IP of machine
- Port : 22
Username: Your chosen username when you created the machine ( For example: Azureuser)
Password : Your Chosen Password when you created the machine ( How to reset the password if you do not remember)
Step 2) Database Login Details:
Username : root || Password : Passw@rd123
For Stack Database: For Stack Database: MySQL DB magento with user magentouser and password Passw@rd123 has already been created.
Please use this MySQL database for you Stack Configuration.
Step 3) Other Information:
Note: Please do the initial setup with http://YourIP/
Version: Magento 2.1.6
1.Default installation path: will be in your web root folder “/var/www/html/”
2.Default ports:
- Linux Machines: SSH Port – 22
- Http: 80
- Https: 443
- MYSQL ports: By default, these are not open on Public Endpoints. MYSQL: 3306
3. To access Webmin interface for management please follow this link
Configure custom inbound and outbound rules using this link
Installation Instructions for Windows
Note : How to find PublicDNS in Azure
Step 1) RDP Connection: To connect to the operating system,
Connect to the virtual machine using following RDP credentials:
- Hostname: PublicDNS / IP of machine
- Port : 3389
Username: Your chosen username when you created the machine ( For example: Azureuser)
Password : Your Chosen Password when you created the machine ( How to reset the password if you do not remember)
Step 2 )Database Login Details:
- MYSQL Username : root || MYSQL Password : Passw@rd123
Note: For Stack Database MySQL DB magento with user magentouser and password Passw@rd123 has already been created.
Please use this MySQL database for you Stack Configuration.
Step 3) Application URL: Access the application via a browser at http://PublicDNS/magento
Step 4) Other Information:
1.Default installation path: will be in your web root folder “C:\inetpub\wwwroot\Magento”
2.Default ports:
- Windows Machines: RDP Port – 3389
- Http: 80
- Https: 443
- Mysql ports: By default, these are not open on Public Endpoints. Internally Mysql server: 3306
Configure custom inbound and outbound rules using this link
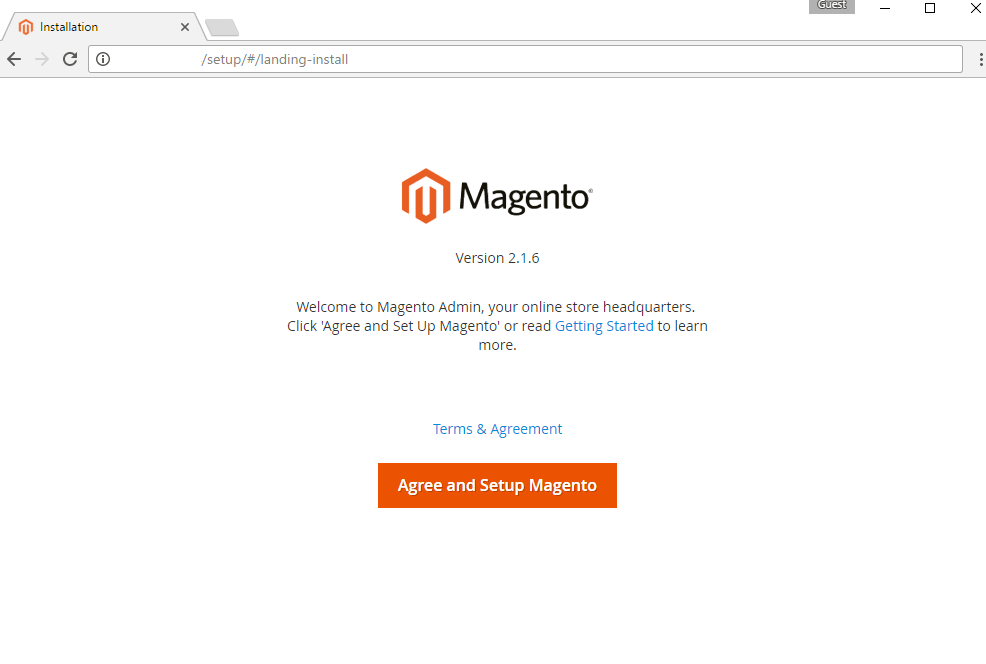
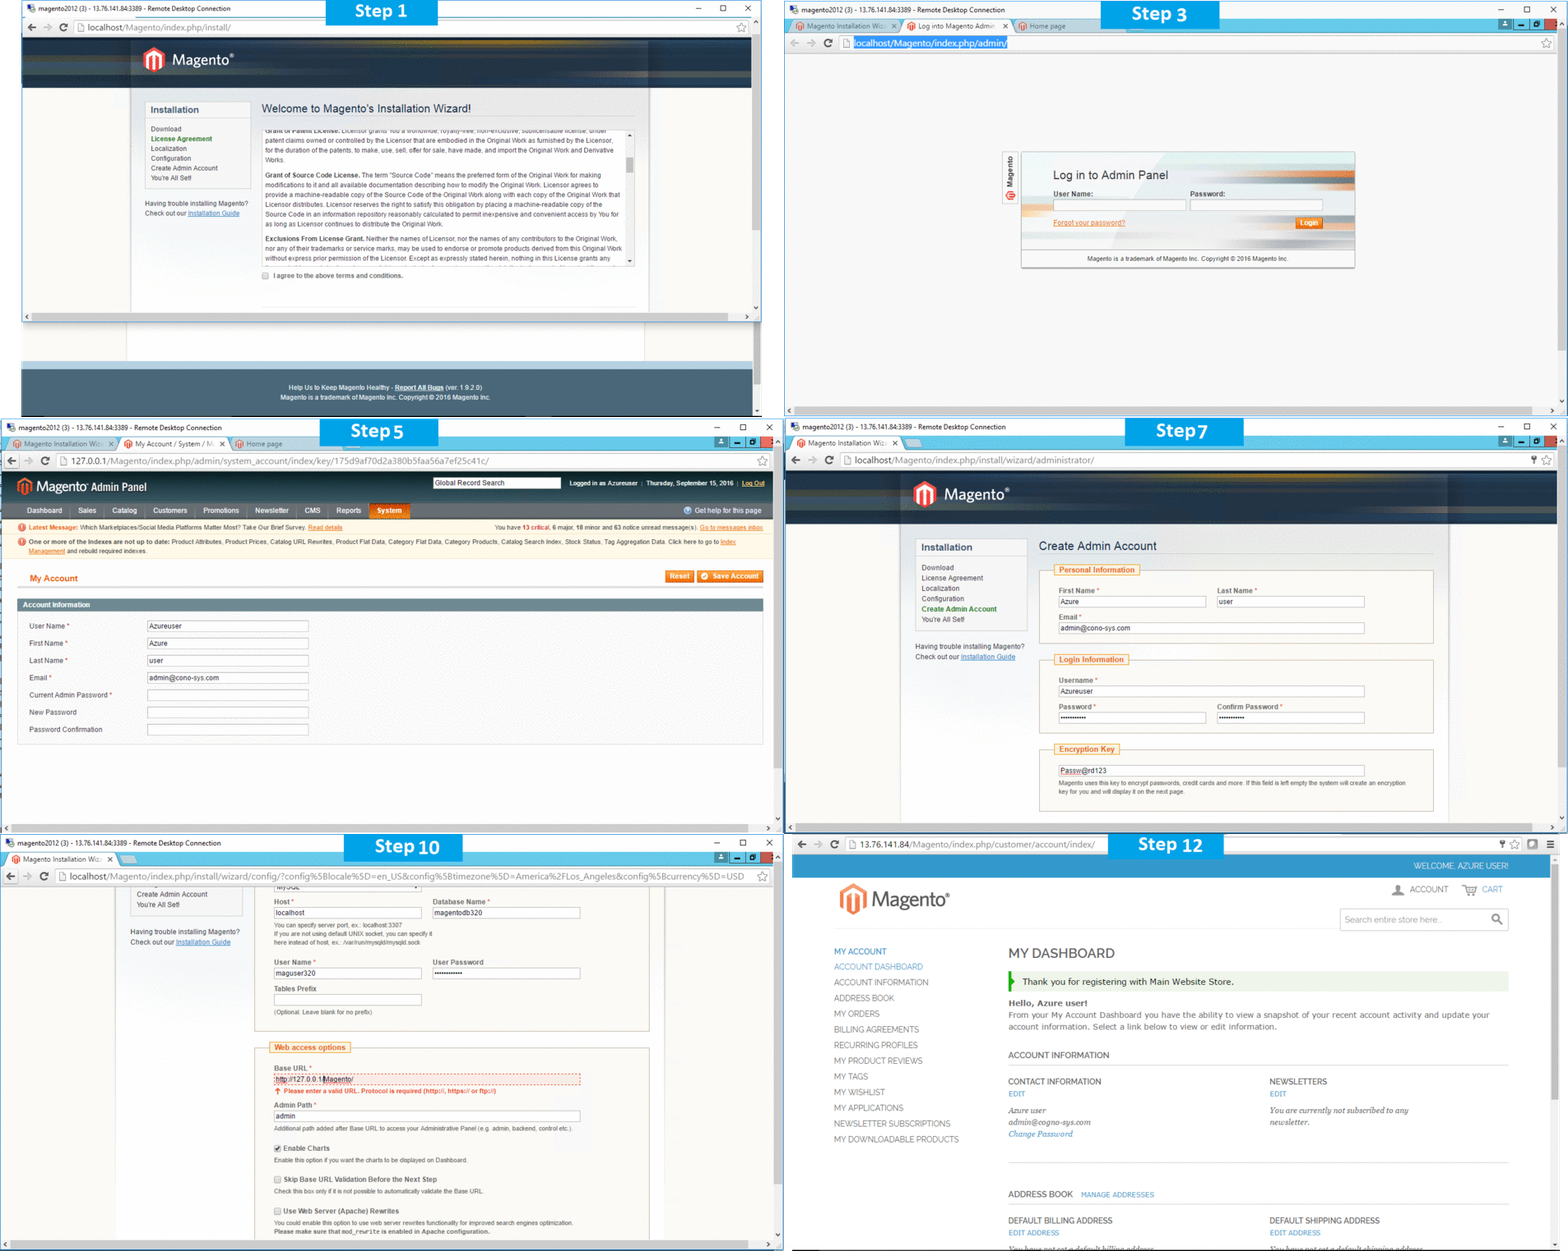
Step by Step Screenshots
1.Welcome page
2. User can Configure Database
3. Create admin Account

4. After successful login user will get Welcome wizard for Magento.
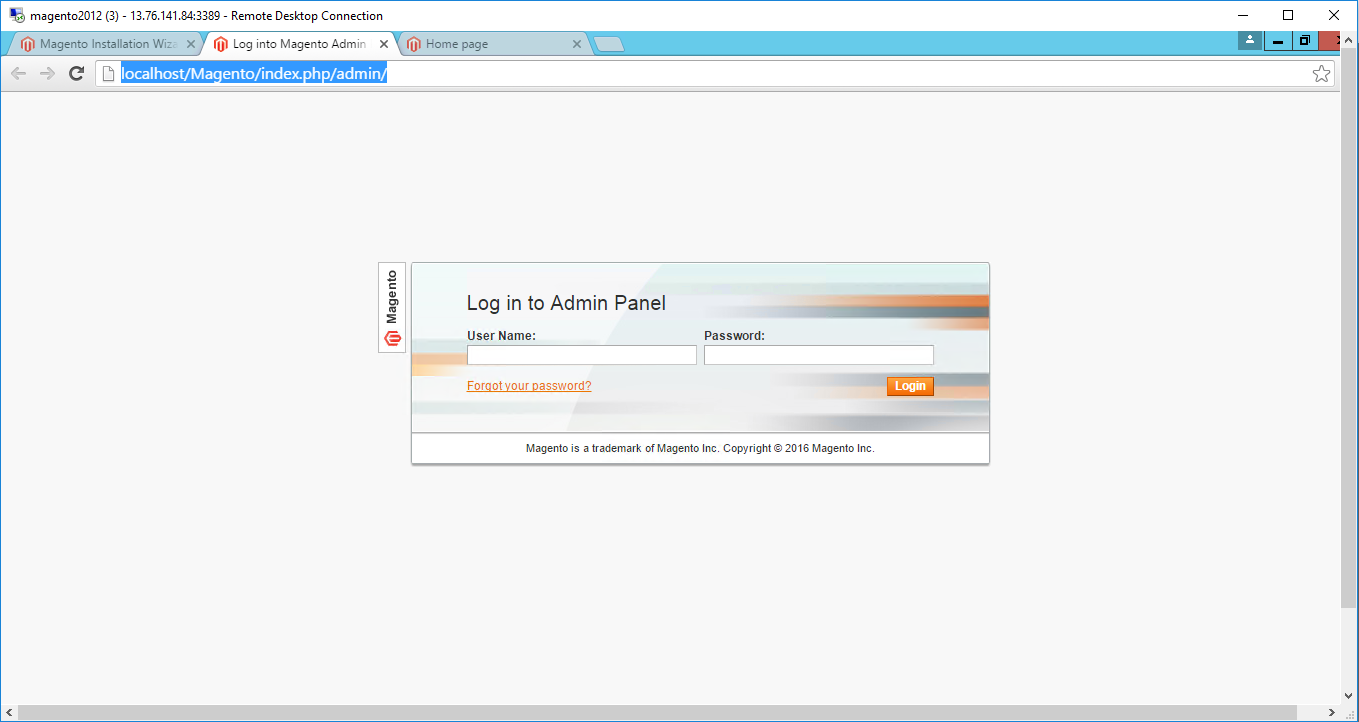
5. User can create , change password and manage his profile.
- Installation Instructions For Windows
- Installation Instructions For Ubuntu
- Installation Instructions For Redhat
- Installation Instructions For Centos
Installation Instructions For Windows
Step 1) VM Creation:
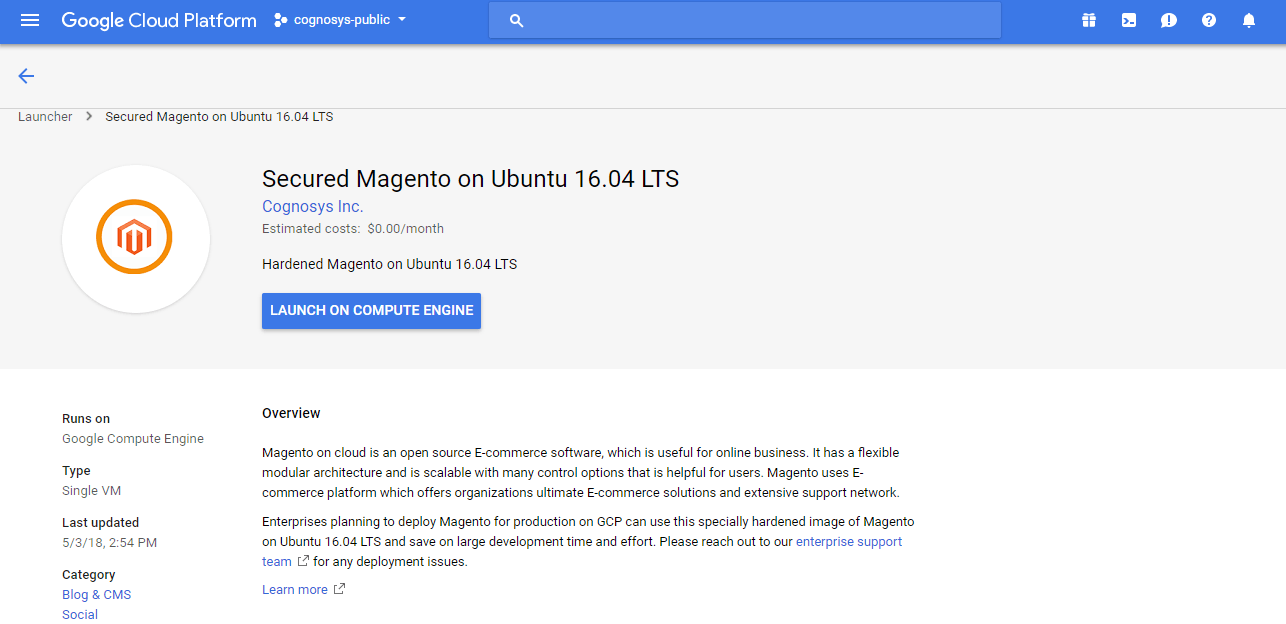
1.Click the Launch on Compute Engine button to choose the hardware and network settings.
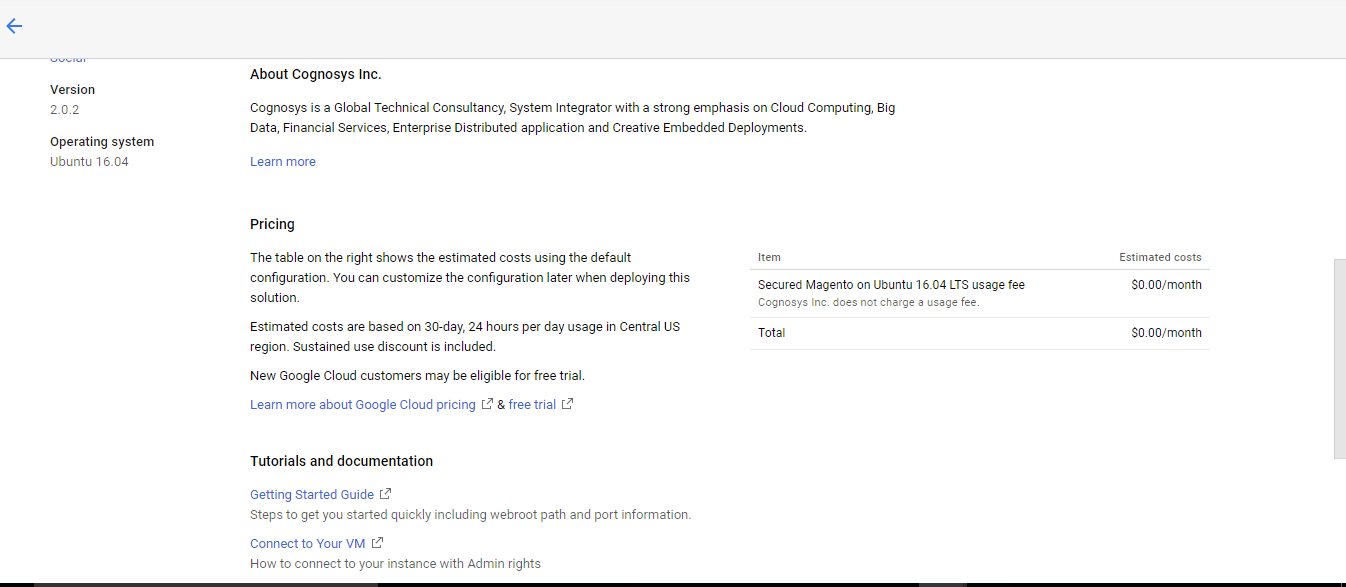
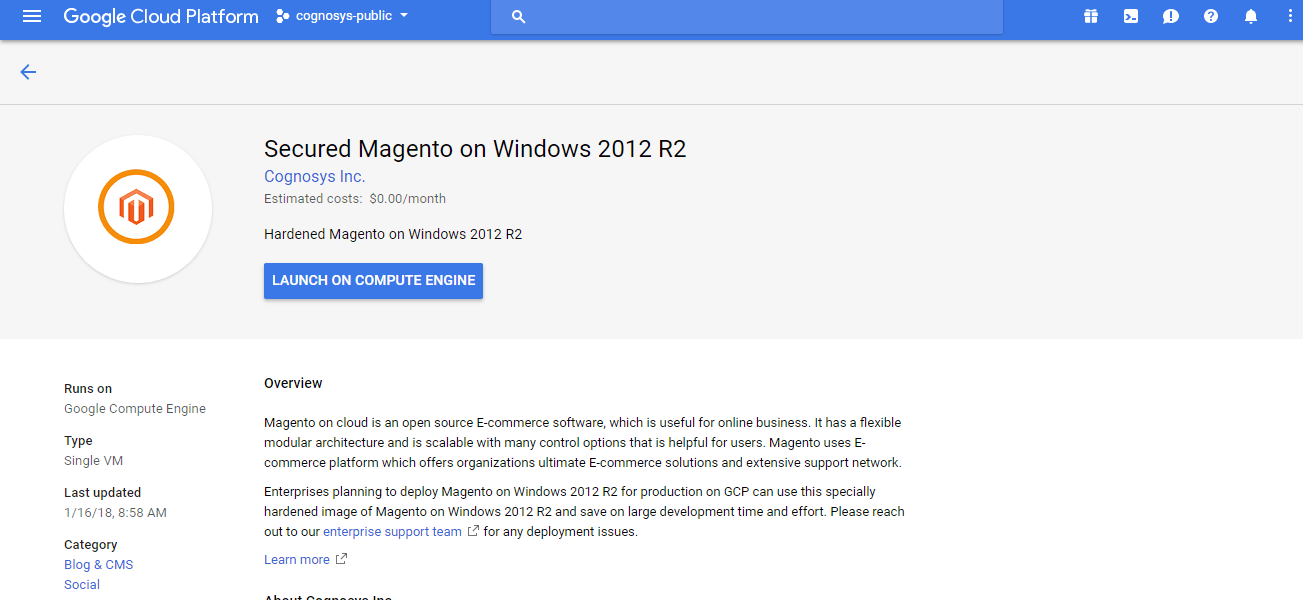 2.You can see at this page, an overview of Cognosys Image as well as some estimated costs of VM.
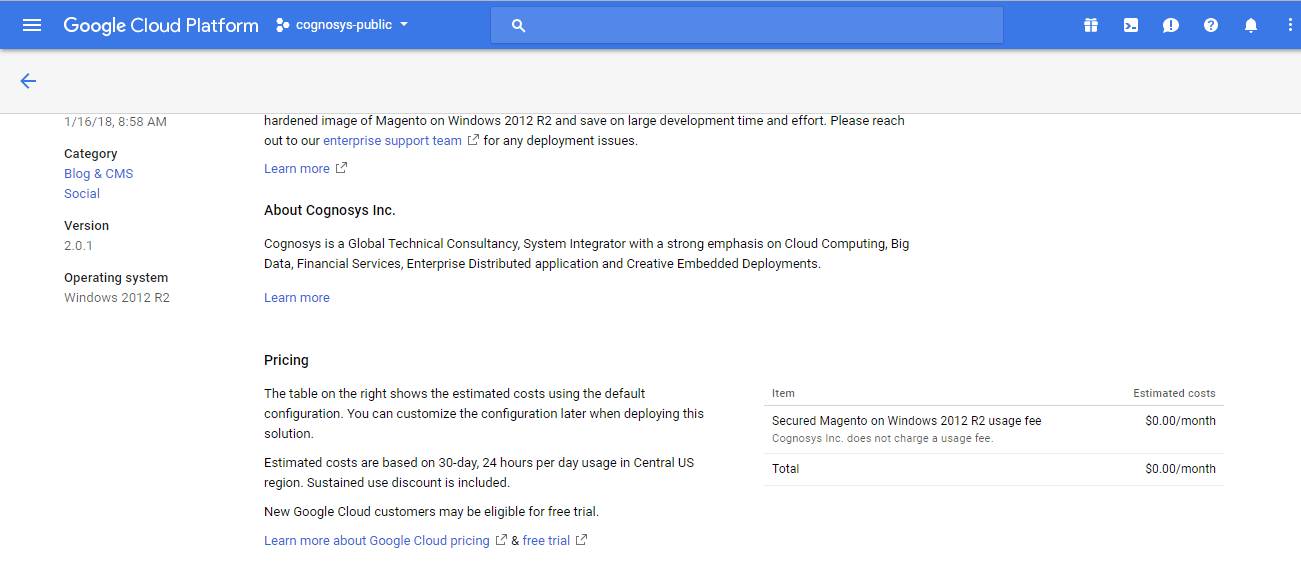
3.In the settings page, you can choose the number of CPUs and amount of RAM, the disk size and type etc.
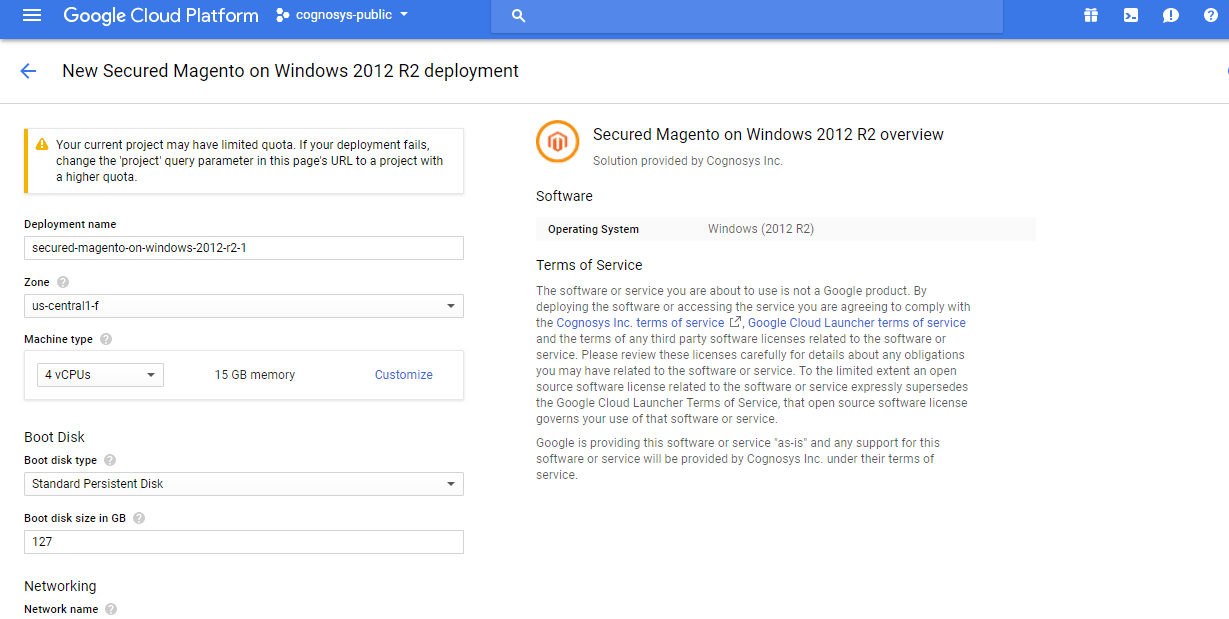 Step 2) RDP Connection: To initialize the DB Server connect to the deployed instance, Please follow Instructions to Connect to Windows instance on Google Cloud
Step 3) Database Login Details:
The below screen appears after successful deployment of the image.
For local MySQL root password, please use the temporary password generated automatically during image creation as shown above.
i) Please connect to Remote Desktop as given in step 2 to ensure stack is properly configured and DB is initialized.
ii) You can use MySQL server instance as localhost, username root and password as shown above.
If you have closed the deployment page you can also get the MySQL root password from VM Details “Custom metadata” Section
Step 4) Application URL: Access the application via a browser at http://PublicDNS/Magento
Step 5) Steps to access the Admin Panel:
- To login to Magento Administrative Panel, you need
to open your browser and navigate to https://PublicDNS/Magento/admin - Enter username and password in the given fields and click on the “Login”button to access the Admin Panel.
- After successful login to the Admin Panel, you will get access to Magento Dashboard.
Step 6) Other Information:
1.Default installation path: will be in your web root folder “C:\inetpub\wwwroot\Magento”
2.Default ports:
- Windows Machines: RDP Port – 3389
- Http: 80
- Https: 443
- Mysql ports: By default these are not open on Public Endpoints. Internally Mysql server: 3306
Step by Step Screenshots
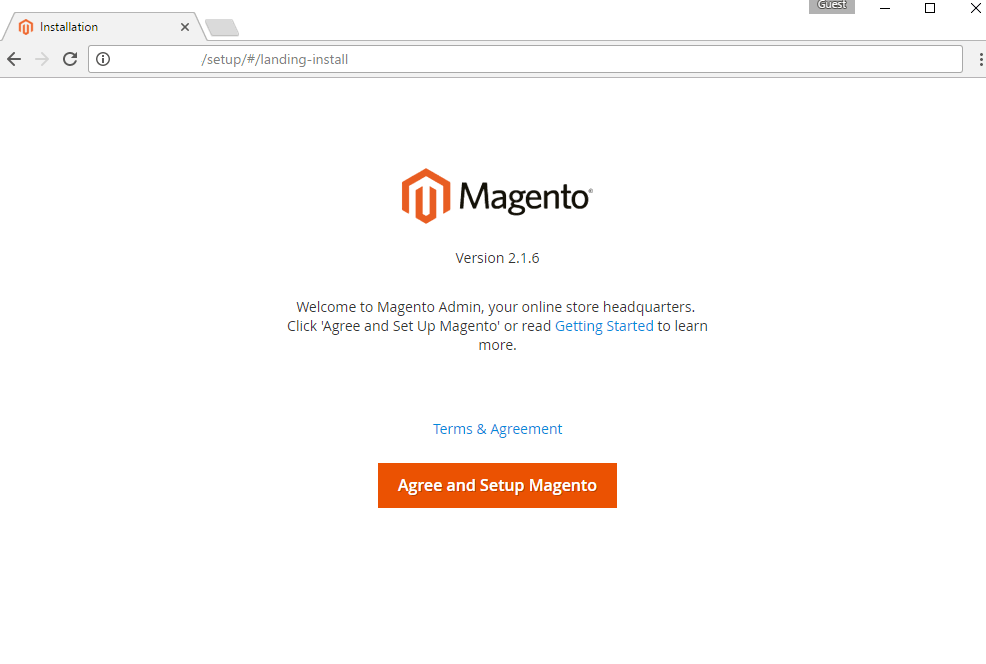
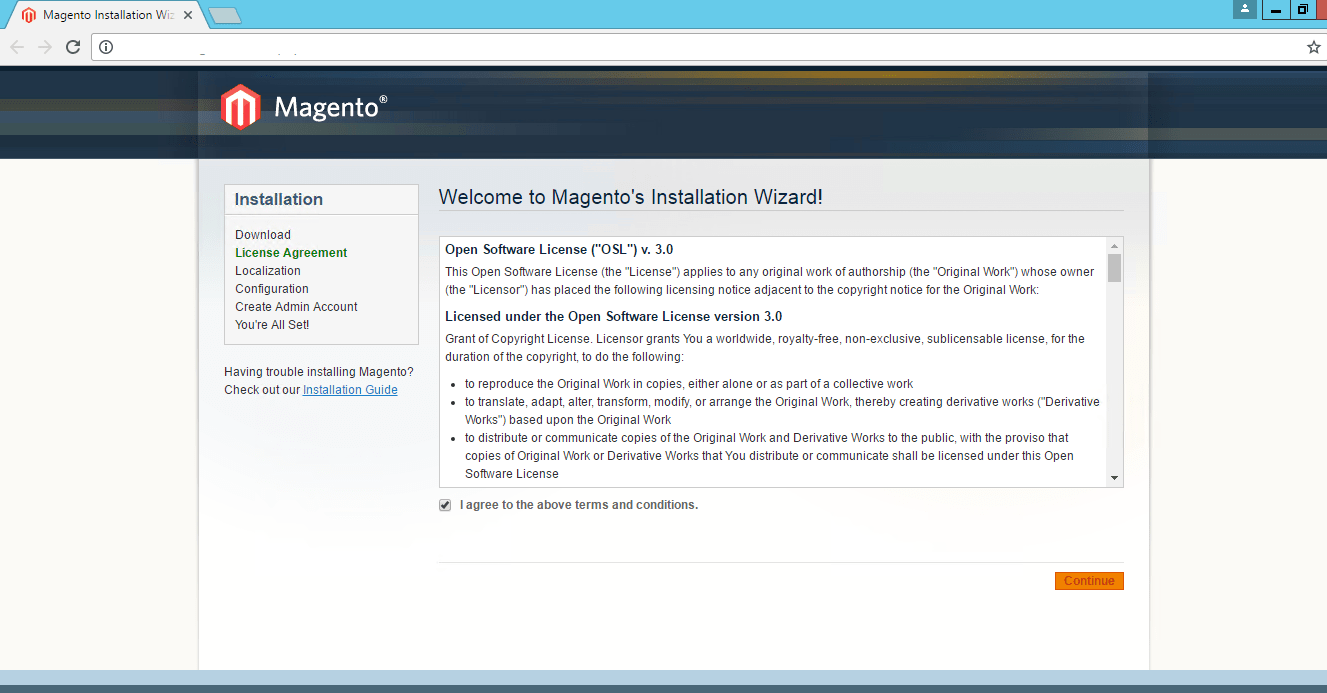
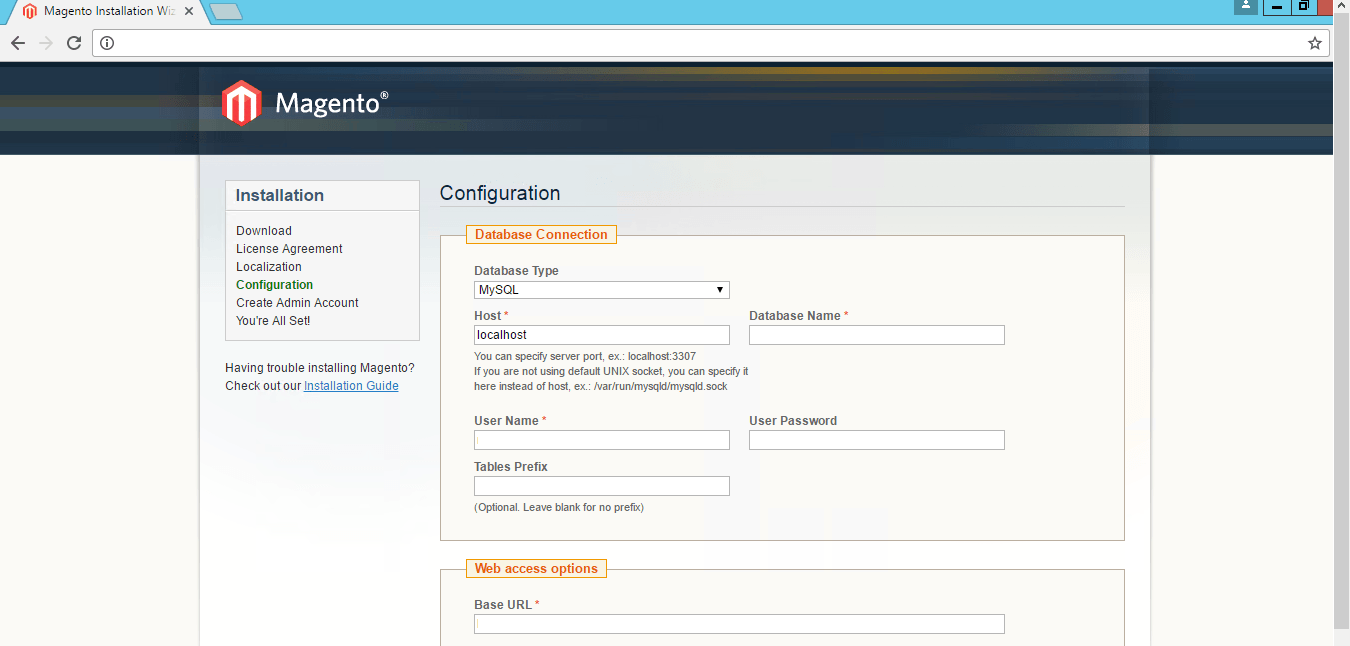
Installation Instructions For Ubuntu
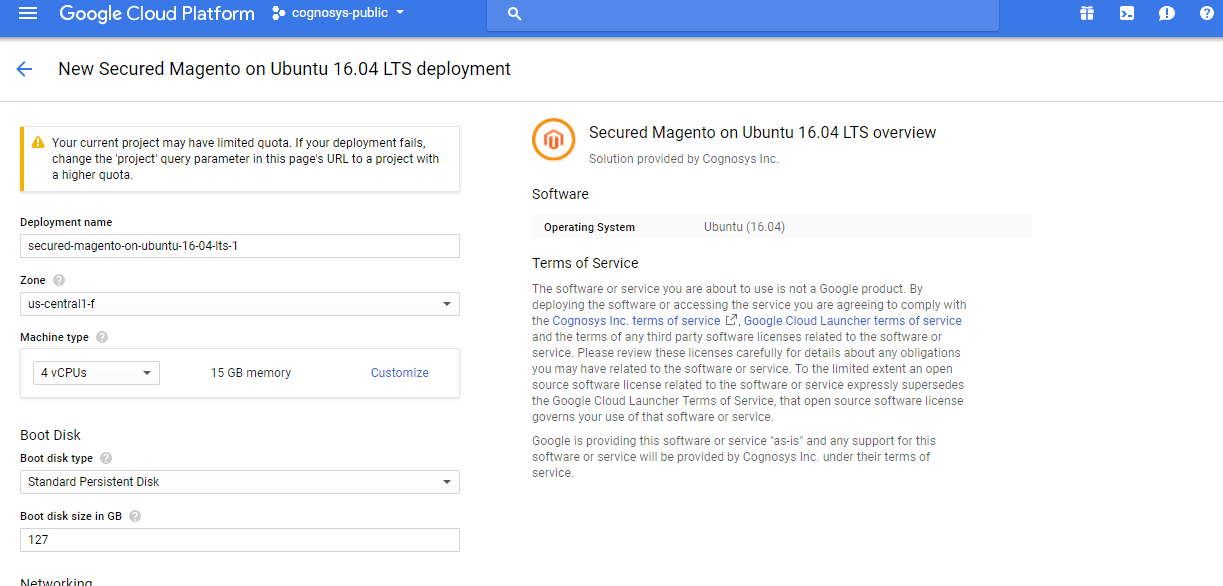
Step 1) VM Creation:
- Click the Launch on Compute Engine button to choose the hardware and network settings.

- You can see at this page, an overview of Cognosys Image as well as some estimated costs of VM.

- In the settings page, you can choose the number of CPUs and amount of RAM, the disk size and type etc.

Step 2) SSH Connection: To connect to the deployed instance, Please follow Instructions to Connect to Ubuntu instance on Google Cloud
1) Download Putty.
2) Connect to the virtual machine using SSH key
- Hostname: PublicDNS / IP of machine
- Port : 22
Step 3) Database Login Details:
The below screen appears after successful deployment of the image.
For local MySQL root password, please use the temporary password generated automatically during image creation as shown above.
i) Please connect to Remote Desktop as given in step 2 to ensure stack is properly configured and DB is initialized.
ii) You can use MySQL server instance as localhost, username root and password as shown above.
If you have closed the deployment page you can also get the MySQL root password from VM Details “Custom metadata” Section
Step 4) Application URL: Access the application via a browser at http://PublicDNS/Magento
Step 5) Steps to access the Admin Panel:
- To login to Magento Administrative Panel, you need
to open your browser and navigate to https://PublicDNS/Magento/admin - Enter username and password in the given fields and click on the “Login”button to access the Admin Panel.
- After successful login to the Admin Panel, you will get access to Magento Dashboard.
Step 6) Other Information:
1.Default installation path: will be in your web root folder “/var/www/html/Magento”.
2.Default ports:
- Linux Machines: SSH Port – 22 or 2222
- Http: 80 or 8080
- Https: 443
- Mysql ports: By default these are not open on Public Endpoints. Internally Mysql server: 3306
Step by Step Screenshots


Installation Instructions For Redhat
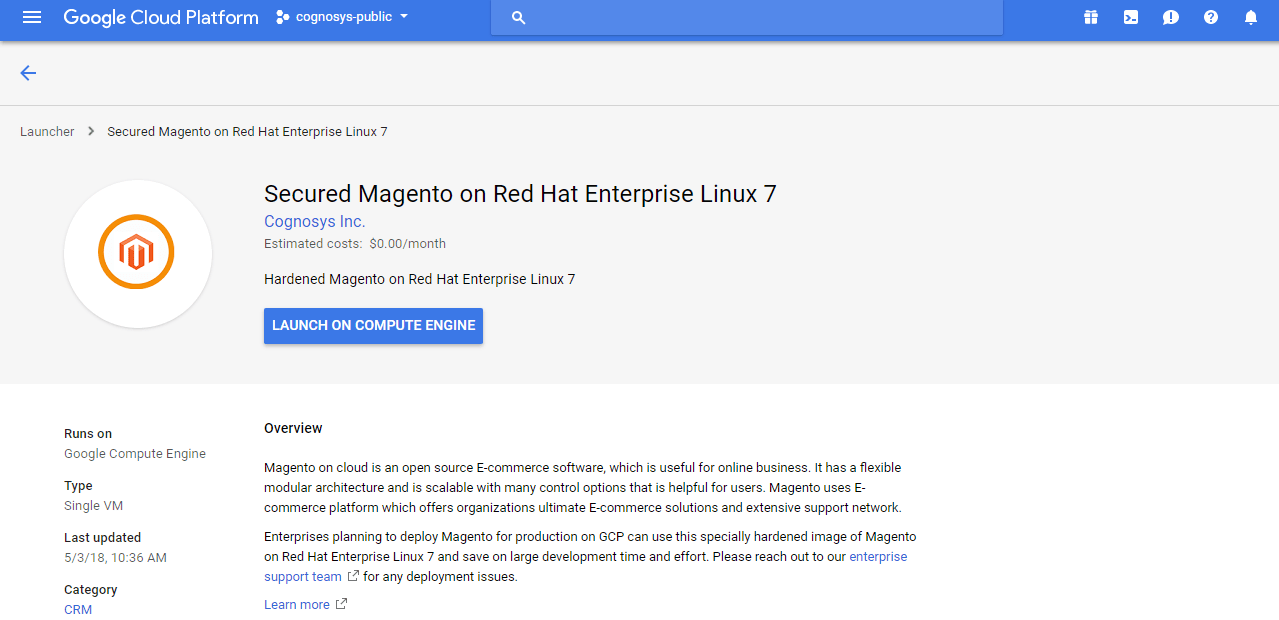
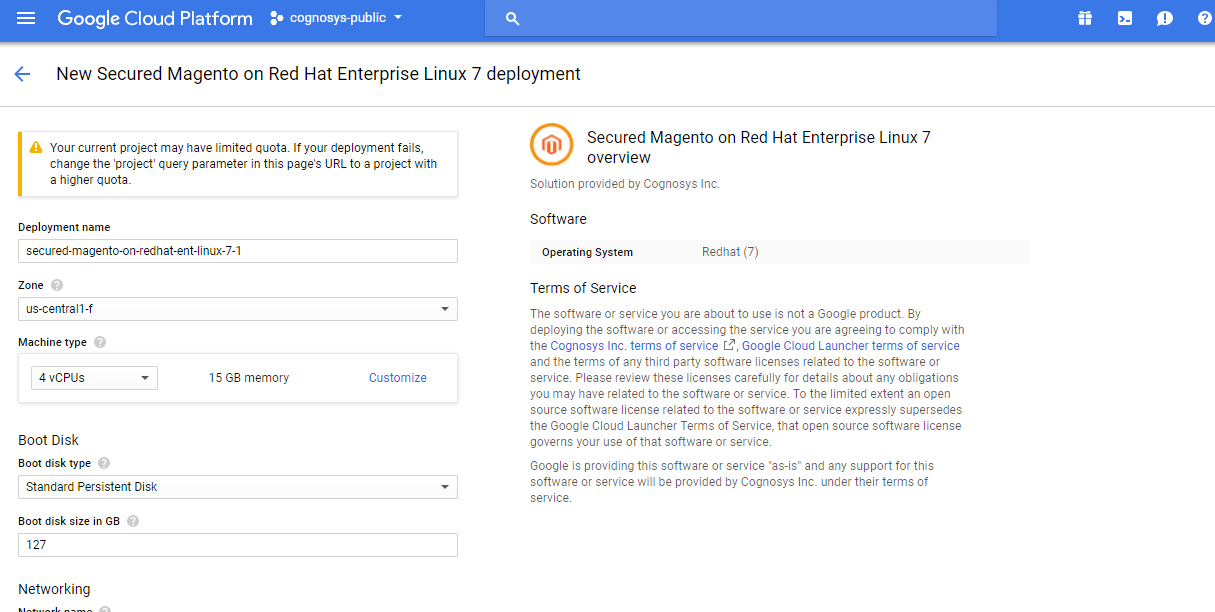
Step 1) VM Creation:
- Click the Launch on Compute Engine button to choose the hardware and network settings.

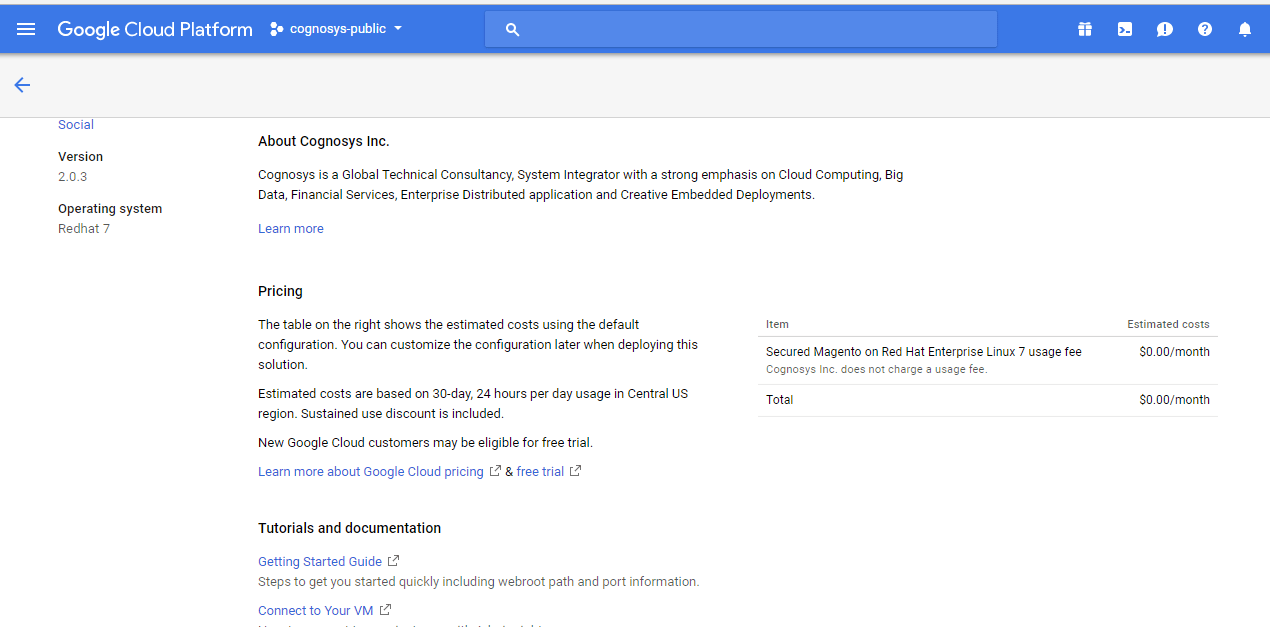
- You can see at this page, an overview of Cognosys Image as well as estimated cost of running the instance.

- In the settings page, you can choose the number of CPUs and amount of RAM, the disk size and type etc.

Step 2) SSH Connection: To connect to the deployed instance, Please follow Instructions to Connect to Ubuntu instance on Google Cloud
1) Download Putty.
2) Connect to the virtual machine using SSH key
- Hostname: PublicDNS / IP of machine
- Port : 22
Step 3) Database Login Details:
The below screen appears after successful deployment of the image.
For local MySQL root password, please use the temporary password generated automatically during image creation as shown above.
i) Please connect to Remote Desktop as given in step 2 to ensure stack is properly configured and DB is initialized.
ii) You can use MySQL server instance as localhost, username root and password as shown above.
If you have closed the deployment page you can also get the MySQL root password from VM Details “Custom metadata” Section
Step 4) Application URL: Access the application via a browser at http://<yourip>/magento
A) You will see the page where you can configure your site data with site name, magento admin name etc.
B) On next page you will see configuration success message.
C) You can login to the magento admin portal with the magento username and its generated password from point A shown above.
D) You can access the configured site at http://yourIP/magento
Step 4) Application URL: Access the application via a browser at http://PublicDNS/Magento
Step 5) Steps to access the Admin Panel:
- To login to Magento Administrative Panel, you need
to open your browser and navigate to https://PublicDNS/Magento/admin - Enter username and password in the given fields and click on the “Login”button to access the Admin Panel.
- After successful login to the Admin Panel, you will get access to Magento Dashboard.
Step 6) Other Information:
1.Default installation path: will be in your web root folder “/var/www/html/Magento”.
2.Default ports:
- Linux Machines: SSH Port – 22 or 2222
- Http: 80 or 8080
- Https: 443
- Mysql ports: By default these are not open on Public Endpoints. Internally Mysql server: 3306
Step by Step Screenshots


Installation Instructions For CentOS
Step 1) SSH Connection: To connect to the deployed instance, Please follow Instructions to Connect to CentOS instance on Google Cloud
1) Download Putty.
2) Connect to virtual machine using following SSH credentials:
- Hostname: PublicDNS / IP of machine
- Port : 22
Username: Your chosen username when you created the machine
Password : Your Chosen Password when you created the machine ( How to reset the password if you do not remember)
Step 2) Other Information:
1.Default ports:
- Linux Machines: SSH Port – 22
2. To access Webmin interface for management please follow this link
Videos
Secured Magento on Windows 2012 R2
Introduction to Magento
What is Magento
Install Magento


