1-click AWS Deployment 1-click Azure Deployment
Overview
ImpressCMS is a free Content Management System through which you will be able to easily create and manage a dynamic web site.ImpressCMS is a community developed Content Management System for easily building and maintaining a dynamic web siteImpressCMS can be used for many types of web sites. The system is highly scalable and it can be used for example as an intranet for a company with 20,000 employees as well as for building a simple 5-page website for the promotion of a small company.The software uses an open architecture, allowing webmasters to add modules into the core CMS for additional functionality.
What can ImpressCMS help you do?
ImpressCMS can be used to create and maintain many types of web sites. It is a highly scalable system that can be used for example as an intranet for a company with 20,000 employees as well as for building a simple 5-page website for the promotion of your company. The system is extremely useful for managing online communities because it has the ability to create user groups and assign permissions for managing content to each different group.
A few examples of what you can do with them:
- Publish news of your organization
- Let visitors contact you through a state of the art customizable contact form
- Create and manage articles
- Add a forum to your site
- Sell products through your web site using an online store
- …and many more
The ImpressCMS core distribution offers several features that make it a solid foundation to build your website on. On top of these foundations, you can start building your site in complete freedom making use of the different addons that are available on the ImpressCMS site, or decide to build your own.
What is a Content Management System
A Content Management System is a web solution that is dedicated to creating, maintaining and updating websites in a dynamic way. The contents that need to be managed can go from simple articles, photos and videos to more complex content types such as calenders, taxonomies or even complete e-commerce systems.
A big advantage of a CMS is that is offers a number of ready to use functionalities, offered in the case of ImpressCMS through a simple and easy to use web interface, which makes it also possible for people that are no ICT or web specialists to manage their own websites.
What are the possibilites offered by ImpressCMS?
Our core distribution is bundled with 3 so-called ‘core modules’, that offer basic functionality for your site out of the box:
- handle content pages,
- a basic advertisement manager
- a more powerful user profile module
They can be used on your site, or they can be replaced with alternatives if you need specific functionalities that these modules don’t offer.
Next to that, in the addons section, you will find all kinds of modules that allow you to add more sections to your sites, such as forums, galleries, blogs, portfolios, events..
Manual ImpressCMS Installation
To install ImpressCMS manually you will first need to prepare two things:
The ImpressCMS script
A MySQL database
You can download the latest version of ImpressCMS from their official website at:
http://www.impresscms.org/
Extract the archive and upload the whole content of the “htdocs” folder into your account. If you want to have your ImpressCMS website accessed via https://yourdomain.com, you should upload the files in your public_html folder. You can easily do this via FTP. You can check our FTP video tutorials here:
https://tmdhosting.com/tutorials/video/ftp.html
To create a cPanel database, simply go to your cPanel and use the “MySQL Database Wizard” which will guide you through the whole process. You can check our video tutorial how to create a MySQL database wizard here:
https://www.tmdhosting.com/tutorials/video/cpanel/cpanel-x3-createmysql.html
Now you are ready to start the installation. Access your website at the following URL:
https://yourdomain.com/install/index.php
If you have uploaded your script in subfolder for example /public_html/cms/ you can initiate the installation using:
https://yourdomain.com/cms/install/index.php
Now you should see the installation page of ImpressCMS:
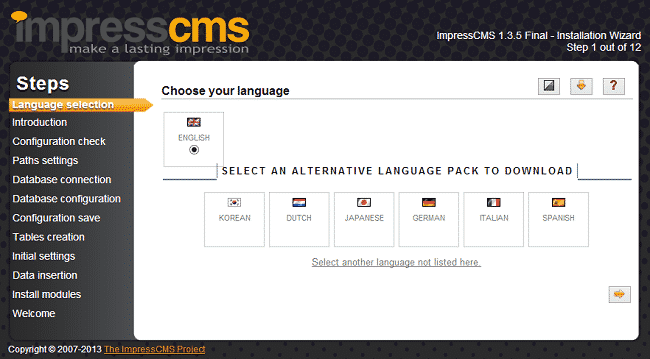
Select the language in which you wish to install ImpressCMS and click the right arrow at the bottom. You will be taken to the introduction page where you will be provided with some of the requirements to install ImpressCMS. If you have uploaded the files via FTP, you can skip this step as all files and folders will already have the correct permissions:
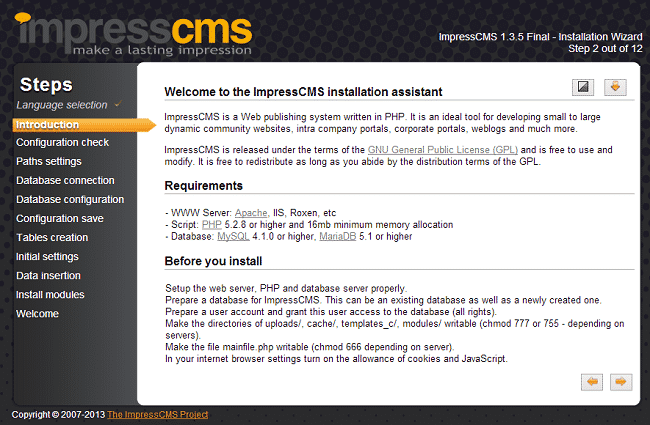
Click the right arrow at the bottom to proceed to the next page. The script will perform a check if all server requirements are met:
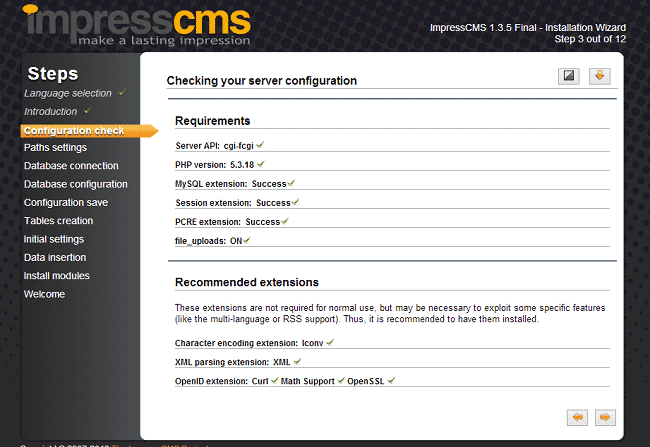
You should see a green checkmark on each line as verification that the requirement is met on the server. Proceed to the next page. You will be provided with the paths for your website. On that page scroll down a little and click the “Create Trust Path” button:
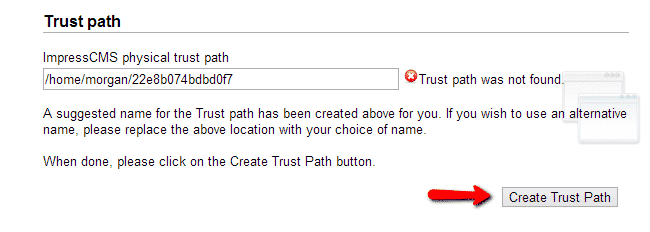
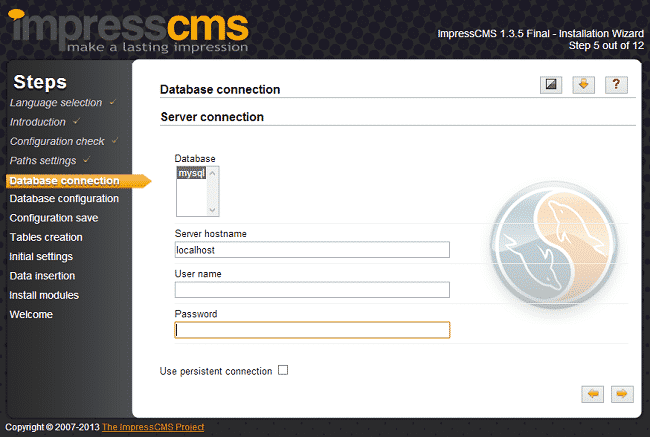
Proceed to the next page after that. Now enter the database username and password that you have created earlier:
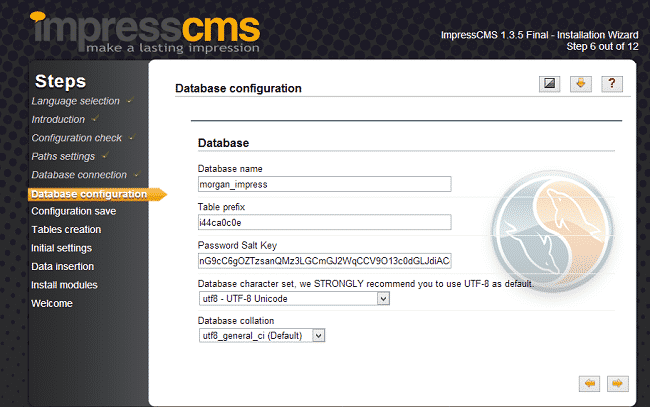
Proceed to the next page and only enter your database name:
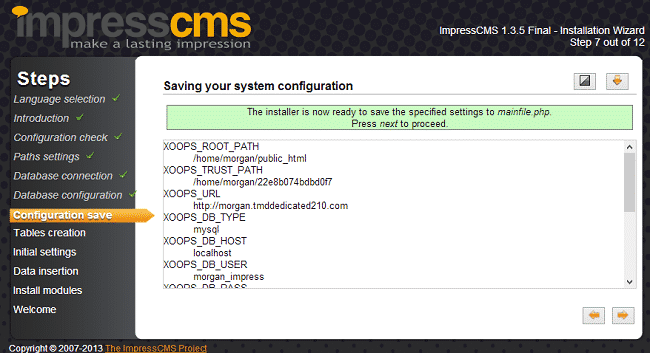
Proceed to the next page so your configuration file will be saved:
Go to the next page. You will receive message that the installer is ready to create the ImpressCMS database tables. Proceed to the next page. You will see the tables that have been created and populated:
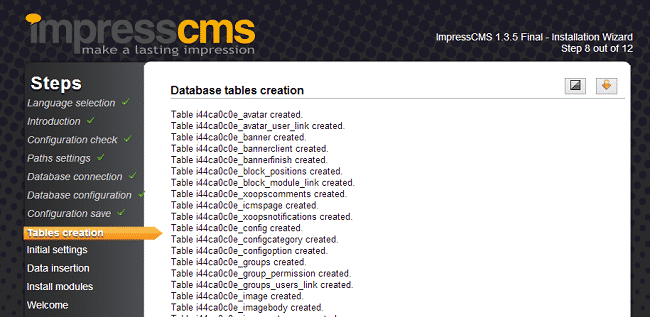
Proceed to the next page to setup your admin account. Fill the following information:
Admin Display Name
Admin login
Admin Email – make sure to use a valid email address
Admin Password
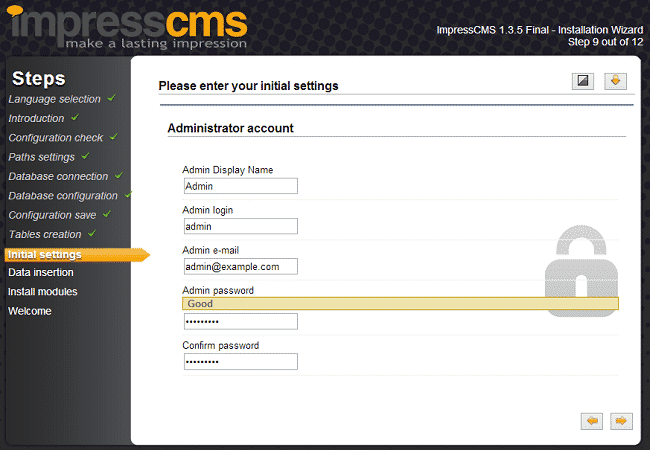
Proceed to the next page to see that the data has been inserted into your database. After that proceed to the next step. Choose the modules which you wish to use on the site and proceed to the next page:
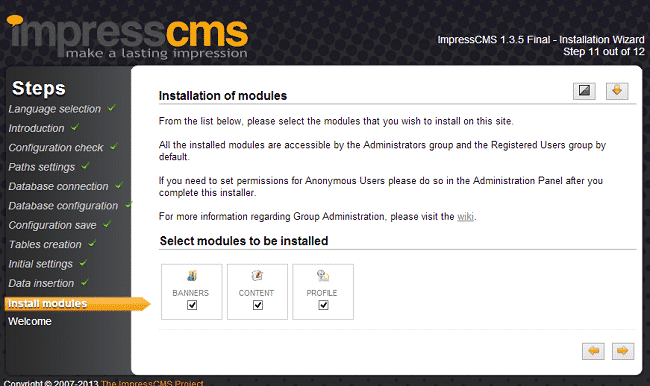
You will receive a message that your ImpressCMS website has been successfully installed and you can access your website.
ImpressCMS Admin Area and Mail Setup
In this tutorial we will show you the ImpressCMS admin area and how to configure the mail settings of your site.
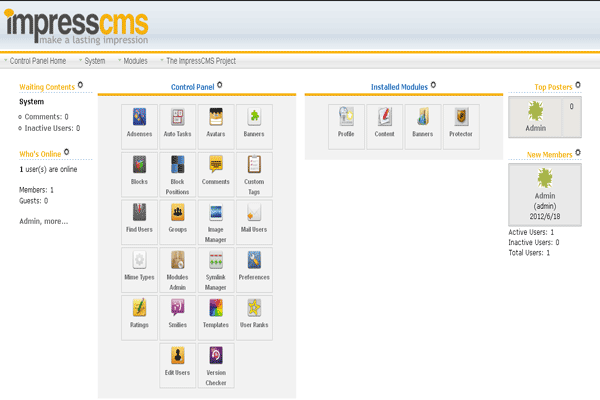
When you first log in with your admin username and password, you will see the following page:
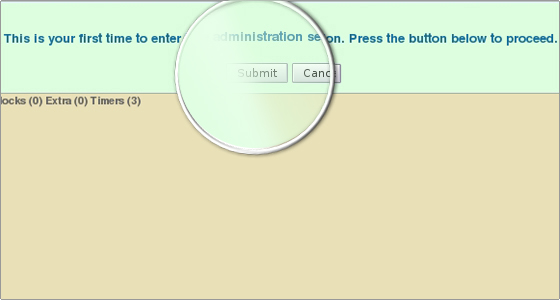
Click “Submit” to proceed.If you have not removed the install folder and changed the permissions of the mainfile.php file to 444, you will see some warnings.
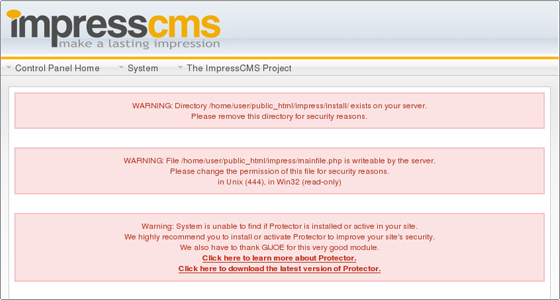
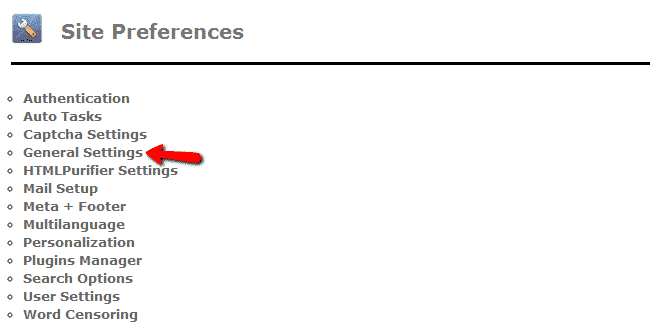
Once you remove the install folder and change the permissions of mainfile.php, the only warning remaining will be about the Protector module.For more information on how to install a module in Impress CMS you can refer to the module installation page.Now let’s take a look at the general settings of your Impress CMS. You can access them from the admin area > Preferences > General Settings.From here you can change your site’s name, slogan, theme, the admin address, etc.
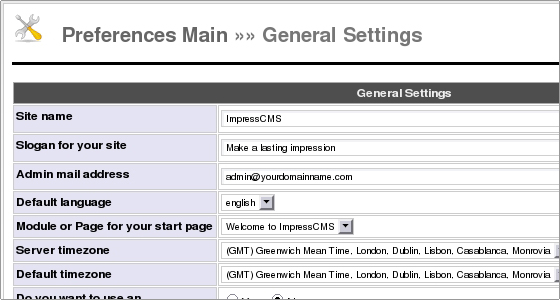
All options are self-explanatory and you should have no problem changing the general settings to your preference.Next let’s configure the mail settings of your Impress CMS.For the purpose of this tutorial we will configure Impress CMS to work with SMTP.
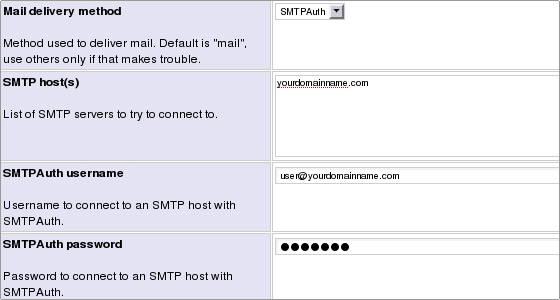
The important settings here are:Mail delivery method – choose SMTPAuth from the drop-down menuSMTP host(s) – here you should enter mail.yourdomainname.comSMTP username – here you should enter an existing mail account, e.g. john@yourdomainname.comSMTPAuth password – here you should type the password for john@yourdomainname.comClick the “Go” button to save the changes.
ImpressCMS Admin Area and Mail Setup
Here,we will show you the ImpressCMS admin area and how to configure the mail settings of your site.When you first log in with your admin username and password, you will see the following page:

Click “Submit” to proceed.If you have not removed the install folder and changed the permissions of the mainfile.php file to 444, you will see some warnings.

Once you remove the install folder and change the permissions of mainfile.php, the only warning remaining will be about the Protector module.For more information on how to install a module in Impress CMS you can refer to the module installation page.Now let’s take a look at the general settings of your Impress CMS. You can access them from the admin area > Preferences > General Settings.From here you can change your site’s name, slogan, theme, the admin address, etc.

All options are self-explanatory and you should have no problem changing the general settings to your preference.Next let’s configure the mail settings of your Impress CMS.For the purpose of this tutorial we will configure Impress CMS to work with SMTP.

The important settings here are:Mail delivery method – choose SMTPAuth from the drop-down menuSMTP host(s) – here you should enter mail.yourdomainname.comSMTP username – here you should enter an existing mail account, e.g. john@yourdomainname.comSMTPAuth password – here you should type the password for john@yourdomainname.comClick the “Go” button to save the changes.
How to Transfer ImpressCMS From Another Host?
To transfer your ImpressCMS website from another server you will need to do several things. The first one would be to transfer your website files via FTP. You will need to transfer both your “trust” folder and your website files. You can perform the transfer via FTP. You can check our FTP video tutorials at:
https://tmdhosting.com/tutorials/video/ftp.html
The next thing you will need to do is export your ImpressCMS MySQL database using a database management tool like phpMyAdmin. You can check our video tutorial how to export a MySQL database via phpMyAdmin here:
https://www.tmdhosting.com/tutorials/video/phpmyadmin/phpma-export.html
The next thing you will need to do is create new MySQL database within your cPanel. You can easily do that via cPanel > MySQL Database Wizard. Simply follow the steps on the screen. After that import the MySQL backup copy that you have exported. You can import the database using phpMyAdmin. To import the database, you can follow the instructions provided in our video tutorial here:
https://www.tmdhosting.com/tutorials/video/phpmyadmin/phpma-import.html
As a final step, edit the configuration file that is located in your “trust” folder. The file should look something like:
53320bcbfd6389c4cd3765be6ff0d222.php
Edit the following lines:
define( ‘SDATA_DB_USER’, ‘DB_User’ );
define( ‘SDATA_DB_PASS’, ‘DB_pass’ );
define( ‘SDATA_DB_NAME’, ‘DB_name’ );
Replace DB_User, DB_Pass and DB_name with the actual database credentials that you created earlier. Save the changes. Your ImpressCMS has been successfully transferred.
Themes Installations in ImpressCMS
You can easily install new themes for your ImpressCMS website to change its outlook. You are going to learn how to install new themes in this tutorial. First choose the theme which you wish to use on your website. You can find free ImpressCMS themes here:https://addons.impresscms.org/modules/wfdownloads/viewcat.php?cid=29
Once you have selected your theme, download its archive. Extract the archive and upload the extracted folder in the themes folder of your CMS. You can upload the theme using FTP. You can find our FTP video tutorials here:
https://tmdhosting.com/tutorials/video/ftp.html
If you have installed ImpressCMS in public_html folder you must upload the new theme in:
/public_html/themes/
In case you have installed ImpressCMS in a subfolder of public_html, for example folder called “cms”, you must upload the new theme in:
/public_html/cms/themes/
Next thing you will need to do is login your ImpressCMS admin area. Click on “Preferences”:
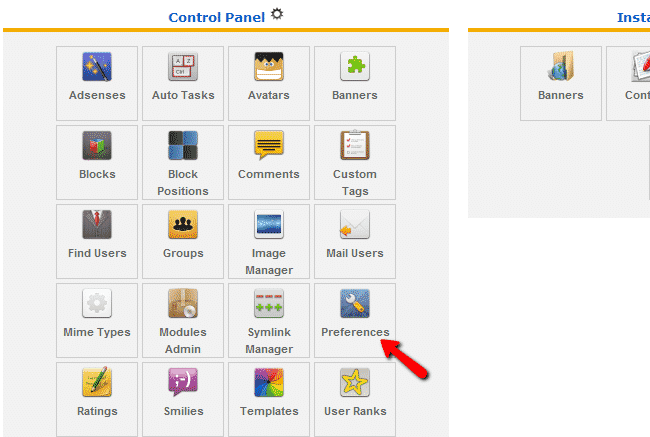
Then click on “General Settings”
Now using the drop-down menus, you can change the “Default Theme”, “Admin Theme”:
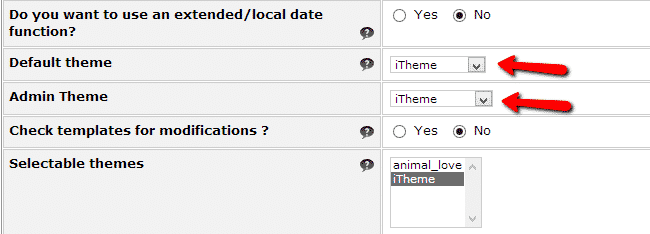
Click the “Save” button to apply the changes.
Plugin Installations in ImpressCMS
ImpressCMS comes with a wide range of functionalities, but if you want to, you can add even more. This can be easily done by installing an ImpressCMS addon. You can do that from here:
http://addons.impresscms.org
Once you have downloaded the module which you wish to install, extract its folder in your ImpressCMS “modules” folder. If you have installed ImpressCMS in public_html folder, you should place the new module folder in:
/public_html/modules/
In case you have installed ImpressCMS in a subfolder of public_html folder for example “cms”, you should place the content in:
/public_html/cms/modules/
In both cases make sure that the module files are placed in their own folder. Once you have placed the module folder, access the admin area of your website and select “Admin Modules”:
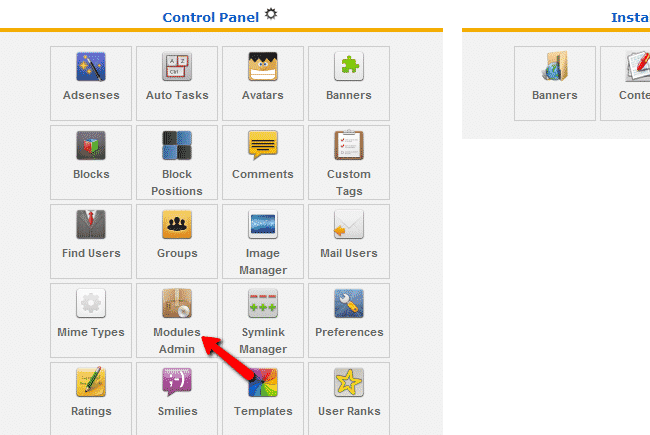
On the next page scroll down and under “Uninstalled Modules” find the module you have just uploaded:

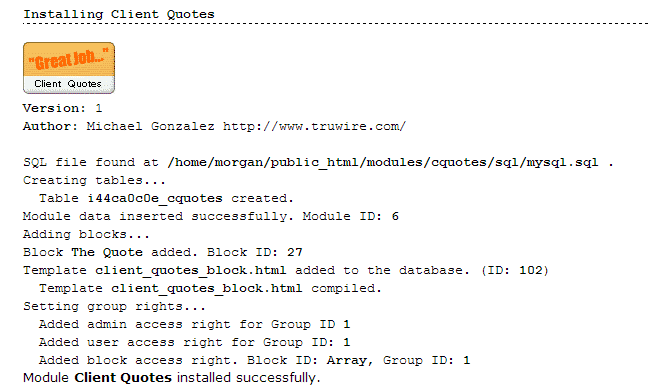
Under “Actions” click the install button to install the module. You should receive a message that the module has been successfully installed, similar to the one below:
ImpressCMS Blocks
Settings such as which menu is published or not, as well as the different menu and module positions, login form module, etc are managed from the Blocks Administration section in your ImpressCMS admin area.
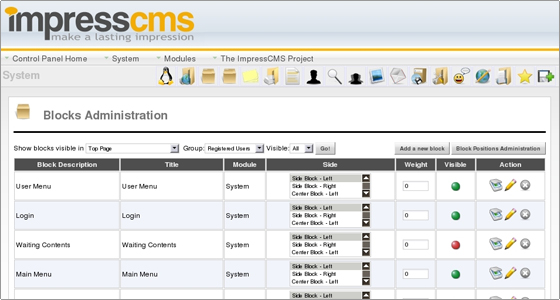
The “Side” column of the Blocks Administration section defines at which side of your pages a given menu/module will appear.
From the “Visible” column you can publish/unpublish blocks (green represents published and red represents unpublished blog).
From the “Action” column you can “Clone” (copy), “Edit” and “Delete” a block.
Let’s take a look at the Edit options for a block, for example the Login block.
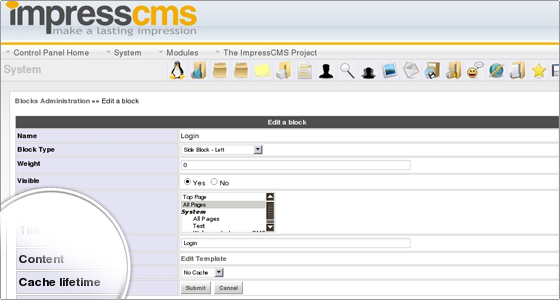
Here you have basically the same options as the ones on the main Blocks Administration page, as well as two additional options – “Content” and “Cache lifetime”.
The “Content” option allows you to edit the template (code) of the block. We don’t recommend changing anything here unless you know what you are doing.
The “Cache lifetime” option allows you to set the cache lifetime of the block. You can disable caching for the block (No Cache), or choose cache lifetime from 30 seconds to 1 month.To save any changes, use the “Submit” button.
Block Positions Management in ImpressCMS
The content of the pages in ImpressCMS is managed by different blocks placed in different positions. In this tutorial we are going to show you how to rearrange these blocks so that you can customize your site per your needs.First, you will need to login to your website’s admin area. Do this by going to:
https://yourdomain.com/admin.php
If you have installed ImpressCMS in a subdirectory of your public_html folder for example: /public_html/cms/ you should access the admin area of the site using:
https://yourdomain.com/cms/admin.php
When you login to the admin area click on the “Blocks” icon as shown on the picture:
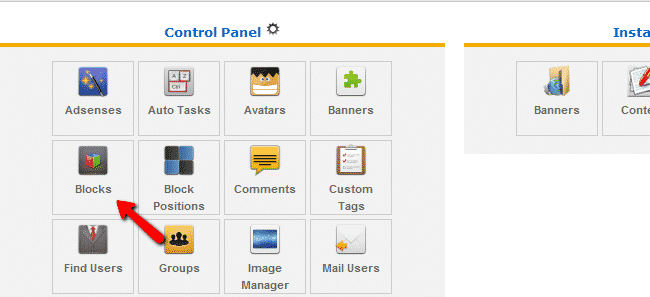
You will see a list of blocks already present on the site:

We will provide a brief description of each of the columns that you can have better understanding of the blocks table:
Visible – using this column you can select if the block will be visible or not
Name – name of the block
Title – Title of the block
Module – the module that enables the block
Side – the side on which the block will be placed. Use the dropdown menu to select sides
Weight – the order in which the block will appear. 0 (zero) comes first
Actions – you can perform the following actions on the blocks – move up, move down, clone, edit
You can use these settings to rearrange the blocks on the website.
ImpressCMS Modules
In order to learn how to install modules in Impress CMS, we’ll install the Protector module. Follow the steps below to complete the installation.
STEP 1 The first thing you should do is download the module .
STEP 2 Upload the archive to your account and extract it there.
The extracted package will contain two directories:
html/xoops_trust_path/
STEP 3 Move the contents of the html folder directly into your Impress CMS installation directory.
STEP 4 Move the contents of the xoops_trust_path folder to your trust path.
The trust path for our Impress CMS installation was automatically set to /home/user/trust_patheb3b5. This path will vary depending on your Impress CMS installation.
STEP 5 If you remember, when we extracted the Impress CMS package, there was a folder “extras” along with the html and the other directories.
Inside the extras folder there is another folder called “preload”. Inside this folder is the file we need in order to complete the Protector installation. The file is called protector.php and you should copy it to your ImpressCMS main folder.
STEP 6 The final step is to install the module from your Impress CMS admin area. Log in as administrator and go to Modules. There you will see that the Protector module is ready to be installed.
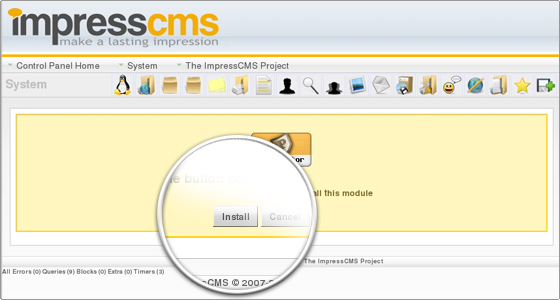
All you have to do is click the install button to initiate the module installation:
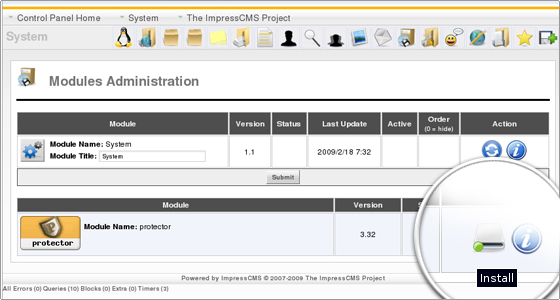
and then click Install to complete the installation:
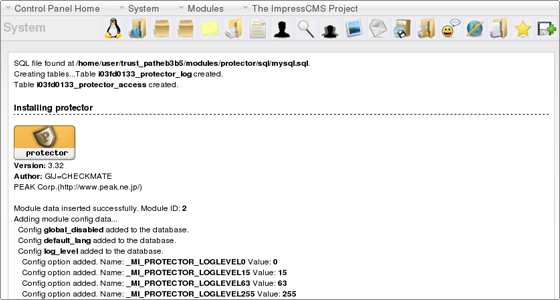
You will see the installation log and this will complete the Protector module installation.
Comments Management in ImpressCMS
In this tutorial we are going to show you how to manage the comment posted on your website. The first thing you would need to do is login to your website’s admin area. If you have installed ImpressCMS in the public_html folder of your account, you can access the admin area using:
https://yourdomain.com/admin.php
If you have installed ImpressCMS in a subfolder of public_html, for example in /public_html/cms/, you should access the admin area using:
https://yourdomain.com/cms/admin.php
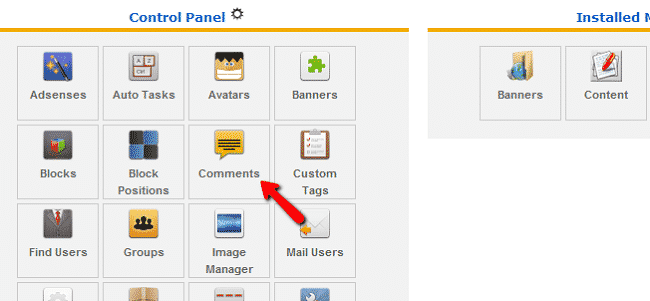
Once you login to the admin area, click on the “Comments” icon:
You will see a list of comments posted on pages of your website:
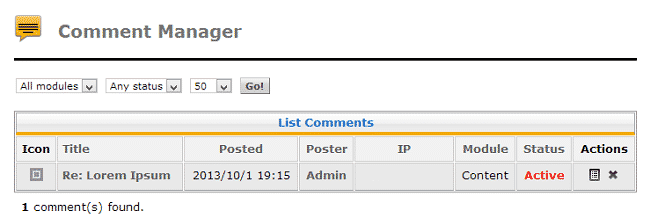
The table provides information about:
Title of the page where the post has been posted
Date on which the comment has been posted
Name of the comment poster
IP address of the poster
Module that was used to create the page
Status of the comment
Actions you can perform
Using the actions settings you can choose to delete or edit the comment.
Users Management in ImpressCMS
When using ImpressCMS you can give your users different types of permissions. That way, for example, you can assign authors and moderators for your site. Each group of users will have different permissions. We are about to show you how to manage your users. The first thing you would need to do is login to your website’s admin area. If you have installed ImpressCMS in the public_html folder of your account, you can access the admin area using:
https://yourdomain.com/admin.php
If you have installed ImpressCMS in a subfolder of public_html, for example in /public_html/cms/, you should access the admin area using:
https://yourdomain.com/cms/admin.php
Once you are logged in click on the “Groups” icon as shown in the picture:
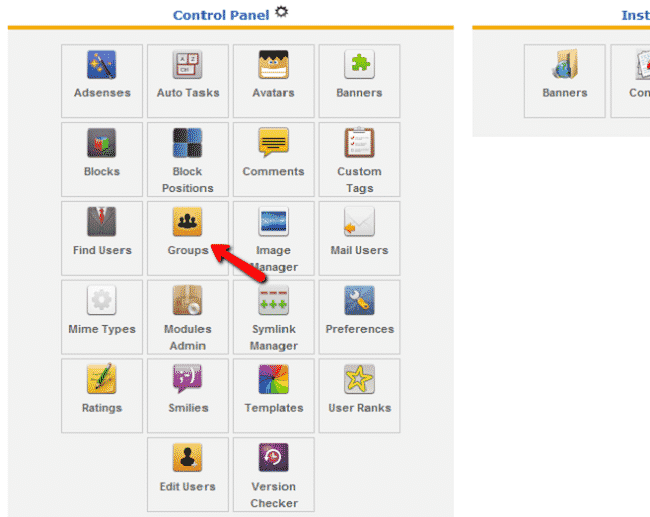
You will see the list of existing groups. You can edit those by clicking the “Modify” button next to each group.
On the same page you can create new groups and assign them the permission that you would like them to have. Simply check the boxes for the permissions that you wish to assign:
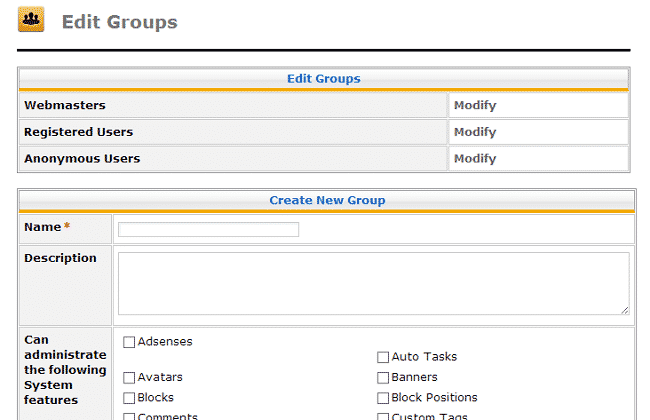
When you are done, save the changes to create the group.
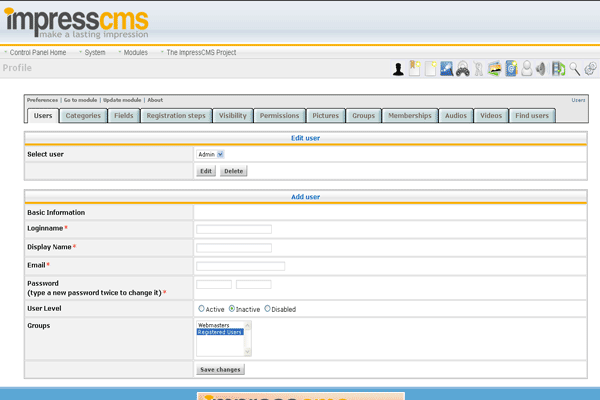
To edit a user, go back to your administration control panel’s home page. In there click on “Edit Users”:
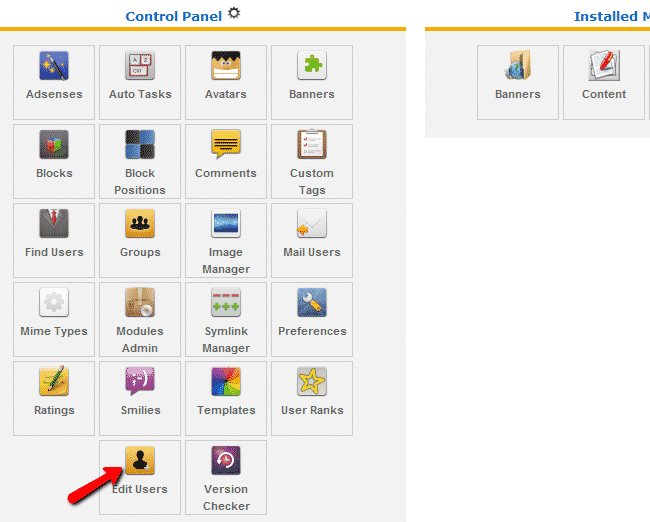
From the drop down menu select the user which you will be editing and click the “Edit” button:

On the next page you can edit the following information for your user:
Login Name
Display Name
Password
User Level
Groups
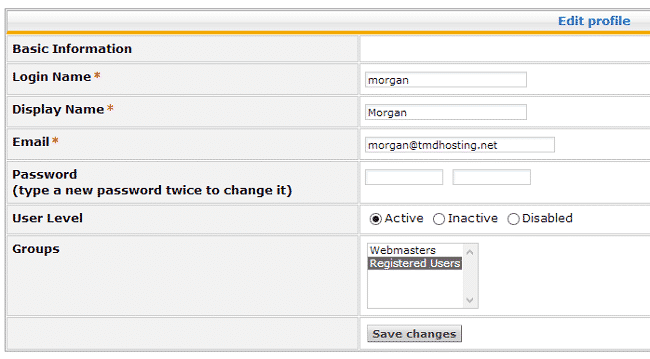
Click the “Save Changes” button when you are done.
IMPRESSCMS PROS
· Easy to Use
Updating the content on this CMS is very simple. Most people compare it to Microsoft Word, so if you know how to make a document in Word, this will come quite naturally.
· Security
The main development team has done a good job at focusing on web security.
· Community
The community of users and developers for this platform are quite active. This can be very helpful if you have improvement suggestions or need any type of assistance.
IMPRESSCMS CONS
· Updates
While the latest updates have been coming out quite regularly, there are some periods of many months or even longer without an update. This may be a concern to some users.
· Plugins
There are not very many plugins available with this platform.
-ImpressCMS is a community developed Content Management System for easily building and maintaining a dynamic web site. Keep your web site up to date with this easy to use, secure and flexible system.It is the ideal tool for a wide range of users: from business to community users, from large enterprises to people who want a simple, easy to use blogging tool. ImpressCMS is a powerful system that gets outstanding results!
Users
Control Panel
Welcome
User Login
Image Manager
ImpressCMS is released under the terms of the GNU General Public License (GPL).
Features
ImpressCmS Features include:
· Initial Setup
Getting the website up and running is quite easy. Whether you use the one-click installation tool included with all hosting packages or you choose to download and install it manually, you won’t have any trouble. The initial setup really only takes a few minutes, and most people will find that they can go through the main settings without much effort as well.
· Plugins
The plugins that are available are easy to find and install, even for those without much website experience. When you look through the list of plugins on the official site, however, you will likely be disappointed in how many there are. For this platform to really be great, they need to work on having additional plugins developed and released.
·Themes
There don’t seem to be any themes that are officially published by the ImpressCMS site. This means you will have to go out to third party theme developers to find what you’re looking for. There are some developers that release their themes for this CMS, but you’ll likely have to go to multiple different places to find the ones you like.
· Customization
Customization with this platform is quite easy, but there isn’t too much that you’ll need to change. Most of the options are done through the admin control panel, which is fairly standard and easy to interface with. If you really want to make your site stand out, this may not be the best platform. If you want your site to operate well and be easy to use, however, this is a great option.
· SEO Friendly
ImpressCMS is an average option when it comes to SEO. There is nothing that will hurt your site’s rankings, but there isn’t anything that will really help you to push them to the top either. I didn’t see any plugins to help with SEO though, which is something many people will be disappointed about.
· Cost of Running
The system itself is completely free and from what I can tell so are the plugins that they offer. The platform is also quite fast and properly coded, which means you won’t likely need to move up to a higher end hosting package unless you are getting a lot of visitors to your site. Overall, this is a very affordable content management system.
-Database driven (MySQL supported).
-Fully modularized.
-Granular permissions for users and groups:
-Optional user registration.
-Security: IP banning, restricting content by group, backend security features for database manipulation, security token system for form validation and more.
-Personalization.
-Versatile Group Permissions System.
-Complete user profiles and private messaging.
-Customizable themes and templates.
-Integrated comment system, with moderation options.
-Integrated management for banner advertising.
-Site-wide search function.
-Multibyte language support including Japanese, Simplified and Traditional Chinese, Korean.
-Major Features of ImpressCMS
- Publish news of your organization
- Let visitors contact you through a state of the art customizable contact form
- Create and manage articles
- Add a forum to your site
- Sell products through your web site using an online store
…and many more
Videos
Installation ImpressCMS

