
1-click AWS Deployment 1-click Azure Deployment
Overview
What is IIS?
IIS or Internet Information Server is the server used to host .Net web applications. IIS is normally installed on a Window Server.For users to access a website, it is required that the website is hosted on some sort of web server. There are different web servers available for different technologies. In .Net, the web server available is called Internet Information Services or IIS.Once the web application is developed, it is then deployed on an IIS Server. This web application can then be accessed by the end users. There are two ways to deploy an application to the server:
- Using the File Copy method.
- Using the Web publish method.
How does IIS Work?: IIS Processing Model
As a web server IIS has its own Process Engine that handles all requests from client to server. Essentially a client sends a request to the server and then IIS processes that request and sends a response to the client. The processing architecture of IIS can be separated into two distinct layers:
- Kernel Mode – Executed code has complete access to connected hardware and can execute any command. Kernel Mode is mainly used for trusted processes. Crashes in Kernel Mode are devastating to the overall system. You can find HTTP.SYS within Kernel Mode.
- User Mode – In this mode, any code you execute are commands short of accessing hardware or reference memory. This affords an extra layer of protection against mistakes and can be recovered much more easily. When you execute code in user mode it delegates APIs to interact with hardware and reference memory instead. In User Mode you’ll find Web Admin Service, Virtual Directory, and Application Pool.
Kernel Mode has the job of using HTTP.SYS to accept requests from a client and forwarding them on to an application pool. This is initiated when the client clicks on or enters the site URL and requests access to the page. HTTP.SYS captures these requests and adds a queue for each individual application pool.
Once a request has been forwarded to the application pool, the Worker Process or w3wp.exe (outlined below) loads the ISAPI filter. Depending on the request, the Worker Process opens HttpRuntime.ProcessRequest and if it is an APSX page loads “aspnet_isapi.dll” as well.
The launch of Http.Runtime.ProcessRequest shows that processing has begun. The HttpRuntime process builds a pool of HttpApplication objects which are then passed on through HTTP. HTTP Modules continue to be activated until the request reaches the HTTP handler of the ASP.NET page. Once the request has passed on through the HTTP route, the page starts.
As you can see the Worker Process and the Application Pool are two very important concepts in the world of IIS. Below we’re going to look further at what these two concepts actually mean:
Application Pool
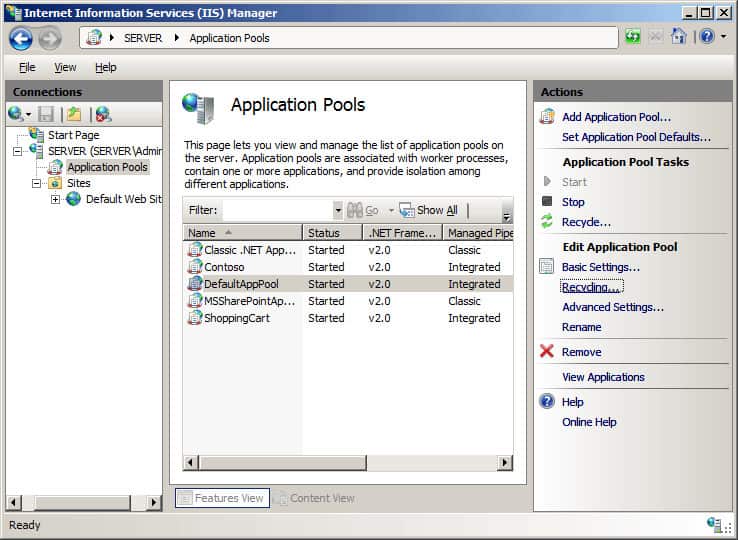
On the other hand, the Application Pool acts as a container. It contains the Worker Process and segregates multiple applications from each other. This is true whether they are running on one or multiple servers. One application pool can contain multiple websites. Putting it another way, an application pool is basically a group of URLs that have been served by worker processes. Separating applications from one another simplifies management and ensures that if one application pool experiences an error, the others do not.
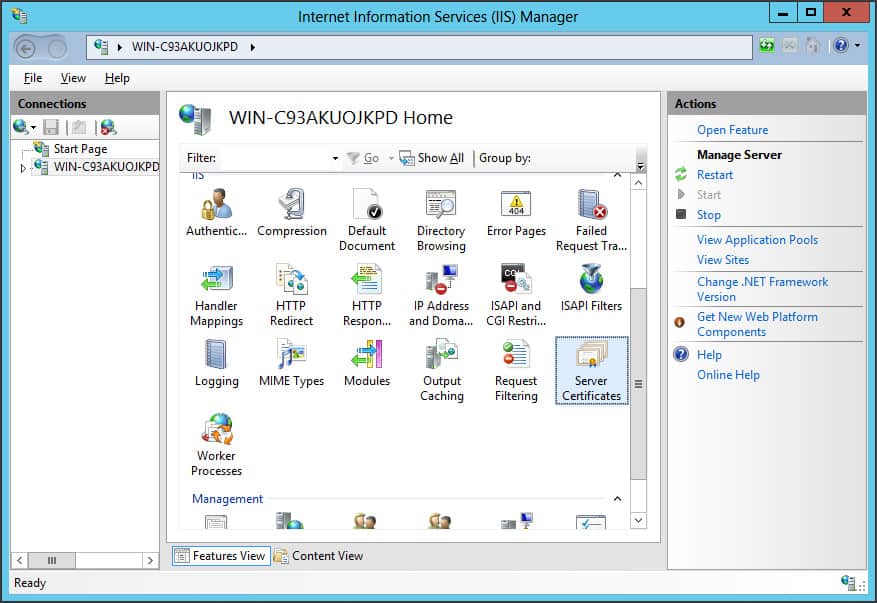
Configuring IIS
- Locate the My Computer icon on your desktop and click Manage.
- Click on the Services and Applications option in the Computer Management box.
- Click on Internet Information Services and then Web Sites.
- If your default node hasn’t started, right-click on the Default Web Site node.
Configuring IIS Websites and Active Directories
One of the main reasons why people use IIS is to deploy web applications. With IIS and the Advanced Installer utility, you can deploy web applications on multiple servers very quickly. This also has the advantage of eliminating the need to add new configurations for each machine.
The first step when configuring websites is to open the Files and Folders view. From here you can examine your current application files and add new ones. You want to make sure that your application files are placed in their own individual directory (The admin panel of the website you connect to will use these later).
Once you’ve done this switch to the IIS Server view and enter your new website name using the New Web Site toolbar.
At this point, you need to configure your website settings for HTTP and HTTPS. You also need new SSL options for your website. In the section below we show you how to configure a website or folder with SSL and HTTPS:
- Log on to your computer as an Administrator.
- Press Start and go to Settings. Click Control Panel.
- Double-click on Administrative Tools and Internet Services Manager.
- In the left-hand pane select the website you want to configure.
- Right-click on your Website (or folder or file) that you want to configure SSL for and click Properties.
- Click on the Directory Security tab.
- Select Edit.
- To add SSL as a requirement, click Require Secure-Channel (SSL).
- Next click Require 128bit Encryption.
- (Optional) If you want users to connect regardless of whether they have a certificate, click Ignore client certificates. If you want to block users without a certificate, select Accept client certificates.
Securing IIS with Secure Sockets Layer (SSL)
Most enterprise users are naturally going to want to secure their data against unauthorized access. This can be done through the use of SSL. SSL allows you to encrypt all the data that you transmit. This prevents any outside entities from getting access to data they don’t have permission to. In order to use SSL to secure your server, you need to install a server certification on the server machine. The first step to enabling SSL is to create a certificate. This can be achieved by following the steps below:
- Install Windows Server 2003.
- Ensure that you have IIS installed and configured.
- Install Microsoft Certificate Services (this allows you to create authentication certificates).
- Open Internet Explorer and browse for Microsoft Certificate Services (http://MyCA/certsrv).
- Click Request a Certificate and click Next.
- Next click Advanced request.
- Click Next, then submit a certificate request to this CA using a form. Click Next. This will raise the certificate request form and add the domain name of your server machine.
- Now click Server Authentication Certificate in the Intended Purpose or Type of Certificate Needed field.
- Select either Microsoft RSA SChannel Cryptographic Provider, Microsoft Base Crypto Provider version 1.0 or Microsoft Enhanced Cryptographic Provider. (Take extra care not to select Microsoft Strong Cryptographic Provider).
- Select the Use Local Machine store box and verify that Enable Strong Private Key Protection is unchecked.
- Click Submit. Now you will either have the certificate installed immediately or you will have to wait for it to be administered by the CA administrator.
Designating an SSL Server Certificate to a website
To add an SSL server certificate to a website:
- Open IIS Manager, click on Local Computer, and then Web Sites folder.
- Look for the website that you want to assign the certificate to and right-click Properties.
- Next, click the Directory Security section and click Server Certificate. (You’ll find this under Secure Communications).
- Raise the Web Server Certificate Wizard and press Assign an existing certificate.
- Complete the Web Server Certificate Wizard process. Once completed, go to the Properties page, select the Directory Security tab and press the View Certificate button (here you can view more information about the certificate).
Virtual Directories
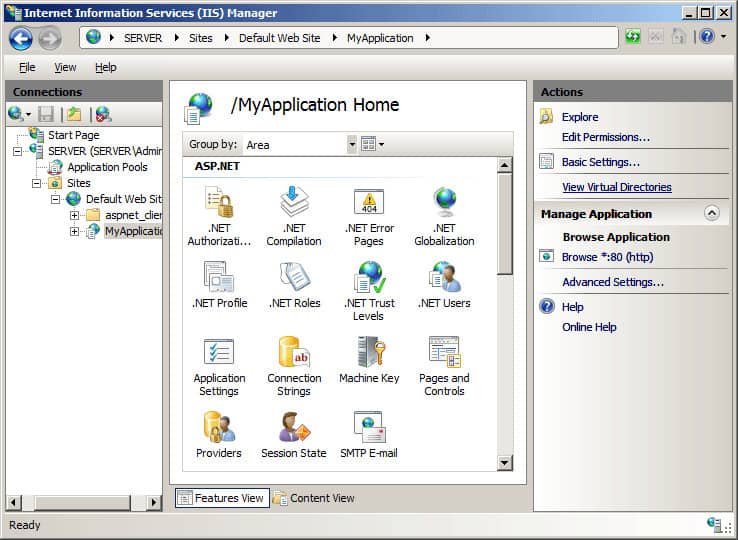
IIS not only allows you to create sites and applications but also allows you to create virtual directories. In IIS you specify a name that maps to a physical directory. The direct name provides users with a way to access the content hosted on a server quickly. In many cases, this is another website, but it can also be smaller media elements like photos and videos as well.
In the older IIS 6.0, virtual directories and applications were considered to be separate objects. An application was comprised of the following metabase components:
- AppFriendlyName
- AppRoot
- AppIsolated
- AppPoolID
As of IIS 7.0 and after, virtual directories and applications are still considered as separate objects but they also exist in a hierarchy. For example, one website can contain multiple applications. In turn, one website can contain multiple virtual directories which lead to a physical directory on a computer.
Log Files
Log files are used to record a variety of actions on your server. Loading up the log files will show you everything from the date and time of the event, the IP address involved, and the quantity of data transmitted. Most of the time your log files can be found here:
< %SystemRoot%\system32\Logfiles\ >On most contemporary versions of IIS, you can find your IIS log files by performing the following actions:
- Click Start and Control Panel.
- Click Administrative Tools and run Internet Information Services (IIS).
- Look for your website on the left-hand side of the tree and select it.
- Next, click the Logging icon.
- Look for the dialog box at the bottom of the screen that says Directory, and click Browse.
If you’re using IIS 6 then:
- Go back to step 3 of the instructions above.
- Right-click on your website and click Properties.
- Find the Website tab and look for the Active Log Format section.
- Click the Properties button and look at the bottom of the box where the log file directory and log file name are shown.
Ports
Generally speaking, your server will use port 80 for all of your HTTP traffic. However, if this isn’t suitable for your needs then you can change it as required. You can do this by following the steps below:
- Open Internet Information Services (IIS Manager).
- Right-click on your website then press Properties.
- In the Properties window find the TCP port box and change it to a port of your choice.
Please note that if you change the port from the default setting when you go to open up your website, you will need to enter your domain name and the new port. For example: domainname:80 (type the number of the port you wish to use instead of 80).
Windows 8 and 8.1
On Windows 8.1 there are a couple of differences:
- Type IIS Manager into the Search Box on the homepage.
- Select Internet Information Services Manager in the search results.
- On the left-hand side of the screen you’ll see a navigation tree; click Default Web Site.
- Next, go to the sidebar on the right hand of the screen and click Bindings.
- Highlight http from the main view and click Edit.
- Enter the new port you want to use in the Port text box.
- Press Ok and click Close.
- Go back to the left-hand tree and select the relevant server node.
- Finally, click Restart Server from the sidebar on the right-hand side.
Third-Party IIS Tools
1. SolarWinds Server & Application Monitor (FREE TRIAL)

SolarWinds Server & Application Monitor is an application monitoring platform that can monitor IIS sites. With SolarWinds Server & Application Monitor you can see the availability of IIS servers and websites.
Key metrics like CPU usage, memory usage, response time, and disk usage can all be monitored with this tool. If there is a problem with a site then you can automatically restart it to try and fix the issue.
The monitoring experience is driven by graphs and status buttons. Graphs show you details about resource usage and other information so that you can see how an IIS website or server is performing.
For example, there are graphs outlining IIS Average CPU and Memory Usage to show how many resources you have available. This helps you to know whether you need to buy more resources or not.
Security wise, SolarWinds Server & Application Monitor can monitor SSL certificate expiration. The tool can tell you the dates when your SSL certificates expire and the number of days you have left before that point in time. Having this information on hand makes it easy to manage SSL certificates for multiple sites or servers without running the risk of them expiring.
As a performance monitoring solution for IIS, SolarWinds Server & Application Monitor has everything you need to manage IIS resources efficiently. It is also competitively priced, starting at $2,995 (£2,308). T
2. Paessler PRTG Network Monitor (FREE TRIAL)

PRTG Network Monitor is a free network monitoring tool that can be used to monitor IIS services. With PRTG Network Monitor you can use the dedicated Windows IIS Application Sensor to monitor sent and received bytes per second, number of sent and received files per second, number of anonymous and known users per second, number of common gateway interface requests per second, and more.
While monitoring IIS performance can be challenging, PRTG Network Monitor analyzes performance right down to the application source code. For instance, PRTG Network Monitor measures the loading time of the source code to spot problems as early as possible.
Likewise, alerts can be configured to alert you once a predefined threshold has been crossed. Alerts are sent to your email, SMS, or mobile device (through push notifications) to make sure that you’re always up-to-date.
PRTG Network Monitor can also monitor physical hardware performance. In many instances, the performance of physical hardware will have a tremendous impact on the performance of IIS services. As such, using PRTG Network Monitor’s infrastructure monitoring capabilities to track hardware CPU and memory can catch performance issues in their infancy.
The performance monitoring experience offered by PRTG Network Monitor is perfect for enterprises on a shoestring budget. PRTG Network Monitor is free up to the first 100 sensors.
However, there are a number of paid versions available for larger organizations. Paid versions of PRTG Network Monitor start at $1600 (£1,233) for 500 sensors.
3. Dynatrace

Dynatrace is an application monitoring platform that can monitor IIS server performance. Through the dashboard you can view the availability of web servers and delve down into web server process groups.
For instance, you can see active services and dependent applications with information like the application version immediately visible. Once you install the Dynatrace Agent you can also see All Requests, Response times, Response sizes, Active threads, CPU usage, and memory usage.
The fast-track configuration capabilities of Dynatrace make it an impressive tool. There is an autodiscovery feature which can automatically detect IIS web servers in your network. All you need to do is install one agent and Dynatrace will do the rest of the work for you. These services are then displayed to you on an interactive map so that you can view your IIS architecture in more detail.
Another great feature is the ability to visualize IIS service requests. On the Service Flow screen you can view an IIS service from start to finish. Here you are shown a chart which details each service request type. This feature allows you to see what processes contribute to the response time of IIS.
For end-to-end IIS monitoring, Dynatrace is one of the top performance monitors on the market. In order to know the price of Dynatrace you’ll have to contact the company directly.
4. AppDynamics

AppDynamics is an application performance monitoring solution that offers a flawless IIS monitoring experience. AppDynamics monitors the throughput, memory usage, Disk I/O, and CPU utilization of IIS web servers. The platform is straightforward to deploy and can be installed in just a few minutes.
The user interface is extremely user-friendly. IIS applications are automatically discovered and displayed as part of a flow map. The flow map displays the transactions that are occurring with a web server or application.
If you want to view memory information then clicking the memory tab will show you the real-time memory utilization of your resources. This information is displayed as line graphs so that you can view the change over time.
Where AppDynamics excels as a IIS monitoring solution is in its diagnostic capabilities. The tool automatically provides you with code level data if an application is slow or a bottleneck is detected. By viewing the code execution you can see where the problem originated and find a solution.
The root cause abilities of AppDynamics are essential for those who want a performance monitoring solution. AppDynamics supports Microsoft IIS Express 7.x, Microsoft IIS 6.0, Microsoft 7.0, Microsoft 7.5, and Visual Studio development server.
5. IIS Crypto
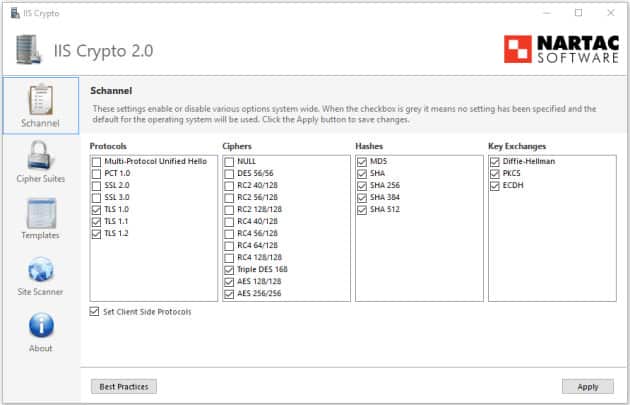
IIS Crypto is an IIS extension that can enable or disable protocols, hashes, and key exchange algorithms. The user interface is easy to use, with six main tabs: sChannel, Cipher Suites, Advanced, Templates, Site Scanner, and About.
On the sChannel screen you can enable or disable different features and protocols. There are five lists you can interact with: Server Protocols, Ciphers, Hashes, Key Exchanges, and Client Protocols. On the Cipher suites page you can reorder cipher suites.
The next most notable feature is that of templates. You can create custom protocol templates that can be run on multiple servers. This helps to make managing multiple sites or applications more convenient. However, it is important to note that you need to have administrator privileges in order to use IIS crypto.
One of the biggest perks of IIS Crypto is that it is completely free. IIS Crypto is available for Windows Server 2008, Windows Server 2012, Windows Server 2016, and Windows Server 2019. The software is available as a GUI or a command line interface..
6. Orca
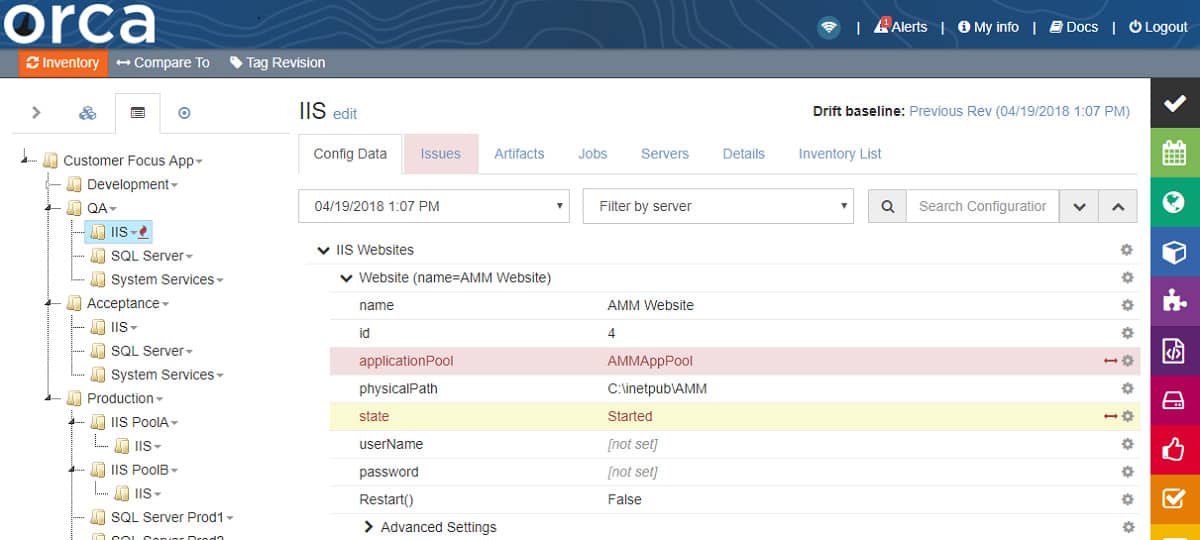
Orca is a configuration management solution for IIS. When using Orca you can compare the differences between different IIS configurations automatically. Configurations can be compared between environments and different points in time.
Once you’re ready to make changes you can deploy configuration changes up to hundreds of servers. Any configuration changes that are non-compliant can be scrapped immediately.
The security documentation features offered by Orca are also very useful. Orca automatically reports configuration changes so that you have a record of what changes have been made. Having these reports readily available is not only useful for regulatory compliance but also improves visibility as well.
Orca is one of the more convenient configuration management solutions on the market. If you’re looking to manage configurations across multiple IIS sites then Orca is highly recommended. The pricing options for Orca is only available if you contact the company directly.
7. eG Enterprise
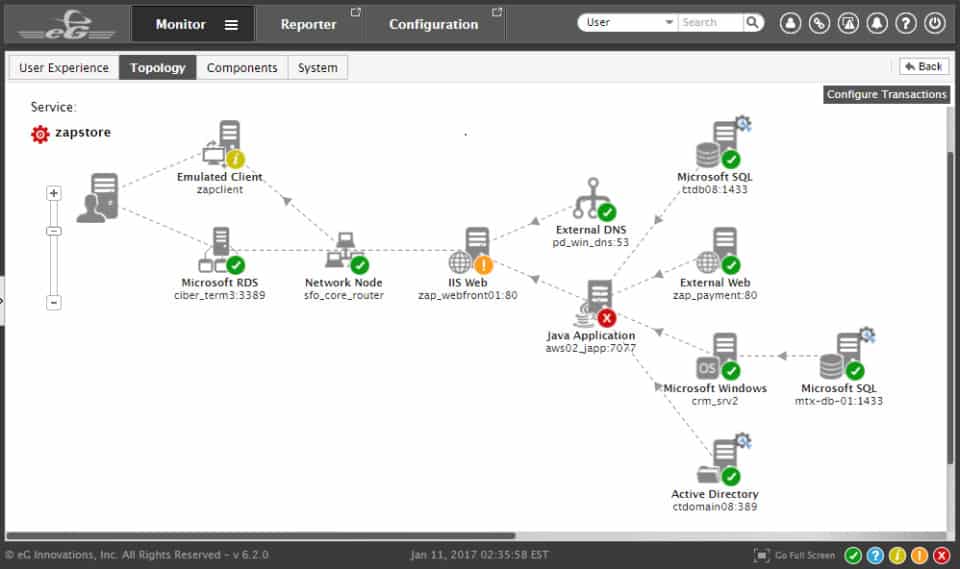
eG Enterprise is a performance monitoring platform with IIS monitoring. eG Enterprise monitors the availability and response time of transactions between IIS websites and users. Monitoring the user experience is eG Enterprise’s primary concern with IIS monitoring. The external agent tests the quality of the user experience in different locations by using request emulation and measuring the response time users are experiencing.
The internal transaction monitoring of eG Enterprise breaks down the request rate of individual web transactions, average response times, and the number of aborts by web transactions. With this information, you can pinpoint if your site is living up to expectations or needs to be tweaked further.
eG Enterprise can be deployed on-premises or in the cloud as a license or subscription. However, you need to contact the sales team in order to view a quote. There is a free evaluation version which supports up to five servers as a cloud-deployed platform.
Tools for monitoring IIS
Once you have IIS set up, you will need to keep ahead of any possible problems. Monitoring a complex application, such as IIS takes a lot of resources and you can reduce the amount of staff that you need to dedicate to the task by introducing automated tools.
SolarWinds Microsoft Management Tools (FREE TRIAL)
SolarWinds Microsoft Management Tools can watch out for key attributes in the performance of IIS. You will particularly need the Web Performance Monitor and the Server and Application Monitor to keep IIS running smoothly. Both of these tools are written to a common platform, called Orion. This enables them to connect together into a contiguous tool. Both tools will also help you manage other Microsoft products, including Exchange Server, Sharepoint, and Office 365. These monitoring systems are not free to use.
Microsoft Extensions
1. UrlScan 3.1
UrlScan 3.1 is a security tool that helps to protect IIS against cyber attacks. There are a number of added protections that you get from using UrlScan 3.1 that you don’t get from the standard version of IIS.
First, this tool can restrict HTTP requests that will be processed by IIS. Blocking some HTTP requests is advantageous because it protects against requests that can be part of a cyber attack.
In addition, UrlScan 3.1 can also filter HTTP values and headers to eliminate the risk of SQL injection attacks. This is done by creating deny rules which prohibit certain requests that could be malicious. To make sure that you don’t block out legitimate connections there is also an AlwaysAllowedUrls section where you can specify URLs that should always be permitted.
For further information, UrlScan 3.1 also provides log files that you can use for more sophisticated analysis. In practice, log files help to provide additional information on errors and other problematic activity on IIS. With this information, you can make changes and deliver a more reliable service.
On account of its security features, UrlScan 3.1 is an essential download. It helps to supplement some of the security limitations that come with an unmodified version of IIS. UrlScan 3.1 supports IIS 5.1, IIS, 6.0, and IIS 7.0 for Windows Vista and Windows Server 2008.
2. URL Rewrite 2.1
URL Rewrite is another IIS extension that allows the user to create rules to modify URL rewriting behavior. By configuring URL rules the user can change how HTTP headers, responses, or request headers are rewritten.
In the context of an organization, configuring URL rules is useful as an administrator can configure a rule. URLs can be created that are easy for users to remember and simple to index for search engines.
Having URLs that are easy to index on search engines is a valuable step towards making your site or application available to clients. URLs that are search engine-friendly increase the visibility of your site. You don’t have to write your own rules for this either, There are a number of rule templates included out-of-the-box to help you get started.
URL Rewrite is also a good tool because it updates the user interface in IIS Manager. Having an integrated tool that allows you to create new rules helps to manage URLs much more effectively. As an extension for IIS, URL Rewrite 2.1 is available for free.
3. IIS Manager for Remote Administration 1.2
IIS Manager for Remote Administration 1.2 is vital for any enterprise looking to manage IIS remotely. You can manage IIS remotely on devices with Windows XPand up.
You can perform the majority of the functions you could on the original IIS without being onsite. Administration privileges can be used to restrict access to those employees who require access.
Managing remotely with IIS Manager for Remote Administration 1.2 is also secure, using HTTP over SSL. There are also automatic downloads where features are downloaded on the local IIS Manager that have already been installed on the web server. This simplifies the manual administrative concerns that come with remote updates.
For teams working remotely or looking to share control of web applications across multiple sites, IIS Manager for Remote Administration 1.2 is an absolute must. IIS Manager for Remote Administration 1.2 is available for IIS 7, IIS 7.5, IIS 8, and IIS 8.5.
4. Web Deploy 3.6
Web Deploy 3.6 or msdeploy is a tool that integrates with IIS to synchronize IISsites, servers, and applications. When synchronizing, Web Deploy 3.6 can detect the difference between two locations and make only the necessary changes to synchronize servers. Using this tool is more efficient because it identifies which data needs to be synchronized rather than attempting to do everything from scratch.Another use case where Web Deploy 3.6 is very valuable when deploying web applications. The user doesn’t need any user administrative privileges in order to deploy updates. However, the server administrator still has the control to delegate tasks to lower-ranked users without administrative privileges. In other words, deploying web applications is much easier and less restrictive than it is in the default version of IIS.
IIS Architecture
IIS has two main layers – Kernel Mode and User Mode. The Kernel Mode contains the HTTP.SYS and User Mode contains WAS and W3 service. The subsection of both are shown in fig.

The above diagrams shows the flow of an HTTP request in process. The request-processing flow is described as:
- An HTTP request first goes to HTTP.sys and now, HTTP.SYS is responsible for passing the request to a particular application pool.
- HTTP.sys contacts to WAS and WAS requests configuration information from the xml file.
- The configuration information is sent to WWW service receives.
- The WWW service uses the configuration information to configure HTTP.sys.
- Configured HTTP.sys contacts to WAS and now, WAS starts a worker process for the application pool to which the request was made.
- The worker process processes the request and returns a response to HTTP.sys. The request is passed through an ordered series of module in the processing pipeline.
Role of HTTP.sys in IIS
HTTP.SYS is the part of kernel mode of IIS. Every client request is passes through the kernel mode, Http.sys then makes a queue for each and individual application pool based on the request. Whenever we create any application pool IIS automatically registers the pool with HTTP.sys to identify the particular during request processing. It provides the following services in IIS:
- Routing HTTP requests to the correct request queue.
- Caching of responses in kernel mode.
- Performing all text-based logging for the WWW service.
- Implementing quality of service functionality, which includes connection limits, connection timeouts, queue-length limits, and bandwidth throttling.
ISAPI Filter
ISAPI filters are DLL files that can be used to modify and enhance the functionality provided by IIS. ISAPI filters always run on an IIS server, filtering every request until they find one they need to process.
ISAPI filters can be registered with IIS to modify the behavior of a server. It can perform the following tasks:
- Change request data (URLs or headers) sent by the client
- Control which physical file gets mapped to the URL
- Control the user name and password used with anonymous or basic authentication
- Modify or analyze a request after authentication is complete
- Modify a response going back to the client
- Run processing when a request is complete
- Run processing when a connection with the client is closed
- Perform special logging or traffic analysis.
- Handle encryption and compression.
Different Security Settings Available in IIS
IIS provides a variety of authentication schemes:
- Anonymous (enabled by default)
- Basic
- Digest
- Integrated Windows authentication (enabled by default)
- Client Certificate Mapping
Steps to follow to Change ASP timeout session in IIS
- Login to your VPS via RDP. Click on Start -> Administrative Tools -> IIS.
- Click on website name and open ASP feature from IIS group.

- Expand Session Properties under Services and as per requirement modify Time-Out value [Default Value is 00:20:00 (HH:MM:SS)].
- From the Actions Pane, click on Apply link to save the changes.

Pros of using IIS:
The graphical user interface (GUI) helps new users. IIS has good integration with Performance Monitor, which provides for easy access to extensive usage statistics.
Cons of using IIS:
- IIS is not robust and can easily be made to ‘hang’ so that the server must be rebooted to recover. It is certainly unacceptable for an NT Service to fail in this way.
- IIS can only be configured using the GUI, which can be a complex and laborious manual process in a production environment. There seems to be no way to encapsulate all of the settings in a single configuration file, as you can with Apache, which is essential for configuration management.
- IIS lacks flexibility in many areas. For example, there is almost no way to control how URLs are parsed.
- Remote administration and configuration of IIS is almost impossible, as this can only be done using a crippled web-interface that, of course, requires IIS to be running and correctly configured!
- IIS is only available for Windows.
Install and Configure IIS Web Server on Windows Server 2019
Step 1: Start Server Manager
As with all Windows Server roles, we have to go to the Server Manager to begin the installation. Hit your “Windows” key and search for Server Manager if it is not already opened. Once open, click on “Add Roles and Features“


Step 2: Click Next on Wizard
On the first page of the “Add Roles and Features Wizard“, click “Next“

Step 3: Select Installation Type
In the “Select Installation type page“, select “Role-based or feature-based-installation” and click “Next“
Step 4: Choose Destination Server
Select the server you will install NFS on and click “Next“
Step 5: Select Roles to install
In this “Select server roles” part check the “WebServer (IIS)” box then a pop-up window will come up.
Step 6: Add IIS Features
In the pop-up window, just click on “Add Features” then hit “Next“. After that click “Next” on the next three consecutive windows as illustrated below.
Step 7: Confirm Selections
On the “Confirm installation selections” page simply click on “Install” and afford it some time to finish after which you just click “Close“.
Step 8: Prove the Web Server is running
Open your browser either within the server or on a computer that can access your IIS Server network and input its IP Address on the browser’s search as shown below. If it loads, then we are good to go.
Step 9: Configure Default Site
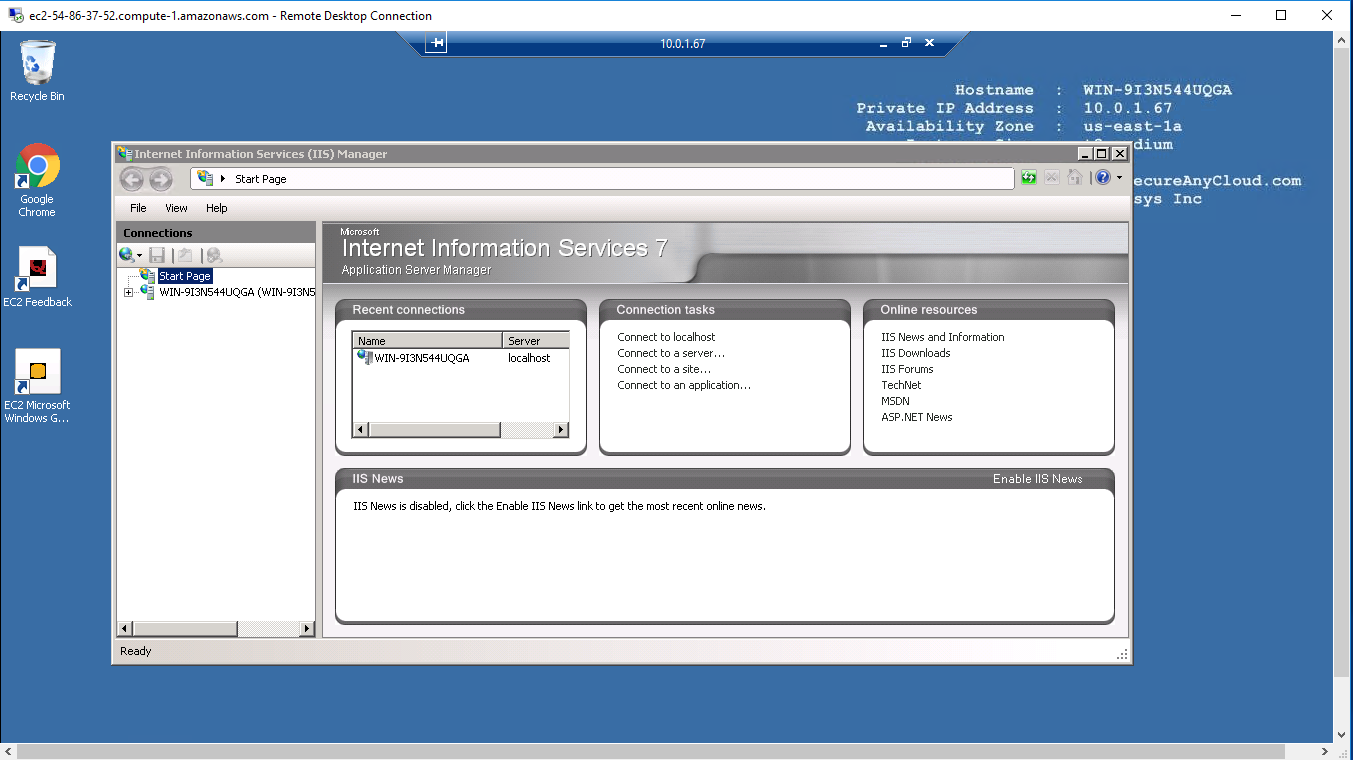
Step 1: Open Default Site
Open IIS Manager by opening “Server Manager“, clicking on “Tools” and choosing “Internet Information Services (IIS) Manager” from the drop-down menu. Once your IIS Manager is open, expand Server name below “Start Page” and further expand “Sites” folder to expose the default site.


Expand Server name

Expose the default site

Step 2: Check its files
The “Default Site” stores its files in a particular directory. To expose this information, right-click on it, choose “Manage Website” then “Advanced Settings” as illustrated below.

This will open a pop-up window with all of the Default Sites information such as files or Document Root as it is normally known, enabled protocols and even bindings. If you click on “Physical Path” a button appears on its extreme right where you can choose a different document root.
Step 3: Default documents
The “Default documents” feature in IIS Manager helps you to specify the default files to return when a client does not request a specific file from the web-server. Double click on it to check the files shown. They are in order of priority.
Let us create an index.html file in the document root and check if it gets loaded.
Checking it out on Browser
And it loaded successfully.
-Internet Information Services (IIS, formerly Internet Information Server) is an extensible web server created by Microsoftfor use with Windows NT family.IIS supports HTTP, HTTPS, FTP, FTPS, SMTP and NNTP. It has been an integral part of the Windows NT family since Windows NT 4.0, though it may be absent from some editions (e.g. Windows XP Home edition), and is not active by default.
The Administration API for IIS was developed as an ASP.Net Core application. This allowed us to take advantage of the Web API conventions that the MVC framework offered. This application has to be accessible at all times to allow users to be able to configure IIS whenever necessary, therefore we needed it to run as a service. Hostable Web Core (HWC) is a technology that allows a consumer to have an in-process version of IIS available to them. When HWC gets loaded in, the process has access to all the capabilities that the full IIS offers. We took advantage of HWC to enable behavior quintessential to the success of the API such as windows authentication, logging, and SSL bindings.
The architecture that we use allows the API to be self hosted as a windows service.
Features
New Features Introduced in IIS 10.0
1.HTTP/2
IIS 10.0 adds support for the HTTP/2 protocol, which allows for numerous enhancements over HTTP 1.1 and results in an efficient reuse of connections and a reduction in latency. HTTP/2 support was added to Windows Server 2016 and Windows 10 as part of the kernel-mode device driver, HTTP.sys, and all your existing IIS 10.0 websites can benefit from this. (The latest versions of most modern browsers already support HTTP/2 over TLS so you may already be using HTTP/2.)
2.IIS on Nano Server
Nano Server is a new headless, 64-bit-only installation option for Windows 10 and Windows Server 2016 which installs “just enough OS” thereby resulting in a smaller footprint. Nano Server provides higher density, increased uptime, and a smaller attack surface making it suitable for running web workloads. You can currently run ASP.NET Core, Apache Tomcat, and PHP workloads on IIS on Nano Server, in addition to using it as an reverse proxy to any HTTP listener via the HttpPlatformHandler module.
3.IIS in Containers
Windows Server 2016 and Windows 10 with the Anniversary Update add support for containers which are isolated, resource controlled, and portable operating environments. Windows Server 2016 and Windows 10 support two different container runtimes with a different degree of isolation: Windows containers achieve isolation through process and namespace isolation, while Hyper-V containers achieve isolation through lightweight virtual machines. IIS 10.0 runs in both container runtimes as well as on both base OS images, Server Core and Nano Server, allowing you to choose the best Windows container environment for your web workloads.
4.Managing IIS
With the advent of Nano Server and Windows Containers, IIS now provides a better management story for all environments running (including those without a GUI).
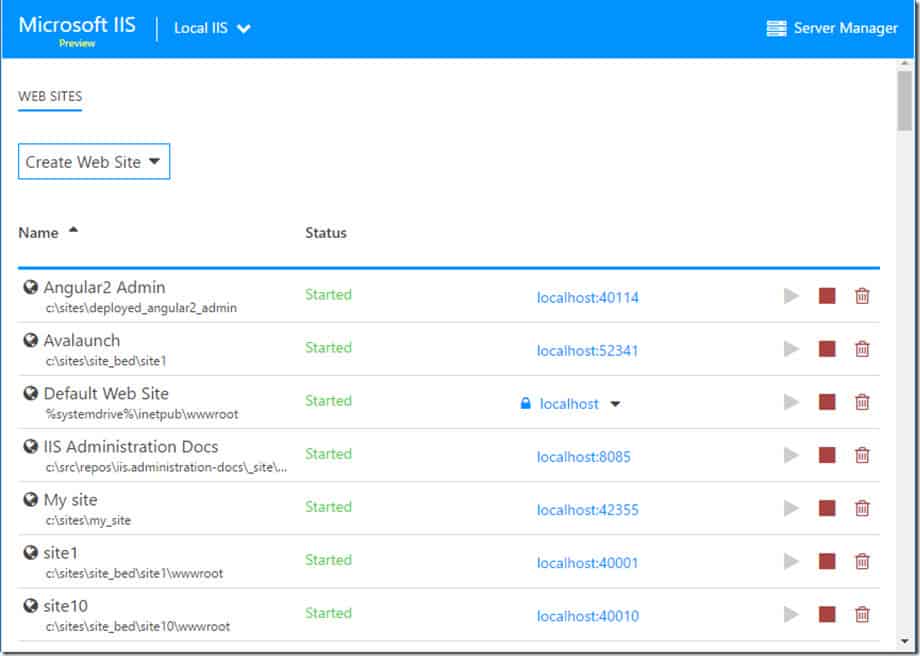
5.Microsoft IIS Administration (https://manage.iis.net)
Microsoft IIS Administration is a REST API which allows you to configure and monitor your IIS instance, and it is an open-source project that is under active development on GitHub. With this API users can take advantage of the new IIS Web Manager that is available at https://manage.iis.net. This browser based application consumes the IIS Administration API to provide a familiar management experience. Microsoft IIS Administration supports IIS 7.5 and above.
6.IIS Administration PowerShell cmdlets
IIS 10.0 adds a new, simplified PowerShell module for managing IIS which scales better and offers superior pipelining support than existing WebAdministration cmdlets. The new module gives you direct access to the ServerManager object allowing for greater control over the configuration system.
7.Wildcard Host Headers
IIS 10.0 adds support for Wildcard Host Headers; you can now set up bindings to serve requests for any subdomain within a given domain.
8.IIS Thread Pool Ideal CPU Optimization for NUMA hardware
IIS 10.0 provides better performance on NUMA hardware through the IIS thread pool ideal CPU optimization.
-Major Features of Internet Information Services
IIS 8.5 has several improvements related to performance in large-scale scenarios, such as those used by commercial hosting providers and Microsoft’s own cloud offerings. It also has several added features related to logging and troubleshooting. The new features are:
- Idle worker-Process page-out: a function to suspend idle site to reduce the memory footprint of idle sites.
- Dynamic Site Activation: a feature that registers listening queues only to sites that have received requests.
- Enhanced Logging: a feature to allow collection of Server variables, request headers and response headers in the IIS logs.
- ETW logging: an ETW provider which allows collecting real-time logs using various Event-tracing tool.
- Automatic Certificate Rebind: a feature that detects when a site certificate has been renewed, and automatically rebinds the site to it.
IIS 8.0 offers new features targeted at performance and easier administration. The new features are:
- Application Initialization: a feature that allows an administrator to configure certain applications to start automatically with server startup. This reduces the wait time experienced by users who access the site for the first time after a server reboot.
- Splash page during application initialization: the administrator can configure a splash page to be displayed to the site visitor during an application initialization.
- ASP.net 4.5 support: With IIS 8.0, ASP.net 4.5 is included by default, and IIS also offers several configuration options for running it side-by-side with ASP.net 3.5.
- Centralized SSL certificate support: a feature that makes managing certificates easier by allowing the administrator to store and access the certificates on a file share.
- Multicore scaling on NUMA hardware: IIS 8.0 provides several configuration options that optimize performance on systems that run NUMA, such as running several worker processes under one application pool, using soft or hard affinity and more.
- WebSocket Protocol Support.
- Server Name Indication (SNI): SNI is an extension to Transport Layer Security, which allows binding of multiple websites with different hostnames to one IP address (similar to how Host Headers are used for non-SSL sites).
- Dynamic IP Address Restrictions: a feature that enables an administrator to dynamically block IPs or IP ranges that hit the server with a large number of requests.
- CPU Throttling: a set of controls that allow the server administrator to control CPU usage by each application pool in order to optimize performance in a multi-tenant environment.
AWS
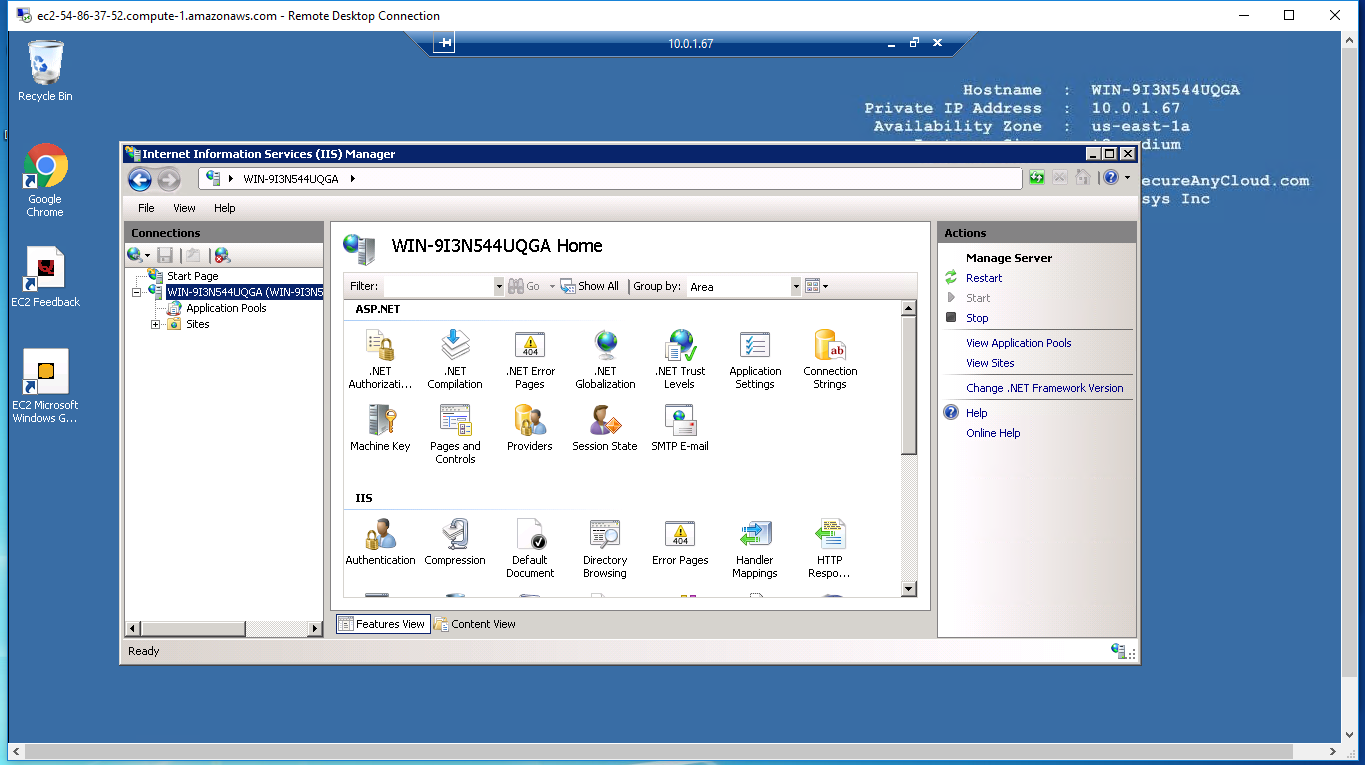
Installation Instructions for Windows
A) Choose Start, expand All Programs, and then expand Internet Information Services
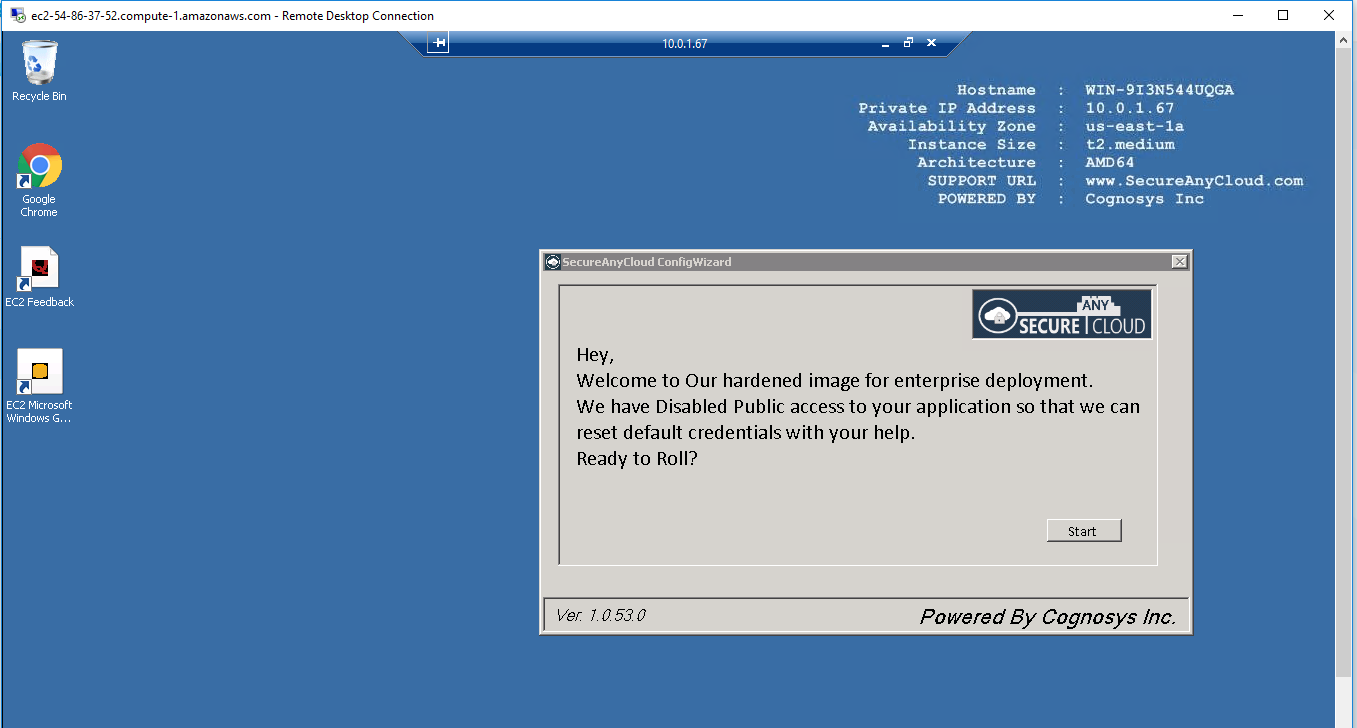
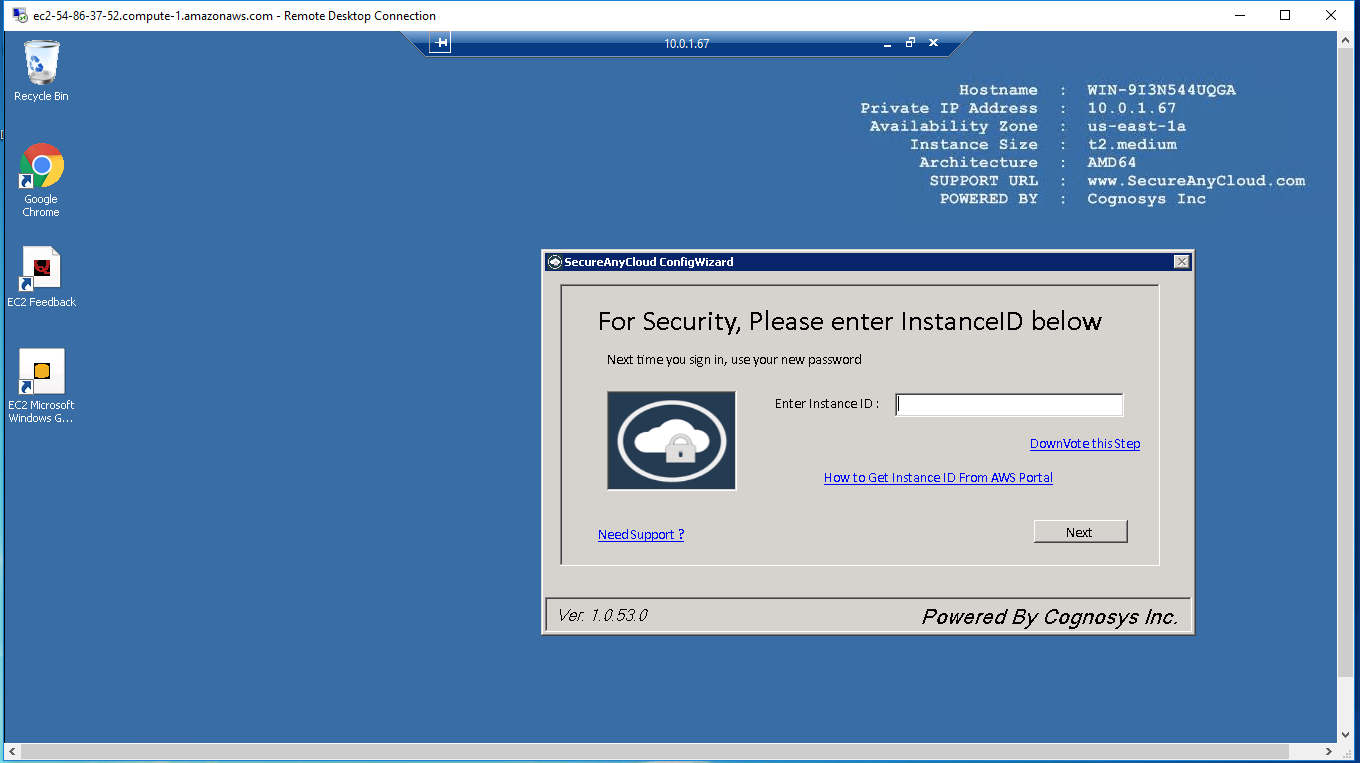
B) RDP Connection: To connect to the operating system,
1) Connect to virtual machine using following RDP credentials :
- Hostname: PublicDNS / IP of machine
- Port : 3389
Username: To connect to the operating system, use RDP and the username is Administrator.
Password : Please Click here to know how to get password .
C) Other Information:
1.Default installation path: will be on your root folder “C:\Program Files (x86)\Microsoft Visual Studio 14.0”
2.Default ports:
- Windows Machines: RDP Port – 3389
- Http: 80
- Https: 443
3. To activate Visual Studio use Product Key or Sign in from of Internet Information Services
Configure custom inbound and outbound rules using this link
AWS Step by Step Screenshots


Videos
Introduction
Embedded media removed during static cleanup.
How IIS work
https://www.youtube.com/watch?v=byuF0gdqulA
Basic configuration
Embedded media removed during static cleanup.
