1-click AWS Deployment 1-click Azure Deployment
Overview
Grav is a content management system (CMS) with a difference. Content management systems are commonplace in the modern web, with platforms like WordPress powering a large percentage of websites. They provide an easy-to-use graphical interface for non-technical users to add articles and content while the developers handle the code separately. The major drawbacks come when the CMS is bloated with unneeded features, or forces developers to work in a counter-productive manner. Even a basic CMS-built website that’s little more than a landing page relies on a database, which can make migration and management a larger task than it should be. Meet Grav, the CMS built with the purpose of being lightweight, flexible – and without a traditional database. Yet it still has an optional administration panel with a graphical interface, user management and the same features expected of a CMS.While Grav doesn’t have a traditional database running on MySQL or similar, it does have a type of database which is stored in folders and plain text files. These files store content with the Markdown syntax with configuration stored in YAML.
Why Grav?
The inspiration behind Grav’s development was to create a CMS that fills a gap between simple, static sites and complex multiuser blogs. When the project’s founder, Andy Miller, took a look at the flat-file solutions already out there, he found current options were either commercial, underpowered, or both.This isn’t for lack of technology. Twig tempting, YAML configuration, markdown content support, and other exceptionally user-friendly features were out there, but they hadn’t been assembled into a single CMS available for free.We felt it was important to make Grav not only free, but open source. This enables its community of developers to contribute code, have a definite say in the project’s development, and to easily create plugins and themes that take full advantage of Grav’s capabilities.
Grav – Lifecycle
Here, we will understand the lifecycle of Grav. Grav Lifecycle determines how Grav processes in order to extend the Grav via Plugins. The following diagram shows the flow of Grav lifecycle process.
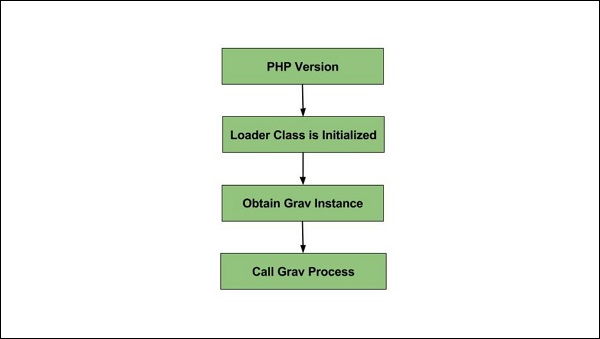
The following four steps from the Grav lifecycle −
- PHP Version
- Loader class is initialized
- Obtain Grav Instance
- Call Grav Process
PHP Version
It checks the version of PHP to make sure that we are running the PHP version above 5.4.0.
Loader class is initialized
In the second step, the class loader gets initialized.
Obtain Grav Instance
- If no instance exists, then it calls the load() method and adds Grav.
- It initializes the debugger value and adds to the debugger.
- It registers the log and the error handler.
- It adds the uri, task, events, cache, session, plugins, themes, twig, taxonomy, language, pages, assets and base url.
- It registers the stream and the config handler.
Call Grav Process
- It initializes the configuration, Uri object, error handler, debugger and session.
- After initializing, it starts buffering the output.
- It initializes the timezone and the plugins and fires the onPluginsInitialized event.
- Next it initializes the theme and fires the onThemeInitialized and onTask[TASK] events.
- It initializes the assets and fires the onAssetsInitialized event.
- It initializes the twig with the following actions −
- Based on the configuration, it sets the twig template paths.
- Handles the available language templates.
- Next it fires the onTwigTemplatePaths event.
- Loader chain and twig configuration is loaded.
- Fires onTwigInitialized event.
- It loads the twig extensions and fires onTwigExtensions event.
- It sets the standard twig variables.
- Next it initializes the pages.
- It calls the buildPages() method.
- If cache is good, then it loads pages from cache. If cache is not good then the recurse() method is called.
- onBuildPagesInitialized event is fired in the recurse() method.
- If a file is found as .md, the following actions are performed −
- To load the file details, the init() method is called.
- It sets the filePath, modified and id.
- The header() method is called to initialize header variables.
- The slug() method is called to set the URL slug.
- The visible() method is called to set the visible state.
- Based on the folder that starts with _(underscore), modularTwig() is set.
- It later fires the onPageProcessed event.
- recurse() the children if a folder is found.
- It fires the onFolderProcessed event.
- calls the buildRoutes() method.
- For all pages the taxonomy is initialized
- The route table is built for fast lookup.
- The events onPagesInitialized and onPageInitialized gets fired.
- Debugger CSS/JS is added to the assets.
- Using Twig’s processSite() method, we get the output.
- The event onTwigSiteVariables is fired.
- Gets the output of the page.
- When page is not found or not routable then the event onPageNotFound is fired.
- All Twig variables are set on twig object.
- Template name is set depending upon the file/header/extension information.
- render() method is called.
- Returns the file format in HTML
- It fires the onOutputGenerated event.
- Set the HTTP headers.
- Displays the output
- The output buffer is flushed to the page.
- The event onOutputRendered will get fire.
- Closes the connection to client.
- Lastly, it fires the onShutDown event.
When the content() method is called on page, then the following lifecycle occurs.
- The event onPageContentRaw will get fire.
- According to the Markdown and Twig settings, it processes the page.
- It fires the onPageContentProcessed event.
Grav – Installation
Software Requirements for Grav
Let us now understand the software requirements for Grav.
Web Server
- WAMP (Windows)
- LAMP (Linux)
- XAMP (Multi-platform)
- MAMP (Macintosh)
- Nginx
- Microsoft IIS
Operating System − Cross-platform
Browser Support − IE (Internet Explorer 8+), Firefox, Google Chrome, Safari, Opera
PHP Compatibility − PHP 5.4 or higher
Text Editors
- Sublime Text (Mac / Windows/ Linux)
- Atom (Mac / Windows)
- Notepad ++ (Windows)
- Bluefish (Mac / Windows/ Linux)
Download Grav
Click on this link https://getgrav.org/downloads and follow the steps as shown in the screenshot given below to download Grav.
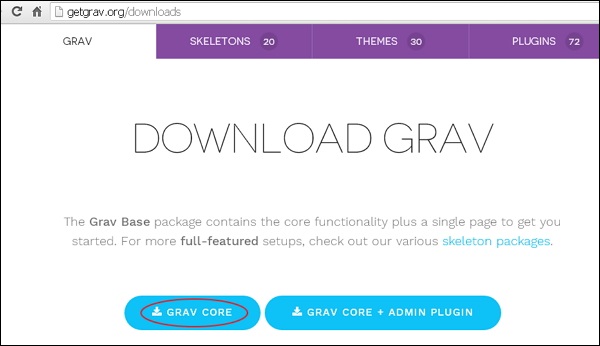
Unzip the downloaded Grav file into your web server.
Setup Wizard
Installation of Grav is a very simple process. Follow the steps given below for Grav setup.
- Download the zip file and extract it to your web server or local host. Rename the folder from its current name that you want to use to refer to your site.
- Open your browser and navigate to localhost/<your_folder_name>, you will be redirected to a screen which shows you have installed Grav successfully as in the following screenshot.

- Grav comes with a sample page that helps you get started. In the above screenshot, you can see the home link which has displayed a sample page.
How to Configure the General Settings of Grav
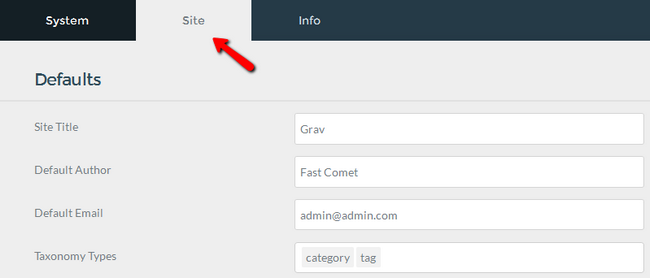
Once you install Grav, you will have to change the general options of your website. Elements like your site’s title or default Author can be changed from within the administration panel but first you will have to log into it.Navigate to the Configuration section from the main admin panel on the left.

Select the Site tab and start editing your website’s general settings:
Defaults
- Site Title – Plain and Simple this is the name of your website
- Default Author – The default name from which you can Post on your website
- Default Email – The default email to use in your website
- Taxonomy Types – Taxonomies are used to organize your content and you can add more than the default two if you so desire
Page Summary
- Enable – It is recommended to enable Page summary in order to have portion of the content on the show even before the user has opened the entire post
- Summary Size – The amount of characters the user will see in the summary from the post
- Format – You can choose between short and long and the difference is that the long format ignores the delimiter
- Delimiter – Placed after an opening paragraph. The delimiter is used as a boundary between independent regions of your content/post

You can use metadata to improve SEO and make certain content more recognizable and with redirects you can have custom routes to pages or completely new routes to older posts or news.
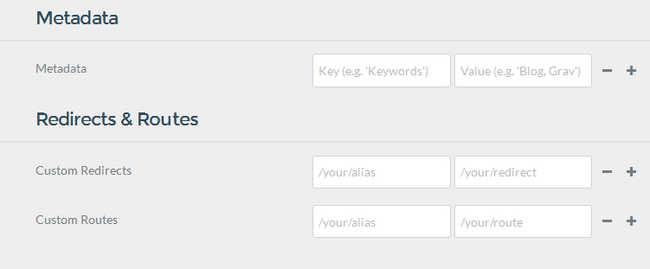
Once you are ready with everything, don’t forget to click on the Save button located at the top right corner of the page.
Grav – Themes Basics
Themes control the looks of your Grav site. Themes in Grav are built with the powerful Twig Templating engine.
Content Pages and Twig Templates
The pages that you create, references a specific template file by name or by setting the template header variable for the page. Using the page name is advised for simpler maintenance.
After installing Grav Base package, you will find the defauld.md file in user/pages/01.home folder. The name of the file, i.e., default tells Grav that this page should be rendered with the twig template default.html.twig placed inside the themes/<mytheme>/templates folder.
For example, if you have a file called contact.md, it will be rendered with twig template as themes/<mytheme>/templates/contact.html.twig.
Theme Organization
In the following sections, we will discuss about theme organization, i.e., its definition, configuration and more.
Definition and Configuration
The information about the theme will be defined in user/themes/antimatter/blueprints.yaml file and form definitions to be used in Administration panel are provided optionally. You will see the following content in user/themes/antimatter/blueprints.yaml file for Antimatter theme.
name: Antimatter
version: 1.6.0
description: "Antimatter is the default theme included with **Grav**"
icon: empire
author:
   name: Team Grav
   email: devs@getgrav.org
   url: http://getgrav.org
homepage: https://github.com/getgrav/grav-theme-antimatter
demo: http://demo.getgrav.org/blog-skeleton
keywords: antimatter, theme, core, modern, fast, responsive, html5, css3
bugs: https://github.com/getgrav/grav-theme-antimatter/issues
license: MIT

form:
   validation: loose
   fields:
      dropdown.enabled:
         type: toggle
         label: Dropdown in navbar
         highlight: 1
         default: 1
         options:
            1: Enabled
            0: Disabled
         validate:
            type: bool
In order to use theme configuration options, you need to provide the default settings in a file called user/themes/<mytheme>/<mytheme>.yaml.
Example
enable: true
Theme and Plugins Events
The ability of theme to interact with Grav via the plugins architecture is another powerful feature of Grav. To achieve this, simply create user/themes/<mytheme>/<mytheme>.php (for example, antimatter.php for default Antimatter theme) file and use the following format.
<?php
namespace Grav\Theme;

use Grav\Common\Theme;

class MyTheme extends Theme {
   public static function getSubscribedEvents() {
      return [
         'onThemeInitialized' => ['onThemeInitialized', 0]
      ];
   }
   public function onThemeInitialized() {
      if ($this->isAdmin()) {
         $this->active = false;
         return;
      }

      $this->enable([
         'onTwigSiteVariables' => ['onTwigSiteVariables', 0]
      ]);
   }
   public function onTwigSiteVariables() {
      $this->grav['assets']
         ->addCss('plugin://css/mytheme-core.css')
         ->addCss('plugin://css/mytheme-custom.css');

      $this->grav['assets']
         ->add('jquery', 101)
         ->addJs('theme://js/jquery.myscript.min.js');
   }
}
Templates
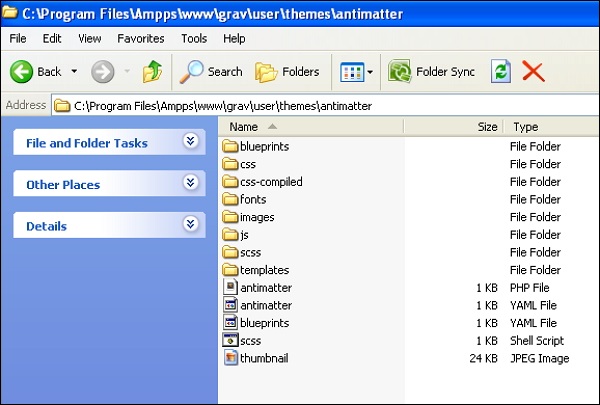
The structure of Grav theme has no set rules except that there must be associated twig templates in templates/ folder for each and every page types content.Suppose you want to support modular template in your theme, you have to create modular/ folder and store twig templates files inside it. If you want to support forms, then you should create form/ folder and store form templates in it.
Blueprints
To define forms for options and configuration for every single template files blueprints/ folder is used. These will not be editable via the Administrator Panel and it is optionally used. The theme is fully functional without blueprints folder.
SCSS/LESS/CSS
If you want to develop site with SASS or LESS, then you have to create sub-folders in user/themes/<mytheme>/scss/, or less/ if you want LESS along with a css/ folder.
For automatically generated files which are compiled from SASS or LESS, the css-compiled/ folder is used. In Antimatter theme, scss variant of SASS is used.
Follow these steps to install SASS in your machine.
- At the root of the theme, type the command given below to execute scss shell script.
$ ./scss.sh
- Type the following command to directly run it.
$ scss --sourcemap --watch scss:css-compiled
The css-compiled/ will contain all the compiled scss files and css file will be generated inside your theme.
Other Folders
It is recommended to create separate images/, fonts/ and js/ folders in your user/themes/<mytheme>/ folder for any images, fonts and JavaScript files used in your theme.
Theme Example
The overall folder structure of the Antimatter theme that we discussed so far is shown below.
How to Install Themes in Grav
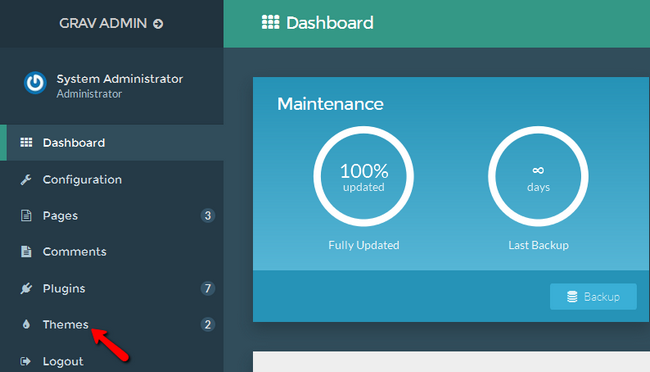
Switching the appearance of your Grav website is easy and can be done in just a few simple clicks. There are themes officially made by Grav and 3rd party themes on your disposal. In this tutorial we will show you how to find a new theme, add it to your website and activate it.As always the first thing you will need to do is to be logged in your admin dashboard. From there, please navigate to the Themes section.
On this window you will see your currently available for Activation themes as well as a button to Add a new one.
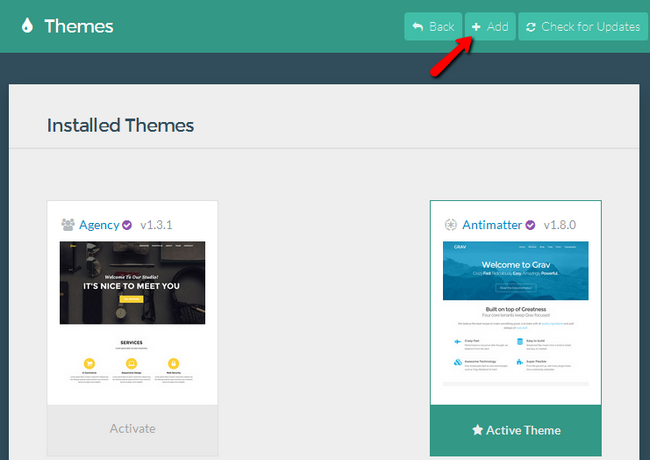
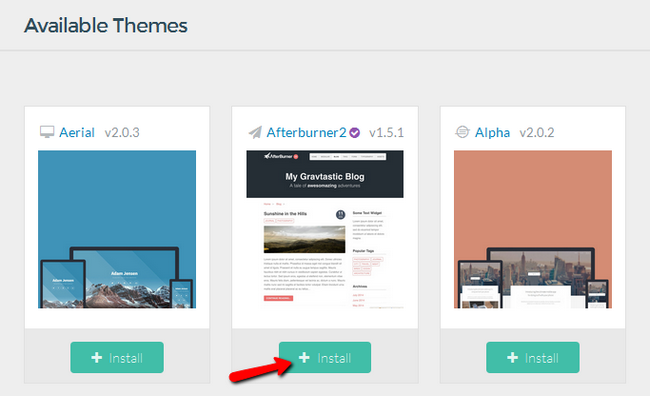
Now select a new theme from the list of themes. Note that themes marked with a purple checkmark are official Grav themes and there is less of a chance with interference with your current website content. Click on the Install button when you have made your choice.
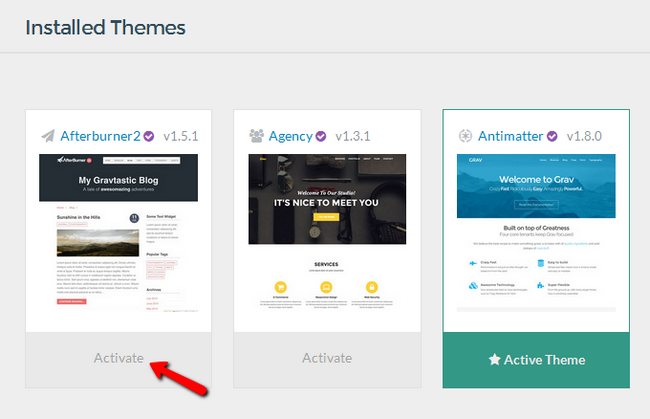
Your new theme has been installed and is ready for use. Now the only thing left for you is to activate it by clicking on the Activate Button.
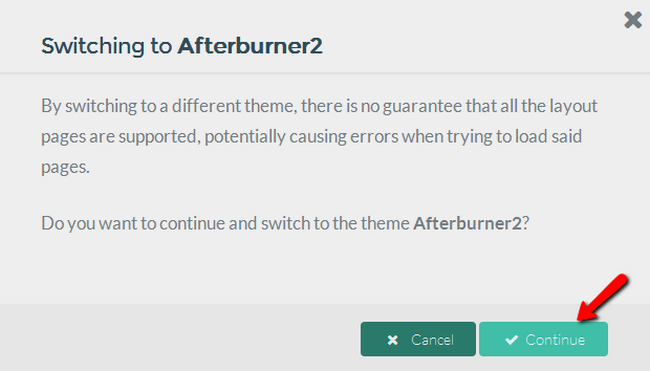
You will receive a notification reminding you that your layout might not work as intended on the new theme. Click Continue to finish the activation.
Congratulations, you have changed the appearance of your website. Feel free to experiment with different themes until you find the one that suits your site the most
Grav – Plugin
Grav Plugin can be uploaded to expand the functionality of the site. Plugins are used to make your work easier. The Dependency Injection Container helps access the key objects in Grav. In the entire life cycle with the help of Grav’s event hooks, we can manipulate Grav as per our need and can also access whatever the Grav knows. Dependency Injection is a software design pattern in which components are given their dependencies instead of hard coding them within the component.There are many free plugins available for Grav which are used for displaying blog archive, sitemap, search engine, form, light slider and many more. In the Plugin folder, you can store the plugins with a unique name; the name should be related to the function of the plugin and it should not contain any capital letter, underscore or space.
Powerful
Plugins are easy to write, flexible and powerful. There are 46 plugins, and have the features that include displaying a sitemap, provides breadcrumbs, display blog archives etc.
Essentials
When Grav is installed on your system, you can see there are two plugins inside the <your_folder_name>/user/plugins folder.
- Error plugin
- Problem plugin
Error Plugin − It is used to display the HTTP errors i.e. 404 Page Not Found when there is no request page available for the given URI.
Problem Plugin − It is used for detecting issues regarding the permissions, hosting setup and missing folders. It is useful when you install new Grav for identifying such issues.
How to Install Plugins in Grav
The Core version of Grav is accompanied by more than 45 plugin each of which provides viable new options for the CMS. The Softaculous installation comes with 6 of those plugin and you can install more at any time from the application itself.
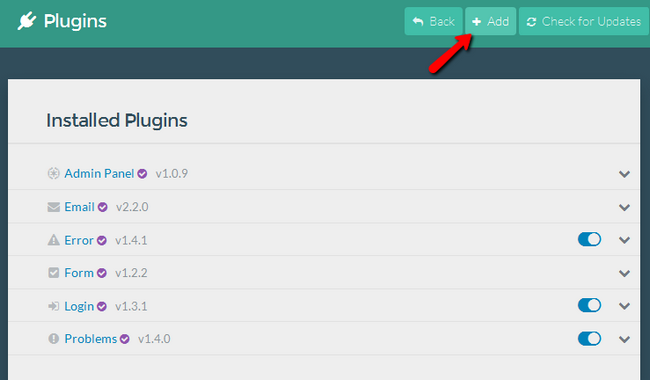
To install a new plugin, access your admin dashboard and navigate to the Plugins section.
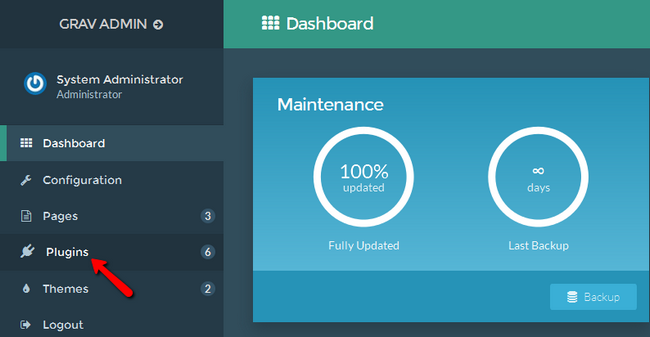
Here you will see the currently installed plugin and will be able to add a new one by clicking on the Add button.
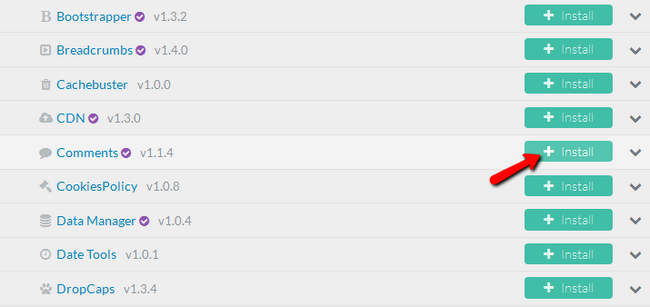
Select from a multitude of different plugin and click on the Install button when you have made your choice.
Just a second later you will see the following message indicating the successful installation of your plugin.

Congratulations. You now have a new plugin which you can configure from the plugin section.
How to Manage Pages in Grav
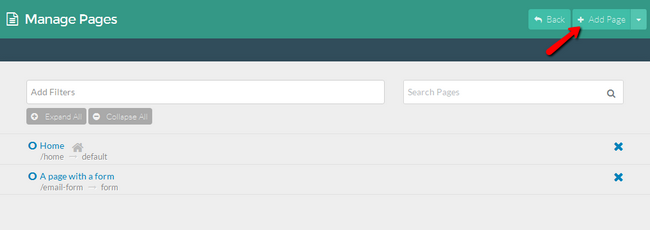
The Pages of your Grav website is what defines it in the virtual space. Your content will be structured and presented on your site via Pages and for this reason we will show you how to use the different types of pages .Firstly, login to your Grav Admin area and click on the Pages menu in the main admin panel.

Click on the Add Page button in the top right corner of the page.
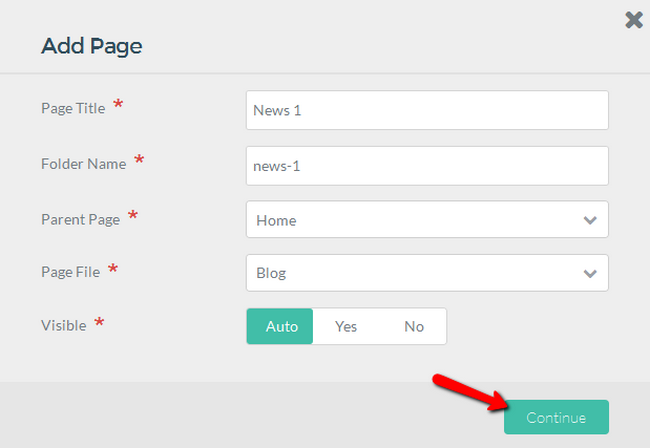
Here you will be able to Title the new page, select a parent Page if such exist, select the type of page and the visibility mode. If you cannot see the page on auto make sure to turn the visible option to Yes.
Now you can fill out the content of your page and change the title if you thought of a better one.
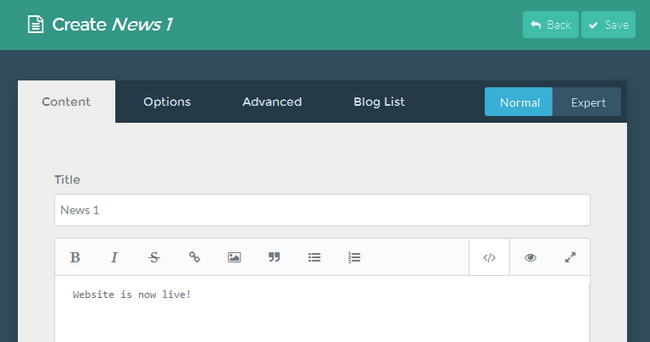
Note that if you click on the Save button now the page will not be published. You will need to go to the Options tab and select Yes for the Published field.
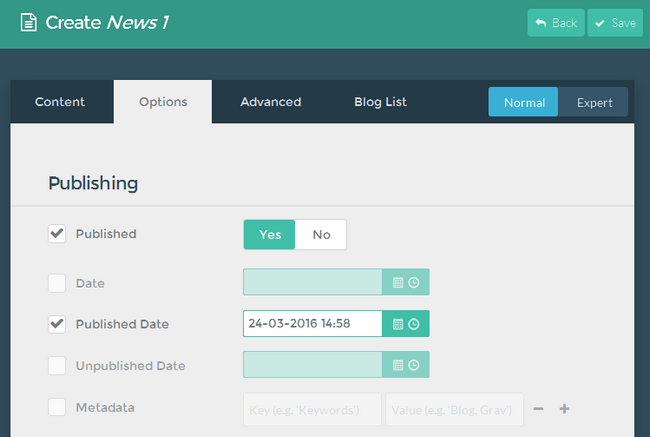
Congratulations, you now know how to create a basic page in Grav. By changing the type of page you will also be able to make form, error and modular pages corresponding to your needs.
How to Clear the Cache in Grav
Unlike other applications where it is hard to find the clear cache option and you have to look under every tab in the configuration and settings menus, in Grav the Clear Cache button is right on top of the admin dashboard screen.

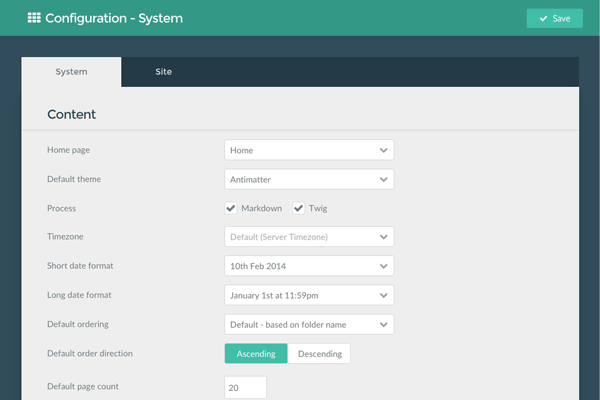
Just select the type of cache you want to clear (or all of it) and you are done. Now, let us talk more about the caching options you have at your disposal. To be able to change those, you will need to click on the Configuration section and select the System tab.
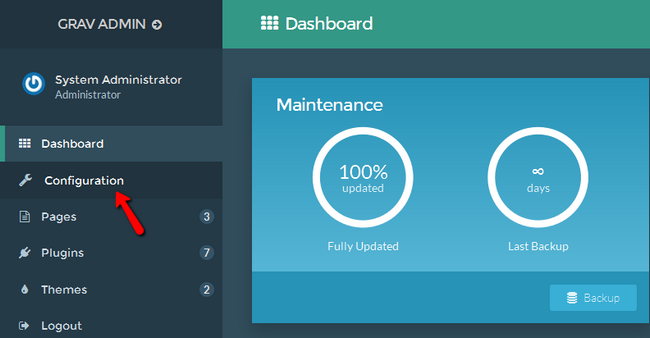
The caching options are as follows:
- Caching – Enables/disables Grav Caching
- Cache check method – Here you can choose from 3 options – File, Folder or None
- Cache driver – If you have a few different caching options enabled you can either select the one you prefer or use Auto Detect and let Grav choose the most optimized method
- Cache prefix – The prefix used by Grav to mark caching
- Lifetime – Here you can set the lifetime of the cache in seconds (0=infinite)
- Gzip compression – Enables Gzip compression for increased performance
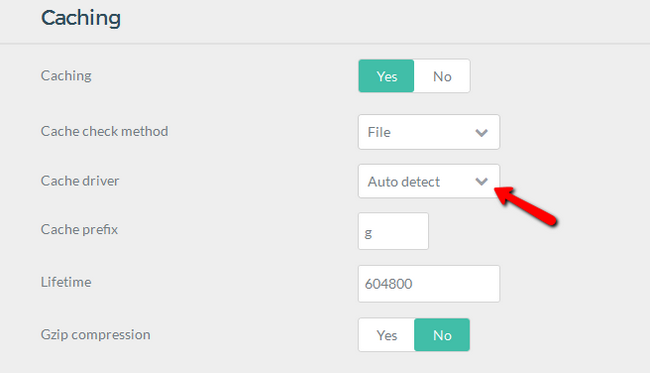
You now know how to setup and clear your website’s cache.
Advantages
- It is not based on database CMS, so it’s very easy to install and will be ready to use when you upload the files to the server.
- It uses Markdown text files to make things easy. Using this, the content is dynamically converted to HTML and displayed in the browser.
- In case of security, Grav doesn’t have admin area and database. So there is no chance of hacking into account or in the database to access the important data.
- You can easily backup all the files to keep the backup copy of your website, since there is no database to backup.
- It is a piece of software which doesn’t require more time to learn.
Disadvantages
- You might come across instances where unauthorized users may access your content from the files directly as there is no database for the files.
- It is difficult to build complex websites using Grav CMS.
-Grav is a Fast, Simple, and Flexible file-based Web-platform. Although Grav follows principles similar to other flat-file CMS platforms, it has a different design philosophy than most. The underlying architecture of Grav is built using well established and best-in-class technologies.
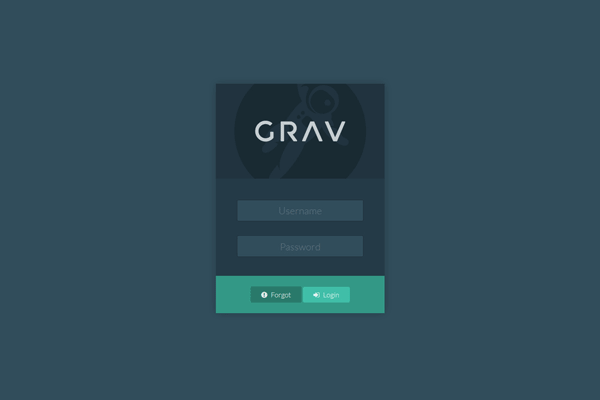
Login
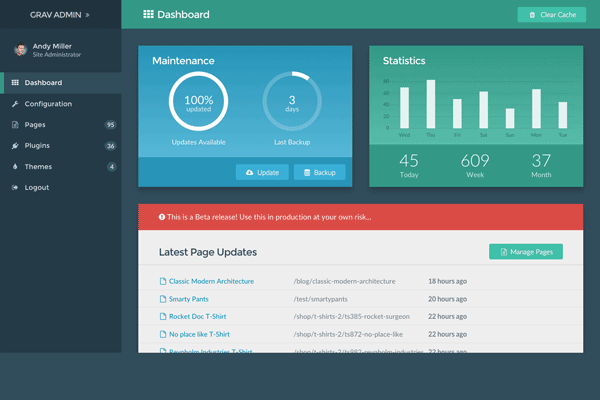
Dashboard
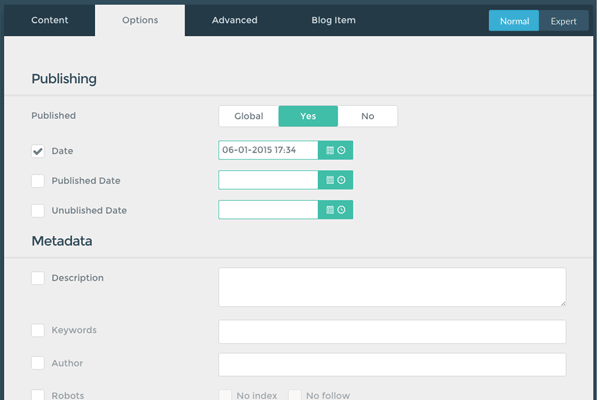
Publishing
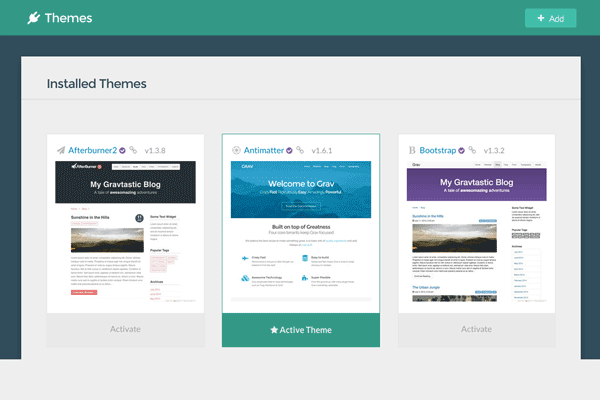
Installed Themes
Content
Grav is released under the MIT License.
Features
Top 10 features of GRAV:
- Ready-to-run open source Grav package
- Uses Markdown for streamlined cross-platform content
- Support for Git (e.g. GitHub or GitLab) syncing and collaboration
- ‘Chromeless’ feature to display only page content (for embedding Hub pages)
- Blog-format homepage, with important reminders and unit preparations areas
- Ability to control which units are listed on homepage
- Additional Hub pages can be easily added/removed/changed
- Supports custom page types and modular content
- Markdown-based optional Sidebar, which can be easily customized
- Custom HTML, CSS, JavaScript and Twig is fully supported
-Major Features Of GRAV
- Fast : Performance is not just an afterthought, we baked it in from the start
- Extensible : Grav has a powerful API and sophisticated Package Manager to make it super flexible
- Enjoyable Content Creation : Use your favorite Markdown editor to create your content online or offline
- Stellar Performance : Grav intelligently caches content to deliver great performance, regardless of hosting
- Powerful Content Filtering : Create unlimited taxonomies such as tags, categories, and authors to filter and manage your content
- Dynamic Content Types : The flat-file nature of Grav lets you define custom fields for any of your pages, including modular content
- Simple Backups and Restores : Being file based means backing up and restoring your data is super easy, and changing hosts/servers is a breeze
- Image Media Processing : Dynamic image manipulation to resize, crop, resample, and effects all with automatic caching of images
- Easy Theme Customization : No need to start from scratch, use Theme Inheritance and then modify the bits you need, allowing for easier update
Videos

