1-click AWS Deployment 1-click Azure Deployment
Overview
Elgg is one of the most popular social network engine.Social network engine is package to create social networking websites.It can be used to create social networking sites for your institution.The best part is Elgg is open source (free) software.It is based on PHP and MySQL.So you can install this on any hosting provider with PHP and MySQL support.
Learning this platform may also help you win projects aimed at creation of groups and communities for institutions like School,Club etc.
Elgg is an award winning open source social networking platform. It can be used for building different types of social networking environments for universities, schools or colleges, or running an internal collaborative platform for your organization. Elgg is a feature rich platform that can help you easily build your project. Some of the highlighted features are the powerful data model, activity streams, user management, access control and others.
Elgg Installation:
First you need to download the script from their official website. The package need to be extracted then uploaded under the desired directory for your web hosting account. If you would like the Elgg website accessible via URL of type http://mysite.com/elgg you should upload the extracted files under “public_html” folder for your account in a sub-folder “elgg”. You can upload the files via FTP Client or using cPanel – FileManager.
The second step is to create a new database that will be used for the Elgg installation and assign a user with privileges to it.
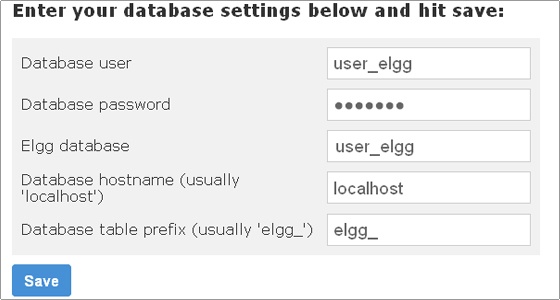
These are all pre-installation steps you need to accomplish. You can now initiate the installation itself by visiting the location where you uploaded your Elgg installation package via a web browser. The installation screen will load. Fill in the database settings with the database details you have setup and click Save.
The next screen will prompt for the system settings for your installation. You can leave the default ones for most of them. At this point it is advisable to create a new directory outside of the web-root for your domain name for the Elgg files only. For example you can use a directory named elgg-files located directly under the root for your hosting account (on the same level as the public_html directory) as shown below:
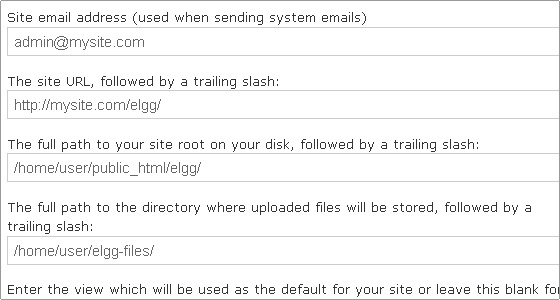
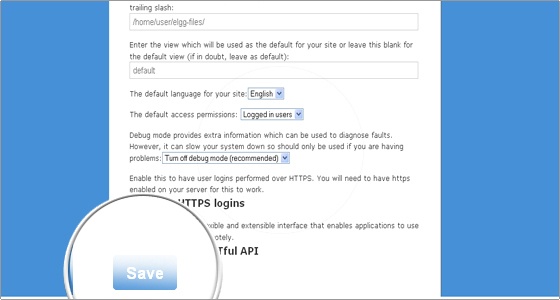
Once you enter the necessary details click the save button.
You will be brought to the next page which will prompt you to register the administrative account for your Elgg installation. Make sure that you have entered a valid email as it might be required for password resetting and choose a strong password as the administrator will have full control over the website and all registered users.
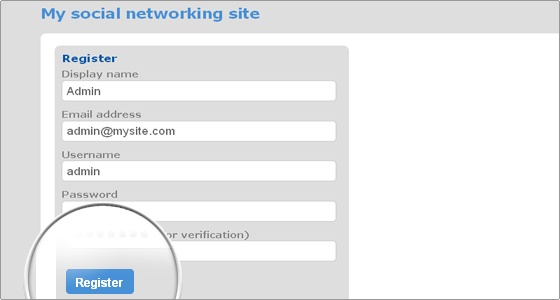
Clicking Register will finalize the installation and you will be brought to the front page of your new Elgg installation. From this point on you can use the Administrator login details to modify the web site according to your needs.
Elgg Administration:
You can login as administrator from the main page of your Elgg installation.
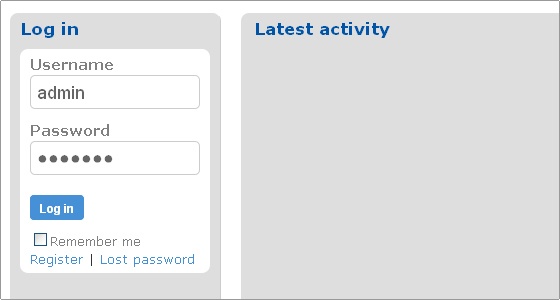
Once you are logged in as an administrator you will gain access to all the different tools provided by Elgg. Note that you will be able to add additional functionality to Elgg by installing plugins. We will address this later in the tutorial.
Elgg also have a number of tools pre-installed by default. Bear in mind that besides installed those tools are not enabled for a newly installed Elgg application. You will be able to choose which tools exactly to enable for your web site from the available ones. It is easy to have all default tools enabled. To do so, once logged into Elgg administration area, go to Administration -> Tool Administration.
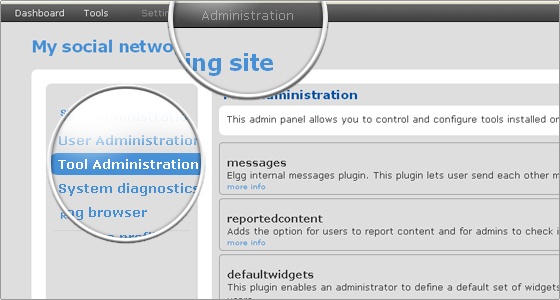
Then click the Enable All button. This will enable all standard tools for Elgg.
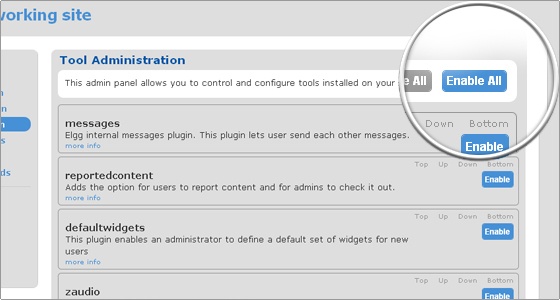
Of course you can choose to enable only certain features. You can scroll down the page and click Enable only for the tools that you plan to use for your website. For example if you want to give your website members the ability to invite their friends to the community using the website functionality you scroll down and click enable for the “invitefriends” tool.
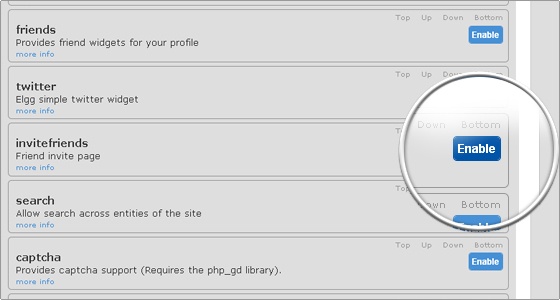
We will presume that all default tools are enabled in order to quickly review part of the functionality provided by Elgg.
Once you have enabled all default tools for Elgg you will see the additional options under the administration section.
- Reported content will display all content reported as illegal by your web site members.
- Default profile widgets allows you to alter the widgets that will be shown by default on profile page once a new profile is created.
- Default dashboard widgets has similar functionality with the only difference that it affects the members dashboard page.
- System diagnostics is can provide you with a diagnostics report that is required when submitting bug reports to Elgg developers.
- Via replace profile fields you can replace the existing profile fields with your own using the form. What you need to do is give the new profile field a label, for example, ‘Favourite team’. Next you need to select the field type, for example, tags, url, text and so on. At any time you can revert back to the default profile set up.
- The Set site categories can be used to create predefined site-wide categories that will be used throughout your system. Compatible tools will then display them when the user creates or edits content.
- External pages will allow you to modify according to your needs the generic pages for your Elgg web site: Frontpage, About, Terms and Privacy.
- Under Log browser you will find a complete log of the full activity on your web site.
Elgg Settings and Modifications:
In this section we will describe how to manage the general settings for an Elgg account and perform basic modifications.
Now that you have enabled more modules you will also see much more tools available in the tools menu. Furthermore you will have additional widgets that your community members can add to their pages on the web site further extending the pages variations and functionality.
SETTINGS SECTION
Lets first explore the Settings menu. When you click on Settings in the main tab of Elgg a new page will load where you will have the following options.
Change your settings. By default this will allow the user to change his name, email address, password and the language for the website (in case additional language packs are installed).
Configure your tools. This panel allows the member to personalize the settings for the tools installed by the system administrator.
Account statistics will show various statistics for the account that is currently logged in.
Notifications will allow the member to adjust the way he is notified when actions are performed on his content. Also it gives to possibility to enable notifications to be sent when changes are performed on members from your friends collections. Finally in order to receive notifications from your friends when they create new content, find them in the “Notifications per user” area and select the notification method you would like to use.
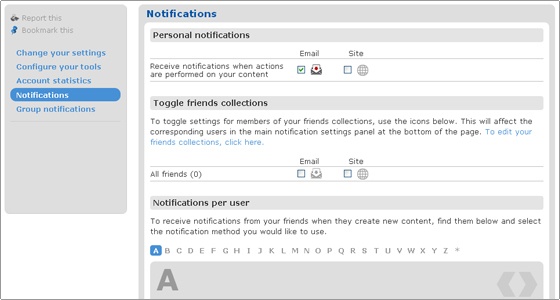
The Group notifications work in a similar way. All you need to do is select the group you are member of and than choose the type of notification you would like to receive.
TOOLS SECTION
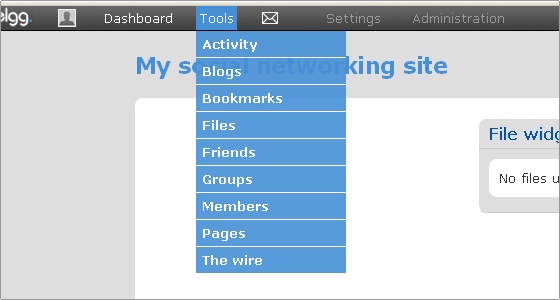
The Tools section will vary depending on the tools enabled via the administration area. Generally this is where you add/invite friends to the community, upload files and manage groups but the exact functionality available there will vary depending on the installed plugins. By default all tools are really easy to use and quite self explanatory. While they provide you with the needed functionality there is nothing too complicated to deal with.
DASHBOARD SECTION
The dashboard is basically your gateway to the website. Users can add all the widgets that are installed by the site administrator to the various areas of their dashboard as shown on the example below. This will enable any user to have fast access to the desired functionality of the website.
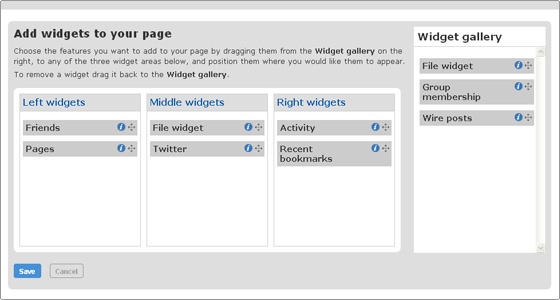
It is not hard to handle the setup via the Dashboard. All you should do is drag and drop the desired widged to the corresponding are on the page. When the page itself is loaded after that the various information will be withdrawn by the published widgets and displayed on the webpage.
PROFILE SECTION
Clicking on the photo like image in the main toolbar will load your personal page in the community website. You can again drag and drop the chosen widget to the desired area of the web site. After the personal page is saved the published widgets will withdraw the available information and display it on your page as you have set them.
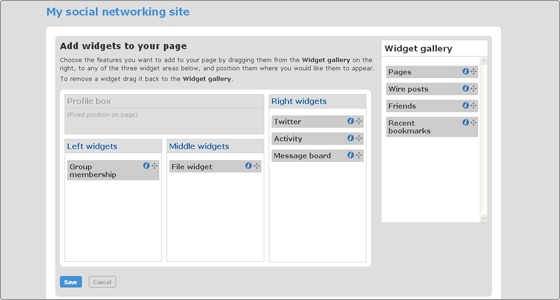
It is a bit different from the dashboard. This page will alter the way your profile page looks like. It has a predefined position for your profile box where profile icon, wire posts and about information are displayed. This defines the way your profile page looks when you or anyone else visits it.
Remove powered by Elgg footer text
Elgg by default has this footer text.After installing Elgg one of the most common task is removal of powered by Elgg footer text.You can keep the footer text as it is.There is no harm in it.But removing the footer text is important for personalizing the installation.
Follow below steps to remove powered by Elgg footer text
- Open your Elgg installation directory.
- Open the directory elements situated under views –> default –>page.
- Under elements directory you will see the file footer.php
- Open the file footer.php
- Search for below code in footer.php file
echo elgg_view_menu('footer', array('sort_by' => 'priority', 'class' => 'elgg-menu-hz'));

$powered_url = elgg_get_site_url() . "_graphics/powered_by_elgg_badge_drk_bckgnd.gif";

echo '<div class="mts clearfloat float-alt">';
echo elgg_view('output/url', array(
	'href' => 'http://elgg.org',
	'text' => "<img src="$powered_url" alt="Powered by Elgg" width="106" height="15" />",
	'class' => '',
	'is_trusted' => true,
));
echo '</div>';
- In above code the line starting with $powered_url and the line echo elgg_view are responsible for powered by Elgg footer text.
- We can delete these lines or we can comment out the lines.I prefer to comment out the lines.Since this is PHP code we can use /* and */ to comment out the line
- The modified code is shown below.You can see that lines starting with $powered_url and echo elgg_view are commented out with /* and */.Make same changes as shown below in your file.
echo elgg_view_menu('footer', array('sort_by' => 'priority', 'class' => 'elgg-menu-hz'));

/*$powered_url = elgg_get_site_url() . "_graphics/powered_by_elgg_badge_drk_bckgnd.gif";*/

echo '<div class="mts clearfloat float-alt">';
/*echo elgg_view('output/url', array(
	'href' => 'http://elgg.org',
	'text' => "<img src="$powered_url" alt="Powered by Elgg" width="106" height="15" />",
	'class' => '',
	'is_trusted' => true,
));*/
echo '</div>';
- The above method works for any theme you have installed on your elgg installation..
- After making above changes save your file and browse your site to see the changes.
Changing default Elgg favicon icon:
Elgg comes with default Elgg favicon icon.So after installing it you need to change default favicon icon with that of yours.This is indeed important task as favicon is identity of your website.There are plugins to achieve this task but I would not suggest using them.
As number of plugins increase performance of CMS goes down.This is applicable for Elgg as well.You should avoid using plugins for simple task.
You can follow below steps to replace default Elgg favicon icon with favicon icon of your own
- Open _graphics directory under Elgg installation directory.
- You will find favicon.ico file in that directory.
- Delete the file and then upload your favicon file..
- The name of your file is important.It should be exactly the same (favicon.ico).You can use any other name as well but for that you will have to make some code changes.
- I will not advice code changes so it will be good to go with same name as above.
- Browse your website to see the change.
- In case you do not see your favicon then you may need to clear browser cache.
Deleting Elgg Top bar:
Elgg topbar is displayed to logged in users.There are some quick access buttons on topbar.It does contain useful quick access to messages,profiles,friends and other links like log out.This links are quite handy and does provide beautiful navigation facilities to the user.I prefer displaying topbar to admin but removing it for rest.
Having said that you might want to remove topbar for customizing your site according to your need.Some Elgg themes also remove topbar.But in case you are using default theme or any theme which displays topbar and you want to remove it then follow below steps
- Open the folder views –>default –>page in your Elgg installation directory.
- In the page folder you will see file default.php.This file controls display of default theme shipping with Elgg.In case you are using other theme making change here will work unless other theme has overridden this.
- Open the file default.php.
- Search for below code in the file
<?php if (elgg_is_logged_in()): ?>
<div class="elgg-page-topbar">
   <div class="elgg-inner">
   <?php echo $topbar; ?>
   </div>
</div>
<?php endif; ?>
- This code is responsible for topbar display on your theme.
- Delete the code from the file.
- You should backup the file before making these changes so that you can revert back in case of any mistakes while removing the lines.
- Again if you want to display topbar to only admin users then instead of elgg_is_logged_in() in the code above use elgg_is_admin_logged_in ().Rest of the code remains the same.
- I have found enabling bar for admin very useful so will recommend to keep it activated.For other users you can disable it.
- Save the file and enjoy.
Adding Google Analytics to Elgg:
Follow below steps to add Google Analytics code to your Elgg website.You can use this method to add other JavaScript based codes to your website.
- Open the folder views –> default –> page under your Elgg installation directory
- In the page directory you will see file default.php.
- Open the file default.php.This file displays the HTML structure of default theme.
- Locate the </head> tag in the file.
- Copy your Analytics code and paste the same just above </head> tag in the file.Remember to backup the file before making these changes so that you can revert back in case anything goes wrong while pasting.
- Save the file and enjoy.
- If you do not want to use Analytics code in header ie </head> area then you should paste it above </body> tag.
- In the same file near the end you can see </body> tag.
- Paste the analytics code just above the </body> tag.
- Save the file and enjoy.
How to install language packs in Elgg:
By default you will download the English version of Elgg. You can however translate the website to your own language by installing a language pack. Language packs are available for download at the Elgg community website at:
https://community.elgg.org/plugins/search?f%5Bc%5D%5B%5D=languages&sb=Search
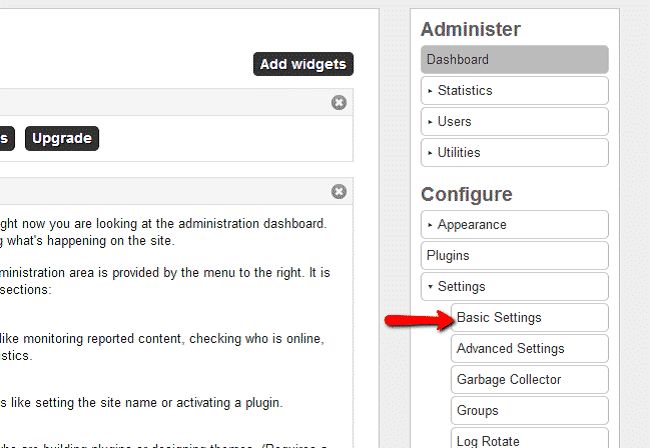
Once you have downloaded the language pack archive, extract its contents in the root directory of your website. The archive will place the required files in the “mod” and “languages” folder of your installation. Once you have uploaded the files, go to your website’s administration, area and using the right side menu, click on “Basic Settings”:
Using the dropdown menu, select the default language for your Elgg website:
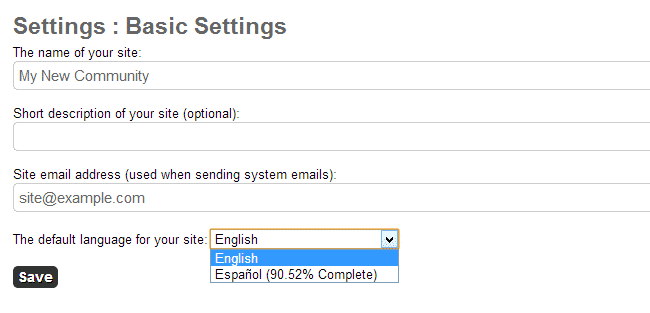
Click the “Save” button to save the changes.
How to install themes in Elgg:
In this tutorial we are going to show you how to install new Elgg themes. You may choose one from:
https://community.elgg.org/plugins/category/themes
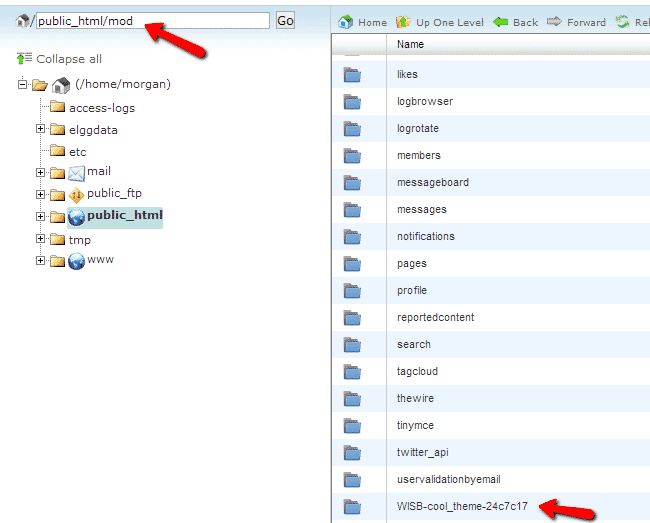
Once you have chosen the theme which you wish to use, download its archive. Extract the archive and upload its contents in the following directory of your account:
/public_html/path-to-elgg/mod/
Where “path-to-elgg” is the actual path to your Elgg. For the purpose of this tutorial we have installed the “cool theme”. Here is how it looks when uploaded in the account:
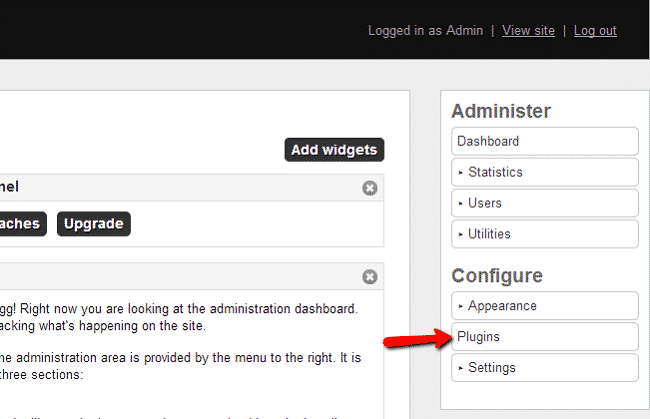
Now you will need to login to your website’s administration area and from the right side menu navigate to “Plugins”
Find the theme that you have just uploaded and click the “Activate” button to enable the theme:
How to install plugins in Elgg:
The Elgg script comes with plenty of functionalities, but you can extend them even more by installing new plugins in your Elgg website. In this tutorial we are going to show you how to install new Elgg plugins. You can find a great variety of Elgg plugins at:https://community.elgg.org/plugins
Once you have found the plugin that you would like to use, download its archive. Extract the archive and upload its contents in the following directory of your account:
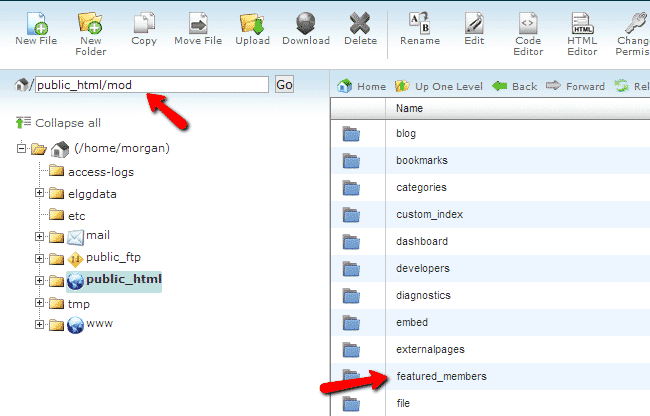
/public_html/path-to-elgg/mod/
Where “path-to-elgg” is the actual path to your Elgg. For the purpose of this tutorial we have installed the “featured members” plugin. Here is how it looks when uploaded in the account:
Now you will need to login to your website’s administration area and from the right side menu navigate to “Plugins”
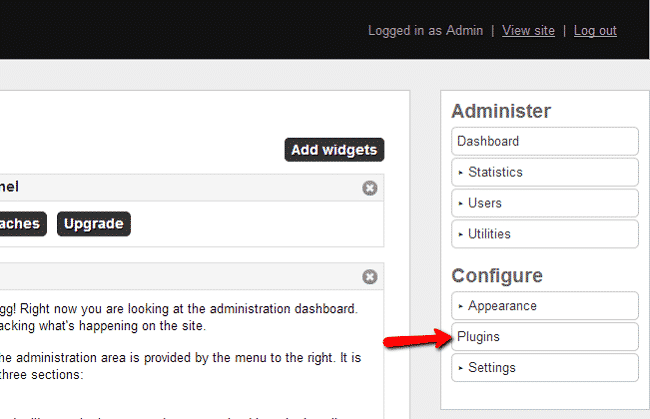
Find the plugin that you have just uploaded and click the “Activate” button to enable the plugin:
Elgg users validation:
Upon registration, your new users will receive a welcome email where they will be provided with a validation link for their profile on your website. To validate their accounts they should simply click on the link. In case that they have not received the message or they have used an invalid email you can still validate these users or resend them the welcome email. In this tutorial we are going to show you how to do this. First, login to your site admin using:
https://yourdomain.com/admin
If you have installed Elgg in a subfolder for example a folder called “elgg”, use:
https://yourdomain.com/elgg/admin/
On the right side menu click on “Users” and select “Unvalidated”
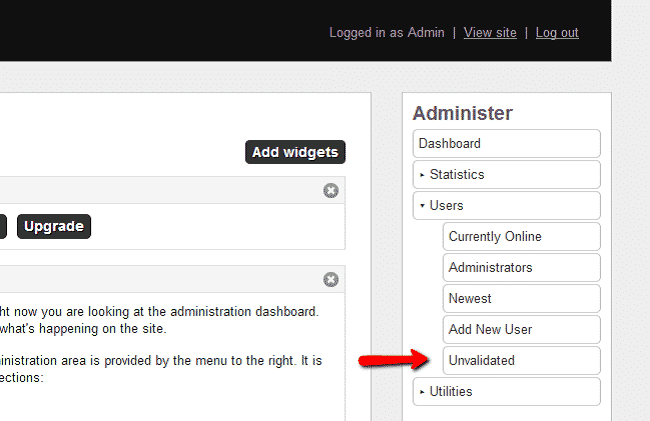
You will see a list of unvalidated users:

On this page you have the following options for each user:
Resend validation – resend the email so the user can validate his/her account
Validate – if you know and trust this user, you can directly validate him/her
Delete – if you think this is a spam registration you can delete the user.
Elgg cronjob configuration
Elgg has a cron handler for executing certain functionality periodically. In this tutorial we are going to show you how to configure your Elgg cron command in your cPanel. In Elgg, the cron command takes the following parameters:
https://www.yourdomain.com/cron/minute/ – if you need to run the command every minute
https://www.yourdomain.com/cron/fiveminute/ – if you want to run the command every 5 minutes
https://www.yourdomain.com/cron/hourly/ – if you want to run the command every hour
https://www.yourdomain.com/cron/daily/ – if you want to run the command once a day
https://www.yourdomain.com/cron/weekly/ – if you want to run the command once a week
https://www.yourdomain.com/cron/monthly/ if you want to run the command once a month
https://www.yourdomain.com/cron/yearly/ – if you want to run the command once a year
For the purpose of this tutorial, we are going to setup the daily cron. First login your cPanel and navigate to “Cron jobs”:

From the dropdown menu you can choose the common settings used for cron tasks. Choose “Once a day”. For command enter:
/usr/bin/curl https://yourdomain.com/daily/ > /dev/null 2>&1
Replace “yourdomain.com” with your actual domain:
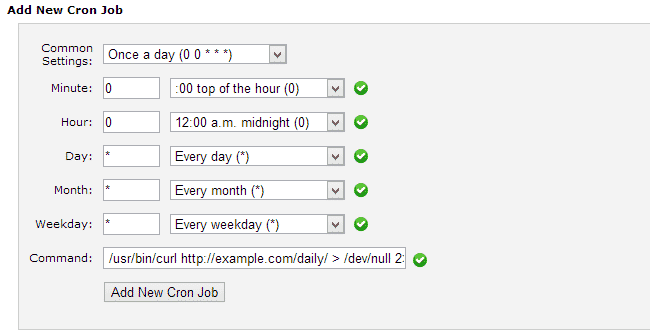
Click the “Add new cronjob” button to add the command. It will now run every 24 hours.
ELGG PROS:
· Price
This system is free, and always has been. They do accept donations, but they aren’t required and you get access to the full platform without having to give any money.
· Easy to Use
Both administrators and users will be able to use this site very easily once they get used to it.
· Expandable
You can expand the features using plugins (widgets) and other options.
ELGG CONS:
Intuitiveness
Not everything is set up in a way that really comes naturally to most people. With this in mind, make sure you are reading their documentation and instructions when creating your social network.
Simple
Compared to some of the other social networking platforms out there, this one feels a little too simple.
-Elgg empowers individuals, groups and institutions to create their own fully-featured social environment.
Log In

My Elgg site

Elgg, started in 2004, is an open source social engine which powers all kinds of social environments – from education and business to martial arts and rugby. If you are looking for a professional social intranet or want to run a site for your organisation, Elgg is a great choice.
Elgg is free, open, and available to anyone under the GNU/GPL license.
Features
Features of Elgg include:
- User, object, file and site management
- Social graph functionality (relationships between users and other users, objects and sites)
- Easy internationalization support
- System-wide, tag-based searching across all content and users
- Fine-grained access controls
- Multiple views, allowing for mobile applications and embeddable widgets as well as the traditional web browser view
- Plugin APIs
- Powerful theming through the plugin API
- RSS and FOAF for content syndication
- OpenID and LDAP for user authentication
- An extensible web services API, with results in JSON, serialized PHP or XML
- AJAX through jQuery and user-definable callbacks
- Easy extension for use with caching systems such as memcached, for increased system performance (experimental)
- Use of multiple database connections for scalability (still in development)
Elgg 3.x features:
- Blog: gallows for text-based notes to be published in reverse-chronological order, allows commenting
- Dashboard. This is a users portal to activity that is important to them both from within the site and from external sources. Using Elgg’s powerful widget API, it is possible to build widgets that pull out relevant content from within an Elgg powered site as well as grab information from third party sources. This is for private use and different from the Profile.
- Diagnostics, an administration tool
- File repository. Allows users to upload any kind of authorized file. Also includes a photo gallery.
- Groups: Flexible grouping tool. Includes a profile, forum, pages, message board and RSS feeds
- Messageboard: Similar to ‘The Wall’ in Facebook or a comment wall in other networks is a plugin that lets users put a messageboard widget on their profile. Other users can then post messages that will appear on the messageboard.
- Messages: Private “mail”
- Pages: create hierarchically-organized pages of text, and define reading and writing privileges.
- Profile: provides information about a user, which is configurable from the plugin’s start.php. One can change the available fields from the admin panel. Each profile field has its own access restriction, so users can choose exactly who can see each individual element.
- The Wire, witter-style microblogging plugin that allows users to post notes to the wire.
- User validation by e-mail
Major Features of Elgg:
- Activity
- Profile
- Notifications
- Groups
- Blog
- Embed
- media
- Files
- The wire
- Pages
- External pages
- Dashboard
- Social bookmarking
- Categories
- Access
- Other goodness
Videos
Elgg customization

