Overview
Drupal is a supple CMS based on the LAMP stack, with a modular design letting features to be added and removed by installing and uninstalling modules, and allowing the whole look and feel of the website to be changed by installing and uninstalling themes. The base Drupal download, known as Drupal Core, contains the PHP scripts needed to run the basic CMS functionality, several optional modules and themes, and many JavaScript, CSS, and image assets. The operating system can be Windows or Mac OS instead of Linux.
- The web server can be Nginx or IIS instead of Apache.
- The database can be PostgreSQL or SQLite instead of MySQL, or a MySQL-compatible replacement such as MariaDB or Percona.
Other operating systems, web servers, and databases can also be made to work; though, the scripts that the software uses are written in PHP, so that cannot be changed.
What are the reasons for using Drupal?
When building a website, you have your choice of using one of the many existing CMS packages and hosted services, developing your own CMS, or building the site without using a CMS. Here are some of the reasons you might choose to use Drupal:
- Building a small, simple site with static HTML pages is not difficult, and you can get a simple site up very quickly. Setting up a site in a CMS generally requires more time initially, but brings you the benefits of on-line editing (easier for less experienced content maintainers), uniformity (harder to maintain using static HTML for larger sites), and the possibility of more complex features requiring a database.
- Some CMS software is special-purpose; for instance, there are packages and hosted services that you can use to build a blog or a club membership website. Drupal, in contrast, is a general-purpose CMS. If you are building a special-purpose site, you might choose to use a special-purpose CMS; however, if your site falls even slightly outside the intended purpose, you will probably be better off using a general-purpose CMS rather than trying to adapt a special-purpose CMS.
- Building your own CMS-type software can seem attractive. However, using a general-purpose CMS like Drupal as a starting point is usually a better idea, because the basic CMS functionality (such as user accounts and content management) has thousands of developer hours behind it, including many years of user testing, bug fixing, and security hardening.
Drupal is a podium for web content management which is a commanding tool for building simple and complex sites. The following diagram shows the architecture of Drupal −

The architecture of Drupal contains the following layers &miuns;
- Users
- Administrator
- Drupal
- PHP
- Web Server
- Database
Users − These are the users on the Drupal community. The user sends a request to a server using Drupal CMS and web browsers, search engines, etc. acts like clients.
Administrator − Administrator can provide access permission to authorized users and will be able to block unauthorized access. Administrative account will be having all privileges for managing content and administering the site.
Drupal − Drupal is a free and open source Content Management System (CMS) that allows organizing, managing and publishing your content and is built on PHP based environments. Drupal CMS is very flexible and powerful and can be used for building large, complex sites. It is very easy to interact with other sites and technologies using Drupal CMS. Further, you will be able to handle complex forms and workflows.
PHP − Drupal uses PHP in order to work with an application which is created by a user. It takes the help of web server to fetch data from the database. PHP memory requirements depend on the modules which are used in your site. Drupal 6 requires at least 16MB, Drupal 7 requires 32MB and Drupal 8 requires 64MB.
Web Server − Web server is a server where the user interacts and processes requests via HTTP (Hyper Text Transfer Protocol) and serves files that form web pages to web users. The communication between the user and the server takes place using HTTP. You can use different types of web servers such as Apache, IIS, Nginx, Lighttpd, etc.
Database − Database stores the user information, content and other required data of the site. It is used to store the administrative information to manage the Drupal site. Drupal uses the database to extract the data and enables to store, modify and update the database.
How to Build a Website With Drupal?
Once Drupal is installed successfully we can get into the steps of building a site using the platform. Let’s go through the process below:
Understanding Drupal Administrator Dashboard
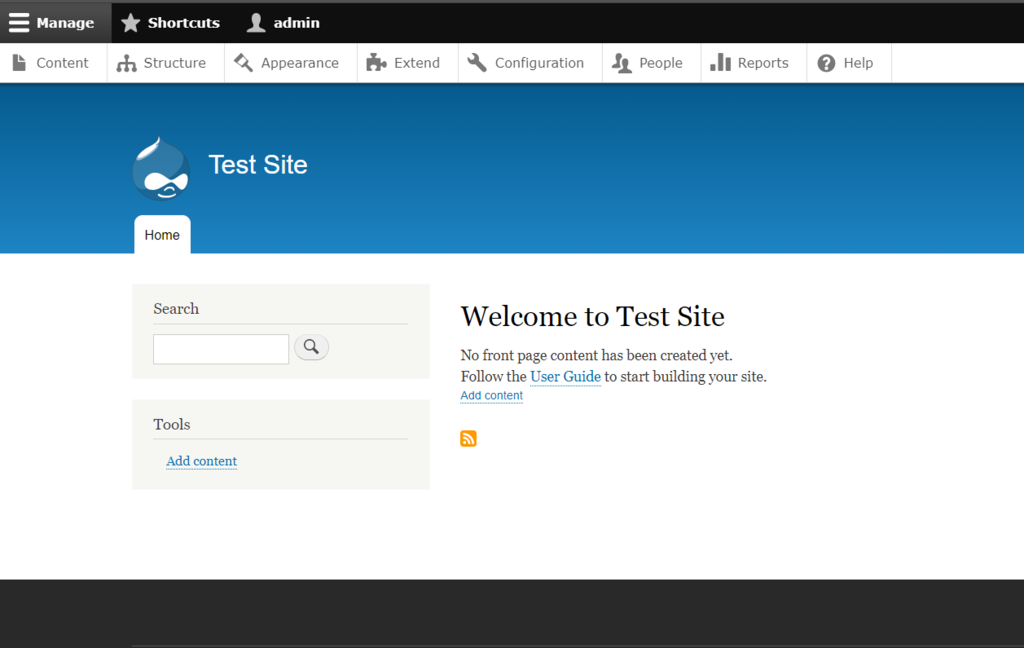
First off, you should learn about the Drupal administrator dashboard. To do so, you need to login by adding user/login at the end of your Drupal URL. As such, it can be accessed via https://your-site-address/user/login.
Once logged in, click Manage at the top left corner of the page. The following sections will be shown:
- Content – this section allows you to add content, including an article or a basic page.
- Structure – here, you can manage the components of your site’s structure, such as block layouts, comment types, and content types.
- Appearance – it allows you to install or uninstall themes. You can also change your theme’s settings.
- Extend – in this tab, you can download and install modules to enhance your website’s functionality.
- Configuration – this tab allows you to edit various configurations, such as basic site settings and account settings.
- People – you can manage user accounts, permissions, and roles in this tab.
- Reports – here, you can monitor your site by checking recent log messages or status report.
- Help – if you ever need help when getting started with your site, you can check out this tab.
Creating Taxonomies
Before knowing what a taxonomy is, you should know the following two words:
- Term – is a word used to describe the content.
- Vocabulary – is a collection of terms.
Taxonomies are used to classify content. A taxonomy uses terms to show specific content. Creating a taxonomy is easy; you can do it by following these steps:
- Go to the Structure tab.
- Click on Taxonomy.
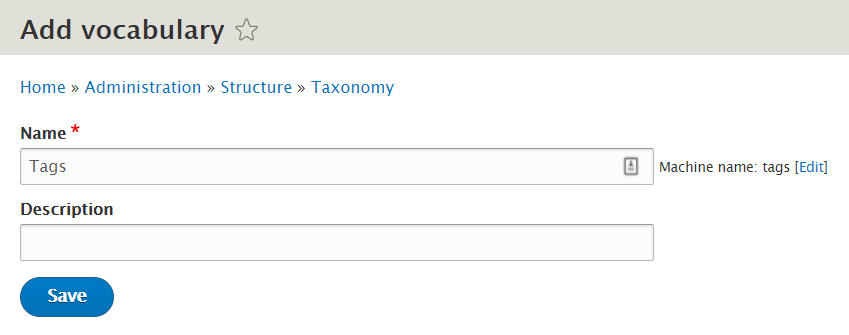
- Now click on Add vocabulary to add a new vocabulary. Enter the name (compulsory) and the description (optional) for your vocabulary. For example, let’s type Tags as the vocabulary if you want to classify your articles based on tags.
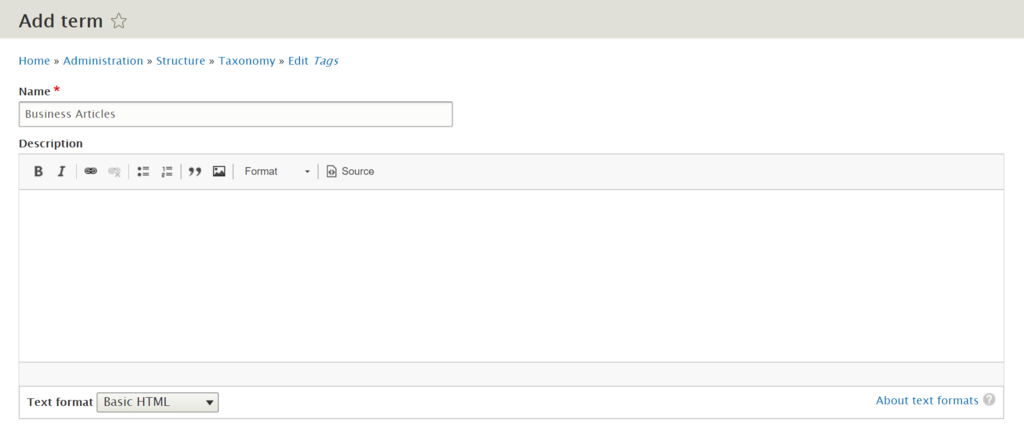
- Click on Add terms to add new terms to the vocabulary – let’s say you want to add Business Articles as one of your tags. Enter the name, description, text format, URL alias (an optional URL to access the term directly), and relations for the term. Then, click Save.
- That’s it! Now you have Tags as the parent category, and Business Articles as the subcategory. Feel free to add more terms if you want to set more subcategories.
Creating Articles and Basic Page
If you want to make your site more engaging, you should know how to create content. Drupal provides two core content types by default:
- Articles – it was previously known as story. You can use it to create content like press releases or blog posts.
- Basic page – it displays static content that’s not expected to change as frequently as articles. One of the most common examples of a basic page is the “About Us” section.
Aside from the core content types, Drupal has optional content types, which you can activate by installing modules:
- Book page – it can be used when creating content for a collaborative book. You can also set the book outline and authoring information to the content. Install the Book module in the modules list to activate it.
- Forum topic – it allows you to post a discussion thread within a forum where visitors can join the topic via comments. You can install the Forum module to use it.
- Poll – you can collect votes in the form of multiple-choice questions. Download and install the Poll module to activate it.
- Blog entry – this content type got discontinued from the core in Drupal 8 and is now a contributed module. It gives registered users the ability to create an online diary or journal.
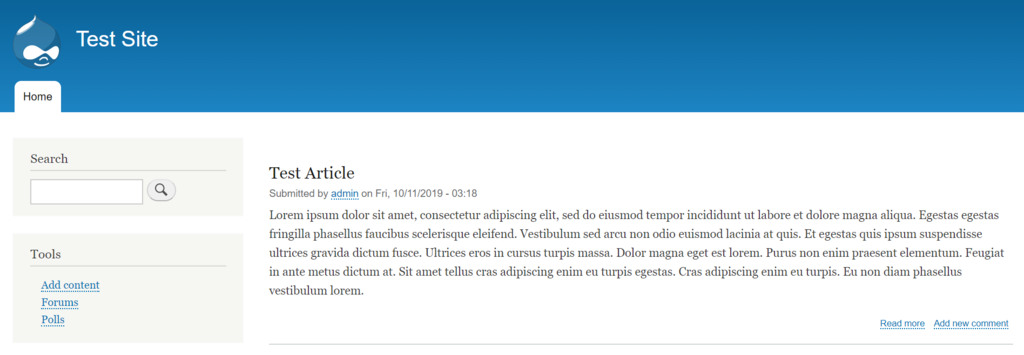
In this tutorial, you’ll learn how to create both core content types in Drupal. First off, we will show you how to create an article, just follow these steps:
- Click on Content on the admin dashboard.
- Now click on Add content and choose Article. You will be presented with a screen that prompts you to add the title, body, tags, text format, and image for the article.
- If you want to link the article to a menu, click on Menu Settings and then on the checkbox that says Provide a menu link. Here you can add the link title, description, parent item, and weight for the menu.
- You can also add revision information, URL path settings, comment settings, and authoring information for your article.
- Now click on the Preview to view the article or just click on Save and publish to make it live.
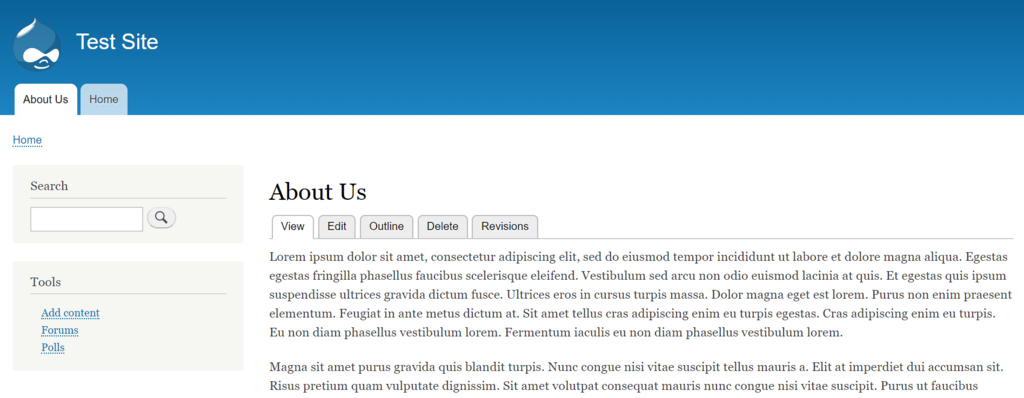
Now, let us have a look at how to create a basic page. To get a real grasp on how to do it, let’s try to create an About Us page:
- Click on Content and choose Add content.
- Pick Basic page. Then, enter the title and the body for the page. As this is an about us page, you can put “About us” in the title.
- Toggle the Menu settings to link the page to a menu. Click on Provide a menu link. Enter the title, description, weight, and parent item – for example, it can be put under a section like “Company history”.
- You can also add revision information, URL path settings, comment settings, and authoring information for your page.
- Click on Preview to view the page or just click on Save and publish to make it live.
Creating Menus
You can use menus for categorizing and structuring the site. For example, let’s add a product menu. Check out the following instructions to create a menu:
- Click on Structure and choose Menus.
- Some of the default menus like Tools, Administration, and Footer are already present. You can edit them by clicking on Edit menu.
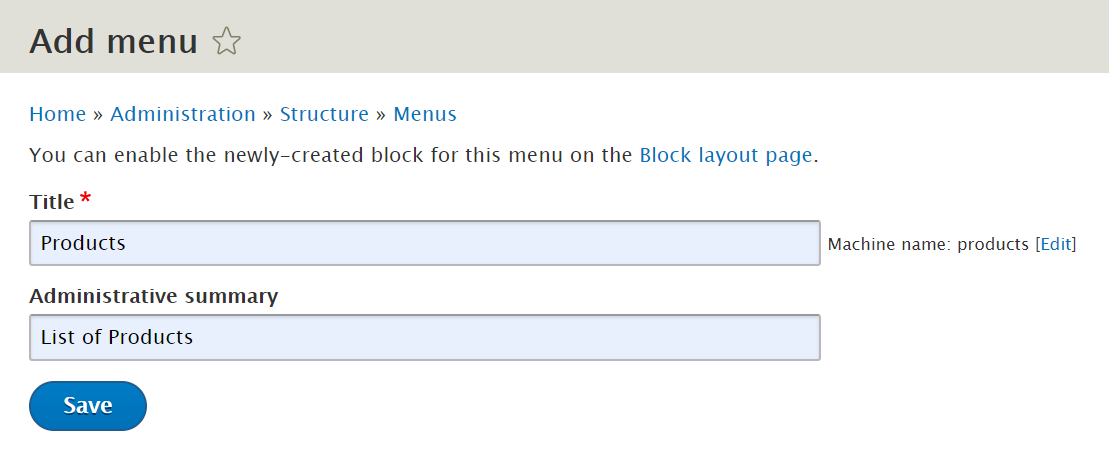
- To add a new menu, click on Add menu.
- Add the title and the summary for the menu. and click on Save.
- Click on Add link to add a link to your menu.
- On the presented window, you will be asked to add link path, title, description, parent link, weight for the link. You can also select whether you want to enable the menu and whether you want to show it as expanded using the Enabled and Show as expanded checkboxes.
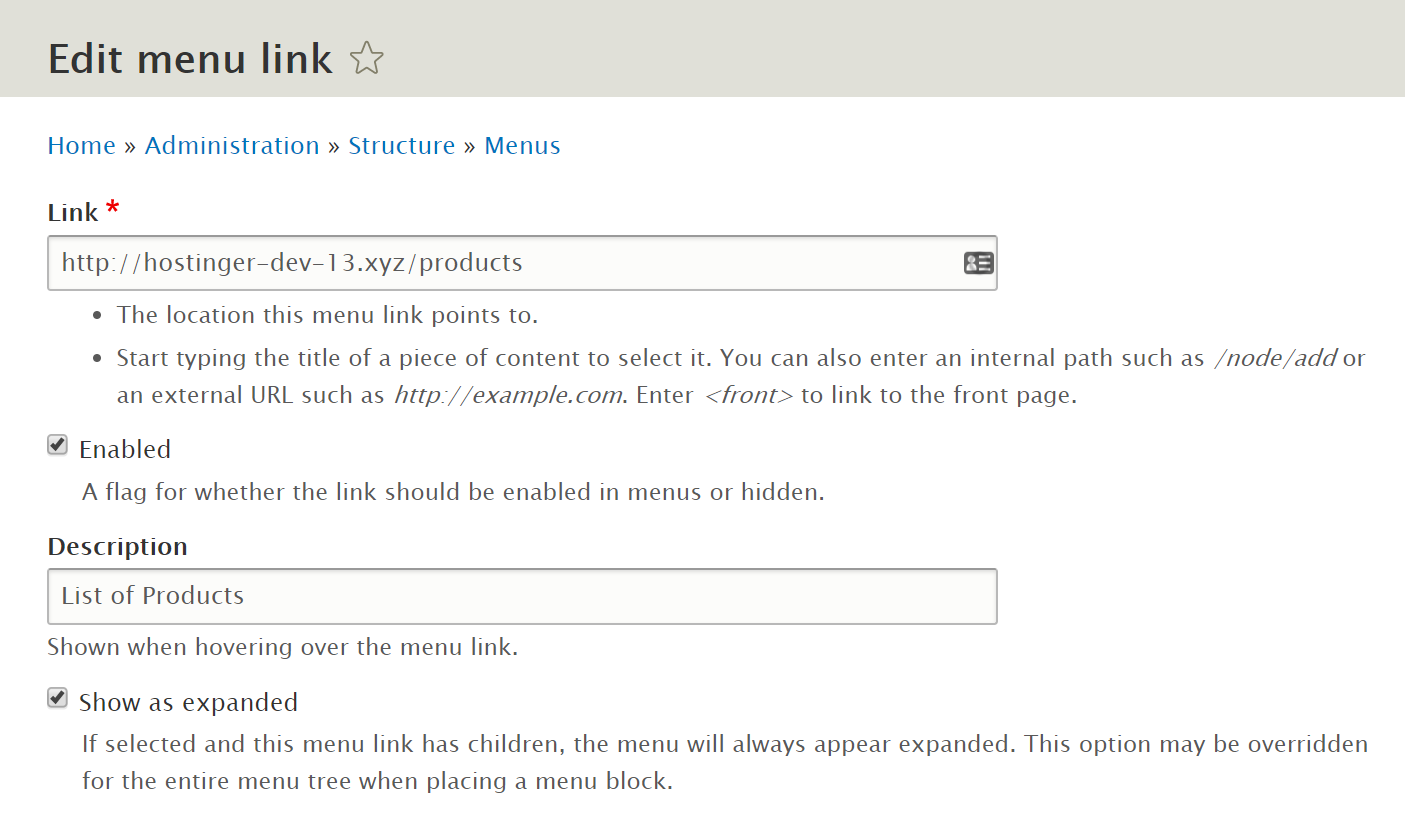
- Once all entries are made, click the Save button.
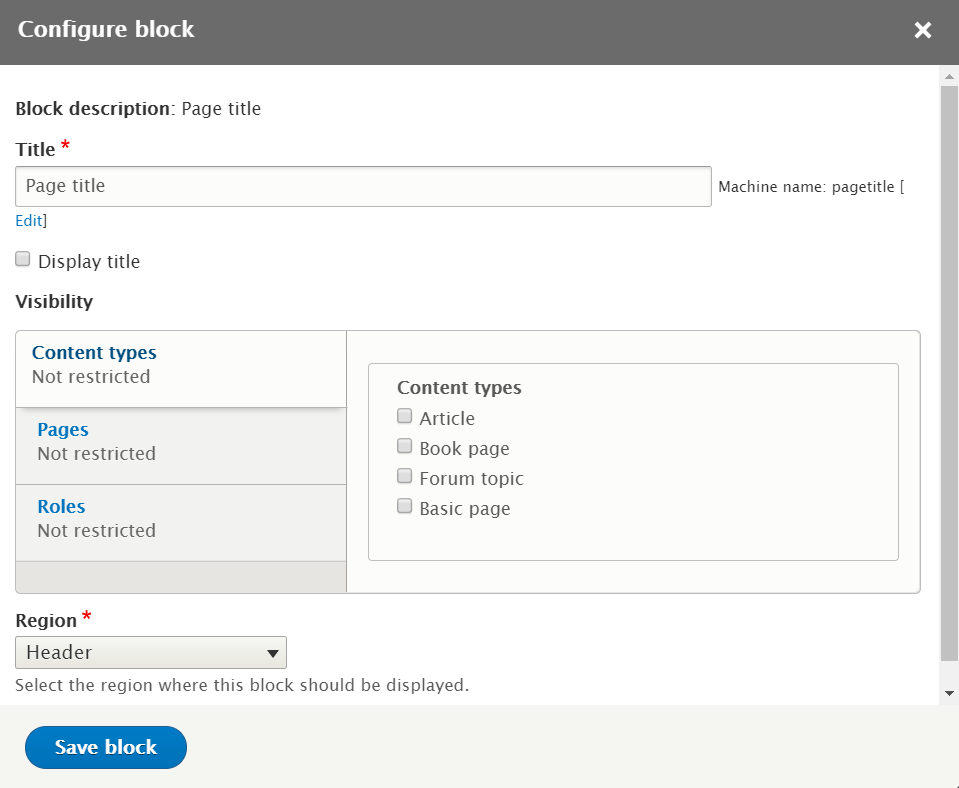
Creating Drupal Blocks
Blocks can be referred to as boxes of content that are rendered into a region. For example, a user login (block) can be added to your website footer (region). If you want to know how to place a block on a region, follow these steps:
- Click on Structure from the main menu.
- Now click on Block layout.
- Let’s say we want to place a page title block in the header region. So, click the Place block button next to Header. Then, click on Page Title from the list of blocks.
- Confirm the title, visibility, and region for your block and click on Save block.
How to Install Modules in Drupal?
Drupal has some highly useful modules embedded by default, like Statistics and Configuration Manager. Moreover, you can extend your site’s functionality by installing contributed modules. In this section, you will learn how to install one.
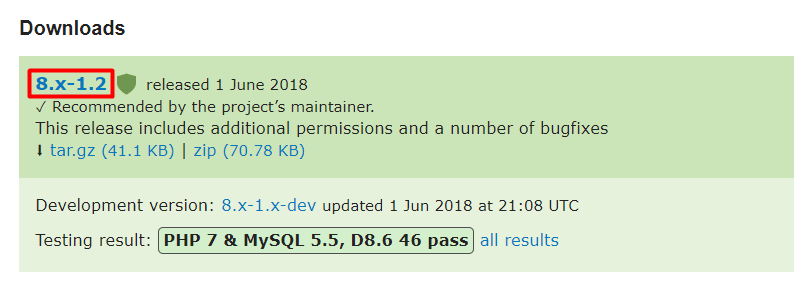
Firstly, you have to navigate to the Drupal module search page and find the module. Once you have reached the webpage for the module you want to install, move over to the downloads section at the bottom of the page.
Please note that the first number in the module version represents the core version. Thus if you are running Drupal 8, be sure to download module with a version number starting with 8. Take this picture as an example:
Now follow these steps to install the module on Drupal:
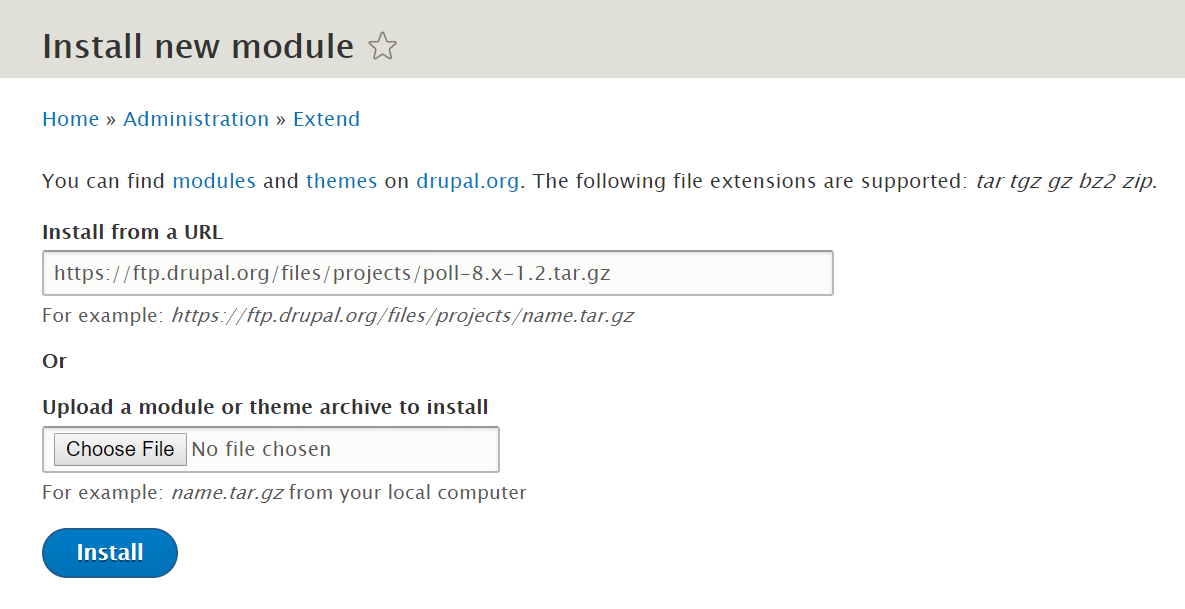
- Right-click on the module download link and choose Copy link location.
- Move over to your Drupal homepage and click on Extend.
- Now click on Install new module.
- Under Install from a URL, paste the link that you copied in step 1.
- Hit Install and wait for the installation to complete.
If the Install new module option isn’t available, you should enable the Update manager module first. You can find it under the Core section in the Extend menu.
Some of the most useful contributed modules in Drupal are as follows:
- Chaos tool suite – this module contains a set of tools and API that could improve the developer experience, such as form wizard and CSS tools.
- Admin toolbar – it transforms the default admin toolbar into a drop-down menu. The module is very light and maintains all the basic toolbar functionalities.
- Metatag – with this module, you can automatically add meta-tags and structured metadata to your site. It also supports meta-tags that allow you to control how content gets displayed when it’s shared on social media .
- Google Analytics – it allows you to add Google’s web stats tracking system to your website.
- Webform – you can create surveys and forms by using this module.
How to Install Themes in Drupal?
Setting up the perfect look for your site is important, as it could bring a good impression to your visitors. Installing a visually-appealing theme is one way to do it. In Drupal, you can view currently installed themes or add new themes by checking the Appearance tab.

It comes with useful filters to search for themes that you would like to use. The most important filter is Core Compatibility, where you can choose the version of your current Drupal installation. Make sure you select a theme that is compatible with your core Drupal version.
The installation process is quite similar to installing modules:
- Right-click on the file you want to install and click on Copy link location.
- Now move over to your Drupal homepage and click on Appearance.
- Now click on Install new theme.
- Under Install from a URL, paste the link that you copied in step 1.
- Hit Install and wait for the installation to complete.
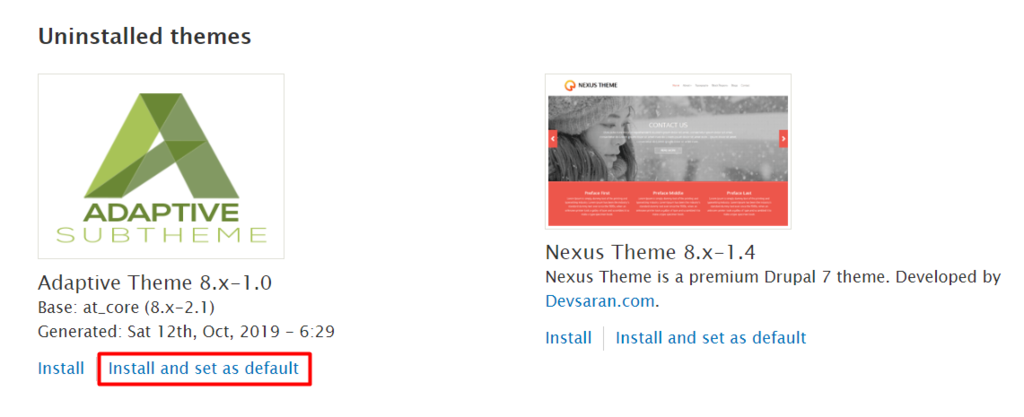
However, the newly installed themes are disabled by default. To enable them, find your theme in the Uninstalled theme section and click on Install and set as default.
How to Create a Blog on Drupal?
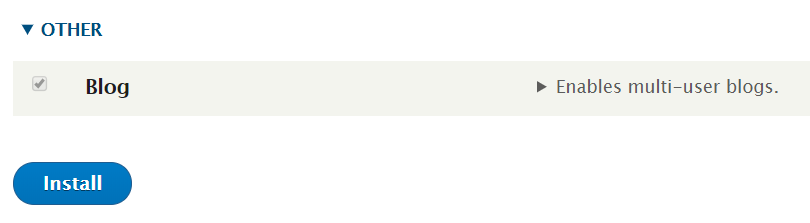
You can set up a fully functional blog on Drupal. Yet, the blog module isn’t a part of the core in the latest Drupal 8 version. Therefore, you should download and install the blog module manually.
Once installed, you’ll see the blog module in the Extend menu. You can check the box next to Blog and click Install to enable the module.
Now navigate to Content ->Add content. You should now see a new content type called Blog post. Add the title, body, and publishing options for the blog, and hit Save and publish. Your blog should now be visible under the blogs section on your homepage.
How to Back up Drupal?
It’s always important to periodically backup the Drupal files. So, you can conveniently recover your site if something goes wrong. In the following steps, we will show you the step-by-step tutorial to back up your Drupal files using Hostinger’s hPanel:
- Login to hPanel.
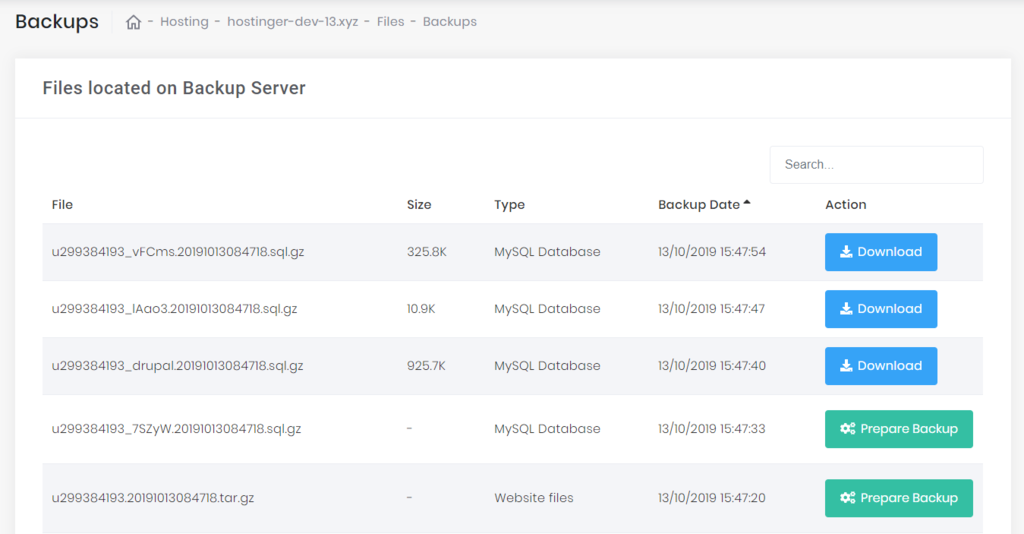
- Select Backups in the Files section.
- You will now see a list of available backups. To create a new backup, click on the Generate a new backup button.
- A dialog box will appear asking you whether you want to replace the existing backup with the new one. Click on Yes.
- Your backup files are now ready. If you want to download them, just click on Prepare Backup, and proceed with Download.
How to Update Drupal?
In Drupal, update and upgrade are two different things. Update stands for taking Drupal from one minor version to another, such as from 8.1 to 8.2, while upgrade would be taking your Drupal core version from 7 to 8.
In this section, we will go through the steps required to update Drupal. However, Before starting the update, it’s strongly recommended to put your site into Maintenance mode. So you’ll be the only one who has access to the site during the updating process:
- Navigate to the Configuration tab and click on Maintenance Mode.
- Check Put the site into maintenance mode option.
- Hit the Save configuration button.
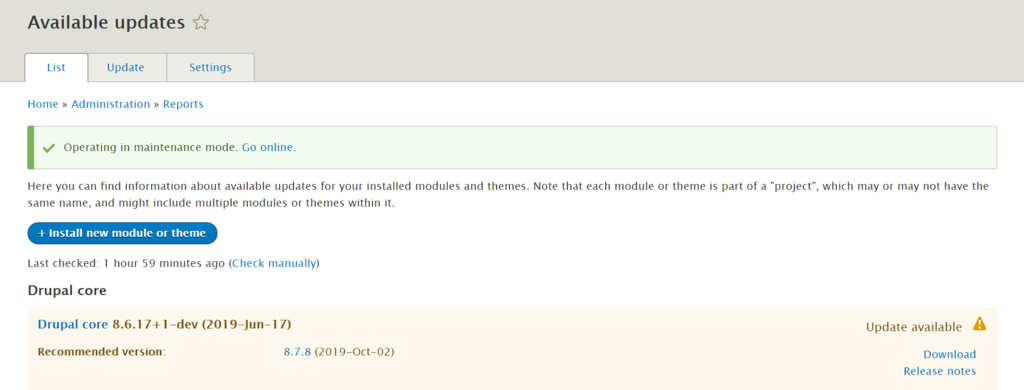
Now let’s start the updating process. Firstly, to see if an update for Drupal core is available, navigate to Reports -> Available Updates section.
There are quite a few ways to update Drupal. For instance, you can use SSH or FTP to update manually or automate updates with composer. If you’re a beginner, the most convenient way would be to use an FTP client like FileZilla:
- Download the latest Drupal version and extract it to your computer.
- Connect to your FTP account and access folder where Drupal is installed. In most cases it’s public_html.
- Select core and vendor folders as well as all the files (not folders) in the root Drupal directory and delete them.
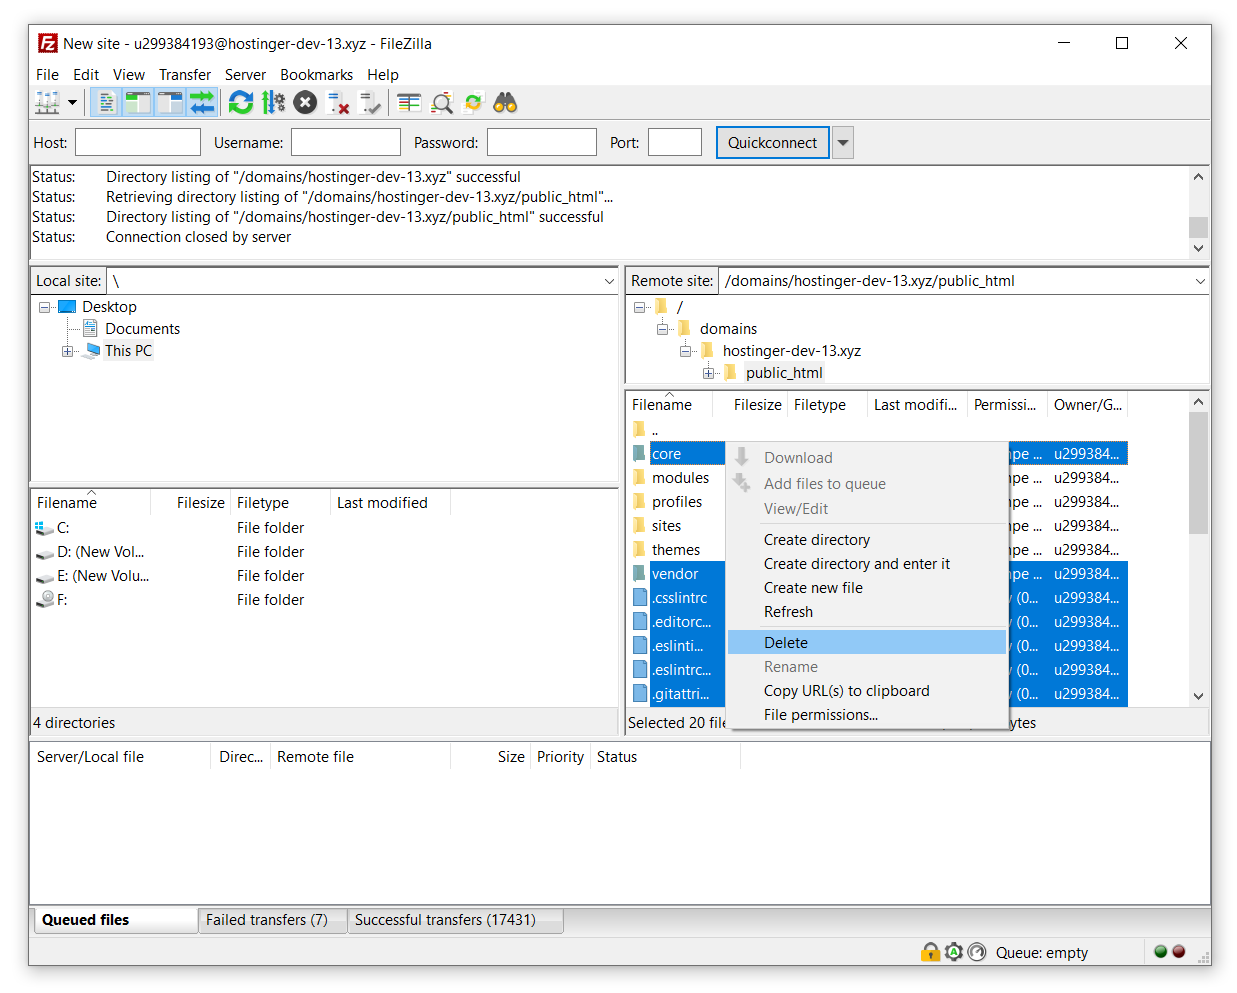
- Now access the folder with Drupal update files and select all files except modules, profiles, sites, and themes. Then, upload them.
- After the uploading process is completed, visit the Available Updates section once again to check whether the core version has updated.

- Turn off the maintenance mode by clicking on Go online.
Drupal is an excellent choice if you prefer a highly customizable CMS. It provides a wide array of themes to help you create a professional-looking site. You can also extend the site’s functionality by adding modules.
—
Drupal 7 with Aurora on Windows Server
Drupal 7 with a high performing Mysql compliant Offering-Aurora with Builtin Security,Scalability and managed service
Drupal Admins can completely remove their overhead of maintaining a mysql server by using Aurora which is not only 100% Mysql Compliant but highly Scalable and Managed by AWS. This Drupal is already tested with Aurora and secured to avoid any external access. As soon as you open the URL, Drupal 7 installation Screen can be seen where you can input the RDS details from the Output of the template, it shall further ask for Site details and auto install. Look no further if you want enhanced performance with Eradicating need of a DB admin.
Due to the SysPrep of this image, it may take up to 20 minutes to launch.
Drupal 7 is content management software. It’s used to make many of the websites and applications you use every day. Drupal has great standard features, like easy content authoring, reliable performance, and excellent security. But what sets it apart is its flexibility; modularity is one of its core principles. Its tools help you build the versatile, structured content that dynamic web experiences need.
It’s also a great choice for creating integrated digital frameworks. You can extend it with any one, or many, of thousands of add-ons. Modules expand Drupal’s functionality. Themes let you customize your content’s presentation. Distributions are packaged Drupal bundles you can use as starter-kits. Mix and match these components to enhance Drupal’s core abilities. Or, integrate Drupal with external services and other applications in your infrastructure. No other content management software is this powerful and scalable.
The Drupal project is open source software. Anyone can download, use, work on, and share it with others. It’s built on principles like collaboration, globalism, and innovation. It’s distributed under the terms of the GNU General Public License (GPL). There are no licensing fees, ever. Drupal will always be free.
Features
Drupal features
Drupal is a completely featured content management system that can be substantially improved through the installation of contributed modules or by customised development:
Platform, Web Server and Database Independent: While the standard install configuration is on Linux, Apache and MySQL or PostgreSQL, Drupal can also be installed on Windows servers running IIS and Microsoft SQL Server, Solaris, BSD or Mac OS X if there’s a requirement to do so.
Granular User Management: Drupal allows total control of user role definitions and permissions for access to different functions within your website.
Multiple Content Types: Drupal provides complete flexibility over defining how different content types (e.g. articles, blog posts, news stories) appear and the functionality associated with each content type, such as allowing or disallowing user comments.
Flexible Taxonomy and Menu Structures: The taxonomy module provides limitless customisation over the categories a content type is associated with, while the menu structure can be configured in any manner required. This flexibility makes the traditional CMS “Section > Category > Article” paradigm obsolete if you need complex ways to categorise your content, or you can keep things as simple as you like.
Standards Compliant Templating & Theming: Drupal separates all content from the presentation layer, allowing you to fully customise the design and layout of your website using standards compliant HTML and CSS. A large number of high quality, pre-built themes are available that may help fast-track the design of your project instead of starting from scratch and investing in a fully customised website design.
Device-Specific Display: If your website needs to be optimised for mobile or other devices, Drupal can detect the browser being used and serve a specific display theme for that device.
Highly Tuned Search Engine Optimisation (SEO): A Drupal website will be optimally tuned for search engines through the provision of natural language URLs, permanent links to content, customisable page metadata and an automatically generated XML sitemap.
Online Community Features: Drupal installs with forums, commenting, polls, blogging, RSS feed aggregation and rich user profiles by default, while a range of modules and custom development can facilitate any imaginable form of user generated content or interaction on par with the Facebooks, YouTubes and Flickrs of the world.
Tracking and Statistics: By default, Drupal contains its own user tracking and statistics, but can be easily integrated with third party reporting tools such as Google Analytics.
Content Administration: A range of core and contributed modules provides a very high degree of editorial workflow and management depending on the size of the organisation and amount of content being managed.
WYSIWYG Content Editing: A range of modules can provide changing levels of WYSIWYG editing control dependent upon the intricacy of editing necessities.
AWS Template Drupal on Aurora
Drupal 7 with Aurora (RDS) and AWS Elastic Load Balancer on Windows Server
Installation Instructions for AWS Template for Drupal on Aurora – RDS
A) Application URL: Template Output provides the Application URL as well as Database details.
Access the application via a browser at the load balancer URL which is the WebSiteURL from the template output.

B) RDS Cluster / Aurora Details:
RDS Cluster / Aurora Details can be obtained from the Output of the template.
Being your installation with the WebSiteURL from the Output and enter custom details for your site
Please enter the RDS Cluster / Aurora details in the configuration of Database stage.
Details are also available in
C:\Install\Aurora_credentials.txt in the ec2 Instance
C) RDP Connection: To connect to the operating system,
1) Connect to virtual machine using following RDP credentials :
- Hostname: PublicDNS / IP of machine
- Port : 3389
Username: To connect to the operating system, use RDP and the username is Administrator.
Password : Please Click here to know how to get password .
D) Other Information:
1.Default installation path: will be on your web root folder “C:\inetpub\wwwroot\”
2.Default ports:
- Windows Machines: RDP Port – 3389
- Http: 80
- Https: 443
To begin configuration please refer the following:
When you open the WebSiteURL you shall see the below screen

Choose the appropriate option and proceed to next page
During Database configuration choose Advance options.
For Database hostname field enter the RDS details from Template Output.
Database Name , Username and Password can also be referenced from the template output which is same as input during Template deployment

After Database information enter the site information on next page

After configuration is complete you can access the site

You can continue further customizations from site configuration

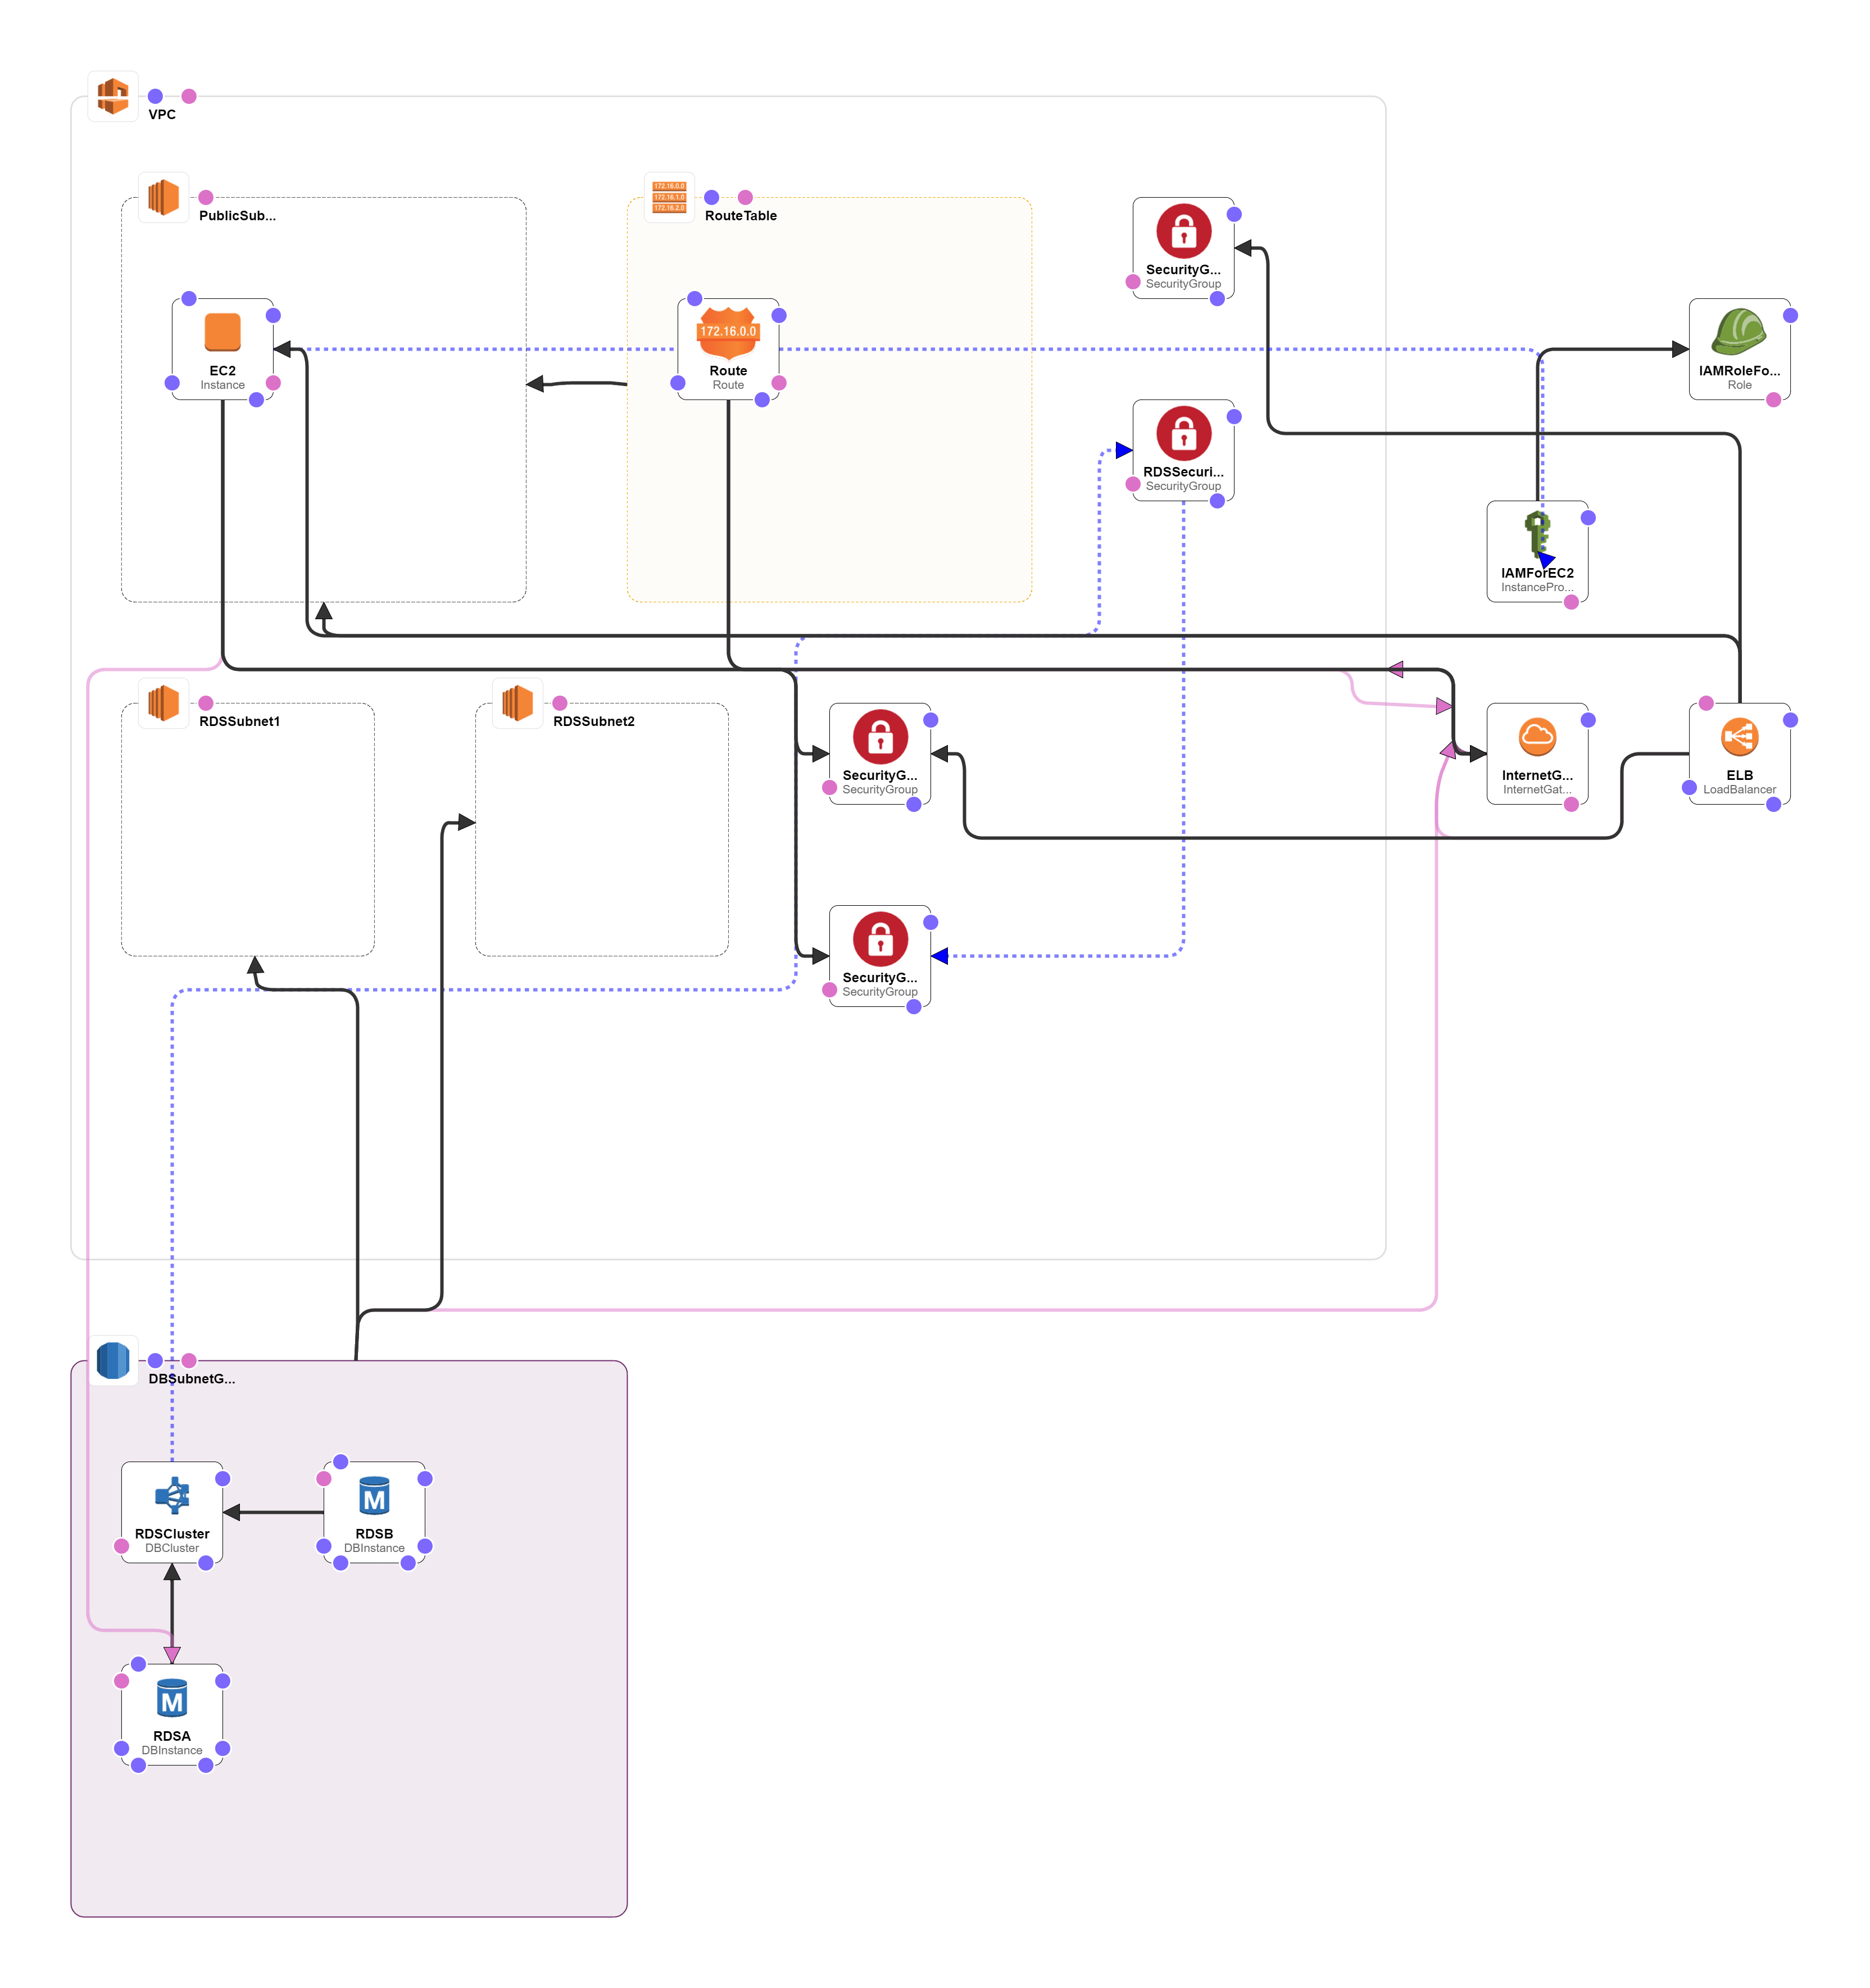
Drupal Aurora Template Topology