1-click AWS Deployment 1-click Azure Deployment
Overview
Contao is a very versatile CMS and can be used in many ways. Medium to larger web projects in particular benefit from the high-performance, easily expandable system architecture. Big companies like Siemens and Telekom have already installed projects with the CMS. Thanks to its easy application, beginners can easily obtain convincing results. Many useful features are already installed with the basic version: The accessibility, search engine optimization, and the integrated newsletter tool, for example, make Contao especially interesting for corporate websites.
Contao’s central CMS structure
Contao is a page-based CMS and structurally differs from other solutions, like Joomla, which is more based on categories. The hierarchical page structure enables users to manage several different pages with ease, while the system’s tree structure provides a basic framework. Here, basic settings like meta tags and settings for extensions and visibility are determined. And thanks to modules, stylesheets, layouts, templates, insert tags, PHP, and additional extensions, users have a wide range of design possibilities available for tailoring the CMS to their individual goals.
The basic version
Most users will probably notice that Contao’s standard version already contains a large variety of functions. This multitude of integrated modules makes it easy to get work done with this CMS. As a result, creating, managing, and editing texts as well as multimedia content is both easy and intuitive.
The most important features at a glance:
- Extended editor functions
- Full text search engine
- Integrated data manager
- Form generator
- Core module for news and event management
- Newsletter module
- Capable of operating multiple sites/multiple languages
- Accessibility
Contao extensions
Contao users have direct access to available extensions via the system’s back end. The back end is where users can manage existing extensions. From e-commerce systems (see below) to managing real estate, Contao’s large community provides users with a wide range of (often free) extensions.
Managing user rights
As a CMS, Contao differentiates between users and members. The latter group is able to set up a password-protected member area, which, in addition to login/logout functions, also features registration forms and user account management options. User rights can be managed in a nuanced way, and different roles can be assigned to different users (e.g. editors, administrators, etc.). Whether full or restricted, access rights can be defined for both individual users and groups as well as different layers.
Contao SEO options
Most on-page SEO measures are easy to carry out using Contao. The requirements for these–a neat source code and options for high-quality internal links–are already fulfilled. Furthermore, the system supports SEO efforts by:
- Generating search-engine friendly URLs
- Incorporating dynamic page titles
- Including completely automated meta data
- Creating an XML sitemap
E-commerce use
Isotope e-commerce provides users with a premium e-commerce module for Contao. This enables administrators to set up a connection between content management and e-commerce solutions. While the program’s concept, page structure, and layout are from Contao, the basic functions are that of an e-commerce system. Isotope has a flexible, adjustable design, which can be integrated with different payment services like PayPal; it also offers different shipping options, and, like the CMS itself, is available in multiple languages.
Pros and cons of Contao
A CMS comparison is always difficult, as there are many individual factors that need to be considered when finding the right one. This being said, some clear advantages and disadvantages do stand out. Here are some of Contao’s pros and cons:
What they’ve done right:
- The large range of functions in the basic version
- The large selection of extension modules
- Web accessibility and intuitive use
- Staying up to date through long-term-support
- Strong support community
For beginners, the program’s basic functions are clear and easy to use; however, implementing Contao’s templates in order to adjust its design does require some experience. The cut-and-dry structure is also somewhat prone to losing complex and, under certain conditions, multilingual content. In such cases, ample support and documentation should be provided for users.
| Pros | Cons |
|---|---|
| ✔ Large spectrum of functions | ✘ Integrating templates is complex |
| ✔ Many extensions | ✘ Clearness is lost with bigger projects |
| ✔ Accessibility | |
| ✔ Active community | |
| ✔ Good support and plenty of documentation |
Find out just how Contao stacks up against other content management systems and which solution is best for your web presence in our article on CMS comparison.
Contao vs. TYPO3
Two big open source systems: Contao and TYPO3. Both are hugely popular – for bigger projects, too – but they also have different advantages. Especially in terms of software usability, it’s clear that Contao and TYPO3 are going in different directions. While the latter is very much focused on enterprise-level solutions and requires its users to have prior knowledge, Contao is directed more at beginners, bringing it closer to WordPress in this respect. Working in the back end is easy and intuitive. TYPO3, on the other hand, is more directed at professional users, who can enjoy endless possibilities with this CMS. Contao is not this flexible and finely adjustable.
What differentiates both Contao and TYPO3 from WordPress: Both systems are not slowed down by unnecessary features. Both Contao and TYPO3 impress with their high speed, which both CMS achieve when accessing the server. Apart from this, Contao and TYPO3 offer everything you could ask for in a CMS: Content can be easily created, planned, and organized. And like other CMS solutions, you can assign different roles, so that you can enjoy an efficient workflow if you’re working in the CMS in a team.
- Contao is especially appealing for beginners that don’t want to opt for WordPress
- TYPO3 is more difficult to use, but offers highly complexconfiguration options
- Both Contao and TYPO3 are suited for bigger projects
- Both solutions let you test the editorial benefits of a CMS
- Both CMS are very popular and are supported by active communities, who continuously work on extensions and support.
Manually Installing Contao:
Setting up the File Structures for the Contao Installation:
- Before beginning you will need to download the latest Contao files. This is the same link as going to the Contact.org website and clicking on “download” in the top menu. When you go to this link you will have the option to download different versions of Contao, but the latest version is 3.03. The installation documentation uses this version of the software. Note that the installation files are compressed using two different methods. If you are familiar with the .tar.gz package you can download it and use it, or if you are not familiar with it, simply use the .zip package. They include the same files. When you download the files, you will be requested to agree with the GNU Lesser General Public License (LGPL) for using Contao. Simply click OK and you will be able to download the file.
- First we will need to move the files into the correct location. We will be using the File Manager in Cpanel in order to do this. Login to the Cpanel and then click on File Manager to launch it.
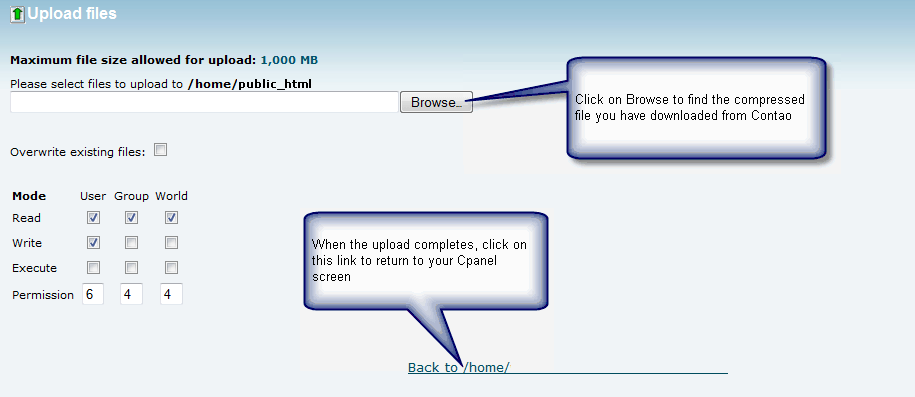
- Once you have launched the File Manager, go to the folder that you have chosen for your Contao installation (e.g. the primary domain defaults to /public_html/). Click on the destination location, then click on the UPLOAD option in the menu bar for the file manager. If you initiate the upload in the folder where your files will eventually be saved, then it will save time and make it easier for you to quickly complete the installation without having to move files. Use the BROWSE button to navigate to the location where you downloaded the Contao installation file on your computer. The screenshot below shows an example what you will see:

- When you have located the file you have downloaded from Contao, click on the installation file to select it, then click on OPEN in the bottom right hand corner. It will automatically start uploading. When it completes, you will see text in the bottom right hand corner of the upload screen like this:
 When it has completed uploading, then click on the “Back to /home/…” link at the bottom of the upload screen to return to the File manager.
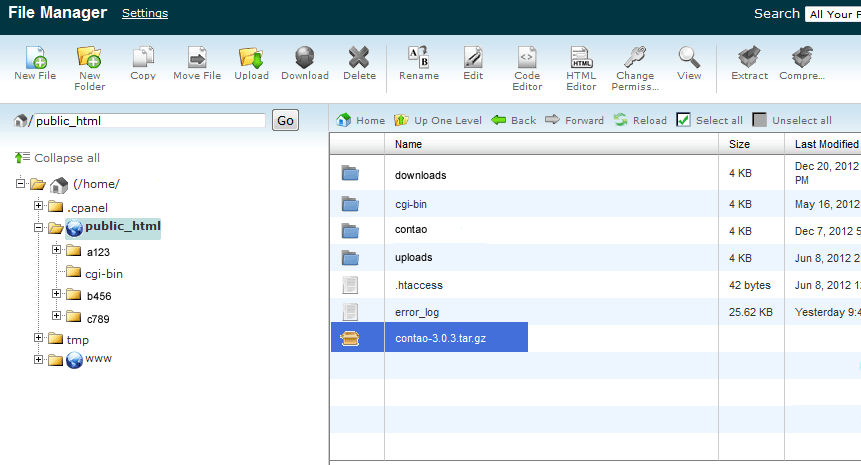
 - After you have uploaded the file to the server, you will see a file labeled: contao-3.0.3.tar.gz (or contao-3.03.zip). You can use either file. The main difference is simply compression efficiency. The .tar.gz file is only 7.3 MB and the .zip file is about 9.5 MB. Both files can be extracted through the extract utility within the Cpanel. Click on this file to select it, then in the top right hand corner click on EXTRACT.
 The screen shot above shows the contao-3.03.tar.gz (or contao-3.03.zip) file has been selected and is located in the public_html folder. Note the location of the folder can be where you wish to place it (within the public_html folder), so it does not necessarily need to be located in the folder designated for this tutorial. Click on EXTRACT in the top right hand corner to extract the files from the compressed file. You will see a dialog screen to determine where the files will be extracted:

- Click on EXTRACT FILE(S) in order to extract the file to directory that you have selected. The EXTRACT dialog includes the location destination location where the files will be extracted.
- When the extraction has completed the file manager should show the files as follows:
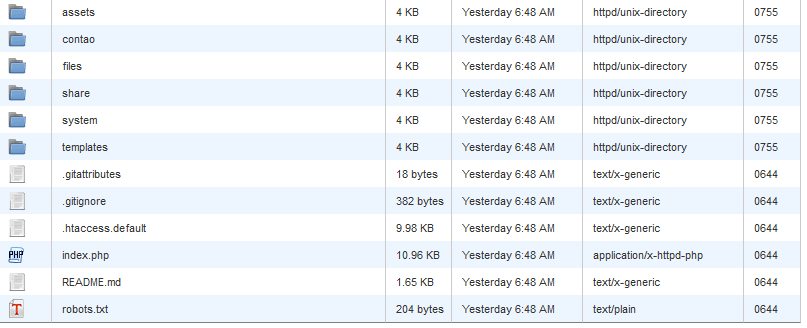
 Notice that the compressed file still exists. At this point, the compressed file is no longer needed and can be deleted. Double-click on the contao-3.0.3 folder to select it and see its contents. It should appear like the following:

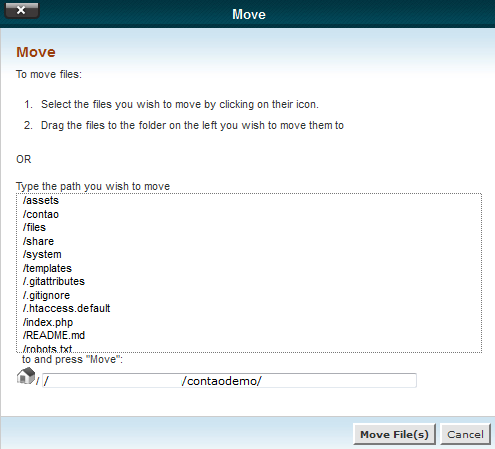
- The next part of the installation will be to MOVE the files into the correct location. They cannot be in the contao-3.0.1 folder. If you were to keep the files in that folder, then if your primary domain was called CONTAODEMO.COM, the actual path to the installation would be http://contaodemo.com/contao-3.0.3. Click on SELECT ALL in the top right hand corner of the file manager in order to select all of the files in the folder. Once all of the files have been highlighted, click on MOVE FILE.
- The purpose of moving the files is to move them from the contao-3.0.3 folder into the root directory or other location that you are using for the Contao installation. Once you have selected all of the files, then click on MOVE FILE. You will see the following dialog: Click on the bottom line in order to specify the location where you move the files and folders.

- Once the files are in place, then you can proceed with running the installation. The installation will work through the URL where you have placed the files. For example, if you placed the files in the document root (web root) of the primary domain, then the files would be in the public_html folder. If the domain were CONTAODEMO.COM, then the installation path you need to type would be CONTAODEMO.COM/contao/install.php. Open your internet browser and then start the installation. You will see the license screen appear first:the license and
- then click on the ACCEPT LICENSE button.
- Next you will see a screen to set a password. The password needs to be at least 8 characters and you will need to type it twice. This password is for securing the Contao Install tool (as per the Contao screenshot below). If you leave the installation at a particular point, then you will need to log back in with this password to continue.

This completes the file setup section. The next part of the installation requires the use of the MySQL database features of the Cpanel inorder to set up the database. Do not leave/close the installation window above. Simply open another window to complete the database tasks, then return to this position in order to finish setting up the Contao CMS.
Setting up the Database for the Contao Installation
Manually setting up Contao will require that you use MySQL to setup a database and database user for the installation. The following instructions will guide you through the steps to meet this requirement.
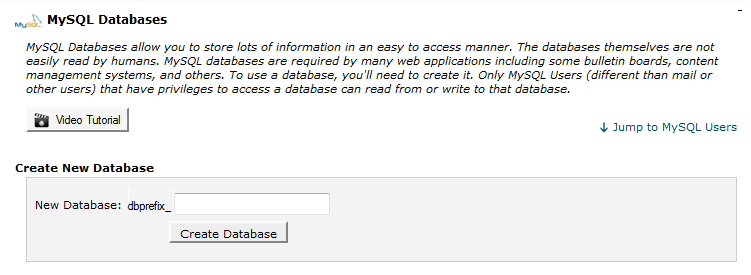
- In the Cpanel, go to the DATABASES section, the select CREATE NEW DATABASE. You will see the screen as follows:

- Note that every database you create will start with your account prefix. So, if your account prefix is example5, then the database name would be something like:example5_databasenameClick on CREATE DATABASE in order to create the database.
- Once the database is created, the next step will be to create the User who will be accessing the database. Like the database, the user name will start with the account prefix:example5_usernameNote that you will need to set up a password for the user. Make sure to record this password so as not to lose it.
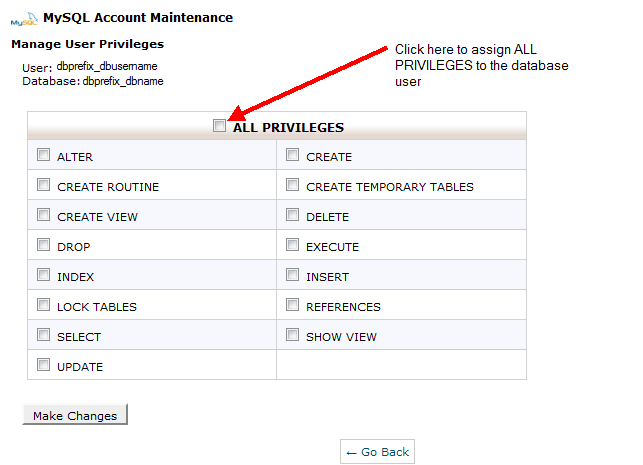
- Take the user you just created and then assign it to the database you have created. You will select the user and the database, then when you have done so, you will need to assign the privileges the user has for the database. Simply click on ALL at the top as per the screenshot below:

- Once you have selected the privileges that the database user will retain , click on MAKE CHANGES in order to save your selection.
- When you have completed checking your database, you can take the next step in the manual installation process. Return to the window where you left off above, and then proceed.
- The final part of the Contao database setup starts with the login screen using the password for the installation. This should be the same as the database user password. If you get it wrong, it will send you back to the database configuration screen. After getting it correct, you should see the following:
 The update screen is fairly long, so only a partial copy of it will show here. Note that at the bottom of all the database updates there is a button labeled UPDATE DATABASE. If you get an indication that the tables are not updated (as per the red text in the screenshot above), then click on the UPDATE DATABASE button to update the database.There were two sections that were not discussed in the steps above: Generate Encryption Key and Collation. Use the Encryption option only if you plan to use the key to decode or encrypt data within your database. Collation should not be changed from the default value (utf8-general-ci) unless you know how to use collation within your database.
Finalizing the Contao installation
- When the database completes updating (usually a very short period of time), then you will be able to move to the next session which starts with the template:
 The default installation comes with a template called music_academy.sql. Simply click on the drop-down menu to choose it. Click on IMPORT TEMPLATE to complete this section. Note that using the template creates a demo website for Contao complete with users and other entries.
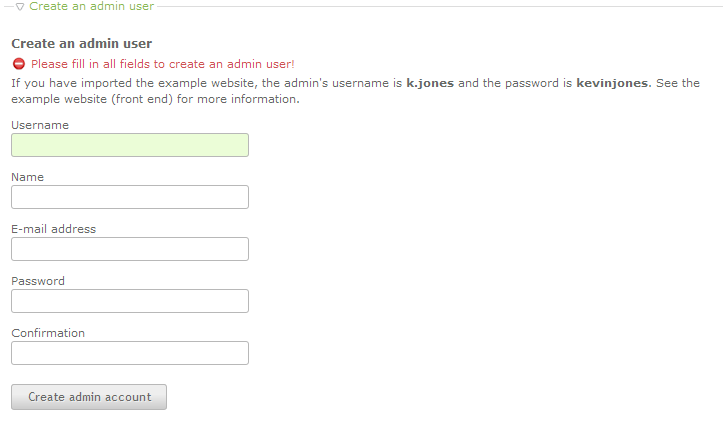
 - When the installation of the template completes, you may see a log-in screen appear. Make sure to use the password you used for the database user. The final section asks for you to setup an Adminsitrator user:

- After you have completed filling in all of the fields for the Administrator user, you will see a screen indicating that you have completed the Contao installation!

Manually installing the Contao CMS requires many steps that involve different sections within the hosting account to successfully complete.
How to Login to the Contao Back End:
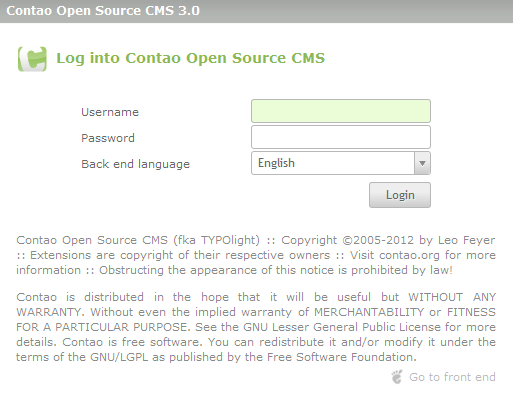
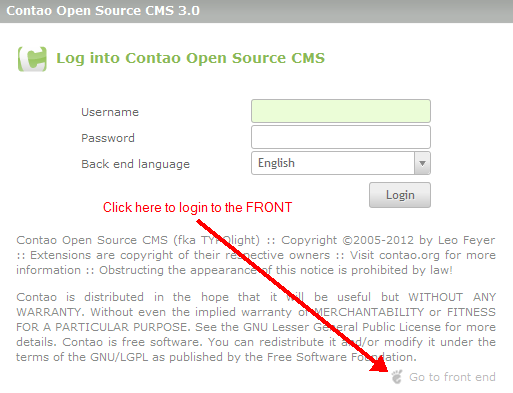
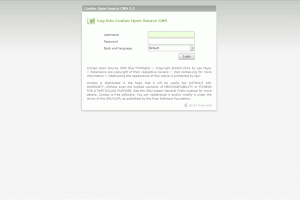
- In an internet browser, type in the back end URL for Contao. This is typically the domain/contao. For example: http://contaosamplesite.com/contao/. You will see the following screen for the Back-end login:

- Type in the user name for the administrator and the corresponding password. Change the language if necessary. Click on LOGIN once the user name and password have been entered.A successful login will lead to the back-end modules which will appear as follows:

If you are unable to login, you will see a LOGIN FAILED message on the login screen.
How to Login to the Front End of Contao:
Contao CMS allows you to see a wealth of information as a user. Additionally, sections of the site, like calendars, may need to be shared. The front-end of the Contao CMS will differ slightly depending on theme. Here’s an example of how the front-end login screen appears:
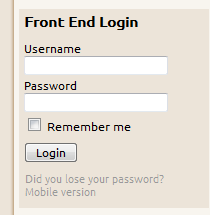
The front-end of the CMS is used to share information or content with registered and non-registered users of the website. Logging in will allow access depending upon the access rights granted to the user by the administrator or administration team of the CMS. The following article shows how to login to the front end of the Contao CMS.
- Type in the URL to get to the front-end login window.
- Type in the User name and password.
- Click on LOGIN in order to get into the website’s front end.
- If you are logged into the BACK-END (see Logging into the Back-end for CMO), then first log OUT of the back-end, then you will see the login screen. As per the screenshot below, click on the bottom right hand corner to login the front-end:

Successul login to the software will bring up the website and allow access to the members-only areas of the website. If youu require help recovering a lost password, simply click on the option in the login to recover the password immediately.
Becoming Familiar with the Contao Back end:
When you first login to the Contao Backend Manager, you immediately see that they organize the screen into three distinct areas: a top menu bar, a left hand menu bar (labeled “Back end modules”), and middle window that displays data depending the section you select. Each section has a different purpose and helps you navigate the different areas of Contao’s interface. The following article describes the different areas that you will see and also explain the different views you will encounter as you display data in the Contao Back end.
Describing the Contao Back end Manager
When Your First Login to the Contao Back end
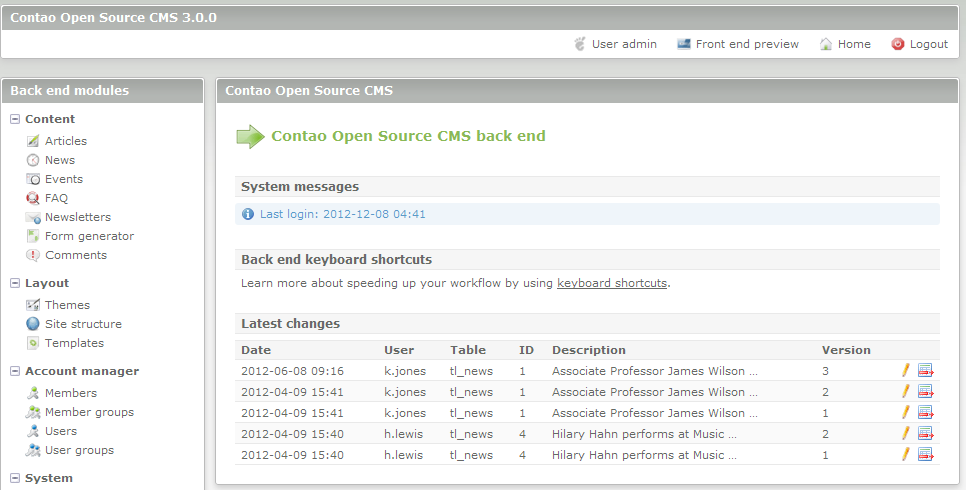
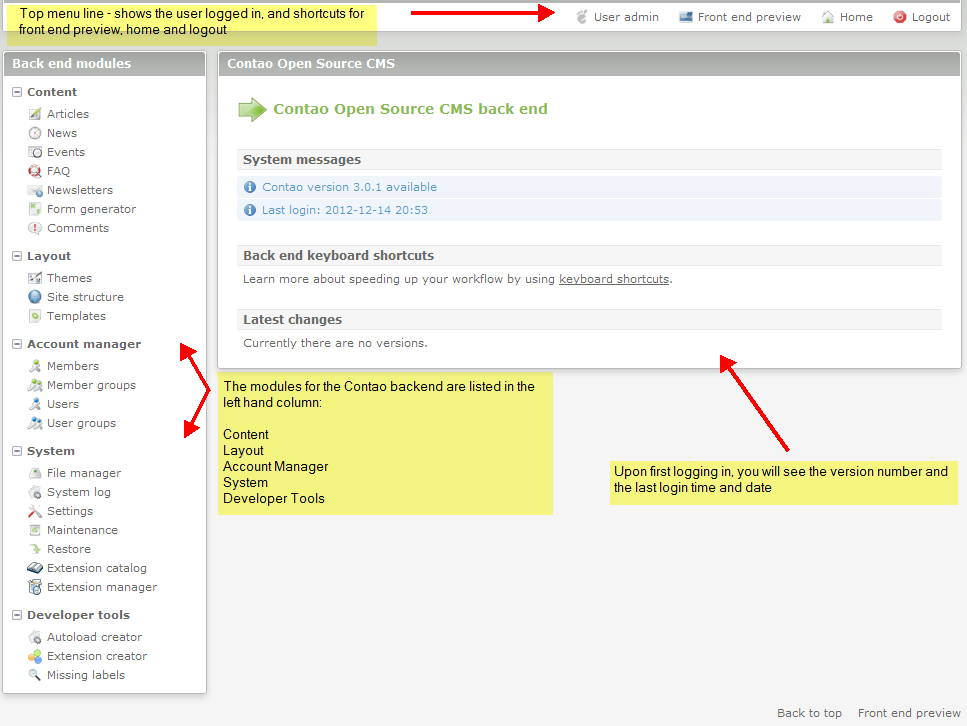
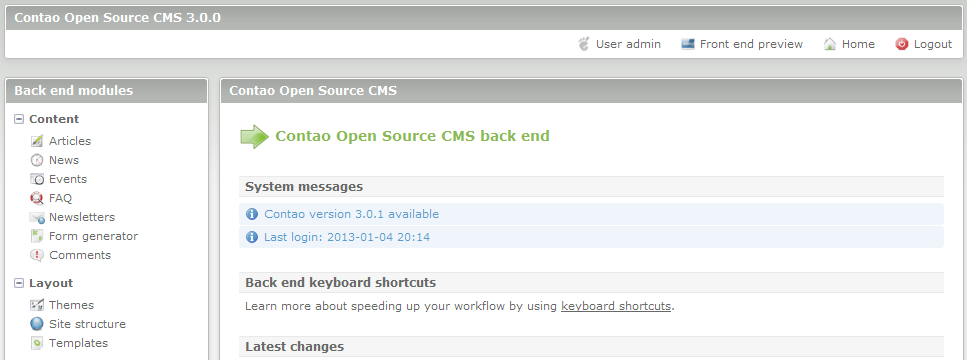
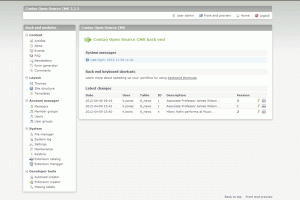
Upon logging into the Contao Back end Manager you will see the following:
Each section is described in the illustration above. You can also take your mouse and hover over the text in each area in the Contao back end. The text will change color and also bring up a description of the text in relationship to the area you are viewing. The data section in the middle right of the screen will show the version of Contao that is loaded as well the date and time of your login. It will also list the Keyboard shortcuts and any changes that may have been recently made to the CMS. Here’s a summary of the highlighted areas for both the top menu and the back end modules:
| Top Menu Bar | |
|---|---|
| User | Name of the User logged in |
| Front End Preview | Web site created with Contao |
| Home | Returns to the Back end Start page |
| Logout | Exit the Back end |
| Back End Modules | |
|---|---|
| Content | Articles, News, Events, FAQ, Newsletters, Form Generator and Comments – content of the website being created and managed with Contao |
| Layout | Themes, Site structure, Templates – design elements for the website created by Contao |
| Account Manager | Members (Front end users), member groups, Users (backend users), and user groups |
| System | File manager, System log, Settings, Maintenance, Restore, Extensions catalog, Extension manager – system items for managing files and Contao settings |
| Developer tools | Autoload creator, Extension creator, Missing labels – developer section for extending and creating items for contao |
The screenshot above also includes two links in the bottom right hand corner: Back to the top and Front End preview. The first link jumps you back up to the top of the interface and the Front End preview will open a separate window with the current view of the website created by Contao.
Understanding the Views
Top Menu Line
As noted above, the middle portion shows a different screen per the item that you select in each menu section. Starting with the Top menu, clicking on the User will lead to the screen to update personal data and the password for the user. This is the only selection in the top menu that will change the middle screen for the user while remaining in the backend. The logout option closes the back end and re-displays the login dialog. The home button returns the user to the beginning screen of the backend.
Back end Modules
The back end modules shows 3 different types of views depending on your selection within the menu:
- List view – will generate a list based on the letter of the item being listed
- Parent view – shows a detailed portion of the document that you select to display
- Tree view – gives a tree view that can be expanded or collapsed to show data
Note that the top menu bar and the back end modules list on left do not change. The screenshots below illustrate the different views per the list above.
Here are examples of each view:
LIST VIEW
PARENT VIEW
TREE VIEW
Becoming familiar with the views will help you feel more comfortable with using the Contao interface. It helps you to quickly navigate to the necessary item that you may have to edit or manage. Each section of the back end interface has a different purpose, but as you learn how to use Contao, the navigation tasks become simpler and you begin to appreciate both its simplicity and efficiency for getting the job done.
Creating a Page in Contao:
How to Add a Page in Contao:
- Login to the Contao back end interface
- In the Back end modules on the left, scroll down until you see SITE STRUCTURE in the Layout section. You will see the site structure in a tree-style view.
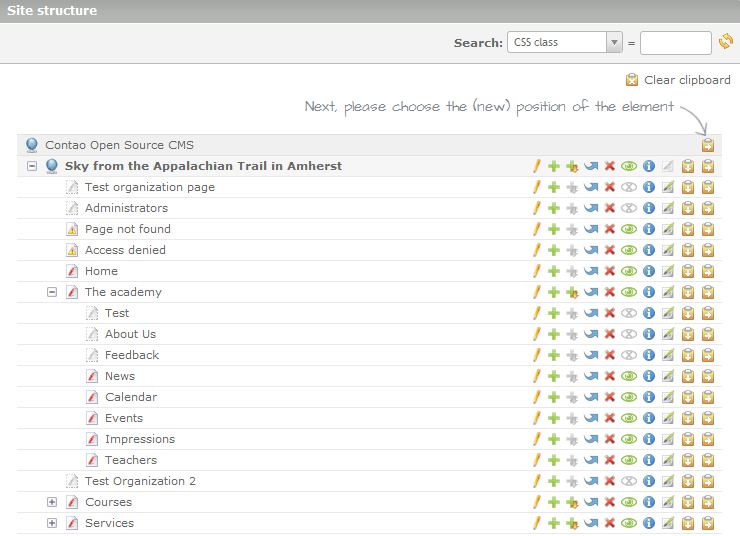
- Towards the top right of the page, click “New page”. You will then be presented with the items in the site structure in a tree-style view once again. You will need to position your new page in the structure. Here’s an example what you may see:
 Note the instructions above: “please choose position of the element…”. You will need to click on the icon on the far right resembling a clipboard. Here’s a quick table summarizing what each clipboard icon type does:

Paste after the selected item. Positions your page under the selected menu item but not within the group or sub-group 
Paste into the selection item. Positions your page under the selected menu item and within the group or sub-group All items have a parent item. For example, “News” is found under its parent, “The academy” in the screenshot above. Determine what you would like to be the parent of your new page, and then click the clipboard icon (the one with the arrow pointing to the right) to the right of the parent. In our testing, we are adding an “Our Services” page that will be found within “The academy”, so we are clicking the clipboard icon next to “The academy”.
There are many details on this page, as a reminder, we are going to highlight only the essential details.
Position your new page, then enter the desired paged name. For example, in the screenshot above, you can see a page that we created called “Test”.
- Scroll down the options for the new page and make sure to check off PUBLISH PAGE.
- Click “Save and close” at the bottom of the page.
- At this point, our new page is created and we now need to add content to the page. Return to the main menu for the Contao Back end (as if you had just logged in again), and in the Back End modules section, scroll down until you find ARTICLES. Click on ARTICLES to proceed.
- In the list of items on the page, find the page you just created (in our testing, we are looking for “Test”. You will see the page name listed twice. Next to the second instance of the page name, click the pencil icon to edit the article. The item and the pencil icon are highlighted below to clarify what you are trying to find:

- You will next be adding the actual content (referred as an “element” by Contao). Click the “New element” link at the top of the page.
- Once again, there are many options for new content, and at this time we are only going to cover the basics. In the drop-down menu, leave the Element Type as “Text”. The third area (the text editor) on the page says “Text”. Within this editor, type the content for your new page. In our testing, as the page is called “Test”, you can any text in order to simply create a test page.
- Click on a SAVE option at the bottom of the page.
Congratulations! At this point, you should have successfully created a new page within your Contao website. Visit your site, and you should see this new page within your menu.
Website Creation in Contao:
Modifying the Website with Contao
When you install Contao, you will be able to setup a test site that comes with a theme, user data and the other general structures that will be part of a typical Contao website. The template provided with the install can be quickly modified to create a specific website to meet your needs. We will be using the default site in order to familiarize you with using Contao by modifying the header image of the default theme and changing menu structure.
- First, login to the Contao Back end interface. Note: Steps 1-4 give you a quick look at the interface. Skip down to step 5 in order to begin modifying the existing theme so that you can add your own content to the demo site.
- You will see the general Contao interface that will appear as follows:
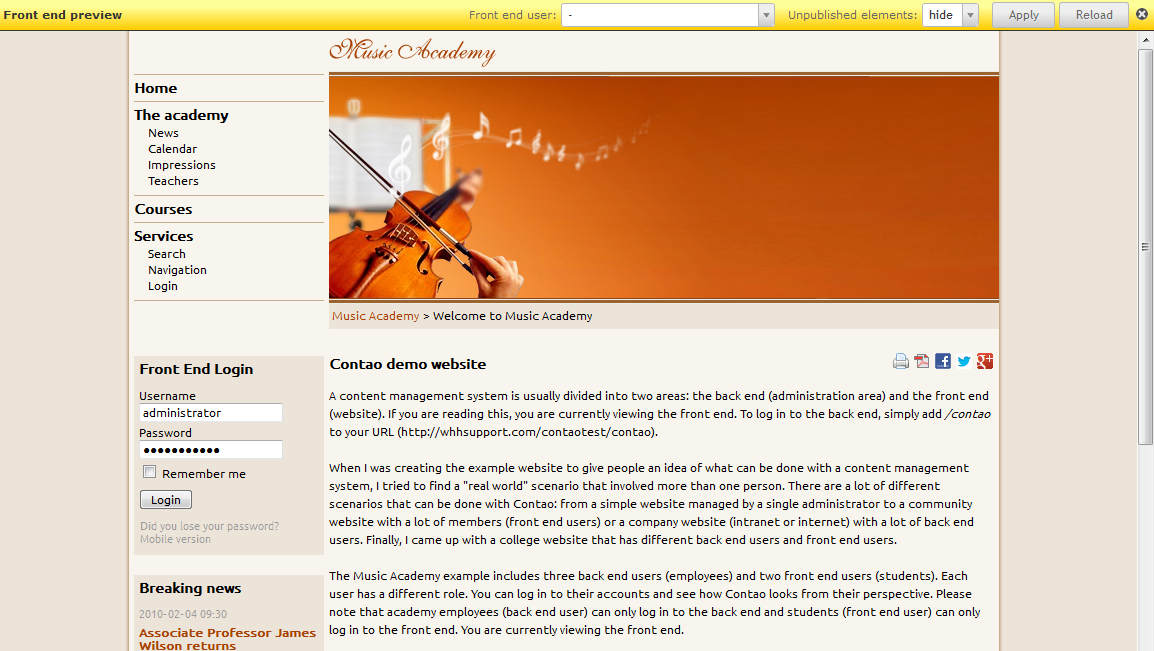
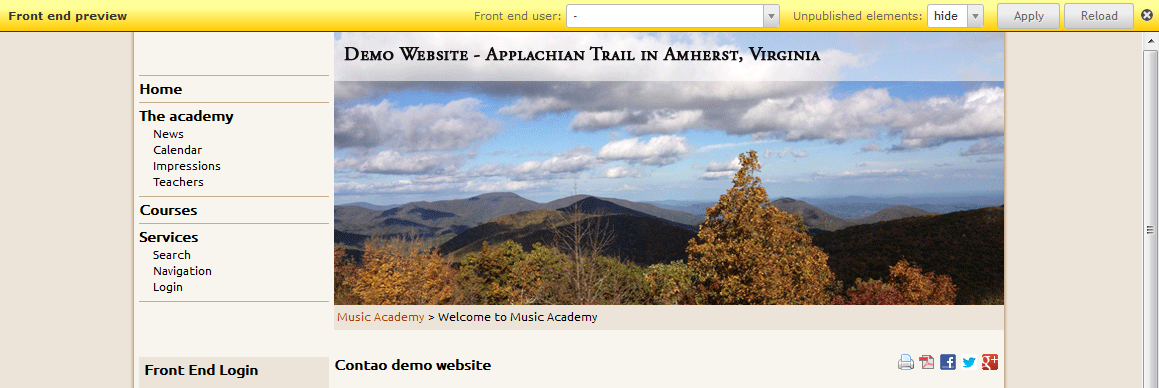
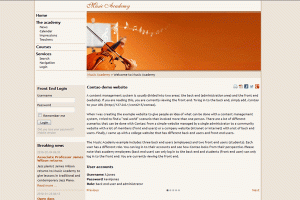
 There 3 main sections with each section highlighted in gray and labeled as: Contao Open Source CMS 3.0.0 (the top menu bar), Back end modules, Contao open Source CMS (the largest window). The window on the right will change as you select items in the Back end Modules section.At the top menu bar, click on FRONT END PREVIEW. The preview shows the default website:
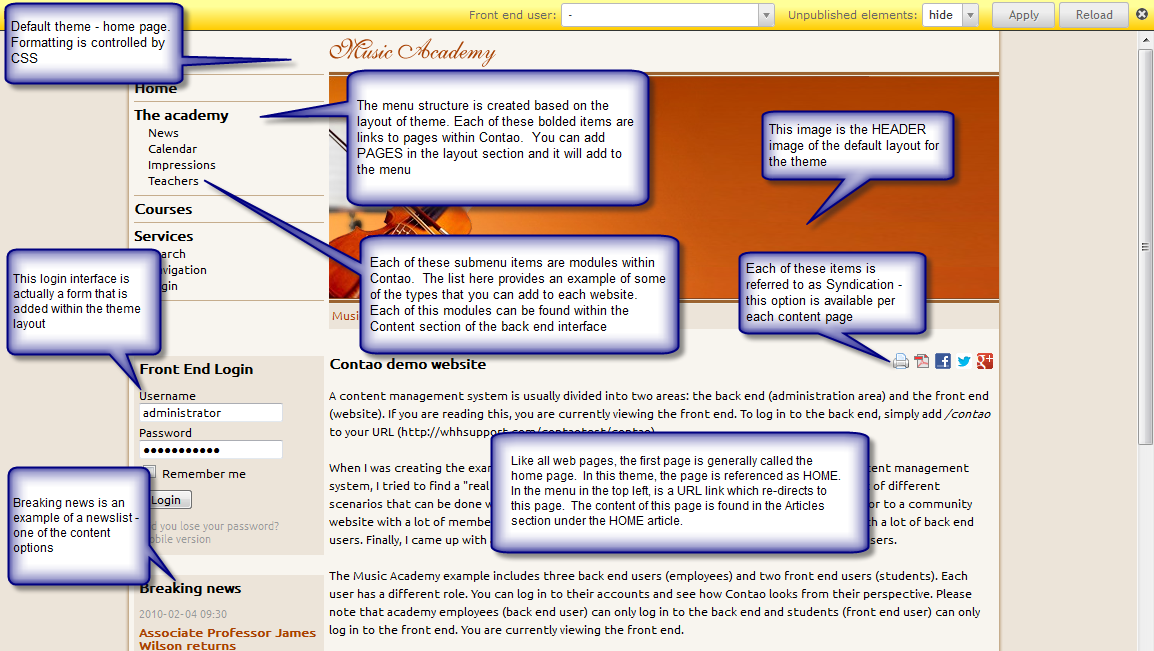
- The front end preview shows the website that we will be modifying. This page is the default available when loading Contao. Note the yellow bar at the top of the page. You can choose to show the web page based on existing users and also hide unpublished elements using each option’s drop-down menu. Clicking on the preview will open a new tab within the browser and show the website as it appears now. Here’s a breakdown of the front page for the default template:
 Click back to the back end interface and we’ll summarize each section before starting to add a page to the website.
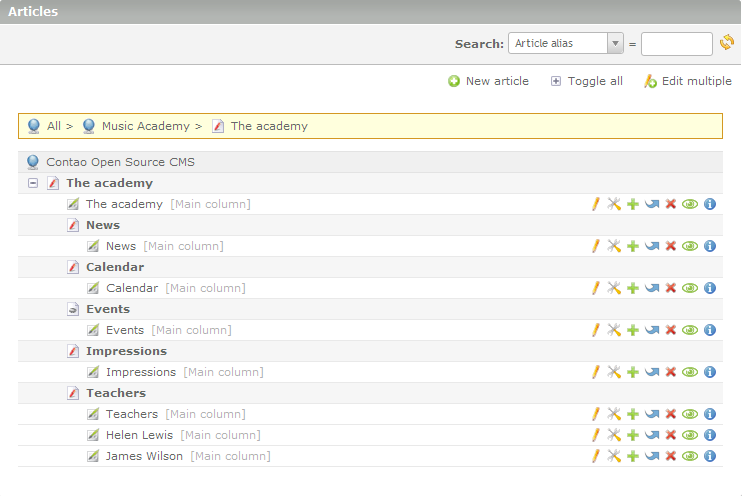
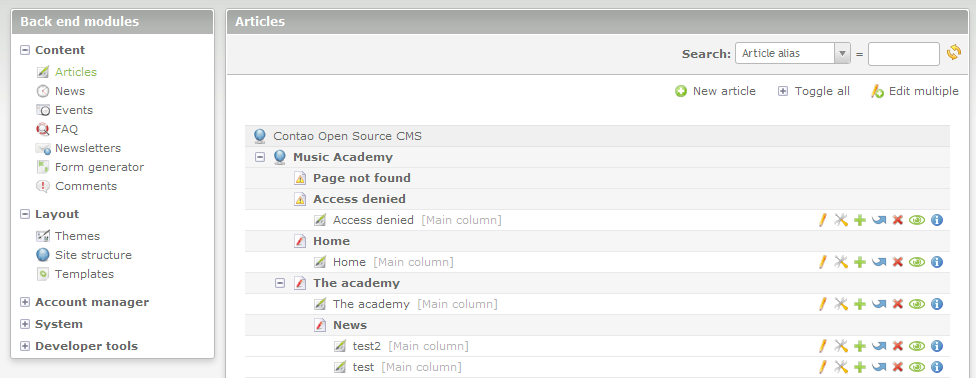
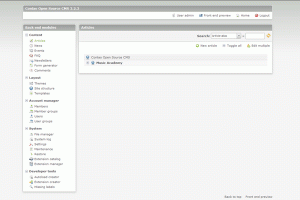
 - Each of the sections identified in the webpage above correspond with the backend interface. Here’s a quick look at the sections to help familiarize you with the setup:CONTENT Module – The screenshot below shows the list of content found in the articles section:
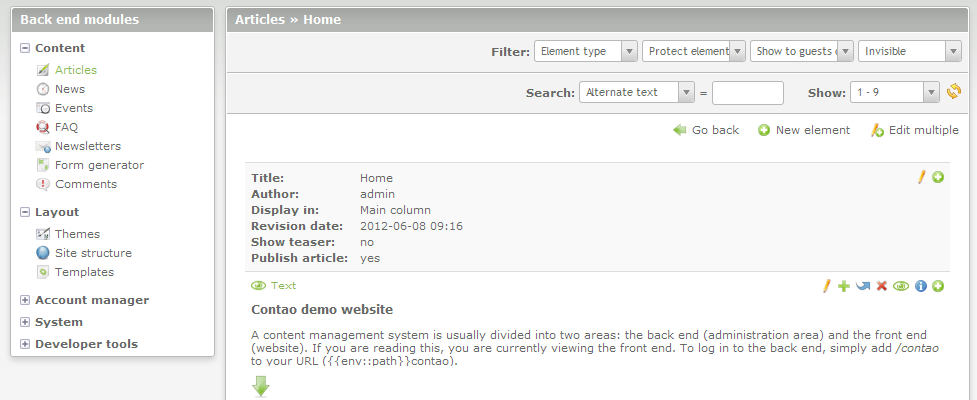
 ARTICLES – You can click on the articles in the list above in order to get to the actual content that actually makes up the article. Additionally, it is important to remember that when creating a new article, you will be creating an article ID section (which contains the many of the settings and identification information for the article) in addition to the article content as seen in the screenshot below.
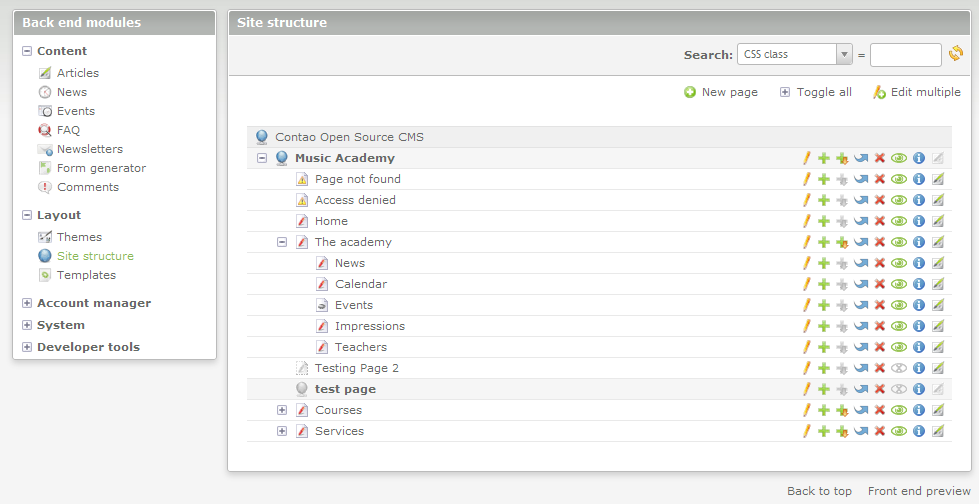
 The other section of the interface that you will quickly begin to use is the SITE STRUCTURE within the Layout section. This is where you will be adding pages that will become the parts of the menu that link to the other pages within the website.
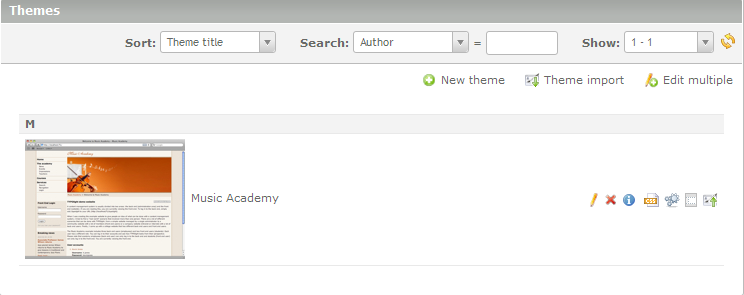
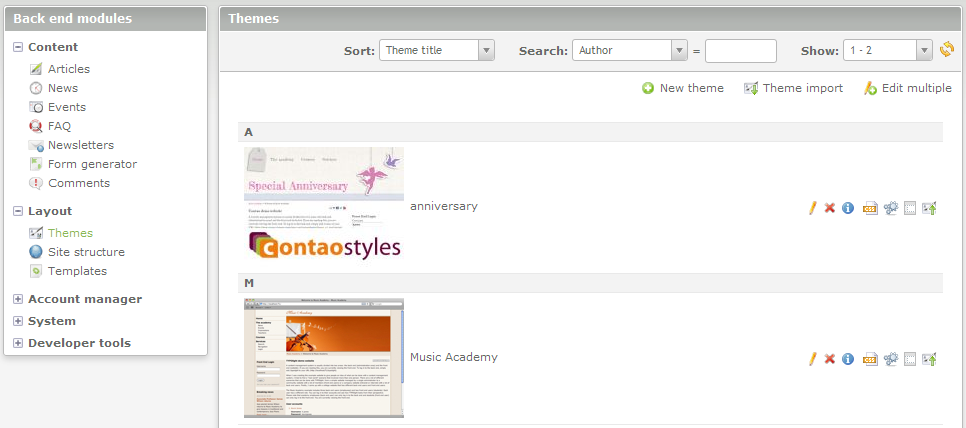
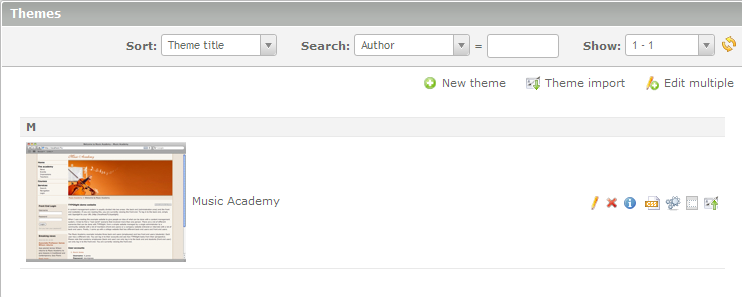
 We will begin by modifying the demo site. In the Back End Modules menu (the left hand column menu in the back end), click on THEMES under the Layout section. The screenshot here shows two themes (though you’ll only one in the default installation of Contao).
To the right of each theme, you will see a series of icons. Click on the second to last icon in order to edit the MUSIC ACADEMY theme’s page layouts. You can hover each icon to see a description of each option. We will be editing the page layouts to simplify and personalize the website header image:
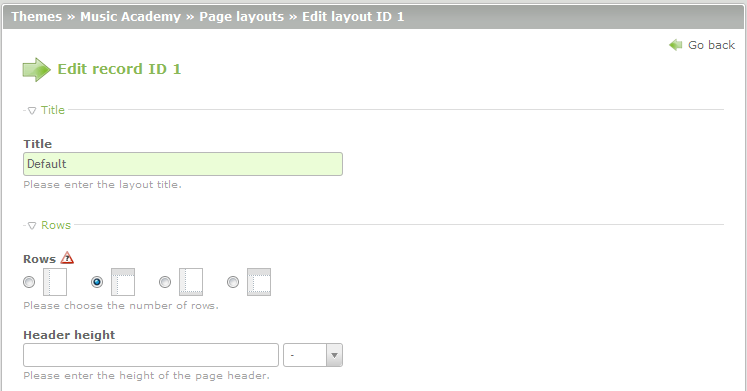
- We will start the changes to the site by modifying the theme graphic – When you click on the EDIT PAGE LAYOUTS icon, you will a list of the page layouts. You will see that there are 6 page layouts. Each page layout has an option for a mobile device display and then one for a non-mobile device display. We will be working with the DEFAULT layout. Click on the pencil icon (the first icon) to the right of the layout name. You will see the following:
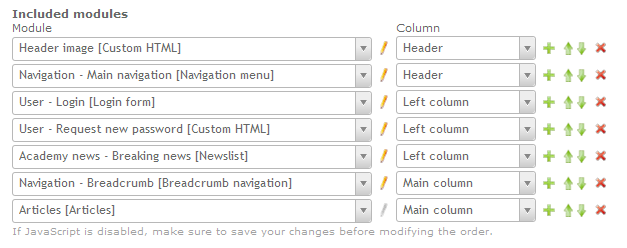
 This is a partial capture of this section. Take a look at the options that you have for modification. Scroll down until you see the following:
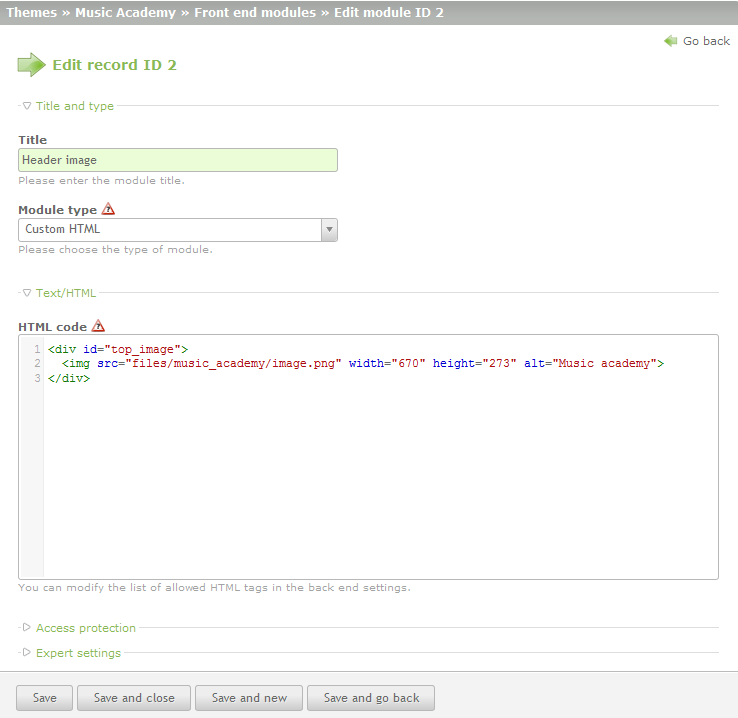
 For the purposes of this tutorial, the header image will be replaced. If you wish to replace it with an image of your own, note that the image is 670×273 pixels. Click on the edit option (looks like a pencil icon) next to the HEADER IMAGE.
 - You will see the following screen that will allow you to modify the current image file. For more information on adding images, go to Creating new Content Elements the Contao CMS.
 The image will be changed to the following file name: amherst-apptrail.png. In order to change the image, the text in the file above has to be changed to the new file name. This is done by clicking the editor and editing the text. The alt text should also be changed to reflect the new image.
 - Here you can see the changed image file and alt text.
<div id=”top_image”> <img src=”/help/files/music_academy/amherst-apptrail.png” width=”670″height=”273″ alt=”View from the Appalachian Trail in Amherst, Virginia”></div>
Click on a SAVEoption at the bottom of the page in order save any changes. The following screenshot shows the change in the front end:

As you can see, the change is relatively simple and quick. The picture also includes text that can be added with a graphic editor to help quickly change how the user will identify the website. Notice however, that the text under the header image still says “Music Academy>Welcome to Music Academy”. We will change this next. In the back end interface, go to the Site Structure menu and return to the view of the tree view of the Site Structures that make up the website.
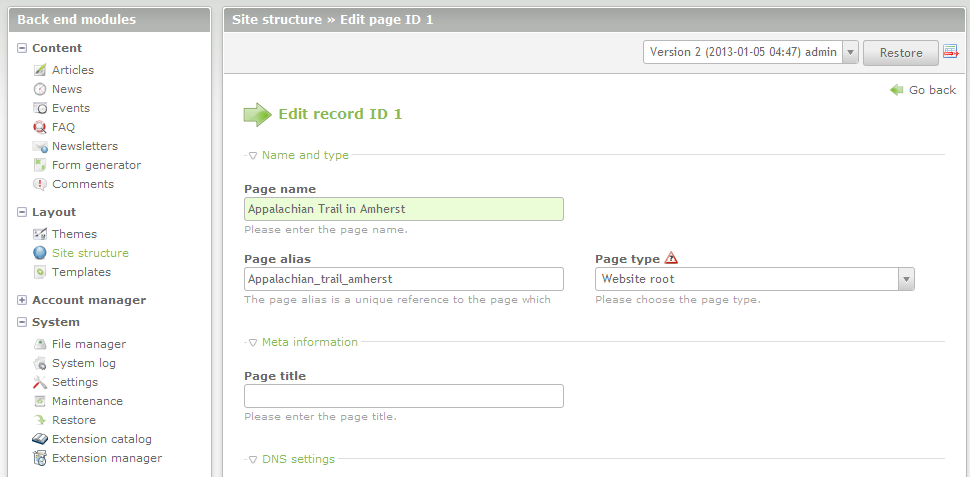
- Click on the menu item labeled “Music Academy”. Click on the edit icon (the pencil icon) to edit this page. If you hover over the pencil icon, you will see the pop-up text that says “Edit page ID1”. You will see the following:
 The screenshot above shows the Page Name and alias has been changed. Next, we will change the Page name used for the Home page. Go back to the Site Structure and click on the edit icon for the HOME page.
 - Change the title of the page (this will be for ID2). Notice the highlighted text under the picture below. The text has been changed since the site description was changed. You can also make changes to the any of the site structure names so that the menu is modified to your liking.
- After making the changes to the site structures, make sure to click on a SAVE option at the bottom in order to save your changes.

As you can quickly see, the appearance of the front end can be quickly changed to become a more personalized website by simply making changes to the default Contao website. You can see that it is easy to make changes to the appearance and menu structure.
Recovering the Admin Password for Contao:
Resetting an Administrator Password for Contao:
- Login to the Cpanel
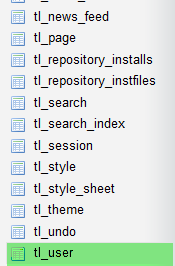
- Go to the Database section and select phpMyAdmin. You will then find the database for your Contao installation. When you have located your database, look for the table labeled tl_user. Here’s how it may look:
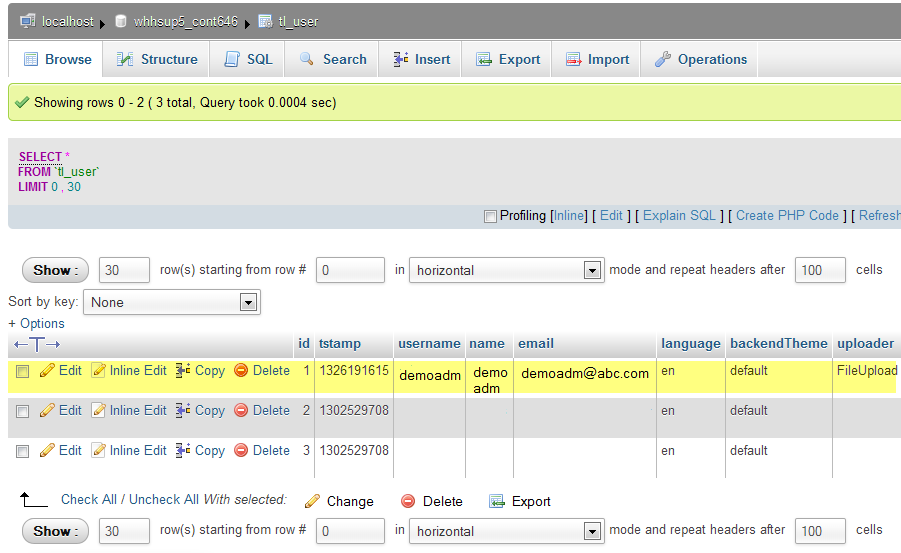
- Click on the table and it will open up into something like the following:

Note that you may need to find the admin user based on the user name (if you know it). If you do NOT know the Administrator’s user name, you can also look for the column ID ADMIN – if there is a value of 1 in the field, then that user is an Administrator. Once you have found your administrator user, click on EDIT (at the beginning of the line) in order to change the password for the admin user. - Scroll down the list of values assigned to the user name until you find the column ID labeled PASSWORD. The following screen indicates how you will change the password:

As per the steps listed above: 1) Click in the field with the old encoded password and type in a new password (it will appear un-encoded), then 2)Click on the drop-down menu and select the SHA1 encryption option. - The last part requires that you scroll down to the bottom until you see the following:

Click on GO in order to save the changes.
As per the Contao documentation, you can also use the following encrypted password if you’re still having issues recovering the password:
8e0107bf1c7fbeef6538dff7173aa458e7dd585e:8c37627a0e2c606189e7765
You use the same steps to find the administrator and password above, then copy and paste the value into the database field for the password. The encrypted password is: reset123. You should be able to log back into the Contao Back end with that change and then immediately RESET the password by editing the user.
Recovering Member and Non-Administrator Passwords in the Contao CMS:
Resetting the Member and Non-Administrator User Passwords:
Recovering the Password through the Front End interface:
- Contao members are front-end users who can access the website from the Contao CMS. Here’s a sample of a typical front end interface.
 Note that in the FRONT END LOGIN, there is a very faint link that says DID YOU LOSE YOUR PASSWORD? Click on this link to begin password recovery for the Member.
 - Clicking on the link will immediately begin the password recovery process starting with the lost password module/page. Note that the process for recovering a password can be handled differently depending on how the Administrator has setup the pages. For example, there is a page called Request New Password, that can be set up in addition to the lost password link. The Request New Password sends a NEW password back to the user through email (the same as the Lost password option).
Recovering the password through the Back End Interface
- Login to the Contao Back End interface.
- Scroll down Back End Modules section until the Members or Users section is found. Click on one or the other. Recovery of the password is similar to both. Note that if the User does not have access they will need to contact an Administrator to change the password. The member cannot access the back end interface.
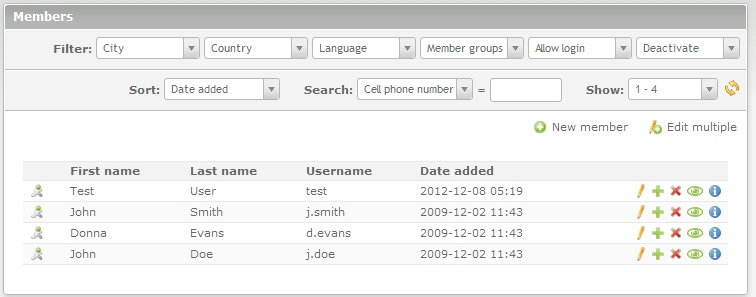
 Note that the member list is similar to the USERS list. The main icon to be concerned about for changing the password is the EDIT icon – the icon that resembles a pencil. Click on the edit icon for one of the users as per the screenshot above.
 - This will bring up the member form screen – which is a fairly long entry area for data on the member. However, the main concern is the password. Scroll down the form until you get to the LOGIN DETAILS. This will show the following:

- Click on the Password field and change the password, then type in the same password in the Confirmation screen.
- Scroll to the bottom and you will see several SAVE options. Select one of them to save your changes.
Recovering a password is relatively simple within Contao, though the Members have only way to change the passwords, depending on the interface has been setup for their particular website. Users and Admins will be able to login to the Contao Back end and change their passwords. Note that if you wish to restrict access to the Login Details for the USERS then you can definitely remove the rights to do it. Note that ALL Administrators will have the same full access privileges for the CMS.
Installing Themes in the Contao CMS:
The layout in Contao consists of a theme, templates, and the site structure (website pages based on theme and templates). This theme is known as a front end theme and viewable by the public and the members/users of your Contao CMS. Back end themes are applicable only to your users, and can be loaded directly in the back end interface. Both theme types can be obtained from the Contao.org website, or through a third party website. The following tutorial explains how to obtain and then apply themes via the Contao CMS back end.
Adding a Theme in Contao
Finding a back end theme or front end theme to use for Contao and then installing is actually a pretty simple process when using th Contao interface. The first set of instructions reviews how to load a back end theme and activate it for a user. The second set of instructions describe how to load a front end theme that makes up the appearance of the public website for you Contao CMS.
Adding a New Back End Theme using the Extension Catalog
- Login to the Contao Back End Interface
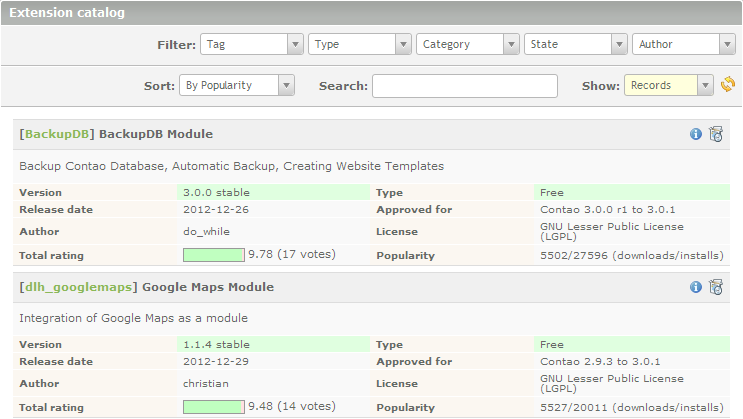
- Scroll all the way down until you find the SYSTEM section of the Back End Modules. Click on EXTENSION CATALOG in this section. You will something similar to the following:
 IMPORTANT – please make sure to read the description of the themes you are viewing. The themes you will see here are for the Back End only. Click on the drop-down menu labeled CATEGORIES, then select THEMES. Once you have specified THEME in the menu, click on the arrows configured in a circular pattern to refresh the page. Note that if you click on the drop-down menu for TYPE, then you can also specify that the you show only the FREE themes. You will need to click on the refresh icon in the top right hand corner to show the list with the new criteria.The back end themes available direct from Contao can be installed immediately through the back end interface. The extension catalog lists several free back end themes, but many Contao front end themes require payment with pricing based on the Euro. The installation instructions for loading a front end theme are directly below this section (Loading Front End Themes).
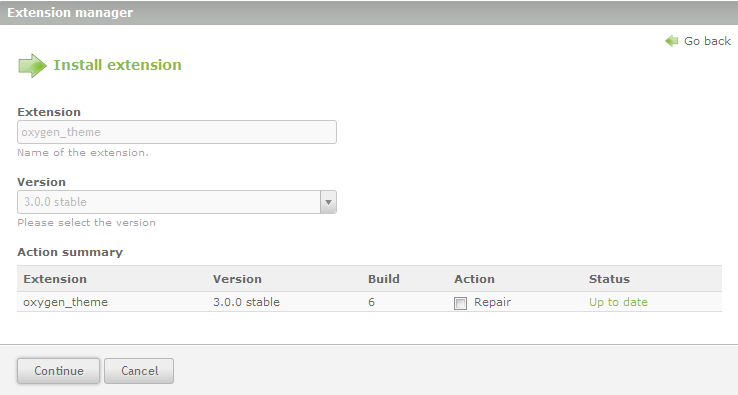
 - When you find the theme you like, simply click on icon in the top right hand corner of theme – when you hover over the icon it will display INSTALL. When you click on that icon, you will see the following:

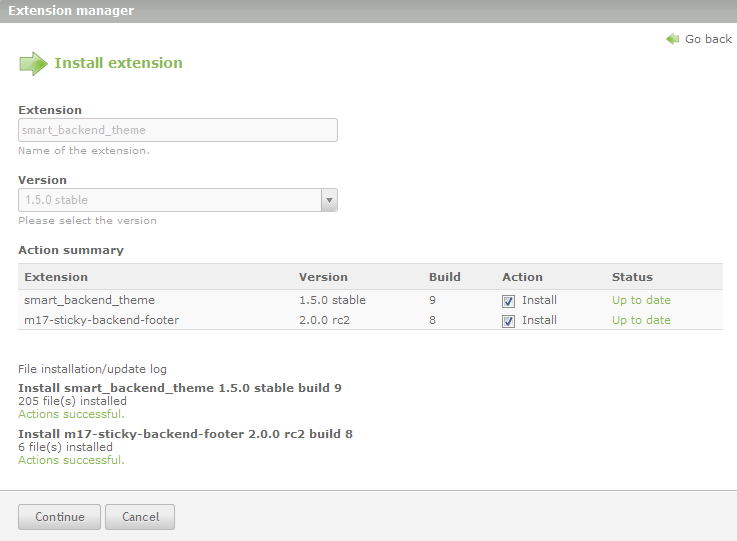
Click on CONTINUE at the bottom of the screen in order to continue the installation. - When the installation completes you will see this screen:
 Clicking continue will take you to the extension manager screen where you can run updates.
 - The last step in using a Back End theme is to simply go into the USER section of the Back End modules, navigate to BACK END THEME, then click on the drop-down menu to select your newly loaded theme. Here’s what you’ll see in the USER section:

- Once you have selected the theme, click on a SAVE option at the bottom of the screen to save your selection.
Loading a Front End Theme
A front end theme changes the web site appearance that your members/users and the general public will see. Loading the front end theme requires that you have the installation files for the theme. As opposed to a back end theme, the theme files for the front end interface are often downloaded from a specific source. You can obtain front end themes from the Contao.org website here: Contao Open Source CMS Themes. If you wish to obtain front end themes from other sources on the internet, you can run a search with a search engine like Google and find many other websites selling or giving themes away for Contao. When you finally get the Contao Theme file, the extension for the file is “.cto” – make sure that you see this, because the file typically will not work otherwise. If the file is compressed, make sure to read the author’s installation instructions for the theme. If any specific files need to be directly loaded, please see Adding a File to the Contao CMS for further information. Here are the steps for loading a front end theme:
- Login to the Contao Back End interface
- Scroll down the Back End modules list until you see THEMES. Click on THEMES and you’ll see the following:

This interface lists the front end themes that are loaded by default – which in this case is the Music Academy theme. - Click on THEME IMPORT and then you’ll see a screen requesting the .CTO file for the theme:
 Select your file with the BROWSE button, then click on THEME IMPORT when you have specified the file.
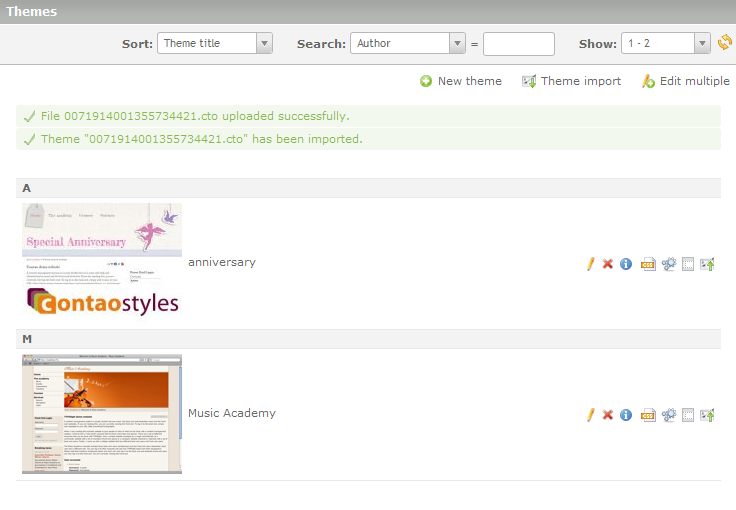
 - When the install is complete, you will see a final listing of the themes like this:
 Files for the theme are automatically imported into the website as per the Contao confirmation at the top of this screenshot.
As you can see the installation process for loading a theme is quick and simple. You just need the files and the login access to the Contao back end to complete the installation for any compatible theme. Remember that front end themes are for the public face of your website, but back end themes must loaded per user in order to be seen and used.
Managing Comments in Contao:
Administering Comments in Contao:
Comments can be published/unpublished, answered, approved and deleted depending on the settings of the item where the comments would be allowed. Typically, comments would show up under News articles or updates and may often require approval before being displayed to the general public (in the front end).
- Loging to the Contao back end as an Administrator for the account.
- Under the Content Section, click on the Back End module option labeled COMMENTS.
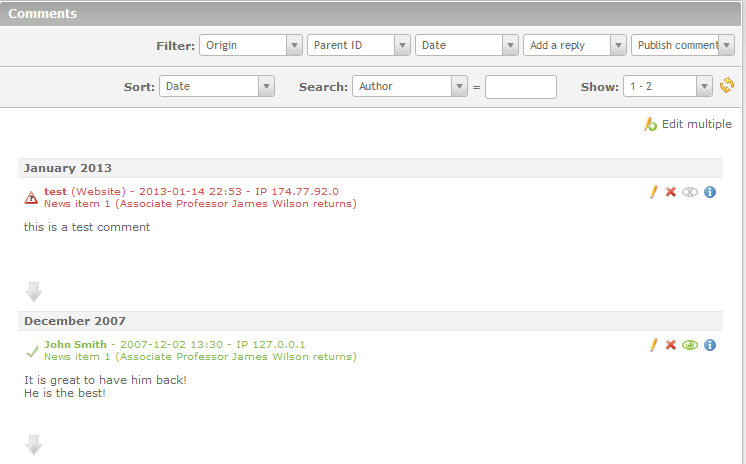
 Comments that have not been approved will appear in red.
 - In order to approve a comment, simply click on the third icon in the list. It will appear either as a green eyeball or a grayed-out eye-ball shaped icon with an ‘x’ in the middle. Green means it’s approved and visible to visitors to the website. Grayed-out means it’s still awaiting approval. The green comment above is a default comment loaded with the Contao demo site. Click on the green eyeball to change it into a grayed-out icon and unpublish the comment. Note that if you unpublish the comment, the entire comment turns red. Click on the eyeball icon again in order to re-publish the comment – this will turn the eyeball (and the text of the comment) back to green. These changes are automatically saved after you click on them – there is no save button for this option.
- In order to REPLY to a comment, click on the pencil icon (on the right hand side of the interface) comment listed as green above. If you hover over the icon, it will have a pop-up description that says “Edit comment ID 1”.
- You will see that you not only have the option to edit the existing comment, but also the option to reply to the comment using the editing field at the bottom of the screen. Type in a reply – for testing purposes. Then make sure that the check box for PUBLISH COMMENT is selected.
- Click on SAVE AND CLOSE in order to save any changes.
In order to edit multiple comments, you can click on the EDIT MULTIPLE option in the top right hand corner when opening the comments list. You can then select multiple items using the checkbox in the right hand corner of each comment. You can also DELETE each comment using the red ‘X’ icon, but you will be prompted to confirm this action before the deletion will complete. Managing comments for Contao is very quick and easy as long as the user has the proper access to the sections that require the moderation . Here’s how an approved comment and reply will look in the website for the members and visitors to the website:
-Contao is an open source content management system (CMS) for people who want a professional internet presence that is easy to maintain.
The state-of-the-art structure of the system offers a high security standard and allows you to develop search engine friendly websites that are also accessible for people with disabilities. Furthermore, the system can be expanded flexibly and inexpensively.
Contao is released under the GNU Lesser General Public License.
Features
Features include:
- Intuitive user interface.
- Accessible XHTML strict output.
- Meets W3C/WAI requirements.
- Uses Ajax technology.
- Web 2.0 support (mootools-based).
- Live update service.
- Accessible administration area.
- Multiple back end languages and themes.
- Generates search engine friendly URLs.
- Multi-language support.
- Powerful permission system.
- Versioning and undo management.
- Advanced search and sorting options.
- Front end output 100% template based.
- Automatic e-mail encryption (spam protection).
- Supports SMTP in addition to PHP’s mail function.
- Supports multiple websites in one tree.
- Supports GZip compression.
Major Features of Contao:
- Advanced editing features
- Powerful site structure
- Fine-grained permission system
- Flexible form generator
- Full-text search engine
- Built-in CSS framework
- Built-in file manager
- Built-in news/blog module
- Built-in calendar module
- Built-in newsletter module
- Wide choice of additional modules
- Accessible front and back end
- Easy live update
- Ajax and PHP 5
videos
Intro to Contao CMS


