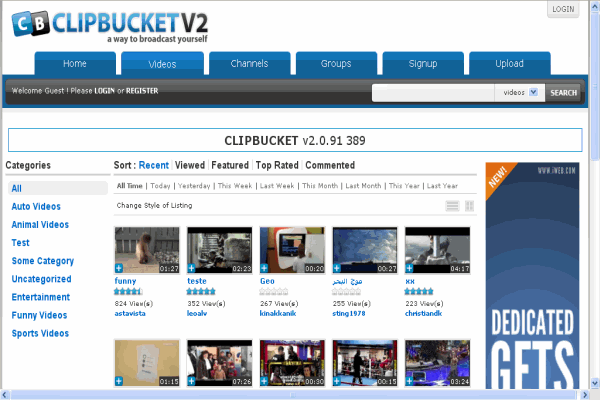
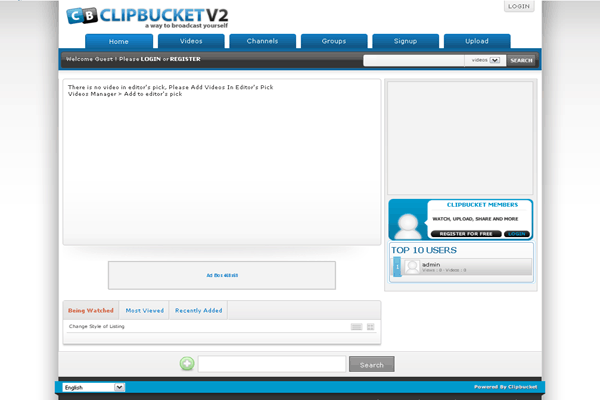
1-click AWS Deployment 1-click Azure Deployment
Overview
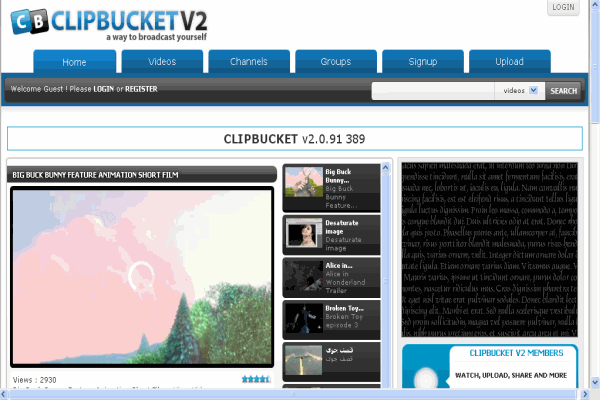
Clip Bucket is probably the most famous and easy to use MMS type of application – Multimedia Management Script. This mean that by installing this application you will be able to fully manage different type of media formats (videos, audios or photos) uploaded either by you or by any of the users you have registered on your Clip Bucket website.Clip Bucket will help you to easily build media sharing website such as Youtube for example and the best part is that you will be the owner allowing you to generate outstanding profit from your website and also to build a social community of users allowed to upload media to their profiles making each of their profiles like a separate channel with multimedia.
ClipBucket Manual Installation
ClipBucket is one the most widely used platforms for building video sharing websites. It offers a variety of amazing functionalities and is easy to manage, once the installation is complete.
Your first step should be to download the latest version of the application from the ClipBucket’s official website. Then you need to unzip its content on your machine. Right after that you need to upload the content of the /upload folder to the root directory of the script via FTP. You would also need a database. After you make sure you have done all that, you need to go to your web browser and type down the exact URL to the root directory, where you extracted the content from the /upload folder as follows:yourdomain.com
If you have uploaded the content of the /upload folder in a subdirectory of your public_html, you should type the URL address like this:yourdomain.com/subfolder
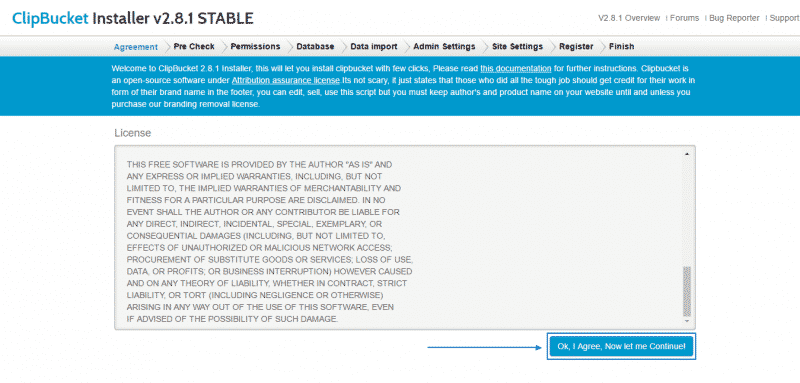
As soon as you are finished with the task click Enter, and you will be redirected to the installation wizard of the script. It begins with the Terms & Conditions section. You have to read it and click on the Ok, I Agree, Now let me Continue button below:
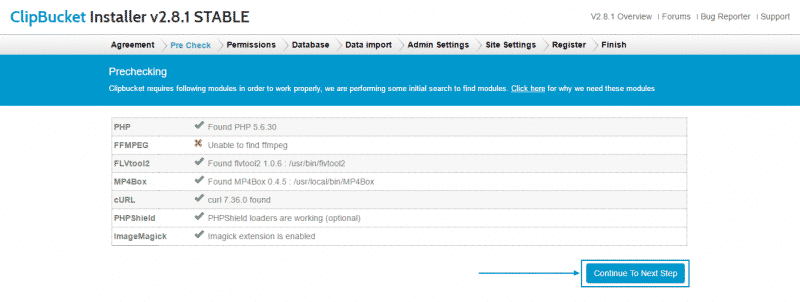
Next, you will see a list of required modules and their availability. Be aware that even if the application cannot locate the FFMPEG it can be configured later on and the installation process can still continue. You just need to click on the Continue To Next Step button:
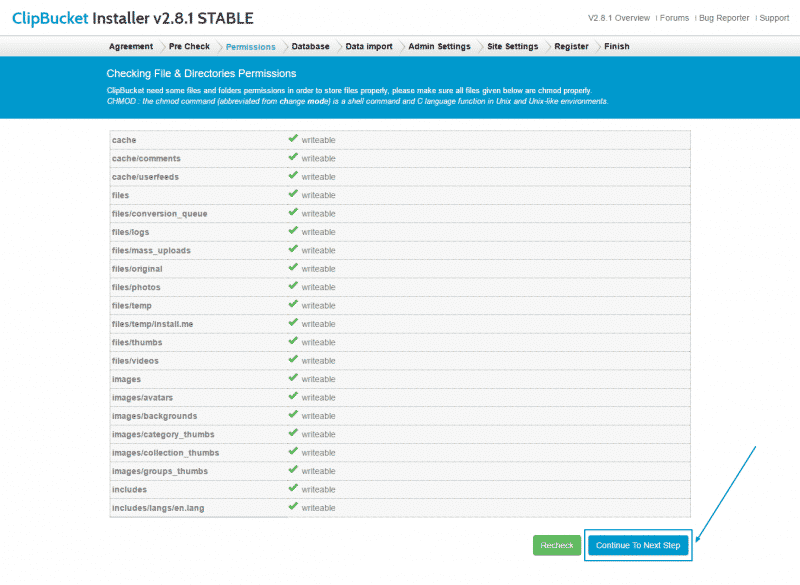
On the next page, you will to see that the installation wizard is going to check if the file permissions are correct. If everything is ok – press the Continue To Next Step button again:
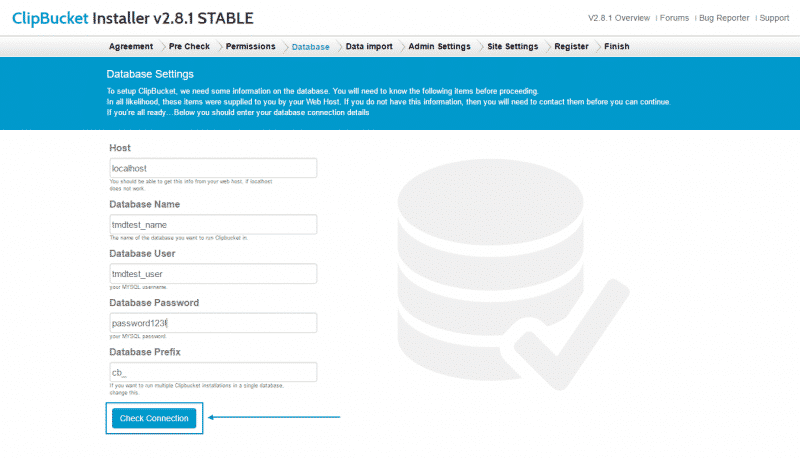
Afterward, you will be required to fill in the details of the Database you have created and then click on Check Connection:
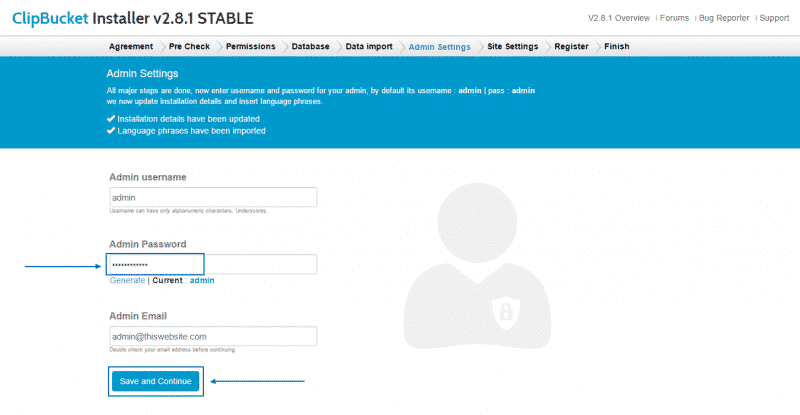
One of the final steps is to enter the username and password for your administration area, together with the administration email as well and click on Save and Continue:
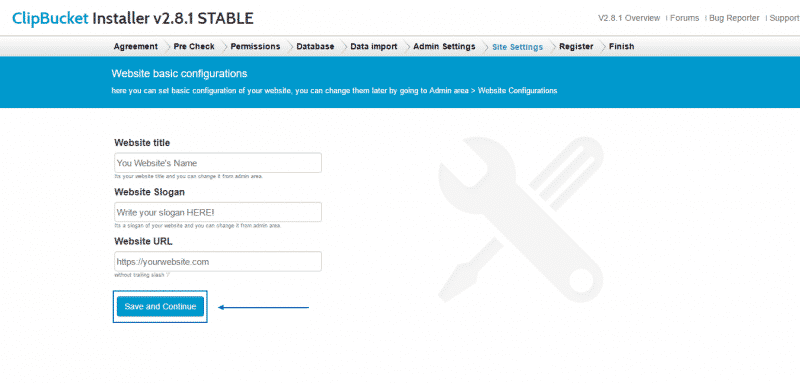
To complete the installation, you have to fill in all the Site Settings options and then press on Save and Continue:
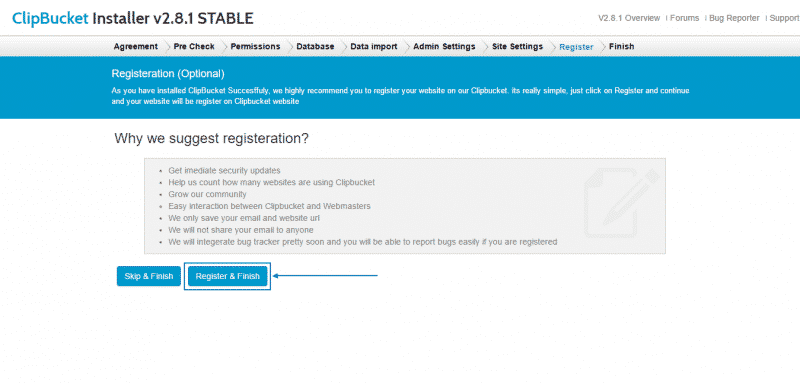
Finally, you can choose to either continue without a registration (via the Skip & Finish button) or, as we recommend – to register your website with ClipBucket, by just selecting Register & Finish:
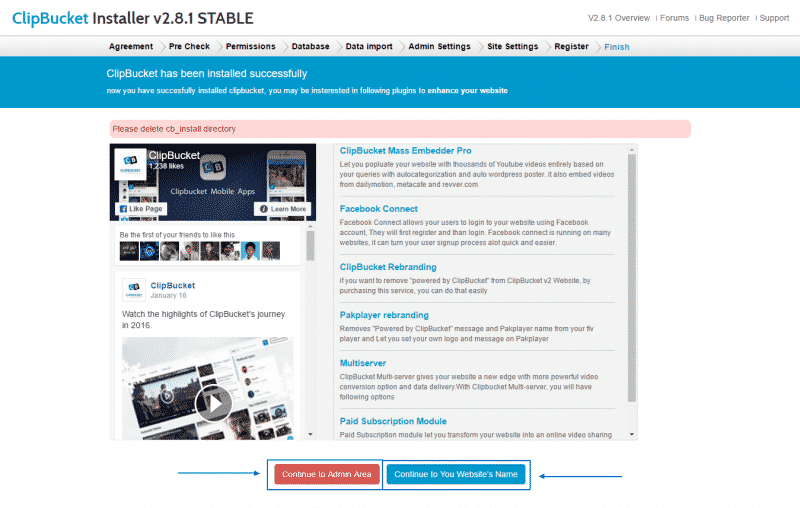
With this final action, the installation procedure would have been completed successfully and you can then choose to go either to the administration area or to continue directly to your website’s front-end by choosing one of the buttons below:
How to use the Video Manager feature of ClipBucket
In order to manage all of the uploaded videos on your website you are provided with separate page in the admin area of your website. In this tutorial we will provide you with more information on how to use that page.In order to access the Video management page you will need to navigate to Videos > Video Manager.

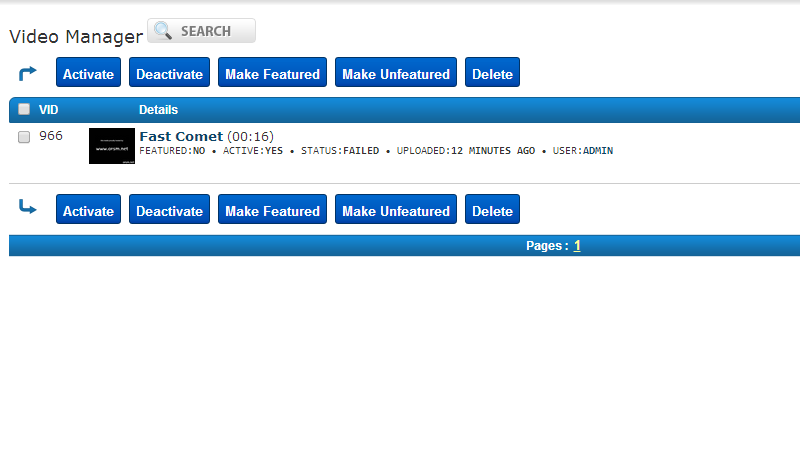
There you will be presented with a complete list for all of the uploaded videos on your website in a convenient table view.
At the top of the page you will be able to find the search feature which will allow you to search within all of the videos for contents matching the search criteria you have configured.
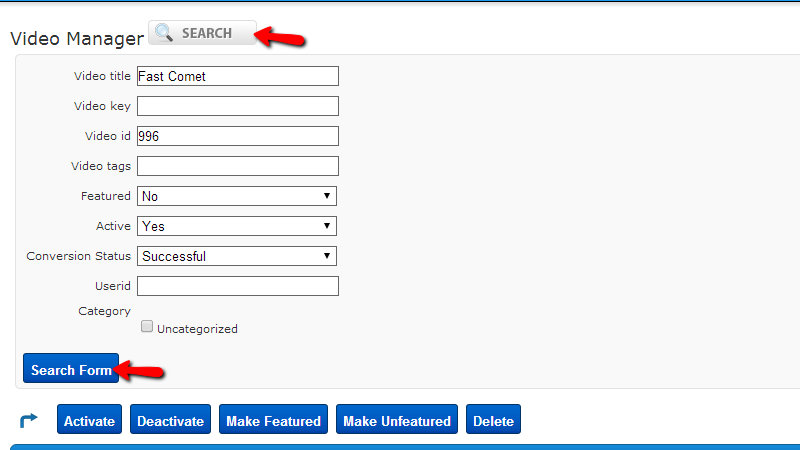
Once you configure the search criteria you will need to simply click on the Search Form button at the bottom of the newly appeared form and you will be presented with the search results.
Next on that page right before the tables view with your videos you will notice five functional buttons which will allow you to take different type of action against all of the selected videos.
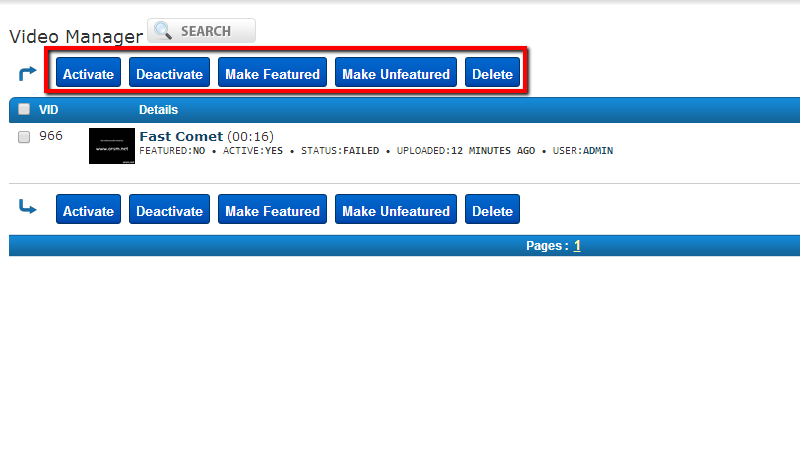
- Activate – For activating any inactive videos
- Deactivate – For deactivating any active videos
- Make Featured – For making a video featured(displayed in the featured videos section)
- Make Unfeatured – To remove a video from the featured section
- Delete – To delete a video
In order to apply any of these functions on a video you will need to ensure that the video will be selected properly. In order for a video to be selected you will need to simply tick the checkbox before the video in the beginning of every row from the videos table view.
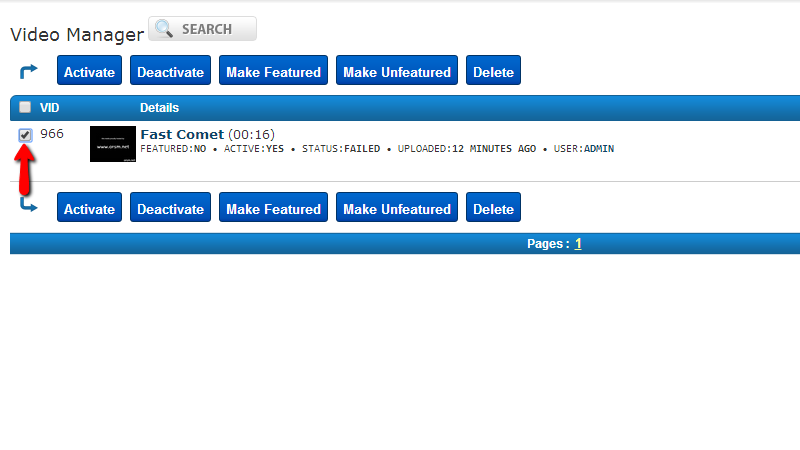
Right below the functional buttons we have described you will be able to find a table view for all of the videos on your website. Each video is displayed in a single row in that table view.
Now if you hover over a video you will be provided with 6 additional options you can choose from.
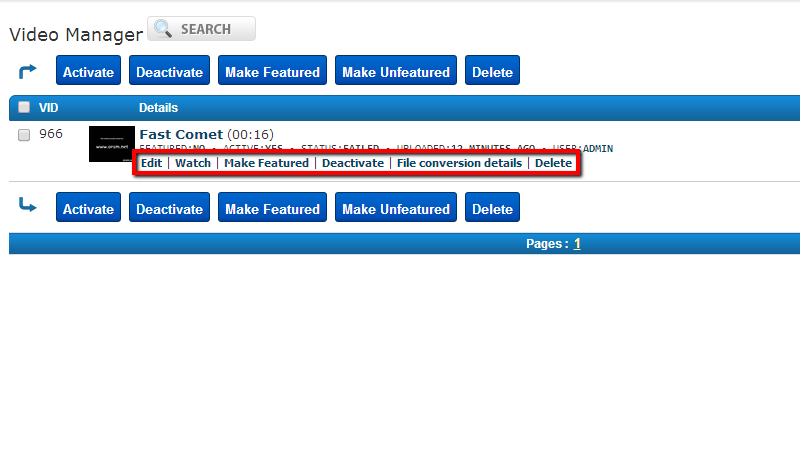
- Edit – For editing the information about the video. This option will bring a new screen with all of the information you can edit for the video you have chosen that option.
- Watch – This option will redirect you to a separate page where the video can be watched.
- Make featured – If you would like to make the video featured.
- Deactivate – If you would like to deactivate the video.
- File Conversion details – Brings a new page where you will be presented with detailed information about the conversion of the video along with any error logs from the conversion procedure.
- Delete – If you would like to delete the video.
All of the videos will be structured on pages so you can be able to navigate between all of them and the paging will be displayed at the bottom of the page.Congratulations! You now know how to fully manage the videos on your website.
How to manage the Plugins in ClipBucket:
Clip Bucket comes with large amount of plugins you can take advantage from. For this reason the authors of the script have made for you an easy to use Plugin Manager which we will review in the next few lines .
In order to access the Plugin Manager page you will need to simply navigate to Plugin Manager > Plugin Manager.
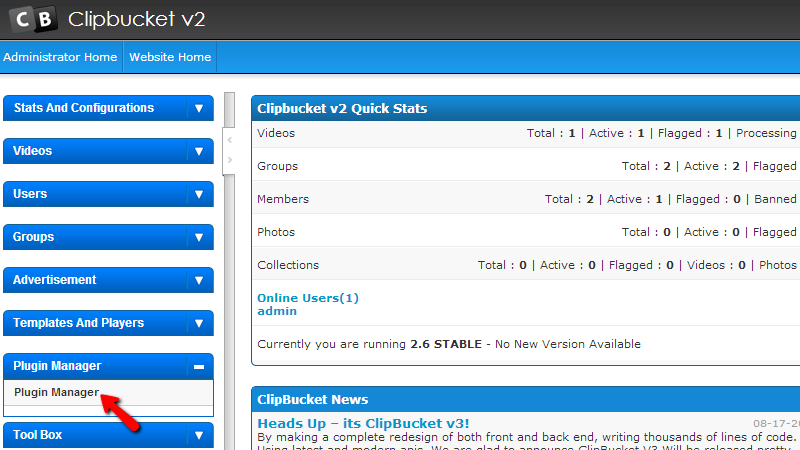
If you are accessing that page for the first time then most probably there will be no plugin sunder the first section called Installed Plugins. In order to install a plugin you will need to find the plugin into the list of Available Plugins which happens to be the second section on the same page.In order to install any of the plugins presented in the list you will need to either directly click the INSTALL PLUGIN link bellow each plugin or select multiple plugins for installation and use the Install button at the top of the page.
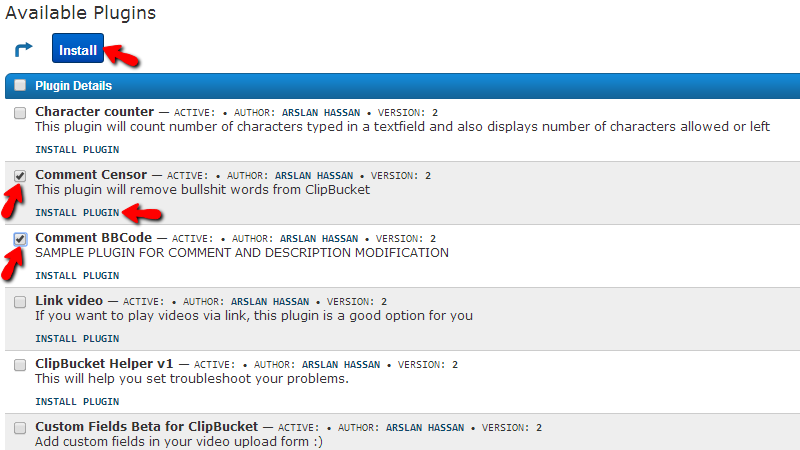
The installation process itself is fully automated and you will not have to configure any of it. Once a plugin is installed it will be automatically listed in the first section of the same page – Installed Plugins.
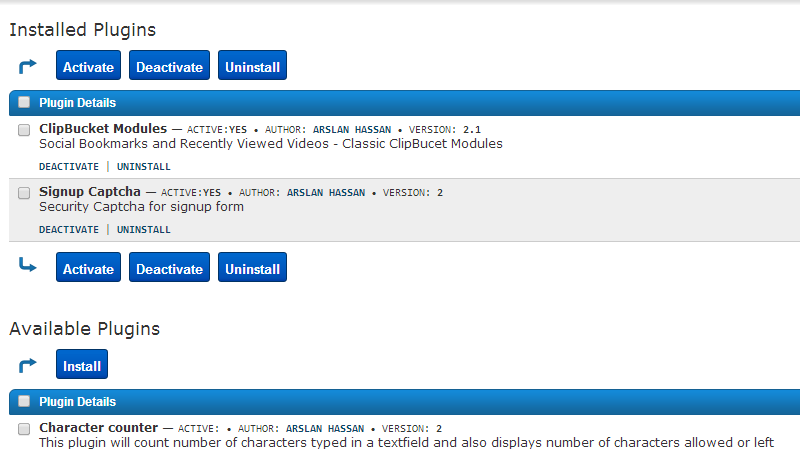
There you will be presented with the options to Activate, Deactivate or Uninstall any of the already installed plugins on your website with the action buttons displayed above and bellow the table view with installed plugins.Congratulations! You now know how to fully manage the plugins of your website.
How To Manage The Basic Settings of ClipBucket:
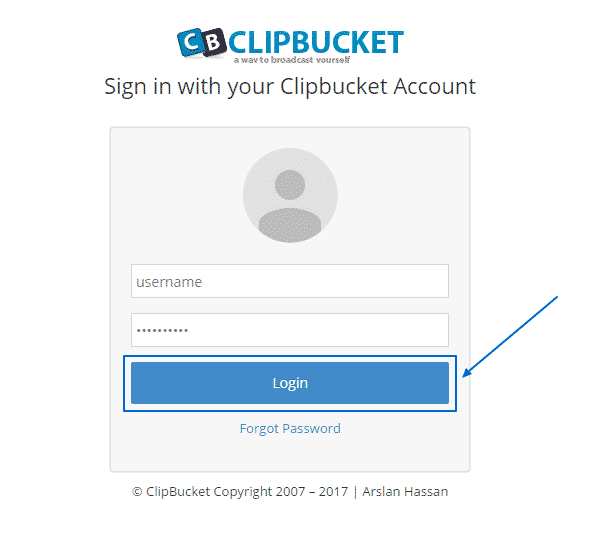
With ClipBucket sharing your video content is made into a very easy-to-do process. It has a variety of functionalities and most of them also depend on your ClipBucket settings. Here, we are going to cover the basic ones and show you where the settings menus are located.Your first step should be to login into your administration area:
Then, you have to click on Stats And at the left column:
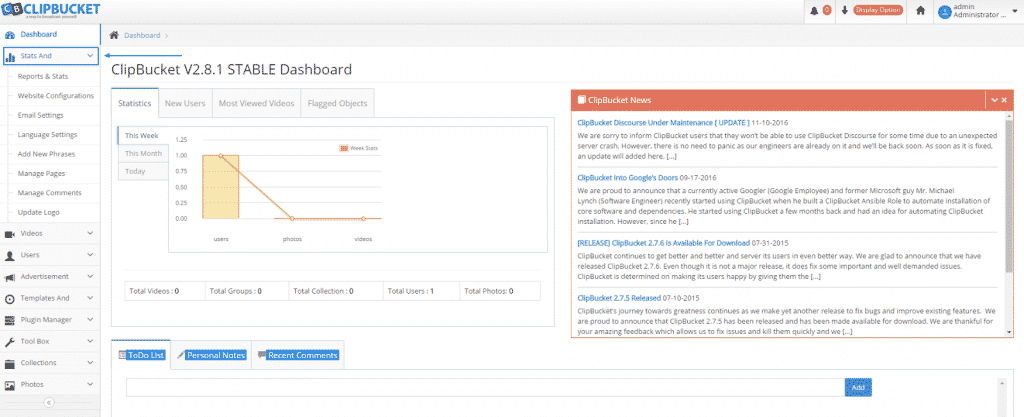
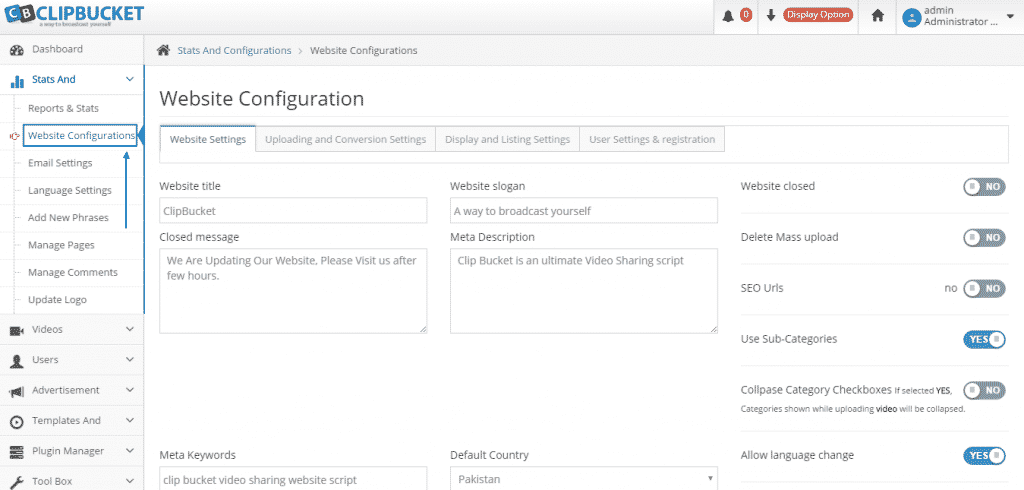
Once you have done that, you will see a drop down menu. You can explore the different statistics and settings by yourself according to your needs. In this tutorial we are going to focus on the two main ones. First, we are going to explore the Website Configuration. The first section, Website Settings, is pretty straightforward and you can make changes as you wish there:
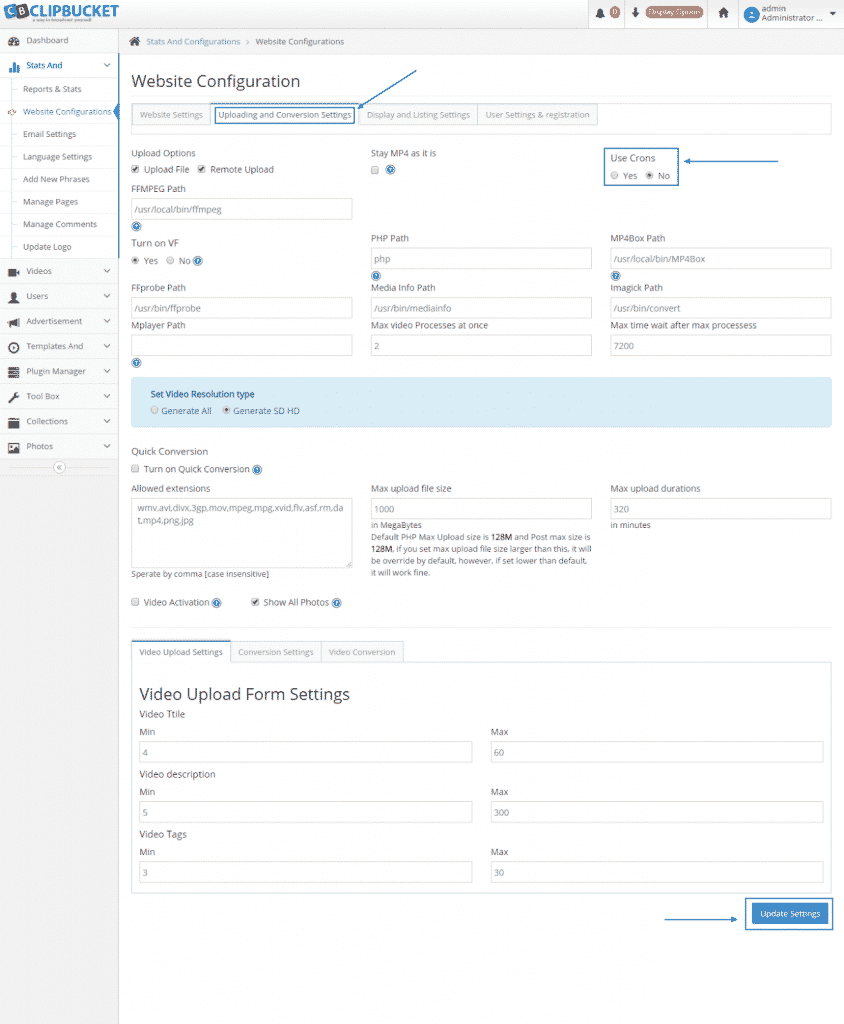
Then, you have Uploading and Conversion Settings, where you can check if the paths are correct. If they are not or you are unsure, you can open a ticket with our Genius Support Team, who can provide you with the correct paths for the server on which your account resides. Also, make sure your preferred video conversion method is in place. The script is built to initiate a conversion process as soon as a video is uploaded. There is also the option for a cron job to initiate this process. In order to do that, simply turn Use Crons to Yes, click on Update Settings and then set your Cron Jobs via your cPanel :
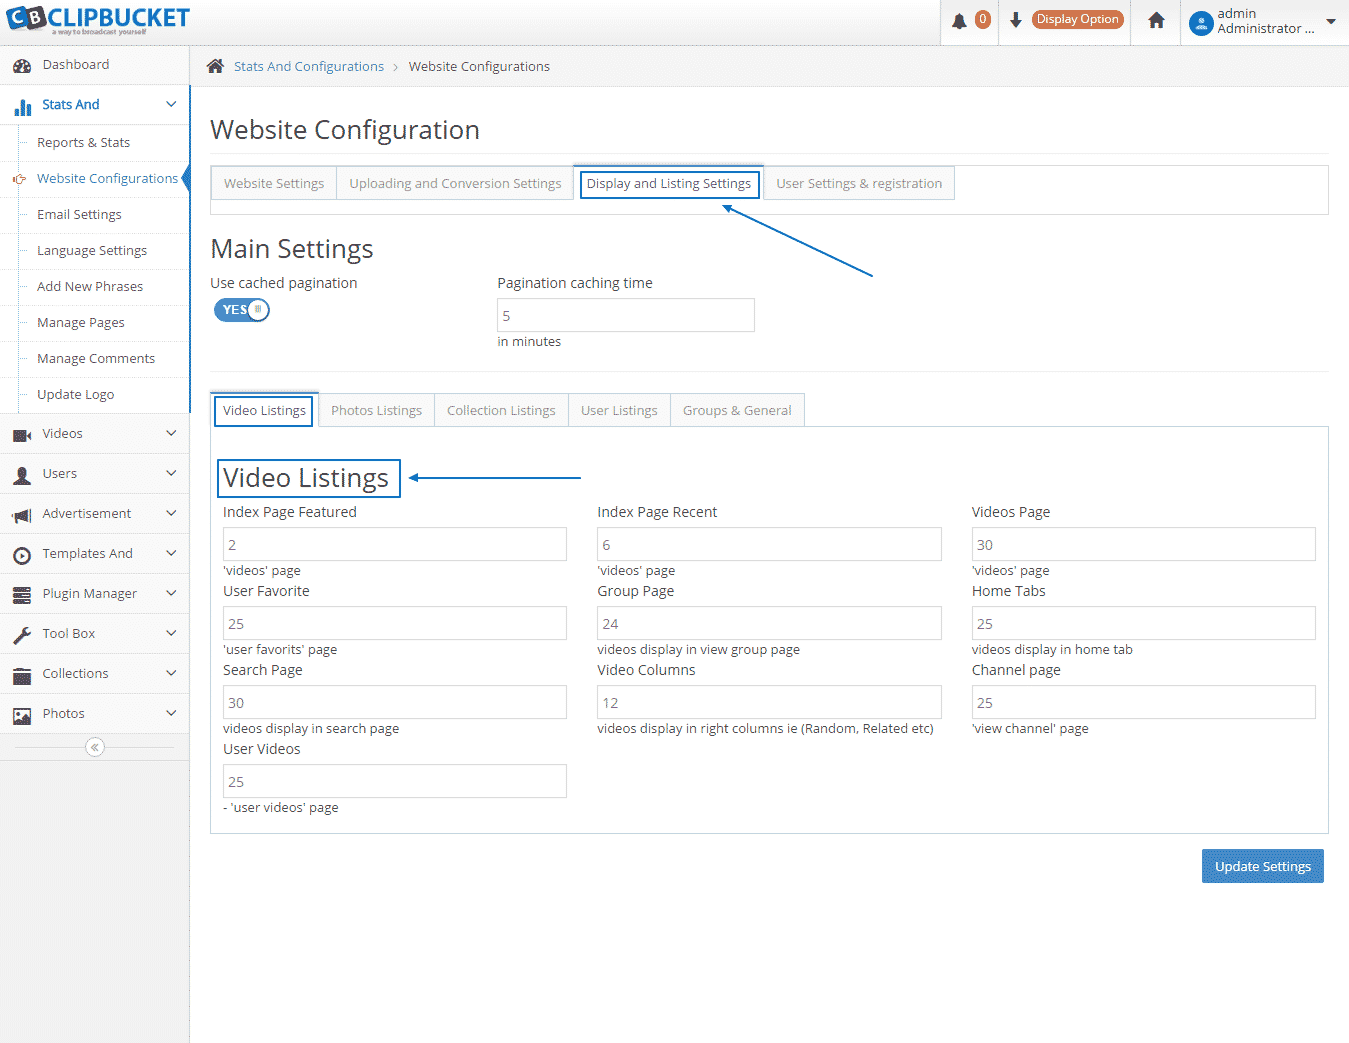
Next, you have the Display and Listing Settings option, where you can manage your Video Listings, according to your wishes and needs and once you are finished you simply press the Update Settings button below:
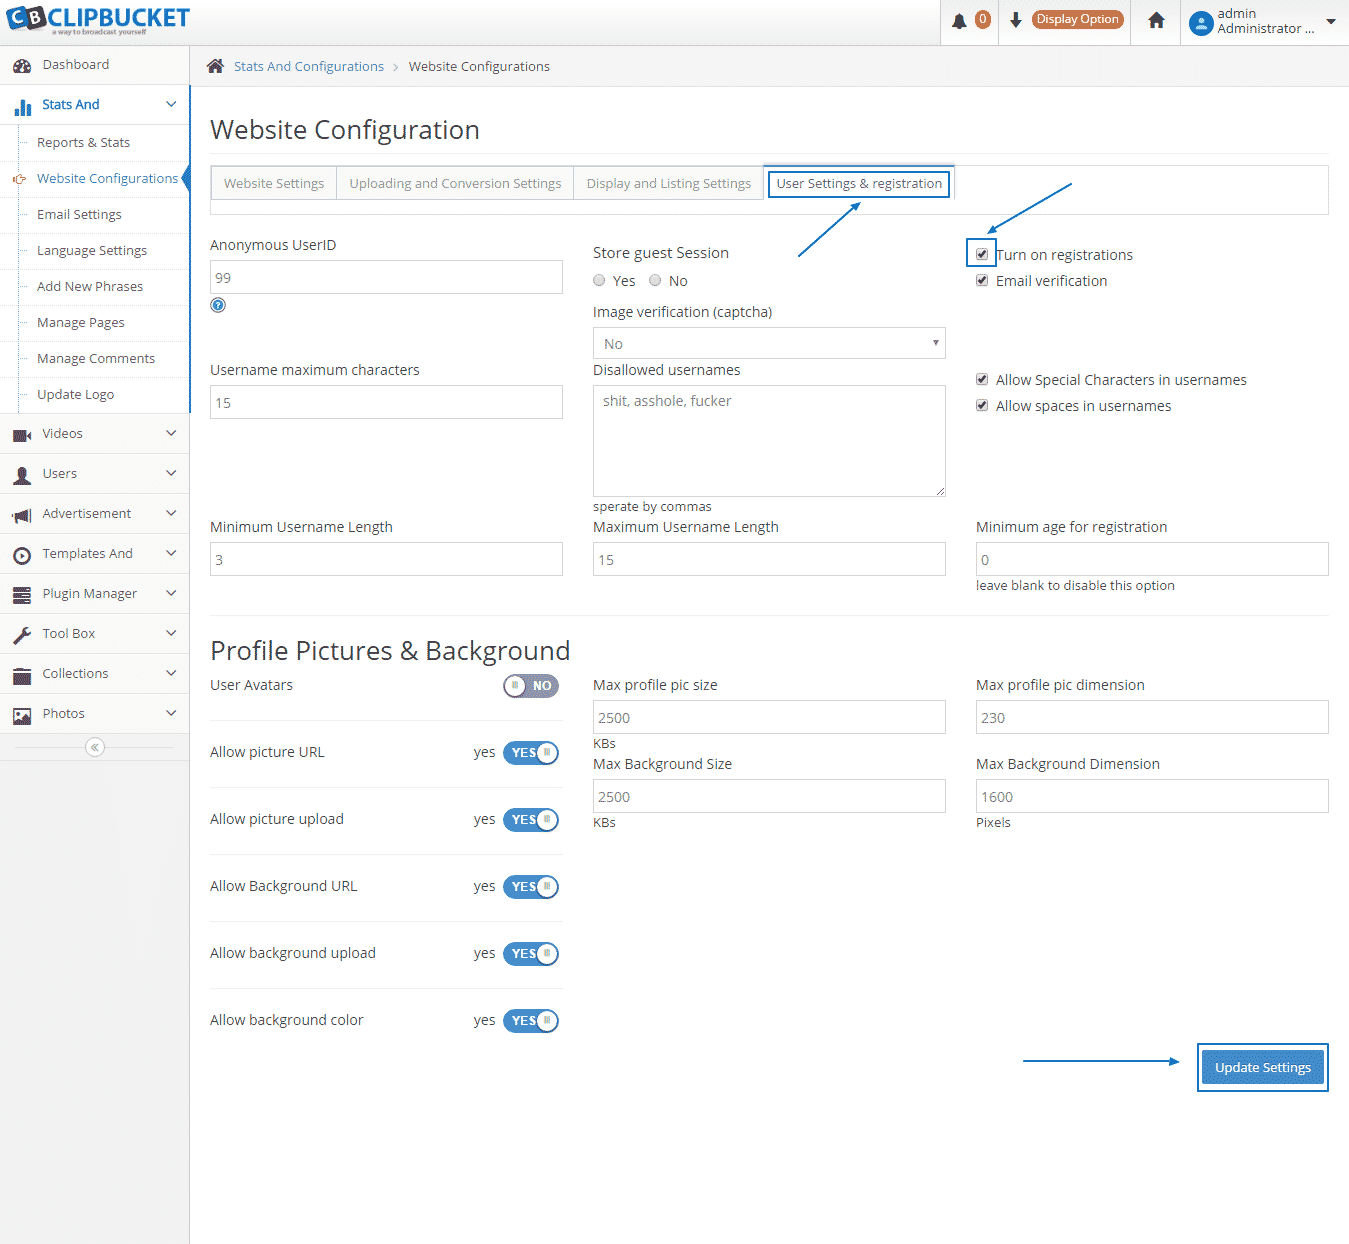
Finally, you have the User Settings & Registration menu. If you want to provide access only to certain users you can do that easily by disabling the user registration. When you are ready with the amendments just press Update Settings:
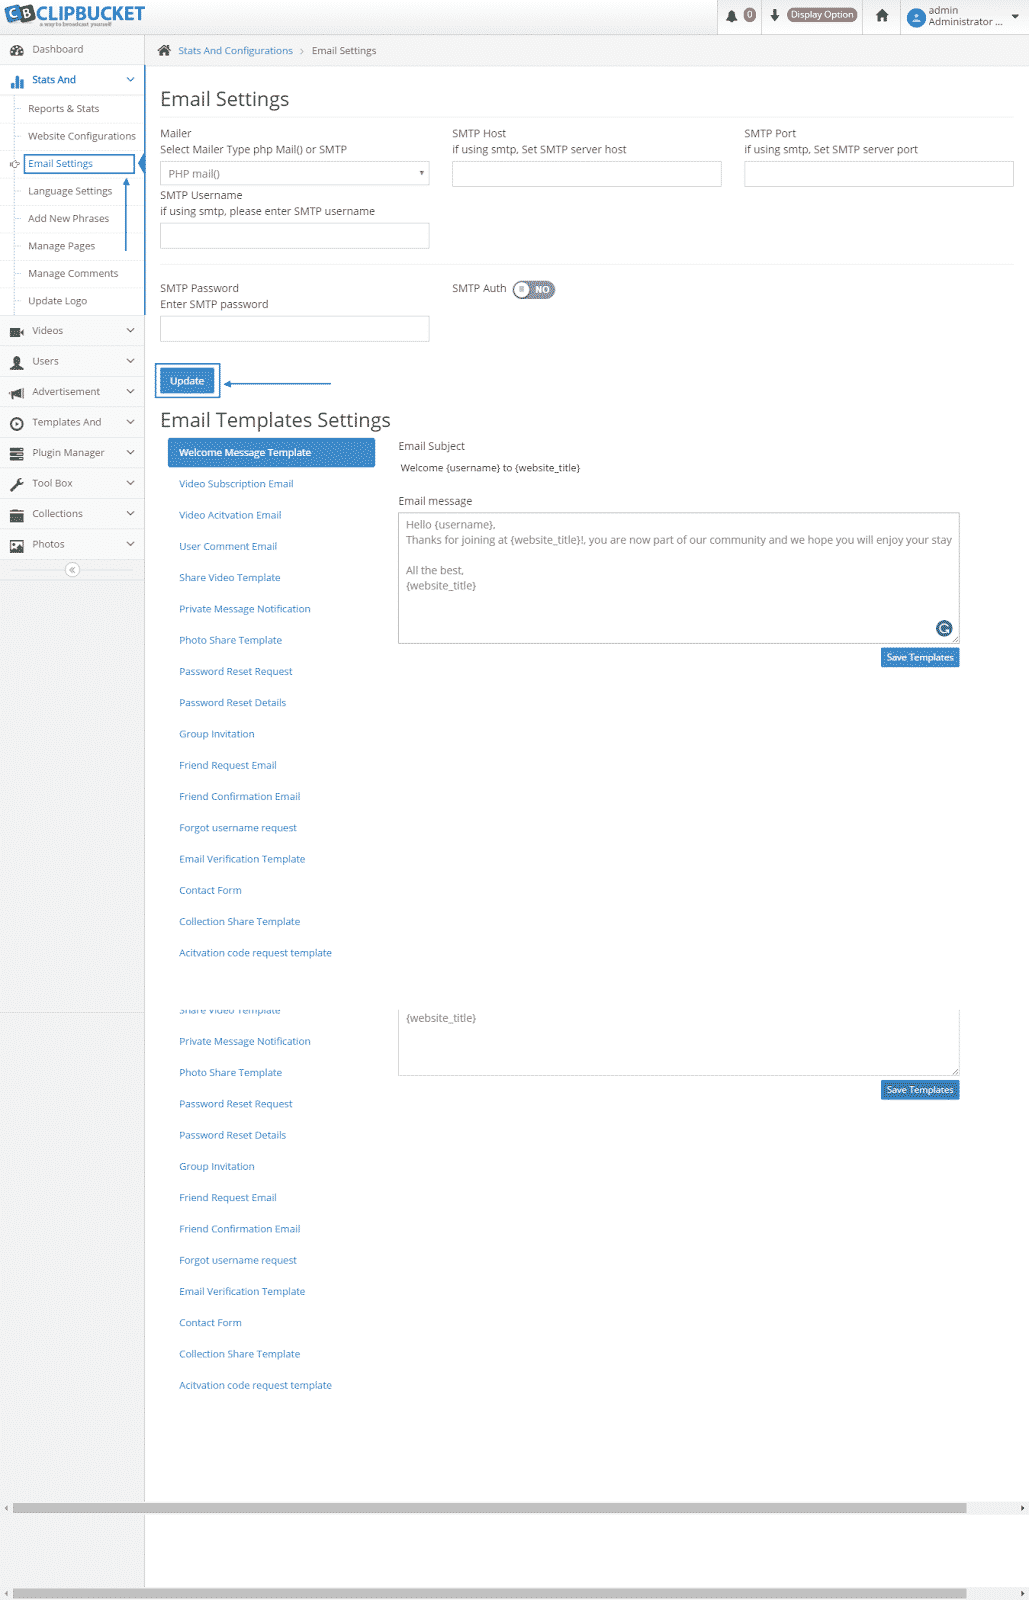
The other important section, which we are going to pay some attention to in this Basic Settings tutorial is the Email Settings. We recommend to configure the script with the SMTP settings instead of the default phpMail function as it is more secure. You can request the details for the configuration as well as ask any question or request any technical help from our Genius Support Team, who are there at your disposal 24/7:
How To Upload Videos In ClipBucket:
ClipBucket prides itself on being one of the top video sharing platforms available at the moment. We have covered the various steps towards operating your website on it – from the installation up until the backup processes, but probably the most essential features of all, which we are going to write about in this tutorial, is uploading video content. Fortunately, one of easiest things to do on ClipBucket is to actually upload a video.
The first step is for you to login into your admin account:

Once you are into your ClipBucket website, click on the Upload button on the right:

Then, at the drop-down menu, you need to choose Upload Video:

Next, you will be able to either Drag & Drop the video file you wish to upload to the cloud icon or to press Select Video and find it from a folder on your computer from the Upload File section:

On the new window you can write a title and a description for the video, then you can choose from the two drop-down options below:
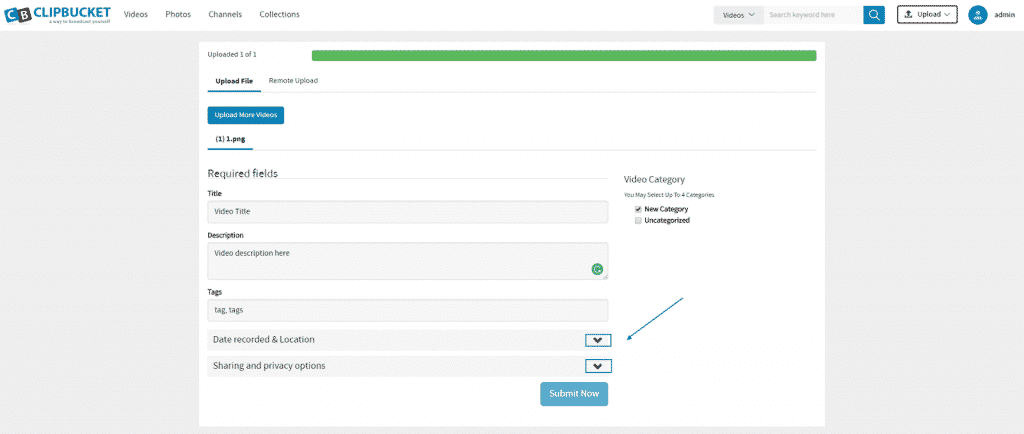
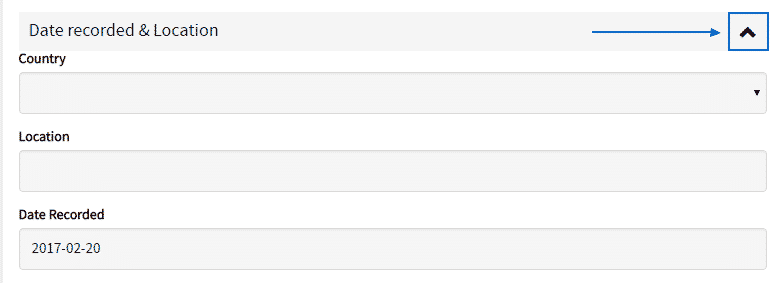
The first of them is the Date recorded & Location:
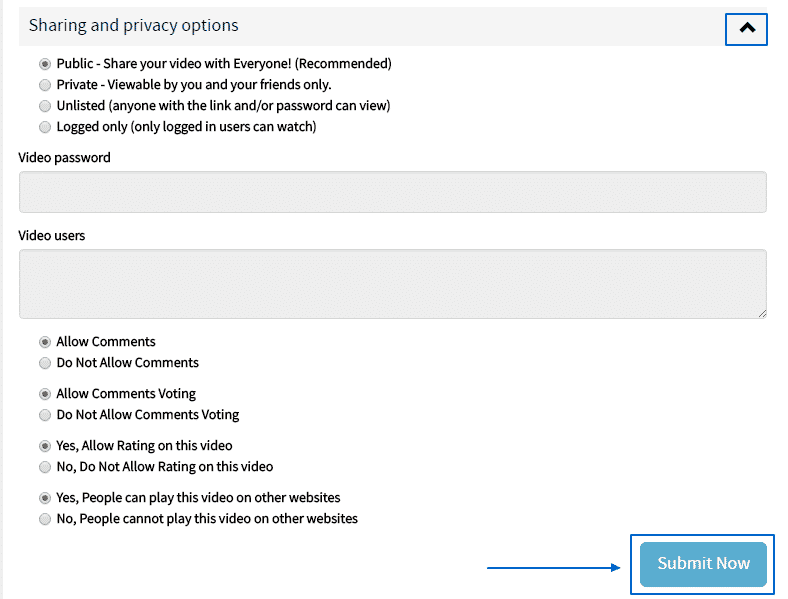
The second one is Sharing and privacy options. One you have set the options you want, you can click on the Submit Now button, in order to complete the upload process:
How To Create a Category or Subcategory in ClipBucket:
ClipBucket is indeed one of the best performing video sharing online platforms. In order to begin the process of setting up your own website, one of the first things you will need to do is to create new categories for the videos you and your visitors are about to upload. Here, we are going to quickly outline how you can do that yourself.
First of all, you have to login into the administration area of your website:
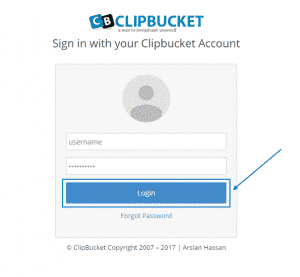
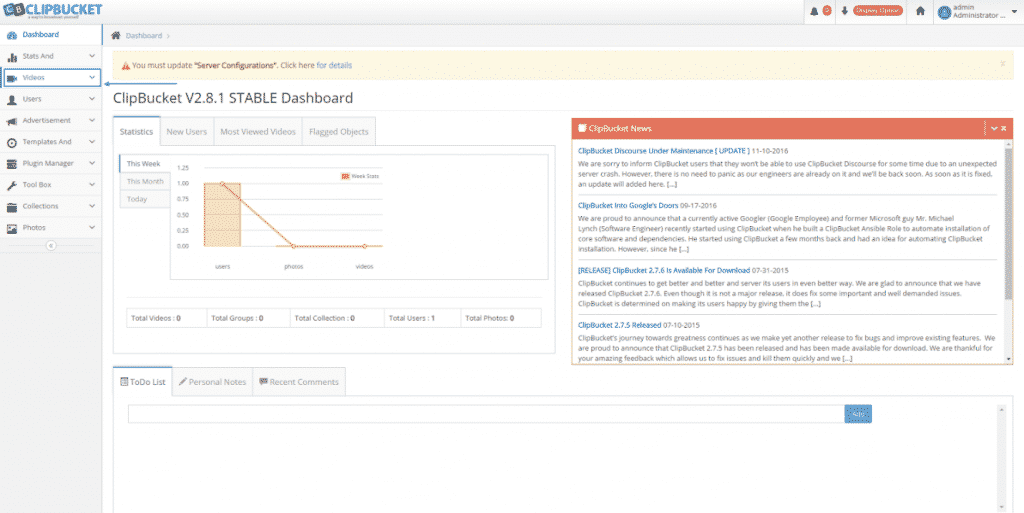
When you are in the ClipBucket’s Dashboard, look on the left menu and click on Videos:
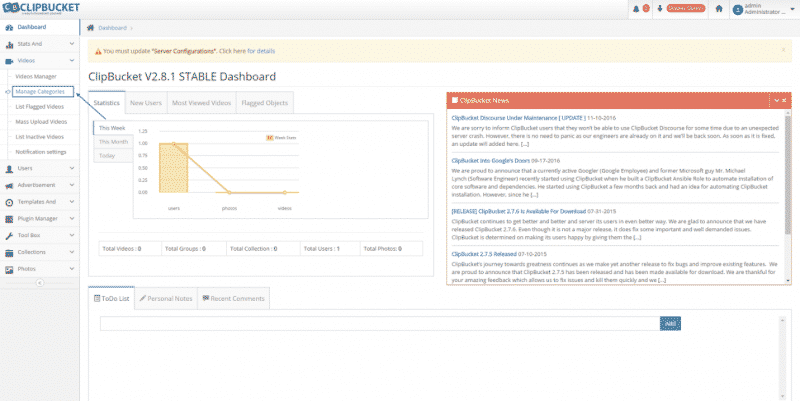
Then, in the drop-down menu, select the Manage Categories option:
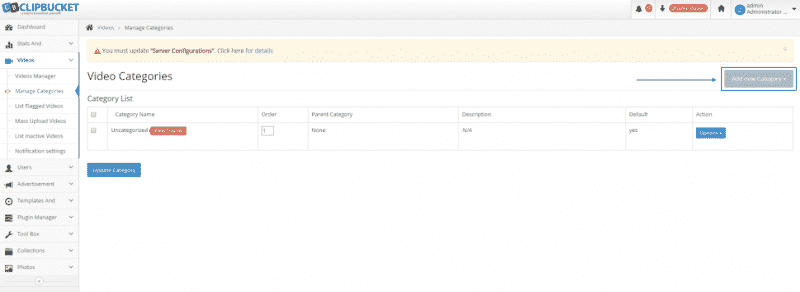
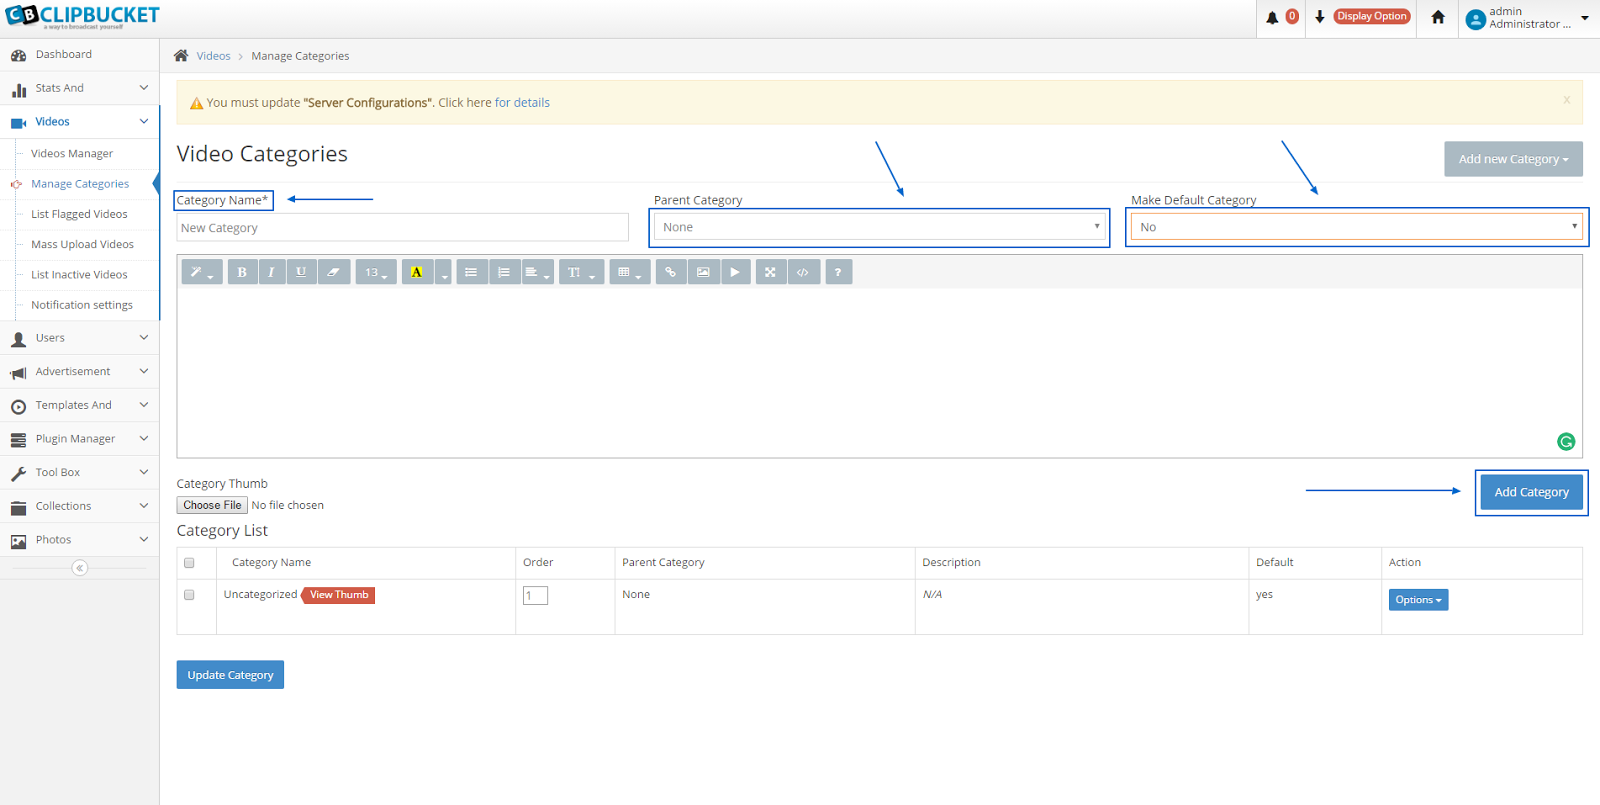
When you are in the Video Categories section, you can add a category/subcategory from the Add new Category button on the right:
Once you are there, you can set the Category Name, choose if you want it to be a default category from Make Default Category and choose if you want to make it into subcategory and assign a Parent Category as well. When you are ready press on Add Category:
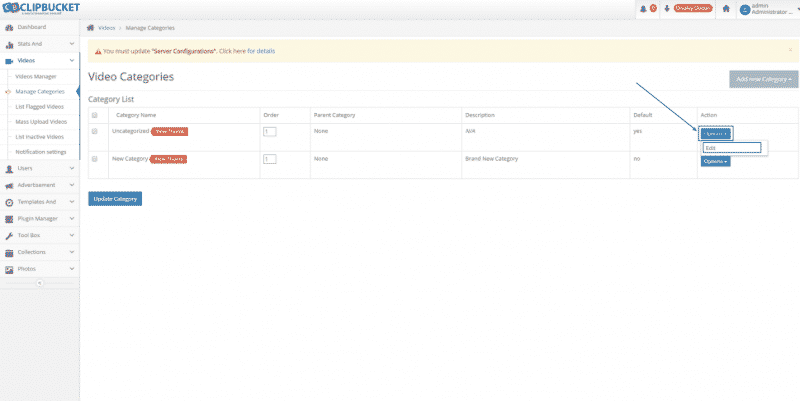
As the new category is integrated you can edit either the old ones or any of the new categories by choosing Options > Edit next to it:
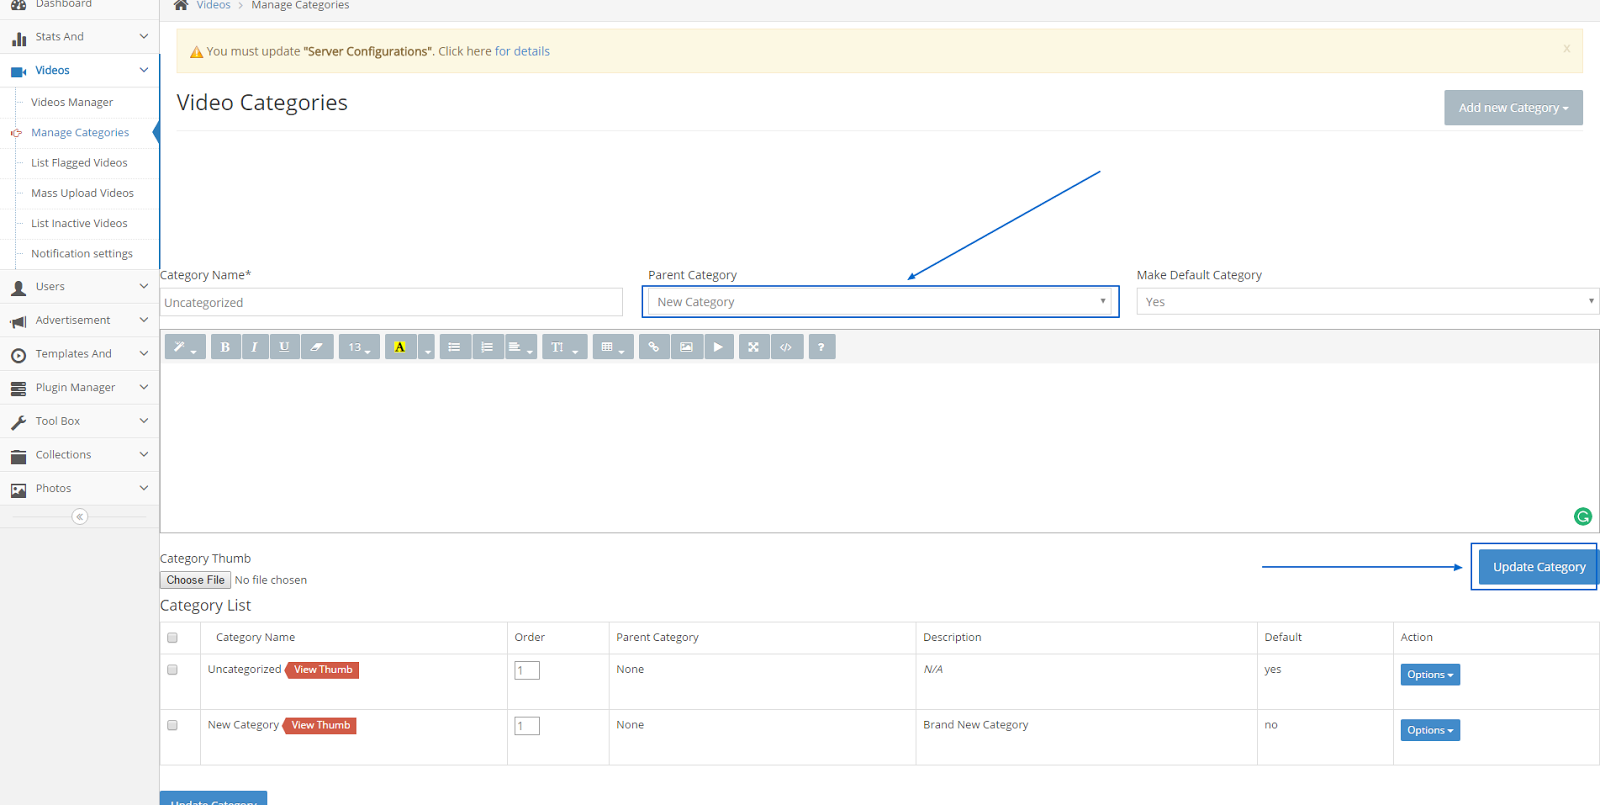
In this case, we are editing a main category and by assigning the New Category we just created as its Parent Category and then clicking on Update Category below, we effectively made it a subcategory of the newly created one:
How to perform a Manual Backup of ClipBucket:
Performing a manual backup of your website is something you should consider to be done on at least weekly basis in order to ensure that you will have an alternative restore point in case of emergency with your website. In this tutorial we are going to show you how to perform a full manual backup of the files/folders and the database of your Clip Bucket website.
To backup your ClipBucket website, you will need to:
- Step 1: Backup the Files
- Step 2: Backup the Database
Step 1 Backup the Files
The easiest way to backup all of the files for your website on your local computer is to simply download all of them. The download process can take place via the FTP service for your account. The FTP login credentials you will need to use for connecting to the FTP service for your account are provided in the welcome email you have received when you have signed up for services with us.
Once you connect to the FTP service please navigate to the folder where your Clip Bucket application is installed in and select all of the files by selecting a single file and then using keyboard combination Ctrl+a. Once this is done please right click on any of the selected files and click the Download option in order for the download process to start.
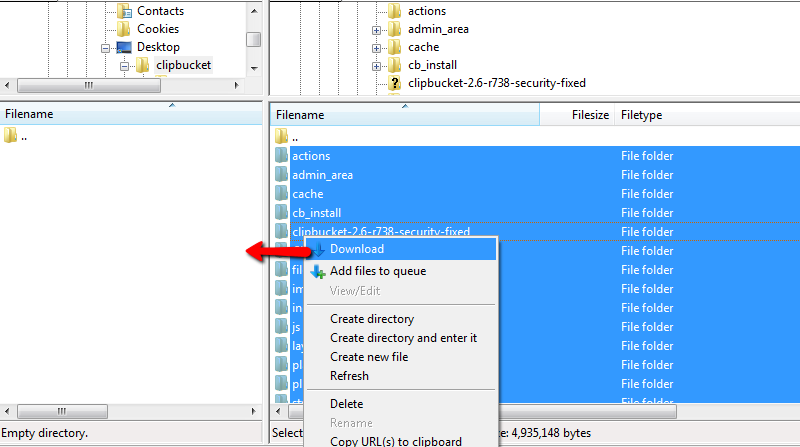
The process of downloading the files and folders of your website can take from few minutes up to few hours depending on the size of the website and uploaded contents respectively. Please allow some time for this process to finish and in the meantime you can proceed with step 2 of this tutorial.
Step 2 Backup the Database
Now that you have downloaded the files (or while those are still downloading) it is time for you to backup the database of your website which is the second and final backup action you will need to take.In order to do so you will need to find the name of your database. The name of the database is used in the configuration file for the Clip Bucket application and you will need to open that file for editing in order for the database name to be retrieved.
Please login into the cPanel service for your account with us and navigate to the File Manager feature. Right when you access that feature you will be presented with the content of the home folder of your hosting space.
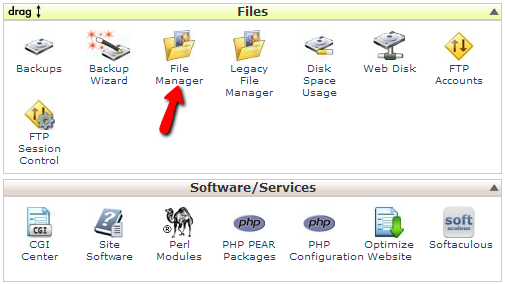
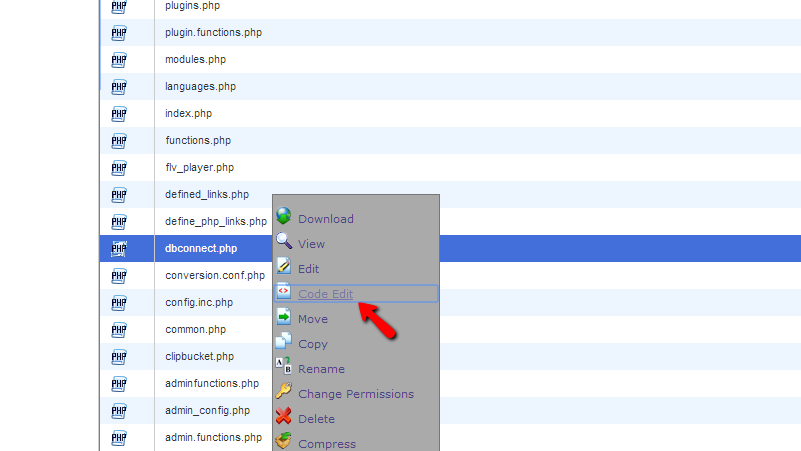
Then you will need to navigate to the folder where you Clip Bucket application is installed in. This is usually the public_html folder of your hosting space but it can be any other folder within that folder depending how the installation has been performed.Once you access the installation folder you will be able to find the includes/ folder within. Please access that folder and find the dbconnect.php file which you should open for edit (right click on the file → Code Edit).
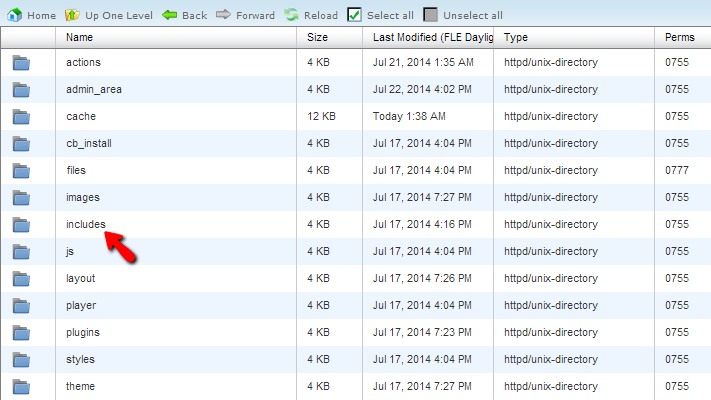
There under the 13th line of the file you will find the “$DBNAME” php variable which holds the database name. For example if the 13th line of the file is the following:
$DBNAME = 'example_database'
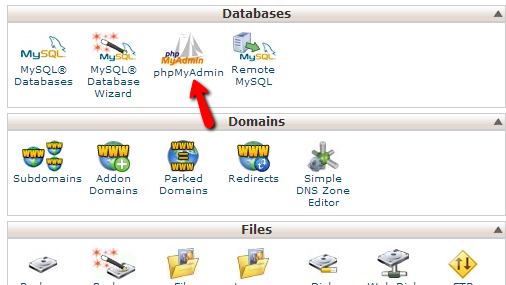
The database name is “example_database”.Now that you know the database name it is time to export it. In order to do so you will need to return to the cPanel service for your account and access the phpMyAdmin feature.
Once you access the feature you will need to find the database name you have just retrieved in the list of database presented in the left vertical menu of the phpMyAdmin feature.
As soon as you click on the database you will be presented with the complete list of database tables and there you will need to simply click on the Export button from the top navigation menu in order for you to begin with the backup of your database.
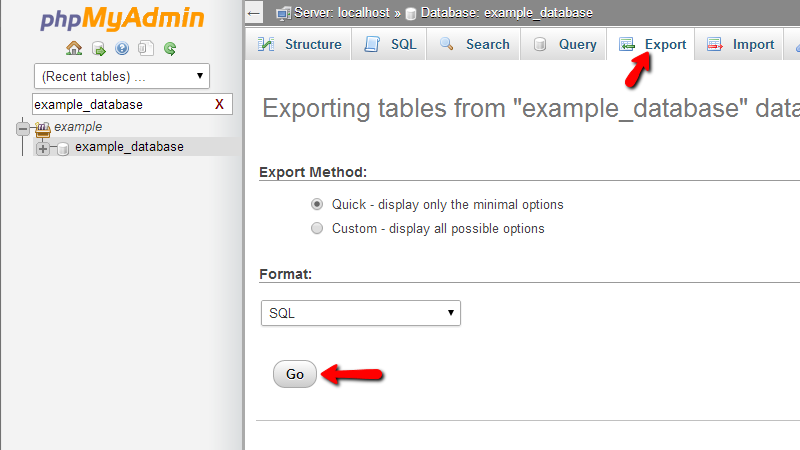
Please simply press the Go button if you would like to have a raw .sql file from the exporting process and the process itself will begin as you will be prompted that a file began downloading.Once the database is properly exported on your computer and the files are successfully downloaded via the FTP service your full website backup is ready.Congratulations! You can now generate a full website backup.
How to check the Reports and Stats in ClipBucket:
Clip Bucket comes with a fully integrated stats and reports page where you will be able to received detailed reports on different elements and contents of your application such as Videos, Users, Groups and many more.
In order to access the Reports and Stats page you will need to navigate to Stats and Configurations > Reports and Stats.
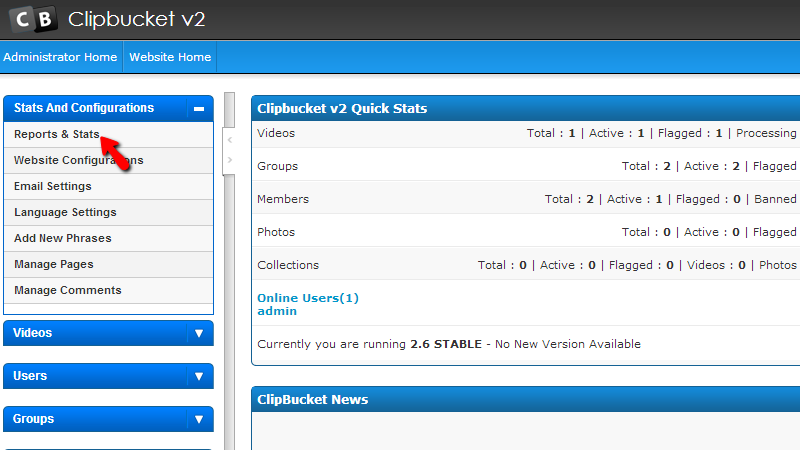
Then you will be redirected to the page where all of the statistics are provided. Let’s review each statistic from the top to the bottom.
The first once is called Clip Bucket Daily Activity and it will provide you with graph for all of the contents added to your website such as Videos, Users or Groups.
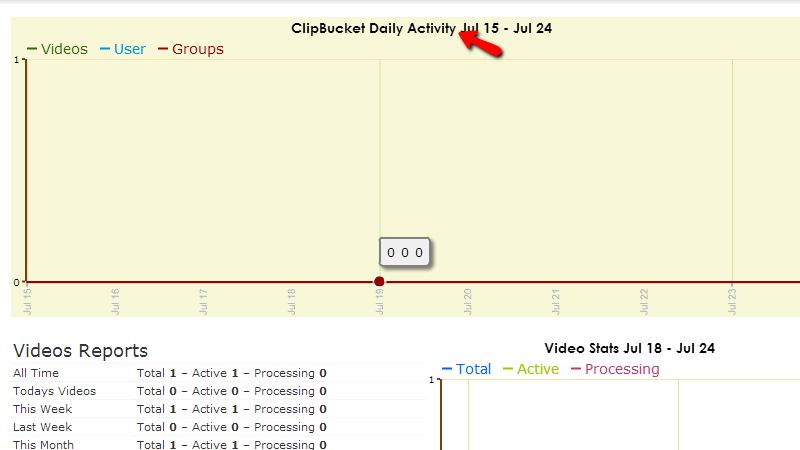
Right bellow this graphic you will find the reports for the videos of your website separated on two sections – one for the raw reports as text and one for the graphic representation of the report.

Next you will find the same two sections, however this time they will contain information for the users on your website.

The final similar representation of reports will be the Group Reports where you will receive information for the groups on your website.
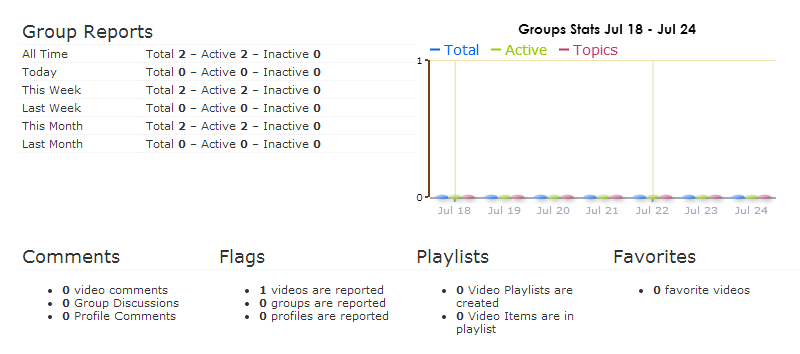
At the bottom of the page you will find the Files and Sizes section which is maybe the most important as you need to check these sizes from time to time due to the fact that if you start to backup your website and you are not aware of the data you are going to download this can take large period of time and also might take large amount of space on your local machine.

That is all the information you will need for checking the Reports and stats for your website and we are recommending for these stats to be checked n daily basis so you can be aware of the condition of your website.
CLIPBUCKET PROS
Proven
This system has been used by many well-known video providers without any issues.
Updated
They keep this platform updated quite nicely so that it is always working with the latest features that users will want.
Free
If you just need a simple video hosting platform, this one can be used for free.
CLIPBUCKET CONS
Premium Prices
While they do have a free option, that is somewhat limited. If you want something nicer, you’ll need to move up into the premium options.
Hosting
The hosting that they offer is overpriced and seems to be just a reseller service that they use as an additional revenue stream.
-ClipBucket is an opensource and free script that will let you start your own Video Sharing(Youtube Clone) website in matter of minutes, ClipBucket is fastest growing script with most video sharing websites and social networking freatures.
Log in
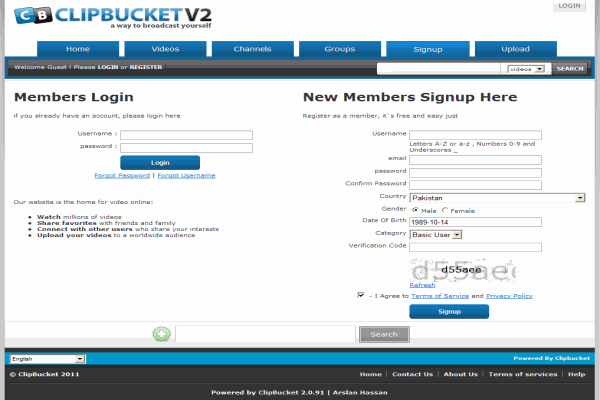
Members Log in
Sort
Sort according to categories
Search
ClipBucket is a free and opensource video sharing script. The owners have permitted us to redistribute ClipBucket.
NOTE: FFMPEG and certain Video Tools need to be installed for this script to work.
Features
Some Key Features of ClipBucket:
- Real Time Conversion – The applications uses server side tools such as FFMPEG to convert uploaded videos so the users can stream those videos directly on your website using the integrated Flash or HTML 5 players.
- Complete Media Management Script – With Clip Bucket you are no longer limited to manage only videos, but you can also take full advantage of the supported media formats like Videos, Photos and Audios all together on one platform.
- User Management & Messaging System – The application also enables you to fully manage social network within your Multimedia sharing website. With the integrated messaging system the users can send messages to each other. Also you are able to limit the access to certain areas of your website to certain users or group of such.
- Ajax Comments & Ratings – With the integrate AJAC techniques your users will be able to comment and rate the media uploaded on your website easily and on the fly while the user is browsing the media content.
- Built-in Language Editor – The application offers a fully integrated language editor which you can use to modify the phrases on your website in order to translate your website to another language or you can also install separate language packs available in the official forums of the application.
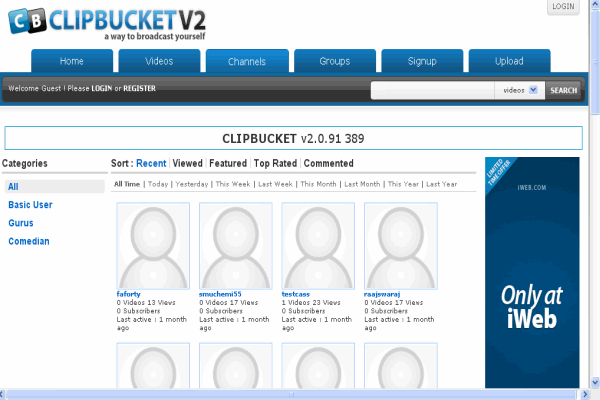
- Channels & User Feeds – The users of your Clip Bucket website will receive their own channel where the uploaded media by the user will be shown. Each channel can be fully customized by its owner in order to perfectly represent the uploaded content by the user. The User Feeds are simple updates and Activity of particular user – just the same as those presented in Facebook.
- Security – The application developers are ensuring 100% SQL injection protection allowing for your script to be at top level of security.
- Scalability & Multi server – The application is highly scalable platform and with the Multi Server plugin you will be able to take your website from one server to tens or even thousands of servers and you will be able to manage all of that content via just one control panel. This will allow you to stop worry about the traffic hikes and load optimizations.
- Separate Section For Everything ClipBucket team fouses on making things as simple as possible and then keeping them that way. ClipBucket has different section with different purposes such as videos, photos, channels, users, watch videos, sign up, manage account, video manager and many other pages
- Multiple Video ConversionYou don’t have to convert videos one by one. Convert as many videos as you want at the same time.
- HD Conversion
Got a high definition video that you want to reach to users without losing quality? You got it. ClipBucket supports upto 720p videos.
Unlimited Video Handling Support
ClipBucket is free and has no limit on how many videos can be uploaded or watched. You have the complete control. Do things the way you like.
SEO Friendly
It is important to make things easier for Google bots so they can index your website faster to make sure you reach as many people as possible. ClipBucket takes care of this headache for you as well.
Easy To Operate
You don’t have to be a techie or anything near that in order to be able to run a video sharing website. All you need to know is the basic knowledge of how websites work and you are good to go.
Responsive
No matter how big or small a computer or laptop screen is, ClipBucket makes sure that your website looks good in all shapes and sizes.
Mobile Friendly
With rapid increase in use of mobile devices, ClipBucket team has made it completely mobile friendly which means you don’t have to worry about user smartphone users anymore.
Cross Browser Compatible
Safari, Chrome, Opera, FireFox, Internet Explorer and all other major browsers are supported.
Plugins Functionality
Need some extra features or functionality added into ClipBucket? You got it pretty easy. Add a your desired plugin and that’s it.
Themes Functionality
Need a different look for website? You are just one click away. Install ClipBucket themes and transform your website in the way you want in matter of a few click.
Complete Photos Support
Photos are supported just as well as videos and ClipBucket is perfect for starting a photo sharing website too.
Collections
It allows you to create collections and add items to them. You can allow users to do the same.
User Friendly
ClipBucket is designed with user’s care as top priority.
Complete BootStrap Support
ClipBucket uses BootStrap which means you can implement your codes with far more ease.
Channels
Like YouTube and other major sites, ClipBucket also allows you to create channels.
User Profiles
Every user that signs up is given a separate unique profile section (like YouTube, Facebook etc) where he can make all the edits he wants such as different channel header, profile picture, bio, interests and much more.
Friend Requests
To make ClipBucket a social media tool, we have also added connecting support. You can add your closed ones as friends and have fun together.
Groups
You may even create groups to communicate to even larger audience.
Block Users
To avoid users annoying each other, ClipBucket allows them to block people. If a user doesn’t want to see any other user, they can simply block him and solve their problem.
Multiple Players With Skins
ClipBucket has more than one video players to help you easily transform your website into anything you like.
Ads Managers
It is easy to monetize a ClipBucket powered website with ClipBucket’s built-in Ads Manager.
In Video Ads
It also supports ads inside videos in start, middle or end of the video.
Social Login
It allows user to login with their social accounts such as Google, Facebook, Twitter and LinkedIn.
Modules Help
ClipBucket helps you in installing it properly by guiding you about current status of your installed modules.
Video Duration Repairing
It can make your life easier in different ways.
Comprehensive Video Editor
Admins or user who has uploaded a video can make edits and change a wide range of thigns.
Well Structured Database
Database is cleanly structured and easy to work with.
Playlists
User can add videos to their playlists to watch them later. There is no limit on how many playlists can be added or videos inside those playlists.
Favorites
Users can also add videos they like to Favorites section.
Private Messages
Messaging ability is also available. Users can send simple text based messages to each other or even attach videos with them.
Complete Backend Control
Admin controls every single thing using a Graphical User Interface. Those controls include user registration, video size limits, comprehensive video manger, user manager, stats and much more.
Essential Control In Hand Of Users
Admins aren’t the only ones with power to change things. User can change their stuff as well such as name, bio, profile picture and other things.
Constantly Updated
ClipBucket is the most frequently updated video sharing script in the world at this moment. That pretty much explains everything.
Highly Secure (Completely MySQL injection free)
No one is going to get into your website by any means. ClipBucket constantly works to make ClipBucket more and more secure.
24 Hours Live Support
If you encounter any issues from smaller to critical ones, we have a talented and dedicated support team always ready to help you.
Active Community
ClipBucket has an active community where users and ClipBucket team members help users , point out bugs, suggest feature upgrades and more.
Upgradeable
Every time a new version of ClipBucket is released, you don’t have to re-install it. You can easily upgrade it keeping all your content the same.
Light Weight
Even though it has so many features, it is still light weight and smooth in work.
Supports Giant Sites (Tune.pk)
It supports your website no matter how big it gets. ClipBucket can handle millions or even billions of users and server unlimited amount of videos without any interruptions.
Comprehensive Yet Easy To Understand Statistics
ClipBucket offers beautifully organized stats to admins including different things such as new users added, videos added, videos size and more.
Video Reporting
User can report inappropriate content with matter of few clicks. Admin can then decide if report is legitimate or not.
Comments
Any website without interactions is dead. ClipBucket offers a well structured commenting system where users can engage in conversation with other users.
Related Videos
Related videos are also shown based on tags, title and description similarity.
Smarty
Smarty is a template engine that makes editing ClipBucket much more easier and fun.
Built-in Functions
ClipBucket has a big list of built-in functions for users to get things done more easily and efficiently.
-Major Features of ClipBucket:
- New Web 2.0 Layout Design for both User and Admin
- Easy to Moderate Videos, Users , Groups etc.
- Create Different User Groups to assign different permissions
- Improved SEO Friendly URLs
- Extendible with Plugins and Addons like WordPress
- Easy to install Themes and templates
- Easy to install FLV Player
- Daily Stats with graphical interface
- Mass Uploader via FTP
- Improved Channel System
- User Categories
- Advance reporting/flagging system
- Ajax Based favorite,comments,ratings and reporting
- Playlists
- Quicklists
- Search Engine
- Highly customizable Profile page
- A Complete SOCIAL NETWORK
- New and Improved Groups system
- Improved templating system Register
videos
ClipBucket Installation


