
1-click AWS Deployment 1-click Azure Deployment
Overview
InvoicePlane is a free and open source application to manage your quotes, invoices, payments and customers. InvoicePlane makes it easy to create new invoices with some simple clickss: dd saved products, set taxrates and send the invoice via email to the customer from within the app.
Quotes, Invoices, Payments
InvoicePlane is a solid application to manage your complete billing circle: from quotes over invoices to payments.
Manage your Clients
The application provides CRM-like management for your clients. Enter contact details, notes or add custom fields. Basic project and task management is also available.
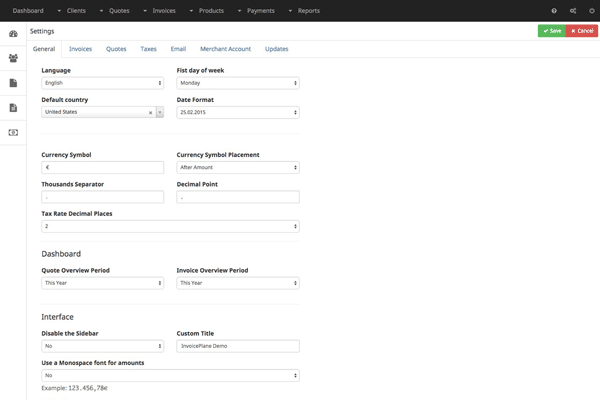
Customize InvoicePlane
You can customize InvoicePlane to make sure it fits your needs: select from different themes, set amount formats, modify email and PDF templates or many more.
One-Click Online Payments
Let your clients pay the invoices by using one of 25 different online payment providers like PayPal, Stripe or even using Bitcoin via Coinbase.
Multilanguage Interface
InvoicePlane is translated into many languages by community members and more languages are coming soon.
The Idea behind InvoicePlane
The main idea behind the InvoicePlane software is the creation of an application you host on your own server and use it for basic invoicing and client management.
The target groups are freelancers, self-employed workers and small to medium sized companies which need a reliable and easy to use invoicing system but who can’t afford an expensive software.
Goals
- keep InvoicePlane a free and open source software.
- provide updates on a regular base.
- maintain a clean and hassle-free interface that is easy to learn and use.
- offer a lot of functions and features while trying not to overload the application.
- make configuration adn customization as easy as possible.
- keep the requirements low so InvoicePlane can also be used within older environments.
Install InvoicePlane on Ubuntu 16.04 LTS with Apache2, MariaDB and PHP 7.1 Support:
InvoicePlane is an open source, self-hosted application for managing quotes, invoices and payments based on PHP. It is designed from the ground up for ease of use to allow business owners create and manage and track their business quotes, invoices and client payments.
If you’re looking for a robust, secure and easy to use invoicing system that’s 100% free, you’ll find InvoicePlane to be useful. This brief tutorial is going to show students and new users how to install InvoicePlane on Ubuntu 16.04 LTS with Apache2, MariaDB and PHP 7.1 support.
This post covers installing the latest version of InvoicePlane, which at the time of writing was v1.5.5
To get started with installing InvoicePlane, follow the steps below:
Step 1: Install Apache2 Web Server
InvoicePlane requires a webserver to function and the most popular webserver in use today is Apache2. So, go and install Apache2 on Ubuntu by running the commands below:
sudo apt update
sudo apt install apache2
After installing Apache2, run the commands below to disable directory listing globally.
sudo sed -i "s/Options Indexes FollowSymLinks/Options FollowSymLinks/" /etc/apache2/apache2.conf
Next, run the commands below to stop, start and enable Apache2 service to always start up with the server boots.
sudo systemctl stop apache2.service
sudo systemctl start apache2.service
sudo systemctl enable apache2.service
Step 2: Install MariaDB Database Server
InvoicePlane also requires a database server to function.. and MariaDB database server is a great place to start. To install it run the commands below.
sudo apt-get install mariadb-server mariadb-client
After installing, the commands below can be used to stop, start and enable MariaDB service to always start up when the server boots.
sudo systemctl stop mysql.service
sudo systemctl start mysql.service
sudo systemctl enable mysql.service
After that, run the commands below to secure MariaDB server.
sudo mysql_secure_installation
When prompted, answer the questions below by following the guide.
- Enter current password for root (enter for none): Just press the Enter
- Set root password? [Y/n]: Y
- New password: Enter password
- Re-enter new password: Repeat password
- Remove anonymous users? [Y/n]: Y
- Disallow root login remotely? [Y/n]: Y
- Remove test database and access to it? [Y/n]: Y
- Reload privilege tables now? [Y/n]: Y
Restart MariaDB server
sudo systemctl restart mysql.service
Step 3: Install PHP 7.1 and Related Modules
PHP 7.1 isn’t available on Ubuntu default repositories… in order to install it, you will have to get it from third-party repositories.
Run the commands below to add the below third party repository to upgrade to PHP 7.1
sudo apt-get install software-properties-common
sudo add-apt-repository ppa:ondrej/php
Then update and upgrade to PHP 7.1
sudo apt update
Run the commands below to install PHP 7.1 and related modules.
sudo apt install php7.1 libapache2-mod-php7.1 php7.1-common php7.1-mbstring php7.1-xmlrpc php7.1-soap php7.1-gd php7.1-xml php7.1-intl php7.1-mysql php7.1-cli php7.1-mcrypt php7.1-zip php7.1-curl
After install PHP 7.1, run the commands below to open PHP-FPM default file.
sudo nano /etc/php/7.1/apache2/php.ini
Then make the change the following lines below in the file and save.
file_uploads = On
allow_url_fopen = On
memory_limit = 256M
upload_max_filesize = 64M
max_execution_time = 360
date.timezone = America/Chicago
Step 4: Create InvoicePlane Database
Now that you’ve install all the packages that are required, continue below to start configuring the servers. First go and create a blank InvoicePlane database.
Run the commands below to logon to the database server. When prompted for a password, type the root password you created above.
sudo mysql -u root -p
Then create a database called invplanedb
CREATE DATABASE invplanedb;
Create a database user called invplaneuser with new password
CREATE USER 'invplaneuser'@'localhost' IDENTIFIED BY 'new_password_here';
Then grant invplaneuser full access to the database.
GRANT ALL ON invplanedb.* TO 'invplaneuser'@'localhost' IDENTIFIED BY 'user_password_here' WITH GRANT OPTION;
Finally, save your changes and exit.
FLUSH PRIVILEGES;
EXIT;
Step 5: Download InvoicePlane Latest Release
Next, visit InvoicePlane site and download the latest version.
After downloading, run the commands below to create a root directory for InvoicePlane and extract the downloaded file into Apache2 root directory.
cd /tmp && wget -c -O v1.5.5.zip https://invoiceplane.com/download/v1.5.5
unzip v1.5.5.zip
sudo mv ip /var/www/html/invoiceplane
Next, run the commands below to create InvoicePlane default config and .htaccess files.
sudo cp /var/www/html/invoiceplane/ipconfig.php.example /var/www/html/invoiceplane/ipconfig.php
sudo cp /var/www/html/invoiceplane/htaccess /var/www/html/invoiceplane/.htaccess
Then run the commands below to set the correct permissions for InvoicePlane to function.
sudo chown -R www-data:www-data /var/www/html/invoiceplane/
sudo chmod -R 755 /var/www/html/invoiceplane/
Step 6: Configure Apache2
Finally, configure Apahce2 site configuration file for InvoicePlane. This file will control how users access InvoicePlane content. Run the commands below to create a new configuration file called invoiceplane.conf
sudo nano /etc/apache2/sites-available/invoiceplane.conf
Then copy and paste the content below into the file and save it. Replace the highlighted line with your own domain name and directory root location.
<VirtualHost *:80>
     ServerAdmin admin@example.com
     DocumentRoot /var/www/html/invoiceplane
     ServerName example.com
     ServerAlias www.example.com

     <Directory /var/www/html/invoiceplane/>
        Options +FollowSymlinks
        AllowOverride All
        Require all granted
     </Directory>

     ErrorLog ${APACHE_LOG_DIR}/error.log
     CustomLog ${APACHE_LOG_DIR}/access.log combined

</VirtualHost>
Save the file and exit.
Step 7: Enable the InvoicePlane and Rewrite Module
After configuring the VirtualHost above, enable it by running the commands below
sudo a2ensite invoiceplane.conf
sudo a2enmod rewrite
Step 8 : Restart Apache2
To load all the settings above, restart Apache2 by running the commands below.
sudo systemctl restart apache2.service
Then open your browser and browse to the server domain name. You should see InvoicePlane setup wizard to complete. Please follow the wizard carefully.
Then follow the on-screen instructions… you will be asked to input your database configuration, administrative details and other configuration settings. When complete you may sign-in and start using InvoicePlane.
-InvoicePlane is a self-hosted open source application for managing your quotes, invoices, clients and payments.
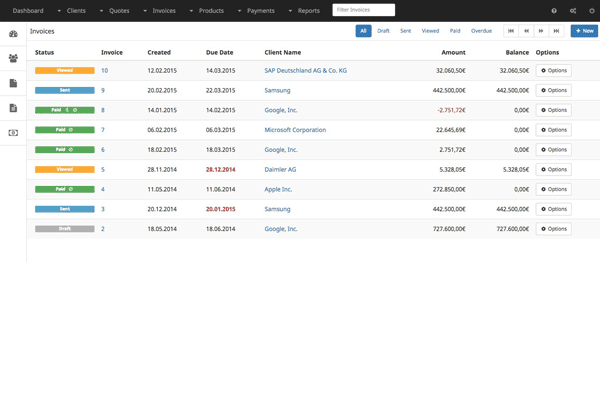
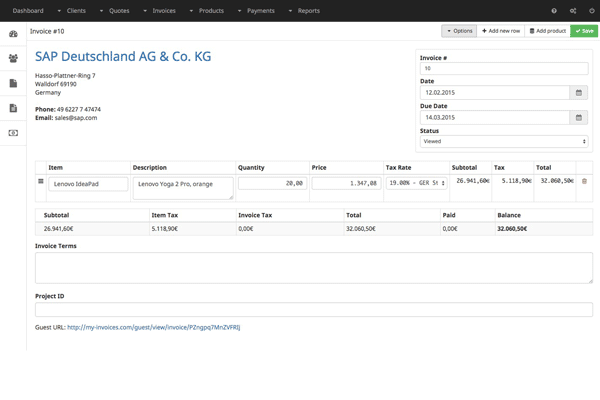
Invoice
Invoice #10
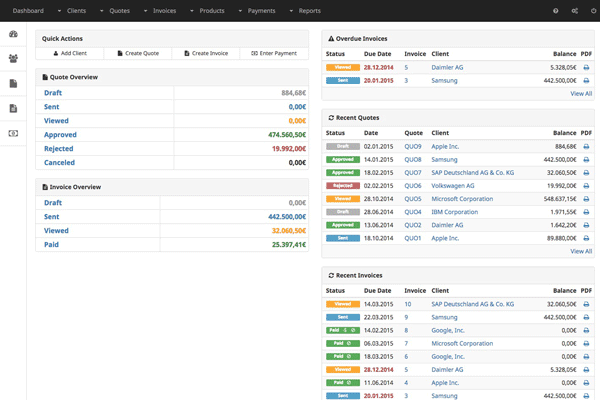
Quick Action
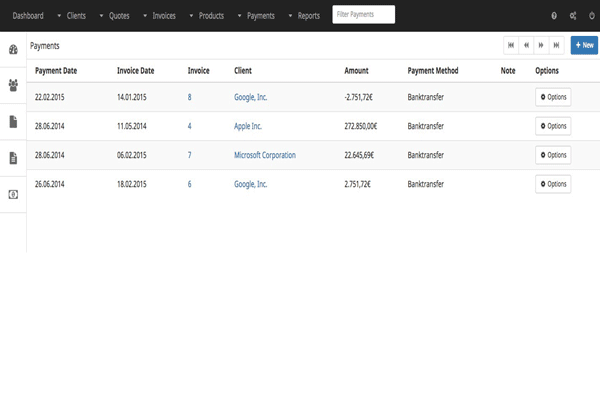
Payments
Settings
InvoicePlane is an open source software which was built to offer a free application for client management, invoicing and payment tracking.
Features
InvoicePlane Features :
- Billing Portal
- Contact Database
- Contingency Billing
- Customizable Invoices
- Dunning Management
- Hourly Billing
- Mobile Payments
- Multi-Currency
- Online Invoicing
- Online Payments
- Payment Processing
- Project Billing
- Recurring/Subscription Billing
- Tax Calculator
Major Features of InvoicePlane:
Easy Invoicing
InvoicePlane makes it easy to create new invoices with some simple clickss: dd saved products, set taxrates and send the invoice via email to the customer from within the app.
Manage your Customers
The application provides CRM-like management for your customers. Enter contact details, notes or add custom fields for your own details like project identiefiers.
Quotes for Customers
Send a quote to your client. He can approve it with a single click from the InvoicePlane web-panel so you can start to work on the project or deliver the listed items.
Customize InvoicePlane
You can customize InvoicePlane to make sure it will fit your needs: currencies, application interface, email templates, invoice groups, taxes and quote or invoice templates.
Track all Payments
Enter Payments for Invoices in InvoicePlane and keep track of the clients balance. All payments can be linked to an invoice to track the payments with different payment methods for them.
Let your Clients use PayPal
Register your merchant account at PayPal.com, enter your credentials and InvoicePlane is ready to provide easy and one-click online payments via PayPal to your clients.
Videos
How to install Fusion Invoice on your server
