
1-click AWS Deployment 1-click Azure Deployment 1-click Google Deployment
Overview
One of the popular, completely free and open source e-commerce platforms, OpenCart also happens to be one of the oldest among the leading e-commerce platforms available in the market. Famous for the user friendly approach it offers, it attracts most of the newbies trying to create an online platform for their business.The inception of it’s idea first occurred long back in the year 1998 by Christopher Mann. It became dormant due to involvement of Christopher Mann in other projects but the idea was revived by Daniel Kerr, a UK based developer after a couple of years. Eventually he launched a fully fledged and developed OpenCart version 1.1.1, onto Google Code on 10 February 2009.
At first the script was mostly popular in China where it held the first place among the various applications available. In 2015 OpenCart is recorded as responsible for around 6.5% of the global eCommerce volumes.Currently the application holds around 9% of the overall usage of eCommerce platforms as you can see in the following chart:
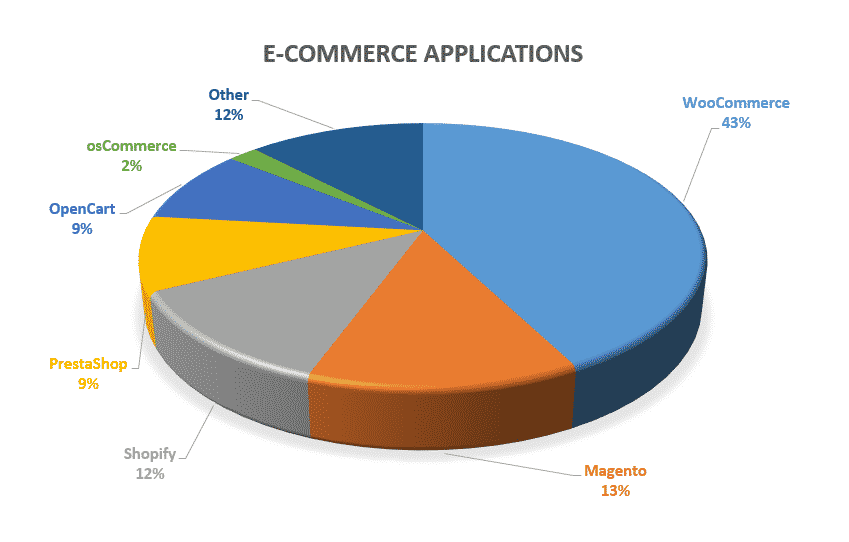
As you can see the application is not the leader in its category but this is not because it does not offer a competing solutions – it’s because WordPress has gained a lot of popularity with its WooCommerce plugin which might be considered as an easier one as a start. However OpenCart is a reliable product filled with a great variety of capabilities offering straight forward back-office.Since the application’s community is big enough you can be confident that if you have any difficulties with creating your website there would always be someone who will be able to help you. There are also a significant number of modules and themes to empower your platform and make it look amazing.The script can be downloaded from the official OpenCart website. You can also review its hosting requirements here.
It is compatible with all of our hosting packages but you should have in mind the fact that once your website gains popularity and the visitors start to grow in number the resource usage will be also increased and at some point you should consider an upgrade to a higher plan that will ensure the proper functioning of the application and therefore a better experience for your customers.If you plan to create an online shop OpenCart is a great tool to use – providing you with a stable and powerful base with a lot of opportunities to extend its look and behavior. Check out our OpenCart Hosting packages here.
What is MVC?
In modern web programming, the MVC architecture is widely used. Many of the most popular frameworks employ MVC; however, it is not an application, it is a design pattern – a prescribed solution to a common problem organized in code. Similarly, It is also known as an architectural pattern. MVC can be considered as layer based architecture. That is, the controller, model, and view are three layers all of which are related to one another.
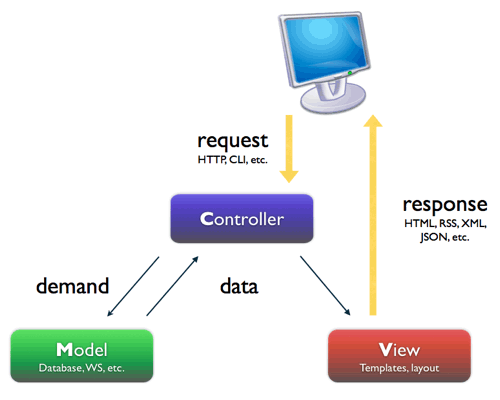
1. Controllers
Controllers hold the main control of the program. A controller is responsible for the program flow. In web-based MVC applications, it is also the first layer which is called when the browser hits the URL.
Models hold the main data of the program such as information from database objects and SQL queries. All data is gained from the models; however, the models cannot be directly called – it is a controller who requests a model for specific data and the model performs the request and returns the data to that controller.
3. Views
A view is the last layer of the MVC Architecture which holds the user interface of the program. In web applications, a view contains HTML, CSS, JavaScript, XML or JSON, etc. The view is a visible layer to the user whereas the models and controllers are hidden from the user.
Let’s understand that with the help of conversation form when a user hits the URL:
- Controller: Hey ABC Model: The user wants the XYZ Data, please pass it to me.
- Model: Got the XYZ Data! Here it is.
- Controller: Hey ABC View, I am passing the XYZ Data to you.
- View: Renders the information on the page for the user to see.
Understanding MVC in OpenCart
1. Controllers
As discussed above, A controller is the first layer of MVC Architecture. So let’s take a look at this within the context of our site. We are going to create a new controller to help us gain a better understanding.
- Create a empty
testdirectory in controllers directory i.e.,catalog/controller/test. - Create a
abc.phpPHP File inside thetestdirectory i.e.,catalog/controller/test/abc.php. - Edit the
abc.phpin your IDE and add the following code:
|
1
2
3
4
5
6
7
8
9
|
<?phpclass ControllerTestAbc extends Controller{ public function index() { echo 'Hello World'; exit; }}?> |
In above example, there are some OpenCart Framework constraints that should be strictly followed by the programmer.
- For a controller class name, It should be Like
Controller(FolderName)(Filename). Things to Remember: The first case of folder name and filename must be in uppercase, and don’t include file extension as a class name. - The
index()is the main function that is executed automatically on controller call index()function must be public.- Don’t use HTML, JavaScript, or CSS in the controller
Now go to your browser and type the URL: http://localhost/Opencart/index.php?route=test/abc
How To Install OpenCart Automatically:
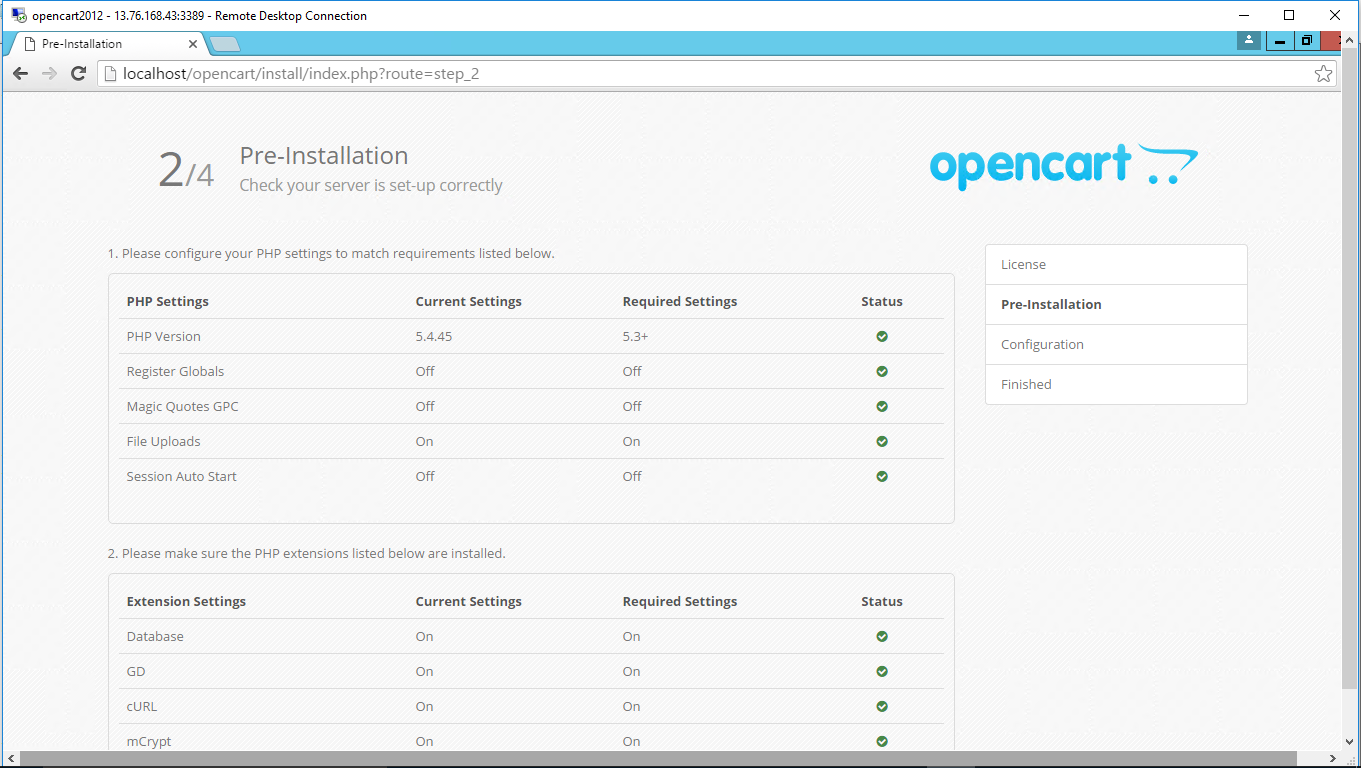
In this article we will show you how to install the OpenCart script using the auto installer. It is included in all of our OpenCart Hosting plans.Below are listed the application’s hosting requirements which you need to consider before you install it:
– Apache web server
– PHP 5.3 or above
– MySQL support
– CURL
– ZIP
– GD PHP library
– Mbstring
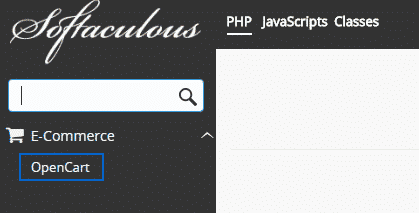
The above mentioned requirements are met in all of our hosting packages but you should have in mind that once the visitors and products on your online store grow in number you might need to upgrade to a plan providing more resourcesWe will now proceed with the actual installation.As a start you need to go to your cPanel which is available at yourdomain.com/cpanel.

You will be redirected to the
main page. Type OpenCart in the search field and click on the result:
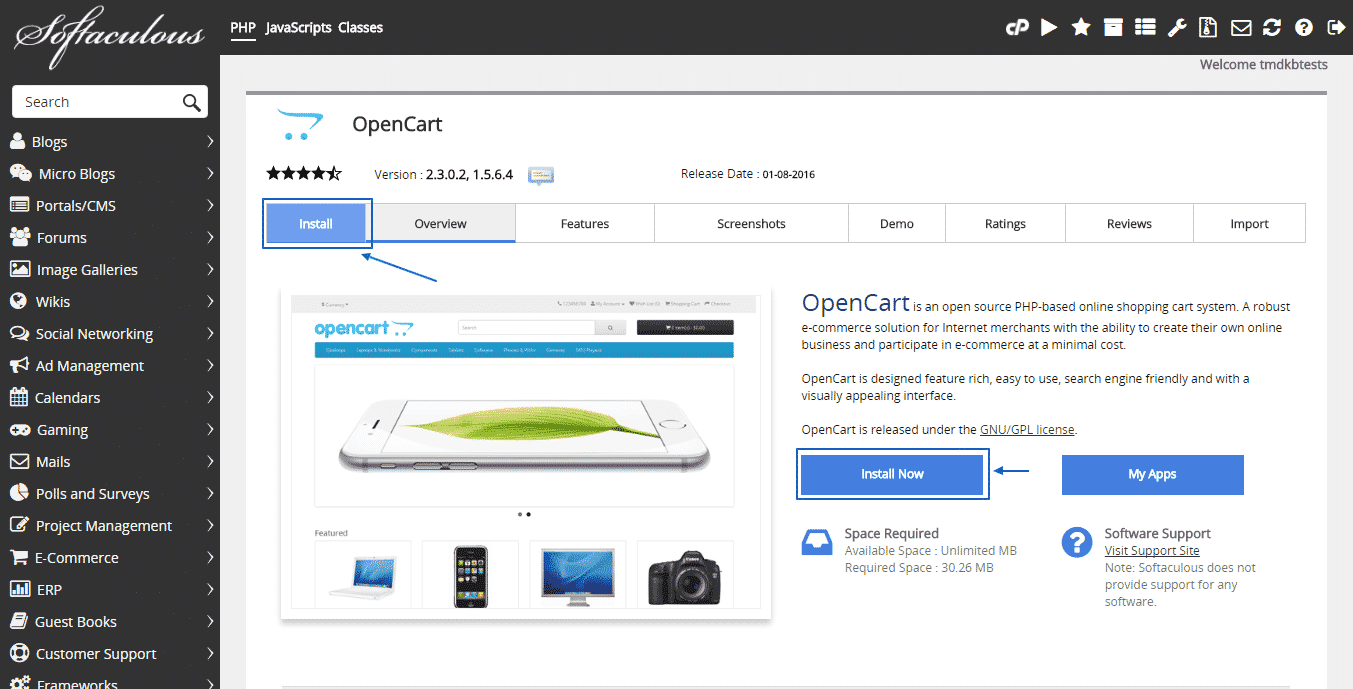
This will lead you to the application’s overview page. Now you need to click either on the Install tab or on the Install Now button:
On this step you should choose the application version, the protocol, the exact domain name and the root directory under which you want to install it:
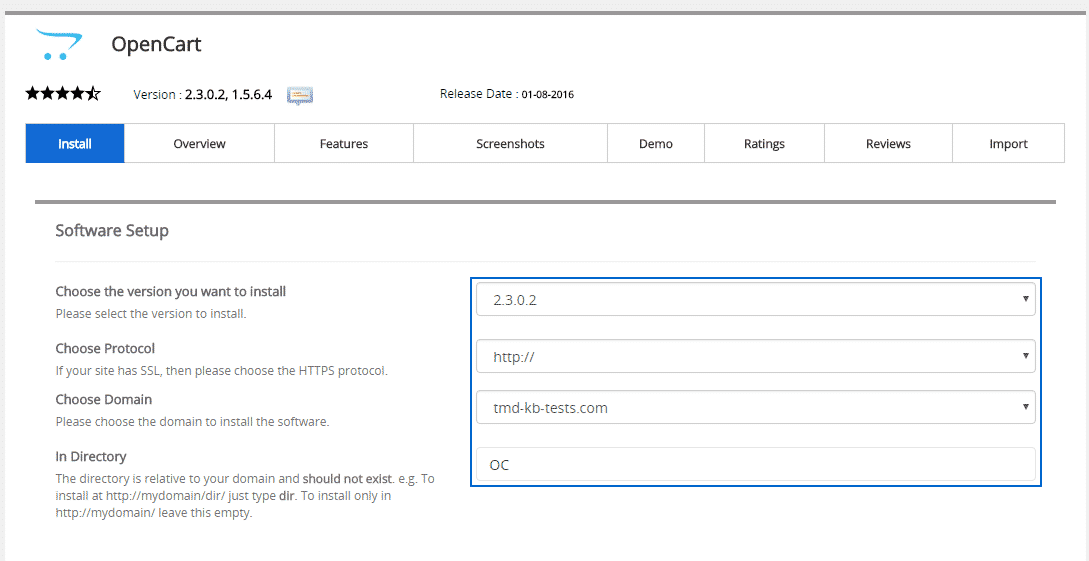
It is advisable to use the latest version of the script due to security reasons. Once the script is updated the latest version is added to the auto installer so you can use it.Choose the domain name under which you would like to install OpenCart and the folder you would like to operate in. The simplest way to make that decision is to ask yourself whether you would like to have the website at www.yourdomain.com or at www.yourdomain.com/subfolder.
If you want to install it directly under your domain name leave the directory field blank. Otherwise if you would like to put it under something like /ocart or /store or /opencart, then fill it respectively in the directory field (omitting the / sign).In our example below, we are installing OpenCart in a folder named “OC”, under the tmd-kb-tests.com domain, so it will be available at www.tmd-kb-tests.com/OC when finally installed.
Further on you will need to apply the following details for your PrestaShop application:
– Store Name – The name of your website
– Store Description – brief description of your website
– Store Owner – here you can apply your name or company name
– Store Address – the address of your business
– Admin Username – the username of the admin user
– Admin Password – the administrative password for your website
– Admin Email – the email address you want to use for your administrative account
– First Name – Your first name
– Last Name – Your last name
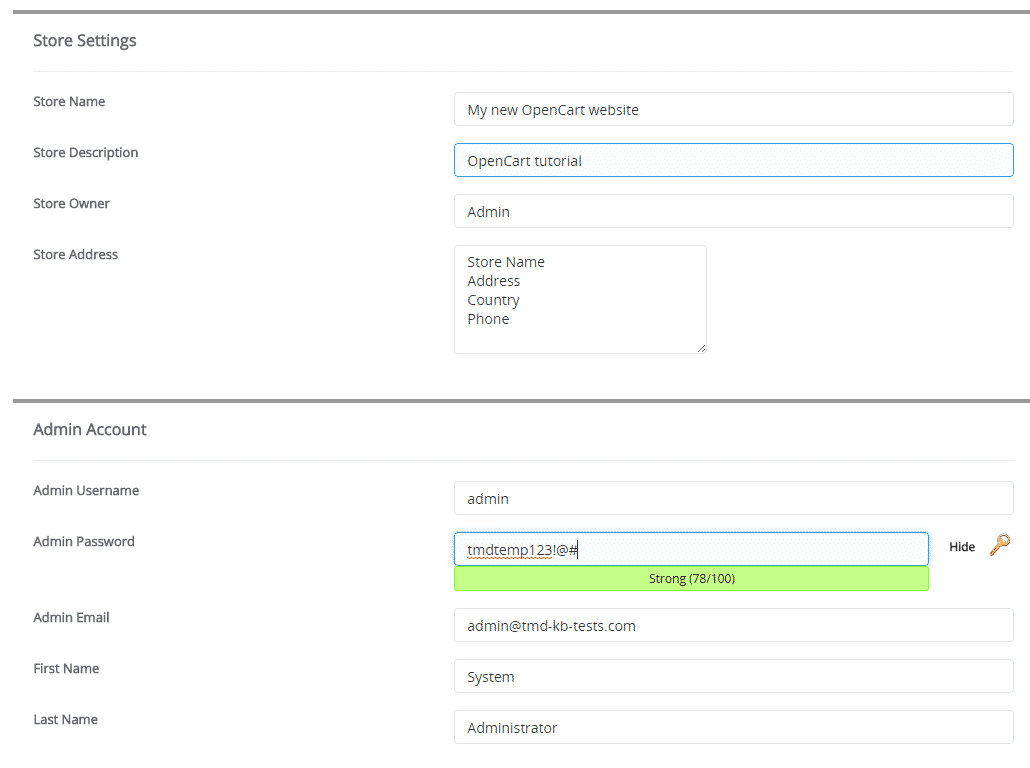
As soon as you are ready filling these details, please revise the whole page, making sure that you have filled the correct details and write the most important down. Once you do so, you are ready to proceed.
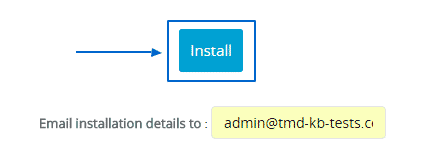
Now fill in the email account on which you would like to receive the installation details and click on the Install button:
Wait for a couple of seconds while the installation is in progress. Once it is completed you will be prompted with the frontend and administrative URLs:
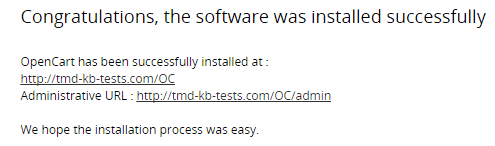
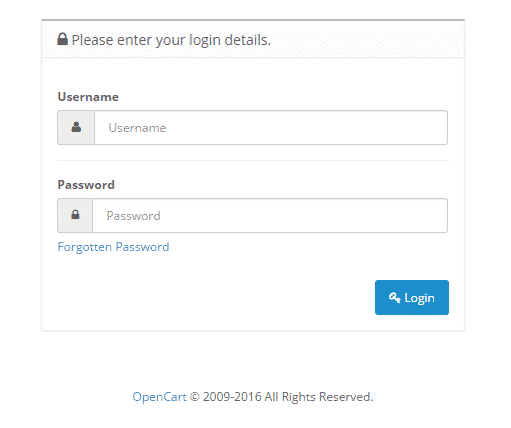
It is that simple! Now you are ready to proceed with the configuration of your new OpenCart store! Click on the Administrative URL and you will see the login screen:
How To Install OpenCart Manually?
In some cases you might need to install the application manually. In this article we will show you how to do that step by step.
To begin with the installation you will first need to download the application from the official website of the vendor. Currently the latest version of the application is 2.3.0.2.
Once you have downloaded the 2.3.0.2-compiled.zip file you need to extract it on your local computer. The extracted files should be uploaded under your hosting account where you would like to have PrestaShop installed. Now you should set the root folder of the application and upload the files in it. You can do that using an FTP client by following the instructions here.
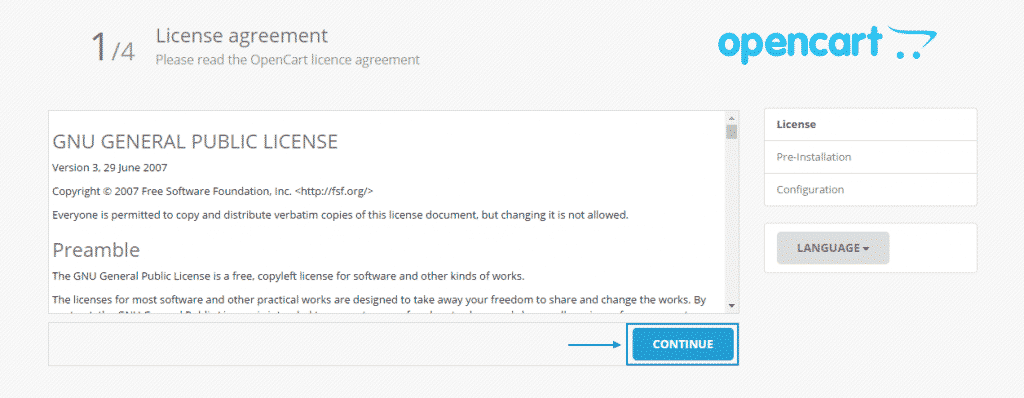
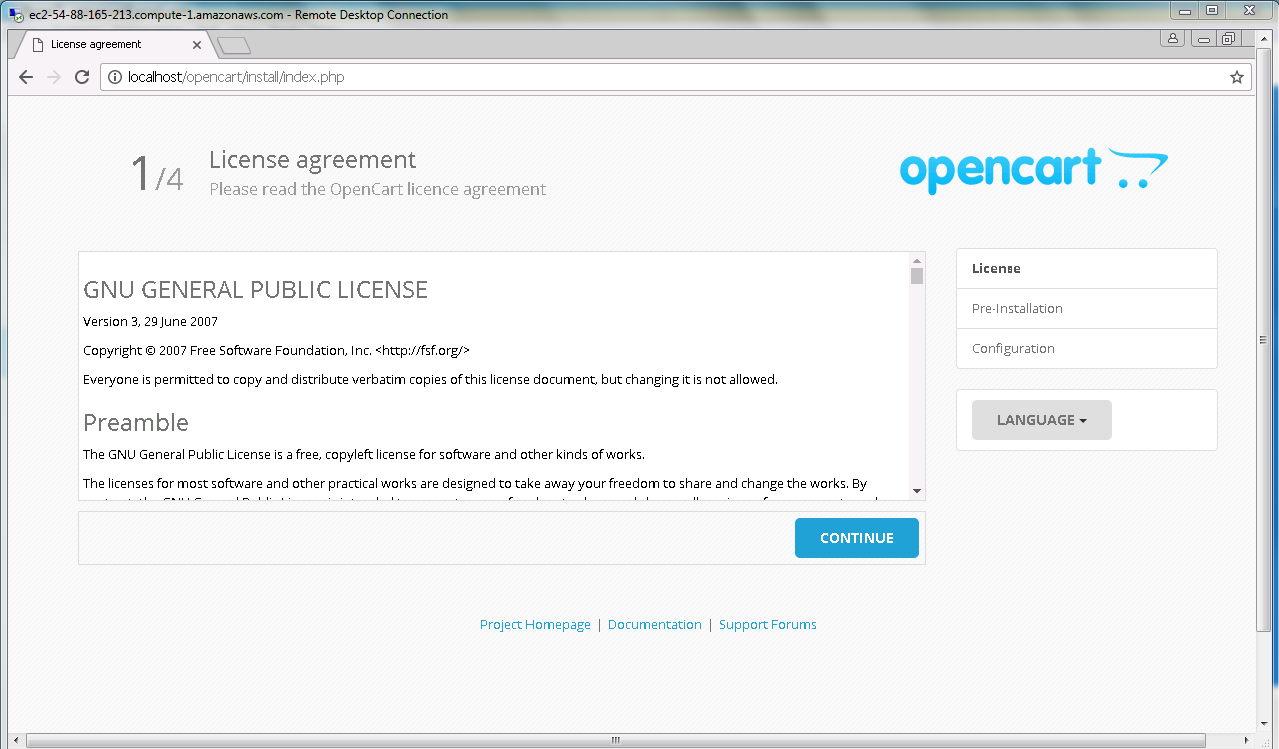
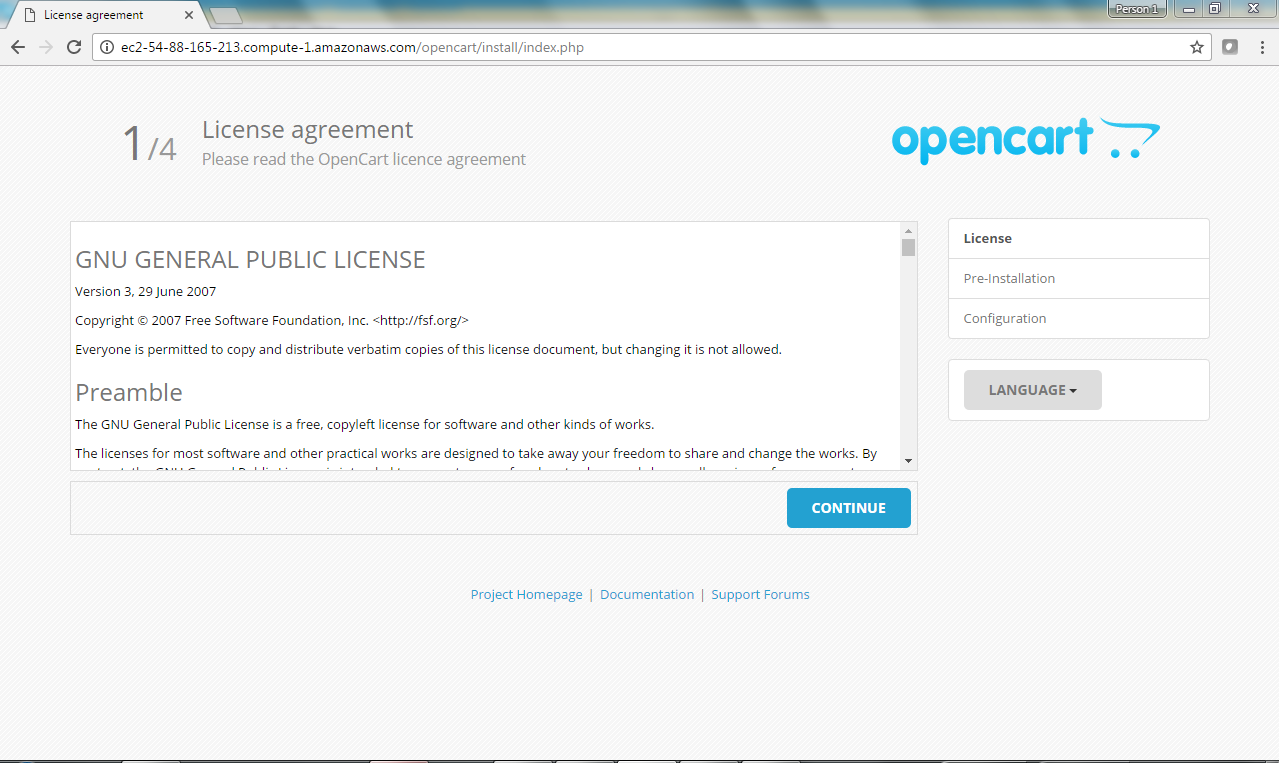
As the files are uploaded to your account a database for the application should be created. You can find more information on how to do that in the article here.When the database is created you can proceed with the actual installation. To do so you should access the root folder of the script via your web browser. In our example we are installing OpenCart in public_html/OC, so the URL we will type in the browser is domainname.com/OC. This will lead you to the installation wizard.
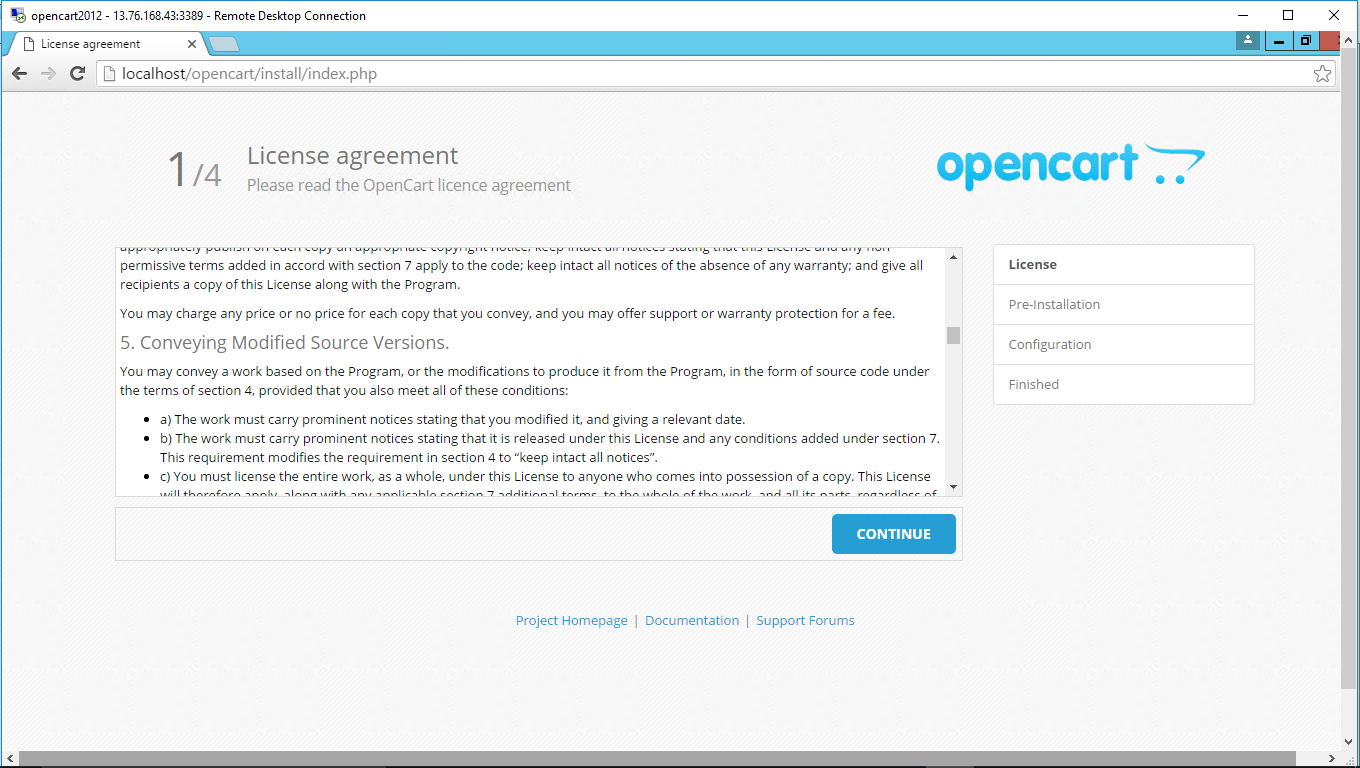
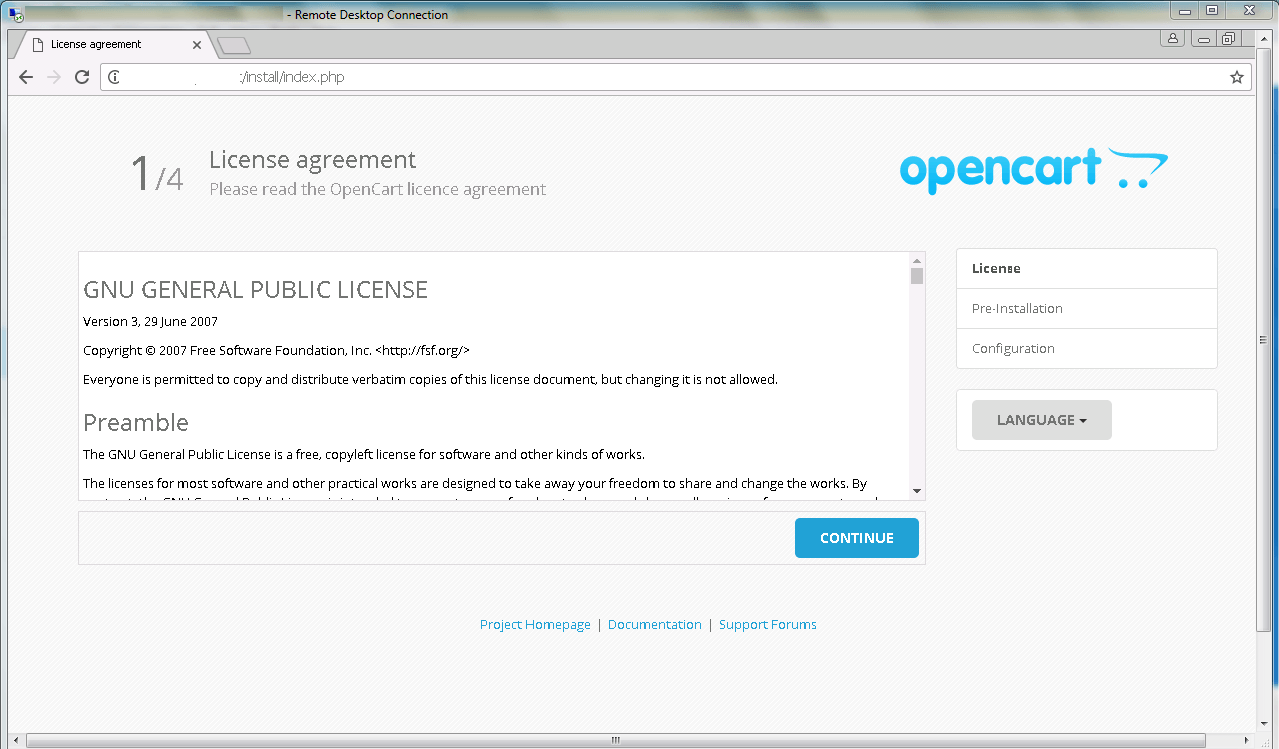
On the first screen you will see the license agreement notice. You can read it and next you should click the Continue button:
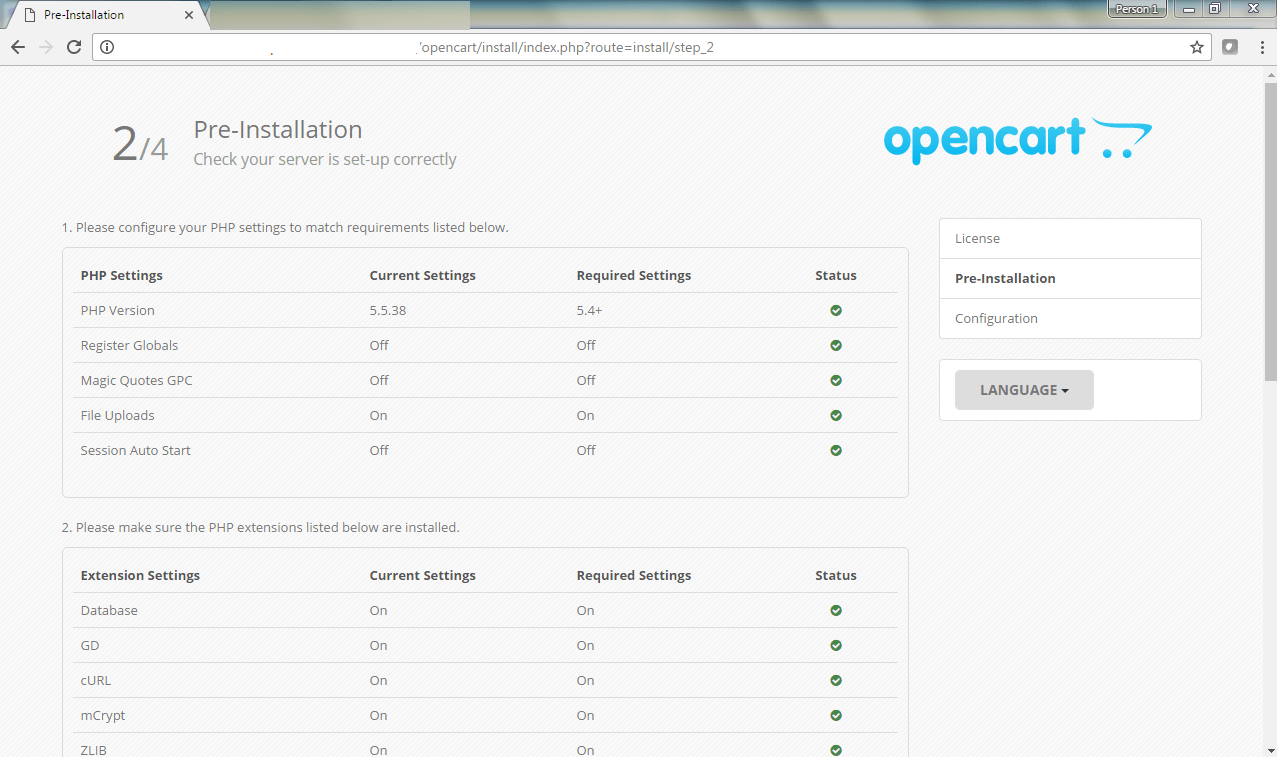
Next a system requirements check is made. As you can see in the following image the config.php and admin/config.php files are marked as missing:
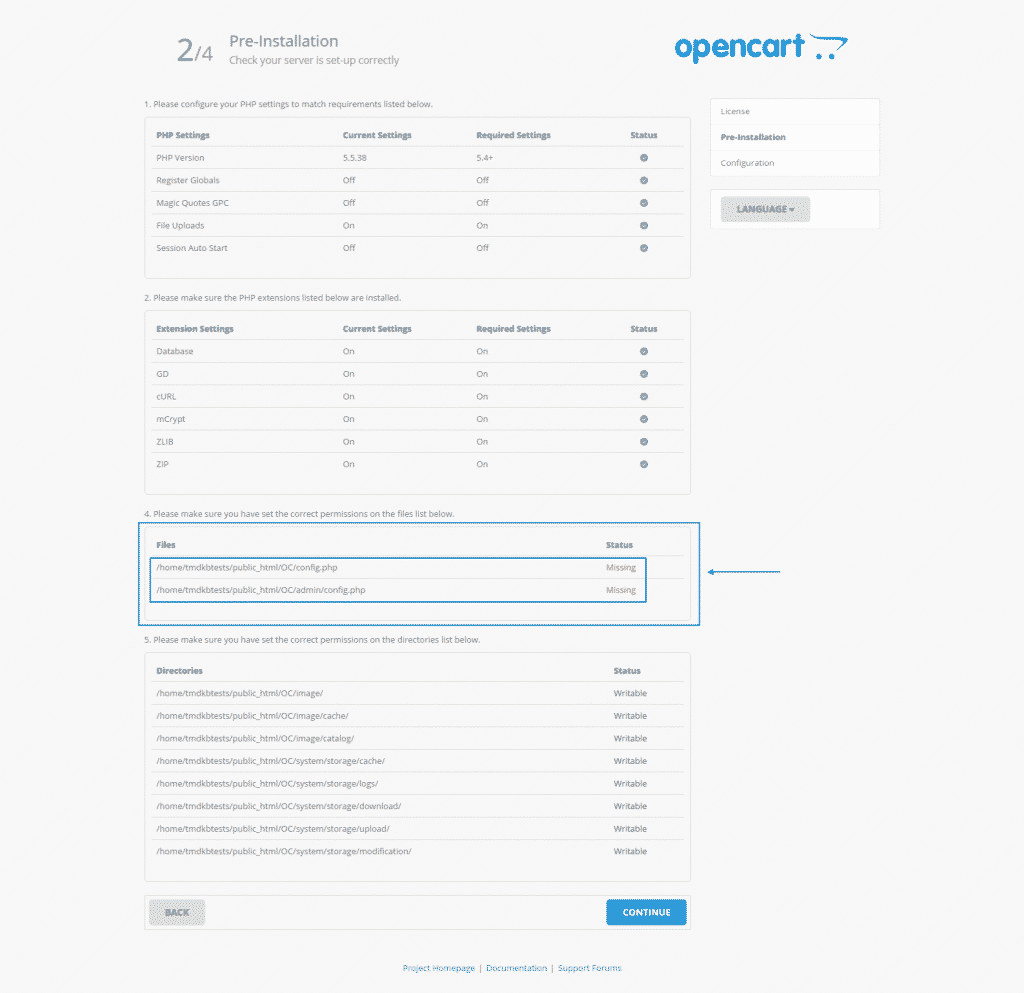
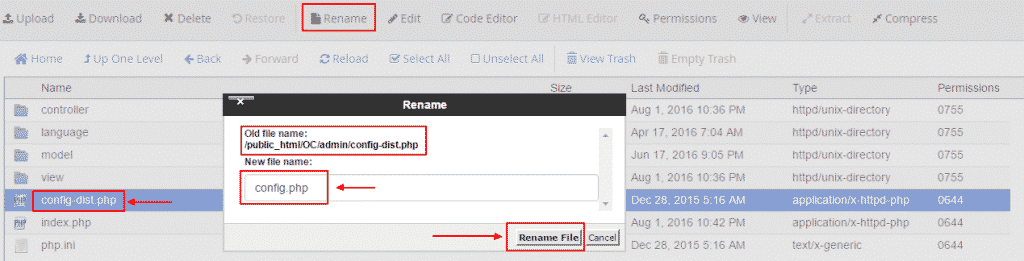
This is due to the fact that the file names are changed by default in order to avoid a harm in case that you mistakenly upload the new files in already created application. To resolve the issue and proceed you will need to access the root folder of the application using the File Manager in cPanel and rename the files.
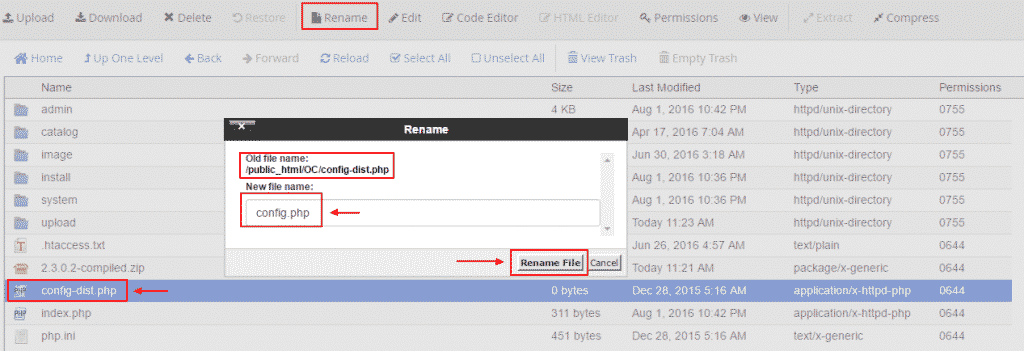
The first one in in the root folder and is currently called config-dist.php – you need to rename it to config.php:
The second file is located in the admin folder under the root directory and it is also called config-dist.php. You must rename it to config.php:
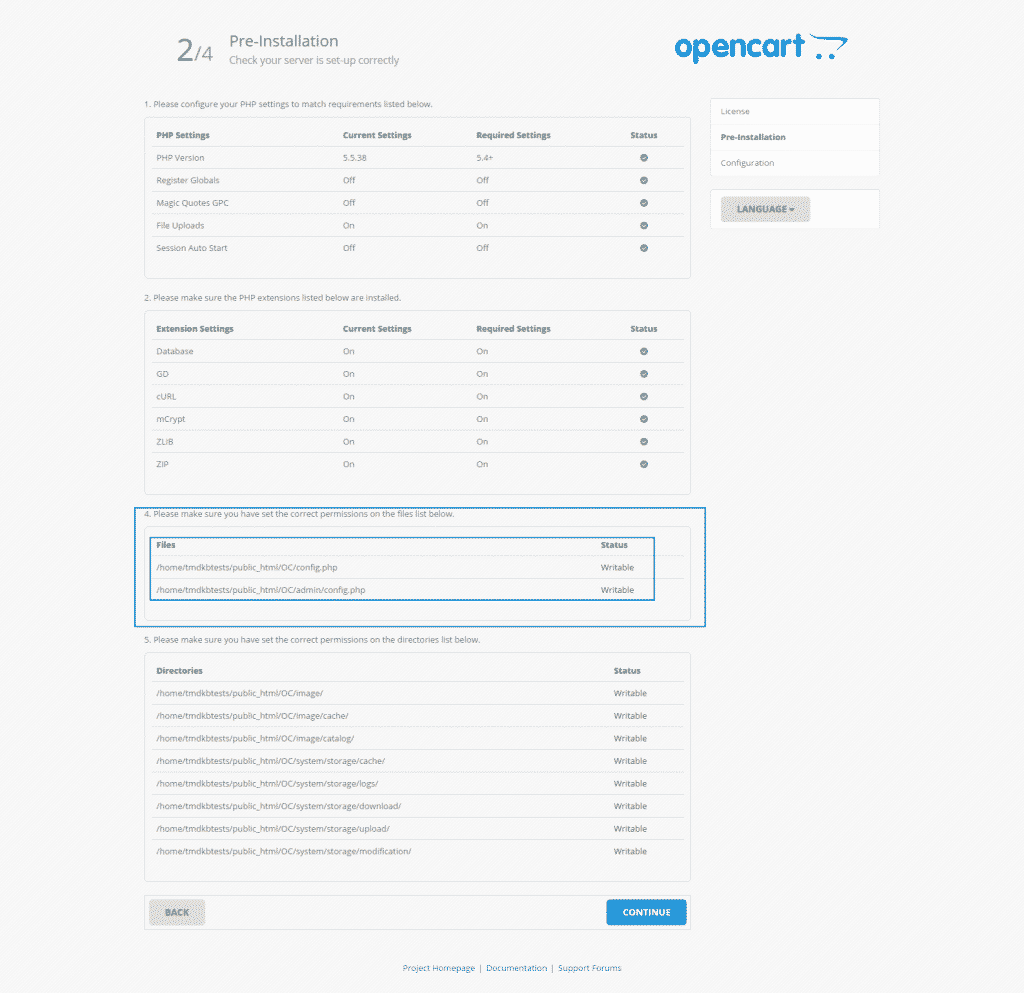
Once the files are properly renamed you can proceed with the installation of the script. If you refresh the page where the notice was displayed you will see that all the requirements are now met:
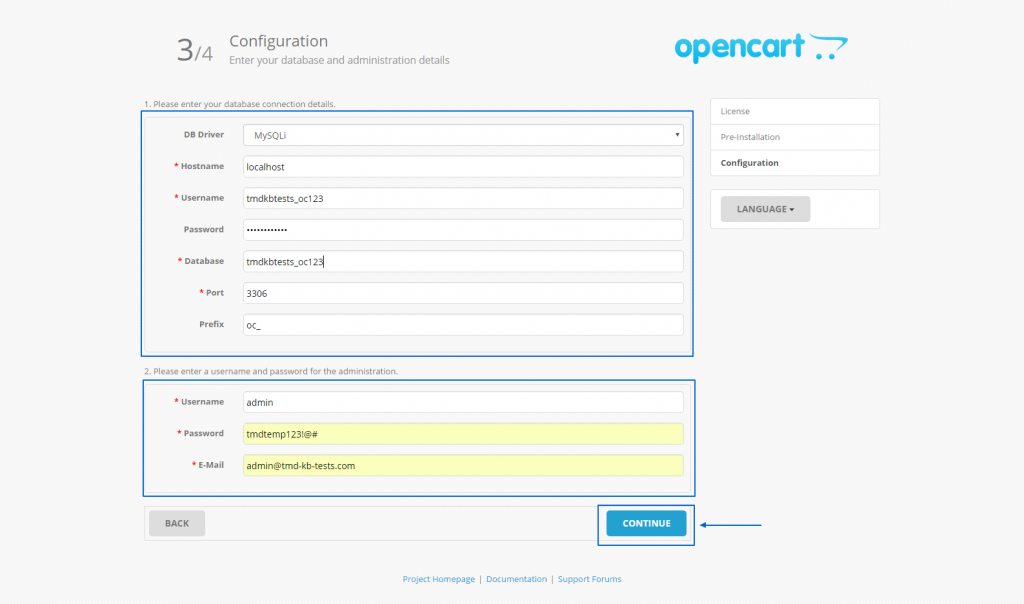
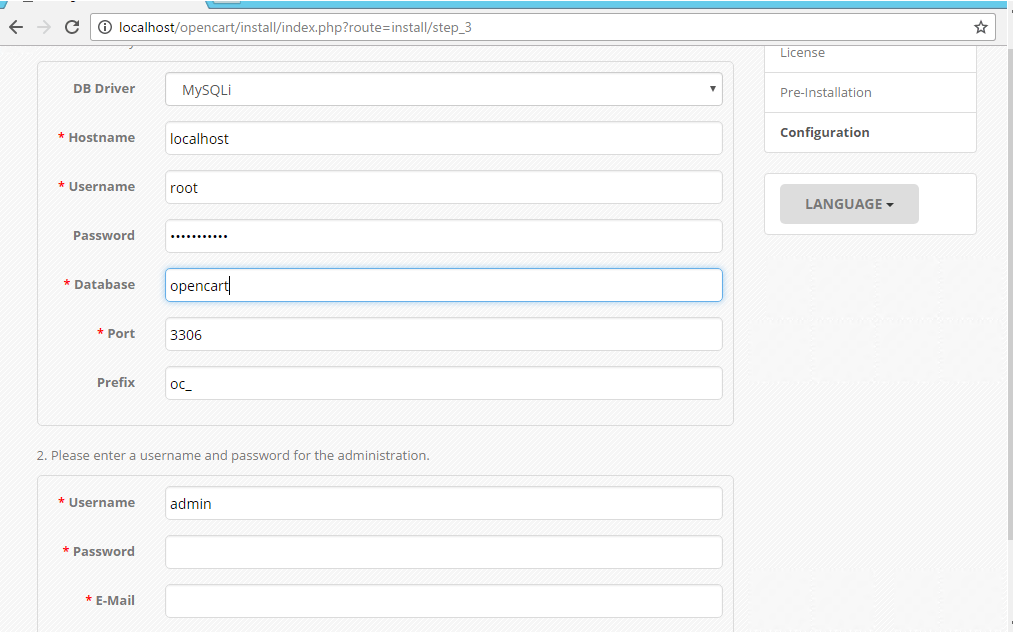
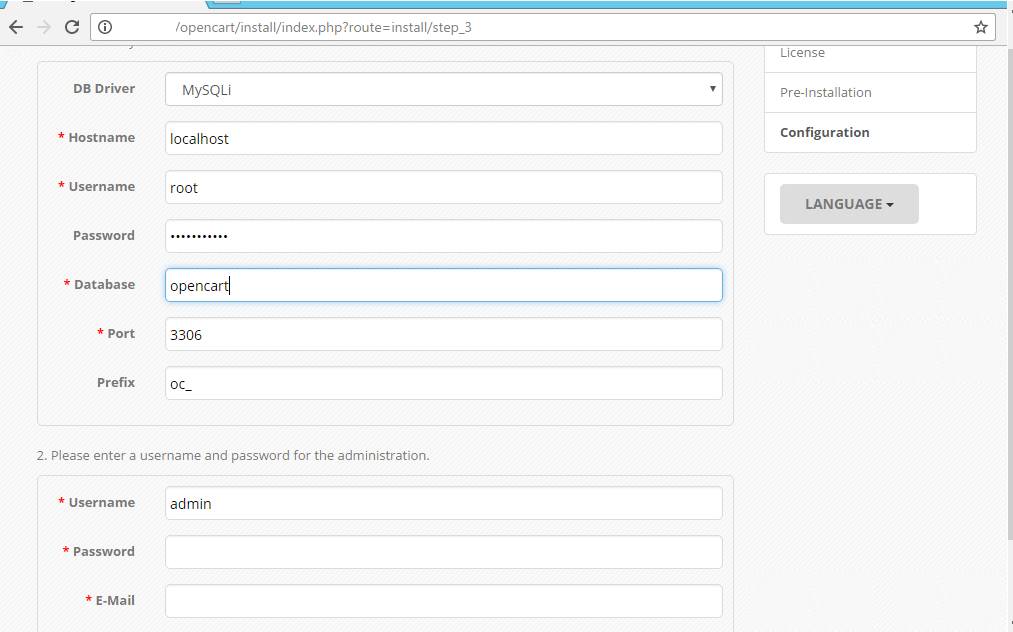
Clicking on the Continue button will lead you to the next page of the installation wizard and you will be asked to fill in the database associated with the application. You can find more information on how to create a database here. You should also enter the administrative username, password and email address:
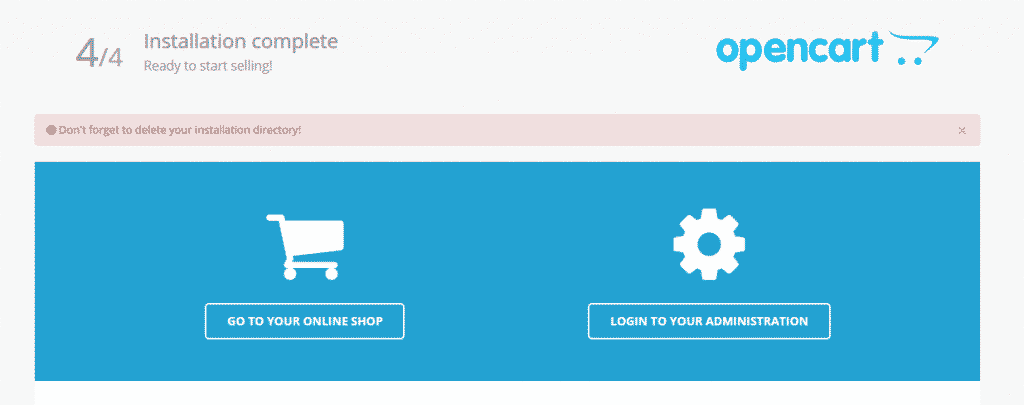
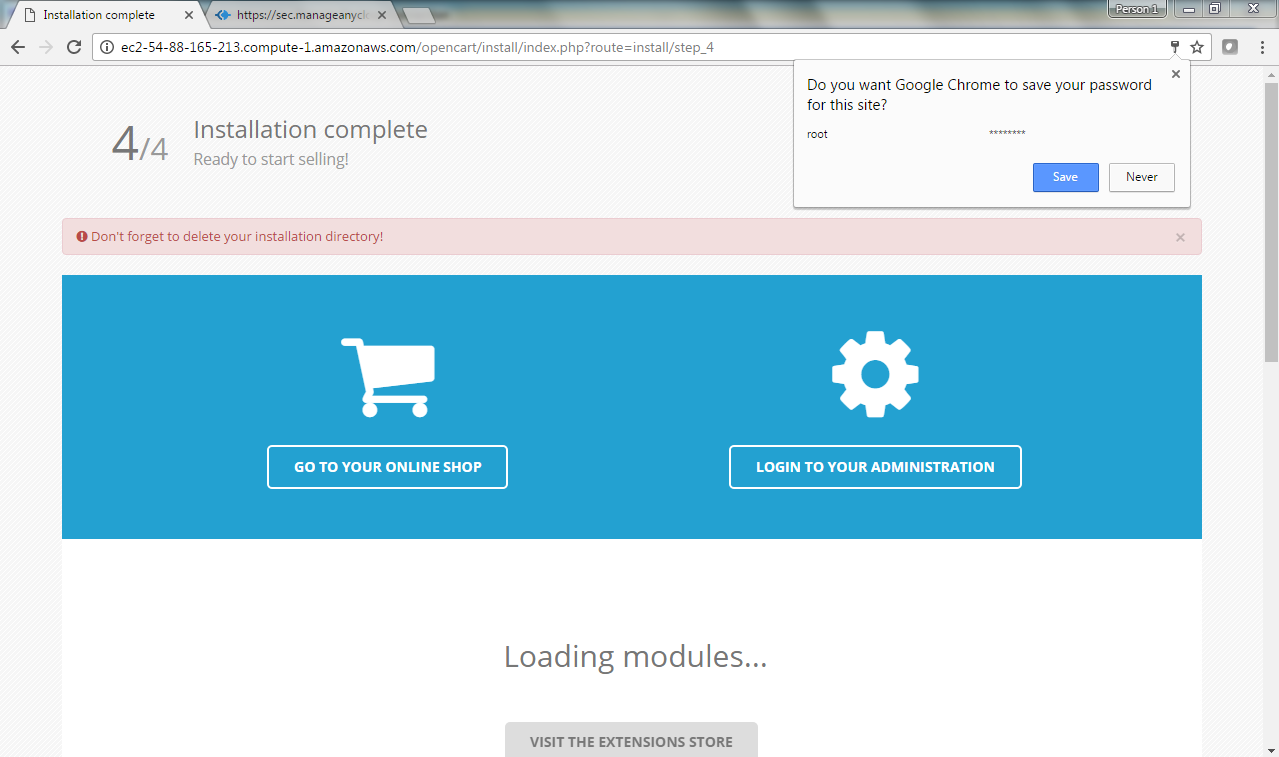
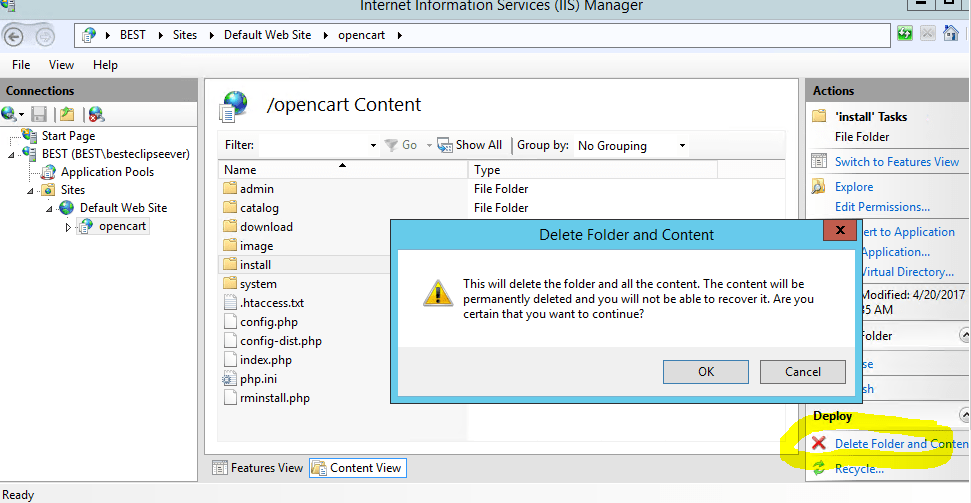
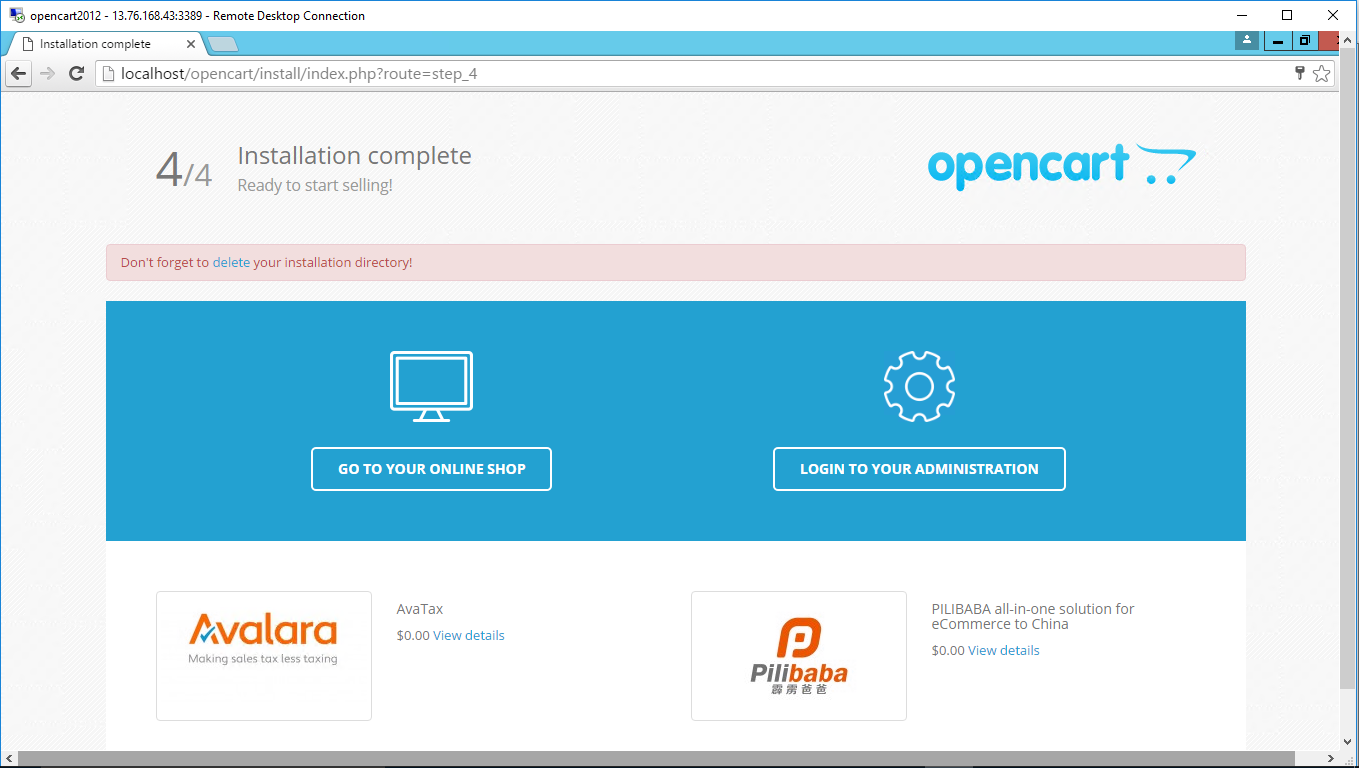
You are almost ready now. Once the details mentioned above are applied you will see a screen that reminds you to delete the installation directory of the application. You can do that either using the File Manager in cPanel or your FTP client:
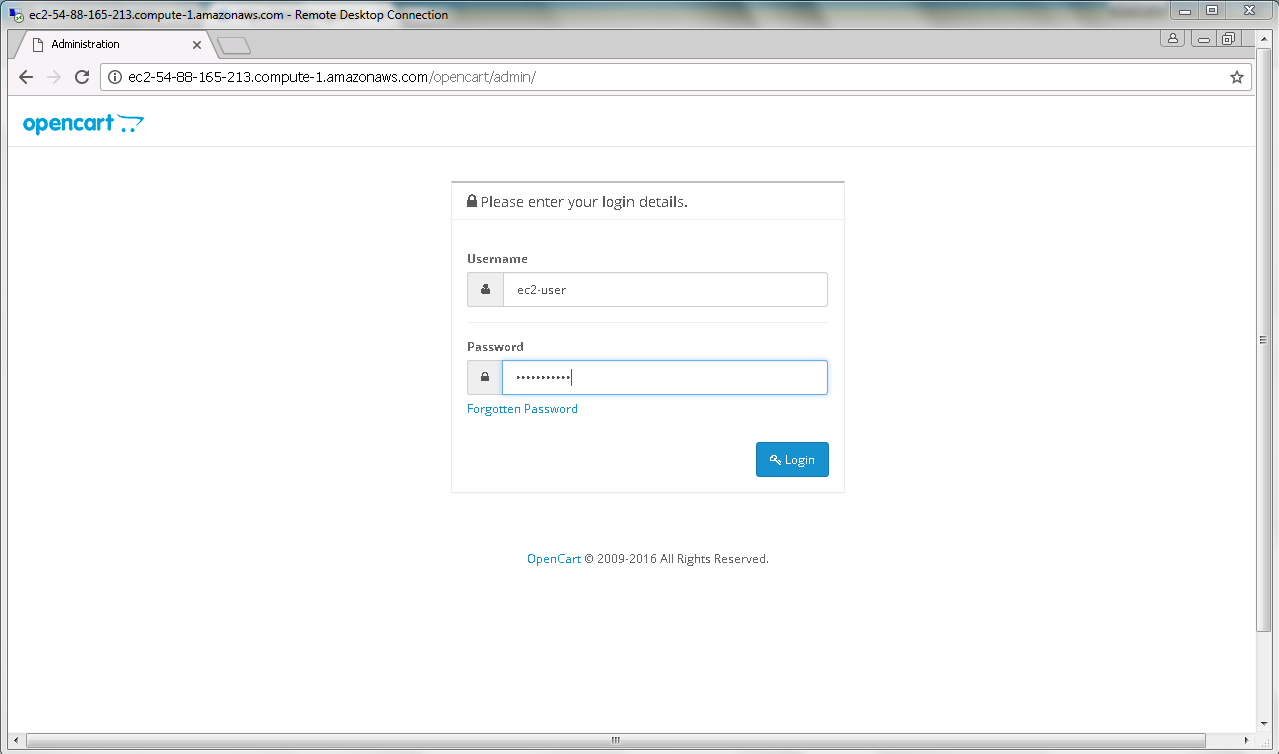
Once you delete the install folder you should be able to access the website and its administrative area:
How To Create A Backup Of OpenCart Store?
It is important to keep a local copy of your website in case that something unexpected happen.To create a backup of your OpenCart store you need to copy both the files and the database associated with it.You can find more information on how to download a copy of the application’s files here..Once the files are downloaded on your computer keep them in an easy accessible folder and if there is some issue you can quickly deploy them to your hosting account and restore the website in its working condition.
How To Create A Category/Product In OpenCart?
In this tutorial we will show you how to create products and categories in your store.First you need to access the administrative area of your application which is available here: yourdomain.com/admin.If you have installed OpenCart under a subfolder the URL to the dashboard would be:yourdomain.com/subfolder/admin
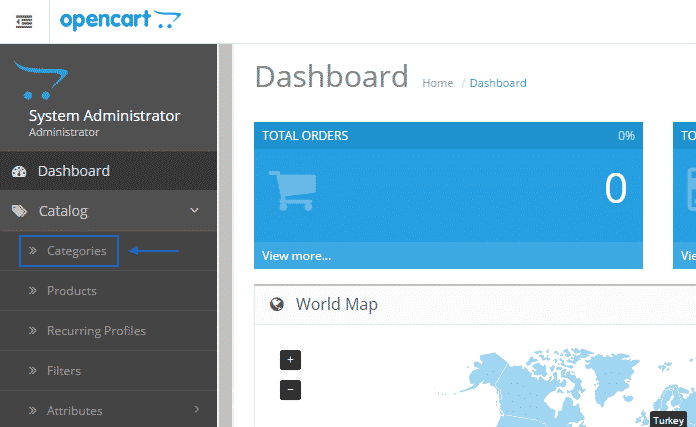
Let’s first create a category. To do so you will need to navigate to Dashboard > Catalog > Categories:
At the top of the page you should click on the Add New button:

On the new page you must apply the information associated with the new category such as its name, description, meta tag, and any additional info.
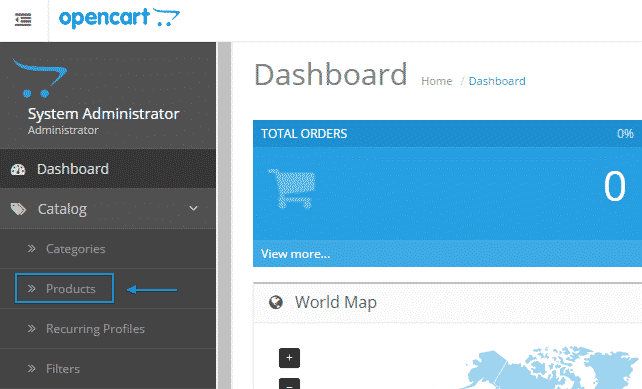
To create a product you need to go to Dashboard > Catalog > Products:
In the same way as you have added a category you need to click on the Add New button at the top of the page to add new product:
![]()
![]()
On the page where you will be redirected to you need to fill in all the details associated with the new product.
How to manage Product Catalog
To manage your OpenCart 2 product catalog you will need to login into your store admin dashboard and refer to the Catalog section from the main navigation menu. From the Catalog menu you should refer to the Products page.
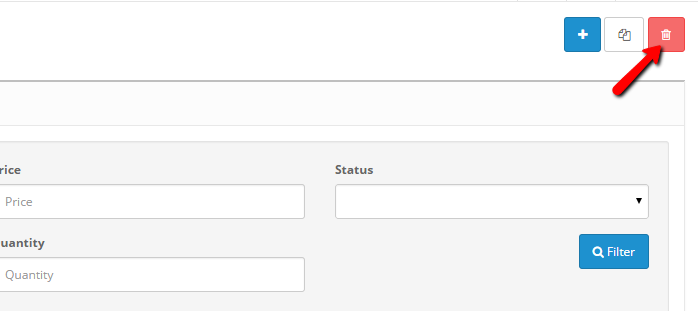
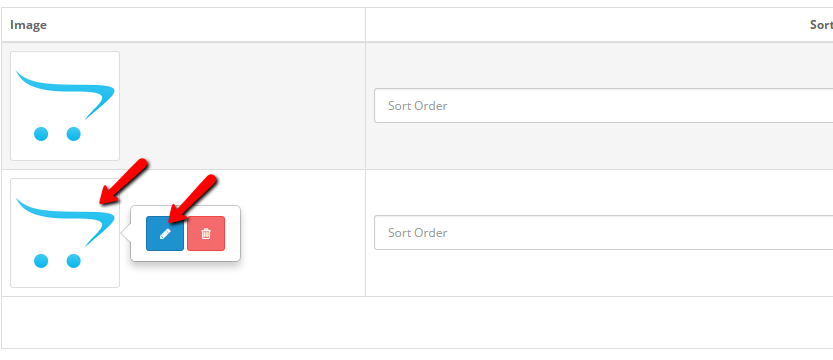
From the Product List page you can add new products and edit or remove existing products. To edit an existing product, click on the edit icon next to your product name.

Via the Edit Product page you can edit all aspects of your product. When you are ready with your changes you can save the new product details via the Save icon at the top right corner of your screen.
To completely remove a product from your product catalog, select the product by clicking on the tick box and use the Delete icon.
To add a new product to your catalog, click on the Add icon from the Product List page. This will direct you to the Add Product page. Via this page there are several tabs with different configuration settings for your new product. You should start with the General information tab.
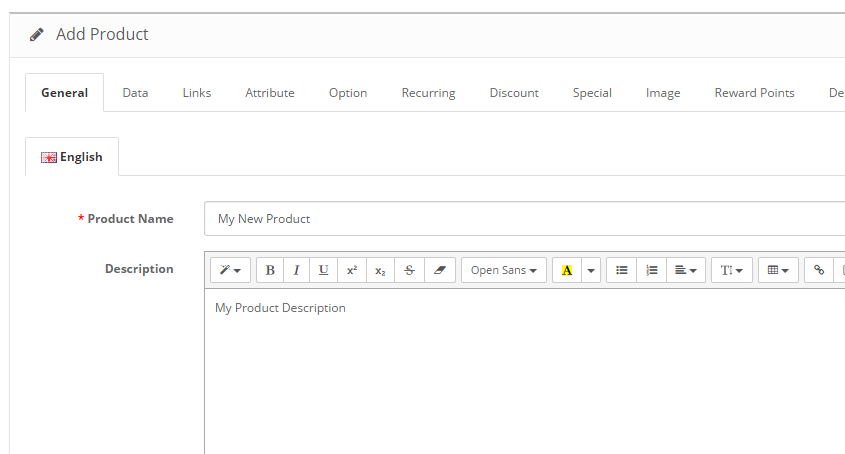
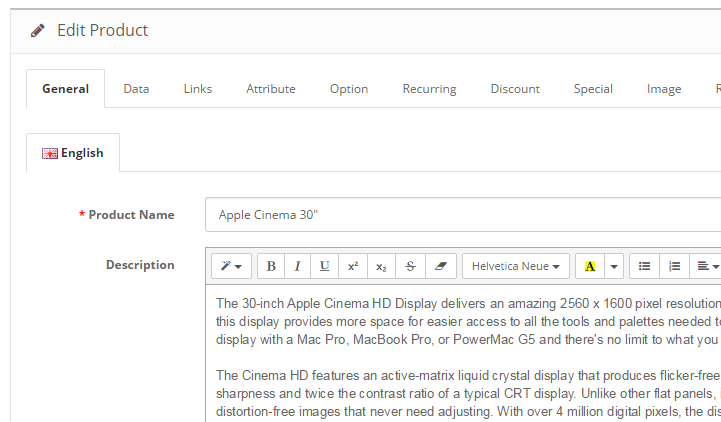
Make sure that you have set your product name and product description for your new product. This information will be visible to your visitors and it is important to present your product in the best possible way. Additionally, you should consider the Meta information and tags. This information is for the Search Engines that will associate your product with the filled information. Make sure you have a short and relevant meta description of your product so people can find your products in Google and other search engines.
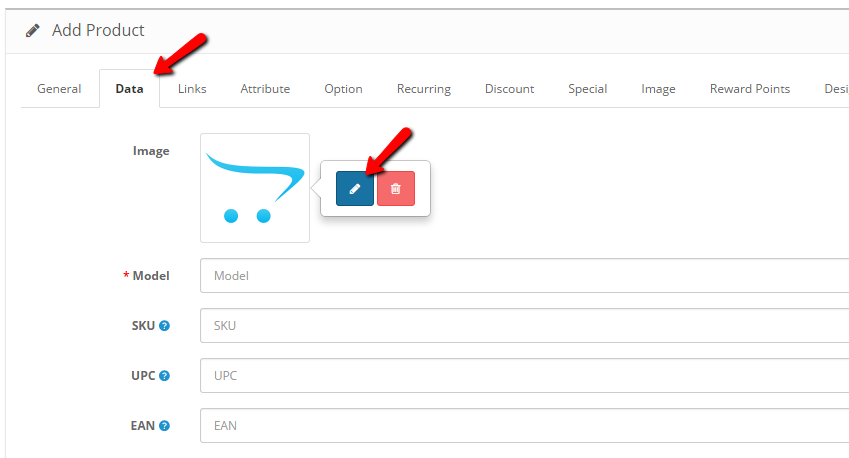
When you are ready with your product basic settings, please proceed with the Data tab. Here you can configure your product catalog and physical settings. This tab provides a large number of configuration options depending on the type of product you are about to add. For example, if you are adding books to your store, you can input the book ISBN. On the other hand, if you sell furniture or other type of product that comes in different dimensions, you can input the product dimensions and weight. Configure your settings depending of your product type and change your product image.
To configure your product Manufacturer and product category, please refer to the Links tab. Additionally, you can configure related products and your product store in case you have multiply stores on your OpenCart 2 installation.

If you have custom attributes for your product, you may apply them via the attribute tab. When all other settings for your product are set, you should upload your product images. This can be done via the Image tab.
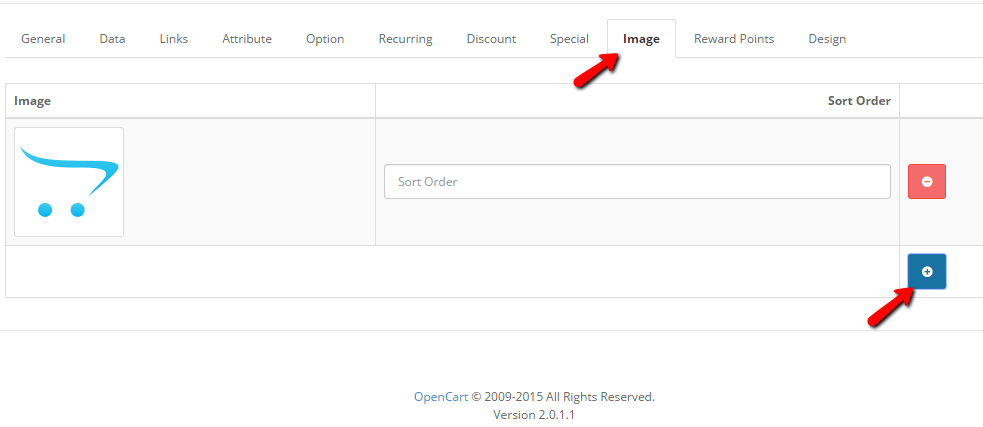
To add a new image, click on the Add icon and click on the thumbnail to change the image.
From the pop up click on the upload button to add new images from your local computer.

Repeat the steps to add all of your product images and use the Sort Order field to set the desired order of your images. Be advised that the image with the lowest number will be displayed first on your store product catalog frontend.
When you are ready with your settings, click on the Save button to add the product to your OpenCart 2 product catalog.
How to Manage Product Attributes
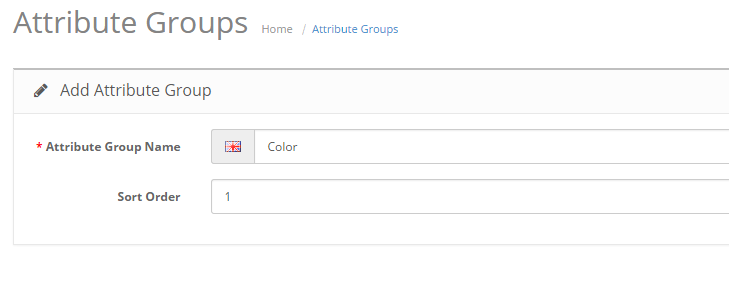
Product attributes allows you to add specifications to your products that are common among product groups or represent different variations of your product . For example, if you have your product available in different size and colors you might consider adding Attribute group for these specifications and setup the available options as attributes.For the purpose of this tutorial we will create an attribute group called Color and add an attribute Red. This attribute can be added to your OpenCart 2 products later to inform your customers about the available variations of your product.
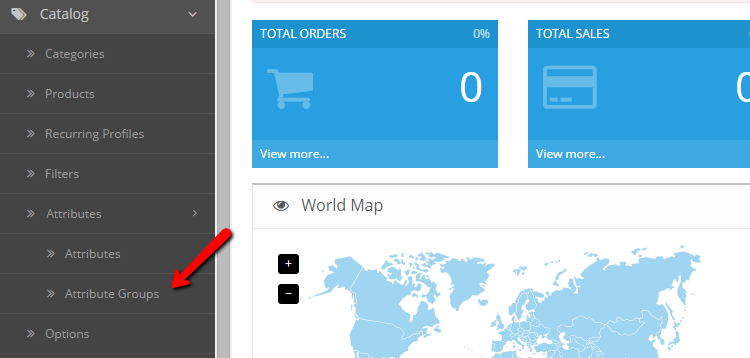
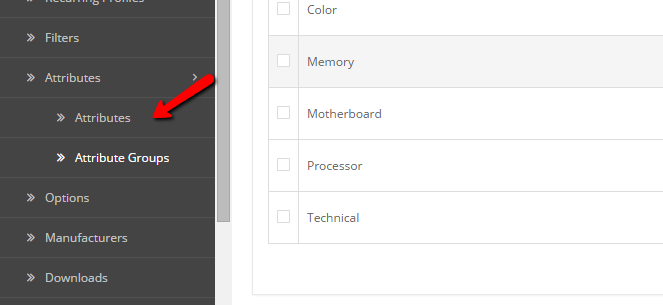
To create an attribute category, please login in your OpenCart 2 admin dashboard and navigate to the Attributes Group section via the main navigation menu on the left.
From the Attribute Group List page click on the add button to add a new attribute group. Input the Attribute Group Name and sort order. The sort order is used to set the position of your attributes on the product page. In case you have several attributes applied on a single product, the one with the lowest number will be displayed first.
When you are ready with your settings click on the save icon.
Now lets add an attribute to the attribute category. Click on the Attributes link from the menu to proceed to the Attributes List page.
To add a new attribute click on the add icon from the top. On the new page input your attribute name and select the category under which the new attribute will be added. Additionally, you will need to set the attribute number. The attribute sort order number will represent the position of the attribute in compare to other attributes under the same category.
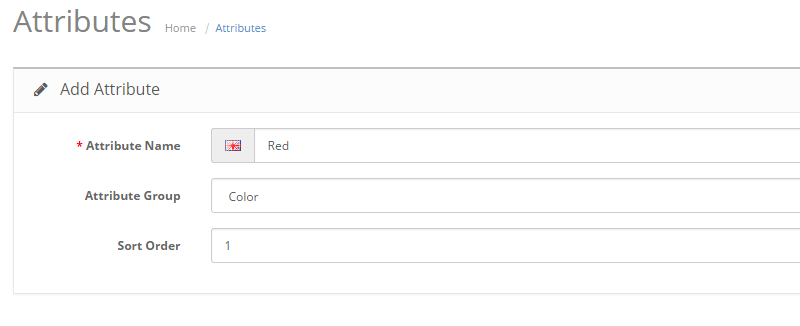
When you are ready with your setup click on the Save icon to add the attribute.
How to Manage Extensions in OpenCart 2
There is a great variety of OpenCart 2 extensions available for integration with your store. While it may seem easy to add those extensions, some issues like unclear modification cache, leftover files from previous uploads or configuration of the FTP settings of your store may interfere with the correct loading and visualization of your extensions.
To fully manage extensions in OpenCart 2 you need to know how to:
Upload Extensions
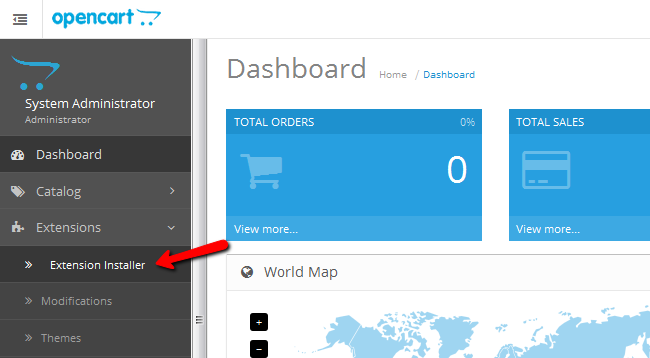
Once you have downloaded an extension, you will most likely have to extract it to get to the .ocmod rar file which you can upload on your store. Once you have done that, access your website’s admin area and navigate to Extensions → Extension Installer.
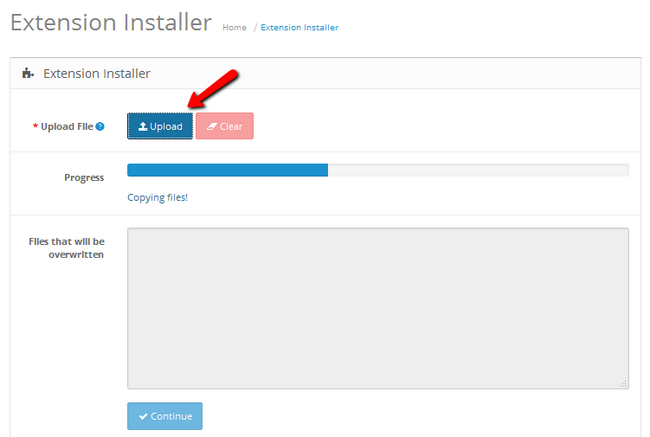
Click on the Upload button, select the extension file from your local computer and confirm the upload.
Install Extensions
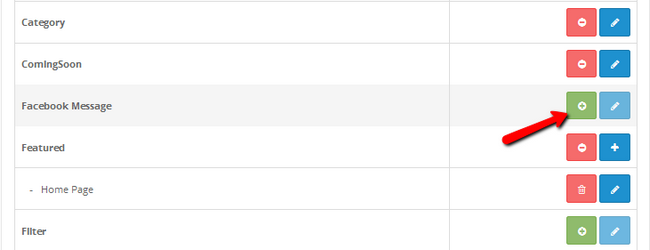
Once the extension has been successfully uploaded you will have to install it. Navigate to Extensions → Modules for a list of all the extensions on your store.
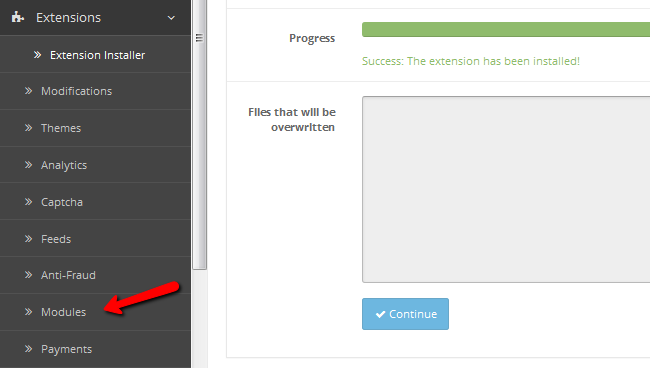
Find the extension which you just uploaded and click on the green Install button next to it.
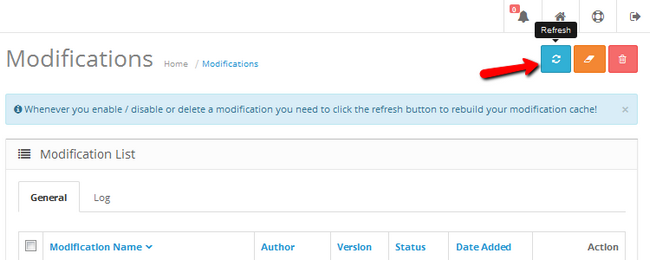
It is recommended to always clear the cache left by the extension installation. To do that you will need to access the Extensions → Modifications menu.
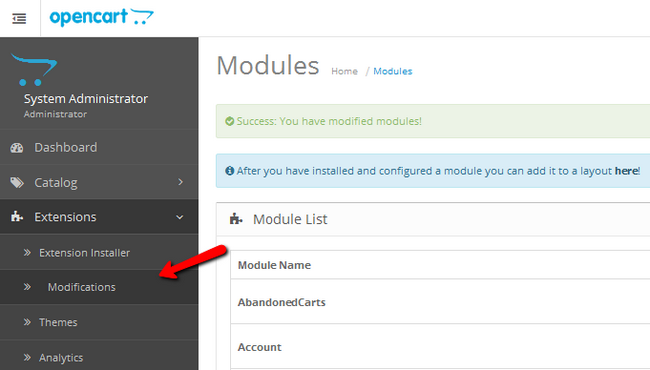
Now click on the blue refresh button in the top left corner of the page to clear the modification cache.
Configure Extensions
As every extension has very different settings for configuring, in this step we will only show you how to access them and how to make the extension viewable if such action is required. For more information of configuring different plugins check out our Extensions section.
To be able to edit the extension settings, you will have to return to the Extensions → Modules window. Search for the extension and click on the blue edit button corresponding to it.
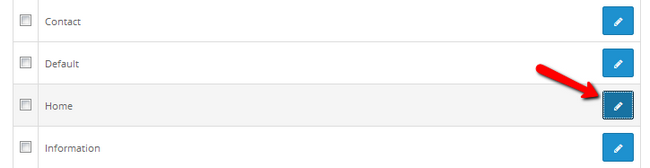
If the extension is not visible when it should be after you have configured it, it is most likely due to it not being added to the layout of your website. To correct this you will have to access the Design→Layouts menu.
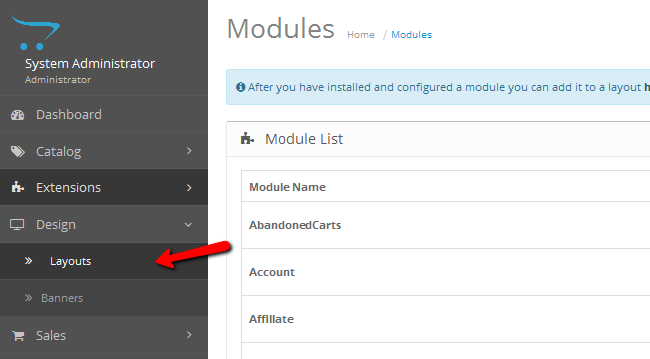
Here you will see a bunch of different pages on which you can change the layout and add the functionality of the extension. Depending on the extension you may only want to add it on one or a few specific pages. Let us take for example the home page. If you wish to add your extension to the layout of your store’s home page, select that page from the multitude of options.
Here you will see the different modules that have been added by default. Click on the blue Add Module button to add a new row for your extension.
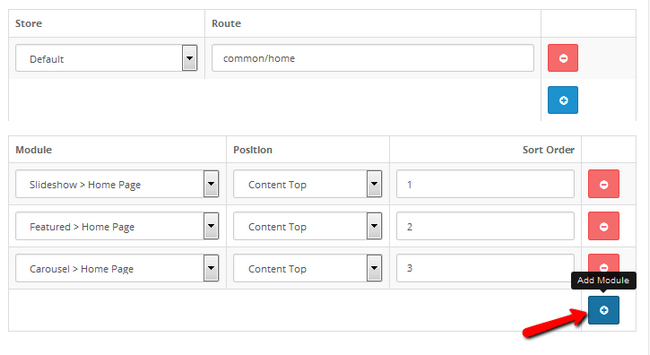
From the Module bracket, select the extension/function of the extension you wish to add. From the Second bracket you can choose the position on which the extension will be placed and the third bracket is used to give priority if you have more than one module enabled for the same position.
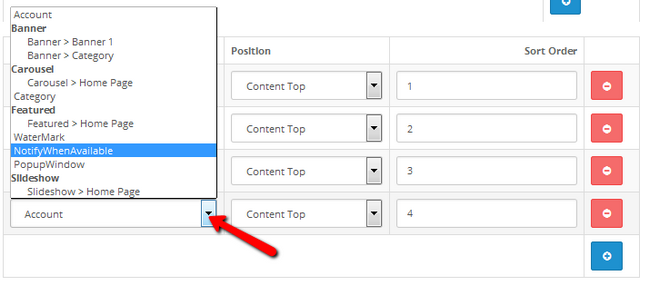
Don’t forget to click on the Save button at the top of the menu to apply and save the changes you have just made.
Uninstall or Delete Extensions
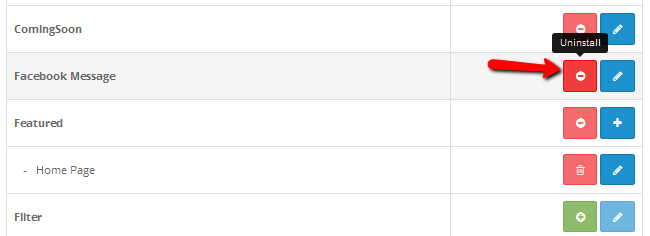
If you wish to stop using an extension but still have it as an option for you to install later, you can always uninstall set extension. To do that you will have to open up the Extensions → Modules menu, find the extensions in question and click on the red Uninstall button corresponding to it. Alternatively, you can just disable the functionality of the extension via its options if such are provided by the developer.
Completely removing an extension is quite different than simply uninstalling it. You will need to access your OpenCart’s files and manually remove every file that has been created/uploaded when the extension was first installed. Due note that every extension can create a different number of files in different locations of your installation directory so a unified explanation on what to remove cannot be compiled. However, we have created a list of the most common locations where extensions usually reside for your convenience.
If you can access your website directly via your domain your OpenCart installation is located in the public_html directory. The files which we are looking for are situated in the admin and catalog folders.
Go to the following locations, find the file which has your module’s name ending with the the .php extension and delete it:
- public_html/admin/controller/module
- public_html/admin/model
- public_html/admin/view/image/modulename
- admin/view/template/module
- admin/view/template/module/modulename
- admin/view/javascript/modulename
- admin/view/stylesheet
- catalog/view/theme/yourtheme/template/module
- catalog/view/theme/default/template/module
- catalog/controller/module/modulename.php
- catalog/language/english/module/modulename.php
- catalog/model/module/modulename.php
Once you have removed the extension from all of these locations, it should be completely removed from your OpenCart 2 Installation.
Payment And Shipping Methods In OpenCart
In this tutorial we will briefly explain how to manage the payment and shipping methods available in OpenCart.
First you should go to the administration area of your store, which is available at:
yourdomain.com/admin
Or if the application is installed in a subfolder at:
yourdomain.com/subfolder/admin
Once you are in the dashboard navigate to Extensions > Extensions > Payments:
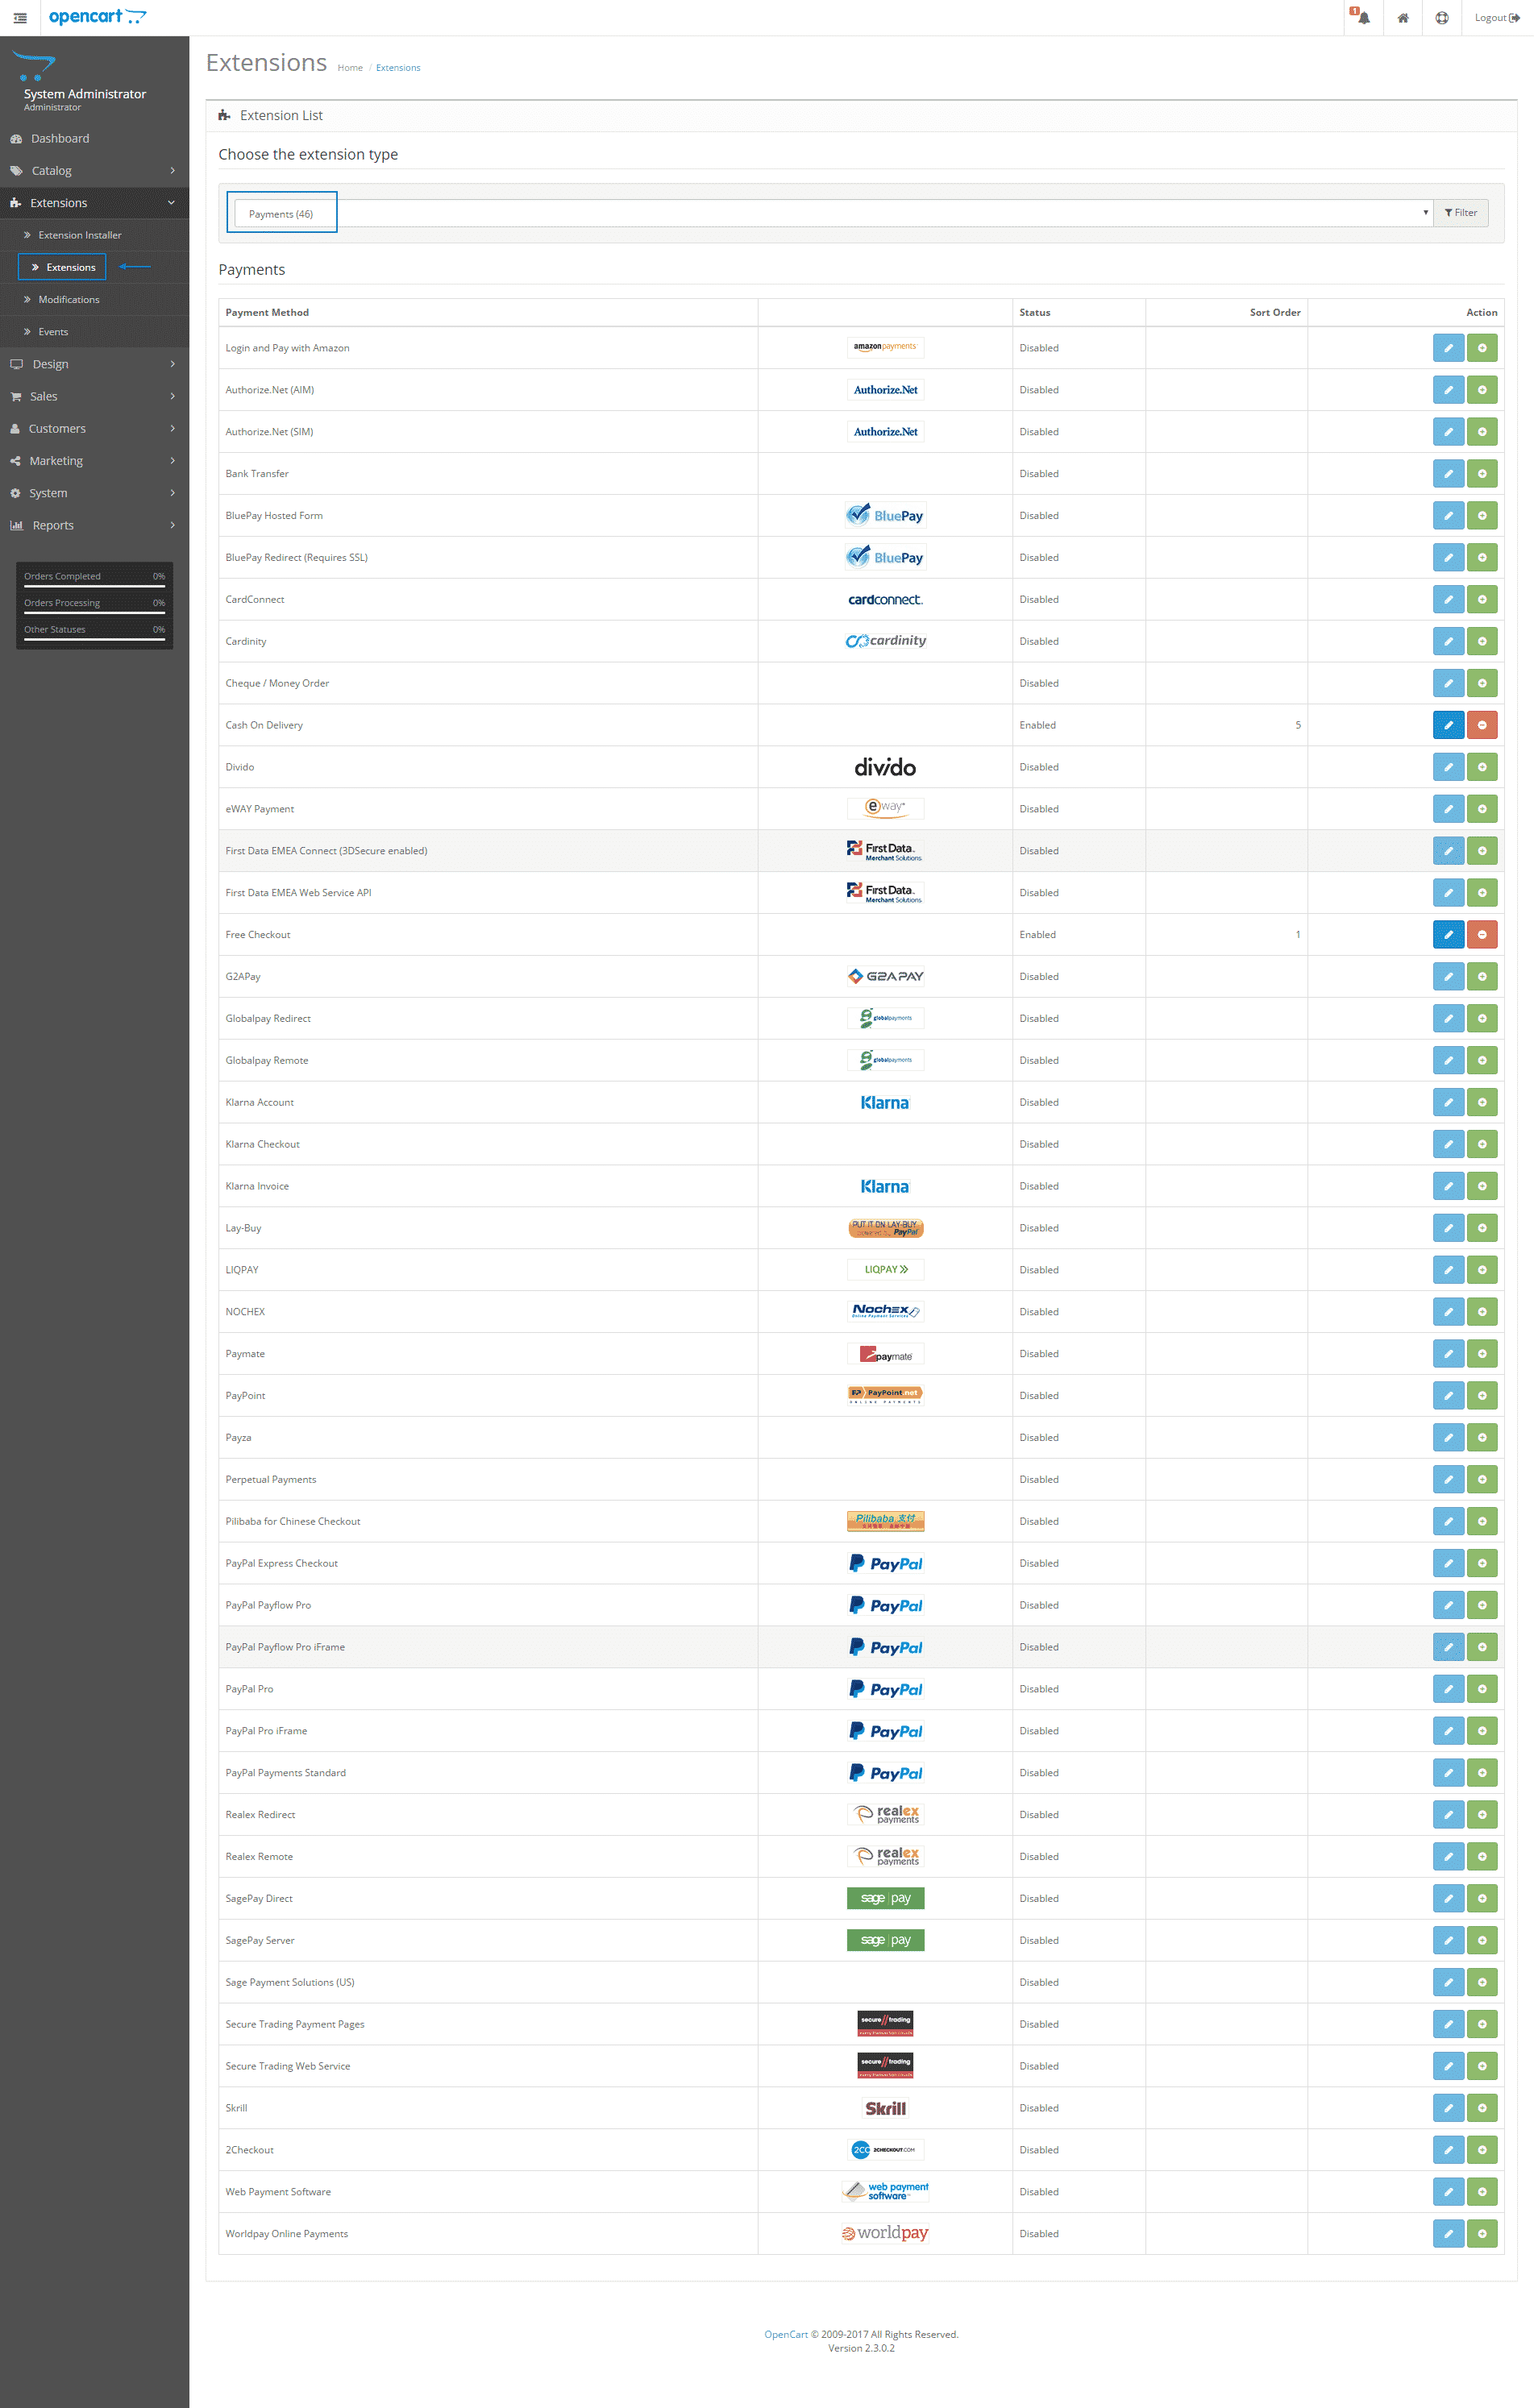
In the image you can see all the preloaded payment modules in the OpenCart application. You can install and configure the ones you need with a few clicks. Please have in mind that not all of the methods are available worldwide and you need to make sure that you set the appropriate ones for your country.
To configure your shipping methods you should go to Extensions > Extensions > Shipping:
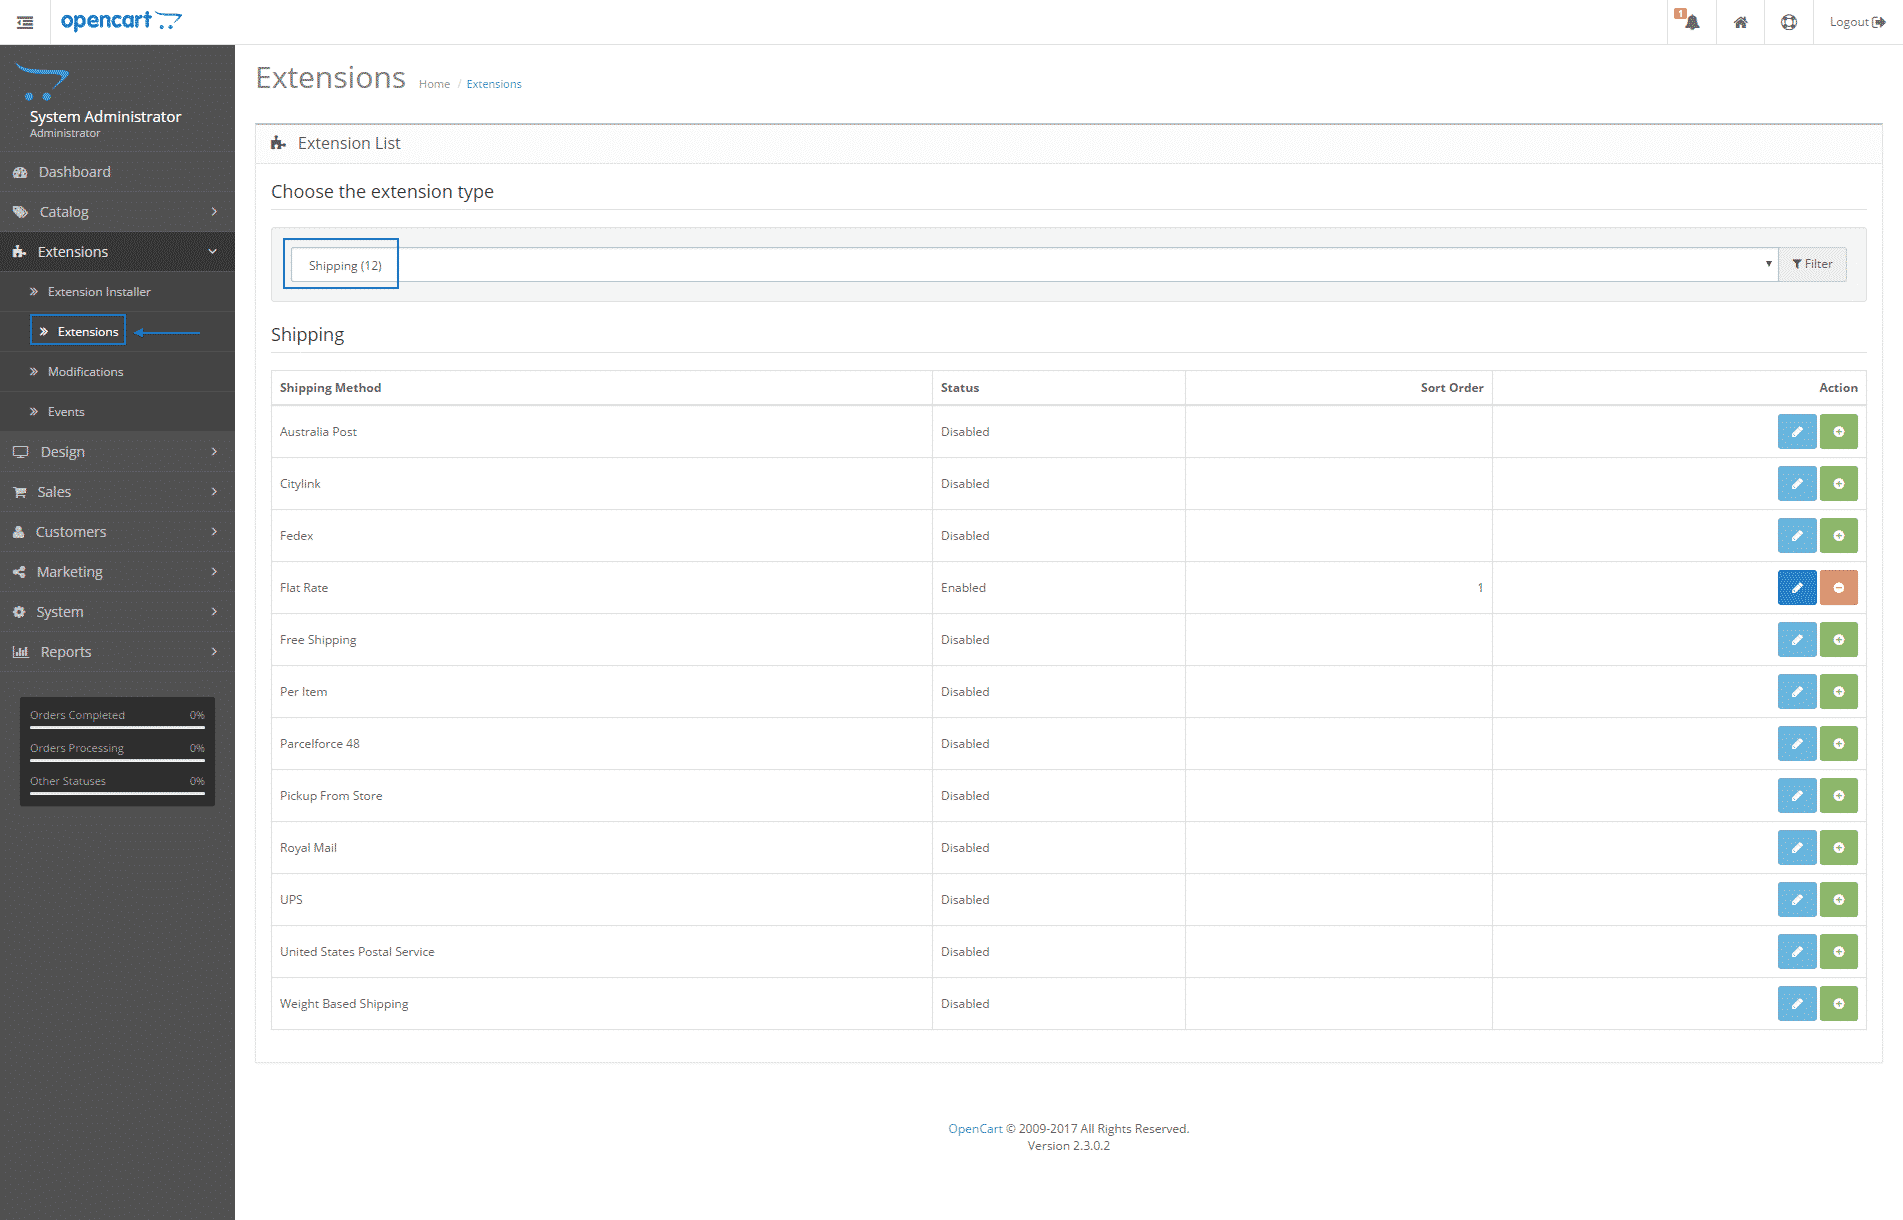
As you can see there are several predefined Shipping methods available in OpenCart. In the same way as you have chosen the payment methods you should set the appropriate shipping modules for your country.
OpenCart Pros and Cons:
Pros :-
- Easy to set up an online business even with less time and resources, hence becomes a good choice for the new comers.
- Comes pre-loaded with many of the essential features as stock plugins which are sufficient enough to run the store.
- Easy management and smooth mechanism between various components of your online store.
Cons :-
- When it comes to enhancing your shop’s new functionalities, every plugin and extensions might not work out for you. To seek the best results, you might have to try different combinations of extensions and plugins.
- The basic stock features or plugins might not be enough if you seek for an enhanced functionality. Some paid extensions excluding the basic ones are available for additional functionalities.
- Being a light-weight platform might affect the scalability of your online shop. This can restrict your scope for future up gradations.
-OpenCart is an open source PHP-based online shopping cart system. A robust e-commerce solution for Internet merchants with the ability to create their own online business and participate in e-commerce at a minimal cost.OpenCart is designed feature rich, easy to use, search engine friendly and with a visually appealing interface.OpenCart is released under the GNU/GPL license.OpenCart is designed feature rich, easy to use, search engine friendly and with a visually appealing interface.OpenCart is free open source e-commerce platform for online merchants. OpenCart provides a professional and reliable foundation from which to build a successful online store. This foundation appeals to a wide variety of users; ranging from seasoned web developers looking for a user-friendly interface to use, to shop owners just launching their business online for the first time. OpenCart has an extensive amount of features that gives you a strong hold over the customization of your store. With OpenCart’s tools, you can help your online shop live up to its fullest potential.
OpenCart is owned by OpenCart(https://www.opencart.com/) and they own all related trademarks and IP rights for this software.
Cognosys Provides Hardened images of OpenCart on the cloud ( AWS marketplace, Azure and Google Cloud Platform).
Deploy OpenCart securely on cloud i.e. AWS marketplace, Azure and Google Cloud Platform (GCP)
Secured Opencart on Windows 2012 R2
Opencart on cloud for AWS-Windows

Opencart on cloud for Azure-Windows

Features
Features of OpenCart
Let us now have a look on features in OpenCart. It will also help you to understand the key points which have enabled it to become one of the widely recognized platforms among all the e-commerce CMS available :-
- It is cost-effective with a variety of versions which makes it most likely to be considered as an efficient option for new comers. Furthermore, it comes with pre-equipped functionalities which are enough for setting up a basic online shopping store. Hence it serves the newbie shop purpose well.
- Talking about payment options, though the shop owner can add other extensions for payment option, but still OpenCart comes pre-equipped with approximately more than 30 payment gateways. The more we are getting to known about, clearly the more cost effective it proving to be. Can you imagine?. Rejoice! and brace yourselves for more such awesome features.
- The next is a wide variety of options when it comes to adding categories and sub-categories of a product. Even it’s basic version is very well equipped with versatile features to carry out your online business in a fully fledged and functional manner. More such features include the ability to add as many number of products as you like. You can also define different areas for various purposes. These may include tasks like reviewing the products, reward points, mentioning about various brands in sub categories etc.
- You can easily carry out third party integration to your online shop. This helps you to enhance the functionality of your online store as and when required. Third party integrations sorted according to your requirement can be easily found on its online portal.
- An efficient online shop should be accessible easily on a wide range of devices. Don’t worry, even here Opencart gets you covered. It is already responsive and SEO optimized so that you have nothing to worry regarding the exposure of the products in your store among the searches in any search engine.
Its pre-existing features include the following:
- Open source nature
- Templatable for changing the presentation section
It also supports:
- Downloadable products
- Unlimited categories, products, manufacturers
- Multilanguage
- Multicurrency
- Product reviews and ratings
- PCI-compliant
- Automatic image resizing
- Multiple tax rates related products
- Unlimited information pages
- Shipping weight calculation
- Discount coupon system
It is search engine optimized and has backup and restoration tools. It provides features such as printable invoices, sales reports, error logging, multistore features, multiple marketplace integration tools such as OpenBay Pro, and many more.
-Major Features Of OpenCart
- Unlimited Categories
- Open Source
- Unlimited Products
- Free Documentation
- Unlimited Manufacturers
- Template
- Multi Currency
- Automatic Image Resizer
- Multi Language
- 20+ Payment Gateways
- Product Reviews
- 8+ Shipping Methods
- Product Ratings
AWS
Installation Instructions For Windows
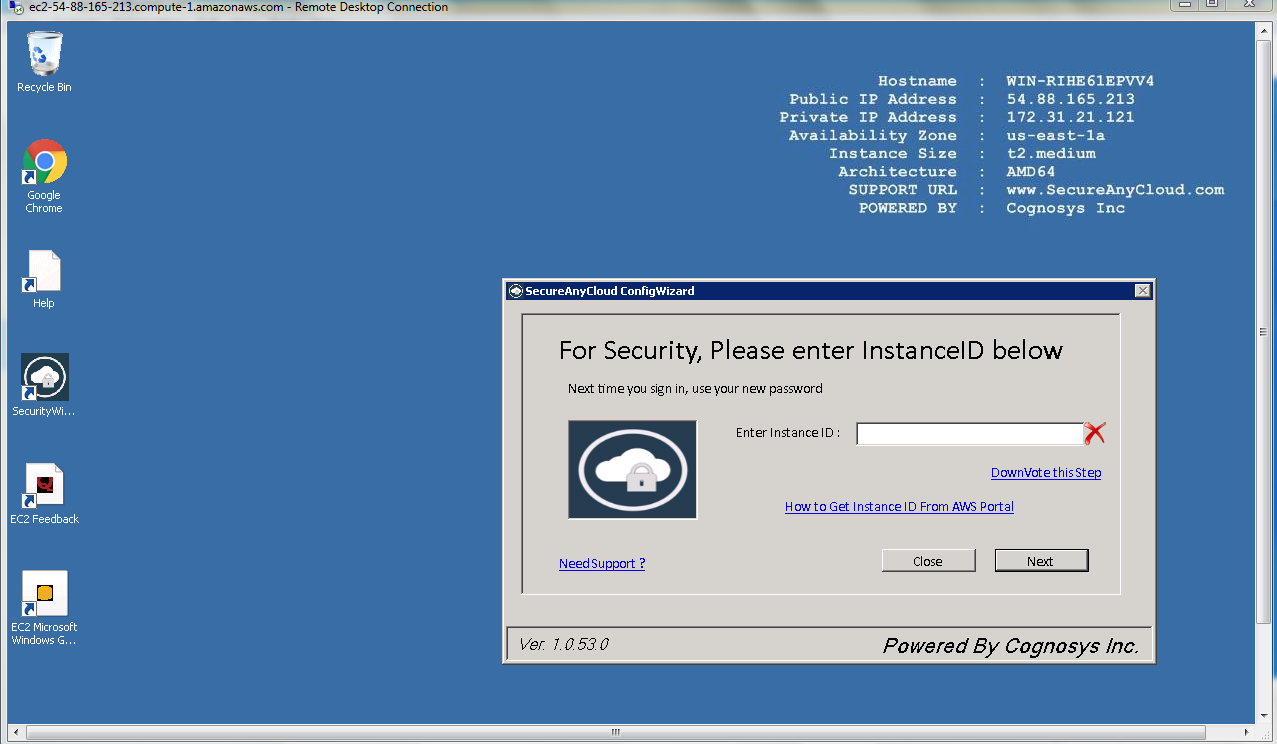
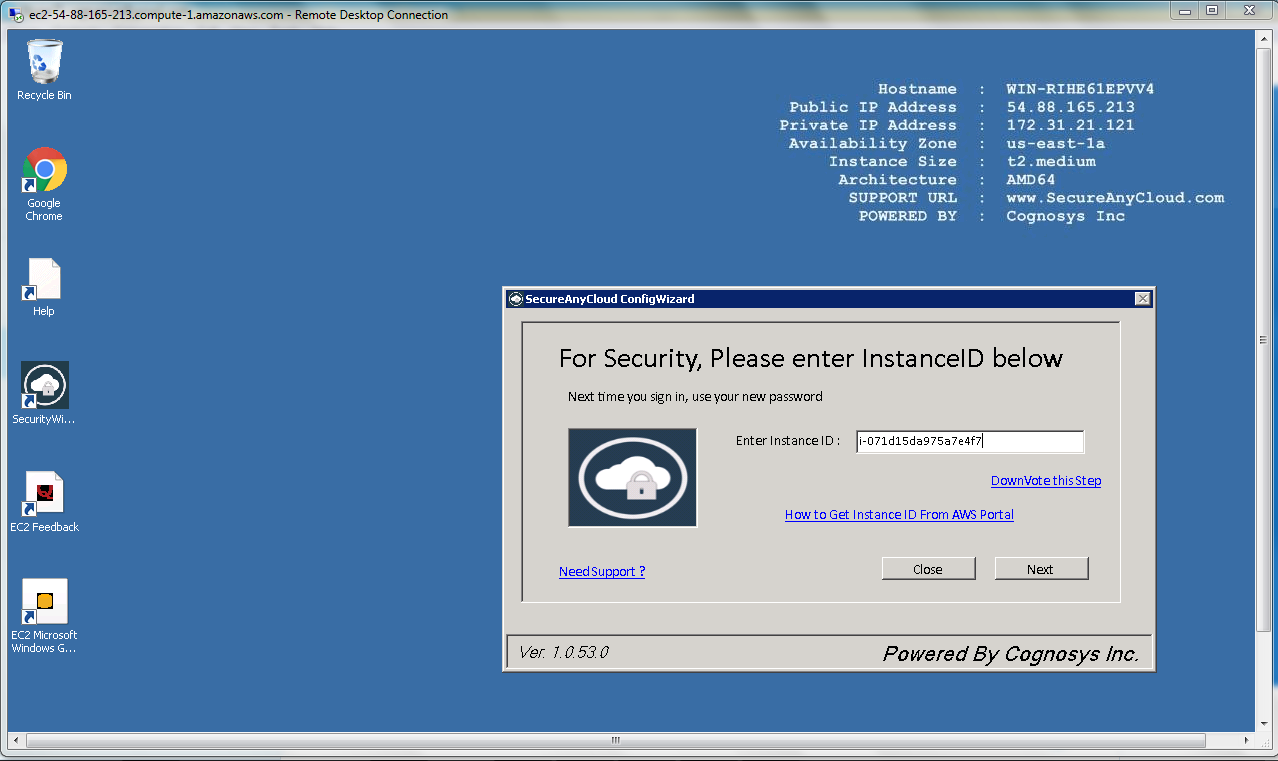
Note: How to find PublicDNS in AWS
Step 1) RDP Connection: To connect to the deployed instance, Please follow Instructions to Connect to Windows instance on AWS Cloud
Connect to the virtual machine using following RDP credentials:
- Hostname: PublicDNS / IP of machine
- Port : 3389
Username: To connect to the operating system, use RDP and the username is Administrator.
Password: Please Click here to know how to get password .
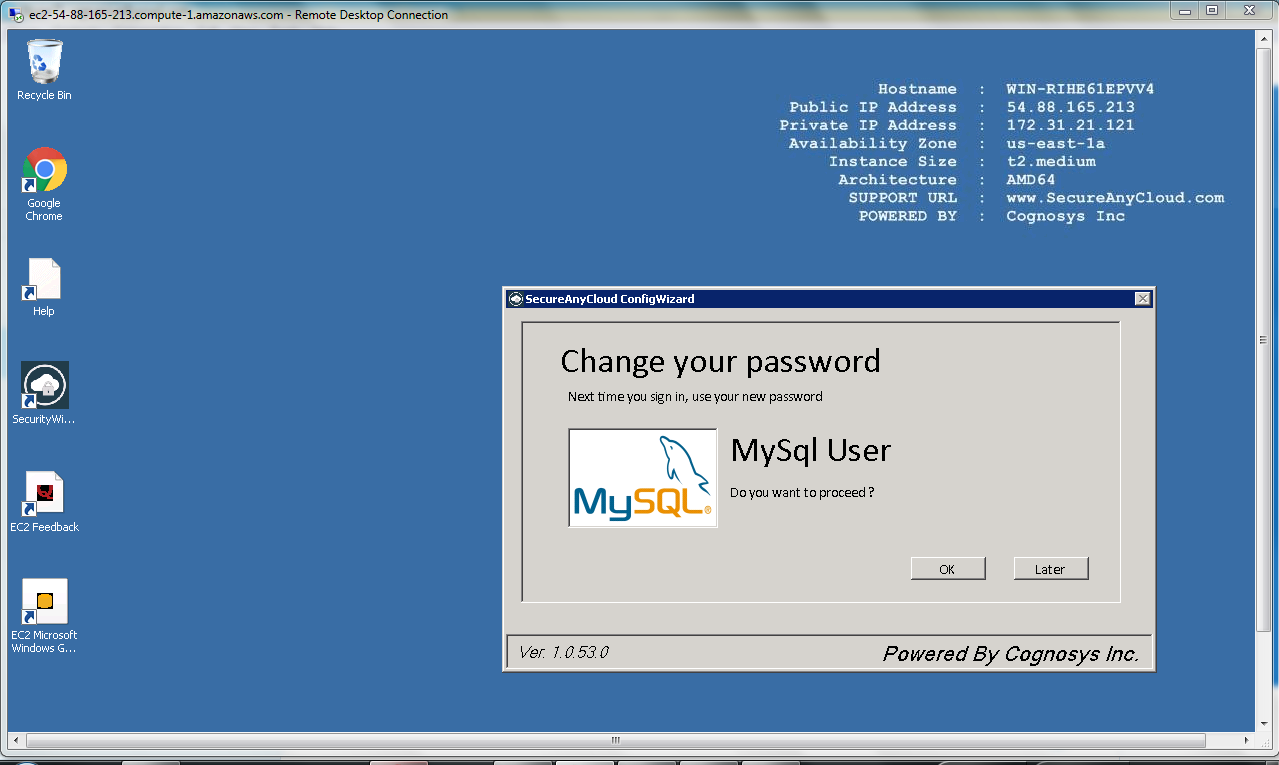
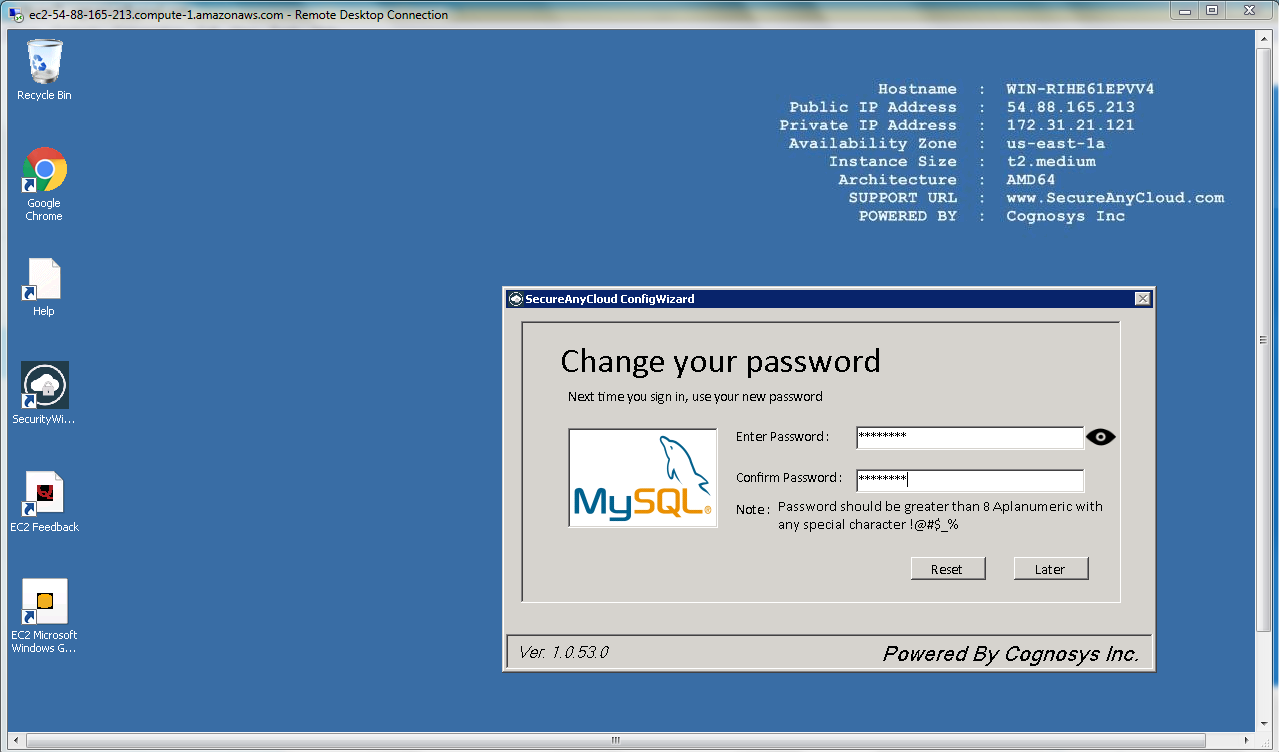
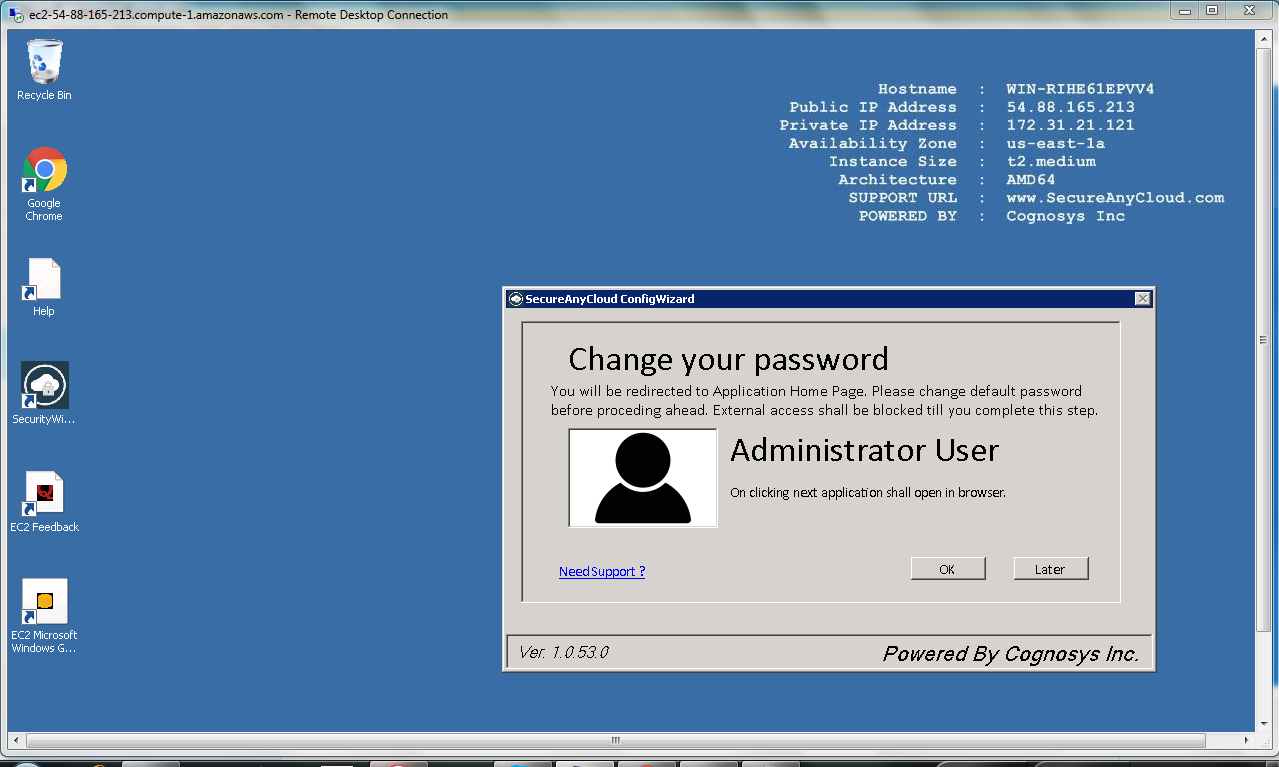
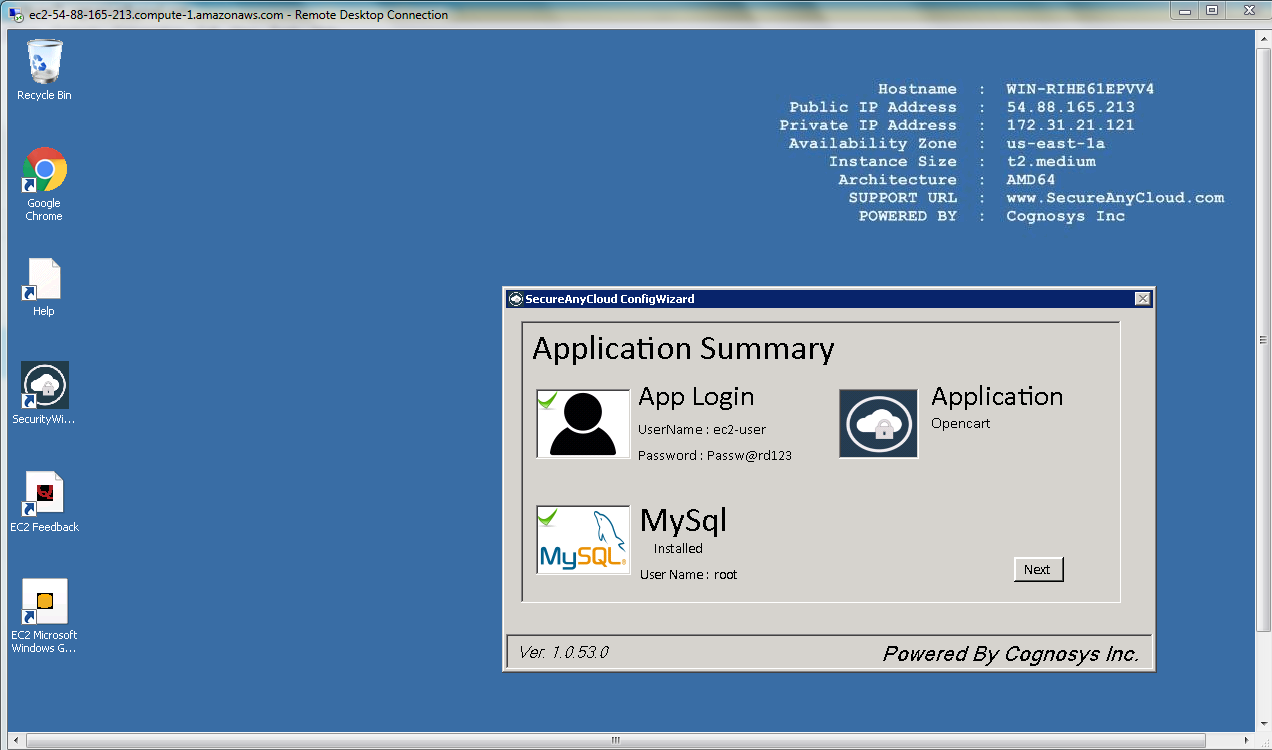
Step 2) Database Login Details:
Username : root || Password : Passw@rd123
Note: Please change the password immediately after the first login.
Step 3) Application URL: Access the application via a browser at http://PublicDNS/Opencart/
Step 4) Other Information:
1. Default installation path: will be in your web root folder “C:\inetpub\wwwroot\”
2. Default ports:
- Windows Machines: RDP Port – 3389
- Http: 80
- Https: 443
- MYSQL ports: By default these are not open on Public Endpoints. MYSQL : 3306
Configure custom inbound and outbound rules using this link.
AWS Step by Step Screenshots


How to deinstall directory


Azure
- Installation Instructions For Ubuntu
- Installation Instructions For Windows
- Installation Instructions For Centos
Installation Instructions For Ubuntu
Note : How to find PublicDNS in Azure
Step 1) SSH Connection: To connect to the deployed instance, Please follow Instructions to Connect to Ubuntu instance on Azure Cloud
1) Download Putty.
2) Connect to virtual machine using following SSH credentials:
- Hostname: PublicDNS / IP of machine
- Port : 22
Username: Your chosen username when you created the machine ( For example: Azureuser)
Password : Your Chosen Password when you created the machine ( How to reset the password if you do not remember)
Step 2) Database Login Details:
Username : root || Password : Passw@rd123
Note: Please change the password immediately after the first login.
Step 3) Application URL: Access the application via a browser at http://PublicDNS
- Username : azureuser
- Password : Passw@rd123
Step 4) Other Information:
1. Default installation path: will be in your web root folder “/var/www/html/”
2.Default ports:
- Linux Machines: SSH Port – 22
- Http: 80
- Https: 443
- MYSQL ports: By default these are not open on Public Endpoints. MYSQL : 3306
Configure custom inbound and outbound rules using this link
3. To access Webmin interface for management please follow this link
Installation Instructions for Windows
Note: How to find PublicDNS in Azure
Step1 ) RDP Connection: To connect to the deployed instance, Please follow Instructions to Connect to Windows instance on Azure Cloud
Connect to virtual machine using following RDP credentials:
- Hostname: PublicDNS / IP of machine
- Port : 3389
Username: Your chosen username when you created the machine ( For example: Azureuser)
Password : Your Chosen Password when you created the machine ( How to reset the password if you do not remember)
Step 2) Database Login Details:
Username : root || Password : Passw@rd123
Please change the password immediately after the first login.
Step 3)Application URL: Access the application via a browser at http://PublicDNS/
Step 4) Other Information:
1. Default installation path: will be in your web root folder “C:\inetpub\wwwroot\”
2. Default ports:
- Windows Machines: RDP Port – 3389
- Http: 80
- Https: 443
- MYSQL ports: By default these are not open on Public Endpoints. MYSQL : 3306
Configure custom inbound and outbound rules using this link
Installation Instructions For Centos
Note : How to find PublicDNS in Azure
Step 1) SSH Connection: To connect to the deployed instance, Please follow Instructions to Connect to Centos instance on Azure Cloud
1) Download Putty.
2) Connect to virtual machine using following SSH credentials:
- Hostname: PublicDNS / IP of machine
- Port : 22
Username: Your chosen username when you created the machine ( For example: Azureuser)
Password : Your Chosen Password when you created the machine ( How to reset the password if you do not remember)
Step 2) Database Login Details:
Username : root || Password : Passw@rd123
Note: Please change the password immediately after the first login.
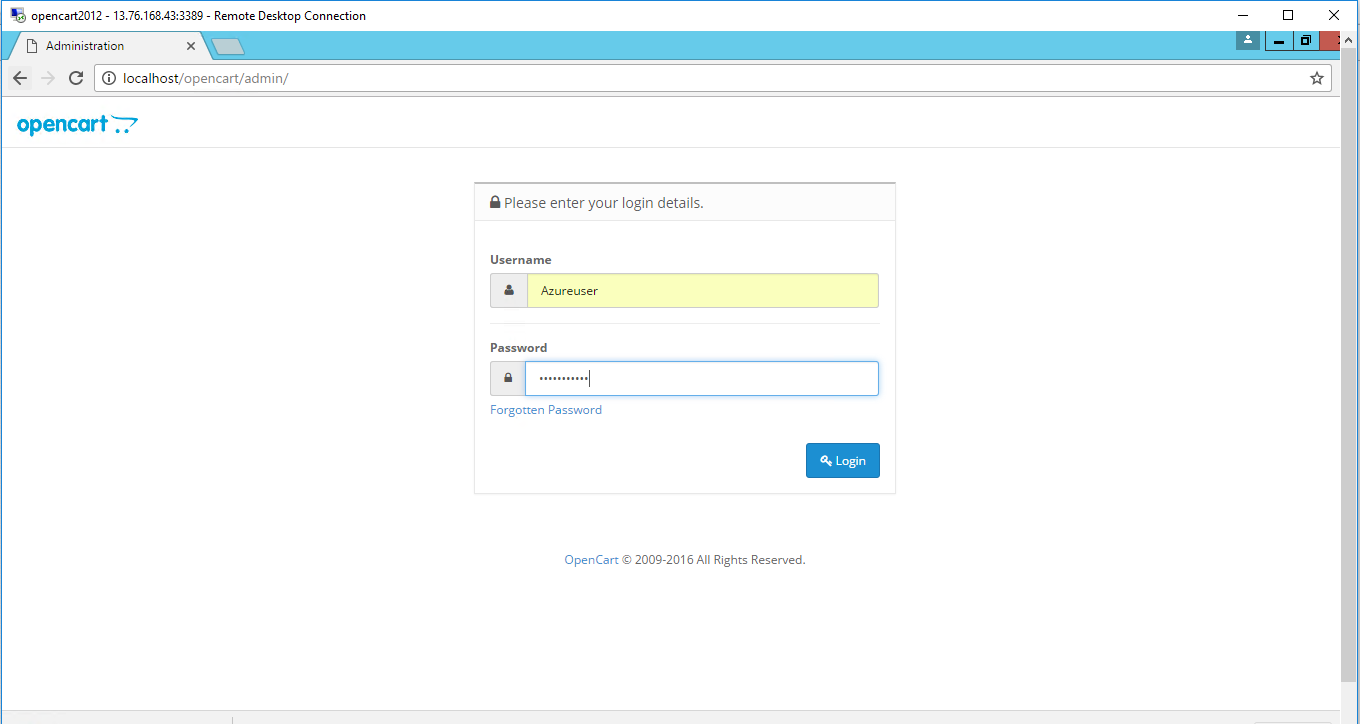
Step 3) Application URL: Access the application via a browser at http://PublicDNS/Opencart/admin
- Username : azureuser
- Password : Passw@rd123
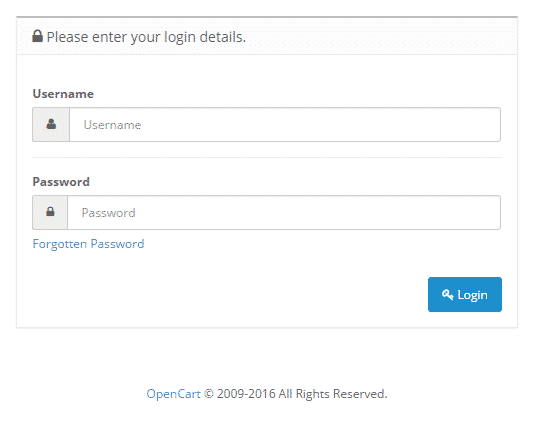
Steps to access the Admin Panel:
- To login to Opencart Administrative Panel, you need
to open your browser and navigate to http://PublicDNS/opencart/admin - Enter username and password in the given fields and click on the “Login”button to access the Admin Panel.
- After successful login to the Admin Panel, you will get access to Opencart Dashboard.
Step 4) Other Information:
1. Default installation path: will be on your web root folder “/var/www/html/Opencart”.
2. Default ports:
- Linux Machines: SSH Port – 22
- Http: 80
- Https: 443
- MYSQL ports: By default these are not open on Public Endpoints. MYSQL : 3306
Configure custom inbound and outbound rules using this link
3. To access Webmin interface for management please follow this link.
Azure Step by Step Screenshots
How to Deinstall Directory
Installation Instructions For Windows
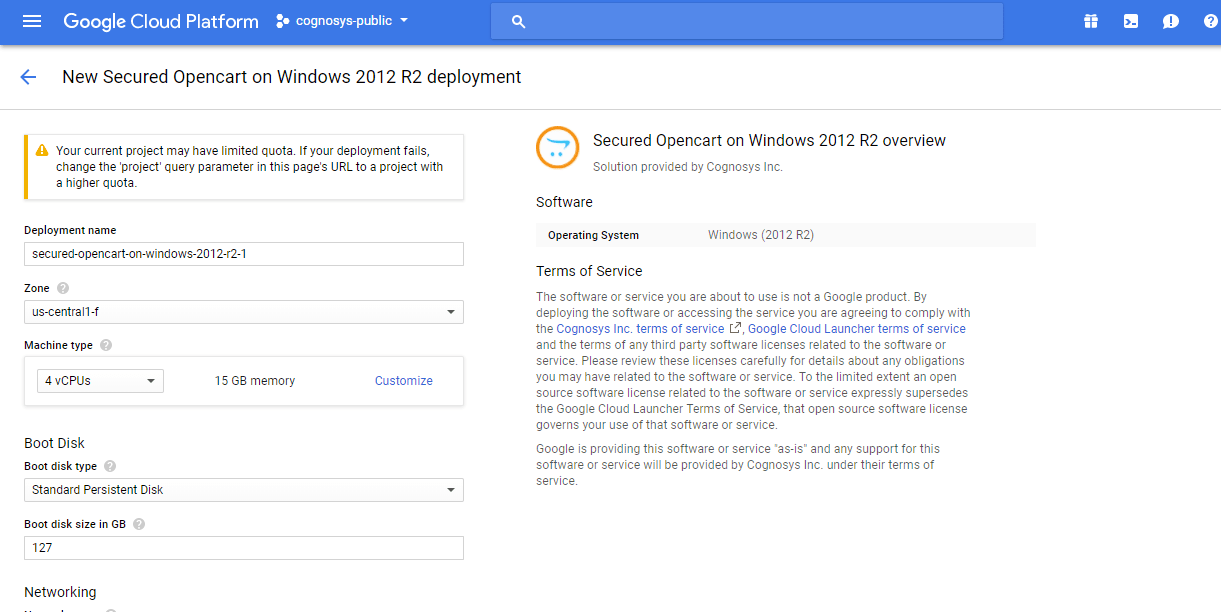
Step 1) VM Creation:
1.Click the Launch on Compute Engine button to choose the hardware and network settings.
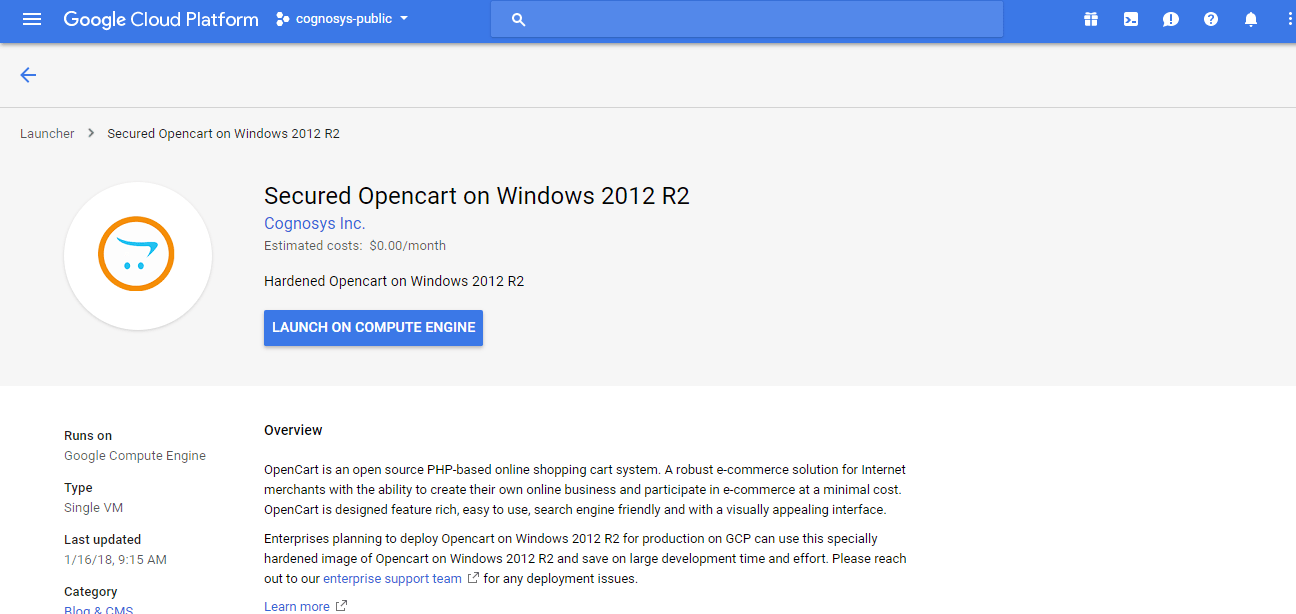
2.You can see at this page, an overview of Cognosys Image as well as some estimated costs of VM.
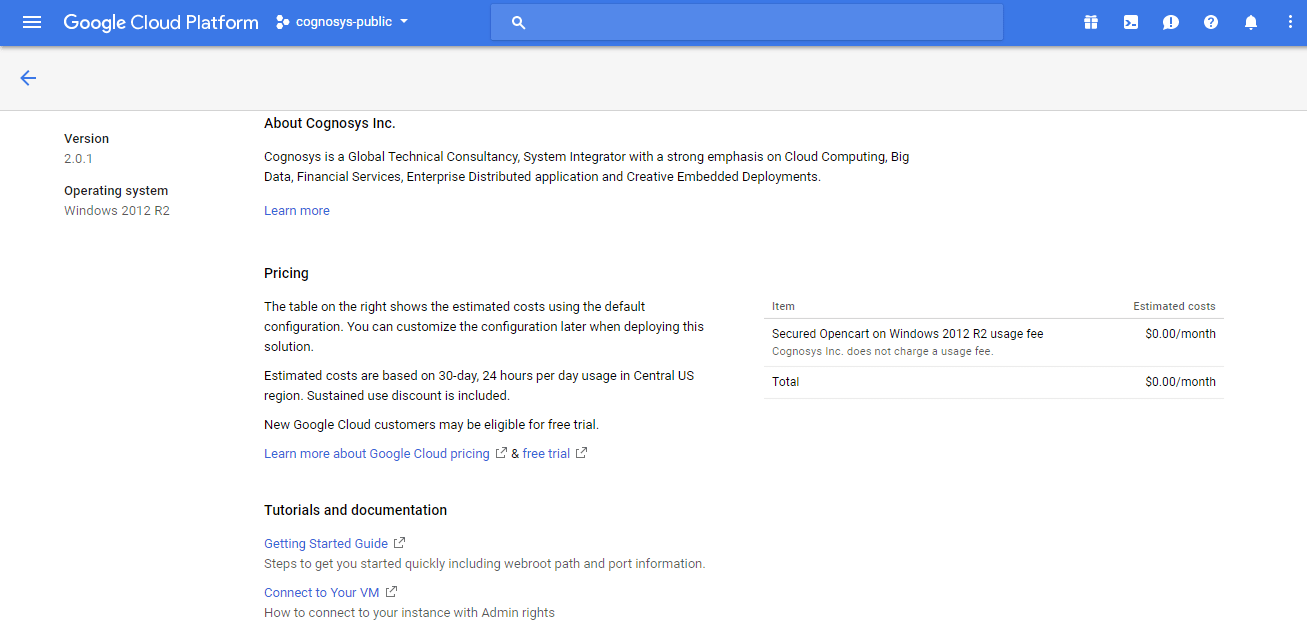
3.In the settings page, you can choose the number of CPUs and amount of RAM, the disk size and type etc.
Step 2) RDP Connection: To initialize the DB Server connect to the deployed instance, Please follow Instructions to Connect to Windows instance on Google Cloud
Step 3) Database Login Details:
The below screen appears after successful deployment of the image.

For local MySQL root password, please use the temporary password generated automatically during image creation as shown above.
i) Please connect to Remote Desktop as given in step 2 to ensure stack is properly configured and DB is initialized.
ii) You can use MySQL server instance as localhost, username root and password as shown above.
If you have closed the deployment page you can also get the MySQL root password from VM Details “Custom metadata” Section
Video
Secured Opencart on Windows 2012 R2
General Overview
Installing OpenCart
Installation
