1-click AWS Deployment 1-click Azure Deployment 1-click Google Deployment
Overview
DNN is an open source web content management system based on Microsoft.Net. It was written in VB.Net but it has been fully migrated to C# since version 6.0. There are three versions available for DNN which are community edition, professional and enterprise editions. The professional and enterprise editions have more features built in and have technical supports offered.Below are the list of features available sourced from Dotnetnuke website:
1.Unlimited online and email product support with second level support from Dotnetnuke corp. architects and engineers.
2.Full product documentation.
3.Email notifications if there are secury patches or product updates available.
4.Access to DNN online knowledge base
5.Product copyright indemnification
6.Advanced Content Approval Process – Administrators can create custom workflows with an unlimited number of states and reviewers. Workflows can be for individual module content changes or for changes to any modules on a page.
7.Granular User Permissions – Page, module and folder level extended permissions provide granular security rights which allow you to precisely define which content contributors can edit which modules on each page.
8.Document Management – A full document management solution which allows your organization to store, control and view documents online including video and media files
9.Microsoft SharePoint Connector (Enterprise Edition only) – Enables fast, secure publishing of documents stored in SharePoint to public web sites, extranets or intranets.
10.Content Staging (Enterprise Edition only) – Make and test all web site changes on a staging server prior to publishing to your production server.
11.Windows Azure and Amazon S3 Support – Compatible with Windows Azure Cloud Hosting and provides two folder provider options for Amazon S3 and Azure File Storage.
12.eCommerce Engine – Empowers organizations with a small portfolio of digital goods and services to quickly enable ecommerce on their web site.
13.User Interface Customization with Telerik RadControls – A license for Telerik RadControls for ASP.NET AJAX for an unlimited number of developers to use within your Professional Edition instance.
14.My Editable Pages – Links to all of the pages and modules in the site which a user has permission to Edit are displayed, allowing efficient page editing.
15.Page and Module Caching – Multiple caching options speed the delivery of web pages and reduce the workload on your web servers.
16.Google Analytics for Marketing – Support for advanced Google Analytics functionality such as visitor type, landing page, role, or referrer segmentation.
17.File Integrity Checking – Checks files in the installation and reports any inconsistencies which may impact web site reliability.
18.Web Server Farm Support – New caching provider delivers more efficient resource usage in web farms
19.Health Monitoring – Pings the website periodically to identify failures and will notify the site owner. Also ensures the site stays in web server memory for faster user accessibility.
How to Install DotNetNuke?
How to Install DotNetNuke?
To install DNN is quite easy as we just need to follow few steps. The example given is using IIS 7 with SQL Server 2008 R2 and run in local computer.
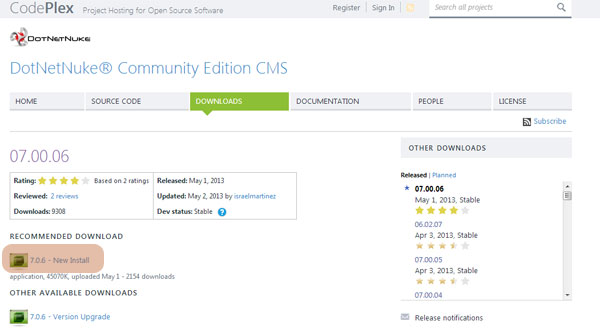
1. Download DotNetNuke Community Edition from Codeplex.
Please visit http://dotnetnuke.codeplex.com/ to download the latest DNN installation file.
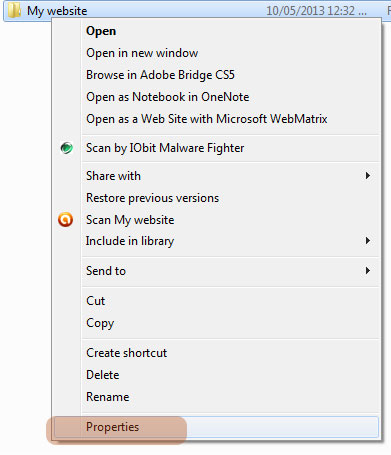
2. Create website folder in your wwwroot folder.
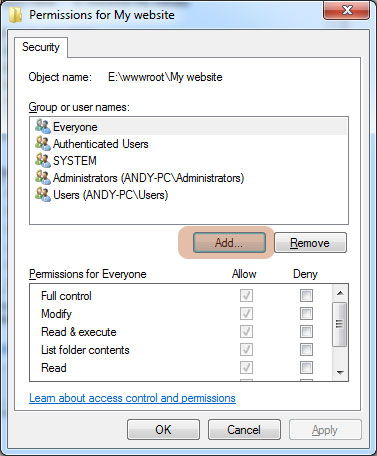
Create a website folder and setup the permission for the folder to allow Network Services has the Change permission. Copy the completed zip file and extract all the files under this folder. See below image screenshots for more details. In this example: the folder name we created we named it My Website.
Right click the folder and select Properties.
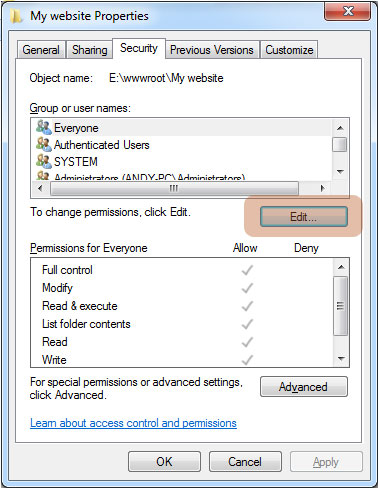
Go to the Security Tab and see if Network Service user/group is already in there. If it doesnt, click the Edit Button.
It will display a list of users/groups available. If the Network Service is not available, click the Add button.
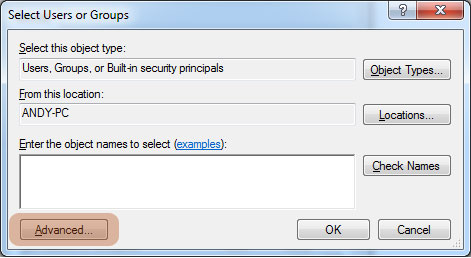
Click the Advanced button to show the list of available users/groups
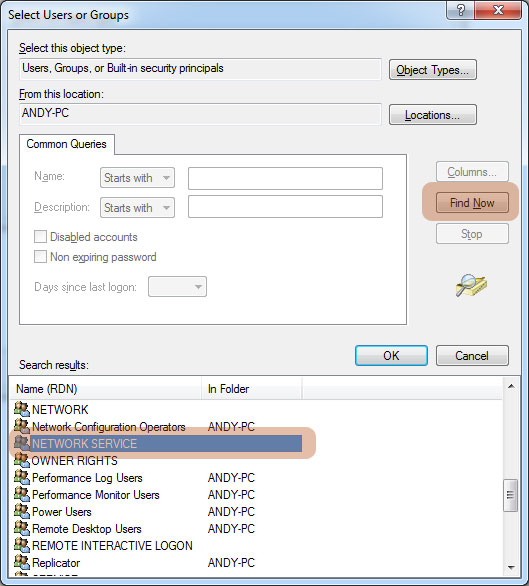
Click the Find Now to list all the users and start looking for Network Service Group/User and then click OK
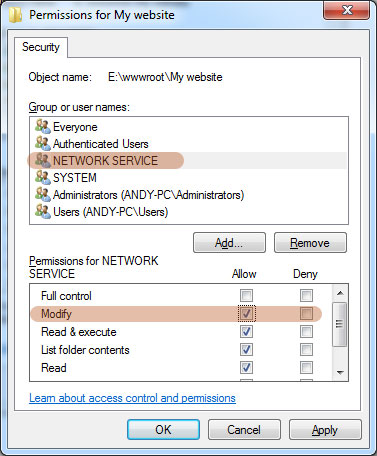
Click the Network Service Row and tick Allow checkbox in Modify permission
Usually the website folder is hosted or placed under C:/inetpub/wwwroot. But it will depends on your server environment, it can be hosted outside of this folder as well.
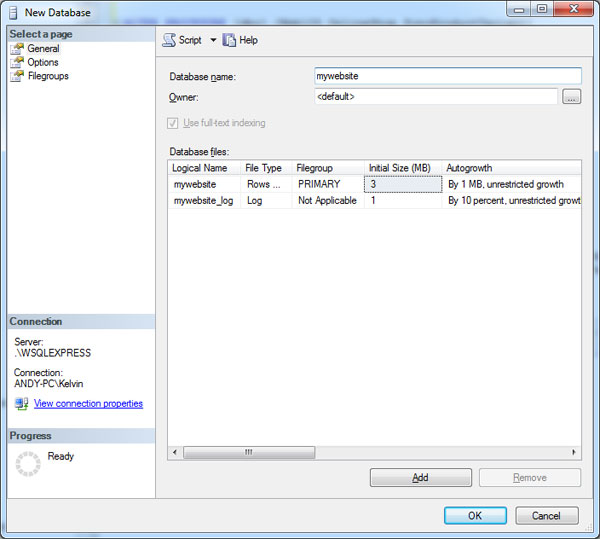
3. Create SQL Server database.
In order to create the SQL Server database, you will need SQL management studio tool and SQL Express 2008 installed on your server. You can download these software from microsoft official website. We assume those software have already been installed on your server.
Enter the database name.
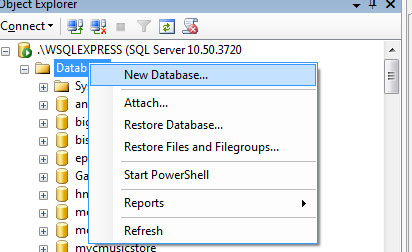
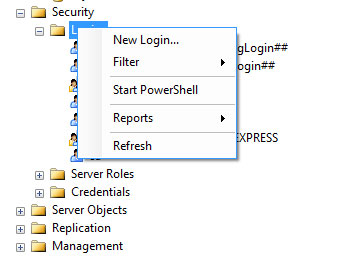
Create new user that will associate with this database. On the server explorer tree, look for the security folder and right click to create a new user login.
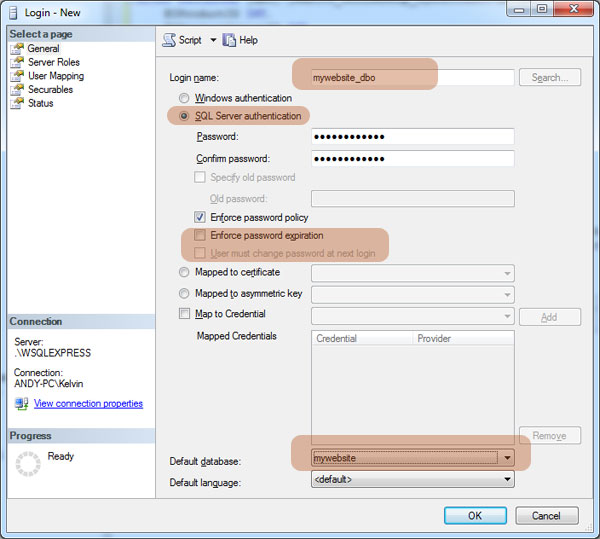
Enter the login name and make sure you click the SQL Server authentication mode. Untick the Enforce password expiration and change password at next login. Also in the Default Database dropdownlist, please select the created database
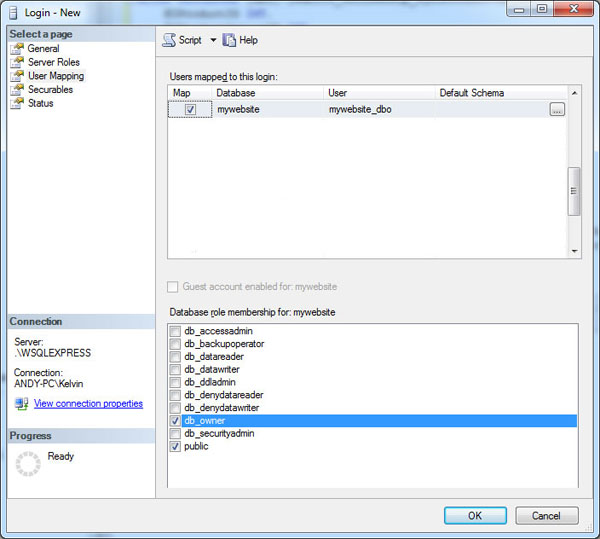
Next is to map the ownership of the database to this user account.
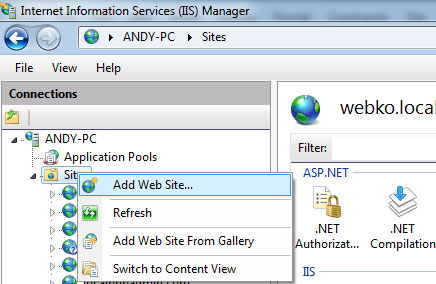
4. Setup IIS for new website.
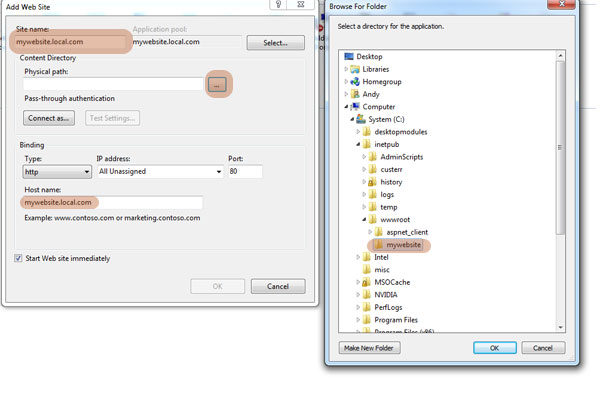
Open the IIS and add a new website.
We enter the website address in the provided url address. Note in this example, as we run the site locally, we need to modify host config file to temporarily host the url.
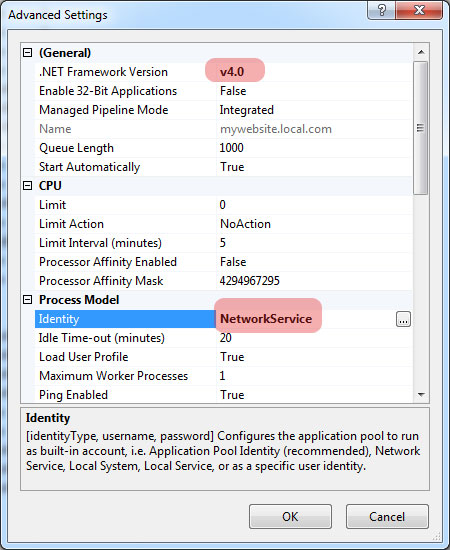
The next step is to setup the application pool properties. This is important and has to be setup properly otherwise the site will have a permission issue.
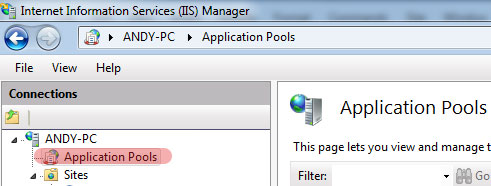
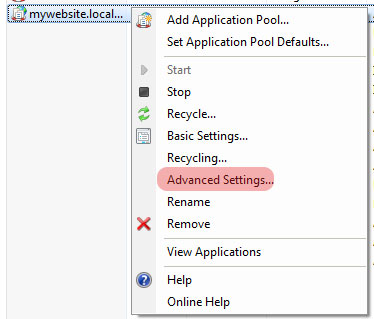
Look for the application pool named mywebsite and right click and choose Advanced Settings
Make sure the ASP.Net version is 4.0 and Network Service is selected for the identity field.
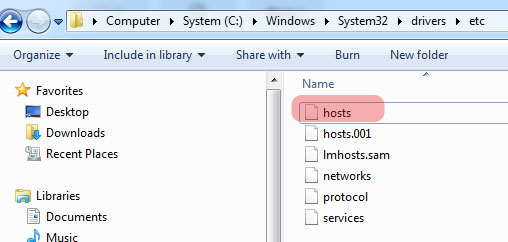
5. Configure Host file (Only if the DNN run locally).
The hosts file usually located under: C:\Windows\System32\drivers\etc. As the file does not has an extension, you will need to open it using NotePad or other alternative text editor. Note: if you get a permission issue, you have to edit the file as administrator account.
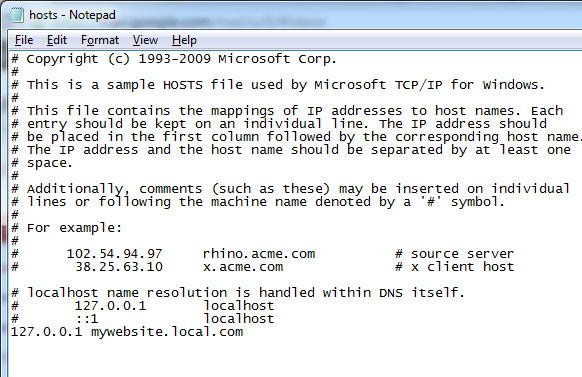
By following up the example given, you just need to enter the local ip address and then website url. In this case, it will be like the following image:
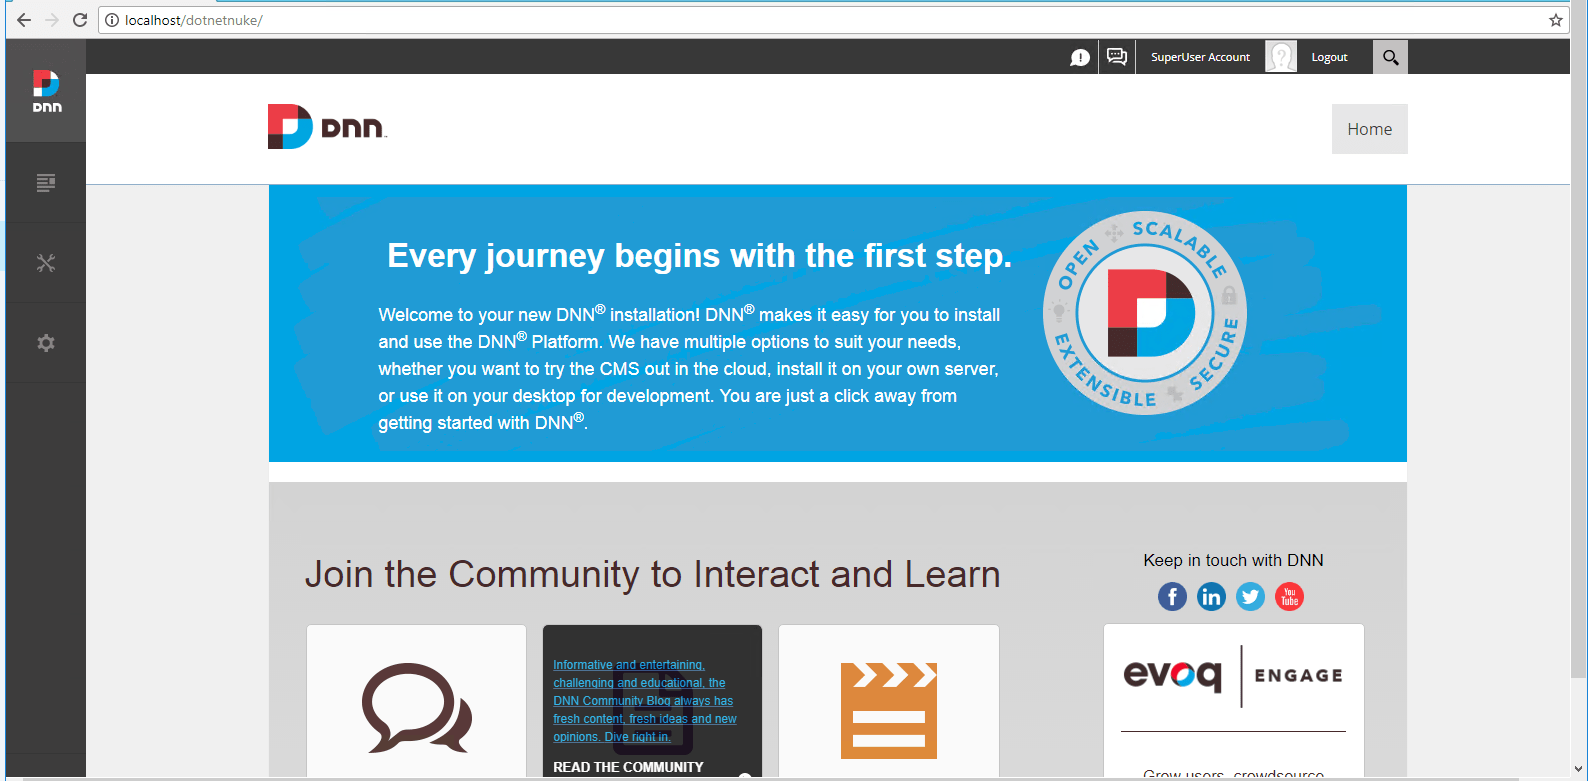
6. Launch the website to start configuring DNN.
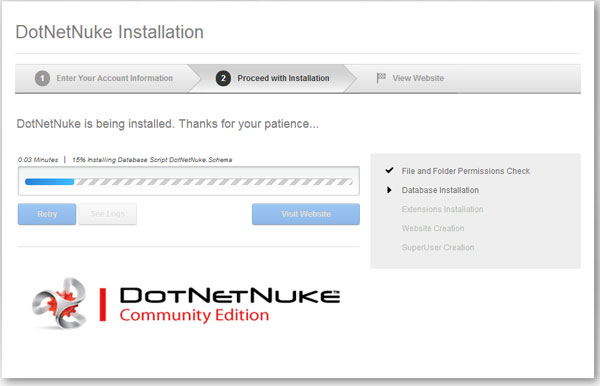
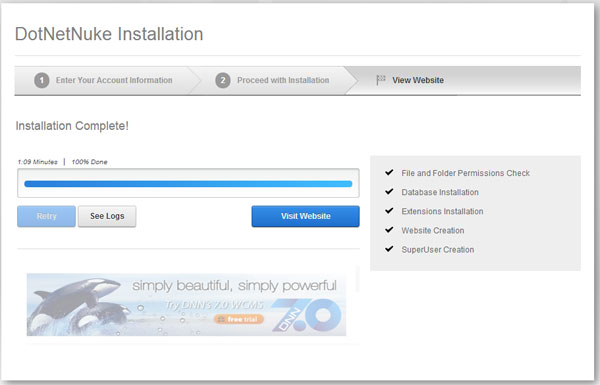
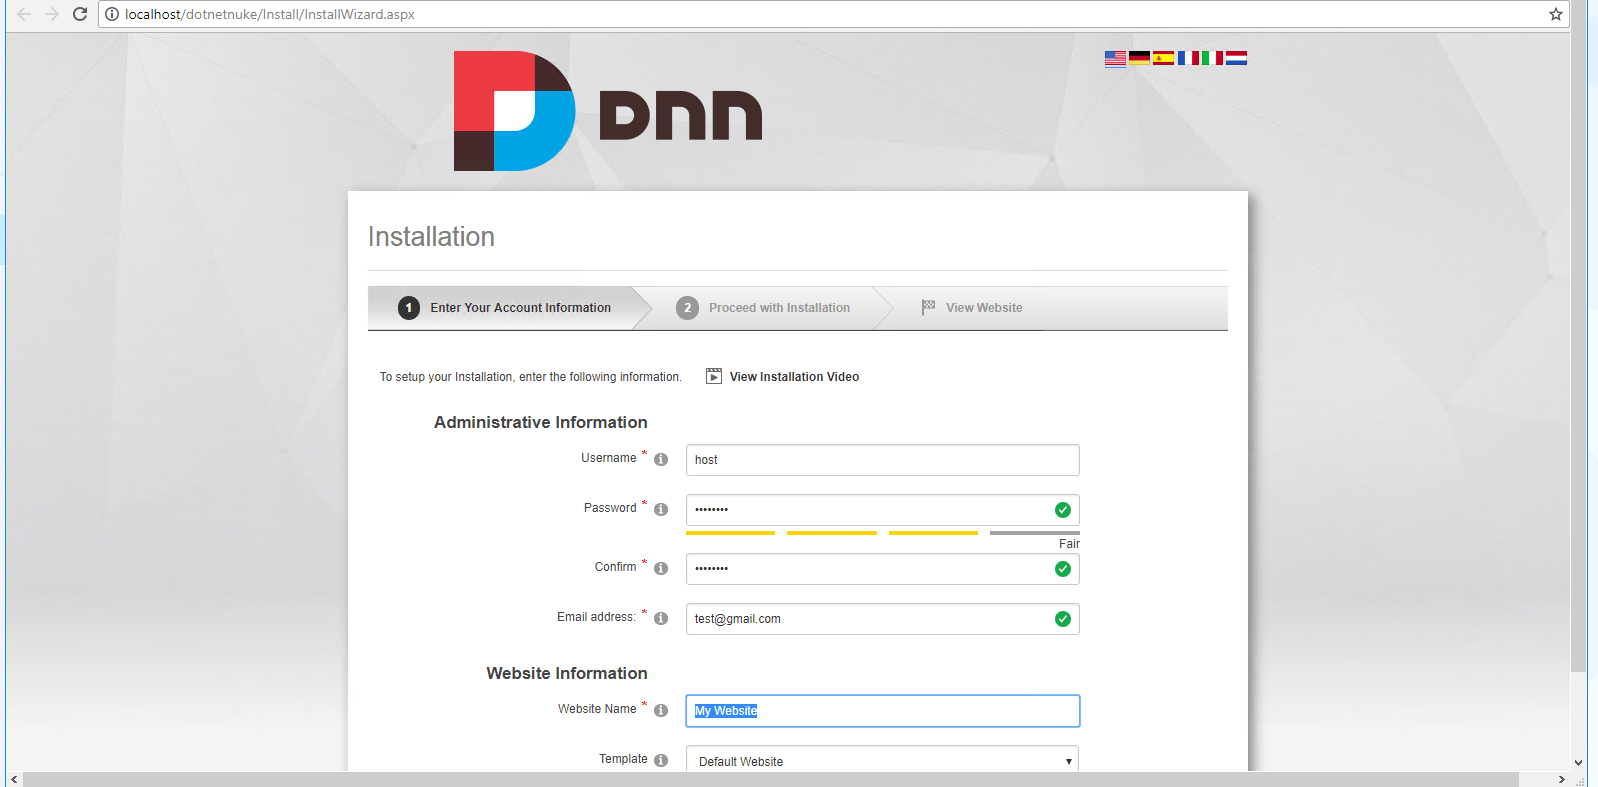
Open a web browser in your computer and enter the website address http://mywebsite.local.com. If everything is setup properly, you will see the following page.
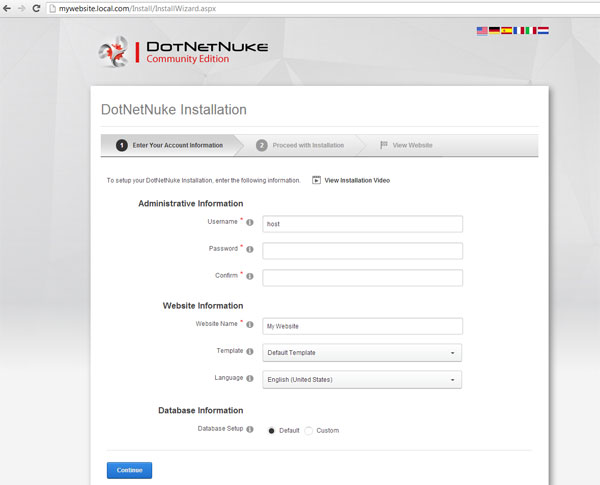
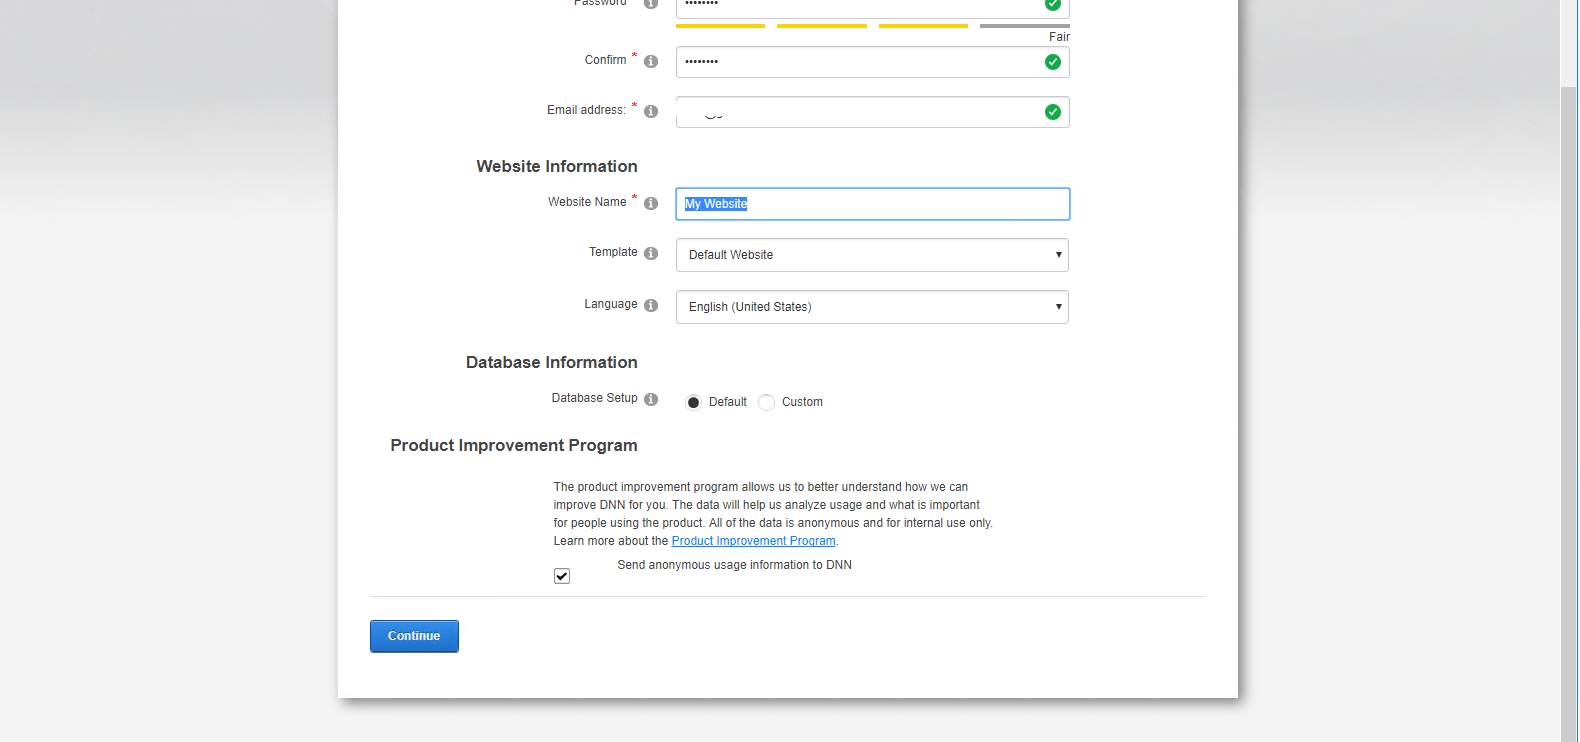
By default the super account username is host, it is recommended that you change this to other name. For the website information section, you can select the template as blank template, this will not create any pages on the site, if you choose default, it will load some basic content and pages.
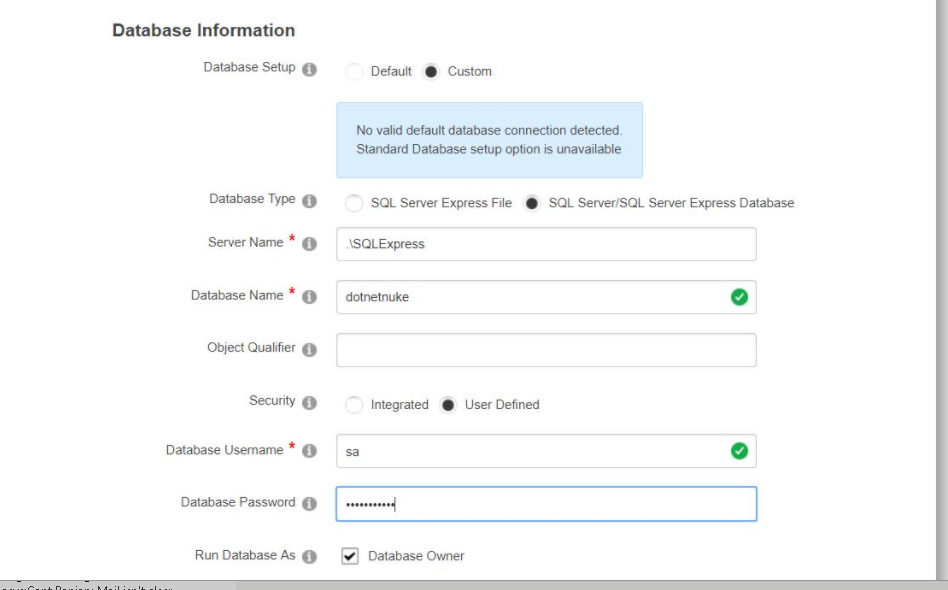
For the database setup, choose Custom option and the database type as SQL Server. You will need to specify the Server Name, by default server name is .\SQLExpress, but in this example, we set the sql server name differently, so specify the value accordingly. In the security option, please select user defined, as we have already create a user login for the database account. Make sure the database owner checkbox is ticked. Once all done you can click Continue button.
Implementing Workflow in a Custom DNN Module:
What is Workflow?
Workflow allows you to create a publishing flow that provides an approval process between when a user creates the content and when the content becomes live. DNN has built a few different workflow processes for the HTML and File Manager modules. Now that release 7.4 is out, third-party module developers can tap into the same workflow mechanism and definitions. Content workflow in a DNN module, when done right, has the following attributes:
Review & Approve Content
Different workflow processes can be chosen or defined
Notifications to appropriate users
Versioning and Rollback capability
Setup work for Workflow
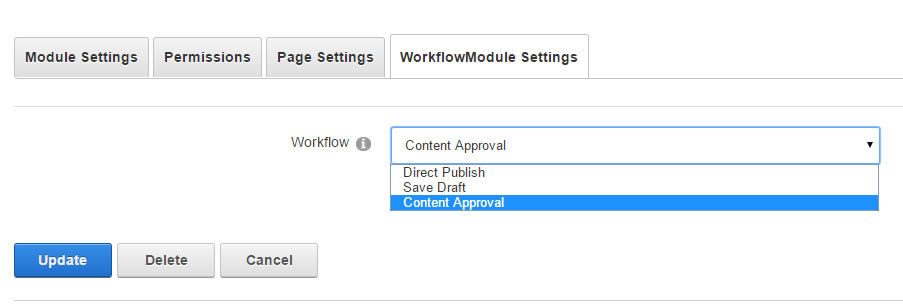
The first thing you need to know about using the Workflow API is that it works inherently with Content Items. To do this, you need to create a content item type for your custom versioned content.The other thing we need to setup is a module setting for allowing the administrator to select the workflow they want to implement. These workflows are defined in the DNN core.
Versioning and Workflow:
1.Create New “Item”

When you save an item, this is the flow that should happen. You need to create the DAL2 item and then create the versioned content item with the Item ID as its Content Key. Then you will send that versioned content item into the workflow process.
Update an “Item”

Updating an item is not much different than the create process. You don’t need to do anything to the main item, just create the versioned item and send it to the workflow process
Workflow State Actions
So how do we control what happens when we start the workflow? Those action state classes that we registered will get called by the framework when users interact with the workflow items from the Notifications area of the User Messaging page.
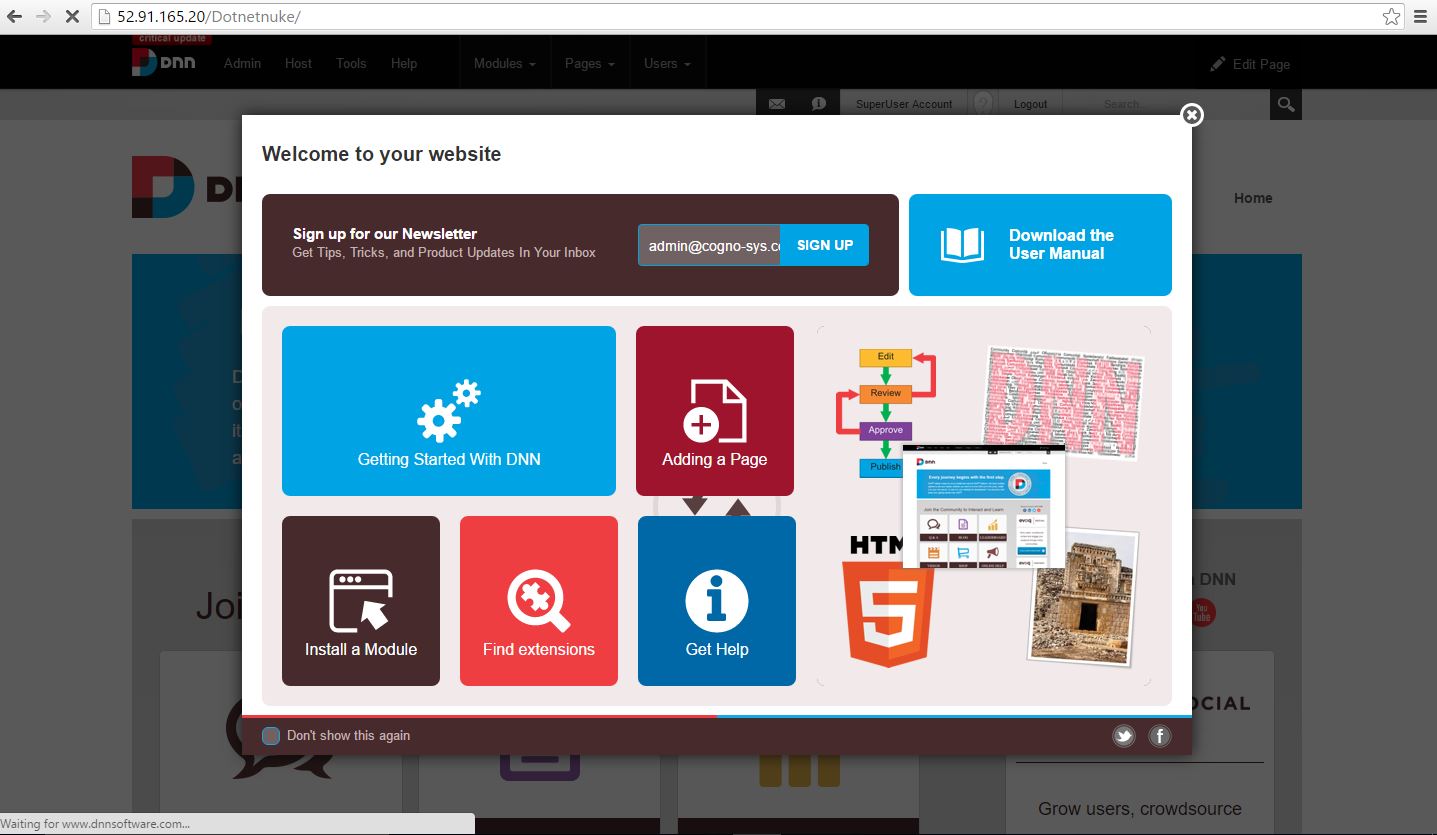
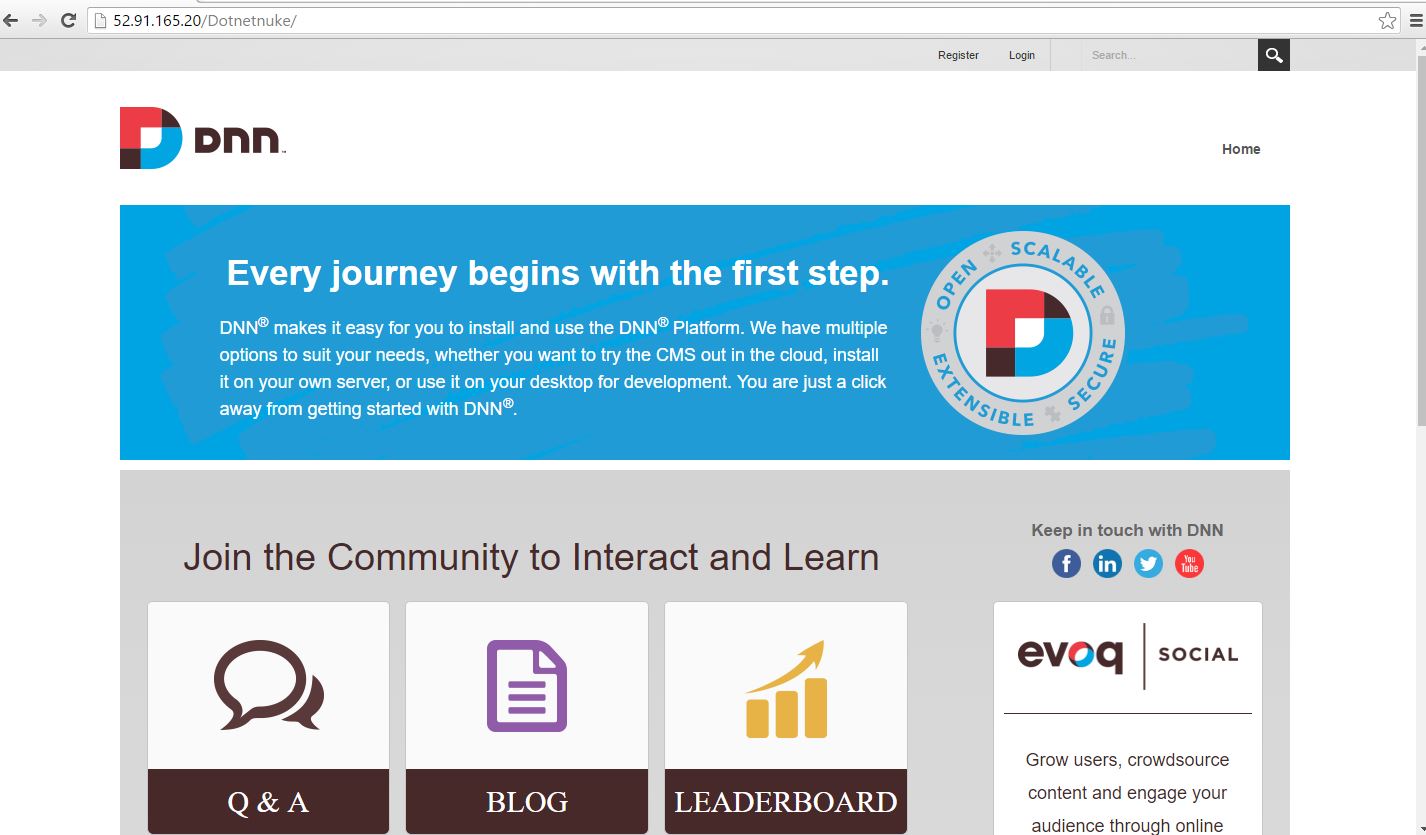
The DNN Platform Edition is open source. DotNetNuke is a web content management system based on Microsoft .NET. The DNN Platform was built to be extensible. Almost any feature of the platform can be swapped out. The product is used to build professional looking and easy-to-use commercial websites, social intranets, community portals, or partner extranets. Containing dynamic content of all types, DNN sites are easy to deploy and update.
DNN provides a suite of solutions for creating rich, rewarding online experiences for customers, partners and employees.
DNN Platform is owned by DNN Software (https://www.dnnsoftware.com/platform) and they own all related trademarks and IP rights for this software.
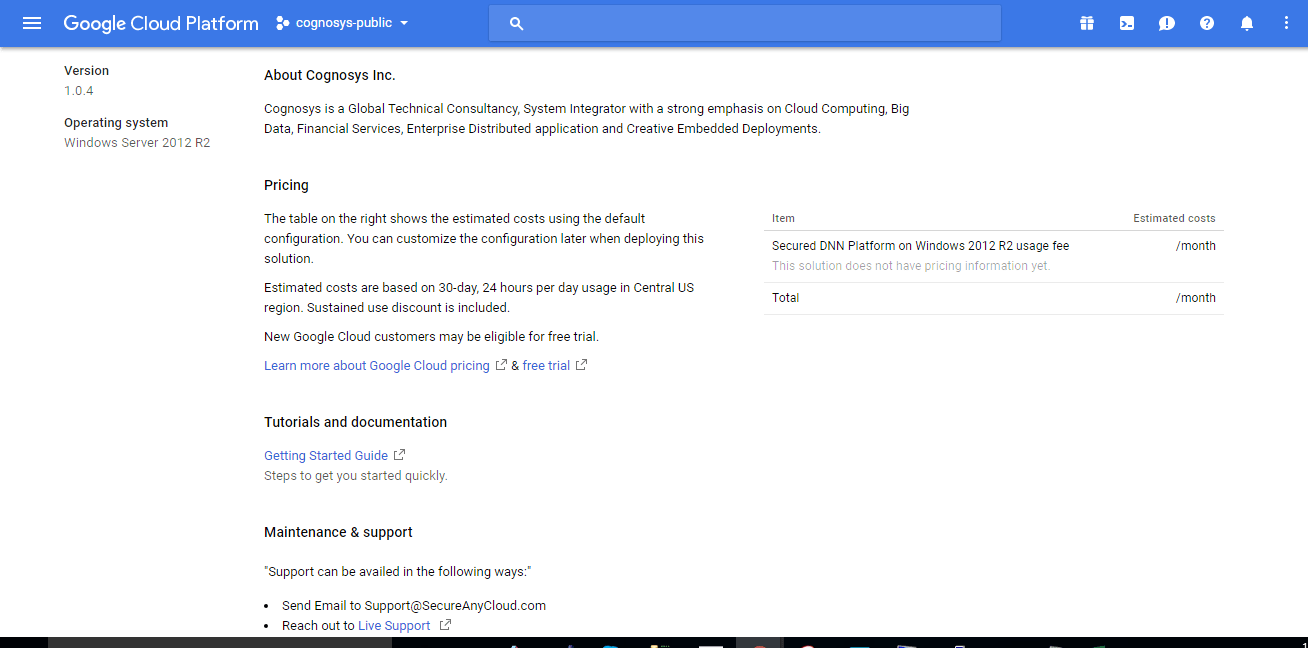
Cognosys provides hardened images of DNN Platform on all public cloud ( AWS marketplace , Azure and Google Cloud Platform ) also offers a secured and one-click deployment of DNN Platform on cloud i.e. AWS marketplace , Azure and Google Cloud Platform with easy installation instructions.
DNN Platform on Windows 2012 R2
DNN Platform on Cloud for AWS -Windows
Features
DNN Features
There are 4 DNN products:
1.DNN platform – an open-source development framework
2.Evoq Basic – a content management tool set with limited capabilities
3.Evoq Content – a complete content management tool set
4.Evoq Engage – a complete community management tool set
Only the DNN platform is free. The other 3 DNN editions are distributed under a commercial licence and offer more advanced CMS features (a drag-and-drop content builder, SEO tools, content analytics, etc.), integrations with third-party systems (Google Analytics, Microsoft Azure, DropBox, etc.), community management features, better performance, and more.
Compare the 4 DNN editions:
DNN Themes
-The DNN theme category contains 464 products – DNN themes, and DNN theme collections.
-You can find 6 free themes and hundreds of commercial themes with a price range from $19.00 to $269.
-There are several theme collections with a price range from $149 to $399.99, and several DNN skins with a price range from $6 to $2.400.
-When browsing through the theme category, you can read an overview of each theme’s specifications, as well as see the theme’s price, number of reviews, and last update.
-You can also filter the products by subcategory (color, genre, site type, theme packs, etc.), or by tag (CSS, iPhone, mobile, tablet, etc.). This way you can easily find the theme that best suits your store.
DNN Plugins
-The DNN marketplace contains 595 plugins.
-162 of them are build to enhance the capabilities of your e-commerce website. You can find them in the ‘E-commerce’ category.
-The e-commerce category consists of 25 subcategories. Some of the more significant subcategories include checkout, content management, forms management, marketing & advertising, email, SEO, and more.
-You can purchase a product grid module, enable dynamic registration, ensure secure credit card transactions, integrate your online store with PayPal or Stripe, manage online orders in Zendesk, and much more.
-Note that if you don’t find the plugin you need on the DNN marketplace, you can always build a custom plugin for your store. You can either do this in-house or outsource it to a third-party (such as a DNN partner or a .NET developer, for example).
DNN Partners & Community
-DNN has a thriving community that consists of more than 1 million members – developers, designers, marketers, store owners, etc.
They gather to discuss technology, design, the DNN framework and issues they are facing on the DNN forum.
The DNN community is active – there are more than 100K posts on the DNN forum and new posts appear every day.
In addition, at the time of this writing, there are 7821 questions in the DNN Questions Directory and 6767 of them have been answered.
Aside from its online community, DNN is supported by its partners as well.
The DNN partner directory consists of 37 partner companies. They are classified as:
Implementation partners – companies that build websites or applications on top of DNN
Hosting partners – companies that specialize in DNN hosting
ISV (Independent Software Vendors) partners – companies that build DNN extensions (themes, plugins, language packs, etc.)
Training partners – companies that specialize in providing training for the DNN platform. There are two types of training: online video training and instructor-led training.
There are 3 partner levels – registered, standard, and advanced. Currently DNN has 19 registered partners, 5 standard partners, and 13 advanced partners.
Note that 19 of all 37 partners have listed e-commerce as one of their competencies.
When browsing through the partner directory, you can read a short description of each partner company, see the number of websites each partner has developed, as well as the partner’s level.
In addition, you can filter the partners based on their location and partner level.
If you don’t have the time to research DNN partners and the services they offer, you can use Partner Match and let DNN themselves identify which partner company is best suited to meet your needs.
DNN Pricing
You can download the DNN platform for free. However, depending on your business objectives, you may need to purchase one of its paid editions:
Evoq Basic (distributed under an MIT license)
Evoq Content (distributed under a commercial proprietary licence)
Evoq Engage (distributed under a commercial proprietary licence)
Some New Features that the DNN Platform Offers:
Content personalization:
Small border for heading and paragraphs with multiple colors
Website visitors of today always expect personalized experience, which means that they want to see something that they want and when they want. Evoq 8 helps to create personalized content that is based on the visitor’s profile. It allows the customers to create specific content that is based on the rules of geography, recent visits, referral source, age, gender, search terms and clicks. Content personalization helps to enhance marketing capabilities and increases the sales conversion rates.
Centralized access to content repositories:
Small border for heading and paragraphs with multiple colors
DNN Evoq 8 includes built in connectors to Dropbox, Amazon S3, Box, Marketo and Microsoft Sharepoint and this makes it easy to access any digital asset or piece of content from a single window. The connectors make it easy to incorporate your cloud hosted assets into Evoq. The Marketo connector allows website owners to connect the site to Marketo based marketing automation system.
Page level content analytics:
Small border for heading and paragraphs with multiple colors
Statistics on page views, unique visitors, referrers and conversions are presented as an overlay on the web pages through the data that is collected and managed by Evoq. The analytics help the marketers, regardless of their level of proficiency to immediately understand how the content is performing without even navigating to a different web analytics system.
Flexible content layouts:
Small border for heading and paragraphs with multiple colors
Managing new pages has become easier for the users with this feature. They can now easily select from the built in layouts and assemble their own by using simple to use drag and drop interface. The new content layout module offers various layouts for e.g 25% + 75%, 5X20% and many more.
Advocate marketing:
Small border for heading and paragraphs with multiple colors
DNN Evoq 8 allows the marketers to activate the brand advocates present on their website by sharing content on their personal social networks. This capability is integrated with Evoq’s native gamification engine and engages the customers by tracking challenge completions, issuing different challenges, awarding badges or points or other incentives.
Major Features of DNN Platform
- A rich-text editor
- File management
- Cloud-ready with MS Azure compatibility
- Mobile API and basic mobile device detection
- Core written in C#
- Single installation, multiple portals
- Social API (in DNN 6.2 and above)
- Modern client-side Web tools like CSS 3, HTML 5 and JQuery
- Bulk email
- Robust security
- Administration features like: security roles, protected content and site log
AWS
Installation Instructions for Windows
Note: How to find PublicDNS in AWS
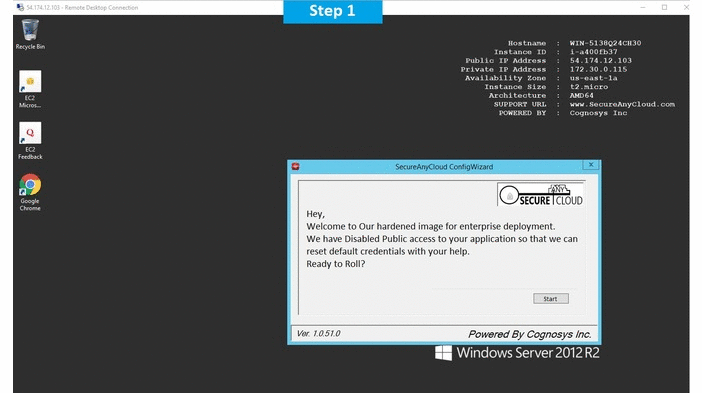
Step 1) RDP Connection: To connect to the deployed instance, Please follow Instructions to Connect to Windows instance on AWS Cloud
1) Connect to the virtual machine using following RDP credentials:
- Hostname: PublicDNS / IP of machine
- Port: 3389
Username: To connect to the operating system, use RDP and the username is Administrator.
Password: Please Click here to know how to get password .
Step 2) Database Login Details:
- SQL Username: sa
- SQL Password : Passw@rd123
Note :- Please change the password immediately after first login.
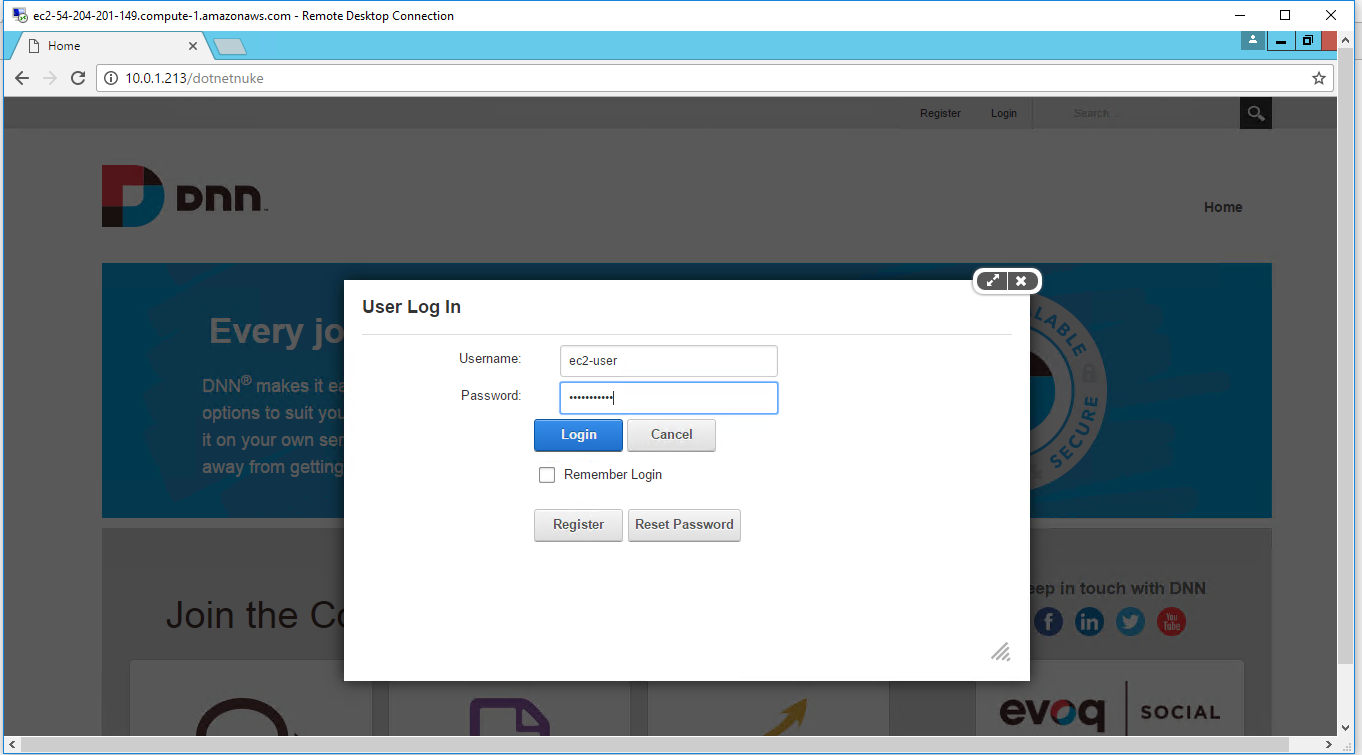
Step 3) Application URL: Access the application via a browser at http://PublicDNS/dotnetnuke
- User Name: ec2-user
- Password: Passw@rd123
Step 4) Other Information:
1.Default installation path: will be in your web root folder “C:\inetpub\wwwroot\dotnetnuke”
2.Default ports:
- Windows Machines: RDP Port – 3389
- Http: 80
- Https: 443
- Sql : By default these are not open on Public Endpoints. Internally Sql server: 1433
Configure custom inbound and outbound rules using this link
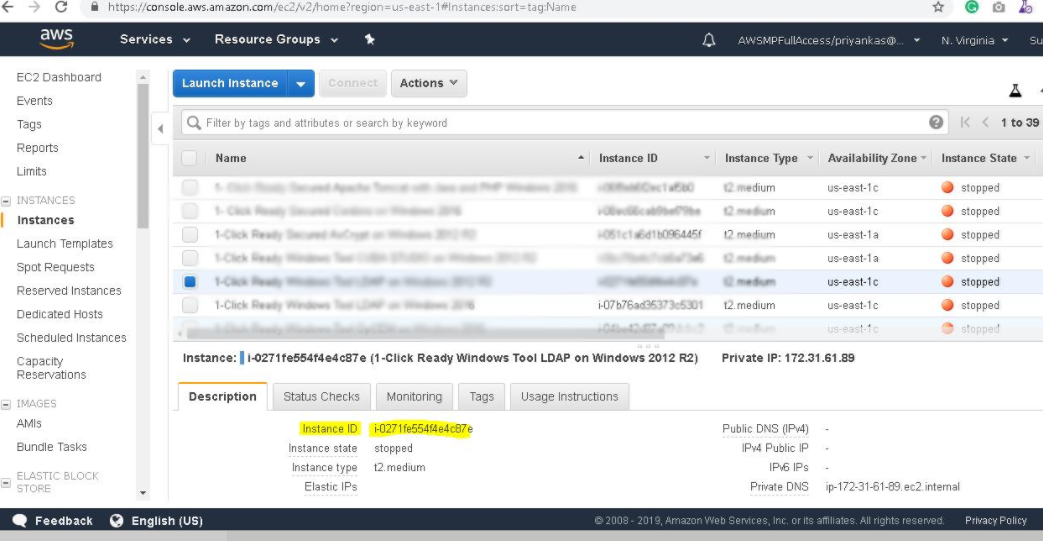
AWS Step by Step Screenshots
Azure
Installation Instructions for Windows
Note :How to find PublicDNS in Azure
Step 1 ) RDP Connection: To connect to the deployed instance, Please follow Instructions to Connect to Windows instance on Azure Cloud
1) Connect to virtual machine using following RDP credentials:
- Hostname: PublicDNS / IP of machine
- Port : 3389
Username: Your chosen username when you created the machine ( For example: Azureuser)
Password : Your Chosen Password when you created the machine ( How to reset the password if you do not remember)
Step 2 ) Database Login Details :
- SQL Username : sa
- SQL Password : Passw@rd123
Note :- For Stack Database: dnnplatform with user dnnplatform and password Passw@rd123 has already been created. Please use this SQL database for you Stack Configuration.
Step 3 ) Application URL: Access the application via a browser at http://PublicDNS/dotnetnuke
Step 4 ) Other Information:
1.Default installation path: will be on your web root folder “C:\inetpub\wwwroot\dotnetnuke”
2.Default ports:
- Windows Machines: RDP Port – 3389
- Http: 80
- Https: 443
- Sql ports: By default these are not open on Public Endpoints. Internally Sql server: 1433.
Configure custom inbound and outbound rules using this link
 Product name

Pricing Details


Installation Instructions for Windows
Step 1) VM Creation:
- Click the Launch on Compute Engine button to choose the hardware and network settings.

2.You can see at this page, an overview of Cognosys Image as well as estimated cost of running the instance.
3.In the settings page, you can choose the number of CPUs and amount of RAM, the disk size and type etc.
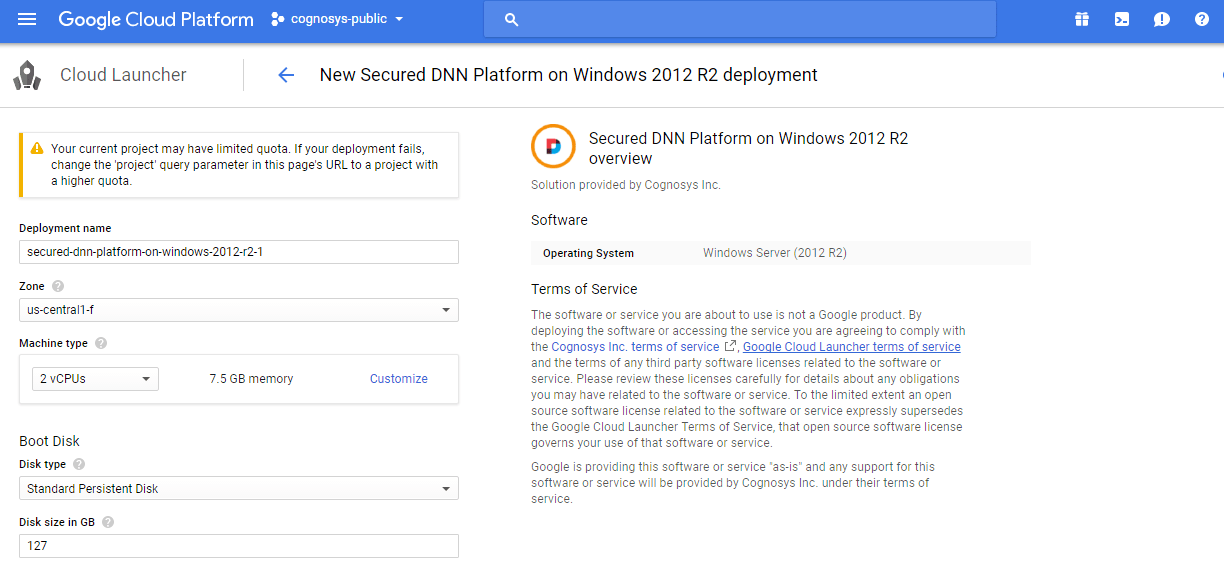
Step 2) RDP Connection: To initialize the DB connect to the deployed instance, Please follow Instructions to Connect to Windows instance on Google Cloud
Step 3) Database Credentials:
The below screen appears after successful deployment of the image.
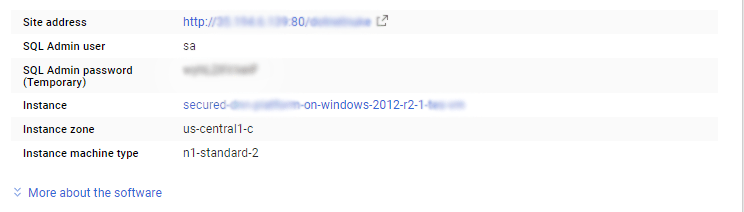
For local SQL Server sa password, please use the temporary password generated automatically during image creation as shown above.
i) Please connect to Remote Desktop as given in step 2 to ensure stack is properly configured and DB is initialized.
ii) You can use SQL server instance as SQLEXPRESS. The SQL Server instance name to be used is “.\SQLExpress” .
Connect to SQL Management Studio with username as sa and password provided in Custom Metadata.
If you have closed the deployment page you can also get the sa password from VM Details “Custom metadata” Section.
Step 4 ) Application URL: Access the application via a browser at http://PublicDNS/dotnetnuke

Step 4 ) Other Information:
1.Default installation path: will be on your web root folder “C:\inetpub\wwwroot\dotnetnuke”
2.Default ports:
- Windows Machines: RDP Port – 3389
- Http: 80
- Https: 443
- SQL ports: By default, these are not open on Public Endpoints. Internally SQL server: 1433.
Videos
DNN Platform on Windows 2012 R2-
DotNetNuke Explained: Basic Module Development
DNN Platform Installation in WebsitePanel
