Overview
WordPress is the world’s most common tool for creating websites. WordPress is proficient of creating any style of website, from a simple blog to a full-featured business website. You can even use WordPress to create an online store Dissimilar to other “free” website tools, WordPress does not lock you into some proprietary service like Wix, Weebly, or Squarespace. You can host your website anywhere. Or move your site to another hosting service anytime you like.Unlike other “free” website tools, WordPress does not lock you into some proprietary service like Wix, Weebly, or Squarespace. You can host your website anywhere. Or move your site to another hosting service anytime you like.
WordPress Dashboard Overview
Primary Navigation Panel (Left Panel)
This is where a majority of your options are located to customize and populate your website with content. Clicking on any item inside of the primary navigation panel will show additional items and options. Some plugins may add items to your primary navigation panel (either as their own item, or under ‘Tools’).
Administrative Navigation Bar (Top Bar)
Here you can customize or WordPress login settings (top right). Various quick-links are also provided to make it easier for you to jump to commonly used tasks (top left). While you are logged into the WordPress Dashboard, the Administrative Navigation Bar will still show at the top of your website, allowing you to easily switch between viewing your website and editing from inside of the Dashboard.
Screen Options Tab (Top Right Tab)
Each screen within the Dashboard has various viewing options and you can choose to display or hide certain editing options for that screen. These have no affect on your website, and are primarily used to simplify your website editing experience.
Help Tab (Top Right Tab)
This tab offers instructions based on the screen currently being viewed. Various links are also provided to direct you to WordPress.org in case you need additional assistance with an item on the page
General Settings in WordPress:
WordPress general setting is used to set the basic configuration settings for your site. In the setting administration screen, it is a default setting screen.
Following are the steps to access the general settings −
Step 1 − Click on Settings → General option in WordPress.
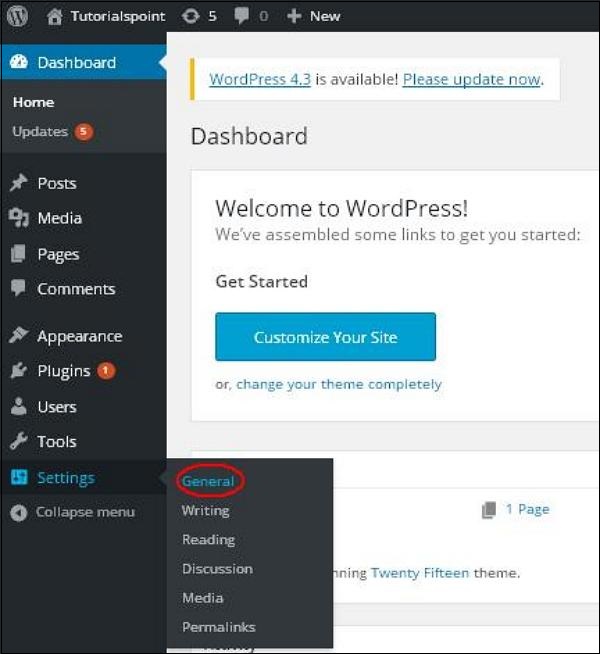
WordPress General Setting
Step 2 − The General Setting page is displayed as shown in the following snapshot.
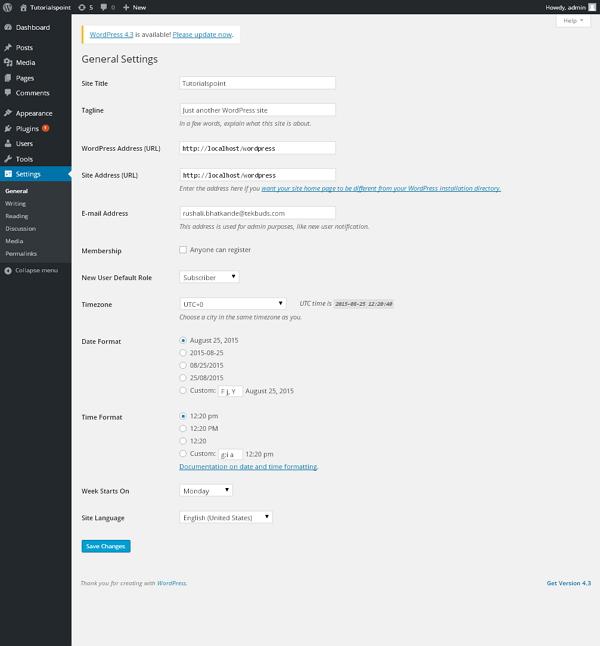
WordPress General Setting
Following are the details of the fields on general settings page.
Site Title − It displays the name of the site in the template header.
Tagline − Displays a short sentence about your site.
WordPress Address (URL) − It is the URL of WordPress directory where your all core application files are present.
Site Address(URL) − Enter the site URL which you want your site to display on the browser.
E-mail Address − Enter your e-mail address which helps to recover your password or any update.
Membership − Anyone can register an account on your site after you check this checkbox.
New User Default Role − The default role is set for the newly registered user or members.
Timezone − Sets the time zone based on the particular city.
Date Format − Sets the date format as you need to display on the site.
Time Format − Sets the time format as you need to display on the site.
Week Starts On − Select the week day which you prefer to start for WordPress calendar. By default it is set as Monday.
Site Language − Sets the language for the WordPress dashboard.
After filling all the information about general settings, click on Save Changes button. It saves all your general setting information.
How to Add Posts in WordPress:
Posts are also known as articles and sometimes referred as blogs or blog posts. These are used to popularize your blogs.Following are the simple steps to Add Posts in WordPress.
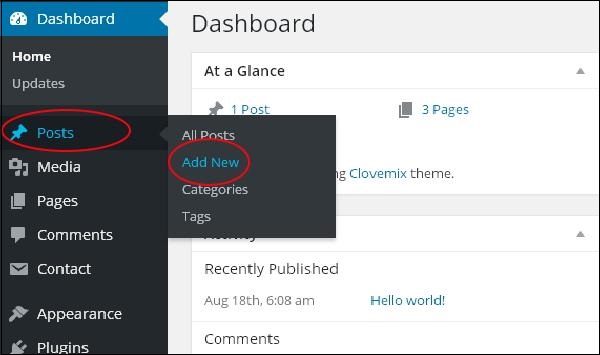
Step (1) − Click on Posts → Add New in WordPress.
Step (2) − You will get the editor page of the Post as shown in the following screen. You can use the WordPress WYSIWYG editor to add the actual content of your post. We will study in detail about WYSIWYG editor in the chapter WordPress – Add Pages.
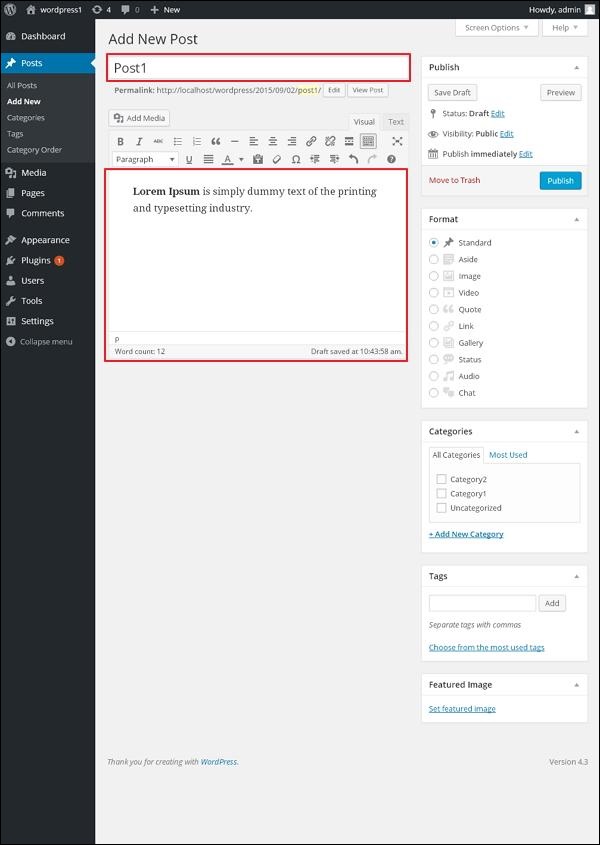
Following are the fields on the editor page of the Add Posts Page.
Post Title − Enter the title of the post, i.e., Post1.
Post Content − Enter the content of your post.
Step (3) − Click on Publish button to publish your respective post.
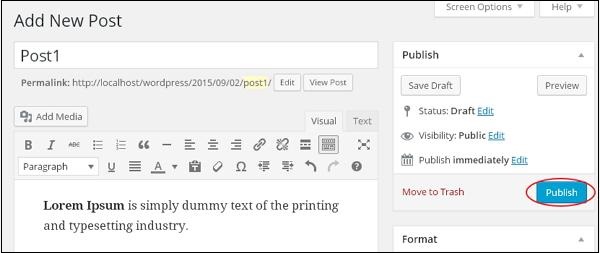
Following are the few other options present in the Publish section.
Save Draft − It saves the post as a draft.
Preview − You can preview your post before publishing.
Move to Trash − Deletes the post.
Status − Change the status of your post to Published, Pending, or Reviewer Draft.
Visibility − Change the visibility of the post to Public, Private or Password protected.
Published − Change the published post date and time.
How to Edit post on WordPress:
Secured WordPress with Aurora on Linux Server
WordPress With its popularity does not need the introduction.But Mysql Management has been a pain point which is being removed using this Instance by using 100% Mysql Compliant Aurora
Wordpress Users have always had the problem of maintaing Mysql inclduing backup, scaling up and administering. AWS has removed this problem by providing a 100% mysql compliant Aurora. Aurora takes out the overhead of maintaining a RDBMS system.Cognosys presents this specially pre-configured WordPress image with inbuilt Mysql Backup. Enterprise Customers who are looking for WordPress can use this Image for instantaneous deployments. WordPress combines simplicity for users and publishers with under-the-hood complexity for developers. This makes it flexible while still being easy-to-use. Everything from simple websites, to blogs, to complex portals and enterprise websites, and even applications, are built with WordPress. The respective trademarks mentioned in the offering are owned by the respective companies.
Due to the initial setup of this image, it may take up to 20 minutes to launch.
WordPress is web software you can use to create a beautiful website or blog. We like to say that WordPress is both free and priceless at the same time.The core software is built by hundreds of community volunteers, and when you’re ready for more there are thousands of plugins and themes available to transform your site into almost anything you can imagine.
WordPress Plugins Manual Install
Essential WordPress Plugins
There are so many WordPress plugins – it could be hard to choose the right one. In fact, many of the plugins serve the same purpose, for example, there are dozens of WordPress caching plugins. That is why we decided to list the best WordPress plugins that are essential for every WordPress blog.
Google XML Sitemaps. This plugin will automatically generate XML site maps for better search engine optimization. It’s easy to use and update it regularly.
Yoast SEO. Probably the most popular SEO plugin for WordPress. It will help you improve the search engine optimization. From meta tags to writing suggestions – Yoast SEO plugin has it all.
Wordfence Security. This plugin will keep your WordPress safe from hackers and malware. It has firewall and malware scanner modules which are super useful.
Contact Form 7. Simple but very powerful WordPress contact form plugin. Create any contact or even lead generation forms with this plugin.
It’s not recommended to clog WordPress with dozens of plugins as it can decrease site’s performance. Keep your WordPress clean by installing only essential plugins and delete the ones you are not using.
Step 5 – Installing WordPress Themes
The look of WordPress site can be changed by applying themes. There are free and premium WordPress themes. Some of them are universal and can be used on any website. Others are built for a very specific purpose, for example, the e-commerce themes.
WordPress made theme installation super easy. It literally takes just a few minutes to install free WordPress themes. In order to proceed, access the Appearance section and search for a nice looking theme. You can even filter themes by features or colors.
Theme preview feature lets you see how your website will look with a selected theme. This is useful, as it will save your time – you will not have to install multiple themes just to find the theme that fits your needs.
The above method is suitable for free and freemium themes only. What if you purchased a nice looking premium theme? In this case, you will have to upload the theme files manually. Access the same Appearance section, press the Upload Theme button and select the theme’s .zip file. It can take up to a few minutes for the uploading process to complete. Once it’s done, simply Activate the theme. Need exact steps? See a comprehensive tutorial on how to install themes.
WordPress Upload Theme
Step 6 – Optimizing WordPress Performance
In this WordPress tutorial, we have now learned how to install and use WordPress in order to create and manage your very own website. As your WordPress site grows, so does the amount of text, images, code and other media files. A bigger website means that it will take longer to load. To avoid slow response time in WordPress, you should also invest some time in optimization. It will ensure that your pages load quickly and efficiently, thus, leaving your visitors happy and wanting to come back for more. Everyone has encountered a slow website at least a few times and felt the frustration that comes while waiting endlessly for it to load. Taking that into account, spending some time to improve your WordPress speed is a really good idea. The best part about WordPress is that it’s really easy to optimize due to the number of plugins and other tools available. You can make your WordPress site lightning fast without even having any coding knowledge at all. To get you on the right track, we will cover a few WordPress optimization techniques that will provide a notable speed boost to your website.
Step 6.1 – Using WordPress Caching Plugins
The first step in optimizing your WordPress site is setting up a WordPress caching plugin. Is short, a cache is a temporary data storage. In most cases, active data is cached which results in reduced loading times. For example, when you access a frequently visited site, your browser will have a portion of the site’s static content located in its cache. As a result, the browser needs to request fewer files and information from the server which ultimately leads to quicker loading. WordPress caching plugins work by creating a static version of your website and delivering it, instead of loading all PHP scripts every time when someone refreshes or re-enters your site.
Most popular WordPress caching plugins are:
WP Super Cache
W3 Total Cache
WP Fastest Cache
You may find a detailed guide on how to implement WP Super Cache plugin for your WordPress site here.
Step 6.2 – Optimizing WordPress Images
Image optimization is another crucial task that should be done in order to make your WordPress site fast. Generally, there are 2 main issues that cause images to load slowly:
Using too large images. For example, you upload a 500 x 500 dimension picture but your site resizes it to 100 x 100. As a result, the visitor’s browser will have to download the larger file first, scale it down and only then display it. The proper way would be to simply upload a 100 x 100 dimension picture so that the excessive task of scaling down the image would be avoided. The image would also take up less space that way, resulting in an overall boost of speed. A detailed guide on how to locate such images and scale them down can be found here.
Images are not fully compressed. You can save lots of space and bandwidth by properly compressing your images. Luckily, WordPress has a really great plugin that can help you with that, it’s called WP Smush. You can find a detailed guide on how to implement this plugin and optimize your WordPress images here.
The more images your WordPress site has, the more beneficial this optimization task will be.
Step 6.3 – Enabling gzip Compression for WordPress
Enabling gzip compression for a WordPress website is a great way to increase speed and performance. In short, gzip compression works by finding similar strings in a text file and replacing it temporarily, resulting in a smaller file size. HTML and CSS files have a lot of repetitive text and spaces, making gzip compression very effective. On the whole, it can reduce the size of a WordPress page by up to 50-70%.
There are a few ways to enable gzip compression:
Enabling gzip compression via .htaccess file (recommended). A more detailed WordPress tutorial can be found here.
Enabling gzip compression via WordPress plugins, such as GZip Ninja Speed.
One thing that you should keep in mind is that gzip compression may slightly increase CPU usage. If CPU is not an issue, then gzip compression is a really great way to optimize your WordPress site.
Deferring parsing of JavaScript in WordPress
Most themes, plugins and social media add-ons use a lot of JavaScript which is by default loaded first when accessing a site. This will make the HTML and other visual contents appear only after the JS is loaded. You can defer parsing of JavaScript so that the visual elements appear faster, while various social media buttons and other content that uses JavaScript would be loaded afterwards. This is one of the techniques recommended by Google Developers that is often overlooked. In WordPress, you can easily do that by using plugins such as WP Deferred JavaScripts or Speed Booster Pack. A more detailed tutorial on how to implement these tools on your WP site can be found here.
Using a Content Delivery Network
Implementing a content delivery network (CDN for short) will speed up WordPress by caching content in multiple data centers around the world. After a visitor enters your site, the content will be delivered by the nearest datacenter available resulting in a better front-end experience. CDNs also work great with WordPress caching plugins and there are free solutions to get you started. For example, CloudFlare has a free plan which provides both benefits of a CDN while protecting your site from DDoS attacks. For step-by-step instructions on how to implement it on WordPress you can check this WP tutorial.
Removing Query Strings from Static Resources
GTMetrix and other optimization tools suggest removing query strings from CSS and JS in order to improve caching of those elements. The previously mentioned WordPress plugin Speed Booster Pack is among a few others that can help you with this task. For more specific information you may refer to this guide for WordPress.
Enabling Lazy Loading
Generally, when a web page is opened, all the content is loaded instantly, which is called eager loading. Alternatively, it is possible to delay the initialization of some objects (such as images) until they are needed, which is called lazy loading. The most common practice is displaying images only when they are visible from the visitor’s viewpoint or in the screen. All you need to do in order to take advantage of this technique is install and enable a plugin such as Lazy Load or Rocket Lazy Load.
Keeping WordPress Secure
Last but not least, in order to have a successful WordPress site, you must harden its security. Just as WordPress is the most popular CMS in the world, it also turns out to be the most hacked. However, there are a few things that you can do in order to protect your site against hacking and other malicious activity.
Keeping WordPress Updated
One of the most important factors in having a safe environment is to always update and use the latest version of WordPress, themes and plugins. Most updates include security tweaks, vulnerability fixes and prevent them from being exploitable in the future versions. A common practice among hackers is taking advantage of web pages that are running an outdated version of WordPress with a known vulnerability. By default, WordPress is updated automatically upon the release of a new version, however, it may not always work or the feature may be disabled on some hosts. Generally, when a new version of WordPress arrives, a notification will be shown at the top of your Dashboard. You may also update your themes and plugins via Dashbard-> Updates section.
WordPress Updates in Dashboard
Using Unique Usernames and Passwords
Admin is the username set by default in all WordPress installations. It is highly recommended to change it, as it will add an extra layer of security to your login credentials. Imagine a situation where someone knows your password, however, they are not aware of the username. The end result is that the person will still be unable to access your dashboard because they do not know the username. Leaving the value as admin can make the hacker’s job that much easier, therefore it should always be changed.
When setting up a password, make sure to include numbers, capital letters and special symbols. In case you are having difficulties keeping track of all the passwords, you can store them using such tools as Last Pass. It will save the trouble of remembering all the different passwords while allowing you to go wild on the password difficulty.
Backing up WordPress
Generating backups is a crucial task for any website. Not only will it increase your security, but will also provide you with a reliable way of restoring your site in case of unexpected errors or issues. You can perform a backup manually or use automation. The manual process would involve downloading the files and the MySQL database of a WordPress site. However, if you make lots of new posts, changes or manage several different websites, downloading everything manually each time can be a real hassle. In addition, nowadays, most hosting providers offer automated account backups. As an extra security measure, you can use WordPress plugins to automate backups monthly, weekly or even daily. They will save you lots of time and also give the option of storing the backup WordPress files and database to a remote location such as DropBox.. You can use such plugins as:
UpdraftPlus a plugin with the capability to backup WordPress to a remote location and restore it. Backup WordPress is a light-weight backup plugin with automation. It permits you to eliminate certain folders, schedule the execution time and has support for numerous different languages.
Features
Major Features of WordPress :
WordPress powers more than 23% of the web – a figure that rises every day. Everything from simple websites, to blogs, to complex portals and enterprise websites, and even applications, are built with WordPress.
WordPress combines simplicity for users and publishers with under-the-hood complexity for developers. This makes it flexible while still being easy-to-use.
The following is a list of some of the features that come as standard with WordPress; however, there are literally thousands of plugins that extend what WordPress does, so the actual functionality is nearly limitless. You are also free to do whatever you like with the WordPress code, extend it or modify in any way or use it for commercial projects without any licensing fees. That is the beauty of free software, free refers not only to price but also the freedom to have complete control over it.
- Simplicity makes it possible for you to get online and get publishing, quickly. Nothing should get in the way of you getting your website up and your content out there. WordPress is built to make that happen.
- Flexibility With WordPress, you can create any type of website you want: a personal blog or website, a photoblog, a business website, a professional portfolio, a government website, a magazine or news website, an online community, even a network of websites. You can make your website beautiful with themes, and extend it with plugins. You can even build your very own application.
- Publish with Ease If you’ve ever created a document, you’re already a whizz at creating content with WordPress. You can create Posts and Pages, format them easily, insert media, and with the click of a button your content is live and on the web.
- Publishing Tools WordPress makes it easy for you to manage your content. Create drafts, schedule publication, and look at your post revisions. Make your content public or private, and secure posts and pages with a password.
- User Management Not everyone requires the same access to your website. Administrators manage the site, editors work with content, authors and contributors write that content, and subscribers have a profile that they can manage. This lets you have a variety of contributors to your website, and let others simply be part of your community.
- Media Management They say a picture says a thousand words, which is why it’s important for you to be able to quickly and easily upload images and media to WordPress. Drag and drop your media into the uploader to add it to your website. Add alt text, captions, and titles, and insert images and galleries into your content. We’ve even added a few image editing tools you can have fun with.
- Full Standards Compliance Every piece of WordPress generated code is in full compliance with the standards set by the W3C. This means that your website will work in today’s browser while maintaining forward compatibility with the next generation of browser. Your website is a beautiful thing, now and in the future.
- Easy Theme System WordPress comes bundled with two default themes, but if they aren’t for you there’s a theme directory with thousands of themes for you to create a beautiful website. None of those to your taste? Upload your own theme with the click of a button. It only takes a few seconds for you to give your website a complete makeover.
- Extend with Plugins WordPress comes packed full of features for every user, for every other feature there’s a plugin directory with thousands of plugins. Add complex galleries, social networking, forums, social media widgets, spam protection, calendars, fine-tune controls for search engine optimization, and forms.
- Built-in Comments Your blog is your home, and comments provide a space for your friends and followers to engage with your content. WordPress’s comment tools give you everything you need to be a forum for discussion and to moderate that discussion.
- Search Engine Optimized WordPress is optimized for search engines right out of the box. For more fine-grained SEO control, there are plenty of SEO plugins to take care of that for you.
- Multilingual WordPress is available in more than 70 languages. If you or the person you’re building the website for would prefer to use WordPress in a language other than English, that’s easy to do.
- Own Your Data Hosted services come and go. If you’ve ever used a service that disappeared, you know how traumatic that can be. If you’ve ever seen adverts appear on your website, you’ve probably been pretty annoyed. Using WordPress means no one has access to your content. Own your data, all of it – your website, your content, your data.
- Freedom WordPress is licensed under the GPL which was created to protect your freedoms. You are free to use WordPress in any way you choose: install it, use it, modify it, distribute it. Software freedom is the foundation that WordPress is built on.
- Community As the most popular open source CMS on the web, WordPress has a vibrant and supportive community. Ask a question on the support forums and get help from a volunteer, attend a WordCamp or Meetup to learn more about WordPress, read blogs posts and tutorials about WordPress. A community is at the heart of WordPress, making it what it is today.
10 Awesome WordPress Features :
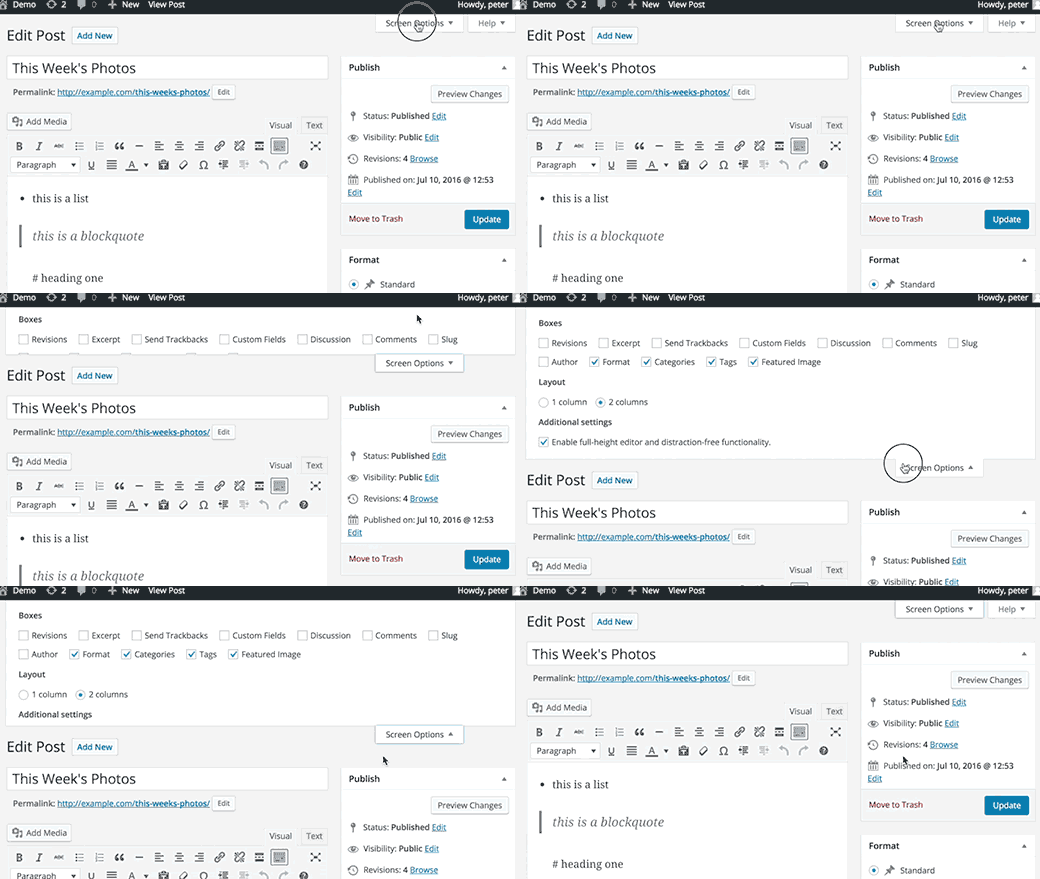
1. Show/Hide Things Using Screen Options
You may have noticed the Screen Options button on some pages of your WordPress admin area. This Screen Options button allows you to show and hide items on the WordPress admin screen you are currently viewing.
2. Move, Add, or Delete Dashboard Widgets
By default, users are redirected to the dashboard page in WordPress admin area when they login. The dashboard page has several handy shortcuts pointing to different sections of your website.
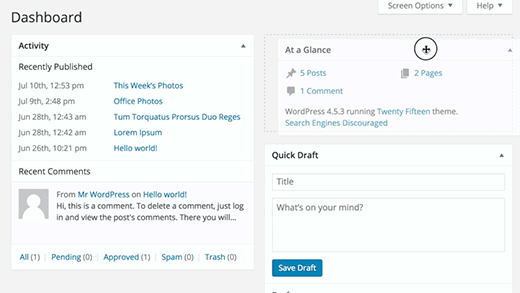
These sections are divided into different boxes called dashboard widgets. You can click on the Screen Options button to show or hide these boxes. You can also drag and drop them to rearrange items on your WordPress dashboard.
3. Paste URL to Make Links in Visual Editor
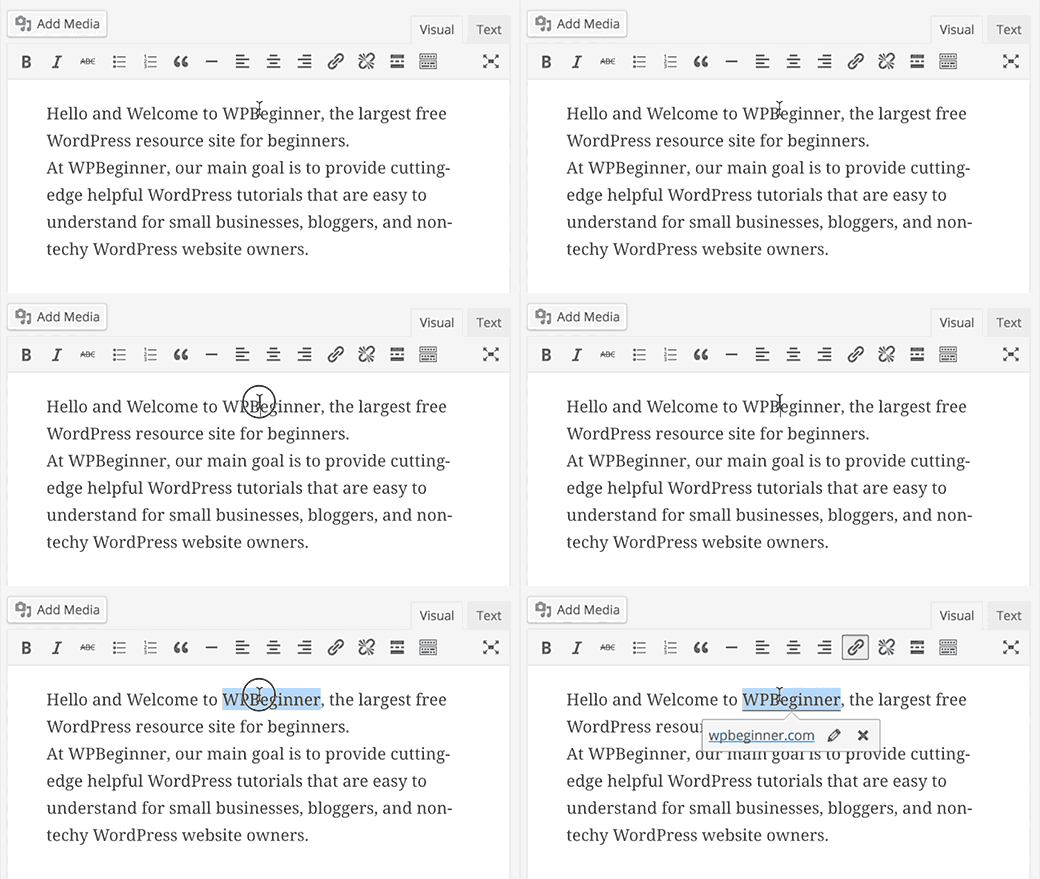
WordPress 4.5 introduced inline link editing in the visual editor.Many users didn’t realize that instead of using a popup to paste a link, they can just select a text and press CTRL+V (Command+V on mac) to paste the URL. The visual editor automatically converts it into a link.
4. Accessibility Mode for Widgets
We all like how easy it is to just drag and drop widgets into sidebars. However, for many users it is not easy to drag and drop things using a mouse or trackpad.WordPress also comes with a hidden accessibility mode for widgets. This accessibility mode makes it easier to add widgets without draging and dropping the items.
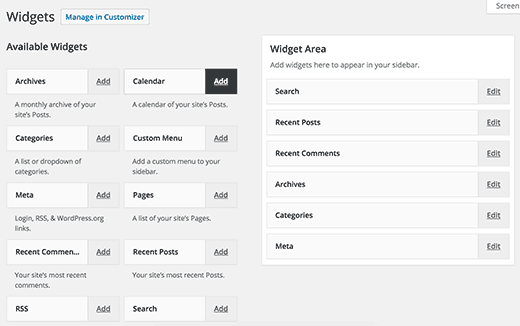
Accessibility mode for WordPress widgets can be activated by clicking on Screen Options button on the Appearance » Widgets page.
5. Preview Themes Without Activating Them
Many users worry that changing their WordPress theme will have unwanted consequences for their website. Their concern is genuine, that’s why we prepared a checklist of things you must do before changing your WordPress theme.One of the things you can do is to test the new theme without activating it. Simply install your new WordPress theme and then go to Appearance » Themes page.
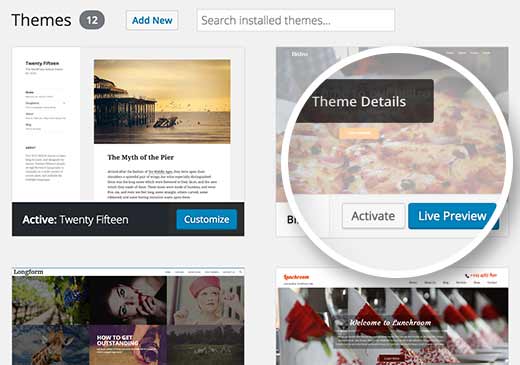
Take the mouse to the newly installed theme’s thumbnail and then click on Live Preview button. WordPress will launch the theme customizer showing preview of your website using the new theme.
6. Edit Images in WordPress
WordPress makes it easy to add images to your posts and pages. What many beginners don’t know is that WordPress also comes with some basic image editing features.
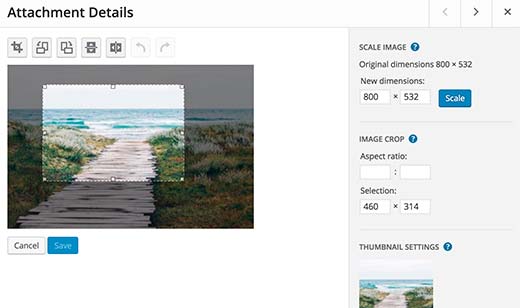
Simply visit Media » Library page and then click on any image. From the image details popup you can click on the Edit Image button.In the image editing mode, you can crop, rotate, and resize an image. You can also flip an image in horizontal or vertical directions. These image editing features come in handy when you need to quickly crop or resize a large image file directly from WordPress.
7. Split Single Post into Multiple Pages
Want to split a lengthy post into multiple pages? Simply add <!–nextpage–> tag in your post and WordPress will split it into two pages. Add the tag again if you want to split it into more pages.
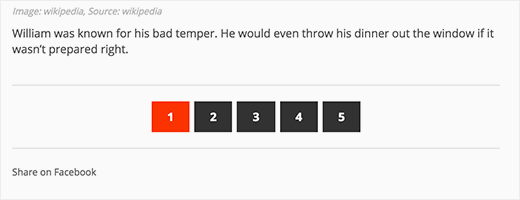
This feature is particularly helpful if you are writing an unusually lengthy article and don’t want users to scroll to much.
8. Embed Links, Videos, and Multimedia
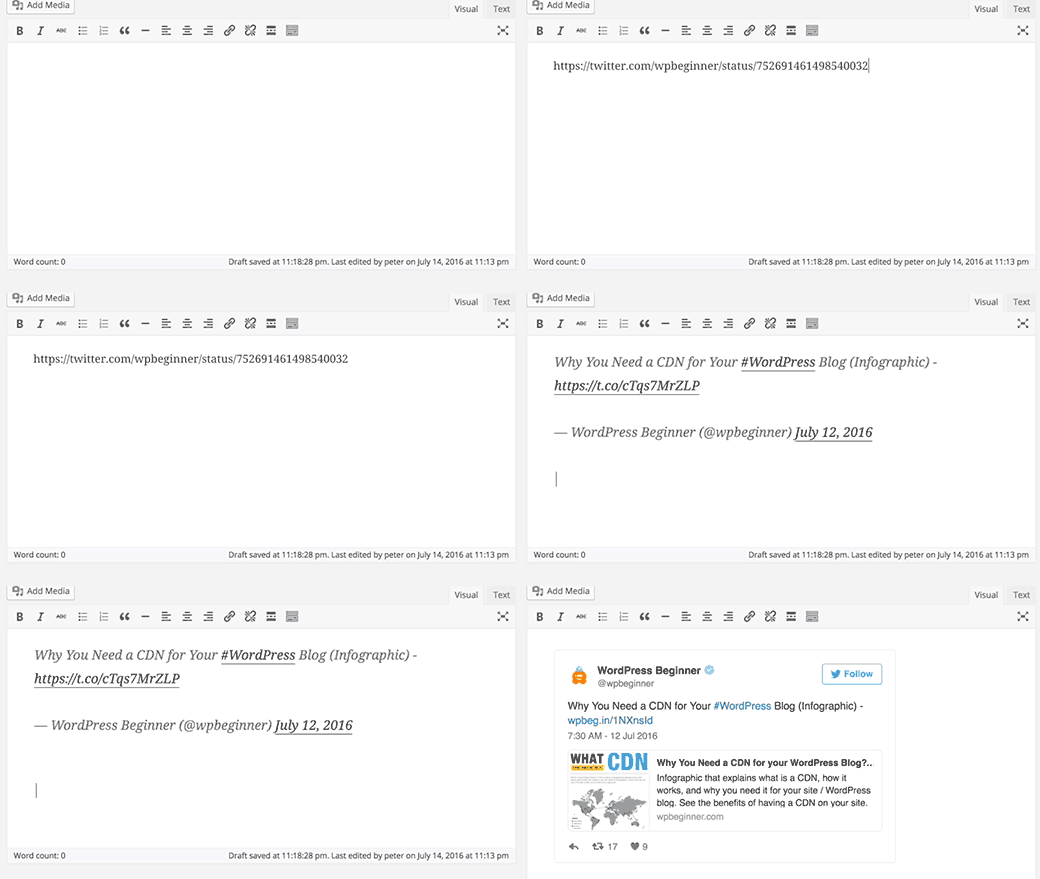
WordPress automatically embeds content from some of the most popular websites like YouTube, Twitter, Instagram, etc. All you need to do is paste a URL from one of the supported sites and WordPress will automatically embed it for you.
9. Hidden Secret Options Page in WordPress
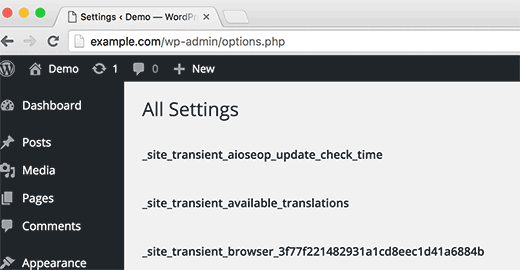
WordPress comes with a hidden master page for all your blog options. This page is hidden because users can easily mess things up here, so we don’t want you to use it. But you should definitely check it out. You can access it by visiting this URL:http://example.com/wp-admin/options.php
10. Markdown and Keyboard Shortcuts Help you Write Faster
Most WordPress users spend more time writing content than anything else on their site. This is is why WordPress developers are always trying to improve the writing experience in WordPress.WordPress comes with a whole range of keyboard shortcuts that you can use to write faster. Apart from these shortcuts, you can also use Markdown like formatting shortcuts. Just enter the formatting shortcuts and WordPress will convert them into HTML.
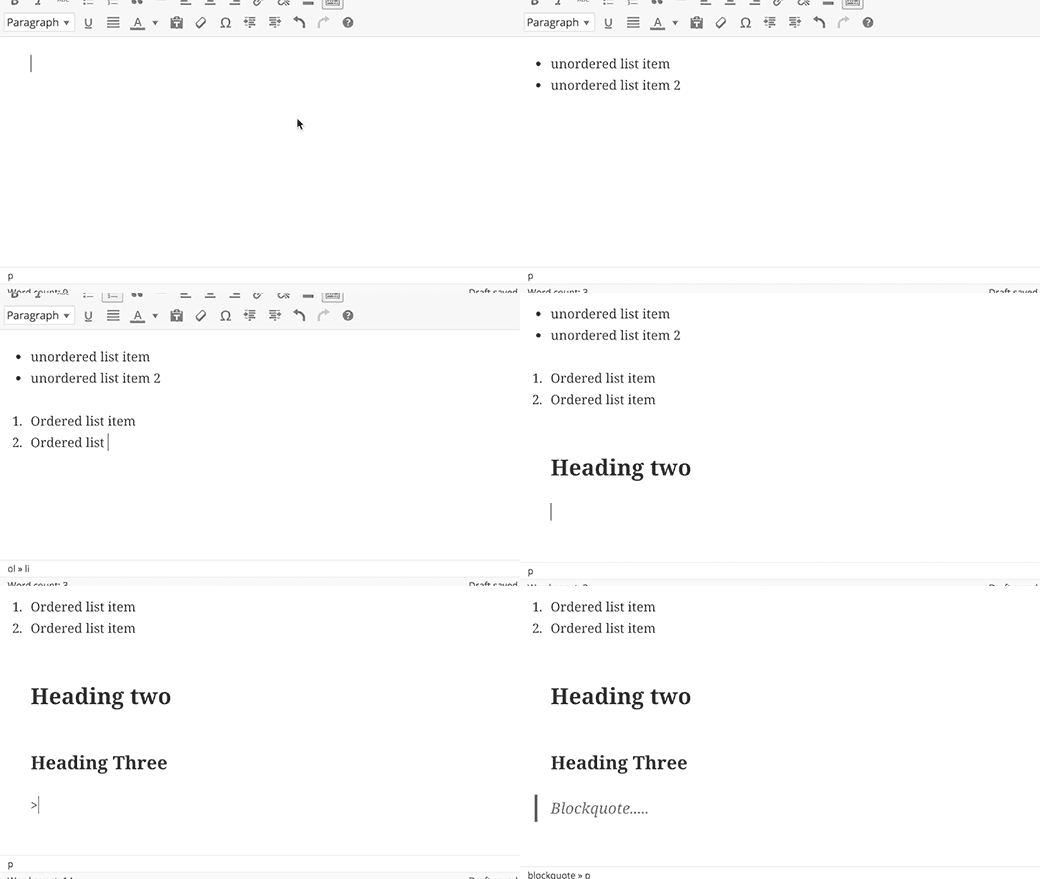
Using * or – will start an unordered list.
Using 1. or 1) will start an ordered list.
Using # will transform into h1. ## for h2, ### for h3 and so on.
Using > will transform into blockquote.
You can also disable these formatting shortcuts if you want.
AWS
Secured WordPress with Aurora on Linux Server
Instructions for using installed components with AWS Template for WordPress on Aurora
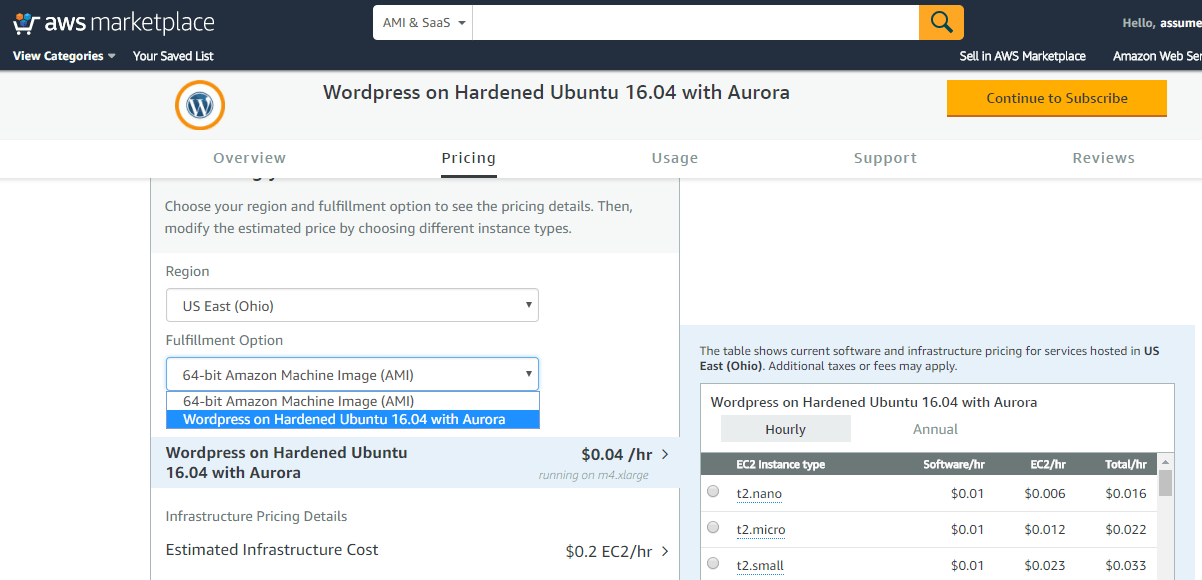
Note: Please do not choose Single Ami option for First time deployment
 A) Template Deployment:
In the input parameters IP address range entered for “ELBCIDR” will restrict the access to the Application URL for the Load Balancer via security group “SG for ELB”
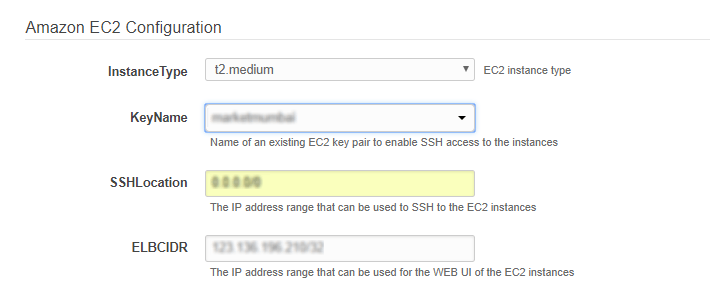
Please enter valid IP in CIDR format x.x.x.x/32 for “ELBCIDR” to access the application URL for completing the remaining stack configuration after template deployment is complete.
Please note x.x.x.x/32 for “ELBCIDR” is CIDR format for single IP.
Template Output provides the Application URL as well as Database details.
Access the application via a browser from valid IP range at the load balancer URL which is the website URL from the template output.

Please refer the steps in “D) Other information” below to finish the stack configuration.
B) RDS Cluster / Aurora Details:
RDS Cluster / Aurora Details can be obtained from the Output of the template.
Start using Wordpress by opening website URL from the Output of the template in a browser and enter custom details for your site.
Database details are already configured for the WordPress site in its config file as per inputs during template deployment and do not need to be configured by the user.
Details are also available in
/root/aurora_credentials.txt in the ec2 Instance.
C) SSH Connection: To connect to the deployed instance, Please follow Instructions to Connect to Ubuntu instance on AWS Cloud
1) Download Putty.
2) Connect to the virtual machine using SSH key Refer this link:
- Hostname: PublicDNS / IP of machine
- Port : 22
Username: To connect to the operating system, use SSH and the username is root
Password : Please click here to know how to get the password .
D) Other Information:
1.Default installation path: will be in your web root folder “/var/www/html”.
2.Default ports:
- Linux Machines: SSH Port – 22
- Http: 80
- Https: 443
To begin configuration please refer the following:
When you open the website URL you shall see the below screen
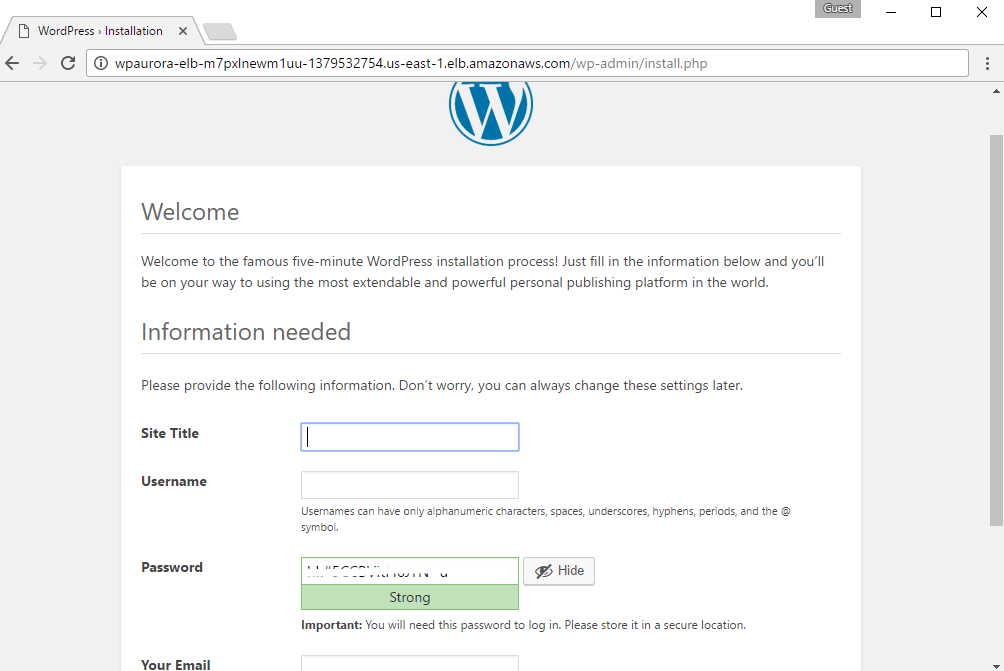
Database details have already been set during template deployment.
After filling the site details and going to next page your site configuration shall be complete.
A configured site shall be similar to below screen.
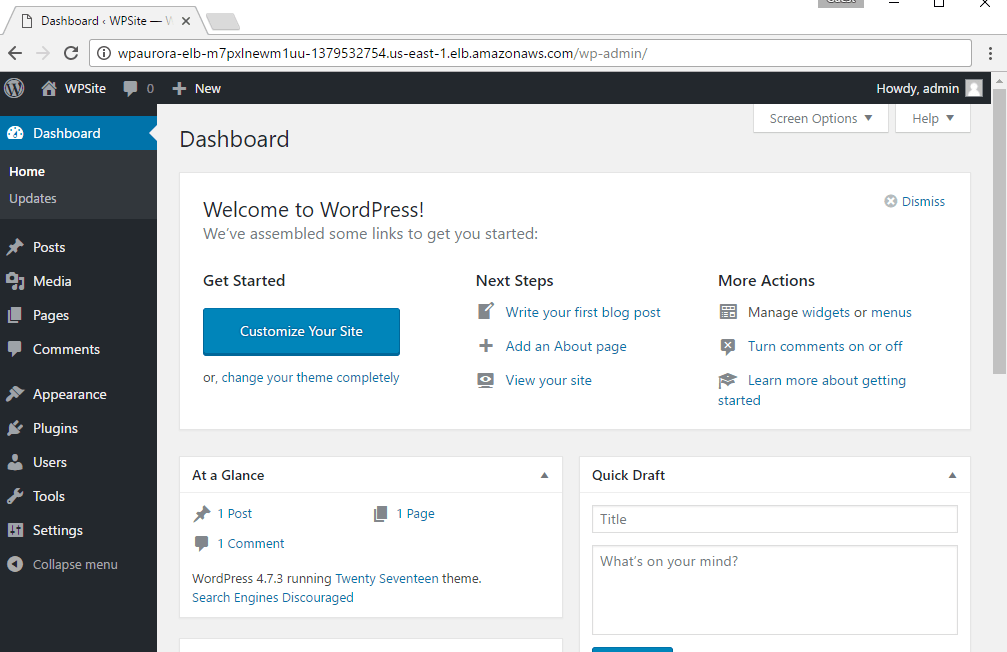
IMPORTANT:
During Template deployment if you have restricted access to “ELBCIDR” to specific IPs, in order to allow access to all users to your website please edit the security group “SG for ELB” as shown in pictures below by allowing access to “0.0.0.0/0”
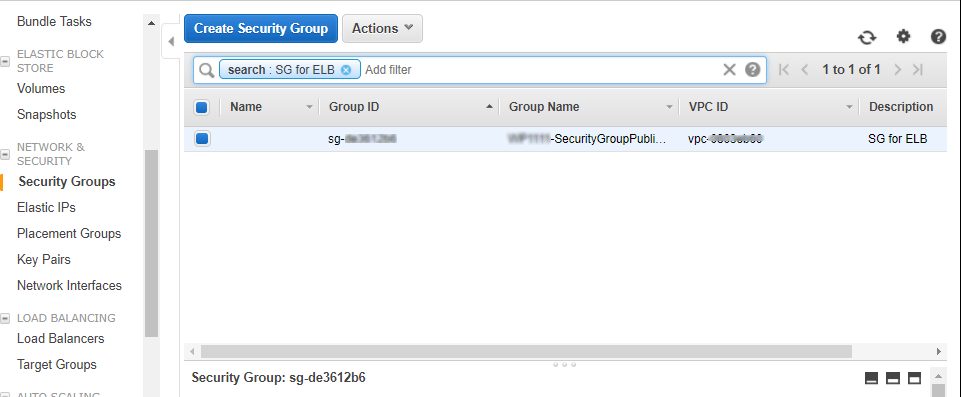
Edit Inbound Rules for “SG for ELB” to allow “0.0.0.0/0” instead of restricted IPs for public access to the configured website.


