
Overview
phpMyAdmin supports a wide range of operations with MySQL. The most frequently used operations are supported by the user interface (managing databases, tables, fields, relations, indexes, users, permissions, etc), while you still have the ability to directly execute any SQL statement. PHPMyAdmin is a web-based open source tool written in PHP designed to help manage MySQL database through the Web browser. Because of this PhpMyAdmin facilitates the management and maintenance of the MySQL database. PhpMyAdmin provides an easy way to use graphic interface to write and execute queries, manage users and databases, to export and import data.
Howto
Step by Step Installation Instructions
Step 1) Considering you have already have IIS Windows server with PHP support and have a running instance of MySQL.
Download the latest version of phpMyAdmin. You can do this from the link below:
https://www.phpmyadmin.net/downloads/
You should download a file with all languages (the file name ends with *all-languages.7z or *all-languages.zip).
File size would be about 5 MB.
Extract the files from the archive to phpmyadmin folder
This can be any folder you wish to create in your IIS default or another site.
For this example we will consider it as C:\inetpub\wwwroot\phpmyadmin
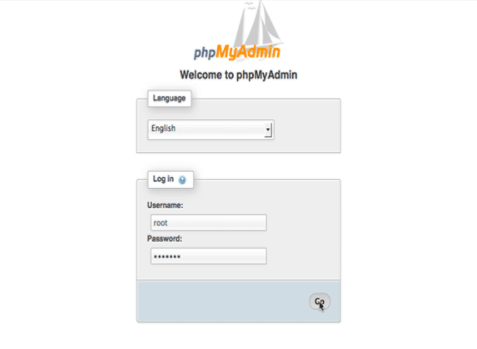
After Installation of phpMyAdmin , open a browser and check browser for http://localhost/phpmyadmin/ and you will see a window like this:
You cannot login just yet, we have to configure the setup.
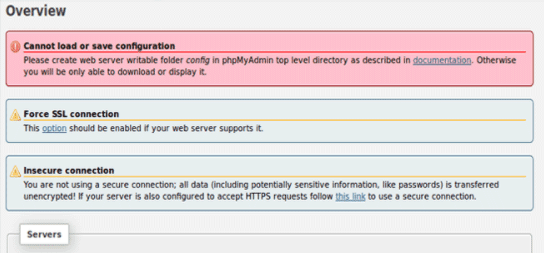
Step 2 ) Before you connect to the DB server, you should create a configuration file. This file can be created manually (simply use a text editor), also user can use using GUI. Visit localhost/phpmyadmin/setup/ in your browser.
During your first session you may see an error message as below
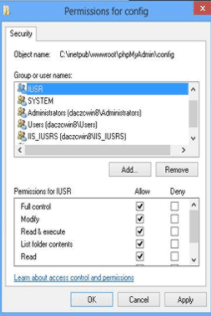
Step 3) To solve this problem you should create folder (C:\inetpub\wwwroot\phpmyadmin\config). After that give full rights for IIS_IUSRS group and IUSR user.
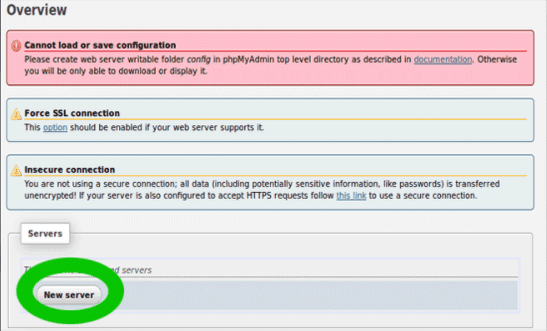
Step 4) Return to the config window. To configure the connection settings click on the “New Server” button.
Step 5) Enter the verbose name of the DB server, and then the server hostname. If necessary, you can specify other settings.

Step 6)Save the settings and then the server will redirect to the previous page.
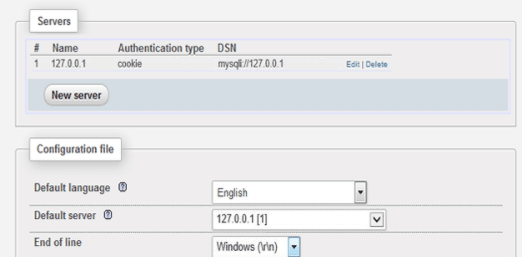
Step 7) Now save. The received file (config.inc.php) you should save to the root directory of phpmyadmin (C:\inetpub\wwwroot\phpmyadmin).
Open the authorization window (localhost/phpmyadmin/) and login with root account. You can later delete this config.
phpMyAdmin requires a dedicated MySQL account.
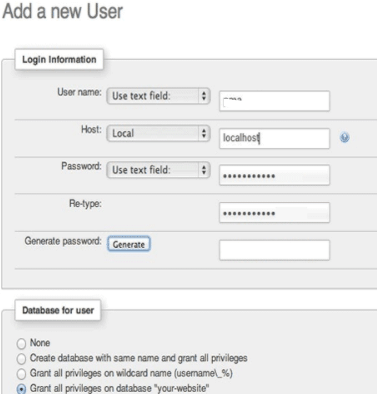
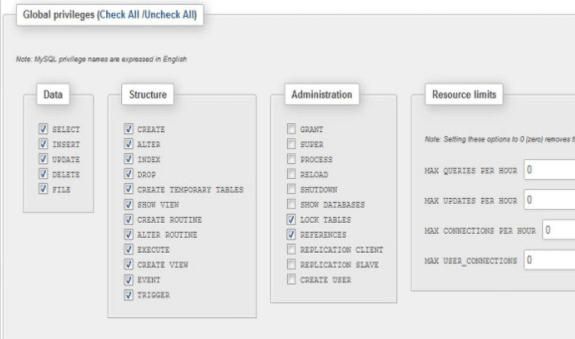
Step 8) You need to grant all database privileges to this user.
Finally, you have to uncomment / add lines in config.inc.php:
$cfg[‘Servers’][$i][‘controluser’] = ‘YOURUSER’;
$cfg[‘Servers’][$i][‘controlpass’] = ‘YOURPASSWORD’;