- In Windows Server Manager go to Dashboard and run Manage > Add Roles and Features.
- In Add Roles and Features wizard:
- Proceed to Installation Type step and confirm Role-based or feature-based installation.
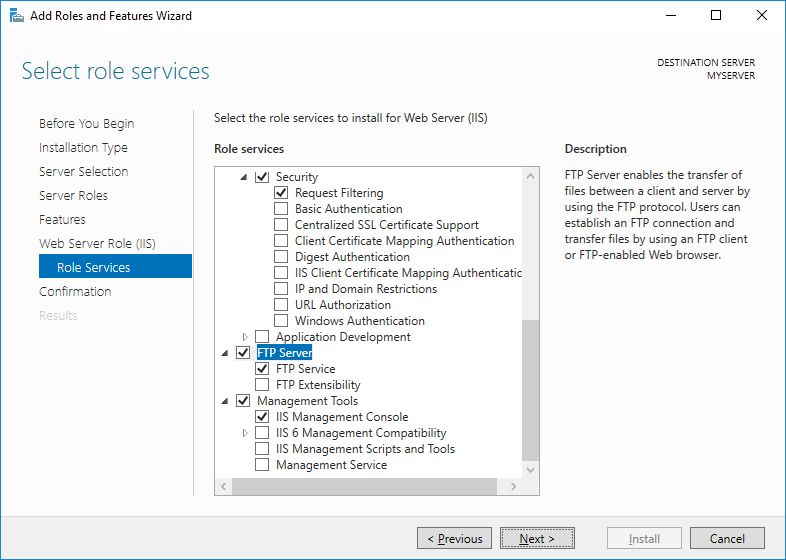
- Proceed to Server Roles step and check Web Server (IIS) role. Note that it is checked already, if you had IIS installed as a Web Server previously. Confirm installing IIS Management Console tool.
- Proceed to Web Server Role (IIS) > Role Services step and check FTP Server role service. Un check Web Server role service, if you do not need it.
- Proceed to the end of the wizard and click Install.
- Wait for the installation to complete.
If you do not have IIS installed yet:
- In Windows Server Manager go to Roles node and in Roles Summary panel click Add Roles.
- In Add Roles wizard:
- Proceed to Server Roles step and check Web Server (IIS) role.
- Proceed to Role Services step and check FTP Server > FTP Service role service. Uncheck Web Server role service, if you do not need it. Make sure Management Service > IIS Management Console role service is checked.
- Proceed to the end of the wizard and click Install.
- Wait for the installation to complete.
If you have IIS installed already (i.e. as a Web Server):
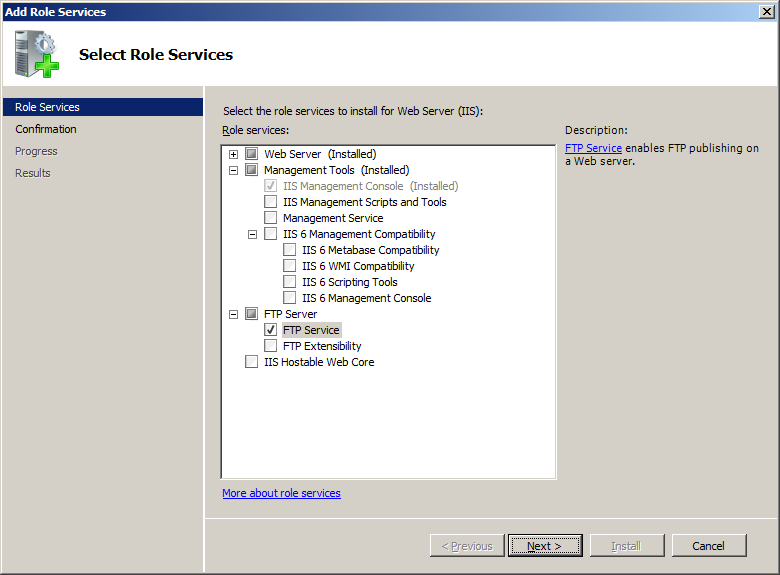
- In Windows Server Manager go to Roles node and in Web Server (IIS) > Role Services panel click Add Role Services.
- In Add Role Services wizard:
- Check FTP Server > FTP Service role service.
- Make sure that Management Service > IIS Management Console is checked.
- Confirm with Next button.
- Proceed to the end of the wizard and click Install.
- Wait for the installation to complete.
You need a TLS/SSL certificate to secure your FTP server. Ideally, you should acquire the certificate from a certificate authority.
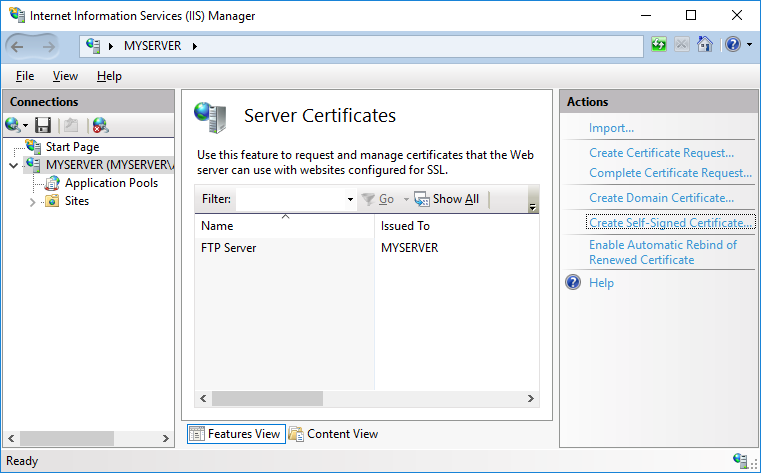
You may also create a self-signed certificate locally, but there will be warning when connecting to the server.
To create the self-signed certificate:
- In IIS Manager, open IIS > Server Certificates.
- Click on Create Self-Signed Certificate action.
- Specify a certificate name (e.g. “FTP Server”) and submit with OK.
New-SelfSignedCertificate PowerShell as an Administrator:New-SelfSignedCertificate -CertStoreLocation cert:\localmachine\my -DnsName ftp.example.comAn internal Windows firewall is automatically configured with rules for the ports 21, 990 and 1024-65535 when IIS FTP server is installed.
The rules are not enabled initially though some versions of Windows. To enable or change the rules, go to Control Panel > System and Security > Windows Firewall > Advanced Settings > Inbound Rules and locate three “FTP server” rules. If the rules are not enabled, click on Actions > Enable Rule.
If you want to add FTP server to manage your web site remotely, locate your web site node in IIS Manager and:
- Click Add FTP Publishing action.
- In Add FTP Site Publishing wizard:
- On an initial Binding and SSL Settings step, select Require SSL to disallow non-encrypted connections and select your certificate.
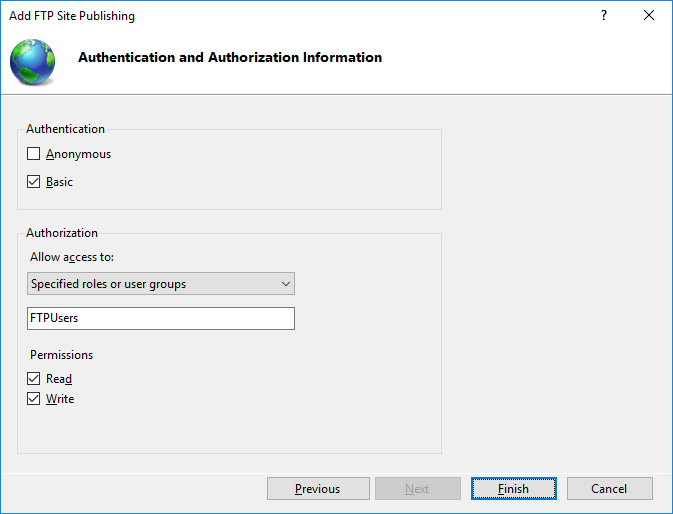
- On Authentication and Authorization Information step, select Basic authentication and make sure Anonymous authentication is not selected. Select which users (Windows accounts) you allow to connect to the server with what permissions. You can choose All users or select only some. Do not select Anonymous users.
- Submit with Finish button.
If you want to add a standalone FTP server to store/exchange files, locate Sites node (folder) of your Windows server in IIS Manager and:
- Click Add FTP Site action.
- In Add FTP Site wizard:
- On an initial Site Information step, give a name to your FTP site (if it’s the only site you are going to have, simple “FTP site” suffice) and specify a path to a folder on your server’s disk that is going to be accessible using FTP.
- On a Binding and SSL Settings step, select Require SSL to disallow non-encrypted connections and select your certificate.
- On Authentication and Authorization Information step, select Basic authentication and make sure Anonymousauthentication is not selected. Select which users (Windows accounts) you allow to connect to the server with what permissions. You can choose All users or select only some. Do not select Anonymous users.
- Submit with Finish button.
Connecting to Your FTPS Server
Start client like WinSCP.
Login Dialog will appear.
On the dialog:
Select FTP protocol and TLS/SSL Explicit encryption.
Enter your Windows server hostname to Host name field. Avoid using an IP address to allow WinSCP to verify that the hostname matches with host the server’s certificate was issued to (not applicable to self-signed certificates).
Specify username and password for Windows account you want to connect with (when using domain accounts, you need to specify a full username with format domain\username).
You may want to save your session details to a site so you do not need to type them in every time you want to connect. Press Save button and type site name.
Press Login to connect.
If you are using self-signed certificate, you will be prompted to accept it.
