
1-click AWS Deployment 1-click Azure Deployment 1-click Google Deployment
Overview
Microsoft Visual Studio is an integrated development environment (IDE) where we can view and edit code, and then debug, build, and publish apps for iOS, Windows, Android and the cloud. Versions are also available for Mac and Windows. We can use Visual Studio 2017 for SharePoint to develop SharePoint hosted add-in or provider hosted add-in. Also, we can create some console application or windows application to interact with SharePoint object
Supported Operating Systems:
- Windows 10 version 1507 or higher: Home, Professional, Education, and Enterprise (LTSB and S are not supported)
2. Windows Server 2016: Standard and Datacenter
3. Windows 8.1 (with Update 2919355): Core, Professional, and Enterprise
4. Windows Server 2012 R2 (with Update 2919355): Essentials, Standard, Datacenter
5. Windows 7 SP1 (with latest Windows Updates): Home Premium, Professional, Enterprise, Ultimate
Hardware Requirements:
- 8 GHz or faster processor. Dual-core or better recommended
2. 2 GB of RAM; 4 GB of RAM recommended (2.5 GB minimum if running on a virtual machine)
3. Hard disk space: up to 130 GB of available space, depending on features installed; typical installations require 20-50 GB of free space.
4. Hard disk speed: to improve performance, install Windows and Visual Studio on a solid-state drive (SSD).
5. Video card that supports a minimum display resolution of 720p (1280 by 720); Visual Studio will work best at a resolution of WXGA (1366 by 768) or higher
Additional Requirements:
- Administrator rights are required to install Visual Studio.
2. .NET Framework 4.5 is required to install Visual Studio. Visual Studio requires .NET Framework 4.6.1, which will be installed during setup.
3. Windows 10 Enterprise LTSB edition and Windows 10 S are not supported for development. You may use Visual Studio 2017 to build apps that run on Windows 10 LTSB and Windows 10 S.
4. Internet Explorer 11 or Edge is required for internet-related scenarios. Some features might not work unless these, or a later version, are installed.
5. For emulator support, Windows 8.1 Pro or Enterprise (x64) editions are required. A processor that supports Client Hyper-V and Second Level Address Translation (SLAT) is also required.
6. Universal Windows app development, including designing, editing, and debugging, requires Windows 10. Windows Server 2016 and Windows Server 2012 R2 may be used to build Universal Windows apps from the command line.
7. The Server Core and Minimal Server Interface options are not supported when running Windows Server.
8. Team Foundation Server 2017 Office Integration requires Office 2016, Office 2013, or Office 2010.
9. Xamarin. Android requires a 64-bit edition of Windows and the 64-bit Java Development Kit (JDK).
10. PowerShell 3.0 or higher is required on Windows 7 SP1 to install the Mobile Development with C++, JavaScript, or .NET workloads.
Microsoft’s Visual Studio 2017 has become an outstanding development tool, for its complete support for all Microsoft’s platforms, and also for its capability to target non-Windows operating systems, which goes well beyond previous releases. Microsoft itself is in transition, with an increasing focus on cloud services such as Office 365 and cloud infrastructure in the form of Azure. Many Azure users run Virtual Machines (VMs) on Linux rather than Windows, and rather than resisting this trend, Microsoft has actively supported it, building partnerships with Linux vendors to improve integration. SQL Server is in the process of being ported to Linux, and the open source fork of .NET, called .NET Core, works on Linux as well as Windows. In the mobile area, Microsoft now has strong support for building cross-platform mobile apps with C# via its Xamarin tools. You can also use Apache Cordova or Visual C++ for iOS and Android. Visual Studio also retains its traditional role as the primary development tool for the Windows platform. Microsoft has just completed the Windows 10 Creators Update, with new features including 3D and mixed reality support (new VR headsets from the likes of HP, Dell and Lenovo will democratize mixed reality experiences previously reserved for the high-end HoloLens devices); an improved Windows Subsystem for Linux; and better Ink support in UWP (Universal Windows Platform) apps. Visual Studio 2017 along with the updated Windows 10 SDK is the best development tool for Windows 10. Worth noting is that, despite limited success to date, Microsoft is still pushing for greater adoption of UWP applications. In Windows 10 Creators Update, there is a new option to restrict application installs to Store-only. The idea is that Store applications are more trusted and better behaved, though this can now include Win32/Win64 applications that are wrapped with the Desktop Bridge If this idea wins adoption, then it pays to develop UWP applications. UWP applications also have a new feature in Windows 10 Creators Update, which is the ability to display a new view called Compact Overlay mode or Picture in Picture. This is an always-on-top view which is intended to pop up a small status window while your app is running, but the user is working primarily on something else. It is ideal for a chat application, for example. This release of Visual Studio comes with the final 1.0 release of .NET Core and ASP.NET Core, the culmination of a long process to build a cross-platform version of the .NET Framework. The final release uses MS Build for building projects, but with a simplified project format that can be edited manually, without unloading the project. It would now be a mistake to perceive.
Professional Visual Studio 2017 is the guide to getting the most out of Microsoft’s primary programming technology. From touring the new UI to exploiting advanced functionality, this book is designed to help professional developers become more productive. A unique IDE-centric approach provides a clear path through the typical workflow while exploring the nooks and crannies that can make your job easier. Visual Studio 2017 includes a host of features aimed at improving developer productivity and UI, and this book covers them all with clear explanation, new figures, and expert insight. Whether you’re new to VS or just upgrading, this all-inclusive guide is an essential resource to keep within arm’s reach.
Visual Studio 2017 fixes the issues that kept professionals from adopting VS 2015, and includes new features and tools that streamline the developer’s job. This book provides the straightforward answers you need so you can get up to speed quickly and get back to work.
- Master the core functionality of Visual Studio 2017
- Dig into the tools that make writing code easier
- Tailor the environment to your workflow, not the other way around
- Work your way through configuration, debugging, building, deployment, customizing, and more
Microsoft is changing their release pace, so developers need to quickly get a handle on new tools and features if they hope to remain productive. The 2017 release is designed specifically to help you get more done, in less time, with greater accuracy and attention to detail.
Visual Studio stands head and shoulders about its competition. The team responsible for developing Visual Studio has always put the productivity of people who code for a living at the top of their priority list. This version continues this tradition. Visual Studio always incorporates the latest advances in Microsoft’s premier programming languages (Visual Basic and C#), as well as adding little tidbits of functionality that are a boon to coders. But at a higher level, Visual Studio 2017 embraces open-source, mobile development, and cloud computing in a variety of ways. Azure is continually introducing new features and products and Visual Studio 2017 integrates seamlessly with them. While, in theory, it is possible to create any .NET application using tools as simple as Notepad and a command-line window, the typical developer would never think to do so. Visual Studio 2017, as was the case with its predecessors, includes a host of improvements and features that are aimed at making the life of a developer easier.
Visual Studio 2017 is a massive product no matter which way you look at it. It can be intimidating to newcomers and difficult for even experienced .NET developers to find what they need. And that’s where this book comes in. Professional Visual Studio 2017 looks at every major aspect of this developer tool, showing you how to harness each feature and offering advice about how best to utilize the various components effectively. Visual Studio has gone through a number of transformations in the last two decades. Right from its Visual Basic and Interdev days, Visual Studio has evolved with every release to address new markets and provide improved experiences across multiple platforms and devices. Visual Studio 2017 (VS 2017) is the 11th version of Visual Studio with a focus on improving experiences around mobile apps, cloud services and devops.New IDE features like interactive code suggestions ,easy code navigation, debugging, fast builds and quick deployment are some of the productivity and performance enhancements in VS 2017.
Visual Studio is a Combined Development Environment developed by Microsoft to develop GUI, Web applications, web apps, mobile apps, cloud, and web services, etc. With the help of this IDE, one can create managed code as well as native code. It uses the numerous platforms of Microsoft software development software like Windows store, Microsoft Silverlight, and Windows API, etc. It is not a language-specific IDE as you can use this to write code in C#, C++, VB(Visual Basic), Python, JavaScript, and many more languages. It provides support for 36 different programming languages. It is available for Windows as well as for macOS.
The first version of Visual Studio named as Visual Studio 97 having version number 5.0. The latest version of Visual Studio is 15.0 which was released on March 7, 2017. It is also termed as Visual Studio 2017. The supported .Net Framework Versions in latest Visual Studio is 3.5 to 4.7. Java was supported in old versions of Visual Studio but in the latest version doesn’t provide any support for Java language.
3 Editions of Microsoft Visual Studio as follows:
- Community:It is a freeversion which is announced in 2014. All other editions are paid. This contains the features similar to Professional edition. Using this edition, any individual developer can develop their own free or paid apps like .Net applications, Web applications and many more. In an enterprise organization, this edition has some limitations. For example, if your organization have more than 250 PCs and having annual revenue greater than $1 Million(US Dollars) then you are not permitted to use this edition. In a non-enterprise organization, up to five users can use this edition. Its main purpose is to provide the Ecosystem(Access to thousands of extensions) and Languages(You can code in C#, VB, F#, C++, HTML, JavaScript, Python, etc.) support.
2.Professional:It is the commercial edition of Visual Studio. It comes in Visual Studio 2010 and later versions. It provides the support for XML and XSLT editing and includes the tool like Server Explorer and integration with Microsoft SQL Server. Microsoft provides a free trial of this edition and after the trial period, the user has to pay to continue using it. Its main purpose is to provide Flexibility Productivity (Powerful features such as CodeLens improve your team’s productivity), Collaboration (Agile project planning tools, charts, etc.) and Subscriber benefits like Microsoft software, plus Azure, Pluralsight, etc.
Enterprise:It is an integrated, end to end solution for teams of any size with the demanding quality and scale needs. Microsoft provides a 90-days free trial of this edition and after the trial period, the user has to pay to continue using it. The main benefit of this edition is that it is highly scalable and deliver high-quality software.
Creating Installer for Visual Studio:
1. Open the Visual Studio solution
Open the solution for which you want to create the install package.

2. Add an Advanced Installer Project to the solution
Once the Visual Studio solution is loaded:
- From the “New Project” dialog select Advanced Installer Project
- In the “Solution” field select Add to solution option
- In the “Name” field you can write a name for your project
- Press to add the project to the solution

By default, when adding an Advanced Installer Project, the build output of the solution will not be automatically added to the installer project, to do this you must:
- Go to the “Files and Folders” section of the Installer Project
- Press “Add Project Output” button
- Select the “Primary Output” and “References”
- Press
![]()
![]() The output of each project contained by the solution is automatically synchronized in the Advanced Installer project.
The output of each project contained by the solution is automatically synchronized in the Advanced Installer project.
Following these steps, Advanced Installer Extension for Visual Studio adds in the installer project all application references except the Microsoft .NET assemblies.

3. Create the first install package
In Visual Studio select “Build” > “Build Solution” option to start the build.
After the build is completed successfully, it will create two main files: HelloWorld.exe which is the output from the C# project and Installer Project.msi which is the installation package.

4. Edit the installer project
Using the Advanced Installer Project viewer, you can edit basic information about your installer like Product Details, Launch Conditions, Install Parameters, and much more..

Let’s suppose we have an Enterprise edition of Advanced Installer. By default, the installer project will be created based on a Freeware license. Since we want to use features from the Enterprise edition, like selecting a theme for the installation dialogs, we will need to upgrade our project type:
- Press the button to open your installer project in Advanced Installer
- From the “Project” menu select “Options…”
- Navigate to the Project Type Tab and select Enterprise
- Press the button

Now, that we have an Enterprise project we have full access to all the available Advanced Installer Enterprise features.
- Go to Themes Page
- From the right view select the desired theme and variation for your installer dialogs
- Save the project and exit Advanced Installer
Visual Studio will ask you if you want to reload the installer project since it was modified. Press the button.
5. Add another Visual Studio Project to the solution
If an Advanced Installer Project is added to a solution, it will automatically import the build output and all useful information related to the projects from the solution. If later, the existing projects are modified, or another project is added to the solution the import operation must be redone.
Let’s add a new Visual Studio project to the solution:
- From the “New Project” dialog in Visual Studio select “Visual C#” > “WPF App”
- In the “Solution” field select Add to solution option
- Press the button. The new project will be added to the solution
- Rebuild the solution

6. Create the final install package
Include the second project in the installer package:
- Select the Installer Project.aip file from the “Solution Explorer”
- Check that both projects output builds are included in the installer package from the “Files and Folders” page
- Rebuild the solution
- Test the new installation package
The newly created installer will contain all the projects from the solution.

7. Automatically import .VDPROJ files (optional)
If you have solutions that contain old Visual Studio Deployment projects (.vdproj) you can automatically convert them to an Advanced Installer project and have it included in your solution, replacing the old VDPROJ. Just open the solution in Visual Studio, with our Advanced Installer VS extension installed, and VS will prompt you to accept the conversion from VDPROJ to AIPROJ (Advanced Installer VS project).
The new project Advanced Installer project will contain all the resources from the old VDPROJ. If you want to customize it more just use the “Edit in Advanced Installer” button, available when you open the .aip file in Visual Studio.
Creating a UML project in Visual Studio
You can create UML project for any of your project in Visual Studio. Note that one Visual Studio project can associate with at most one UML project and you cannot create UML project without associating it with any Visual Studio project. Once you have created a UML project for a Visual Studio project, you cannot remove it or de-associate it.
Creating a New UML Project
- In Visual Studio, select the project where you want to create a UML project for it.
- Right click on the project and select Open Visual Paradigm from the popup menu.


Open Visual Paradigm from Visual Studio project - Select from the Project Structure window the location of the Visual Paradigm project is to be saved. The Visual Paradigm project, with .vpp extension is the UML project file that is going to be associated with the selected Visual Studio project file. Select Create in default path will save the UML project to %Visual Studio_Project_Directory%/vpproject while selecting Create at external location require you to specify the project path you desire. If you want to create in default path for all projects, check Create in default path and Remember my decision.
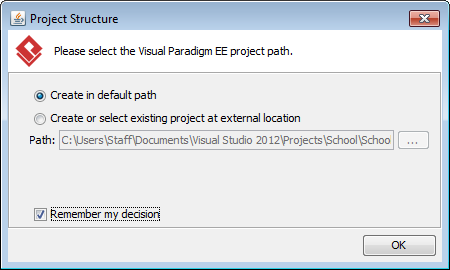

Create a new UML project - Click OK.
Creating a UML Project by Importing an Existing .vpp Project File
- In Visual Studio, select the project where you want to create a UML project for it.
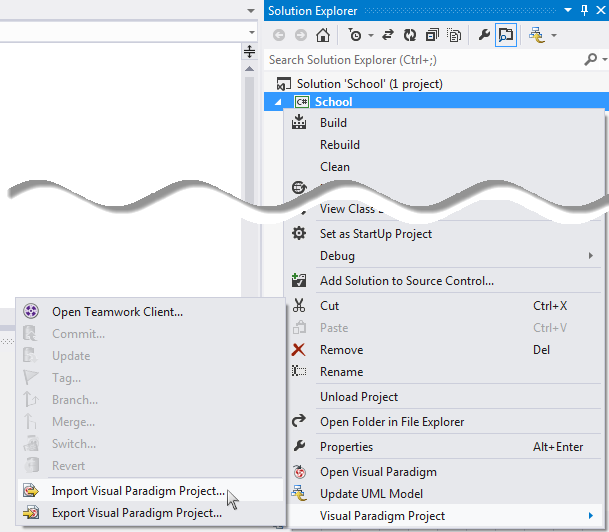
- Right click on the project and select Visual Paradigm Project > Import Visual Paradigm Project… from the popup menu.

Import Visual Paradigm project - Specify the path of source .vpp project as well as the location of the imported project file is to be saved. Select Create in default path will save the UML project to %Visual Studio_Project_Directory%/vpproject while selecting Create at external location require you to specify the project path you desire. If you want to create in default path for all projects, check Create in default path and Remember my decision.
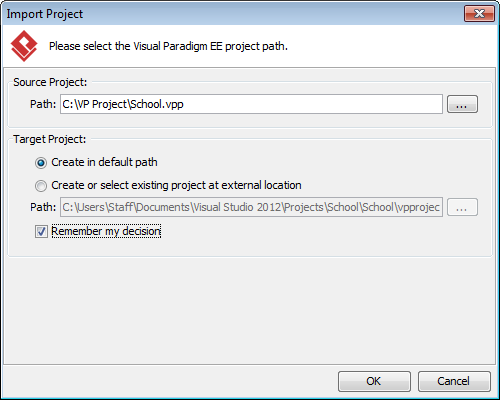

Import an existing .vpp project file - Click OK.
How to Open a UML Project in Visual Studio
Opening a UML Project
- In Visual Studio, select the project where you want to open its UML project.
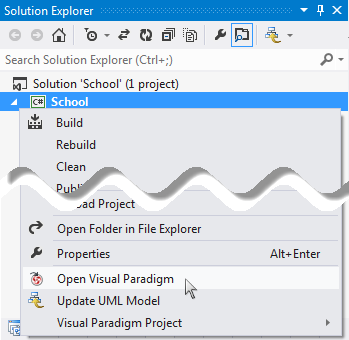
- Right click on the project and select Open Visual Paradigm from the popup menu.
How to Reverse Engineer UML Model in Visual Studio:
Reverse engineering is the process to reverse engineer UML model from source files in Visual Studio project. With reverse engineering you can visualize your program or system with class diagram. Before reverse engineering, you must open the UML project from the Visual Studio project.
Project Based Reverse Engineering
You can produce and update UML models from all source files in a Visual Studio project. Models of the selected project, child namespaces and classes will be created (if the models are not already exists) or updated. To reverse engineer from an Visual Studio project, right-click on the project node in Visual Studio and select Update UML Model from the popup menu.
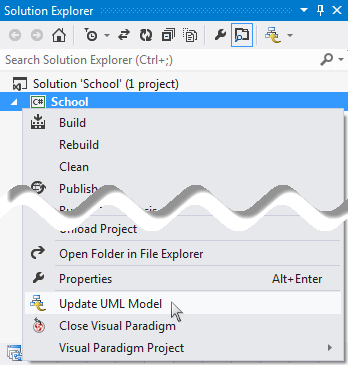 |
| Update the whole UML project from a Visual Studio project |
Namespace Based Reverse Engineering
You can produce and update UML models from source files under namespace. Models of the selected namespace, child namespaces and classes will be created (if the models are not already exists) or updated. To reverse engineer from a namespace in a Visual Studio project, right-click on the namespace in any tree and select Update UML Model from the popup menu.
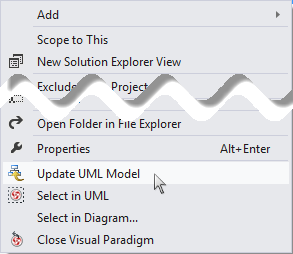 |
| Update UML package and its containing classes from a namespace folder |
Class Based Reverse Engineering
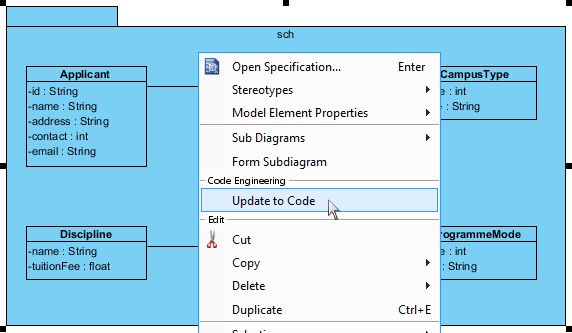
You can produce and update UML models from classes in Visual Studio. Models of the selected class and child classes (inner class) will be created (if the models are not already exists) or updated. To reverse engineer code from a class in a Visual Studio project, right-click on the class file in any tree or in code editor and select Update UML Model from the popup menu.
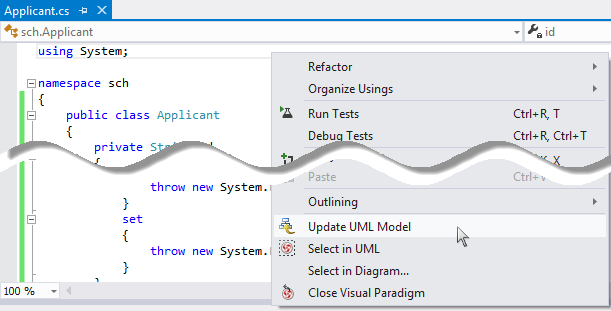 |
| Update UML model from source file |
How to Generate Source Code from UML in Visual Studio?
Code generation creates and updates source files in a Visual Studio project from UML models. You can select to update the whole project, package(s) and class(es) from Visual Paradigm to Visual Studio. Before updating source files, you must open the UML project from the Visual Studio project.
Project Based Code Generation
You can generate and update source files from the whole UML project. Packages and classes will be created (if not already exists) or updated. To generate/update source files from UML project, perform any of the steps below:
- Click

 at the top of Diagram Navigator.
 - Right click on the root node of Diagram Navigator and select Update All to Code from the popup menu.
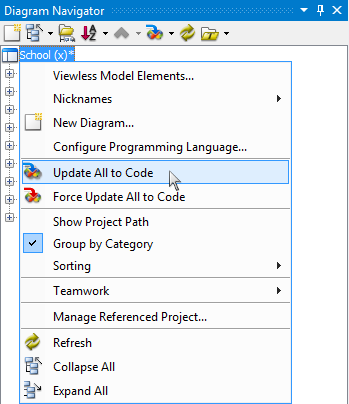

Update the whole project from UML project
Package (Namespace) Based Code Generation
You can generate and update namespace and its containing source file(s) from a UML package. Namespace and classes will be created (if not already exists) or updated. To generate/update source files from UML package, perform any of the steps below:
- Right click on the package in any diagram and select Update to Code from the popup menu.

Update source files from UML package - Right click on the package under Diagram Navigator/Model Explorer/Class Repository and select Update to Code from the popup menu.
Class Based Code Generation
You can generate and update source file from a UML class. Class will be created (if not already exists) or updated. To generate/update source file from UML class, perform any of the steps below:
- Right click on the class in any diagram and select Update to Code from the popup menu.


Update source file from UML class - Right click on the class under Diagram Navigator/Model Explorer/Class Repository and select Update to Code from the popup menu.
How to Select UML Class from Source Code in Visual Studio?
Once a UML class is associated with a source file by code reversal/generation, you can select from source file the corresponding UML class in Visual Paradigm.
Selecting UML Class in Model Explorer
To select the UML class from a source file, right-click on the class file in any tree or in code editor and select Select In Model from the popup menu.
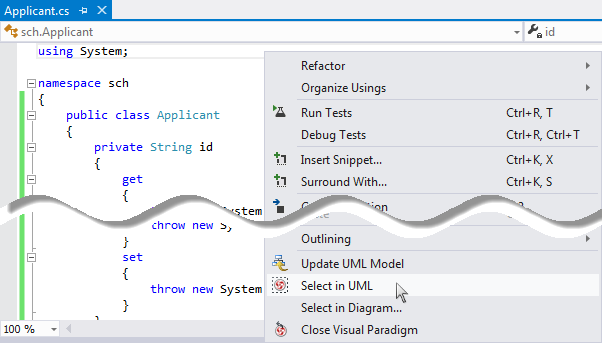 |
| Open the UML class from a source file |
Selecting UML Class in Diagram
To select the view of UML class from a source file, right-click on the class file in any tree or in code editor and select Select In Diagram… from the popup menu. If the class has been visualized with multiple views, you will be prompted to select a view to open.
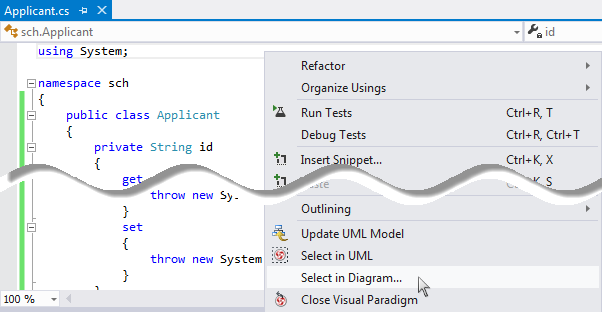 |
| Open the view of UML class from a source file |
Selecting source file in Visual Studio from UML class
Once a UML class is associated with a source file by code reversal/generation, you can select from UML class the corresponding source file in Visual Studio.
Selecting Source File from UML Class
To open a source file from a UML class, right-click on the UML class in Diagram Navigator/Model Explorer/Class Repository or in diagram and select Browse Code from the popup menu. This opens the corresponding source file in code editor.
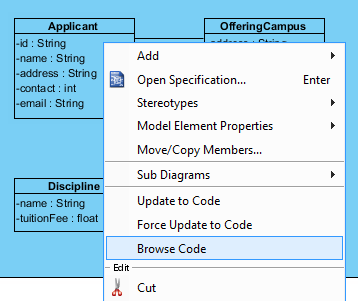 |
| Select source file from UML class |
Benefits of Visual Studio 2017
1. Faster startup time
The first thing you’ll notice is a much faster startup time, and faster loading of large solutions. Faster is always good. If you get code from someone and you want to open it in Visual Studio, you can just do that – no solution or project required. Just use the new Folder command under File, Open, and all the files in the folder will be opened and you can use Solution Explorer to move around between them, as well as exploration commands like Go To Definition and more.
2. Run to Click / Run to Cursor
Out of the many new things in Visual Studio 2017, I want to highlight one little detail: Almost nobody knows about a debugging feature called Run To Cursor. I don’t know how many releases of Visual Studio it’s been in, but it’s been around for more than a decade. Yet, whenever I use and it and work with someone new, they invariably say, “Hey! What did you just do?!”
It’s a way to jump a few lines ahead (past a loop, let’s say) without mashing on the Step Over button dozens of times or having to set a breakpoint and then clear it. You just right-click, and then mouse your way to the Run to Cursor command on the context menu. Or, use the keyboard shortcut—assuming of course that you had any idea this command even exists. I have shown it to hundreds of people who had no idea it was there!
And in Visual Studio 2017, they’ve surfaced it in a delightfully unobtrusive way. When your application is stopped at a breakpoint, as you move the mouse over code, a small version of the debug “go” toolbar button will appear at the left of each line. Click it to run the application to that line. No breakpoint will be created—it will be just as though you clicked Step Over however many times it would have taken to get there. They call it Run to Click because it doesn’t matter where the cursor is at the moment you click, unlike the Run to Cursor context menu command. Other than that, they are the same.
3. Find All References
The tools in Visual Studio help you find specific types or functions, or the places in your code that use them. Some of these have been around unchanged since that very first release, but others are freshened regularly. If you don’t know what Find All References does, or you’ve never used the Go To command on the edit menu to get to a particular line in a file, then it’s past time you learned these ways to navigate code quickly. In this release, Find All References has new filtering, sorting and grouping to make it even quicker to narrow in on the code you’re looking for.
4. Go To commands
In Visual Studio 2017, there are six new Go To commands that can dramatically speed up the how you learn your way around code. The old Go To went to a specific line number, but now you can enter the name of a file, a type (class), a member or a symbol. If the code base you’re working with uses the same string of characters in many different names, this will make things much quicker for you.
5. Install new Workloads on the fly
When you install Visual Studio, you choose specific workloads that you want to use such as Desktop development with C++ or Azure development. If you want to start working in another language or targeting another platform, you don’t need to re-install Visual Studio or make changes using Control Panel. You can use the Quick Launch feature at the top right (another part of Visual Studio too few people know about) and just start typing the kind of work you want to do. Look for a suggestion labeled workload. For example, if you typed Python, one of the choices might be “Python development (workload).” Choose that and the templates and other components you need will be installed for you. You can also launch the installer from the New Project Dialog. After all, it’s usually while looking at that dialog that you realize you’re missing some project templates! Again, this is a small change, but not having to exit the product, bring up some other tool and go through an installation process makes a difference and keeps your mind on what you are there to do.
–Introduction to Visual Studio
Visual Studio is an Integrated Development Environment(IDE) developed by Microsoft to develop GUI(Graphical User Interface), console, Web applications, web apps, mobile apps, cloud, and web services, etc. Visual Studio uses Microsoft software development platforms such as Windows API, Windows Forms, Windows Presentation Foundation, Windows Store and Microsoft Silverlight. It can produce both native code and managed code. It is not a language-specific IDE as you can use this to write code in C#, C++, VB, Python, JavaScript, and many more languages. It provides support for 36 different programming languages. It is available for Windows as well as for macOS.
Visual Studio Editions:
There are 3 different types of editions
1.Community:
It is a free version which is announced in 2014. All other editions are paid. This contains the features similar to Professional edition. Using this edition, any individual developer can develop their own free or paid apps like .Net applications, Web applications and many more. In an enterprise organization, this edition has some limitations. For example, if your organization have more than 250 PCs and having annual revenue greater than $1 Million(US Dollars) then you are not permitted to use this edition. In a non-enterprise organization, up to five users can use this edition. Its main purpose is to provide the Ecosystem(Access to thousands of extensions) and Languages(You can code in C#, VB, F#, C++, HTML, JavaScript, Python, etc.) support.
2.Professional:
It is the commercial edition of Visual Studio. It comes in Visual Studio 2010 and later versions. It provides the support for XML and XSLT editing and includes the tool like Server Explorer and integration with Microsoft SQL Server. Microsoft provides a free trial of this edition and after the trial period, the user has to pay to continue using it. Its main purpose is to provide Flexibility(Professional developer tools for building any application type), Productivity(Powerful features such as CodeLens improve your team’s productivity), Collaboration(Agile project planning tools, charts, etc.) and Subscriber benefits like Microsoft software, plus Azure, Pluralsight, etc.
3.Enterprise:
It is an integrated, end to end solution for teams of any size with the demanding quality and scale needs. Microsoft provides a 90-days free trial of this edition and after the trial period, the user has to pay to continue using it. The main benefit of this edition is that it is highly scalable and deliver high-quality software.
Visual Studio 2017
Visual Studio 2017 to develop apps for Android, iOS, Windows, web, and cloud. Code fast, debug and diagnose with ease, test often, and release with confidence. You can also extend and customize Visual Studio by building your own extensions. Use version control, be agile, and collaborate efficiently with this new release.
Features of Visual Studio 2017
- Tools and services for projects of any size or complexity
- C#, Visual Basic, F#, C++, Python, Node.js, and HTML/JavaScript
- Sprint planning
- Advanced debugging, automated and manual testing, and profiling
- DevOps with automated deployments and continuous monitoring
Visual Studio User Interface
When you open Visual Studio, there are a number of tool windows that let you interact with your code:

- The Code editor is where you write your code.
- The Solution explorer shows the files you’re working with.
- The Properties pane gives additional information and context about selected parts of your project.
- The Output window displays debugging and error messages, compiler warnings, status messages, and other output.
You can add additional tool windows by using the View menu at the top
Menus
At the top of the screen, you’ll see Visual Studio’s menus, which you’ll use to run various commands. Here’s a high level overview of the most important ones:
- The File menu contains commands to create, open, and save projects.
- The Edit menu contains commands to search, modify, and refactor your code.
- The View menu is where you go to open additional tool windows in Visual Studio.
- The Project menu lets you add files and dependencies in your project.
- The Debug menu contains commands to run your code and use debugger features.
- The Tools menu contains commands to change your settings, add functionality to Visual Studio via extensions, and access various Visual Studio tools.
Visual Studio Professional 2017 on Win Server 2016 Deploy on Azure, AWS and Google Cloud Platform
Visual Studio Professional 2017 Edition provides an IDE for all supported development languages.

Cognosys Provides Hardened images of Visual Studio Professional 2017 Edition on the cloud ( AWS marketplace, Azure and Google Cloud Platform).
Deploy Visual Studio Professional 2017 Edition securely on cloud i.e. AWS marketplace, Azure and Google Cloud Platform (GCP)
Features
New Features in Visual Studio 2017
. Visual Studio is 20 years old this year, and on March 7th, 2017 Microsoft released the latest version of its leading developer product, Visual Studio. With this release are a group of new features, improvements, and thrilling changes for Microsoft developer environment. Seven features in the new IDE that will motivate developers using the development environment are as follows.
1.EditorConfig Built In
The EditorConfig project has been available for Visual Studio 2015, but it required you to install a plugin to take advantage of the code-style configuration tool. With the release of 2017, EditorConfig is now built into the IDE. This means you can simply create an .editorconfig file in the root of your solution and check it into your source control. This will get your whole team using the same code format rules .
2.New Visual Studio Installer
Visual Studio 2017 also comes with a new installer. The new installer lets you put together an install of Visual Studio customized to the type of development you’re doing. You can install only the features you will need every day and leave out things that you might never need. This is a great way to keep the IDE small and snappy.
3. Manage Visual Studio Performance
The Manage Visual Studio Performance (under the Help menu) allows you to view the performance of your Visual Studio IDE and can even give you suggestions about extensions that might be impacting the performance of your environment! This includes turning on Lightweight Solution Load, which doesn’t load all the projects in a solution when you open the solution, only when you begin to work in that project. You can still navigate through the code, but the project won’t be loaded until you actually start to work with that project. Awesome!
4. Mobile Development
With Microsoft’s acquisition of Xamarin a few years ago, .NET developers have been enjoying the Xamarin for free as a plugin to Visual Studio 2015. In Visual Studio 2017, it’s now one of the install options when installing Visual Studio! This is a signal that cross-platform, mobile development is now a first-class citizen in your Microsoft development toolbelt!
5.Live Unit Testing
Unit testing has been permeating every development stack over the last decade and Microsoft has followed the trend by making Live Unit Testing available. This means as you change your code, Visual Studio will let you know if your changes will break unit tests, or if they will not be covered by unit tests; in real time.Running unit tests has almost always been an extra step of your development workflow, but with the Live Unit Testing indicators in your editor popping up as you edit code, it just happens. You can also click on an indicator in the editor and it will show you which tests are exercising that line of code. Unit testing for the win, anyone?
6. Better Javascript Support
With the proliferation of Javascript and Javascript frameworks like Angular, React, Ember, and Vue, it’s no surprise that VSCode has really gleaned a lot of support from the developer community. VSCode has excellent support for Javascript (ES5 and ES6) as well as framework support for Angular and React, including JSX.
Building on that win, Microsoft used the Javascript engine built into VSCode in Visual Studio 2017. This means that all the great support in VSCode is now available without switching out of your Visual Studio editor!
7. Docker Support Built-In
With the adoption of containerization, microservices, and Microsoft’s own work with Docker to help support Windows Containers, it’s no surprise that developers are looking for tighter integration with Docker for their development environments. In Visual Studio 2015 (Update 3), you could install the Visual Studio Tools For Docker and get integrated support for Docker containers. Visual Studio 2017, builds this feature in and when choosing the application template from the File -> New menu, you can choose to turn on Docker support, giving you all the goodness of the plug-in, built in to Visual Studio!
Visual Studio has always been the editor of choice for those writing .NET applications and tapping into the Microsoft ecosystem. It has always had all the tools developers need to be their best, most productive selves. Now Microsoft has done some outstanding work to include and integrate with non-Microsoft tools that developers love to use, as well as help developers discover problems in their code, and improve the performance of their IDE. Developers should love new additions and improvements in Visual Studio 2017.
New Features
Performance and productivity
Microsoft made multiple enhancements to improve Visual Studio performance and productivity:
- Improved startup and improved project load
- Enhanced Navigation
- Load files without needing a solution
- IntelliSense filtering
- Language improvements: refactorings, style analyzers, and more.
- CMake support for C++
- Linux support for C++
- Live unit testing
- Run to Click
- Exception Helpers
Redefined fundamentals
Visual Studio 2017 focuses on enhancing the efficiency of basic tasks you encounter every day:
- Brand-new small, lightweight and modular installation
- Faster startup and improved project load
- Adaption of modern DevOps practices, Redgate Data Tools included
- Cloud app development with Azure
Visual Studio 2017 comes with a built-in suite of Azure tools:
- Configure, build, debug, package, and deploy apps and services on Azure
- Enable cloud storage, push notifications, authentication and social integration
- Connect to HockeyApp for app analytics, beta distribution, in-app feedback and track customer metrics
- Easily build and deploy applications and services to Azure, directly from the IDE (Integrated Development Environment)
Mobile app development
Try Xamarin for Visual Studio:
- Create mobile apps for Android, iOS, and Windows through updates like advanced debugging and profiling tools.
- Develop mobile apps in JavaScript or TypeScript with Apache Cordova, or with Visual C++ cross-platform library development tools.
-Major Features of Visual Studio Professional
- Code with confidence : Visual Studio guides you with live assistance as you write code, no matter what language you use, from C#/VB and C++ to JavaScript and Python.
- Navigate in context : Finding your way around in a large code base can be challenging. Visual Studio helps you find your way around more easily, without losing the context of the code or the markup you started from, with capabilities like Peek to definition, Navigate To, and Quick Find.
- Debug cross-language : Rich debugging for all your code, Visual Studio provides an excellent debugging experience no matter what language you use – from C#/VB and C++, to JavaScript and Python, to XAML and HTML, all supported languages have debugging support.
- Testing : Visual Studio provides an excellent way of Testing your code like Unit Testing, IntelliTest, UI Testing, Load and Web Performance Testing.
- Flexible and extensible version control : Distributed or centralized, with extensions. Use Git for distributed version control or Team Foundation Version Control (TFVC) for centralized version control.
- Powerful Git support : Git commands built in. Review diffs, stage files, make commits, view the history graph, cherry-pick, revert, and more, all in Visual Studio. Then push to, or pull from, any hosted Git service.
- Flexibility– Professional developer tool for building any application type
- Productivity- Powerful features such as CodeLens improve your team’s productivity
- Collaboration- Agile project planning tools, team rooms, charts and more
- Subscriber benefits- Includes core Microsoft software, plus Azure, Pluralsight, and more
AWS
Installation Instructions for Windows
Note: How to find PublicDNS in AWS
Step 1) RDP Connection: To connect to the deployed instance, Please follow Instructions to Connect to Windows instance on AWS Cloud
1) Connect to the virtual machine using following RDP credentials:
- Hostname: PublicDNS / IP of machine
- Port: 3389
Username: To connect to the operating system, use RDP and the username is Administrator.
Password: Please Click here to know how to get password
Step 2) Visual Studio Connection: To Connect Microsoft Visual Studio Management Studio in windows server, Please follow Instructions to Connect Microsoft Visual Studio
Note : Please use a Microsoft account to unlock the VS2017 IDE by signing in with your MS account.
Note that you may need to sign out and then sign in again.
You can sign up for MS account here if you do not have one.
Step 3) Other Information:
1.Default installation path: “C:\Program Files (x86)\Microsoft Visual Studio\2017\Professional\Common7\IDE”
2.Default ports:
- Windows Machines: RDP Port – 3389
- Http: 80
- Https: 443
Configure custom inbound and outbound rules using this link
For a list of system requirements, see the Visual Studio Professional .
3. Note :
1. Default password for user cloudVS1@outlook.com is – Passw@rd12345
2. To add New user and delete existing user go to Account settings ->Click on ‘Remove’ to delete Existing User (cloudVS1@outlook.com)
3. Click on ‘Add an Account’ to add New User.
4. Support Email: support@SecureAnyCloud.com
Please reach out to support for any help regarding deployment or Licensing.
Note: To add new account, User must have a Microsoft account.
Configure custom inbound and outbound rules using this link
Installation Instructions for Windows
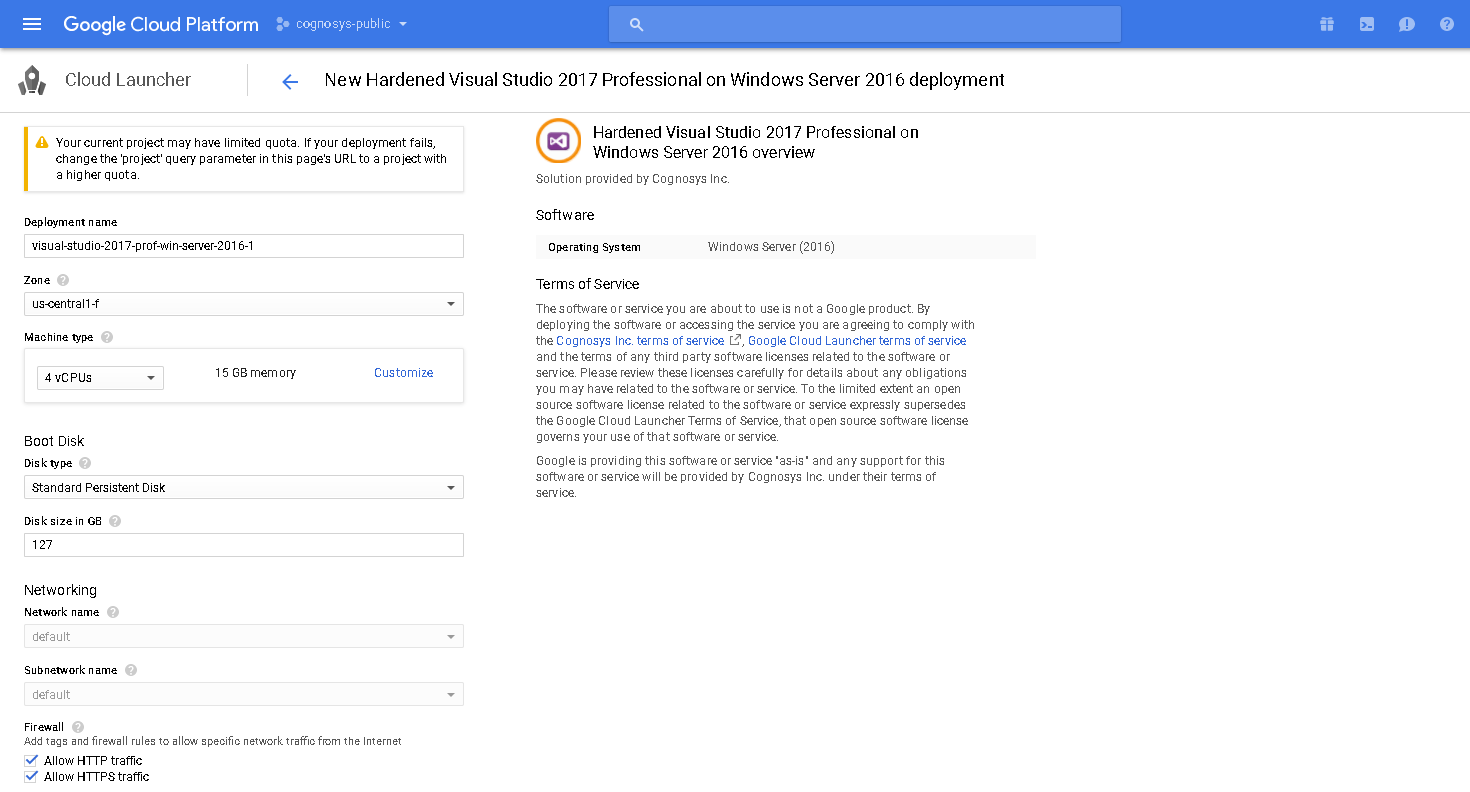
Step 1) VM Creation:
- Click the Launch on Compute Engine button to choose the hardware and network settings.
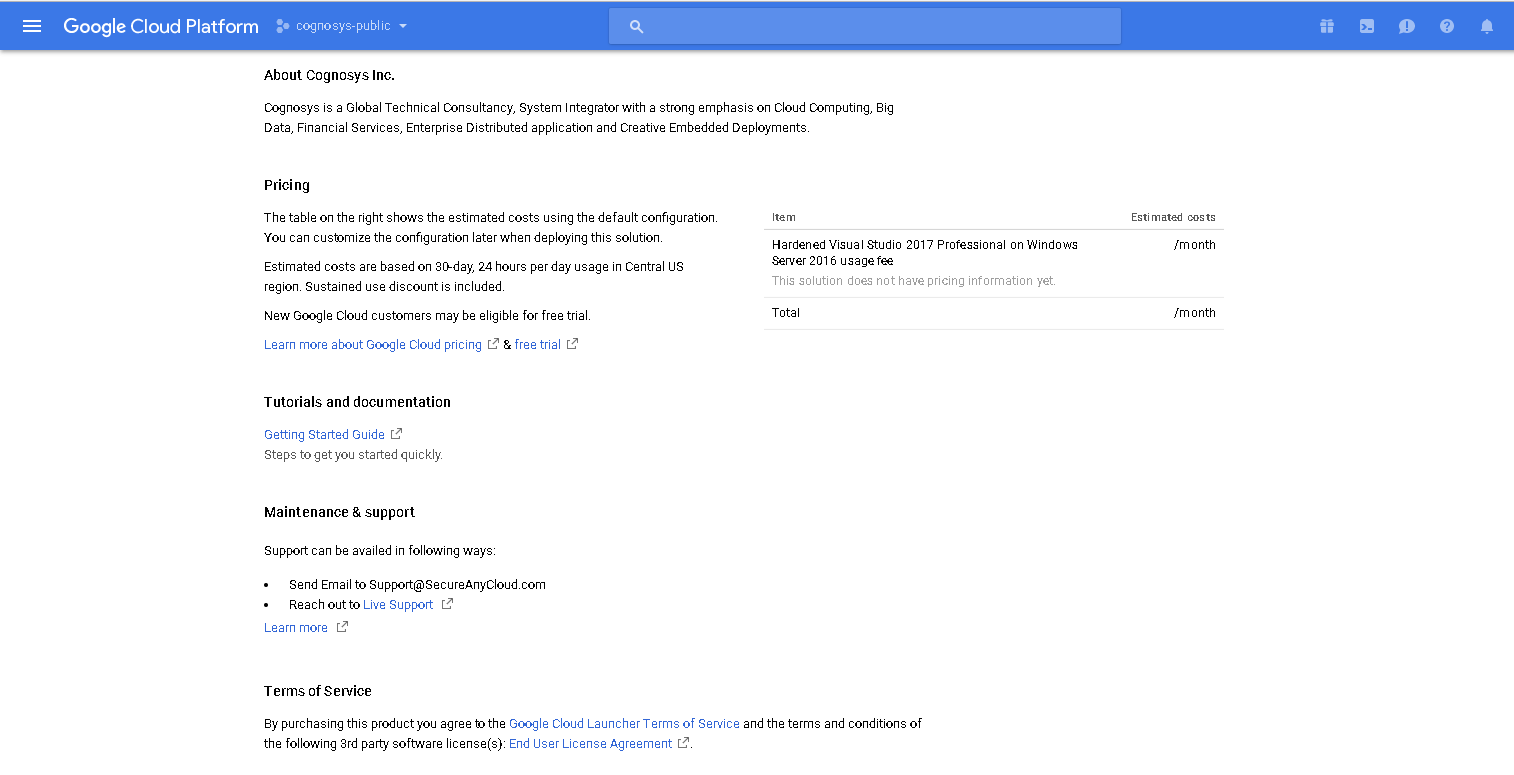
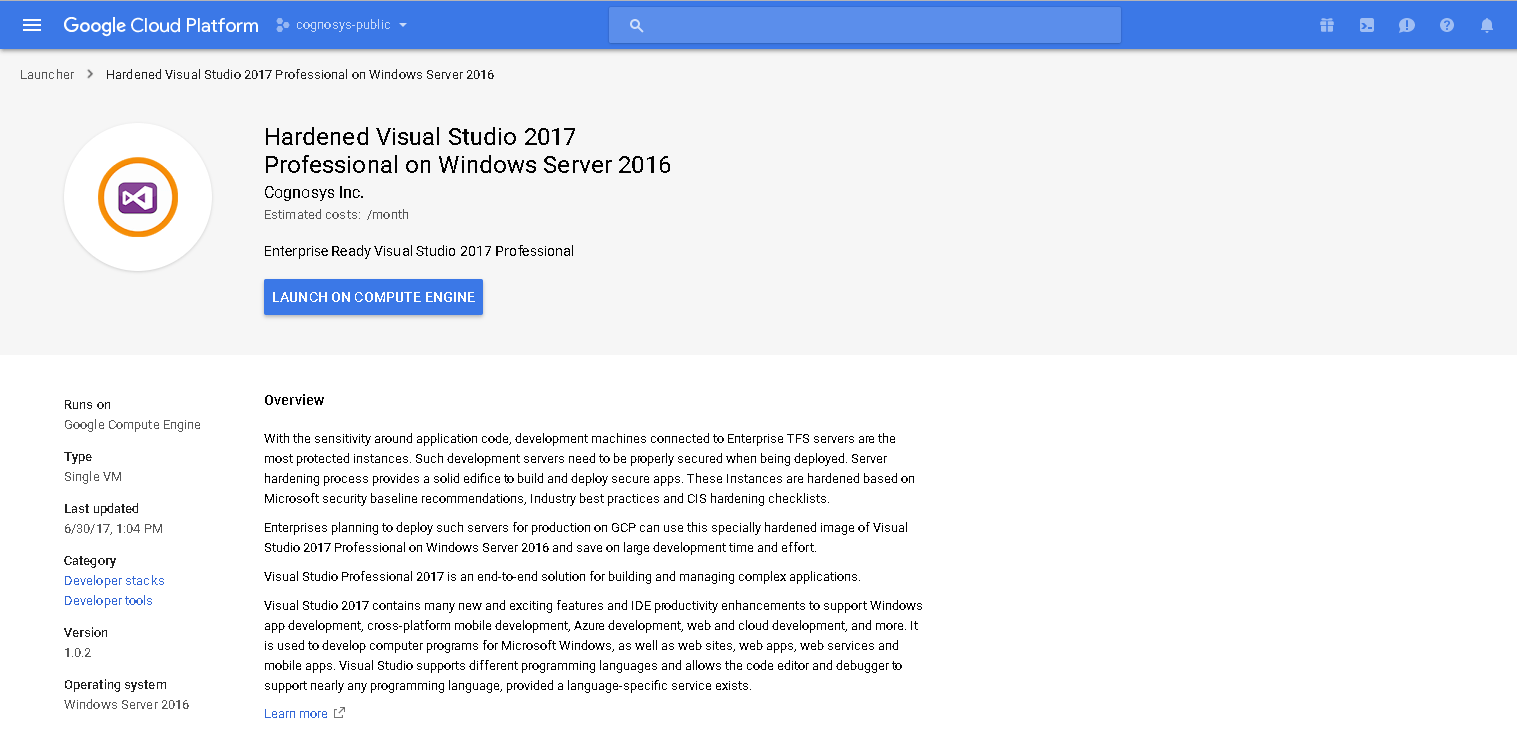 2.You can see at this page, overview of Cognosys Image as well as some estimated costs of VM.
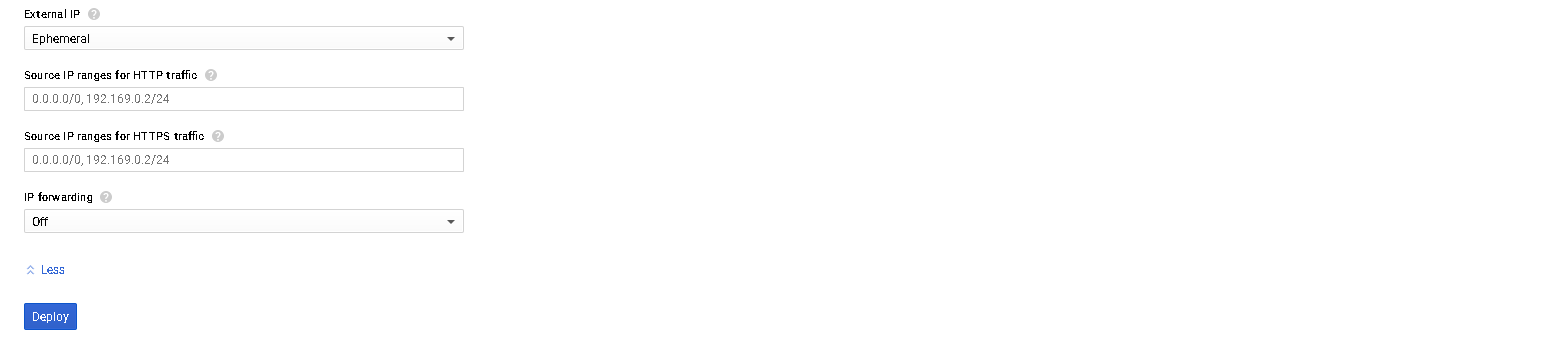
 3.In the settings page, you can choose the number of CPUs and amount of RAM, the disk size and type, etc.
 Step 2) RDP Connection: To connect to the deployed instance, Please follow Instructions to Connect to Windows instance on Google Cloud
Step 3) Visual Studio Connection: To Connect Microsoft Visual Studio Management Studio in windows server, Please follow Instructions to Connect Microsoft Visual Studio
Step 4) Other Information:
1.Default installation path: “C:\Program Files (x86)\Microsoft Visual Studio\2017\Professional\Common7\IDE”
2.Default ports:
- Windows Machines: RDP Port – 3389
- Http: 80
- Https: 443
Note: To add the new account, User must have a Microsoft account.
Videos
What is new in Visual Studio 2017?
