
1-click AWS Deployment 1-click Azure Deployment
Overview
Varnish Cloud is designed for enterprises (SMEs) who want the performance and scalability of Varnish Enterprise implemented on virtual servers. Varnish Cloud is a full version of the Varnish Enterprise software suite that can be accessed via the Amazon Web Services (AWS) marketplace. Varnish Cloud delivers secure, high-powered and scalable internet operations at an affordable hourly fee. You can have Varnish Cloud up and running in a few minutes without any of the hurdles to registering a repository, downloading software and installing it manually.
Varnish is an open source “web accelerator” which you can use to speed up your website.
It can cache certain static elements, such as images or javascript but you can also use it for other purposes such as Load balancing or some additional security. A speedy website is key to a great user experience.
Varnish is an HTTP accelerator designed for content-heavy dynamic web sites as well as heavily consumed APIs. In contrast to other web accelerators, such as Squid, which began life as a client-side cache, or Apache and nginx, which are primarily origin servers, Varnish was designed as an HTTP accelerator. Varnish is focused exclusively on HTTP, unlike other proxy servers that often support FTP, SMTP and other network protocols.
Varnish is used by high-profile, high-traffic websites including Wikipedia, online newspaper sites such as The New York Times, The Guardian, The Hindu, Corriere della Sera, social media and content sites such as Facebook, Twitter, Vimeo and Tumblr. Of the Top 10K sites in the web, around a tenth use the software.
Varnish is a registered trademark of Varnish Software AB and its affiliates.
Varnish is owned by Varnish Software(www.varnish-software.com/) and they own all related trademarks and IP rights for this software.
VARNISH AND SECURITY
The correlation between cloud/edge computing and security is growing stronger every day, and any caching/CDN solution loses value if it doesn’t deliver a set of features that can address this correlation by securing data and connections.
With the upcoming GDPR (Global Data Protection Regulation), which will come into force on May the 25th and will affect any business with at least a single European user, the demand for security is accelerating. End users and customers also require that their data be protected and that their connections be safe, which recent revelations (and scandals) revolving around Facebook have proven – and proven the importance of.
Varnish, as reverse proxy and CDN software, usually sits in a very strategic layer of your architecture with Varnish itself as the very first HTTP gate a user request has to go through to see his/her request fulfilled (in most cases). Therefore, each Varnish solution comes with a complete set of features that can help to secure your architecture.
ENCRYPTION
HTTPS support
Varnish provides secure connections for both the client and the backend side. It means that the data shuffled between your Varnish server and the final user and the bytes between the origin server and Varnish are always encrypted, protecting privacy and avoiding data leaks.
Hitch is an and secures client-side connections; it’s an open source project and fully supported by Varnish Software.
Backend-side HTTPS is a Varnish Software feature. Securing a backend is as easy as setting a flag (on/off) in your Varnish configuration.
Varnish Total Encryption
Encrypting data in cache is as important as having secure connections, as everyone wants to avoid disasters like Cloudbleed. Encrypted cached content will be useless in the event of a data breach, ensuring that your customers’ private information is protected.
It is a Varnish module (VMOD) that is fully tweakable via VCL. Every object in cache will have its own unique encryption key. This unique key, based on the request fingerprint, is assigned to each request, making it impossible for a request to return anything but its intended cache object.
Encrypting your whole caching layer, from end to end, including cached content, makes your whole infrastructure more secure and resilient and helps your business be completely GDPR compliant.
REQUEST INSPECTION AND THROTTLING
Request body access
It exposes the request body in VCL proving functions, among others, to:
- Log the request body to VSL (Varnish Shared Log) making it available for inspection and for use by other components. The request body can be split in multiple lines to make it more readable.
- Find strings in a request body. Using regular expressions, you can detect if malicious patterns are present within suspicious request and run a check on those.
- Evaluate the request body length.
Combining regular expressions check and the length of a request body we can mark a request as potentially dangerous. If we have many requests marked as critical, this could be a DDoS attack.
Throttle
Provides an API, accessible via VCL, to slow down the pace of incoming requests if anything suspicious is detected, i.e if the same IP address makes numerous requests within a short amount of time (usually seconds). Requests are paced based on a key that could be any VCL string, i.e. IP address, a header, a token, etc.
Optionally specific requests can be blocked for a period of time if the rate limit threshold is reached, which helps by throttling down specific traffic patterns.
Even if Varnish can handle more than 20k req/s, detecting dubious requests and throttling them down is vital to providing good service and avoiding wasted resources
WAF
Varnish allows you to set your own security rules in ModSecurity style. It is implemented as VMOD making it configurable via VCL. The Varnish WAF can help you by preventing code injections, malicious clients and by protecting your origin servers. It can be considered security perimeter defense. It is currently under development and will be available starting in Q3 2018.
AUTHENTICATION AND AUTHORIZATION
Using VCL, Varnish can run authentication and authorization logic. Authentication means we can identify each user based on a cookie header or any other VCL token. Once the authentication has been successful, always via VCL, we can decide which piece of content each user is allowed to access.
Combining those two steps a Varnish paywall can be implemented; the solution is fully implemented in VCL using, among others, vmod-http and vmod-kvstore.
Security is taken seriously by the Varnish Software team and our Varnish solutions have extremely flexible security options in place, letting you choose what to secure and how secure you need it to be – as everything can be tweaked via VCL, ultimately helping you secure your caching infrastructure without affecting web performance.
Ready to implement the steps you need to secure yourself and be ready for GDPR? Take a look at our on-demand webinar, “How to make your cache infrastructure GDPR compliant”.
Varnish Software Instance Deployment
Subscription and Configuration
Choose one of our products from the AWS Marketplace page (search for Varnish Software Inc.) and click on “Continue to Subscribe”

Figure 1. Product page
Next you will be prompted to login to your AWS account.
After login, you will see Terms and Conditions and the software offer from Varnish Software Inc. (Pricing/Available EC2 instance types). You may want to select to subscribe an annual license to save cost approximately 20% of the total software price. Once you satisfy the information, click on “Continue to Configuration” button.
(First time users, may need to click on “Accept Terms and Conditions” button before being able to click on the “Continue to Configuration” button.)

Figure 2. Subscribe to this software
Next you choose a fulfillment option. Mostly is about software versioning and a region to run the product. Then you click on the “Continue to Launch” button. You can view pricing details on the right-hand side of the page.
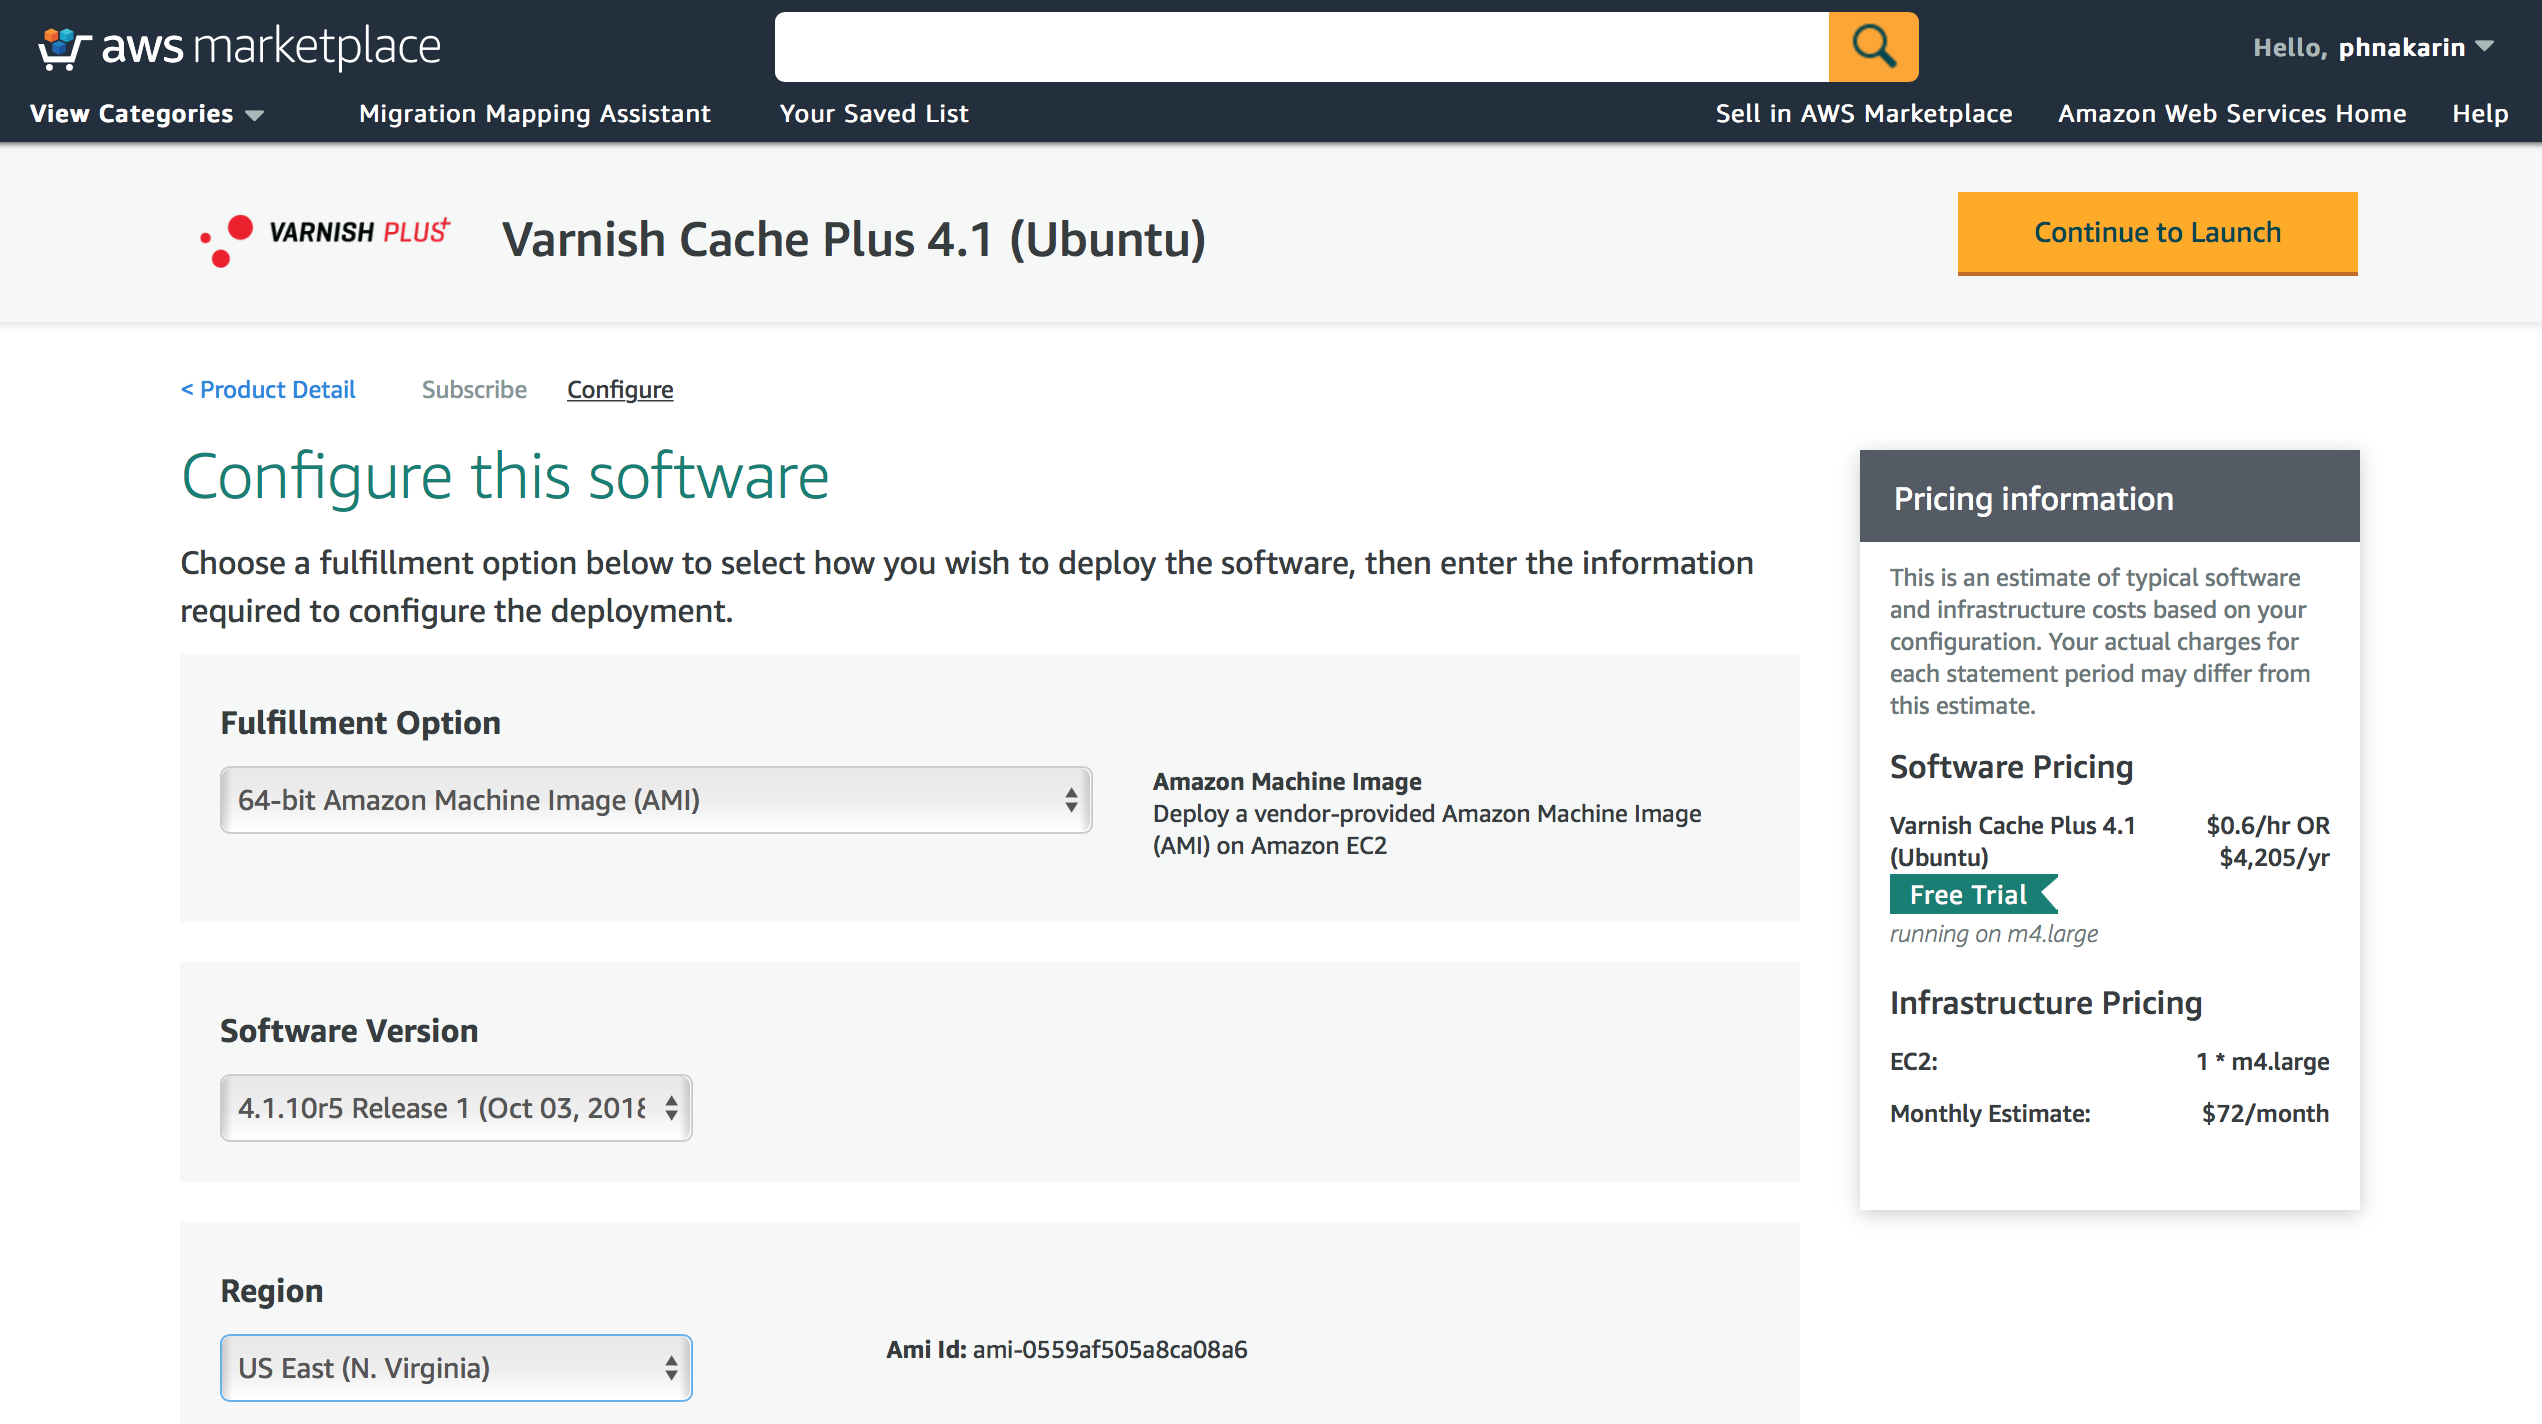
Figure 3. Choose a fulfillment option
Deploy with Launch from Website
On this page, there are 3 options to launch the software. * Launch from Website * Launch through EC2 console * Copy to Service Catalog
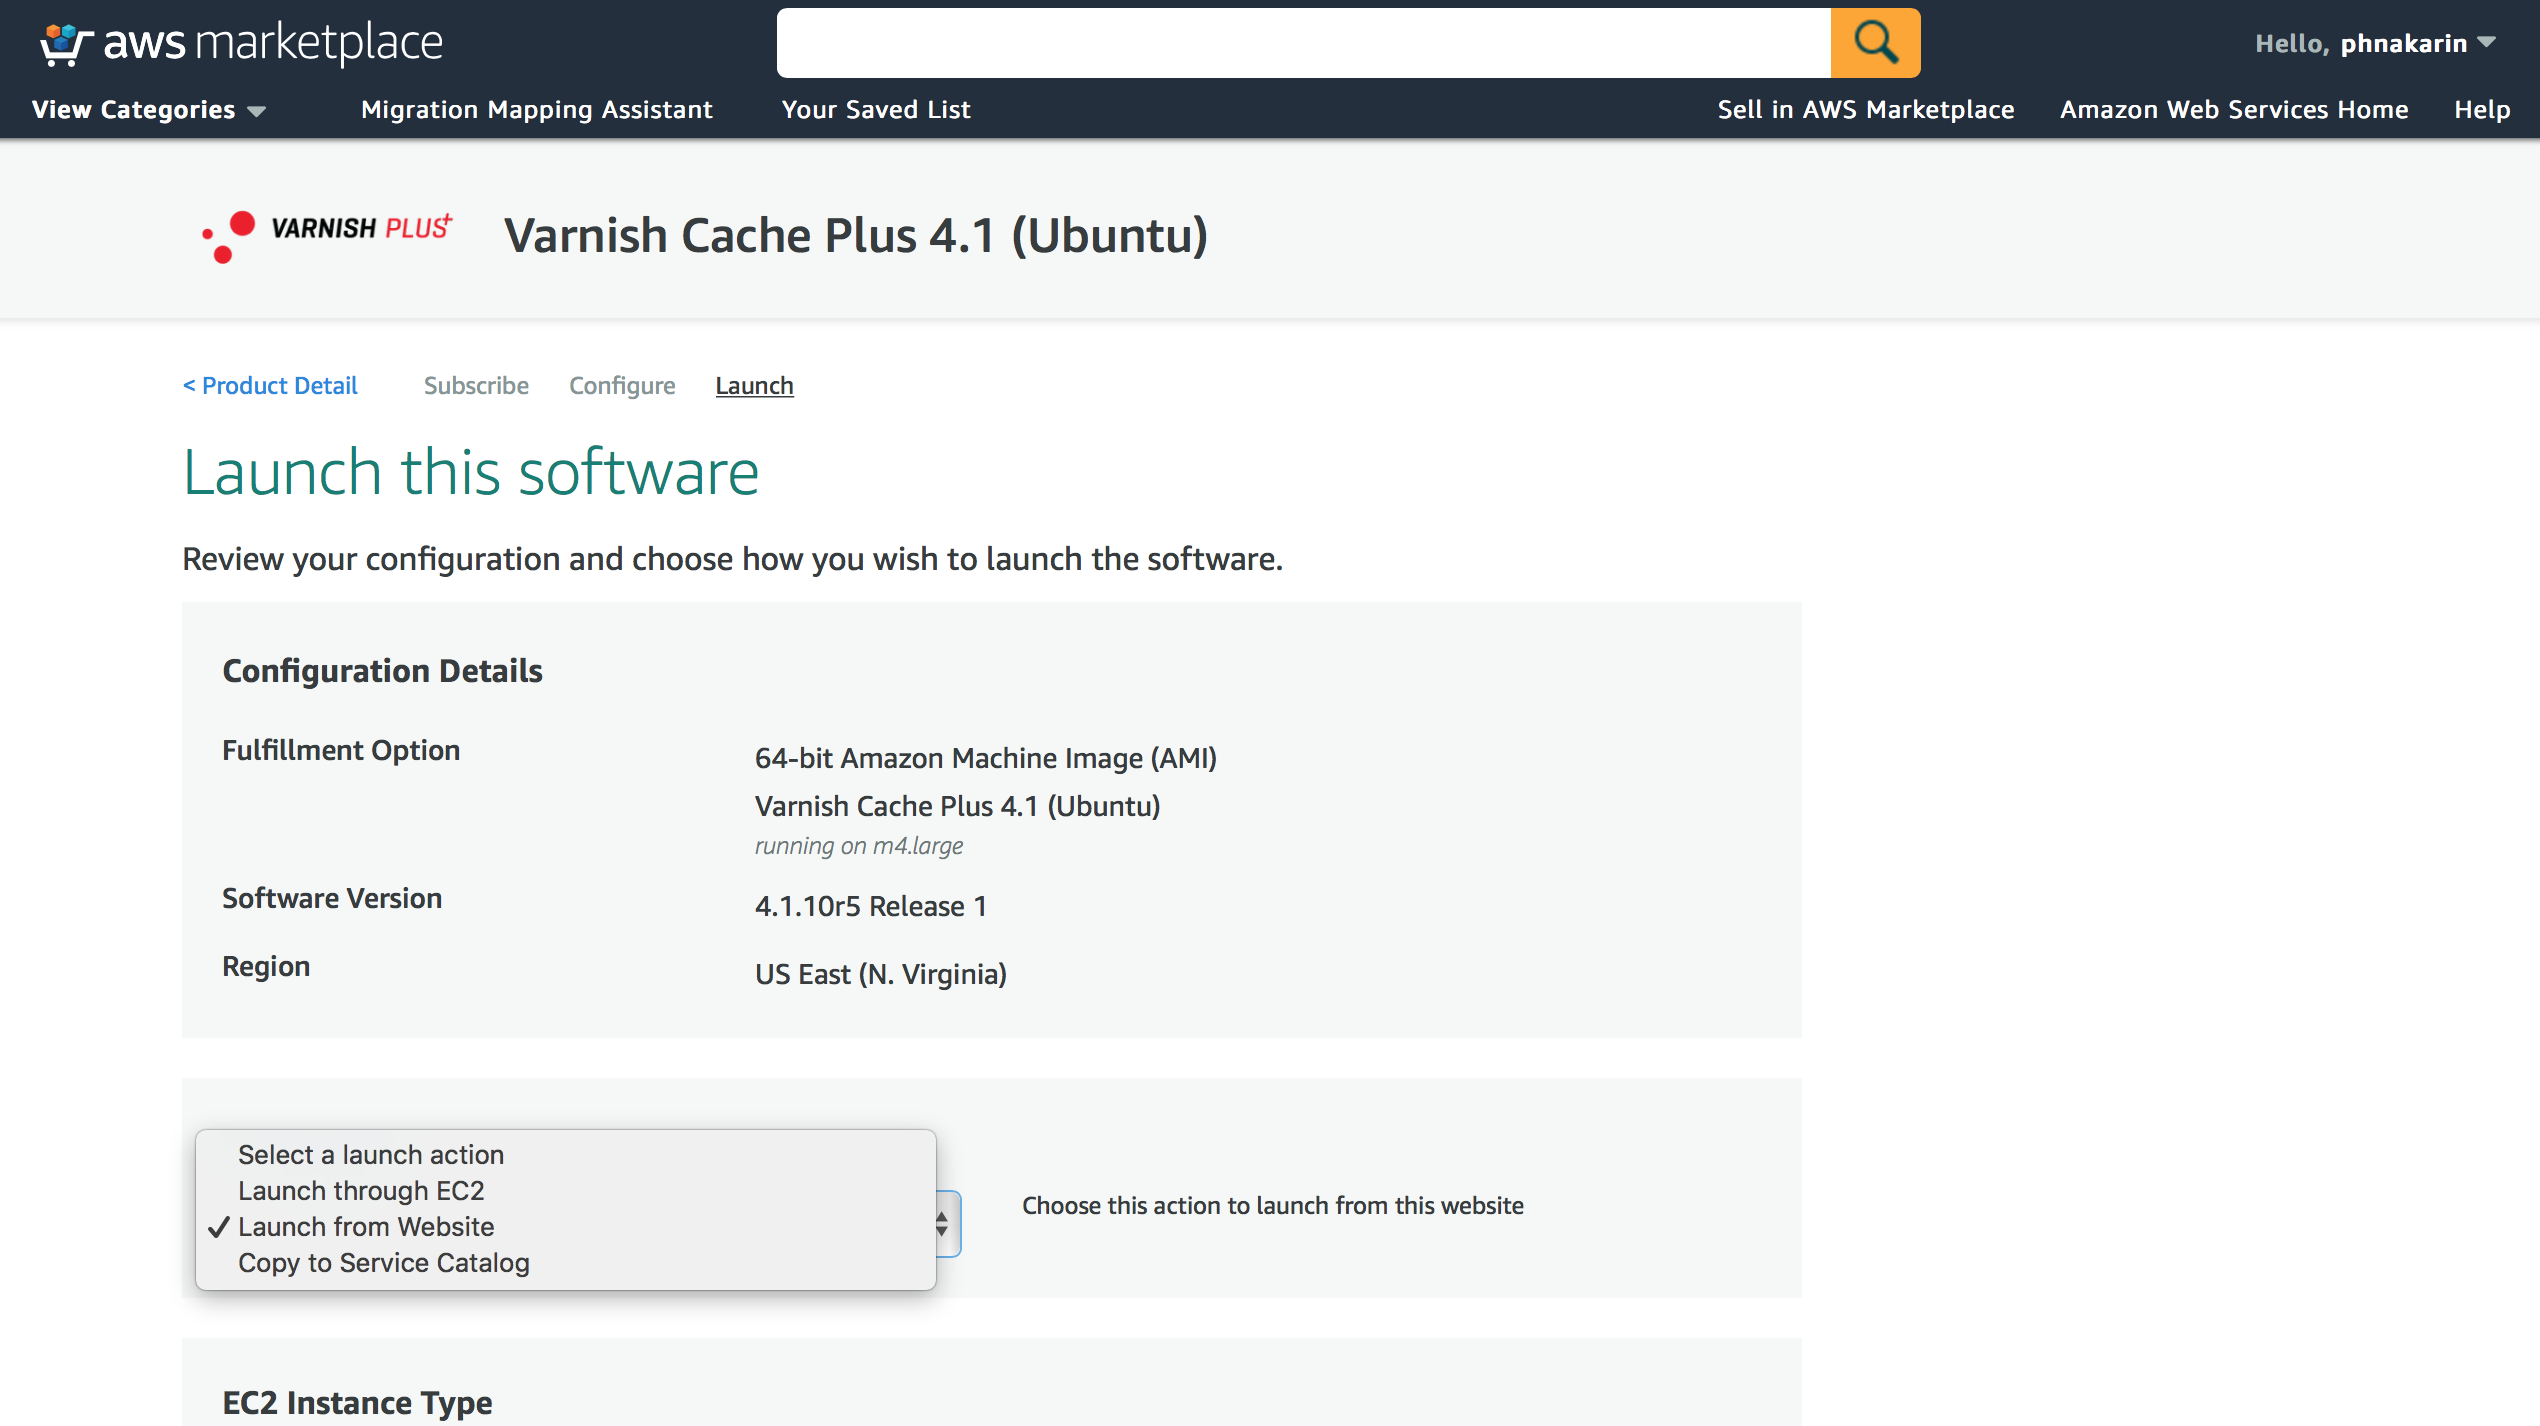
Figure 4. Available launching options
To launch from Website, you select “Launch from Website” and scroll down to select EC2 Instance Type, VPC Settings, Subnet Settings, Security Group Settings and Key Pair Settings before clicking on “Launch” button to run an instance.
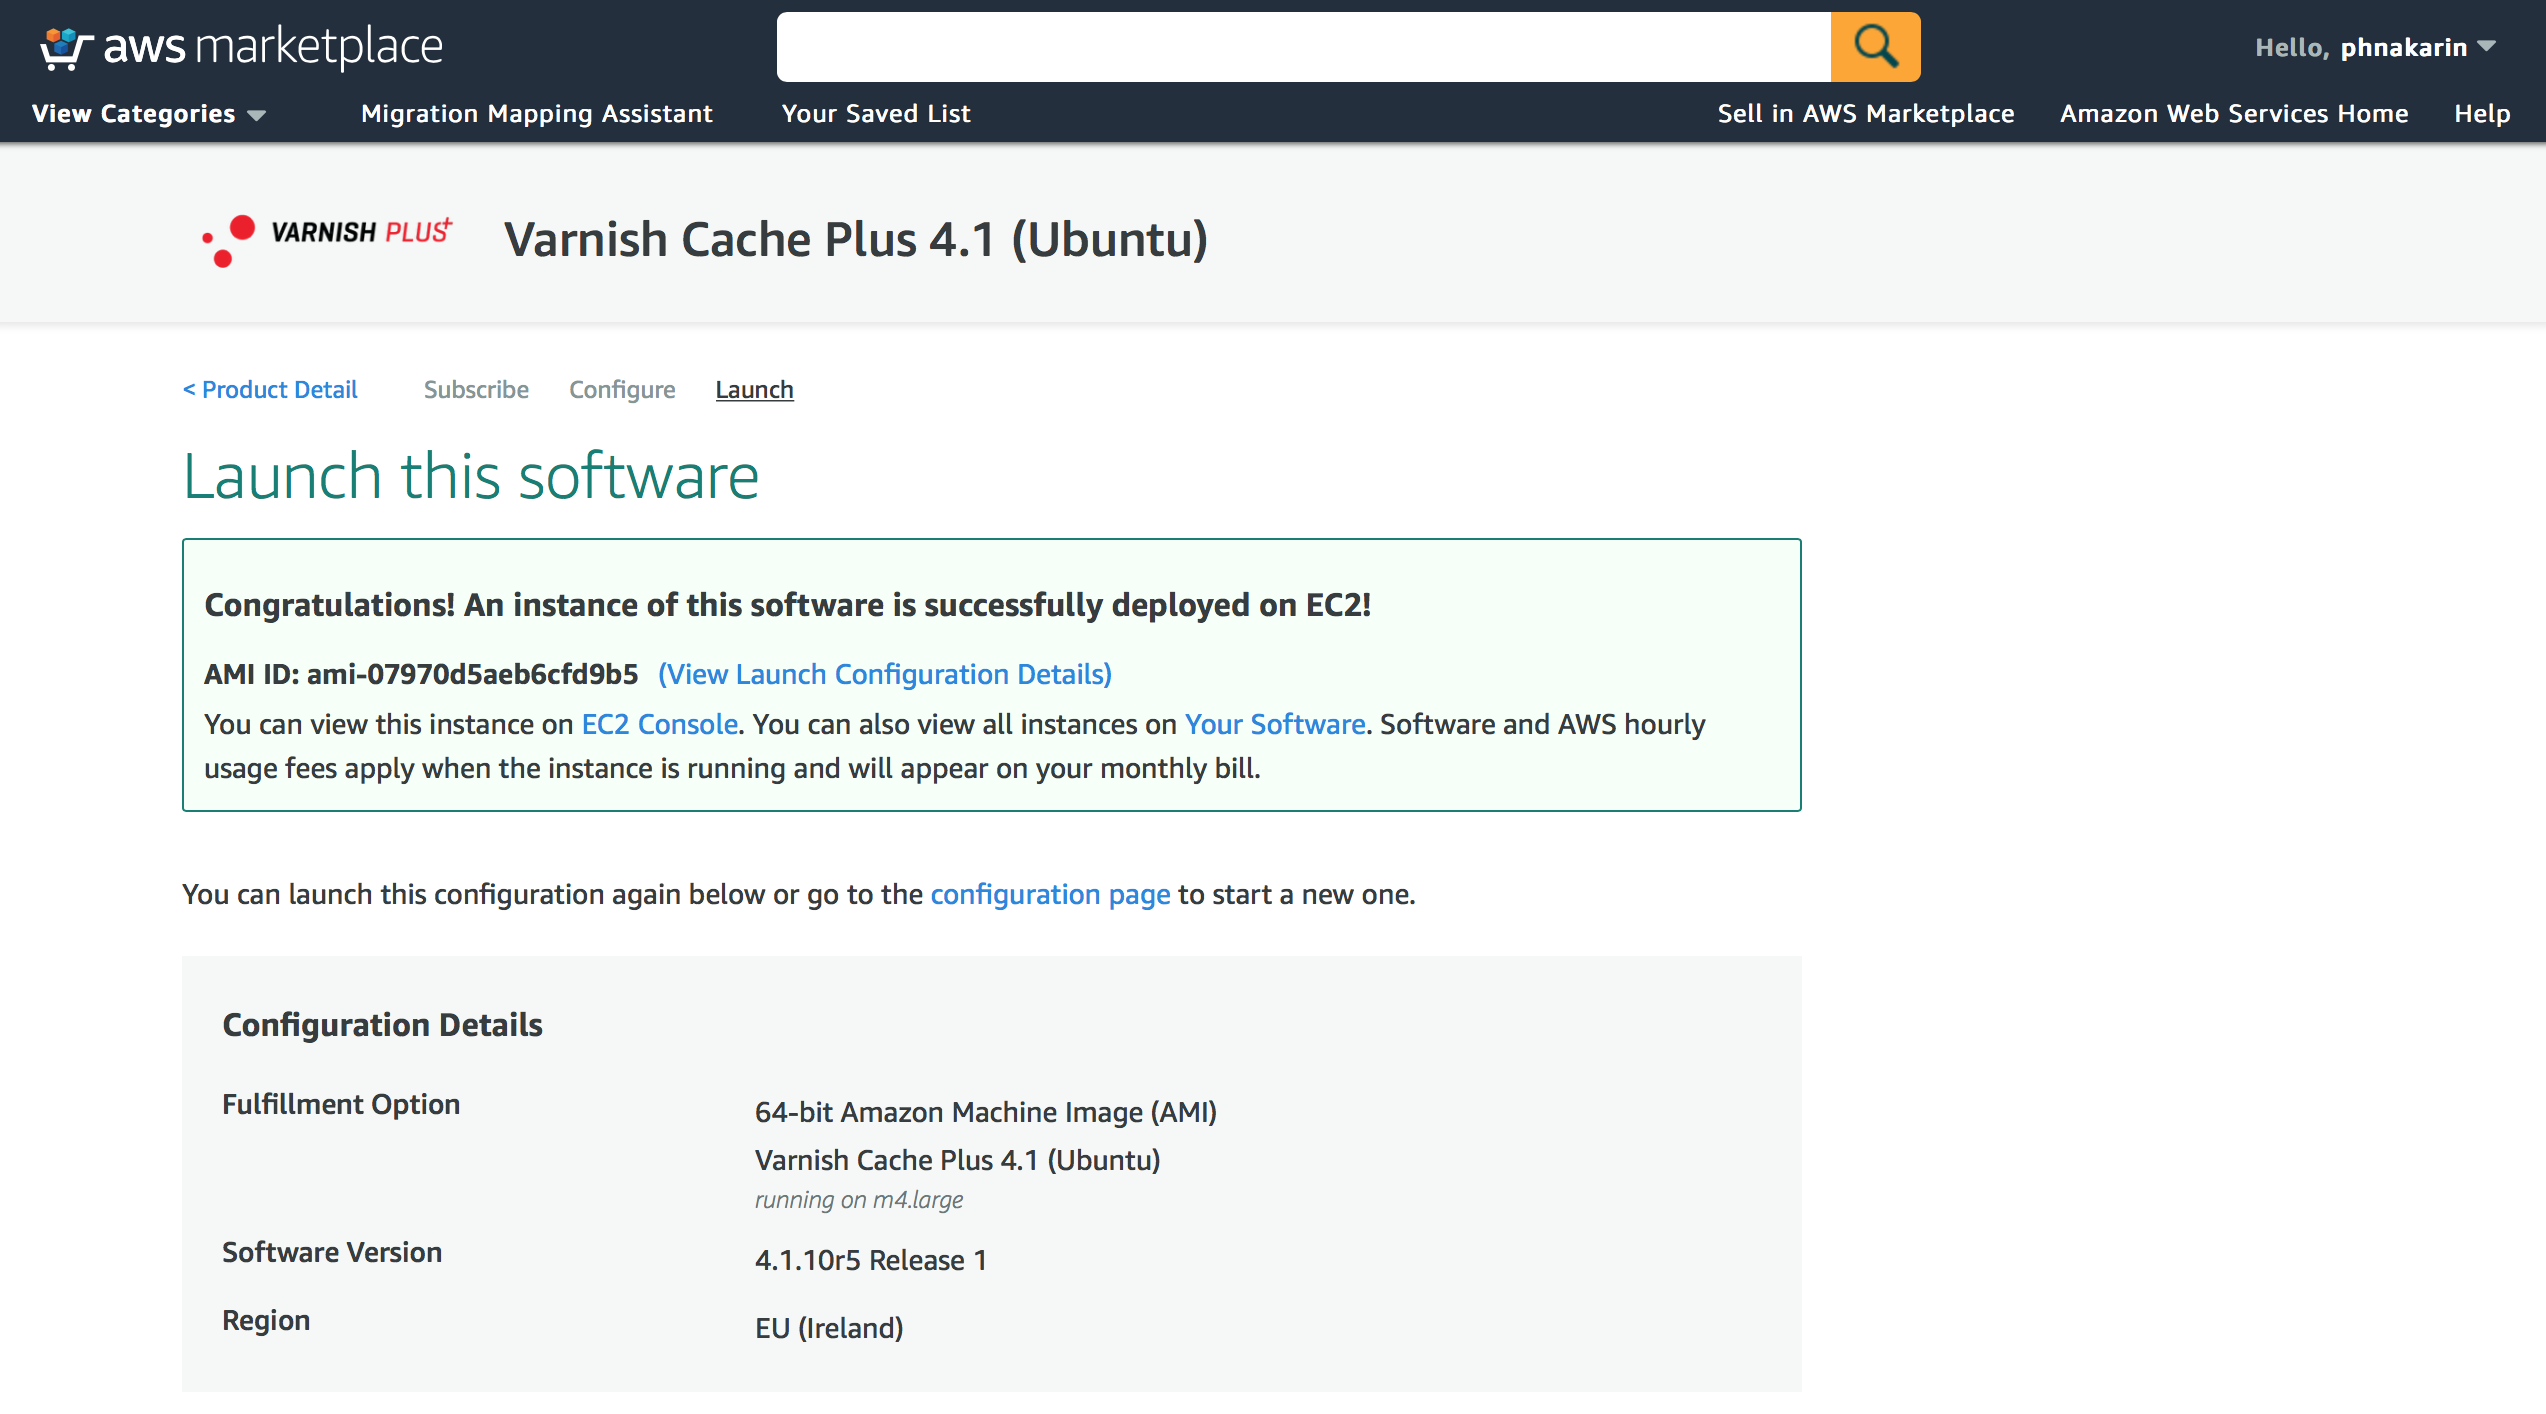
Figure 5. The software is successfully deployed
That’s it. Your Varnish Software instance is up and running. Next, please tune up your configuration and start enjoying the product benefits.
Deploy with Launch through EC2
The 2nd option is to start the instance manually with more flexible options from AWS EC2 console. Select the option “Launch through EC2” and click on “Launch” button.
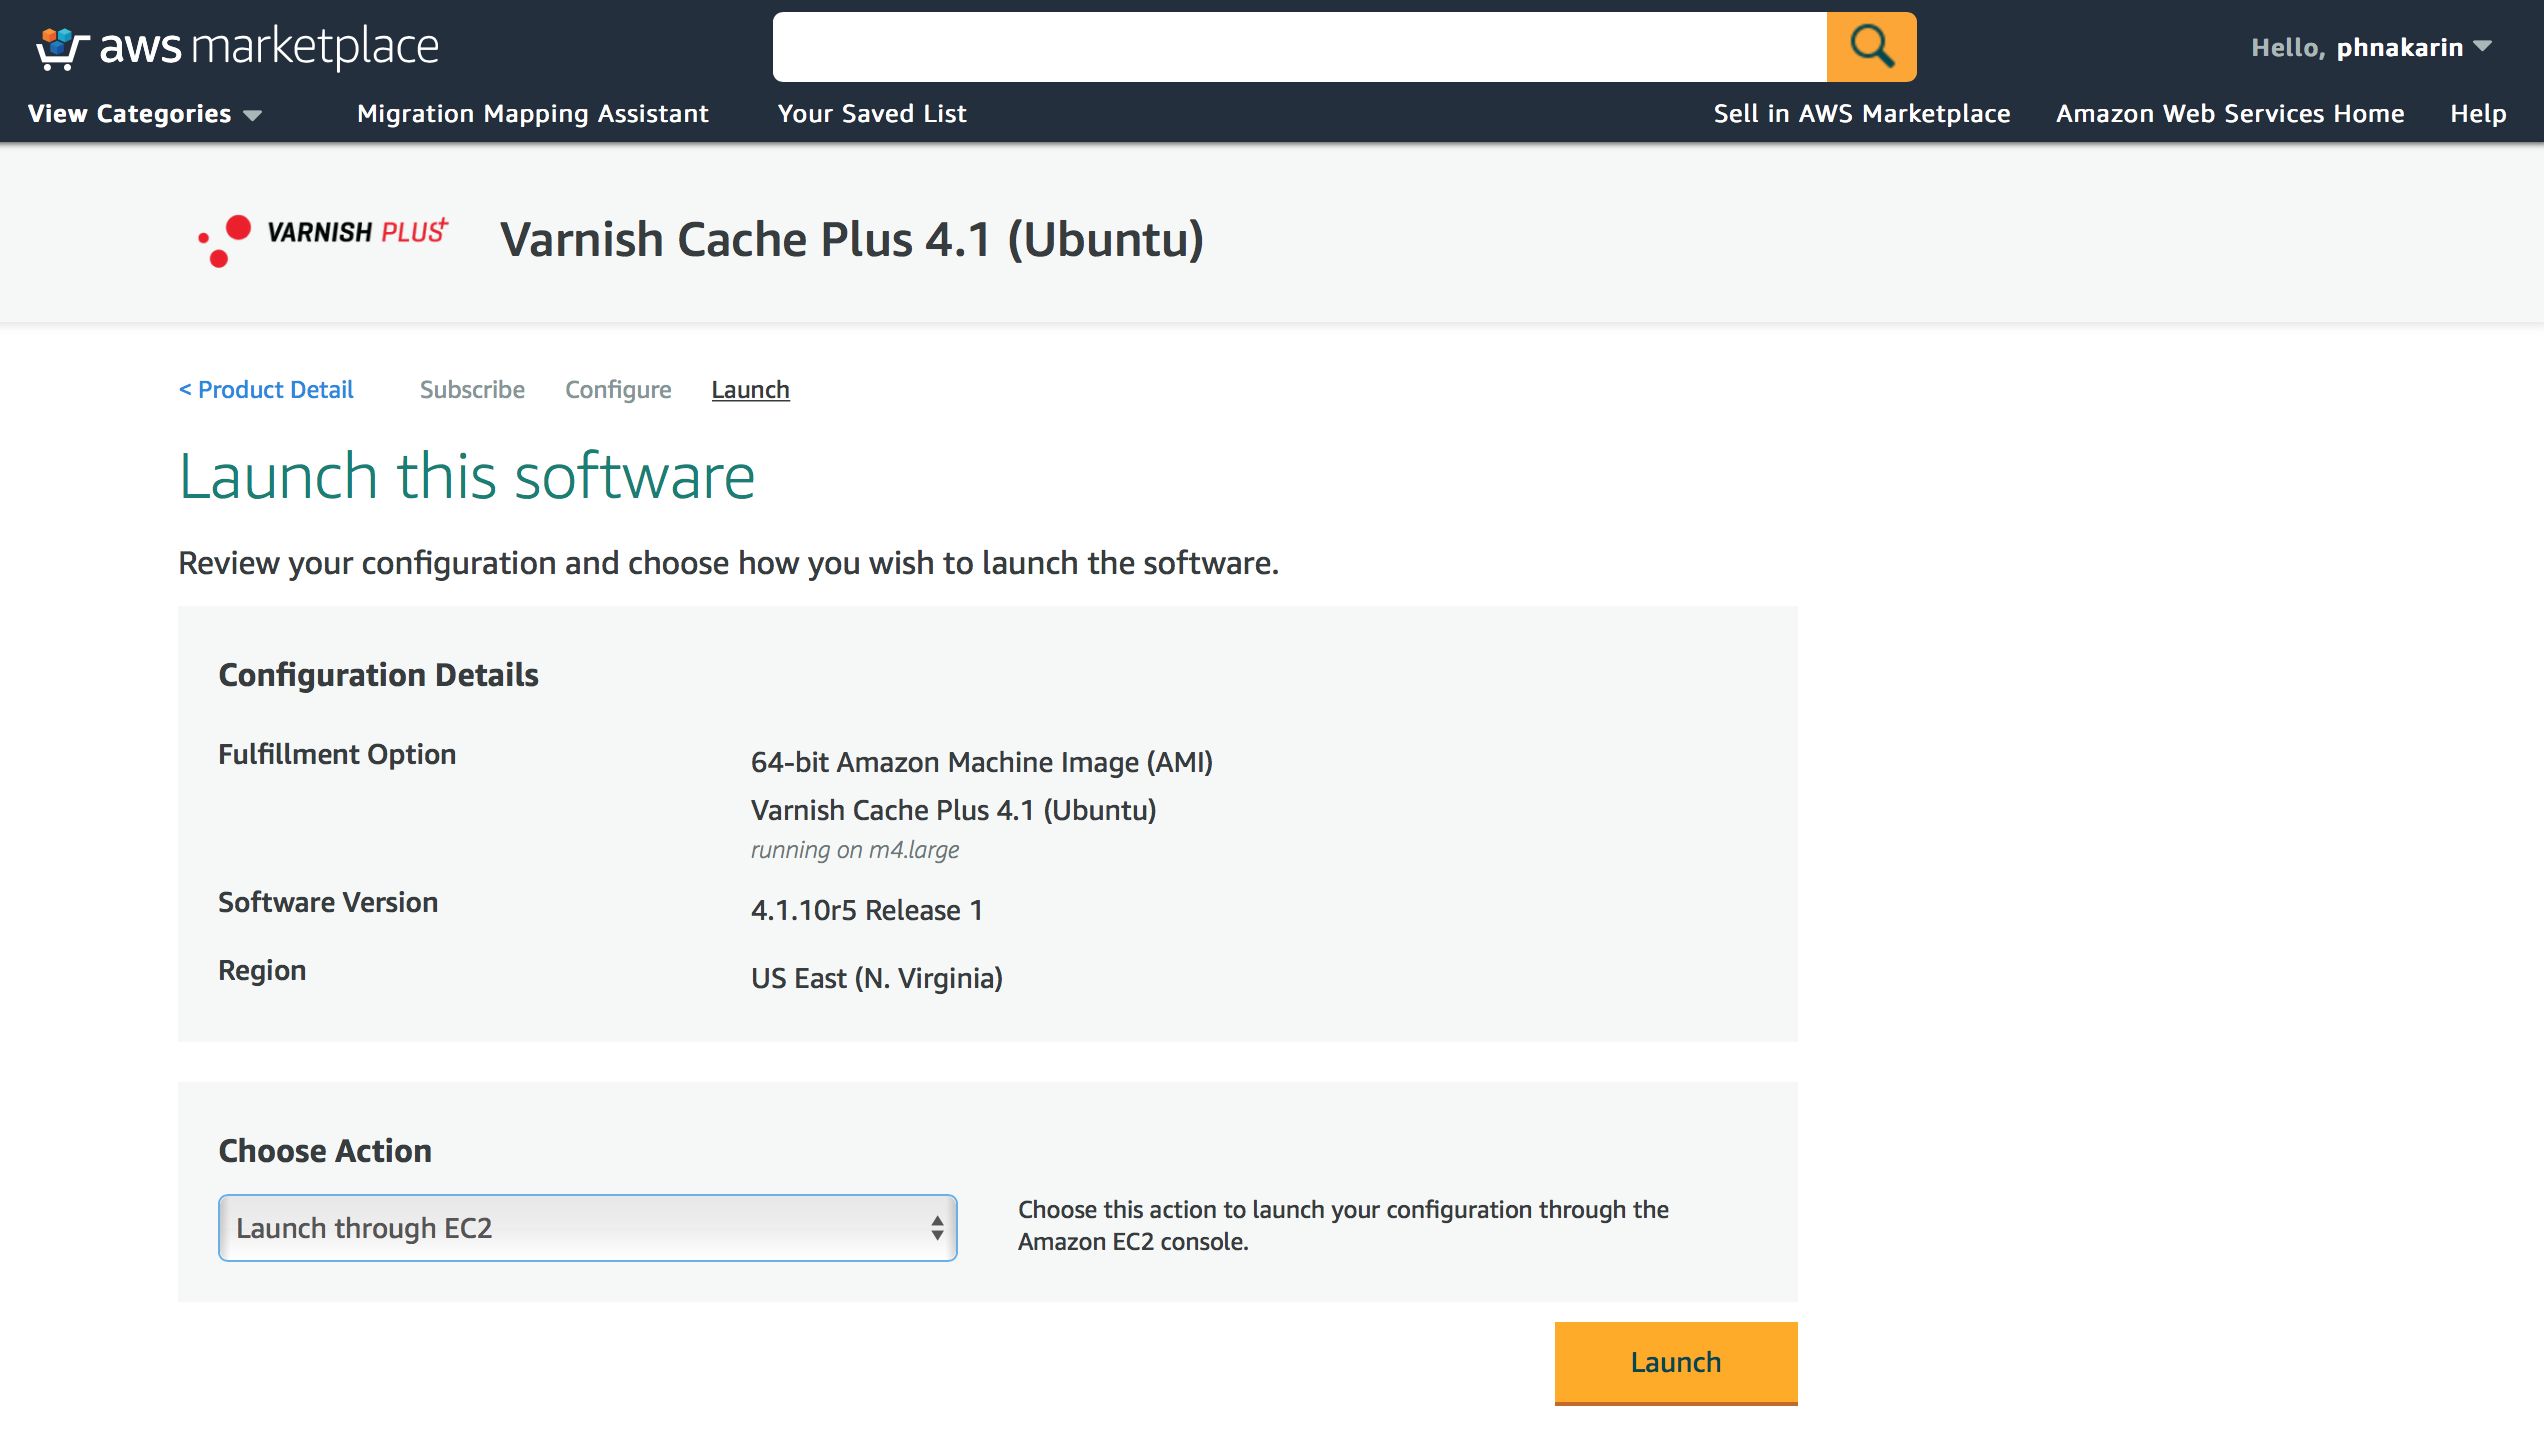
Figure 6. Launch through EC2
Next the Request Instance Wizard will be displayed. On the first screen (Step 2), you will be prompted to choose an appropriate instance type. Select one and click Next.
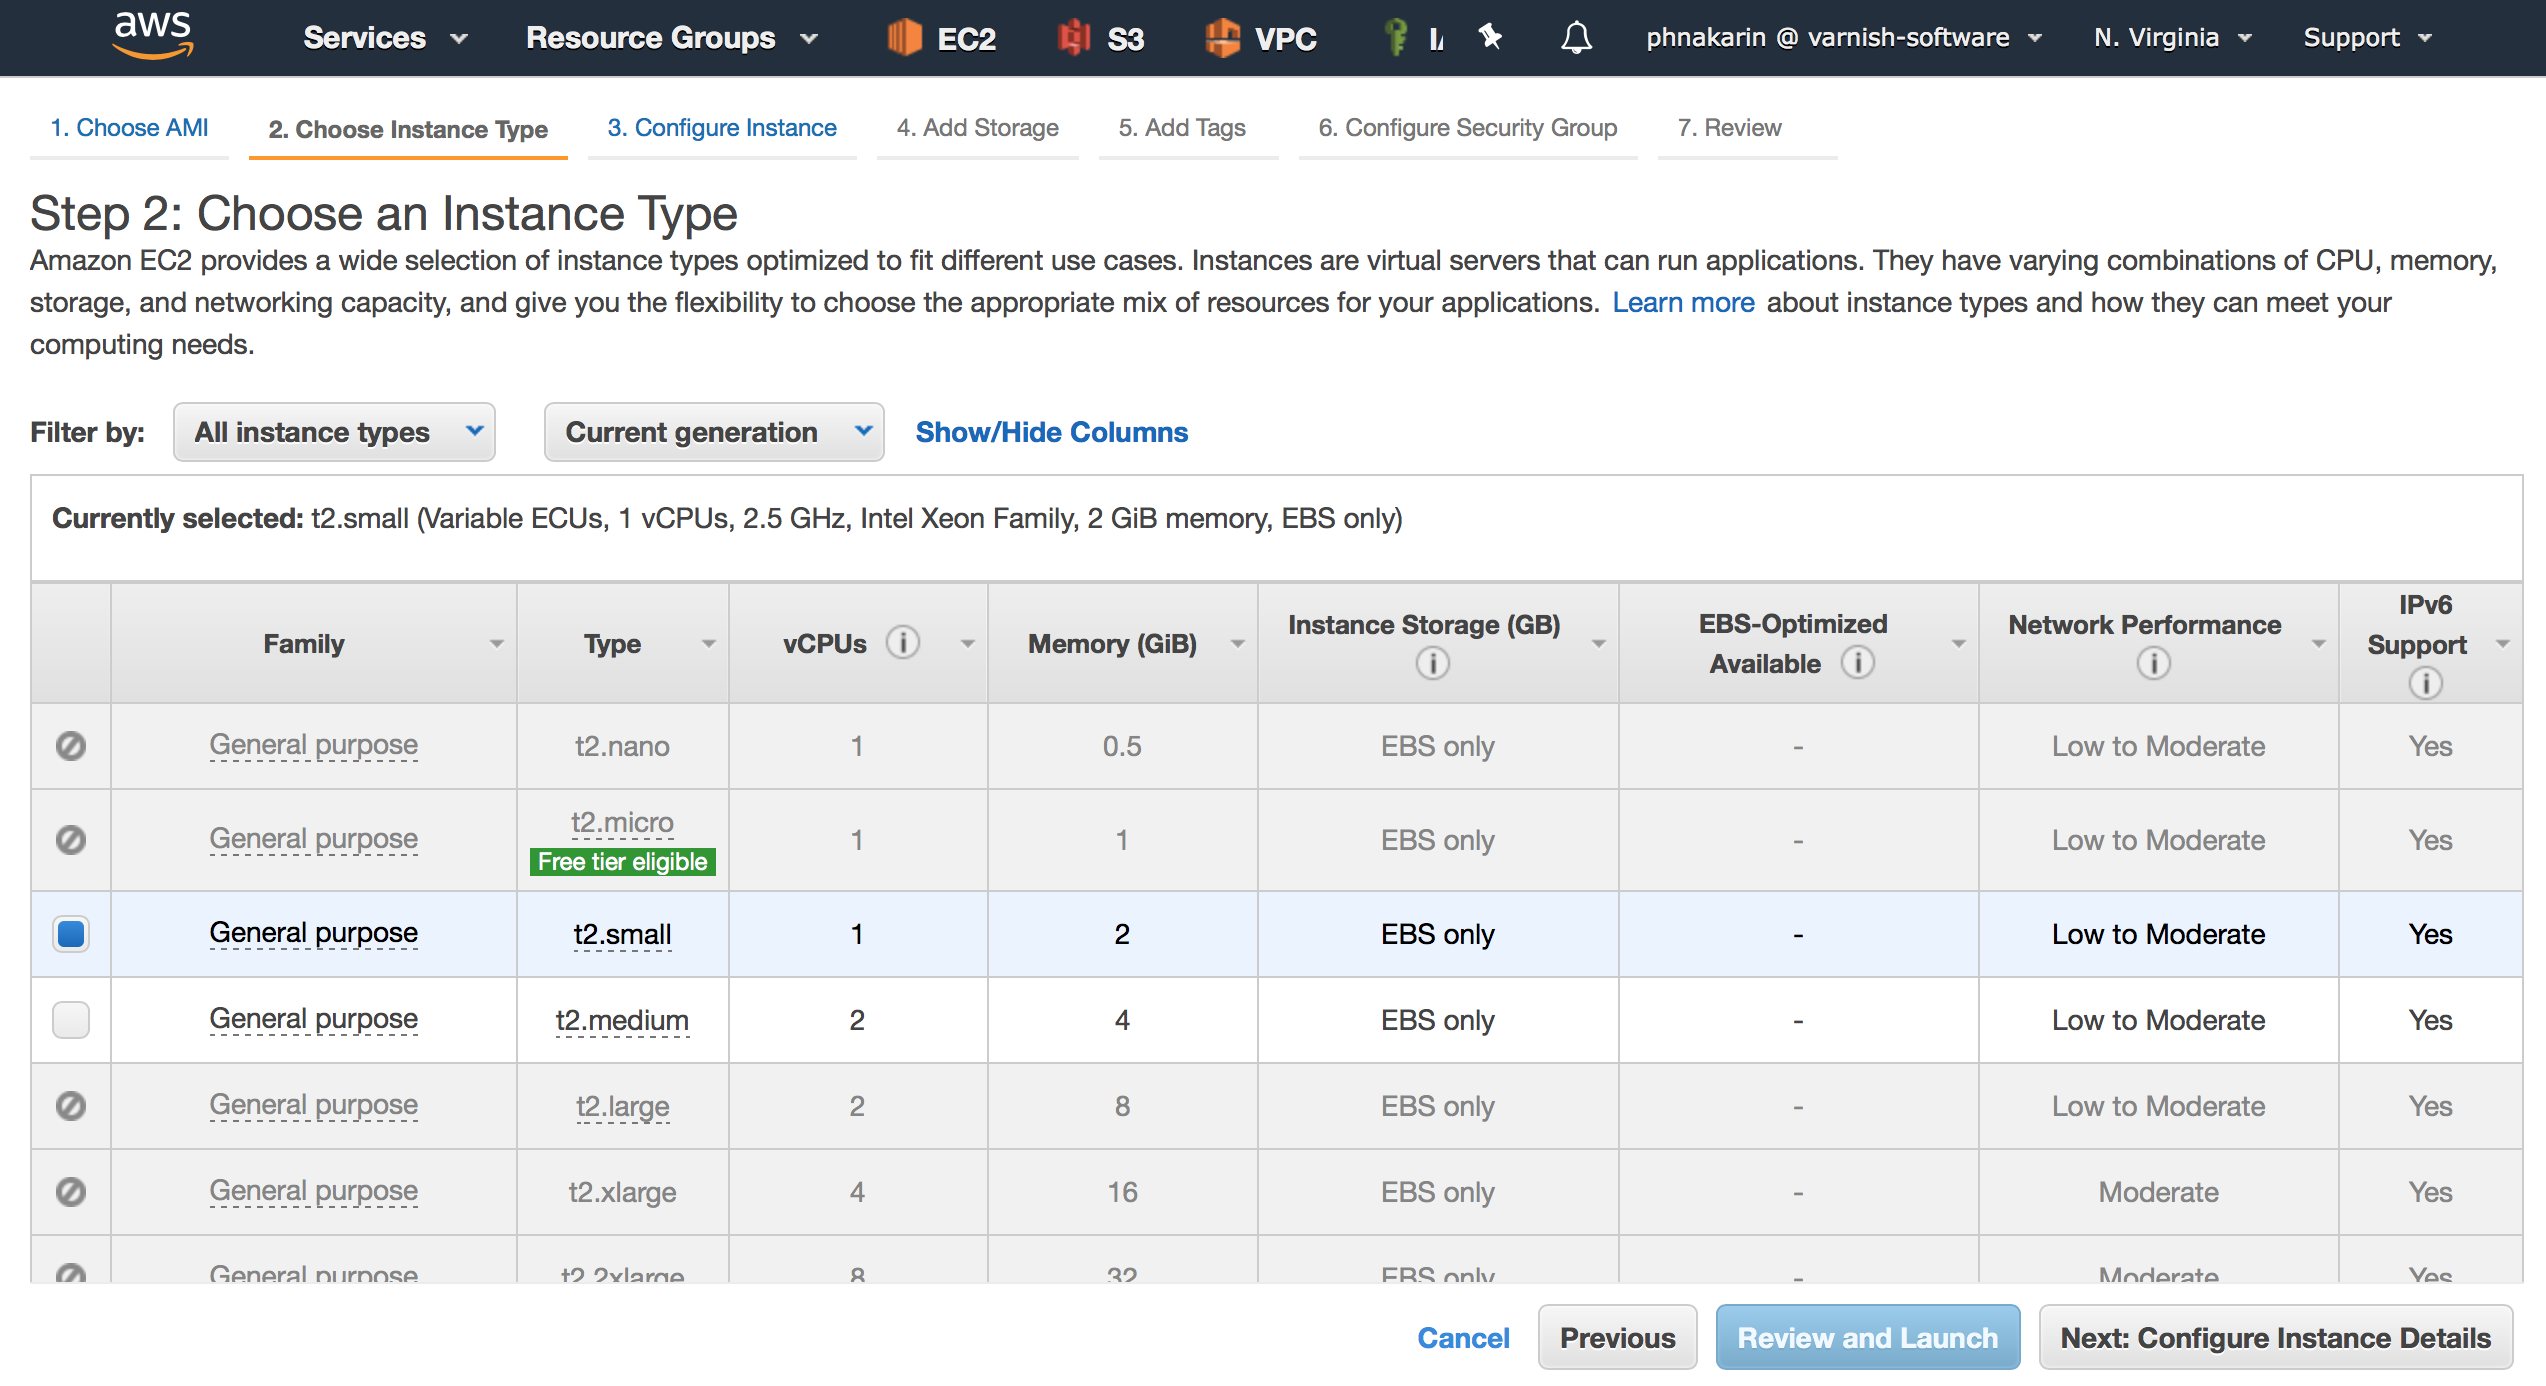
Figure 7. Choose an Instance Type
Step 3, asks you to configure your instance details, such as Number of instances, Network information and Availability Zone. If you intend to automate your setup, you can run your “User Data” script once the instance is fully booted up on this page as well. Once you’re done, click next.
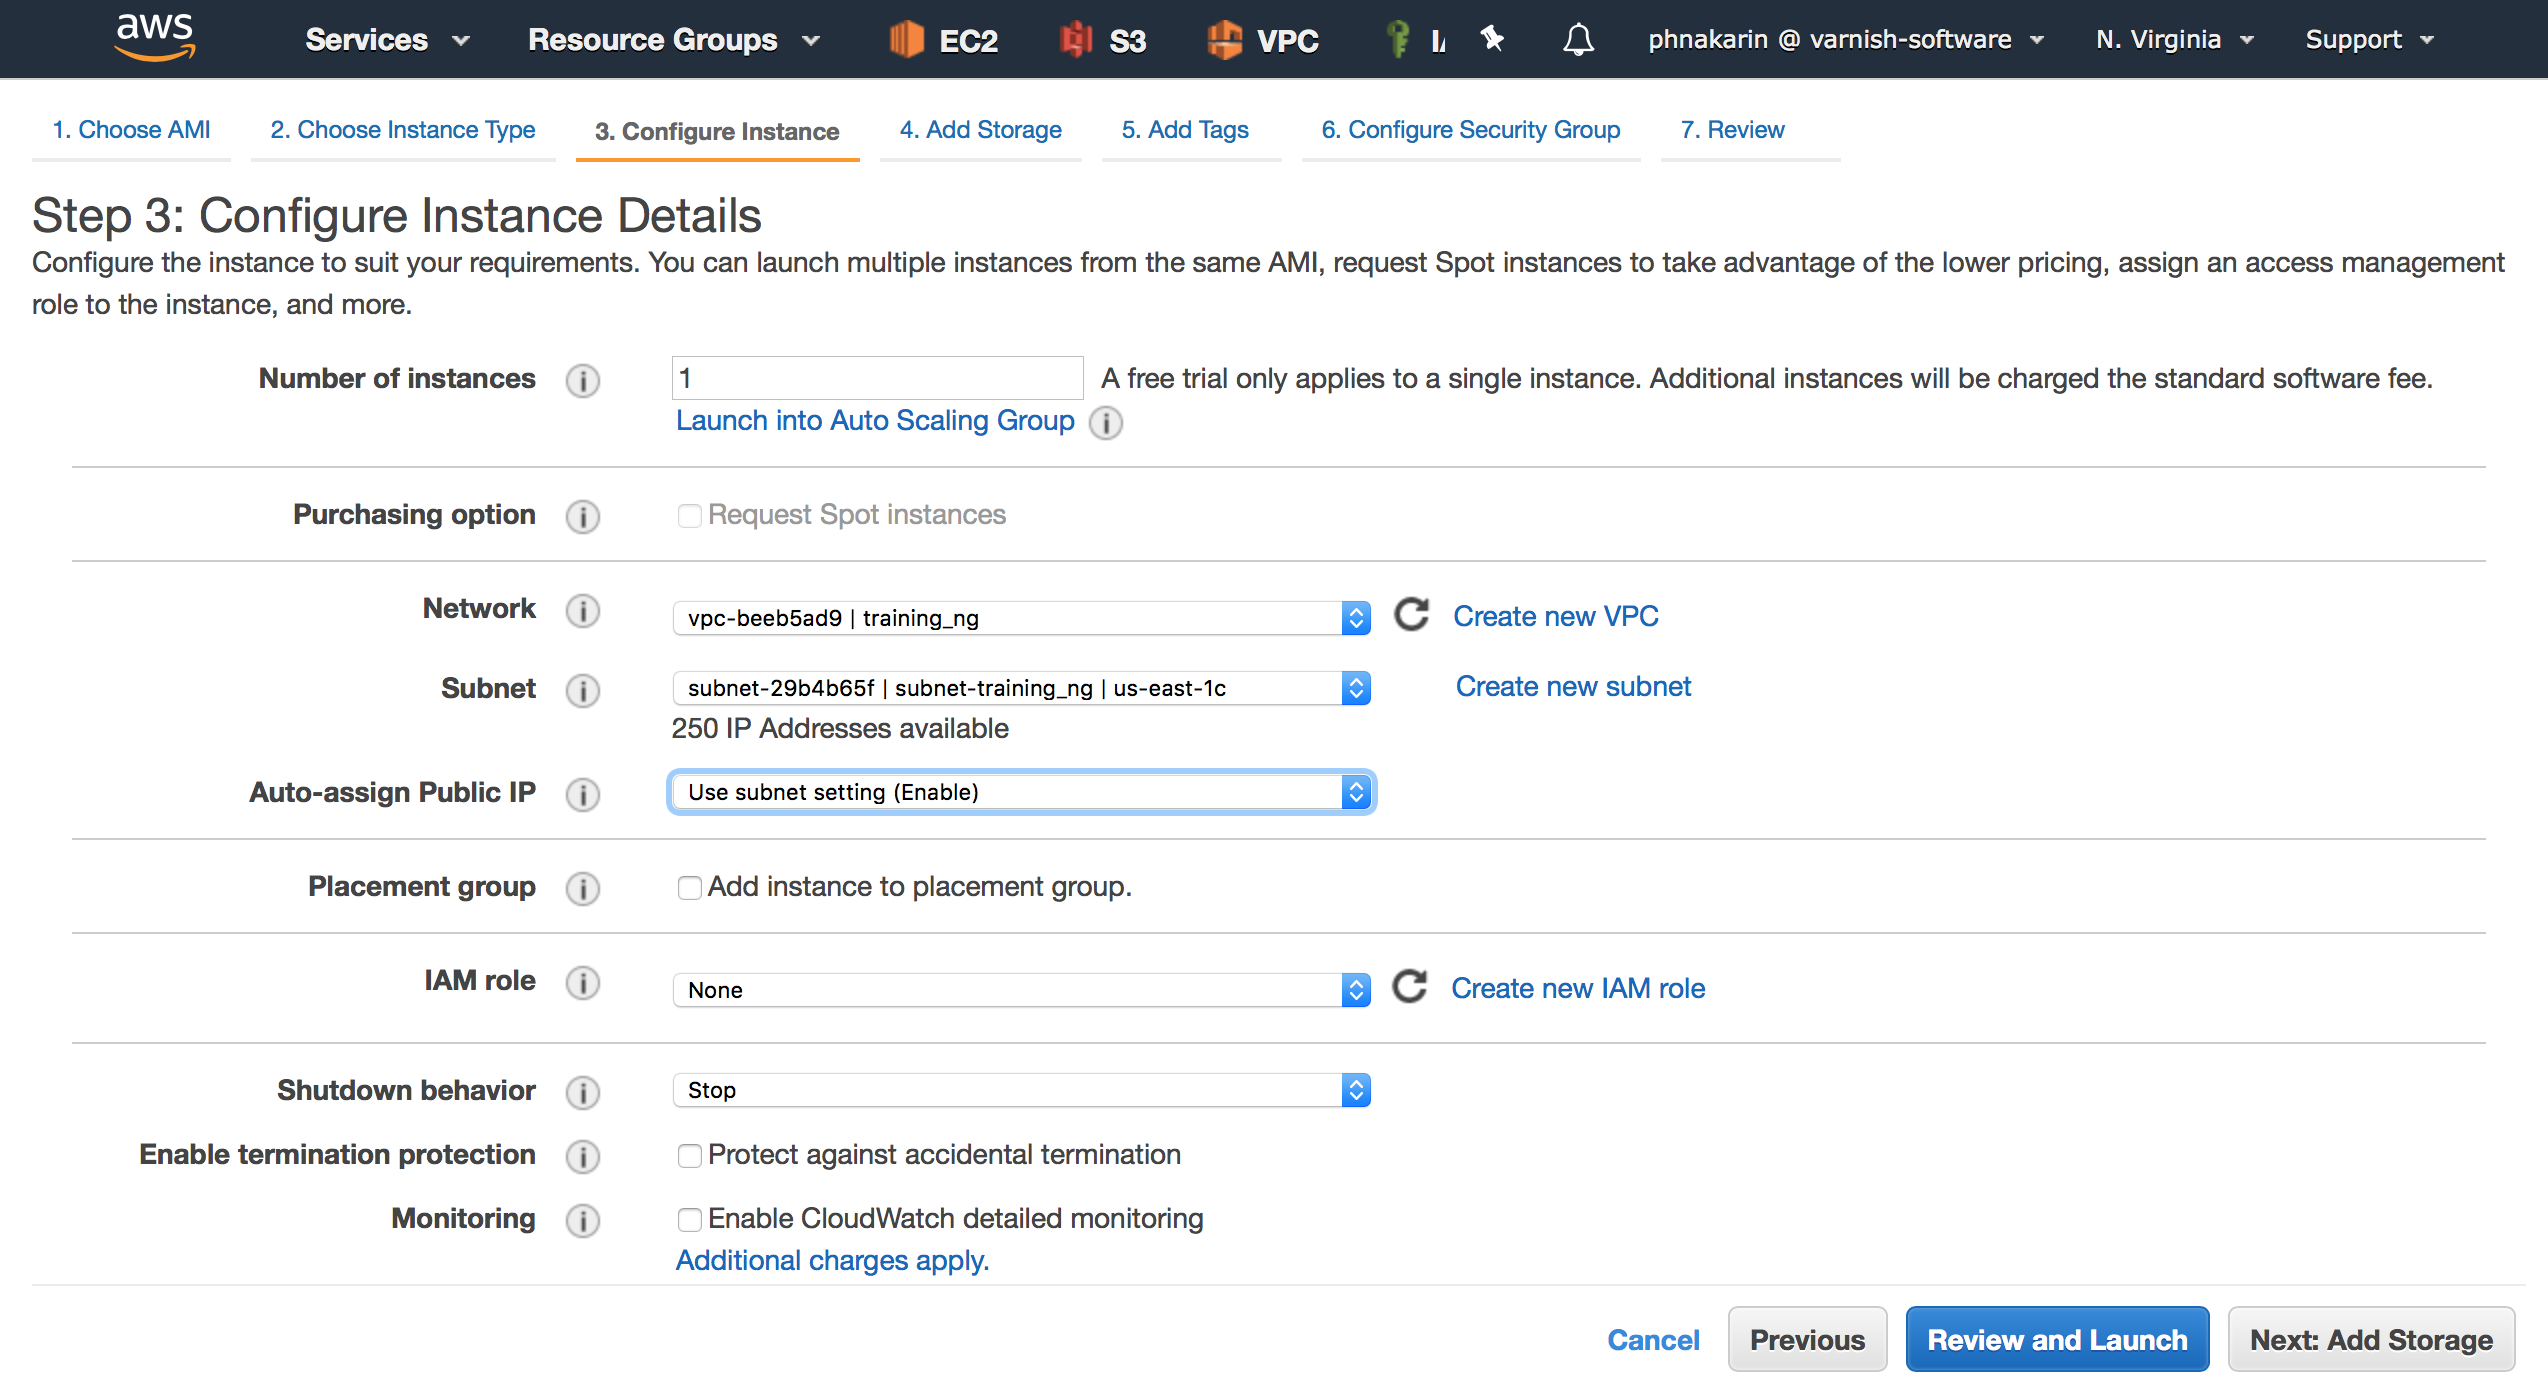
Figure 8. Configure Instance Details
Step 4, is trivial for VAC, VCS and Varnish Cache (VC) instances as they don’t require additional storage. However, it can be relevant for Varnish Cache Plus (VCP) because it comes with the Massive Storage Engine (MSE). MSE is useful when you need a persistent cache stored on your local SSD disk, instead of in memory. Once you are done, click next.
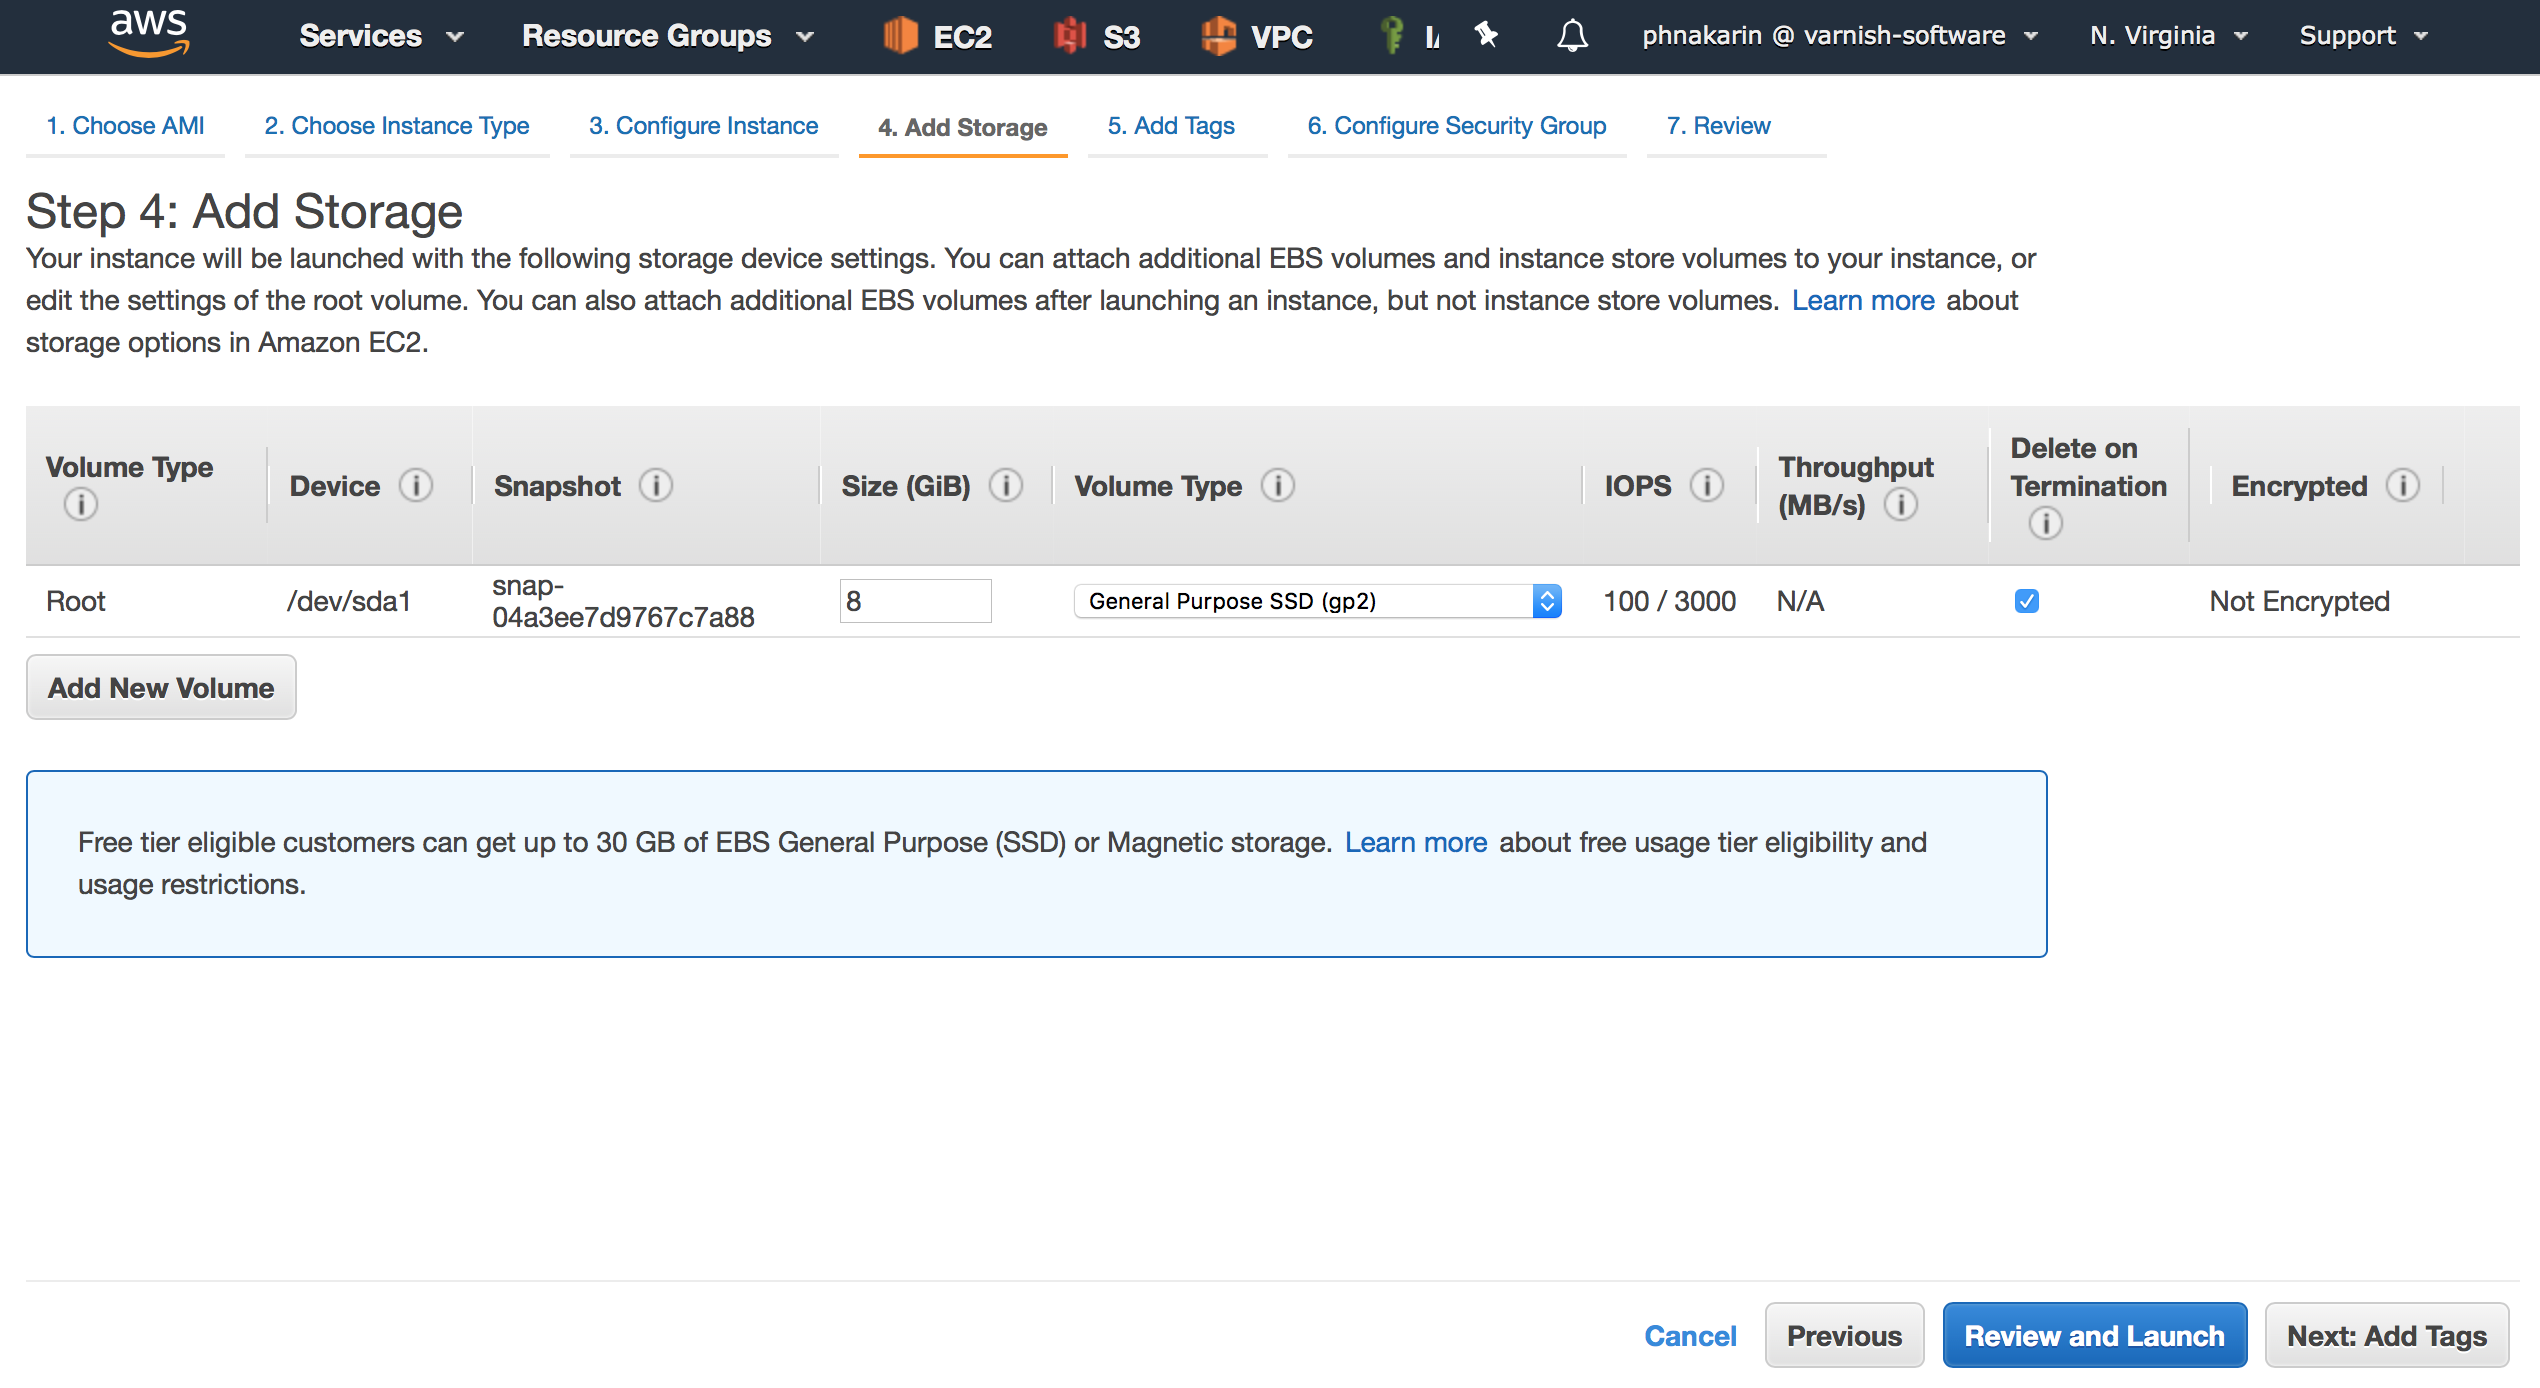
Figure 9. Add Storage
Step 5, asks you to create instance reference tags. You may leave it for now because it can be created at any time on EC2 running instance page.

Figure 10. Tag Instance
Step 6, allows you to configure “Security Group” to control network access to your instance. If this is your first Amazon Machine Image (AMI), select “Create a new security group”, provide a name for the security group and fill in a description of the group, and then click on “Add Rule”.
We recommend using the following security group policies for each Varnish Software instance. This is based on default configurations of the instances. You can choose to configure the different ports later on. (For example, running Varnish Cache Plus on TCP 80 instead of a default TCP 6081.)
- Varnish Administration Console (VAC)
- TCP: 22, 80, 443, 8088
- Varnish Custom Statistics (VCS)
- TCP: 22, 80, 443, 5558, 6555
- Varnish Cache (VC)
- TCP: 22, 80, 443, 6081, 6085
- Varnish Cache Plus (VCP)
- TCP: 22, 80, 443, 6081, 6085
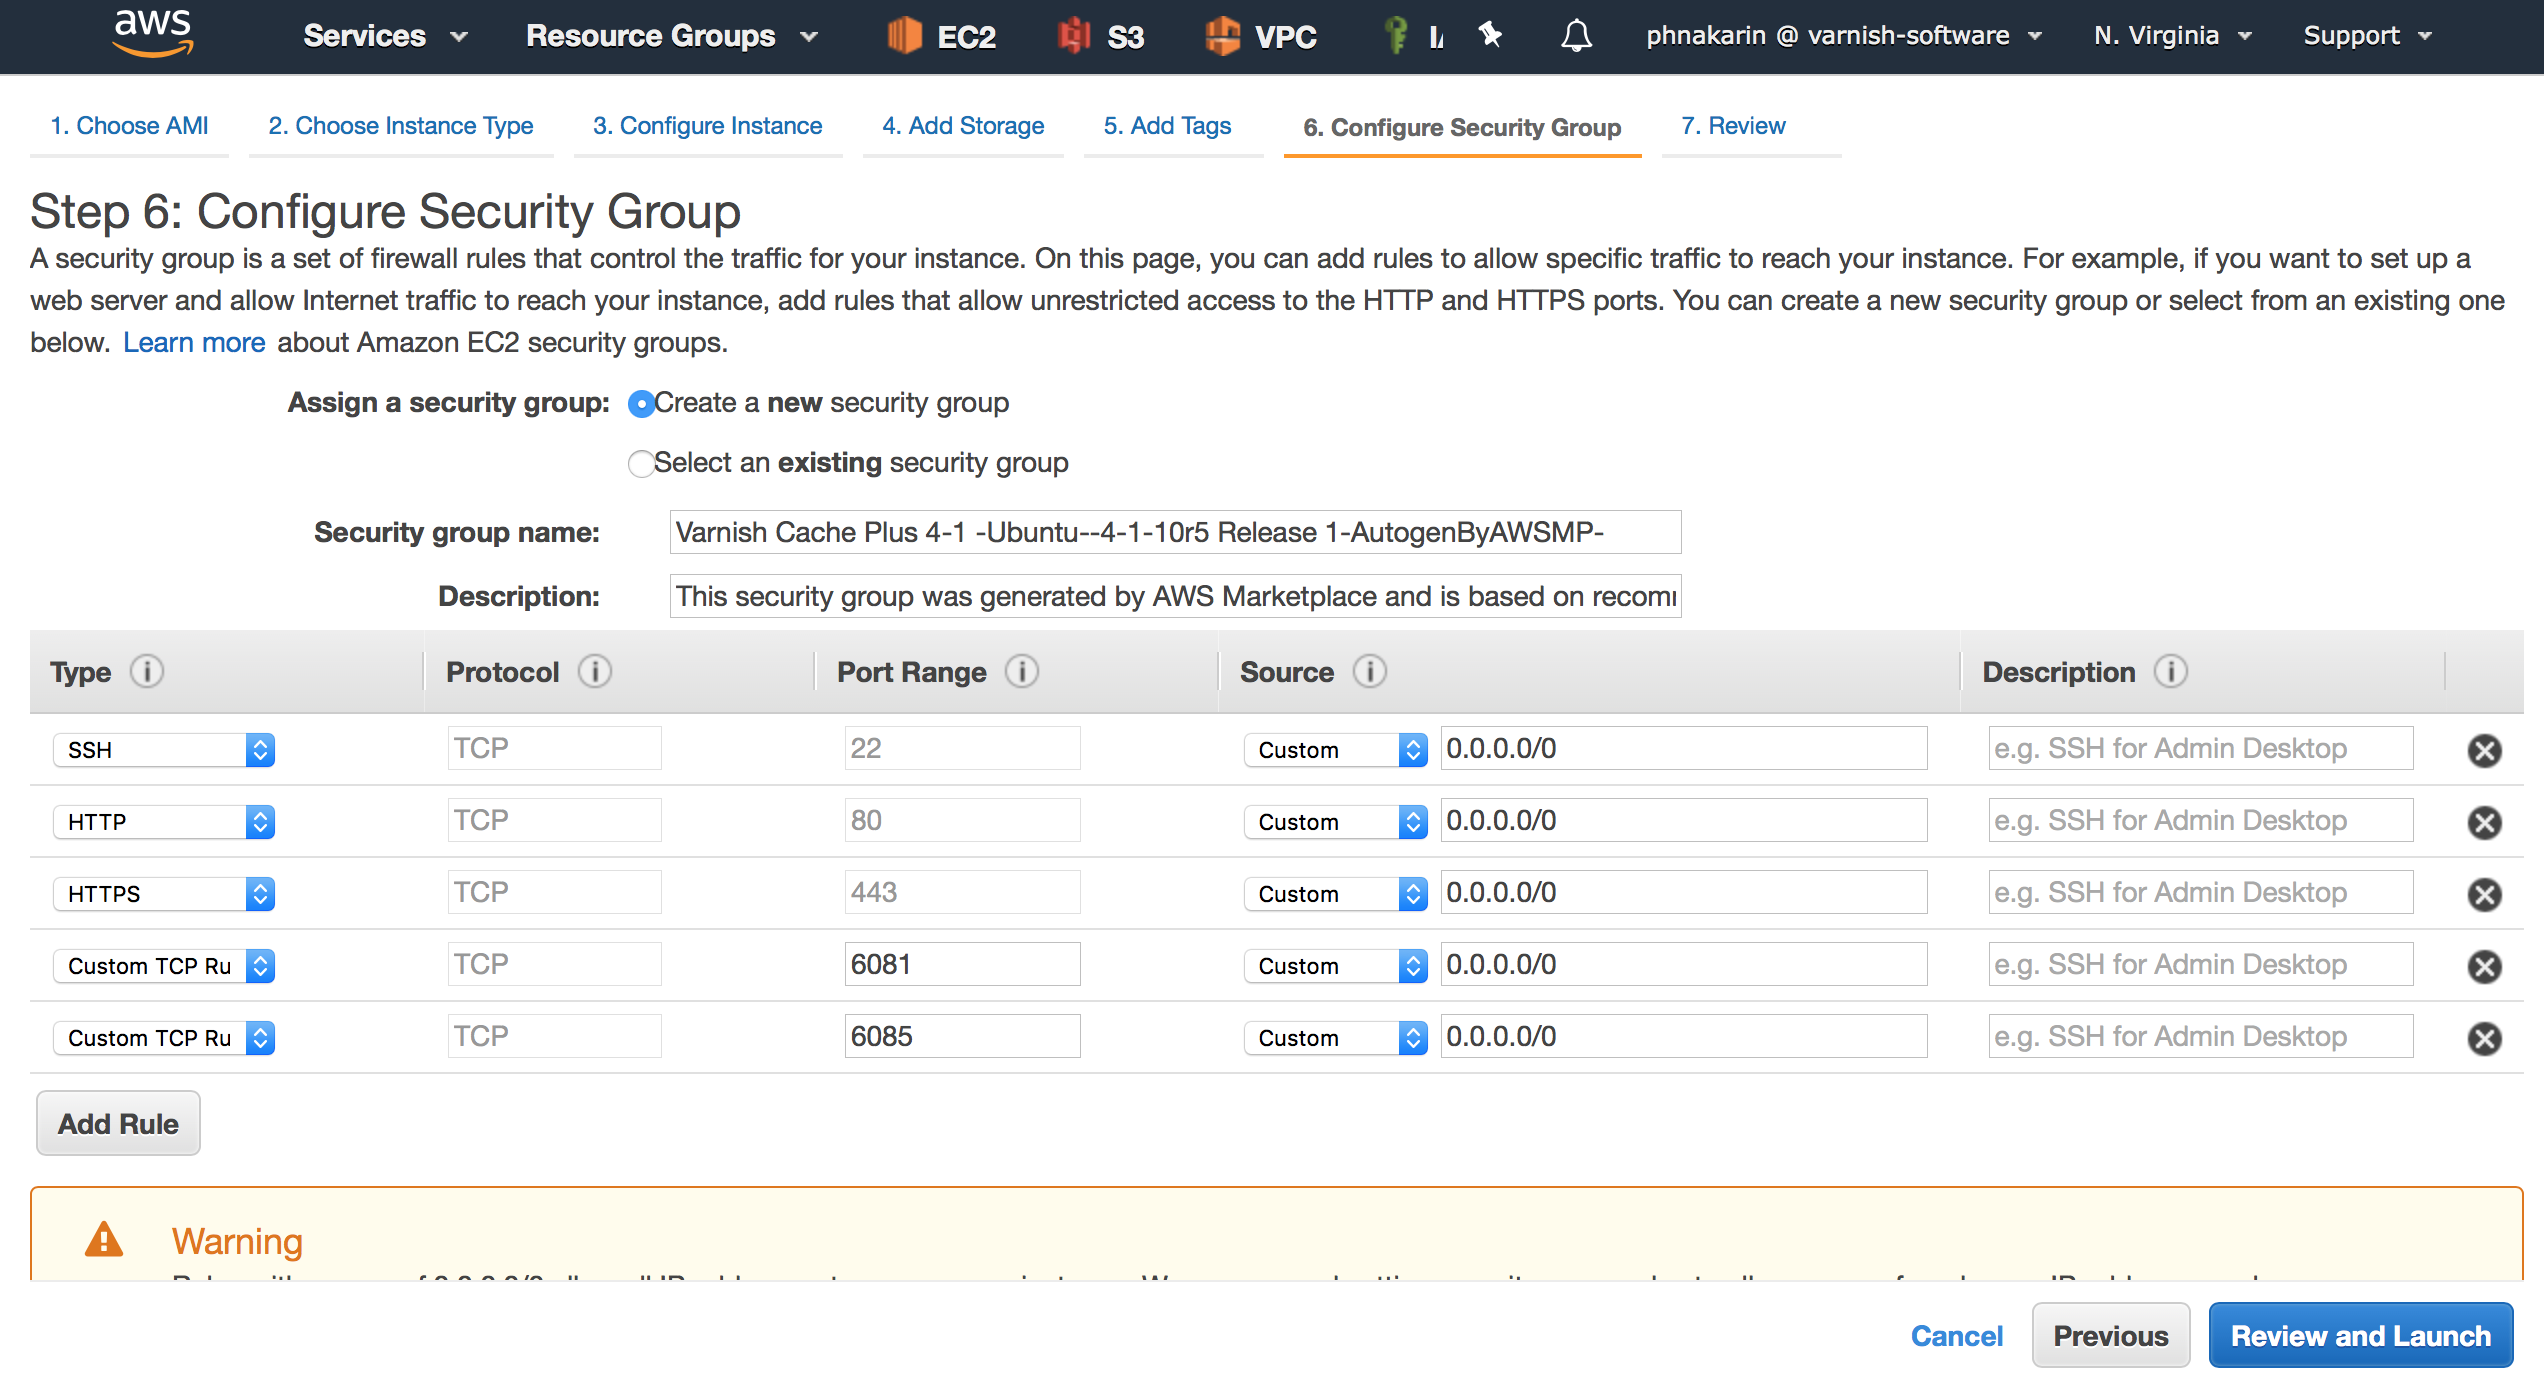
Figure 11. Configure Security Group
On the next screen, verify the settings and click on “Launch” to start the instance.
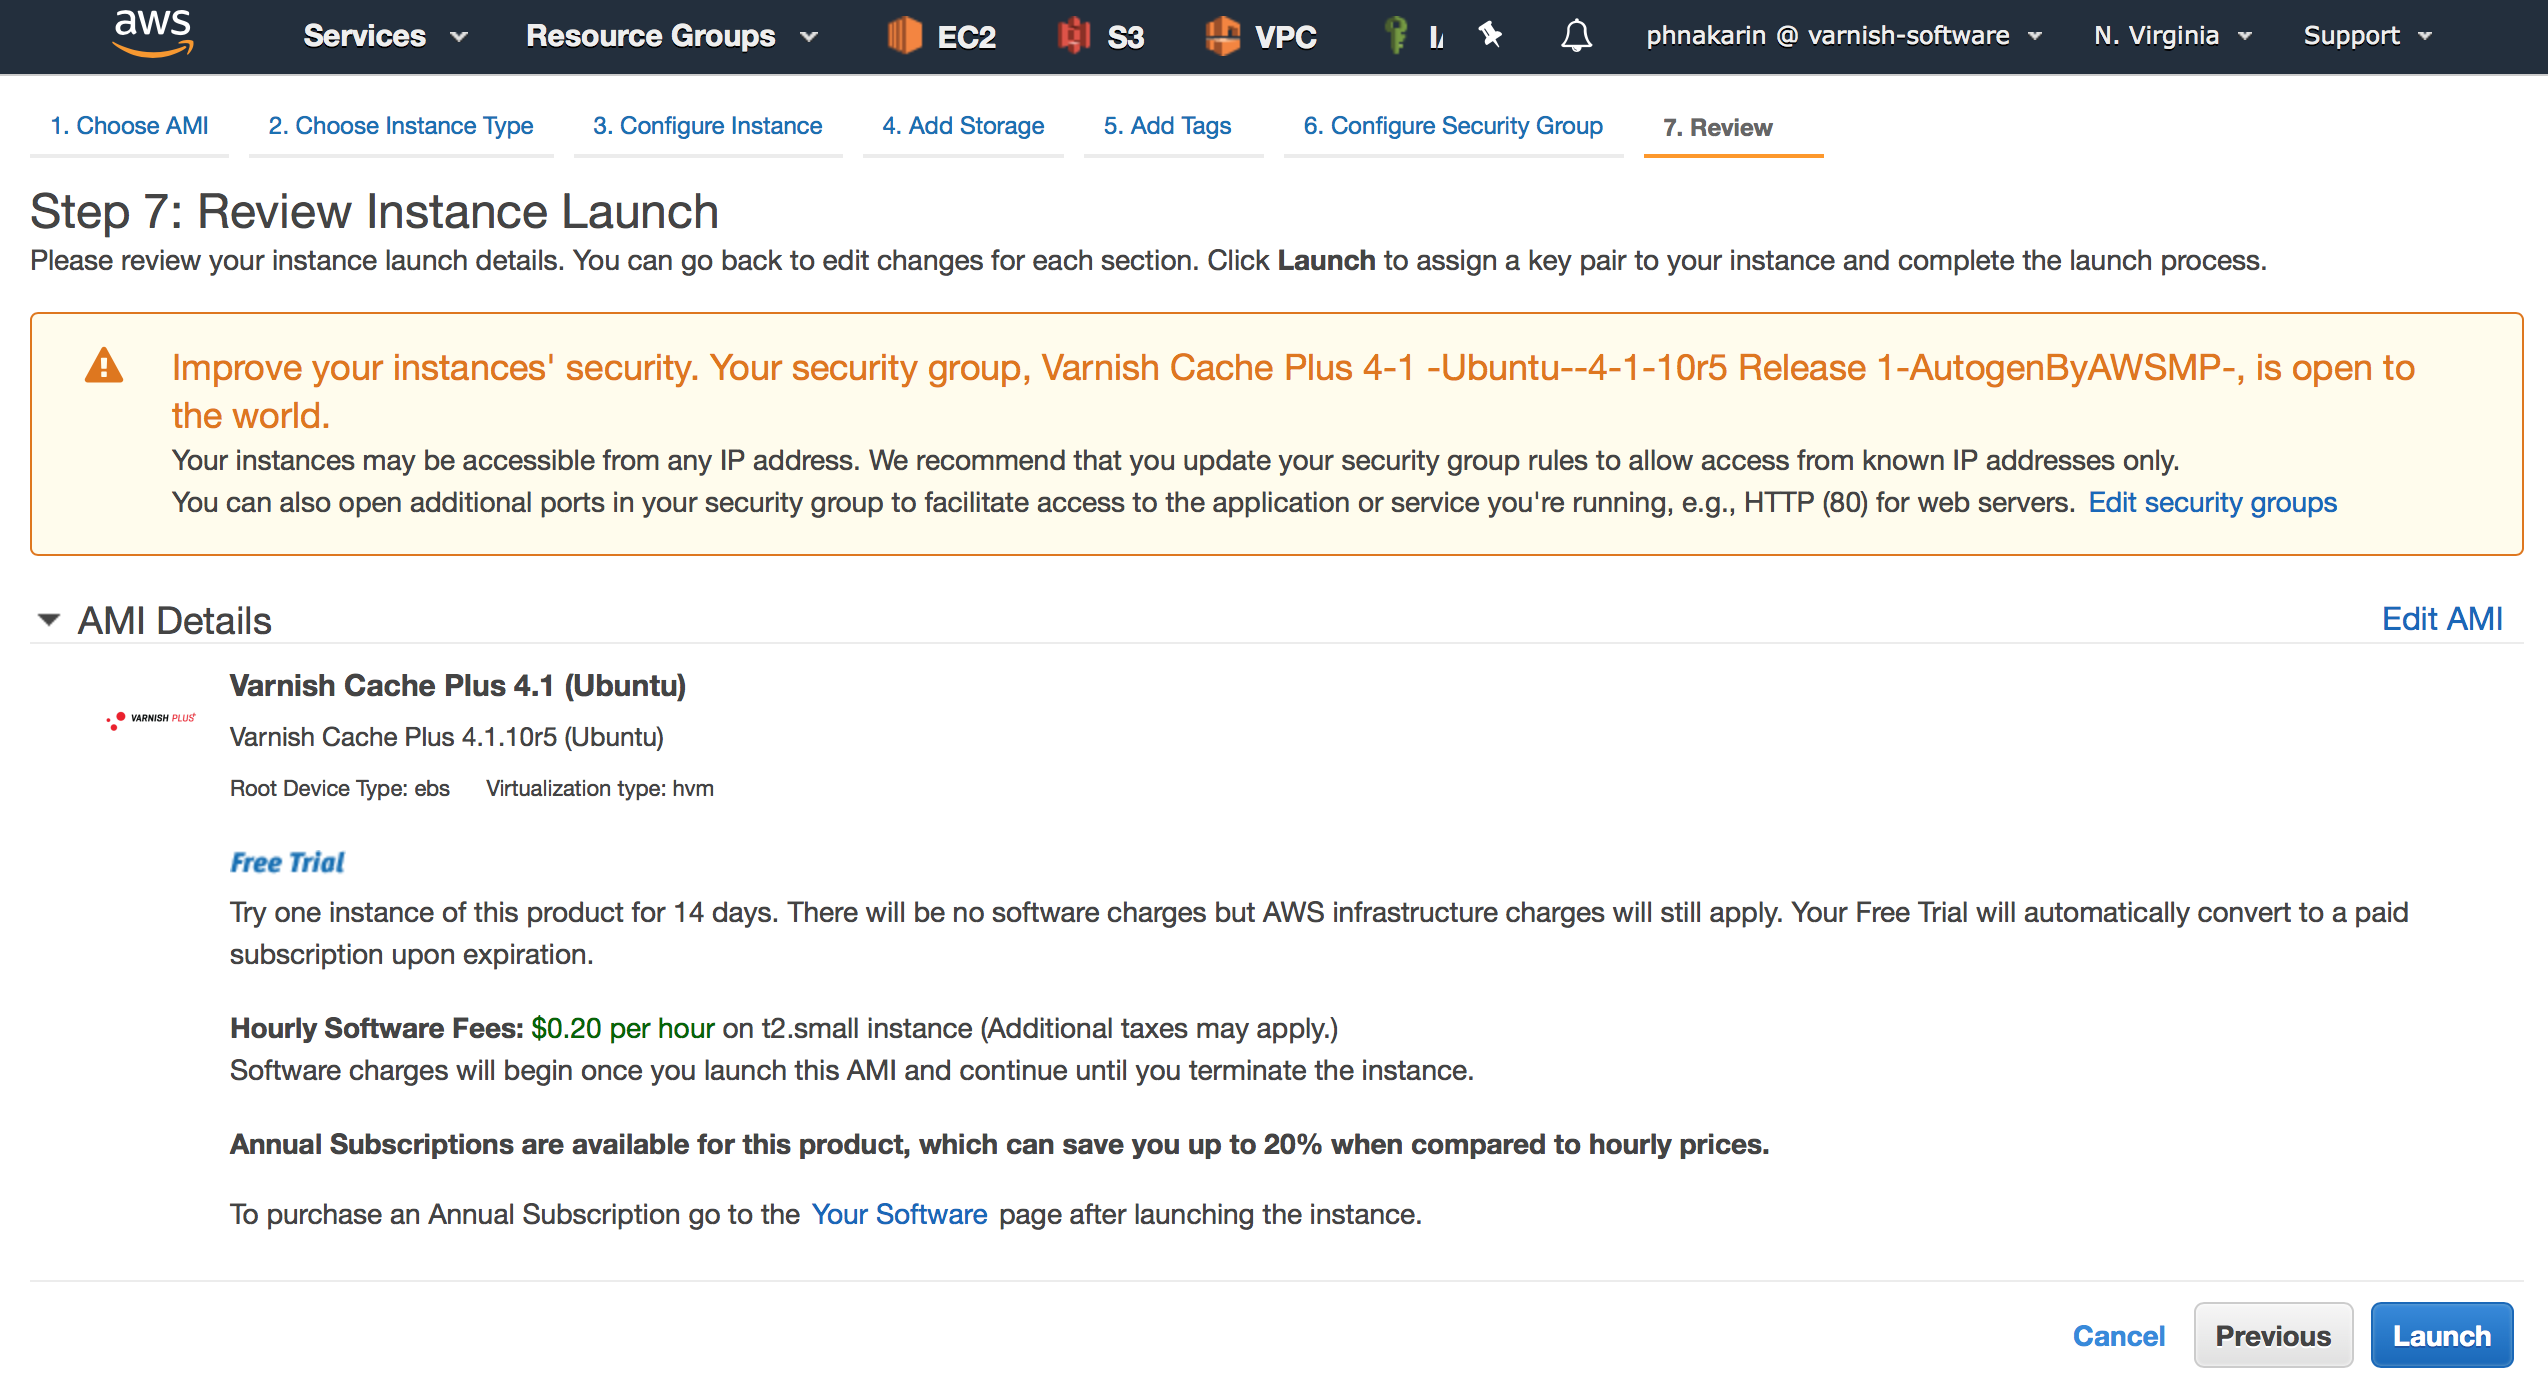
Figure 12. Review Instance Launch
When you select “Launch”, you will be prompted to create a new “Key Pair”. The key is used to connect to your Varnish Software instance. If this is your first AMI or you wish to use a different key pair for this particular instance, select “Create a new Key Pair”, provide a name for it (we suggest “varnish-on-AWS”) and then click on “Download Key Pair”. You will be prompted to save the key on your computer, and then click on “Launch instances”.
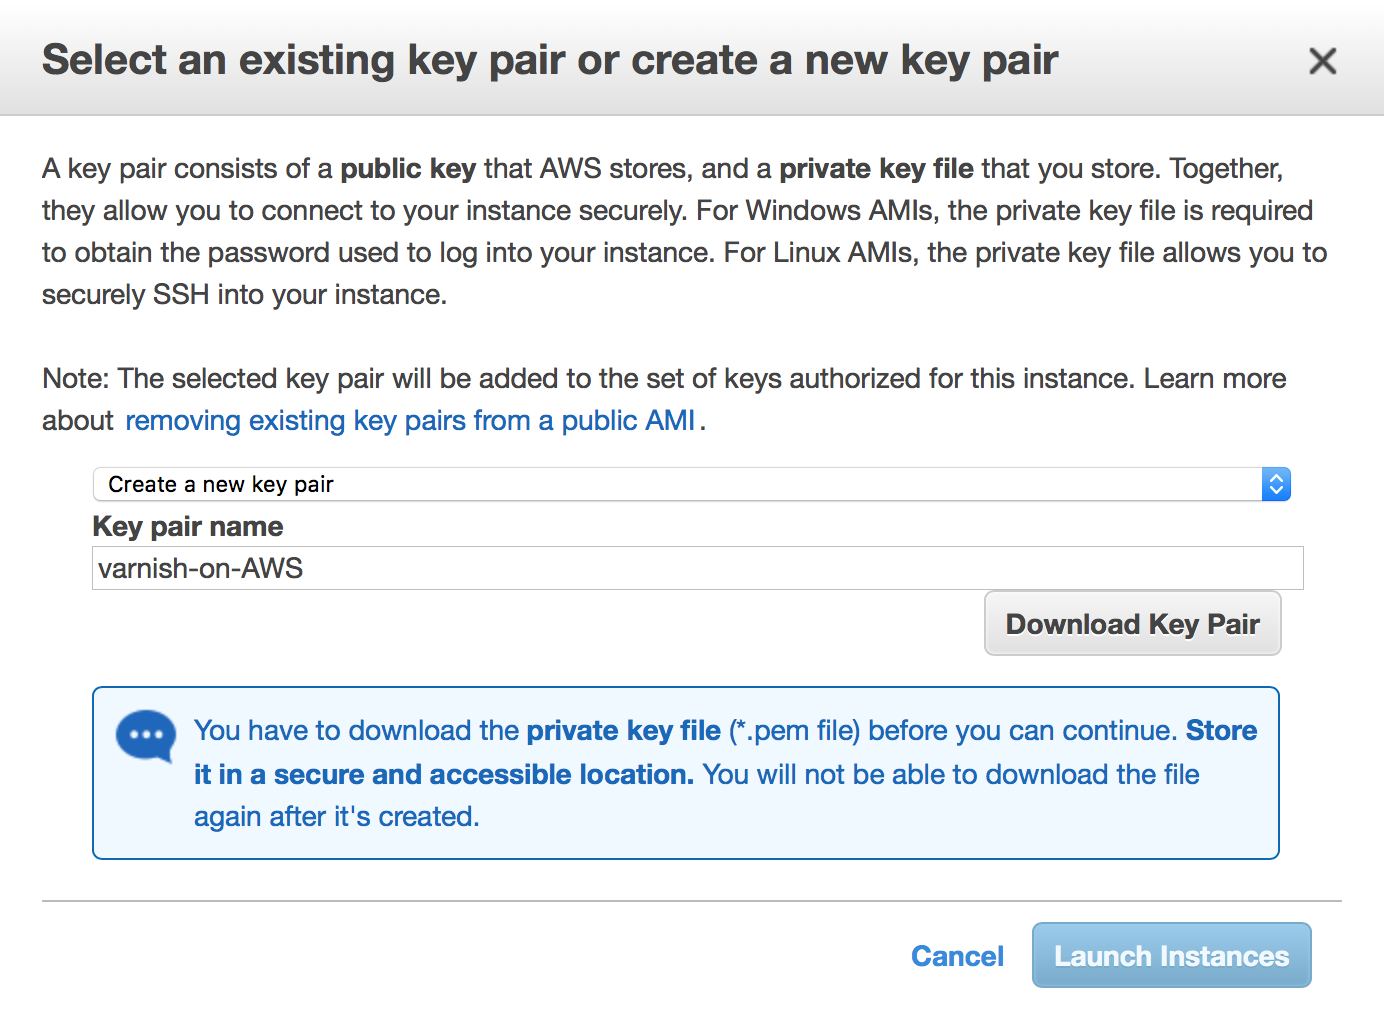
Figure 13. Choose an existing key/Create a new key pair
That’s it. Your Varnish Software instance is up and running. Next, please tune up your configuration and start enjoying the product benefits.
Deploy with Copy to Service Catalog
The 3rd option is to use AWS Service Catalog to run an instance. You select “Copy to Service Catalog” from a drop down menu with a proper region and an available software version and click on “Copy to Service Catalog” button.
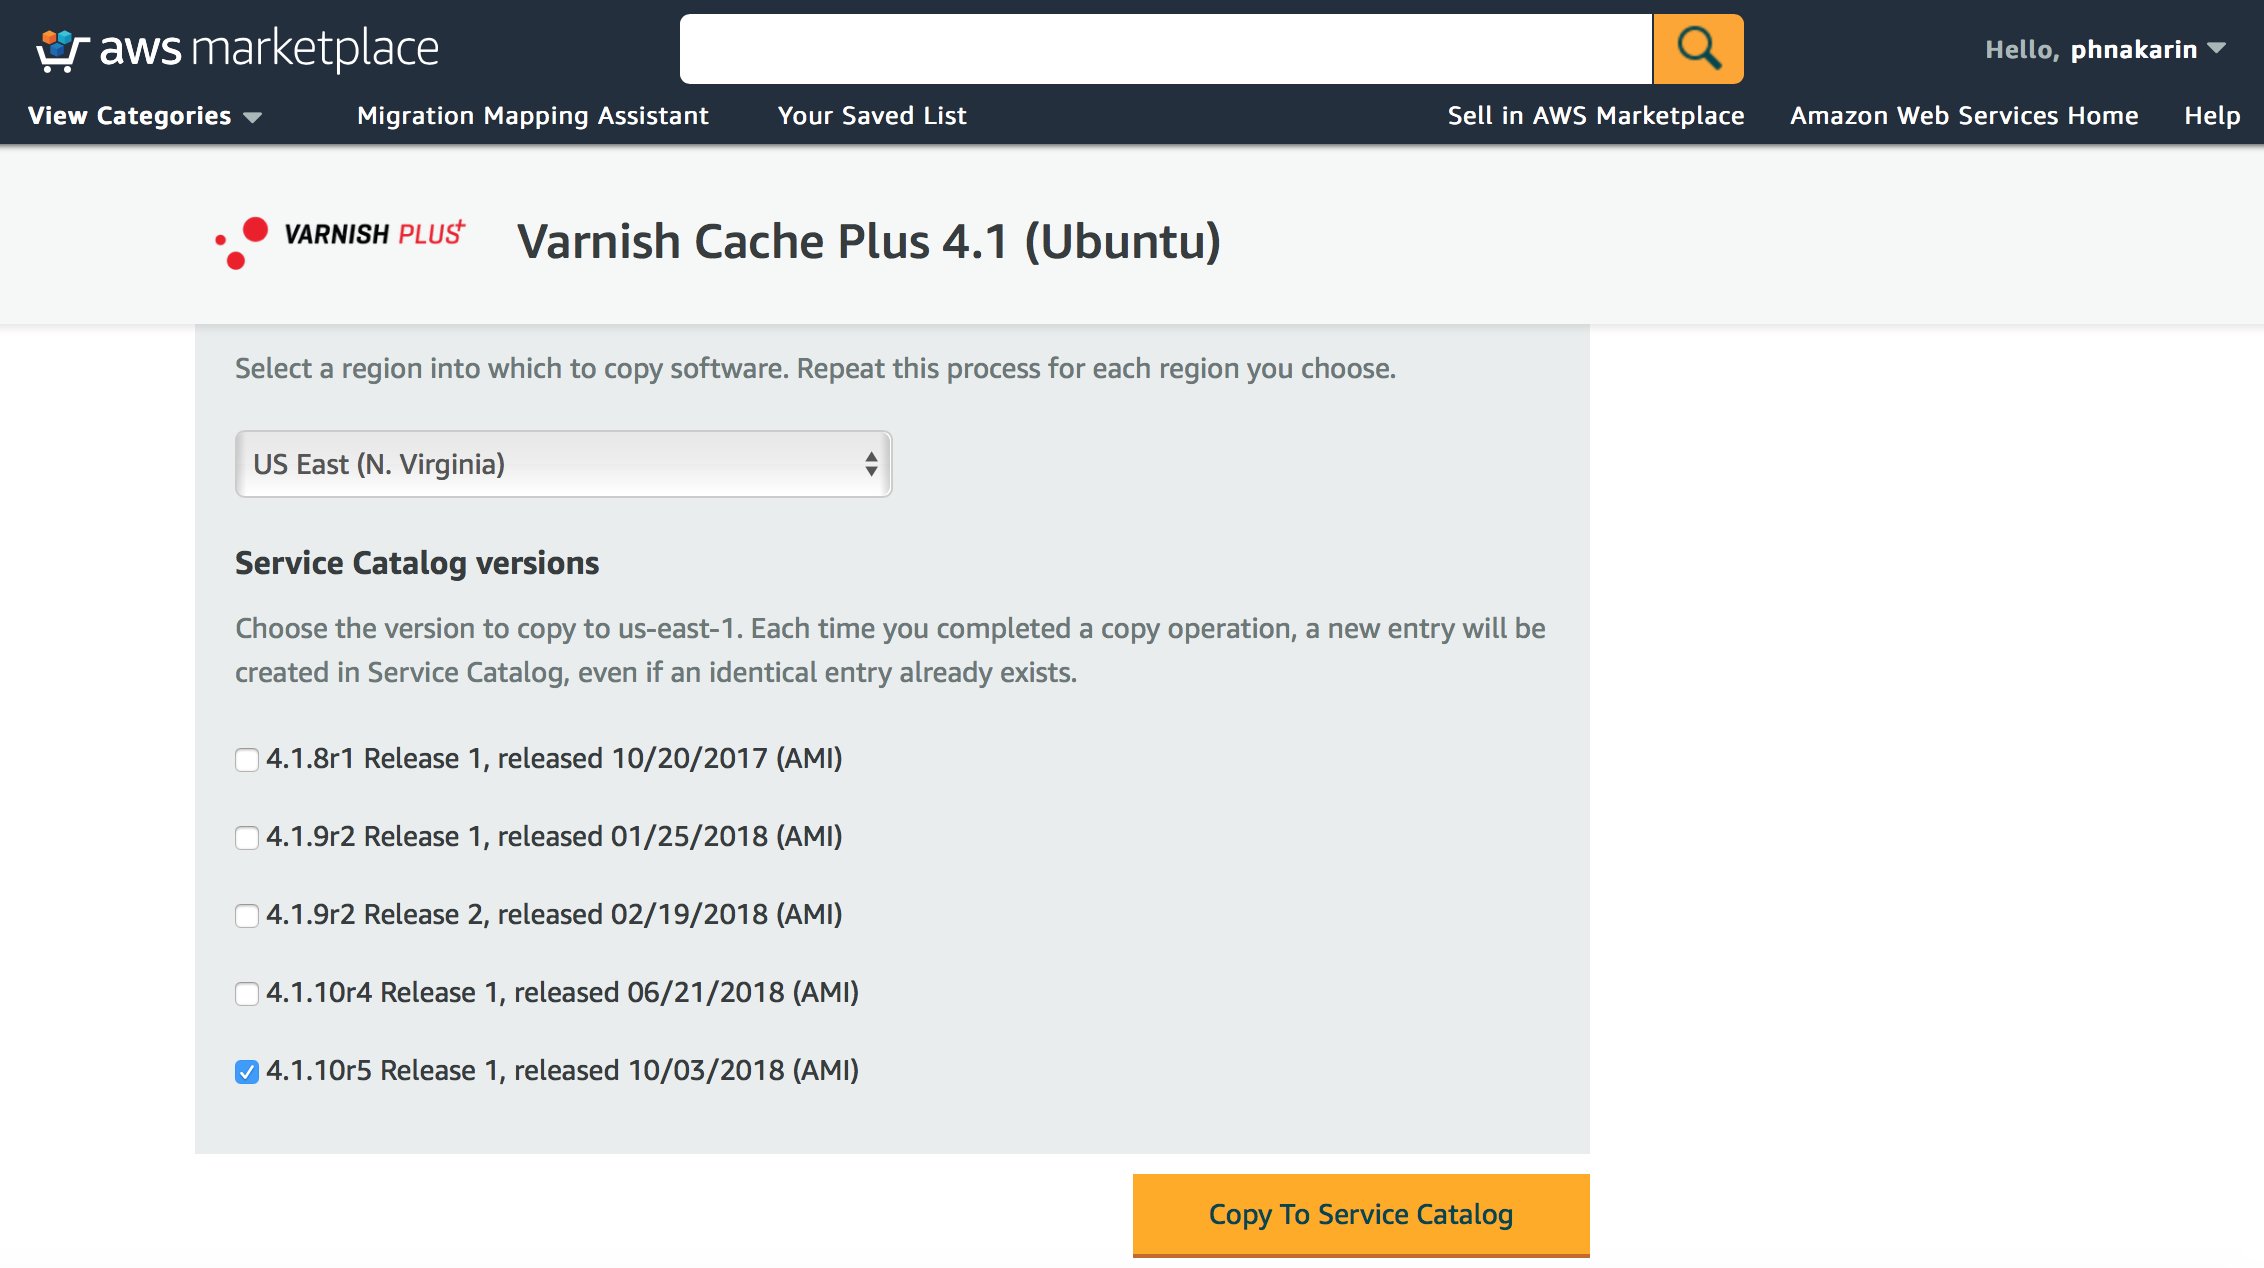
Figure 14. Deploy with Copy to Service Catalog
Configuring your Varnish Software instance
Connecting to your Varnish Software instance
For Windows SSH client, you may use Putty. For Linux and Mac users, you may use your favorite SSH client.
General information regarding Varnish Software configuration
The configuration files are located in different places based on what kind of AMIs you are running, that is: VAC, VCS, Varnish Cache or Varnish Cache Plus.
In this section, we cover the configuration basics. For more details and advanced configuration possibilities, please refer to the materials in the following links
- Varnish Administration Console (VAC)
- Varnish Cache (VC)
- Varnish Cache Plus (VCP)
- Varnish Custom Statistics (VCS)
Varnish Administration Console (VAC)
VAC should run out of the box without any additional effort. The default password for username vac is your AWS instance id. Use it when browsing to an instance hostname/ip address.
- MongoDB
/etc/mongodb.conf
- Varnish Administration Console (VAC)
/opt/vac/etc/defaults/opt/vac/etc/log4j.xml/opt/vac/etc/roles.js/opt/vac/etc/rrd_conf.xml
Varnish Cache (VC)
By default, the varnishd process should be running on TCP 6081. If you have a VAC instance running in your environment, you can configure varnish-agent to talk to VAC to see some graphs and be able to deploy Varnish Configuration Language (VCL) files to all registered Varnish Cache nodes via the VAC RESTful API.
Note: as of August 2017, “Varnish Cache 5.1” is not yet compatible with other products provided by Varnish Software. Development on compatibility is underway.
- Default VCL configuration
/etc/varnish/default.vcl
- Varnish Cache (VC)
- Red Hat
/etc/varnish/varnish.params
- Ubuntu
/etc/default/varnish
- Red Hat
- Varnish-agent
- Red Hat
/etc/varnish/varnish-agent.params
- Ubuntu
/etc/default/varnish-agent
- Red Hat
Varnish Cache Plus (VCP) and Varnish Enterprise (VE)
VCP or VE is the enterprise version of Varnish Cache (VC). Apart from ease-of-use improvements and performance enhancements, VCP also provides additional functionality, such as Varnish Massive Storage Engine (MSE), Varnish High Availability (VHA) and SSL/TLS backend support. Customers can also enable frontend SSL/TLS by using Varnish Plus Addon SSL (Hitch), which is also included with the image.
- Default VCL configuration
/etc/varnish/default.vcl
- Varnish-agent
- Red Hat
/etc/varnish/varnish.params
- Ubuntu
/etc/default/varnish-agent
- Red Hat
- Varnish Plus Addon SSL (Hitch)
- Red Hat
/etc/hitch/hitch.params/etc/hitch/hitch.conf
- Ubuntu
/etc/default/hitch/etc/hitch/hitch.conf
- Red Hat
- Varnish Cache Plus (VCP)
- Red Hat
/etc/varnish/varnish.params
- Ubuntu
/etc/default/varnish
- Red Hat
- Varnish Plus HA
- Red Hat
/etc/varnish/vha-agent.params/etc/vha-agent/nodes.conf
- Ubuntu
/etc/default/vha-agent/etc/vha-agent/nodes.conf
- Red Hat
- Varnish Custome Statistics probe
- Red Hat
/etc/varnish/vstatdprobe.params
- Ubuntu
/etc/default/vstatdprobe
- Red Hat
Varnish Custom Statistics (VCS)
VCS should be running out of the box without any additional effort. The default password for username vcs is your AWS instance id. Use it when browsing to an instance hostname/ip address.
- Varnish Custom Statistics (VCS)
- Red Hat
/etc/varnish/vstatd.params
- Ubuntu
/etc/default/vstatd
- Red Hat
Testing your instance
First of all, find your network information regarding your running instances on the AWS EC2 Running Instances page, AWS EC2 Dashboard -> Running Instances.
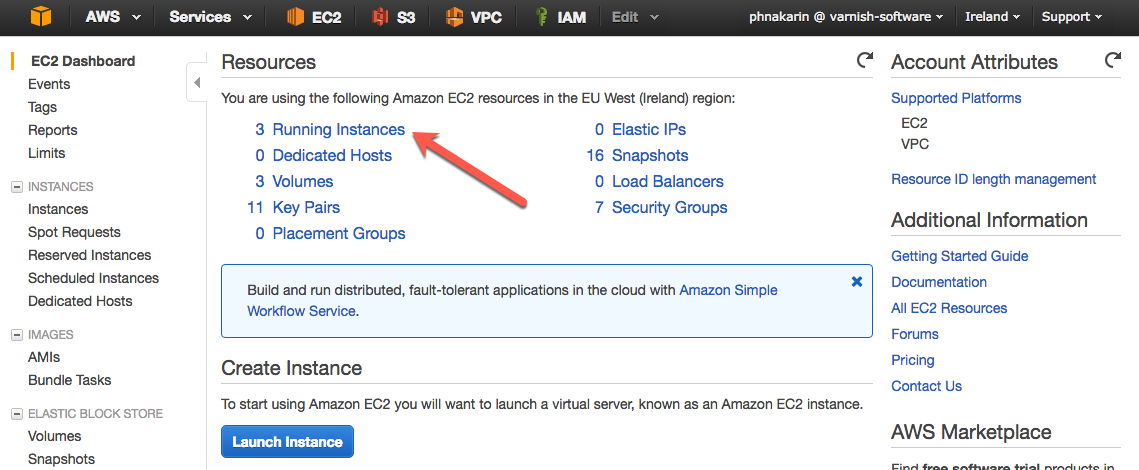
Figure 15. EC2 Dashboard
Select an instance, and you will see all related information in the “Description” tab.
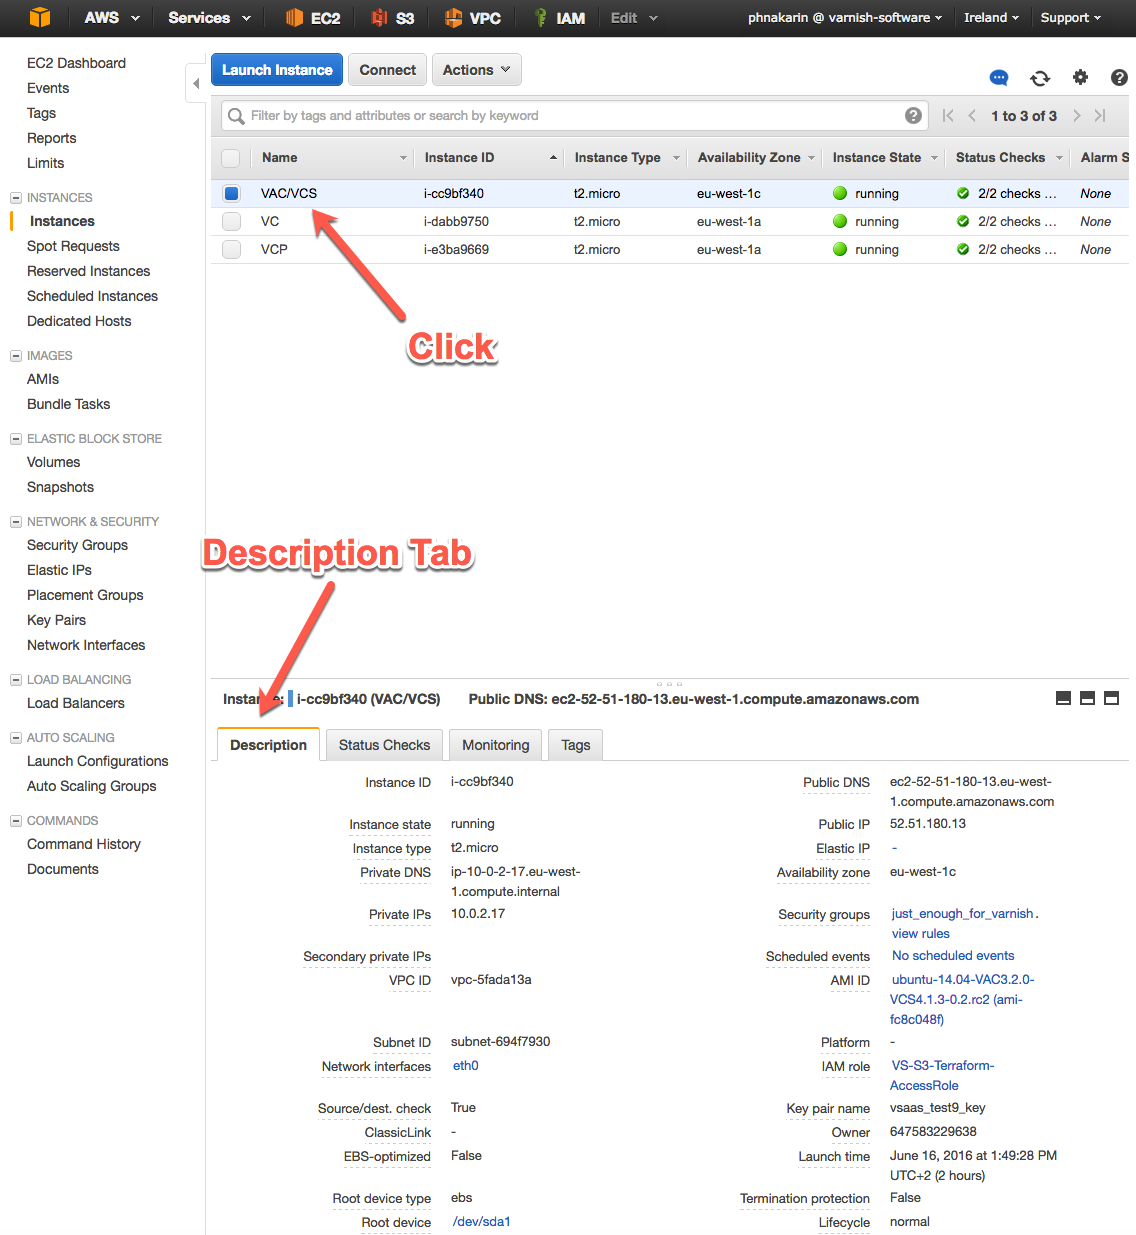
Figure 16. Instance Status Page
Varnish Administration Console (VAC)
Point your browser to your AWS EC2 instance hostname/ip address (http://52.51.180.13 from an example above). You will be able to access the VAC login page. The default username is vac and the default password is an instance id of your running instance, which is i-cc9bf340 in the example above.
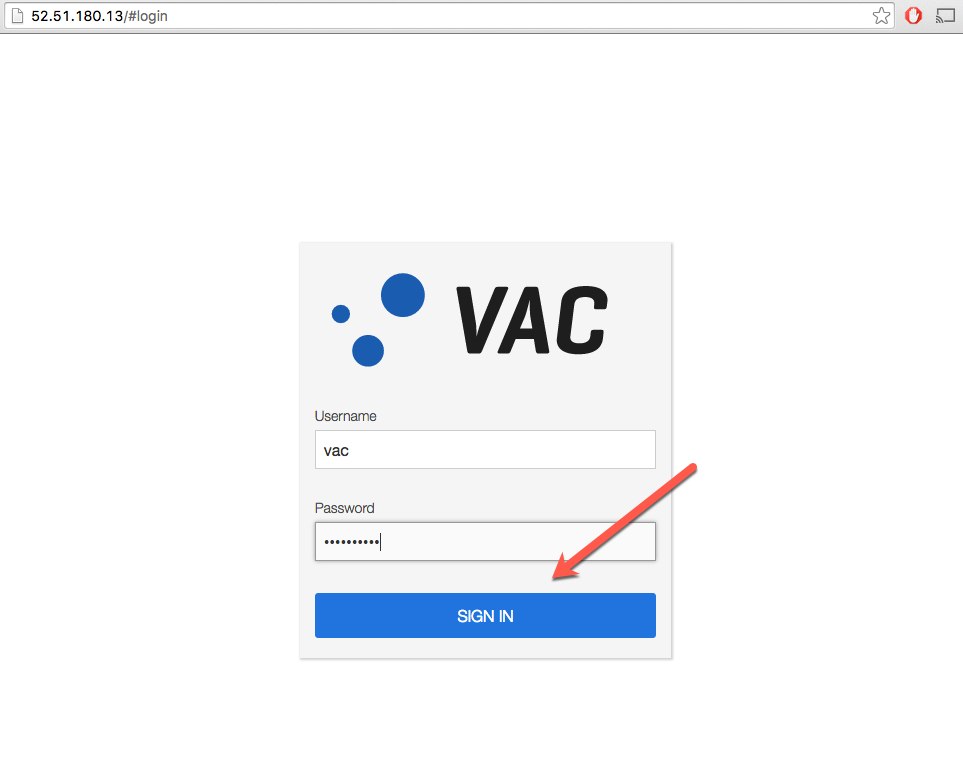
Figure 17. Varnish Administration Console (VAC) Landing Page
After clicking the “Sign In” button, you should see a dashboard looks like that shown in figure 13.
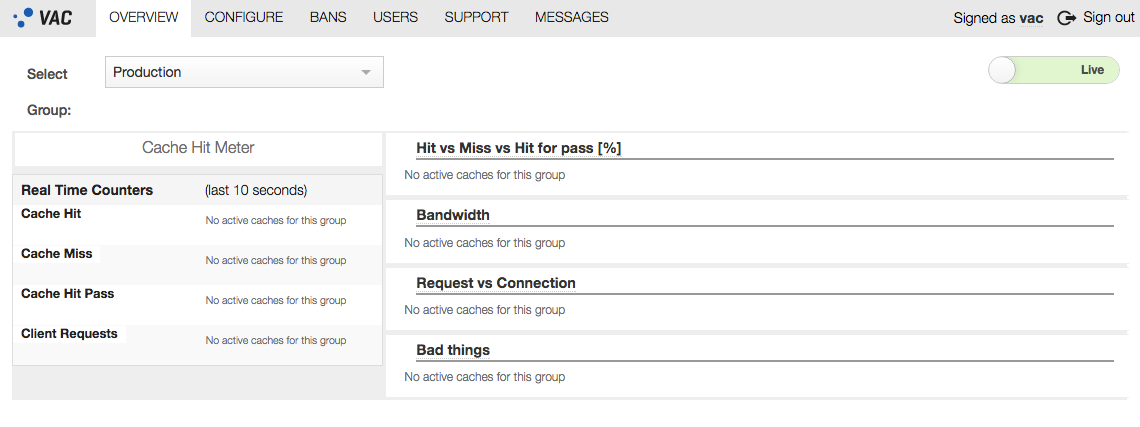
Figure 18. Varnish Administration Console (VAC) Dashboard
Varnish Custom Statistics (VCS)
To verify that VCS is running, point your browser to the hostname/ip address to the TCP 6555 (http://52.51.180.13:6555 from an example above). The default username is vcs and the default password is an instance id. Once you input credentials correctly, you can see the VCS dashboard without any issues or problems.
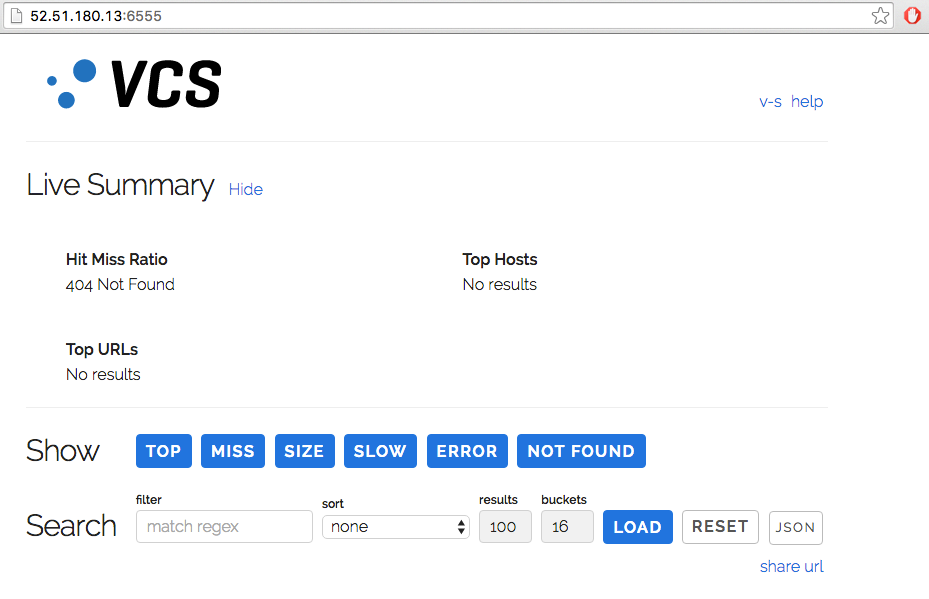
Figure 19. Varnish Custom Statistics (VCS) Dashboard
Varnish Cache (VC) and Varnish Cache Plus (VCP)
In VC and VCP instances, there should be two varnishd processes running out of the box, if you SSH to the instances to verify the process table. However, you can simply verify the process status by running curl from your terminal to [hostname/ip address]:port.
terminal$ curl 52.208.187.80:6081
<!DOCTYPE html>
<html>
  <head>
    <title>503 Backend fetch failed</title>
  </head>
  <body>
    <h1>Error 503 Backend fetch failed</h1>
    <p>Backend fetch failed</p>
    <h3>Guru Meditation:</h3>
    <p>XID: 6</p>
<hr>
    <p>Varnish cache server</p>
  </body>
</html>

terminal$ curl -I 52.208.187.80:6081
HTTP/1.1 503 Backend fetch failed
Date: Thu, 17 Nov 2016 12:53:23 GMT
Server: Varnish
Content-Type: text/html; charset=utf-8
Retry-After: 5
X-Varnish: 32773
Age: 0
Via: 1.1 varnish-v4
Connection: keep-alive
Congratulations! Your varnishd is now running nicely. You should not be worried about the 503 Backend fetch failed message at all. This is an expected behavior. In order to hit a cache or a web page with 200 OK, you need to assign a running web server backend to a default VCL configuration, located at /etc/varnish/default.vcl.
If you see a connection refuse error, that means that the process is not running for some reason. You can fix this by running a restart command. Then curl to check again.
terminal$ ssh 52.208.187.80 -lubuntu -i ~/.ssh/varnish-on-AWS "sudo service varnish restart"
* Stopping HTTP accelerator varnish
No /usr/sbin/varnishd found running; none killed.
   ...fail!
 * Starting HTTP accelerator varnish
   ...done.

*** Note that:
*** if the running instance is Ubuntu then the username is "ubuntu"
*** If the running instance is Red Hat, then the username is "ec2-user"

terminal$ ssh 52.208.187.80 -lubuntu -i ~/.ssh/varnish-on-AWS "netstat -nlt"
Active Internet connections (only servers)
Proto Recv-Q Send-Q Local Address           Foreign Address         State
tcp        0      0 0.0.0.0:22              0.0.0.0:*               LISTEN
tcp        0      0 0.0.0.0:6081            0.0.0.0:*               LISTEN
tcp        0      0 127.0.0.1:6082          0.0.0.0:*               LISTEN
tcp6       0      0 :::22                   :::*                    LISTEN
tcp6       0      0 :::6081                 :::*                    LISTEN
Next:
- Configure a location of web server backend, you have to
SSHto the instance and edit/etc/varnish/default.vcl, adding a backend and define your VCL caching rules.terminal$ sudo vi /etc/varnish/default.vcl - Restart
varnishdservice to active the current configuration.terminal$ sudo service varnish restart - Update your site’s DNS record to be a
hostname/ip addressof the running Varnish Cache or Varnish Cache Plus instances. After making changes in the DNS record (allowing for DNS ttl expiry), traffic will start coming to this instance.
For more advanced features and usage for VCP, please refer to the following documentation:
- Varnish Cache Plus (VCP)
Please contact Varnish Software The Cloud Team, if your instance is not running as expected. We are eager to help you to fix you your issue/problem as early as possible.
Customers who purchase VAC, VCP, VCS or VE AMIs on AWS are eligible for Varnish Cloud support and software updates provided by the Varnish Software, Inc. engineering team. To contact support, please submit the Varnish Cloud Support Activation form.
Varnish Benefits :
- Convenience, affordability & speed: Varnish Cloud makes the Varnish Enterprise experience available in minutes and delivers the same speed and performance you expect with Varnish Enterprise – at an affordable rate and with convenient deployment and implementation.
- Low maintenance: With Varnish Cloud and AWS, the hassle and expense of on-premise hardware is out of your hands.
- Secure, high-powered and scalable internet operations: You want Varnish Cloud for all the reasons you want Varnish Enterprise – end-to-end TLS/SSL security, power, scale. Varnish Cloud puts these enhancements in your hands.
- Proven solutions: Combined proven technology and services of Varnish Enterprise with the reliability, accessibility and affordable cost of AWS.
Who should use Varnish ?
Varnish was specifically designed for enterprises and organizations that wish to reduce their operating costs, forgo the expense of implementing on-premise hardware, or for those who simply want the convenience, affordability, and speed of accessing Varnish Enterprise via AWS.
VARNISH BACKENDS MOVING IN THE CLOUD
Space: the final frontier. These are the voyages of the Varnish Project. It’s continuing mission: to explore strange new requirements, to seek out new patches and new features, to boldly go where no Varnish user has gone before.
Let’s go to the cloud and find them dynamic backends.
Problem statement
Varnish is an HTTP caching reverse proxy, a piece of software traditionally found in your own infrastructure in front of web servers, also located in your own infrastructure. But it’s been a long time now since the traditional infrastructure started its move to the cloud: a weatherly term for hosting.
The problem with Varnish is to keep track of its backends when they may move with the prevailing winds. And in the cloud, your backends may fly way further than where they’d go if they were tethered in the island in the sun of the old-school infrastructure.
Enough with the forecast metaphors, let’s sail another ship instead. A big one actually, since its cargo is made of containers. And containers imply the ability to rapidly spin up new applications, surfing on the cloud’s elastic properties.
Yes, today’s backends may move fast, and Varnish won’t follow them by itself.
Backend limitations
The main problem with backends is that they are resolved at compile-time, so when you load a VCL its backends will be hard-coded forever. I often see backends declared using IP addresses, although I’d rather see domain names, but there’s a catch.
If you declare a backend using a domain name for the address, whatever was resolved will be kept indefinitely as explained above. So Varnish will not honor the TTL of the DNS records. Static backends are your ticket to kissing your cloudy cloud backends goodbye. Worse than that, if you rely on a domain name it can only resolve to at most one IPv4 and one IPv6 address. Even worser than that, we used to have a DNS director in Varnish 3 that would solve this problem for us, and Varnish 3 reached its end of life quite a while ago now. And Varnish Cache Plus 3 will soon be retired.
The DNS director
Before Varnish 4.0 we could have solved the cloud problem by using the DNS director. It worked (and I use past tense because Varnish 3 is dead) in a very unique way in the sense that it could honor TTL unlike plain backends. But there’s a trick to it: backends were created upfront and then enabled/disabled depending on DNS lookups.
The syntax is rather unique:
director directorname dns { .list = { .host_header = “www.example.com“; .port = “80“; .connect_timeout = 0.4s; “192.168.15.0”/24; “192.168.16.128”/25; } .ttl = 5m; .suffix = “internal.example.net“;}
The list property contains the usual backend properties followed by an ACL, and the VCL compiler creates backends for every single IP address matching theACL. Then there is the TTL so in this case five minutes after a lookup, the next transaction using the director blocks and performs the lookup, and other workers trying to use the same director will also block until the end of the lookup.
It worked like a charm, but in some scenarios it is an unrealistic solution. Would you generate backends for all IP addresses in Amazon’s us-east-1 if you expect between two and ten backends at all times?
The great escape
As I see it, Varnish 3 was the feature peak of the project. Starting with Varnish 4.0, features gradually moved away from the core and sometimes spun off a mandatory escape.
The concept of the mandatory escape is really simple: Varnish should give you the ability to bend the tool without being locked by the author’s imagination. A multitude of entry points is available in Varnish and you can extend it using the shared memory log, the CLI, VCL or modules. My favorite being all of them at the same time.
So Varnish 4.0 removed directors from the core and gave birth to the built-in directors VMOD. You could find the usual suspects, except for the client director that was a special case of the hash, and… the DNS director.
The reason is simple: we removed directors from the core, provided an escape hatch to implement your own director (and people did!) but we then lost the ability to act during the VCL compilation phase. So no more creating backends upfront, no more DNS director and instead many users clinging to Varnish 3.
The ability to implement features in modules and expanding modules capabilities has other benefits. It keeps Varnish itself very lean, and allows more contributors to create value. Varnish 5 may have less features than Varnish 3, but with modules contributed by Varnish Software and other Varnish hackers we can definitely do a lot more with the latest release.
The ubiquitous solution
The thing is, there’s a solution to this problem that would work from version 3.0 to 5.0 (and I’m sure with earlier versions too) but it may require tweaks to deal with VCL differences between versions (mainly Varnish 3 against the rest).
The idea is pretty simple: you can generate the backends outside of Varnish, populate a director and load the new VCL. Code generation isn’t too hard to do so I made a quick example in Bourne Shell:
#!/bin/shset -ebackend_file=“$(mktemp)“subinit_file=“$(mktemp)“cat >“$subinit_file“ <<EOFsub vcl_init { new $1 = directors.round_robin();EOFdig -t A +noquestion +nocomments +nostats +nocmd “$2“ |awk ‘{print $NF}’ |sort |while read ipdo be=“$1_$(printf %s “$ip” | tr . _)”cat >>“$backend_file“ <<-EOFbackend $be { .host = “$ip“;}EOFcat >>“$subinit_file“ <<-EOF $1.add_backend($be);EOFdoneecho “}” >>“$subinit_file“cat “$backend_file“ “$subinit_file“rm -f “$backend_file“ “$subinit_file“
On my machine, it produced the following output:
./backendgen.sh amazon amazon.com >amazon.vclcat amazon.vclbackend amazon_54_239_17_6 { .host = “54.239.17.6“;}backend amazon_54_239_17_7 { .host = “54.239.17.7“;}backend amazon_54_239_25_192 { .host = “54.239.25.192“;}backend amazon_54_239_25_200 { .host = “54.239.25.200“;}backend amazon_54_239_25_208 { .host = “54.239.25.208“;}backend amazon_54_239_26_128 { .host = “54.239.26.128“;}sub vcl_init { new amazon = directors.round_robin(); amazon.add_backend(amazon_54_239_17_6); amazon.add_backend(amazon_54_239_17_7); amazon.add_backend(amazon_54_239_25_192); amazon.add_backend(amazon_54_239_25_200); amazon.add_backend(amazon_54_239_25_208); amazon.add_backend(amazon_54_239_26_128);}
The VCL we load can then be as simple as this:
vcl 4.0;import directors;include “amazon.vcl“;sub vcl_recv { set req.backend_hint = amazon.backend();}
Now all you have to do is to periodically reload the VCL, and there you get pseudo-dynamic backends. Obviously this is a very simplistic example, and you can get more information from dig than just a list of IP addresses. This approach works and it is suitable for production use, but if you go down that road you may burn yourself.
Watch the temperature
We solved the discovery problem by using the dig(1) command and routing is done by a director in Varnish. We can now work with our backends in the cloud and let them come and go in our elastic cluster, and the script will help Varnish keep track of everything. But the periodic VCL reloads come with a problem that we tried to solve with Varnish 4.1.
Reloading the active VCL is fairly convenient; it can be as easy as running system varnish reload and if you don’t pay attention and discard older VCLs you can accumulate too many of them. The largest number of loaded VCLs I’ve seen was over 9000 (why actually over 16000) and it must have been a problem frequent enough because in Varnish 4.1 phk introduced VCL temperature.
The idea is that VCL needs to be warmed up before use, and by default will cool down after use. Cold VCLs are meant to have a lower footprint (read: not hamper the active VCL) and for that they drop their probes, counters and kindly invite VMODs to also release any resource that could later be acquired again.
The bottom line is that reloading VCL implies that you should bite the bullet and come up with an appropriate discard strategy to avoid letting loaded VCLs pile up and eat all your resources.
Label rouge
We’ve established that we can generate the backends declaration, for example using a script called periodically. You could instead react to events for cloudy stacks that can notify you of changes. But this kind of solution won’t scale too well – yet another caveat.
What if you don’t have one cluster of backends but several of them? They may need to be refreshed at varying paces, and rollbacks will become more complex because a VCL reload may suddenly relate to a change in the code, or a change in one of the backend cluster definitions.
With Varnish 5.0 came the introduction of VCL labels. They were initially just symbolic links you could use to give aliases to your VCLs. But there was a hidden agenda behind the labels and later on it became possible to jump from the active VCL to a label.
If you run Varnish in front of several unrelated domains, with the use of labels you can now have separate cache policies that don’t risk leaking logic between each other (although there are other things than logic that can leak) and each label can have a life of its own and be reloaded independently.
The syntax is simple:
sub vcl_recv { if (host ~ “amazon.com”) { return (vcl(amazon)); } if (host ~ “acme.com”) { return (vcl(acme)); }}
So now I can generate and refresh VCL independently for my amazon and acme clusters as long as I load them using their respective labels. Chances are that the web applications behind need different caching policy and in a multi-tenant Varnish installation it will make things a lot easier (spoiler alert: isolated caching policies would still share the same cache infrastructure).
Back to the topic at hand
So far, the title of this post has been misleading as we haven’t touched on dynamic backends at all. So let’s remedy that and simply say that it was introduced in Varnish 4.1, or at least made possible with this release.
The backend (VBE) and director (VDI) subsystems sustained heavy changes between Varnish 3.0 and 4.0, breaking everyone’s VCL that made use of directors. Well, breaking most VCL even without directors. But while VCL remained stable between 4.0 and 4.1, there were once again many changes in those subsystems.
The backend (VBE) and director (VDI) subsystems sustained heavy changes between Varnish 4.0 and 4.1 although users don’t see any signs of it in their VCL code. Dynamic backends obviously, but also custom backend transports and the impacts of VCL temperature.
Varnish Cache doesn’t ship with built-in dynamic backends, but Varnish Plus features two VMODs addressing that need: a drop-in replacement of the DNS director like the one in Varnish 3, and on-demand backends with one called goto.
The two hard problems
I won’t be talking much more about vmod-goto, but will focus on the DNS director equivalent. Conceptually, it’s a DNS cache, populated after lookups and evicted based on a TTL. Although cache invalidation is one of the two hard problems in computer science, invalidation wasn’t hard to solve considering it’s a rewrite of the DNS director: do the same invalidation again. The only difficulty was dealing with Varnish internals and figuring out how to evolve them until at some point they stabilized while 4.1 was still under development.
No! The real hard problem for this module was to name it. There was already a DNS module so I had to come up with something else and I eventually named it named, after the N in DNS and so that it would read nicely in VCL:
new amazon = named.director();
It took the development cycle from 4.0 to 4.1, and two point releases to get to a usable state.
DNS director improved
The DNS director in Varnish 3 had an ACL-like notation used to create all the possible backends ahead of time. And such backends couldn’t benefit from probe support. vmod-named however relies on dynamic backends that are created just in time, an actual ACL can be used as a white-list and probes work.
Another difference with the DNS director is that lookups used to happen during transactions once the TTL had expired, blocking all transactions bound to the director. With vmod-named lookups happen asynchronously, and never slow down requests.
Finally, an anecdotal novelty (I would have missed it if it weren’t for Geoff, thanks!) of Varnish 4.1 greatly simplified the director’s creation. VMOD can have optional named (this is going meta) parameters and with a constructor consisting of many parameters: being able to use names instead of parameters ordering is bliss:
new my_dir = named.director( port = “80”, probe = my_probe, whitelist = my_acl, ttl = 5m);
Known limitations
The DNS support is very limited, and only A and AAAA records are partially supported. Using the system’s resolver means losing a lot of information from the lookup results. You have to specify a TTL because only the IP addresses are part of the results. And two distinct backends will be created if a machine is bound to both IPv4 and IPv6 addresses.
Also DNS is a passive system (I’m not referring to passive DNS), it doesn’t notify you of name changes. So it’s your job to figure an appropriate TTL depending on your elastic expectations.
And of course the biggest limitation is that you need a name server, otherwise there’s no point in using DNS.
If you’ve used the DNS director, vmod-named‘s limitations are nothing new.
Going further
DNS is one of them obscure protocols on the internet. It is highly documented and yet often overlooked, and it’s not rare to find hard-coded IP addresses in configuration files (that includes Varnish).
However after searching a bit it turns out to be available in a couple places. Check your cloud provider’s documentation, or your favorite container orchestrator. They will likely provide some kind of DNS support.
If you’re stuck on Varnish 3 because of the DNS director, you can now upgrade to Varnish Plus 4.1 and replace it with vmod-named. For other dynamic backend needs, for instance the use of DNS SRV records, or a discovery system not based on DNS, you will find that vmod-goto meets (or will meet) your needs.
if you want to learn more about dynamic backends. More information about vmod-goto will follow soon. To learn more about Dynamic backends and other new features in Varnish Plus, please register for our upcoming webinar.
Varnish on cloud runs on Amazon Web Services (AWS) and Azure and ensures that your websites load faster.
Cognosys provides hardened images of Varnish on all public cloud ( AWS marketplace and Azure ).
Secured Varnish on Ubuntu 14.04 LTS Community
Secured Varnish on CentOs 7.3 Community
Features
Major Features of Varnish :
1.Design-One of the main features of Varnish is its design. Varnish is a modern program, designed and written for modern operating systems.
2.VCL- Another main feature of Varnish is its configuration language. VCL is a domain specific language. Varnish compiles the configuration into binary code and runs it. VCL can be loaded and replaced on the fly.
3.Load balancing and back end health polling- As it’s quite common to use more than one origin server to feed varnish, it has a built in load balancer. This consists of two parts:
- The health polling system, which maintains a list of back ends able to receive traffic.
- The director, which directs the request to the right back end.
4.Edge Side Includes (ESI) – ESI allows you to split up your web page into components cache them individually. If you’re going to use Varnish to accelerate a dynamic web site with a lot of personalized content ESI is the key to success, more or less.
5.The web management administration interface- If you’re managing a whole cluster of varnish servers you might find the Varnish Administration Console useful. It is only available for customers with a Varnish Enterprise Subscription.
6.The management port- A running Varnish cache can be managed with a management port. You can just telnet in and upload a new configuration, change settings etc. See Management port for a general description on how this works.
- Built on top of open source Varnish Cache, Varnish Cloud gives advanced users access to a unique set of modules and expert support that enable secure, high-powered and scalable internet operations.
- High performance, low investment Allows SMEs to run big Varnish Enterprise installations affordably and securely while exceeding high requirements for digital scalability, speed, manageability and support without investing in hardware infrastructure.
- Use what you need You provision and use only what you need via a web application
- Easy to get started Offering simplicity and low barriers to entry, you can be up and running with Varnish Cloud and all its modules in minutes.
- The full Varnish Enterprise experience You get the full performance, scalability, high availability, custom statistics, TLS/SSL support and professional services/support that make Varnish Enterprise as in-demand as it is.
Azure
Installation Instructions For Ubuntu
Note : How to find PublicDNS in Azure
Step 1) SSH Connection: To connect to the deployed instance, Please follow Instructions to Connect to Ubuntu instance on Azure Cloud
1) Download Putty.
2) Connect to virtual machine using following SSH credentials:
- Hostname: PublicDNS / IP of machine
- Port : 22
Username: Your chosen username when you created the machine ( For example: Azureuser)
Password : Your Chosen Password when you created the machine ( How to reset the password if you do not remember)
Step 2) Other Information:
1.Version: Varnish 4
2.Default ports:
1)Linux Machines: SSH Port – 22
2)Http: 80
Configure custom inbound and outbound rules using this link
3. To access Webmin interface for management please follow this link
Installation Instructions For Centos
Note : How to find PublicDNS in Azure
Step 1) SSH Connection: To connect to the deployed instance, Please follow Instructions to Connect to Centos instance on Azure Cloud
1) Download Putty.
2) Connect to virtual machine using following SSH credentials:
- Hostname: PublicDNS / IP of machine
- Port : 22
Username: Your chosen username when you created the machine ( For example: Azureuser)
Password : Your Chosen Password when you created the machine ( How to reset the password if you do not remember)
Step 2) Other Information:
1.Version :Varnish 4
2.Default ports:
1)Linux Machines: SSH Port – 22
2)Http: 80
Configure custom inbound and outbound rules using this link
3. To access Webmin interface for management please follow this link
Videos
Secured Varnish on Ubuntu 14.04 LTS Community
Secured Varnish on CentOs 7.3 Community
Install Varnish and run
https://www.youtube.com/watch?v=wwZud6X5iNA
