1-click AWS Deployment 1-click Azure Deployment
Overview
Team Foundation Server (TFS) is a Microsoft product that provides source code management (either via Team Foundation Version Control or Git), reporting, requirements management, project management (for both agile software development and waterfall teams), automated builds, lab management, testing and release management capabilities.It covers the entire application lifecycle. TFS can be used as a back-end to numerous integrated development environments (IDEs) but is tailored for Microsoft Visual Studio and Eclipse on all platforms.
Team Foundation Server (TFS) is a Microsoft product that provides source code management (either via Team Foundation Version Control or Git), reporting, requirements management, project management (for both agile software development and waterfall teams), automated builds, lab management, testing and release management capabilities.It covers the entire application lifecycle. TFS can be used as a back-end to numerous integrated development environments (IDEs) but is tailored for Microsoft Visual Studio and Eclipse on all platforms.
Team Foundation Server 2018 on Cloud runs on Amazon Web Services (AWS), Azure and Google Cloud Platform (GCP) is built to add steps for MSBuild, Ant, Maven, PowerShell etc. (readymade templates are also provided) without creating build and to build cross platform solutions.
Team Foundation Server or TFS is developed by Microsoft to manage the teams and the way they work. It is basically a management tool used in project management, reporting, requirements gathering and testing. It actually covers the entire software development life cycle and operates in Microsoft Windows. It consists of version control, issue resolving and application management. This provides end-to-end development of software and testing. This is a back-end management system and uses Git to control the source code. It represents the automation process and testing of application. TFS is provided with visual studio code.
Team Foundation Server (TFS) Tutorials For Beginners\r\n\r\nWelcome to TFS Tutorials. The objective of these tutorials is to provide in depth understand of TFS . In these tutorials we will cover topics such as HTML Attributes, Forms, Scripts, Elements and Tags, Event Handlers etc.\r\n\r\nIn addition to free HTML Tutorials, we will cover common interview questions, issues and how to’s of TFS .\r\n\r\nTFS Tutorials Introduction\r\nTFS stands for Team Foundation Server which is developed by Microsoft. Integration of TFS with Visual Studio enables a team to work together and organize their efforts to complete a project. Dot Net developers use TFS for source control, bug tracking, requirement gathering and to manage complete lifecycle of software development.\r\n\r\nCollaboration\r\n\r\nThe primary purpose of Team Foundation is to enable collaboration on a team to make it easier to build a product, or complete a project. There are many types of projects. Software projects involve building and releasing a software product that is typically a new product, an upgrade to an existing product, or a minor update release.\r\n\r\nTeam Foundation enables collaboration through enhanced communication, supporting multidisciplinary roles, tracking work status, enacting the team’s process, and integration of tools.\r\nFor more details:
TFS is more widely used for .NET development using Visual Studio .NET IDE. With TFS 2015 Update 3, one can connect to any Team Foundation Server Git repo, using an SSH key.
Team Foundation Server (TFS) is an ALM product from Microsoft which provides the capabilities for an end-to-end development and testing using Work Item Management, Project Planning (Waterfall or Scrum), Version Control, Build/Release (Deploy) and Testing capabilities.
Introduction
TFS is tailored for Microsoft Visual Studio and Eclipse on all platforms, however, it can also be used as a back-end to several IDEs (Integrated Development Environments).
We will now take a look at how Team Foundation Server (TFS) will be used to Build, Test and Deploy .NET Web Applications which is traditionally the strength of the tool.
Prerequisite:
- Microsoft TFS 2015 Update 3
- Microsoft Visual Studio .NET 2015 (30-day trial version)
- SonarQube 6.4 or above
- IIS Web Server Enabled. Since I am using a Windows 7 box you can check this tutorial on how to enable IIS 7. How to Install Internet Information Services (IIS 7) on Windows 7 Ultimate
- There are several YouTube videos on how to enable IIS on Windows 2008 / 2012 / 2016.
Typically to perform the steps mentioned in the tutorial you will need a Build Server, where Builds will be performed, and Deployment machines or environments where, applications will be deployed to IIS, with agents installed and running. Please refer to my earlier tutorial to know how to install agents.
Setup a C# Application
Assuming TASK work items are created in TFS and is assigned to developer’s to work on the same. I have always noticed that Traceability is very important from the point of view of tracking any work across the software lifecycle.
Before adding a .NET application to TFS source control repository, ensure whether a Collection and Team Project exists or not.
A Collection is created by the TFS Administrator. It consists of a group of Team Projects in any service organization, where projects for multiple customers are being executed. You can create individual collections for each customer projects in TFS.
Once a collection is created you can create multiple team projects within it. A single team project consists of all work items, source code, test artifacts, metrics for reports etc., Team project can be created using various inbuilt process templates like Scrum, Agile, CMMI etc.
- More on creating collections can be found @ Manage team project collections in Team Foundation Server
- Here, I will be using the Default Collection which is created once TFS is installed
- To create team project within a collection, follow the steps as shown below.
What can you do with TFS?
- It has a shallow learning curve, which means the complexity in understanding its behavior and functionality. Working with TFS also becomes a bit easier compared to other version control tool like Git is its OS (i.e. Windows). Since windows are a user-friendly platform it makes TFS user-friendly too.
- Since TFS is a CVCS (aka Centralized Version Control System), it makes the developer work easy in a number of ways, one of which is repository details information. To have a copy of repository file system hosted centrally there is no chance of losing data. The disadvantage of this is a user cannot commit changes offline.
- Branches in TFS will create a new directory while copying all the files details with directories details of the parent branch. This is useful as it saves time for the user in defining the relation for newly created branches all the time.
How does TFS Working So Easy?
- It has a shallow learning curve, which means the complexity in understanding its behavior and functionality. Working with TFS also becomes a bit easier compared to other version control tool like Git is its OS (i.e. Windows). Since windows are a user-friendly platform it makes TFS user-friendly too.
- Since TFS is a CVCS (aka Centralized Version Control System), it makes the developer work easy in a number of ways, one of which is repository details information. To have a copy of repository file system hosted centrally there is no chance of losing data. The disadvantage of this is a user cannot commit changes offline.
- Branches in TFS will create a new directory while copying all the files details with directories details of the parent branch. This is useful as it saves time for the user in defining the relation for newly created branches all the time.
Understanding TFS
In this section, we will understand TFS and also see what could be the possible difference between Visual Studio.
- It is a hosted version (configured on Servers) whereas Visual Studio is an Online (configured on cloud servers).
- It works only with the premises (kind of limitations) whereas Visual Studio works anywhere (all you need is Microsoft account).
- This need server maintenance or even up gradation whereas for V Studio there is no such need.
- Hardware/ OS up gradation is needed for this but not for cloud version of V Studio
- It does not have SharePoint integration into it whereas V Studio has
- It lacks the SQL reporting service feature whereas V Studio has
- Load Testing is not possible with this but it is possible with V Studio
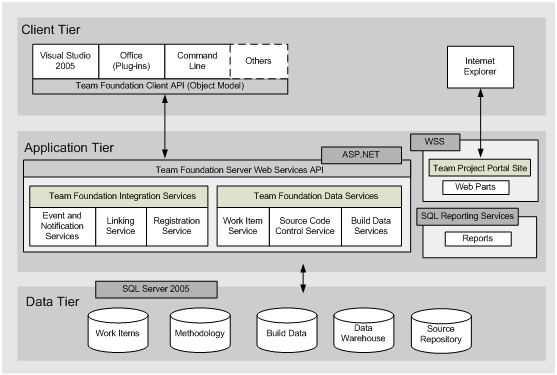
Team Foundation Server (TFS) Architecture
Team Foundation Server Logically works in 3-tier architecture that includes client tier, the application tier and the data tier.
-
Team Foundation Server object model.
-
Visual Studio Industry Partners (VSIP) components.
-
Microsoft Office integration.
-
Command-line tools.
-
Check-in policy framework.
-
Version Control Web service.
-
Work Item Tracking Web service.
-
Team Foundation Build Web service.
-
Registration Web service.
-
Security Web service.
-
Linking Web service.
-
Eventing Web service.
-
Classification Web service.
-
Work item tracking.
-
Version control.
-
Team Foundation Build
-
Reporting warehouse.
Install and configure Team Foundation Server
By restoring the databases that TFS uses, you have already restored the data tier of the original deployment. Now you must complete the restoration process by installing the application tier (the application and services that compose Team Foundation Server) by using the Application-Tier Only wizard. You must also install the extensions used by TFS and SharePoint Foundation by running the Extensions for SharePoint Products wizard, if your original deployment was configured with SharePoint Foundation.
To install the application tier and the extensions:
- Open the administration console and start the configuration process.

 If you don’t see the administration console for TFS, you haven’t installed the TFS software on the server. To learn how, go to Install Team Foundation Server.
 - Launch the application-tier only wizard.

- Specify the name of the SQL Server where you just restored the databases and choose List Available Databases to populate the list. Choose the configuration database.

- Provide the same service account information as used in the prior deployment, if possible.

- Complete the wizard.

- In the Configuration Center, choose Configure Extensions for SharePoint Products and complete that wizard to install the extensions.
- Open the administration console, and in the Application Tier pane, update or refresh the URLs to reflect the new URLs for the restored server. Even if you have not changed the name or ports used for the restored server, you should reapply this information.

- After finishing the update, verify that the URLS appear correctly.

- Reapply the service account for TFS.


Configure SharePoint Products
After you install the application tier and the extensions, you must reconfigure the settings for the SharePoint web applications that your deployment uses.
To configure the settings for SharePoint web applications:
- Open the administration console for Team Foundation.
- In the navigation bar, choose SharePoint Web Applications.
- In the SharePoint Web Applications list, highlight the web application used by the original deployment, and then choose Change.
Tip: By default, the web application should appear automatically in the listf web applications. If it does not, choose Add, and then add it manually.
- The SharePoint Web Application Settings window opens. In Web Application URL and Central Administration URL, review the settings, and if necessary, specify or change the values to reflect the URLs on the new server.
- When you are satisfied with the settings, choose OK.For more information about how to configure SharePoint web applications as part of your deployment, see Add SharePoint products to your deployment.
Configure reporting and Analysis Services
After you have configured SharePoint Foundation, you must redirect Team Foundation Server to the location of the report server, restart the warehouse, and manually rebuild the database for Analysis Services, if your deployment used reporting.
Note: You must complete this procedure even if you restored the TFS_Warehouse and TFS_Analysis databases, as the previous section describes.
To reconfigure reporting and Analysis Services:
- In the navigation bar for the administration console, choose Reporting.
- On the Reporting page, choose Edit.
- In the Take Offline dialog box, choose OK.The Reporting dialog box opens.
- Select the Use Reporting check box.
- On the Warehouse tab, in Server, specify the name of the report server, and in Database, type the name of the warehouse database. Optionally choose Test Connection to verify that the database is valid.
- On the Analysis Services tab, in the Server list, specify the name of the server that is running SQL Server Analysis Services. In Database, specify the name of the analysis services database, and in Account for accessing data sources, specify the username and password of the data sources account.
- On the Reports tab, in the Server list, specify the name of the report server, and then choose Populate URLs. In Username and Password, specify the account name and password (if any) for the data sources account. In Default Path, specify the relative path for the location where reports are stored, and then choose OK.
- In the administration console, choose Start Jobs to restart reporting.
- Open a Command Prompt window, and then change directories to
%ProgramFiles%\\TFS 12.0\\Tools. - Enter the following command to rebuild the database for Analysis Services:
TFSConfig RebuildWarehouse /AnalysisServices /ReportingDataSourcePassword: PasswordPassword is the password for the data sources account for Reporting Services. - Wait until the command is successfully completed.
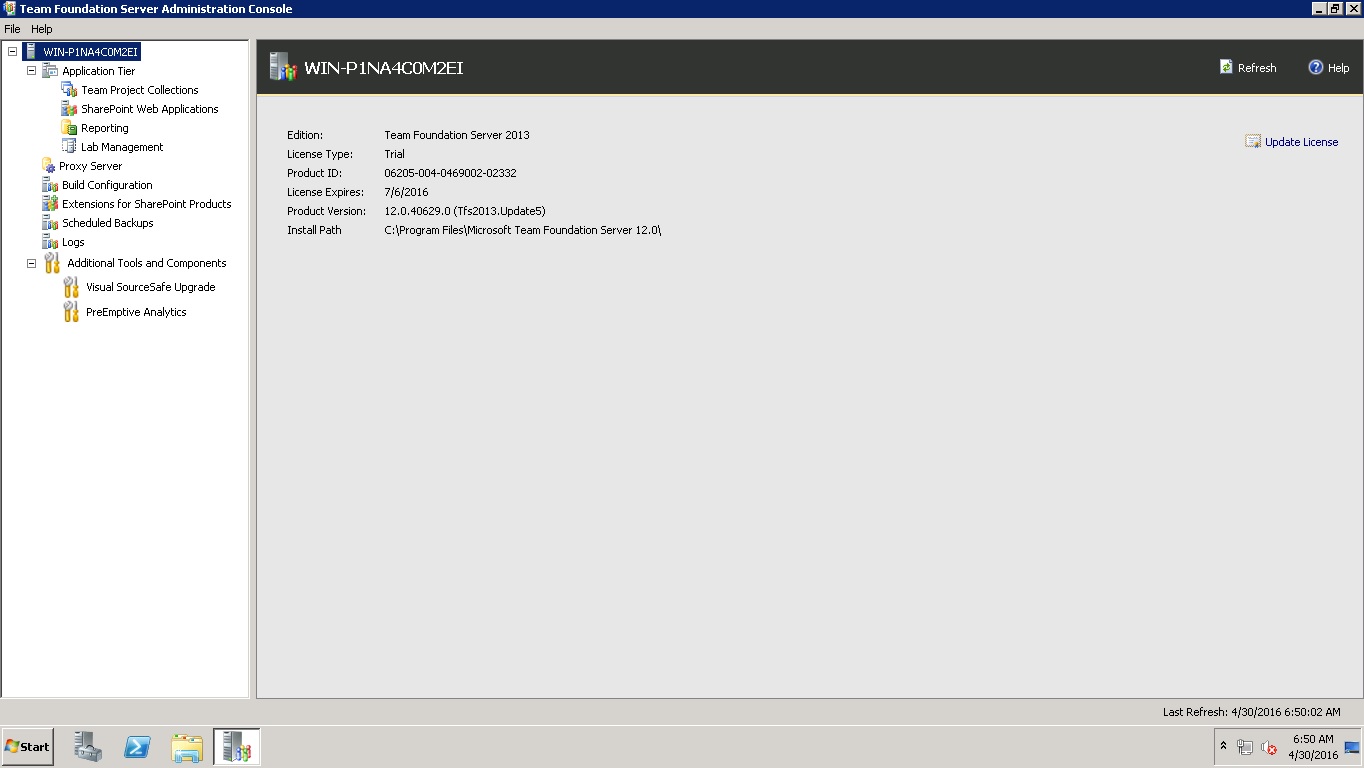
Team Foundation Server 2013 Overview
1. After you’ve established your account, you’ll need to create a user. Access the User Manager, enter a user name, supply a password, confirm the password and then click the “Add” button.
2. Next, you’ll need to assign permissions for the user that was created in the previous step. Assuming that this is the first user for the account, go to the Global Groups tool, locate the Project Collection Administrators group, click the “View/Edit Members” link, and then add the user that was created.
3. At this point, you’ll want to configure Visual Studio 2013 to connect to your Team Foundation Server 2013 server. If you haven’t already, follow the steps available in the Visual Studio 2013 configuration article.
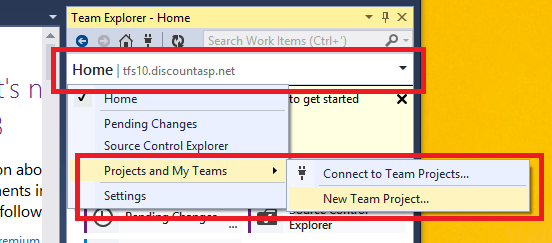
4. Once you’re connected to the server, access the Team Explorer window if it’s not already available. You can open the window in Visual Studio 2013 by going to the View menu and then click on Team Explorer. If you have any problems with the menu, you can also go to the File menu, mouse over the New sub-menu and then click on the Team Project… option.
5. From the Team Explorer window, click on Home, then mouse over Projects and My Teams and then click the New Team Project… option to start the New Team Project wizard.
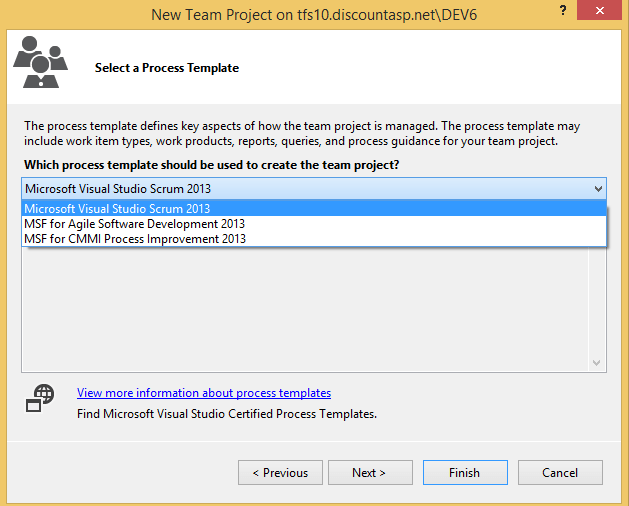
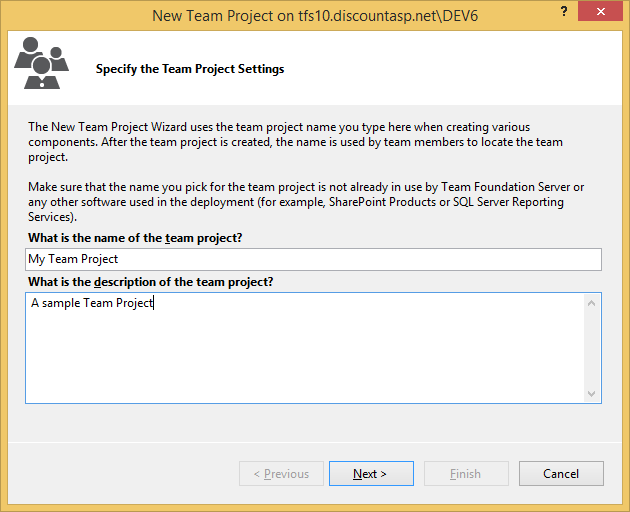
6. The first step will be to provide a name for the Team Project. Enter a name and a description (optional) and then click on the Next button.
7. Next, choose the process template for the Team Project and click on the Next button.
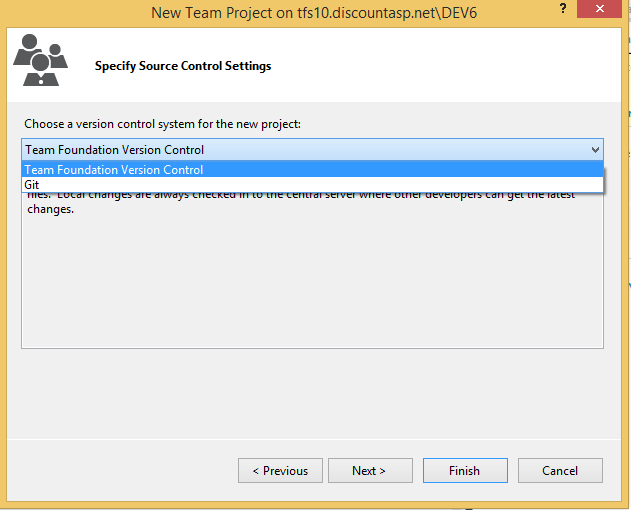
8. Now, choose the revision control provider for the new Team Project. You can choose Team Foundation Server Version Control or Git.
9. Review the settings that will be used for the Team Project and then click on the Finish button.
10. At this point, just wait for the Team Project to be created and then click on the Close button once the procedure is finished.
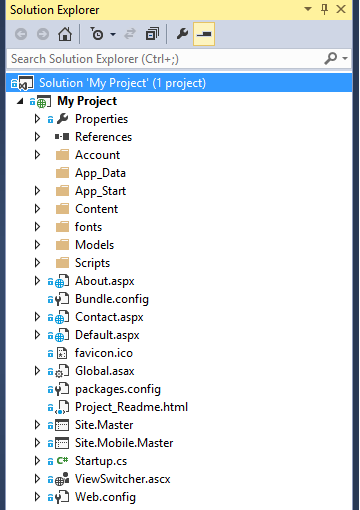
11. Create a new Visual Studio 2013 project or open an existing project. Make sure that the Solution Window is visible and if it’s not active, go to the View menu and then click on Solution Explorer.
12. From the Solution Explorer window, right-click on the solution and then locate the Add Solution to Source Control… option.
13. If you’re prompted to choose a source control system, select the option that matches the process template that was used during the Team Project creation process and then click the OK button.
14. From the Add Solution SolutionName to Source Control window, choose the Team Project location and then enter a name for the solution folder.
15. You should be taken to the Team Explorer window automatically but in case you aren’t, you may need to manually access the window. Click on the Pending Changes… button.
16. From the Pending Changes menu, review all of the included changes to make sure that all of the required files are added, click on the Check In button and then wait for the files to be added to source control.
17. To verify that all of the files were successfully added, click on the Pending Changes area and then select Source Control Explorer from the available menu.
18. From Source Control Explorer, you can take a look around to confirm.
19. When you’re done, switch to the Solution Explorer window and you will see that files under revision control have a lock icon next to them.
Advantages
- You have a plate full of sweets, just pick the one you like. Sounds great, so readers we would like to say that in general, you will be in this situation if you have an enterprise agreement license of Microsoft. Since MS has several applications if you have an enterprise agreement you can handpick whatever application you prefer.
- If you want to practice agile methodologies in your development process you need TFS.
- There is an old saying ‘Time is Money’, this counts true for TFS as it saves the teams time by managing several works at one suite. Being a multi-tasking application is its biggest plus point.
It’s easy to understand as it has Windows platform which is highly user-friendly
Cognosys Provides Hardened images of TeamFoundation on the cloud ( AWS marketplace, Azure and Google Cloud Platform).
Deploy TeamFoundation securely on cloud i.e. AWS marketplace, Azure and Google Cloud Platform (GCP)
Team Foundation Server 2018 on cloud for AWS
Features
Major Features of Team Foundation Server
- Version control, for managing source code and other deliverables that require versioning.
- Work item tracking, for keeping track of such things as defects, requirements, tasks, and scenarios.
- Project management functions, which allow the shaping of a team project based on a user-specifiable software process, and which enable planning and tracking using Microsoft Excel and Microsoft Project.
- Team build, for enabling a common process for building executable products.
- Data collection and reporting, which aid in the assessment of a team project’s state, based on information gleaned from Team Foundation Server tools.
- The Team Project Portal, which provides a central point of communication for a team project packaged as a Microsoft Windows SharePoint Services site.
- Team Foundation Shared Services, which provide a number of common infrastructure services that invisible to end users but that are important to toolsmiths and extenders.
Main Features :
-
1. Associate Work Items in Git commits from any client
Associating work items to your changesets in TFS have always been one of the more powerful features. Not in itself, but in the traceability that this gives us.
Without this, we would have to rely on check-in comments from the developers to understand the reason for a particular change, not always easy when you look at changes that were done a few years back!When using Git repos in TFS, and you use the Git integration in Visual Studio you have the same functionality that lets you associate a work item to a commit, either by using a work item query or by specifying a work item ID.
But a lot of developers like to use other Git tooling, such as Git Extensions, SourceTree or the command line. And then we have the teams that work on other platforms, perhaps developing iOS apps but store their source code in a Git repo in TFS. They obviously can’t use Visual Studio for committing their changes to TFS.
To associate a commit with a work item in these scenarios, you can simply enter the ID of the work item with a # in front of it as part of the commit message:
Here we associate this commit with the work item with ID 4321. Note that since Git commits are local, the association won’t actually be done until the commit has been pushed to the server. TFS processes git commits for work item association asynchronously, so it could potentially take a short moment before the association is done.
2. Batch update work items from the Web Access
Excel has always been a great tool for updating multiple work items in TFS. But over the years the web access in TFS has become so much better so that most people do all their work related to work item management there. And unfortunately, it is not possible to export work item queries to Excel as easily from the web as it is from Visual Studio.
But, we can update multiple work items in TFS web access as well. These features have gradually been added to Visual Studio Online and is now part of TFS 2015 as well.
From the product backlog view, we can select multiple work items and the perform different operations on them, as shown below:
There are a few shortcut operations for very common tasks such as moving multiple backlog items to a iteration, or assigning them to a team member.
But then you have the Edit selected work item(s) that allows us to set any fields to a new value in one operation.3. Edit and commit source files in your web browser
Working with source code is of course done best from a development IDE such as Visual Studio. But sometimes it can be very convenient to change a file straight from the web access, and you can! Maybe you find a configuration error when logged on a staging environment where you do not have access to Visual Studio. Then you can just browse to the file in source control and change it using the Edit button:
After making the changes, you can add a meaning commit message and commit the change back to TFS. When using Git, you can even commit it to a new branch
4. Bring in your stakeholders to the team using the free Stakeholder license
Normally, every team member that accesses TFS and reads or writes information to it (source code, work items etc) need to have a Client Access License (CAL). For the development team this is usually not a problem, often they already have a Visual Studio with MSDN subscription in which a TFS CAL is included. What often cause some friction is when the team try to involve the stakeholders. Stakeholders often include people who just want to track progress or file a bug or a suggestion occasionally. Buying a CAl for every person in this role usually ends up being way to expensive and not really worth it.
In TFS 2013 Update 4 this was changed, from that point people with a stakeholder license does not a CAL at all, they can access TFS for free. Buth they still have a limited experience, they can’t do everything that a normal team member can. Features that a stakeholder can use include:
- Full read/write/create on all work items
- Create, run and save (to “My Queries”) work item queries
- View project and team home pages
- Access to the backlog, including add and update (but no ability to reprioritize the work)
- Ability to receive work item alerts
5. Protect your Git branches using branch policies
When using Team Foundation Version Control (TFVC) we have from the first version of TFS had the ability to use check-in policies for enforcing standards and policies of everything that is checked in to source control. We also have the ability to use Gated Builds, which allows us to make sure that a changeset is not checked in unless an associated build definition is executed successfully.
When Git was added to TFS back in 2013, there was no corresponding functionality available. But in TFS 2015 now, the team has added branch policies as a way to protect our branches from inadvertent or low quality commits. In the version control tab of the settings administration page you can select a branch from a Git repo and then apply branch policies. The image below shows the available branch policies.
- All commits in the master branch must be made using a pull request
- The commits in the pull request must have associated work items
- The pull request must be reviewed by at least two separate reviewers
- The QBox.CI build must complete successfully before the pull request can be merged to the master branch
I really recommend that you start using these branch policies, they are an excellent way to enforce the standard and quality of the commits being made, and can help your team improve their process and help move towards being able to deliver value to your customers more frequently
6. Using the @CurrentIteration in Work Item Queries
Work Item Queries are very useful for retrieving the status of your ongoing projects. The backlogs and boards are great in TFS for managing the sprints and requirements, but the ability to query on information across one ore more projects are pivotal. Work item queries are often used as reports and we can also create charts from them.
Very often, we are interested in information in the current sprint, for example how many open bug are there, how many requirements do we have that doesn’t have associated test cases and so on. Before TFS 2015, we had to write work item queries that referenced the current sprint directly, like so:
The problem with this was of course that as soon as the sprint ended and the next one started, we hade to update all these queries to reference the new iteration. Some people came up with smart work arounds, but it was still cumbersome.
Enter the @CurrentIteration token. This token will evaluate to the currently sprint which means we can define our queries once and they will continue to work for all upcoming sprints as well.
this token is unfortunately not yet available in Excel since it is not team-aware. Since iterations are configured per team, it is necessary to evaluate this token in the context of a team. Both the web access and Visual Studio have this context, but the Excel integration does not, yet.
7. Pin Important Information to the home page
The new homepage has been available since TFS 2012, and I still find that most teams does not use the possibility to pin important information to the homepage enough.
The homepage is perfect to show on a big screen in your team room, at least if you show relevant information on it.We can pin the following items to the home page:
- Work Item Queries
The tile will show the number of work items returned by the query . Focus on pinning queries where the these numbers are important and can trigger some activity. E.g. not the total number of backlog items, but for example the number of active bugs. - Build Definition
This tile shows a bar graph with the history of the last 30 builds. Gives a good visualization of how stable the builds are, if you see that builds fails every now and then you have a problem that needs to be investigated. - Source control
Shows the number of recent commits or changesets. Will let you know how much activity that is going on in the different repos - Charts
Charts can be created from work item queries and can also be pinned to the home page. Very useful for quickly give an overview of the status for a particular area
8. Query on Work Item Tags
Support for tagging was first implemented back in TFS 2012 Update 2. This allowed us to add multiple tags to work items and then filter backlogs and query results on these tags.
There was however a big thing missing and that was the ability to search for work items using tags.This has been fixed since TFS 2013 Update 2, which means we can now create queries like this.
It is also possible to work with tags using Excel, this was another big thing missing from
9. Select how you want to handle bugs
One of the most common questions I get when talking to teams that use TFS is how they should handle bugs. Some teams want to have the bugs on the backlog and treat them like requirements. Other teams want to treat them more like tasks, that is adding them to the corresponding user story or backlog item and use the task board to keep track of the bug.
The good think is that you can configure this per team now. On the team settings page, there is a section that lets you configure the behavior of bugs.
10. Integrate with external or internal services using Service Hooks
Extensibility and integration are very important to Microsoft these days, and this is very clear when looking at the investments for TFS 2015 that included a bunch of work in this area. First of all Microsoft has added a proper REST API for accessing and updating most of the available artifacts in TFS, such as work items and builds. It uses OAuth 2.0 for authentication, which means it is based on open modern web standards and can be used from any client on any platform.
In addition to this, TFS 2015 also support Service Hooks. A service hook is basically a web endpoint that can be called when something happens, in this case in TFS. So for example, when a backlog item is created in TFS we might want to also create a card in Trello. Or when a new change is committed into source control, we might want to kick off a Jenkins build.
Cognosys Provides Hardened images of TeamFoundation on the cloud ( AWS marketplace, Azure and Google Cloud Platform).
Deploy TeamFoundation securely on cloud i.e. AWS marketplace, Azure and Google Cloud Platform (GCP)
Team Foundation Server 2013 on cloud for AWS
Features
Major Features of Team Foundation Server
- Version control, for managing source code and other deliverables that require versioning.
- Work item tracking, for keeping track of such things as defects, requirements, tasks, and scenarios.
- Project management functions, which allow the shaping of a team project based on a user-specifiable software process, and which enable planning and tracking using Microsoft Excel and Microsoft Project.
- Team build, for enabling a common process for building executable products.
- Data collection and reporting, which aid in the assessment of a team project’s state, based on information gleaned from Team Foundation Server tools.
- The Team Project Portal, which provides a central point of communication for a team project packaged as a Microsoft Windows SharePoint Services site.
- Team Foundation Shared Services, which provide a number of common infrastructure services that invisible to end users but that are important to toolsmiths and extenders.
AWS
Installation Instructions for Windows
Note: How to find PublicDNS in AWS
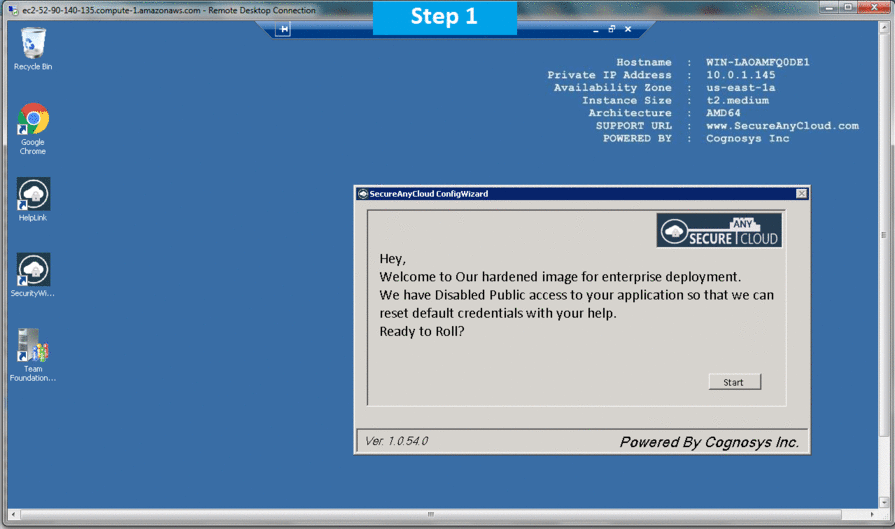
Step 1) RDP Connection: To connect to the deployed instance, Please follow Instructions to Connect to Windows instance on AWS Cloud
Connect to the virtual machine using following RDP credentials:
- Hostname: PublicDNS / IP of machine
- Port : 3389
Username: To connect to the operating system, use RDP and the username is Administrator.
Password: Please Click here to know how to get password
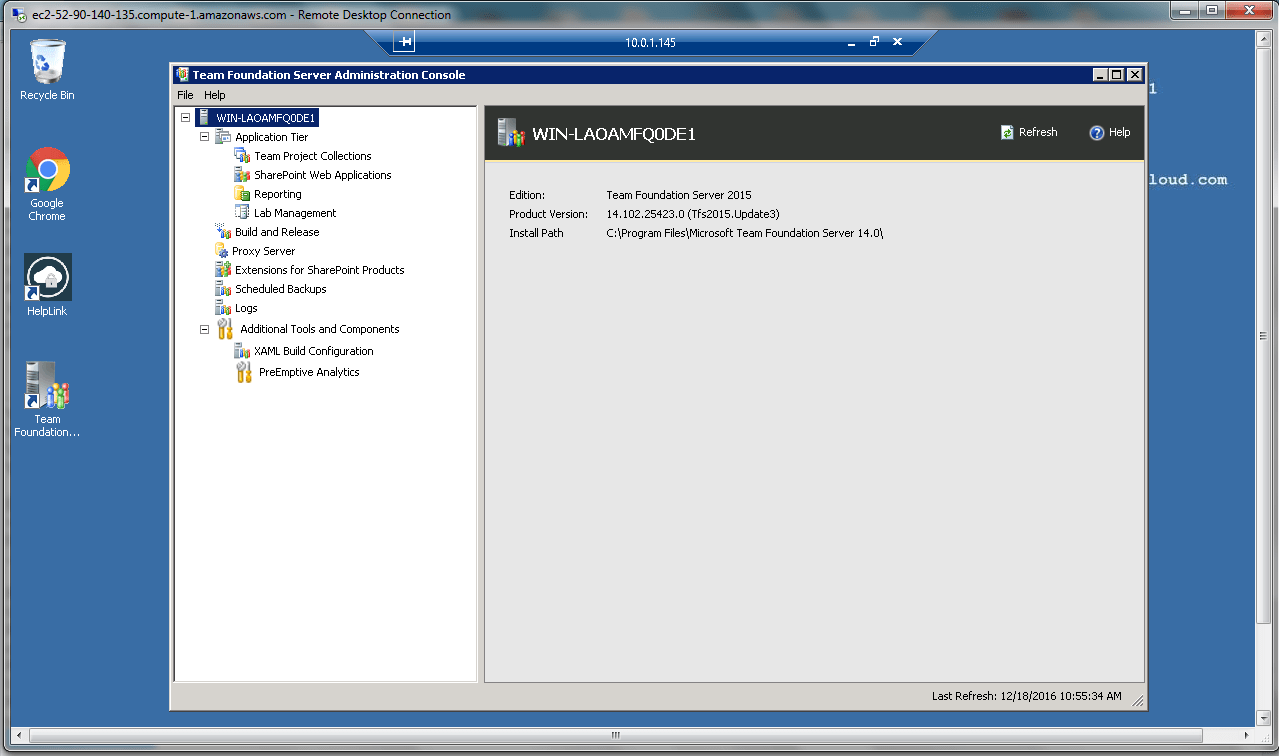
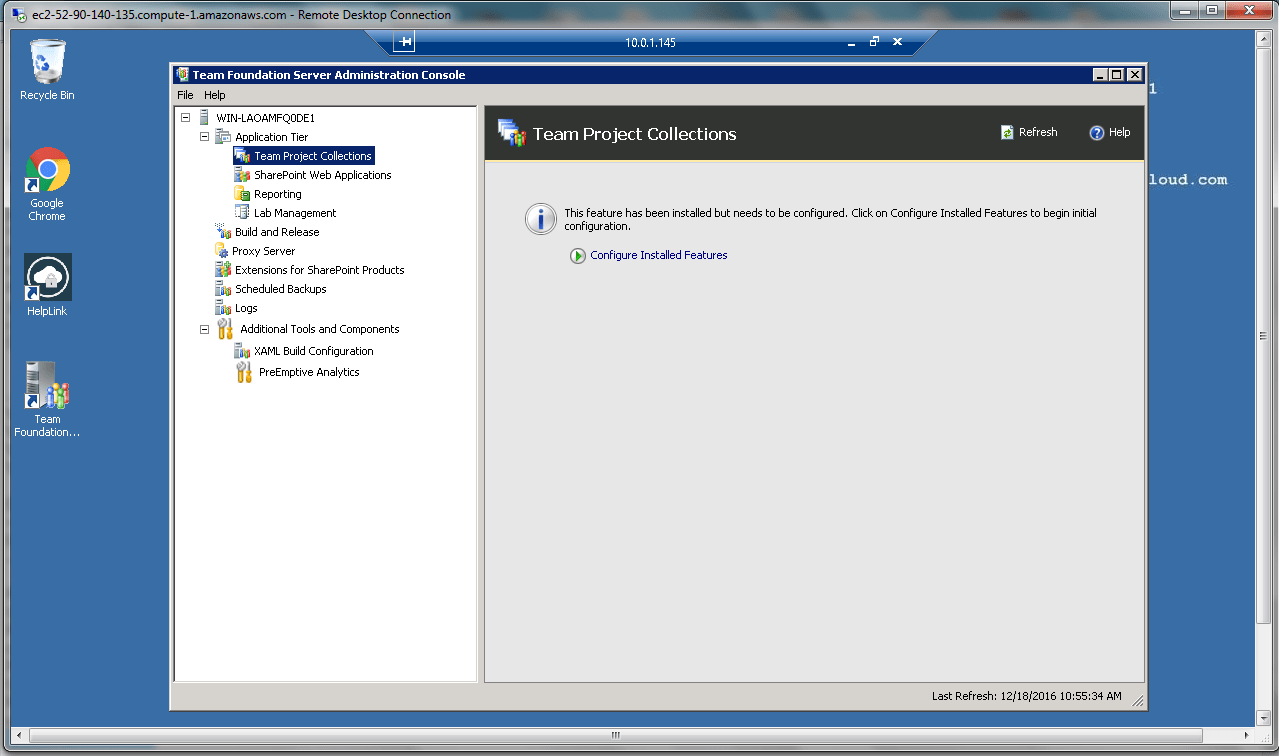
Step 2) On the Start page, type Team Foundation Server 2015 and then click on Team Foundation Server.
or Open from the Desktop Shortcut icon Team Foundation Server.
Step 3) Other Information:
1.Default installation path: will be in your root folder “C:\Program Files\Microsoft Team Foundation Server 14.0”
2.Default ports:
- Windows Machines: RDP Port – 3389
- Http: 80
- Https: 443
Configure custom inbound and outbound rules using this link
For Installation steps Please check on Team Foundation Server.
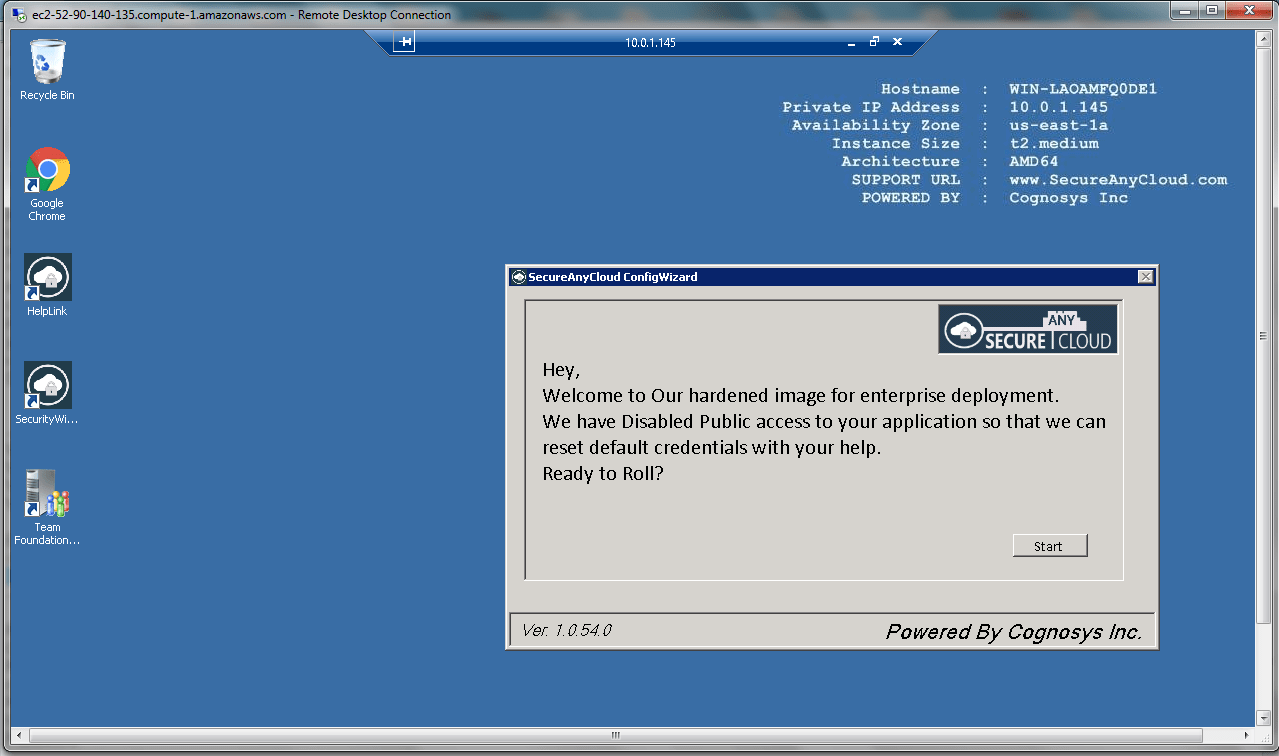
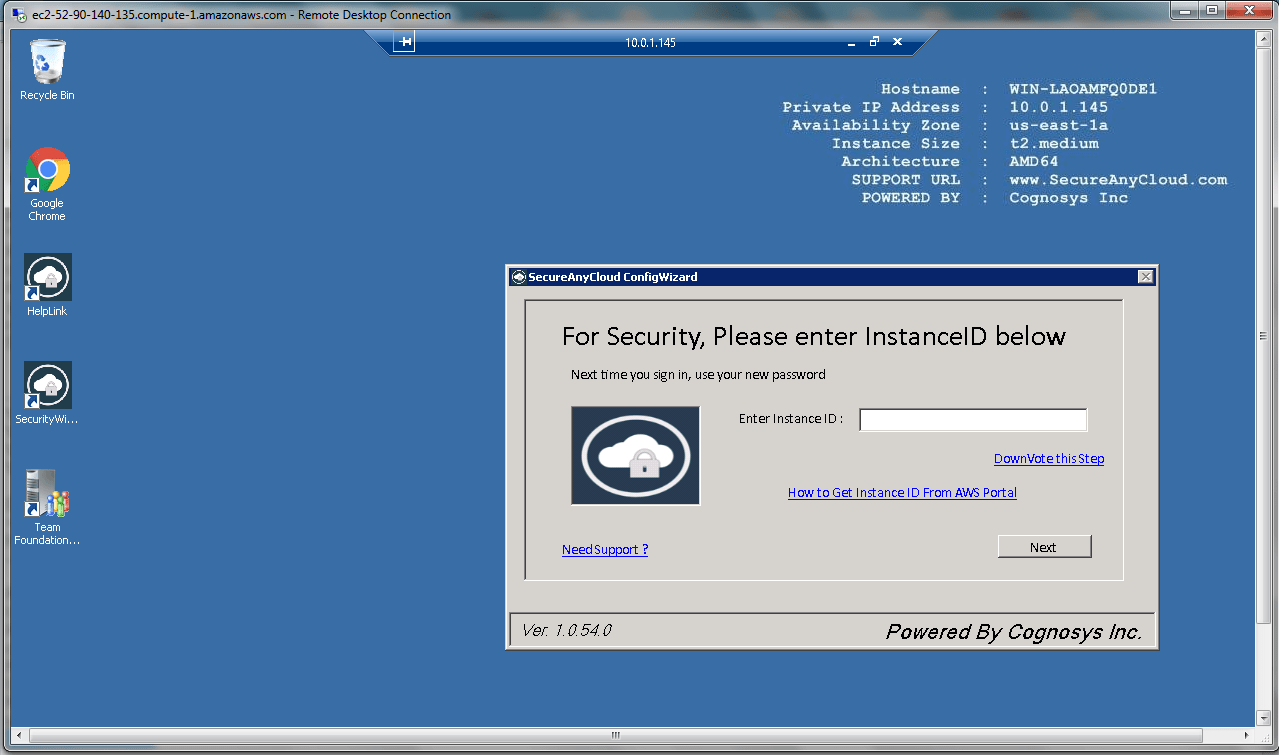
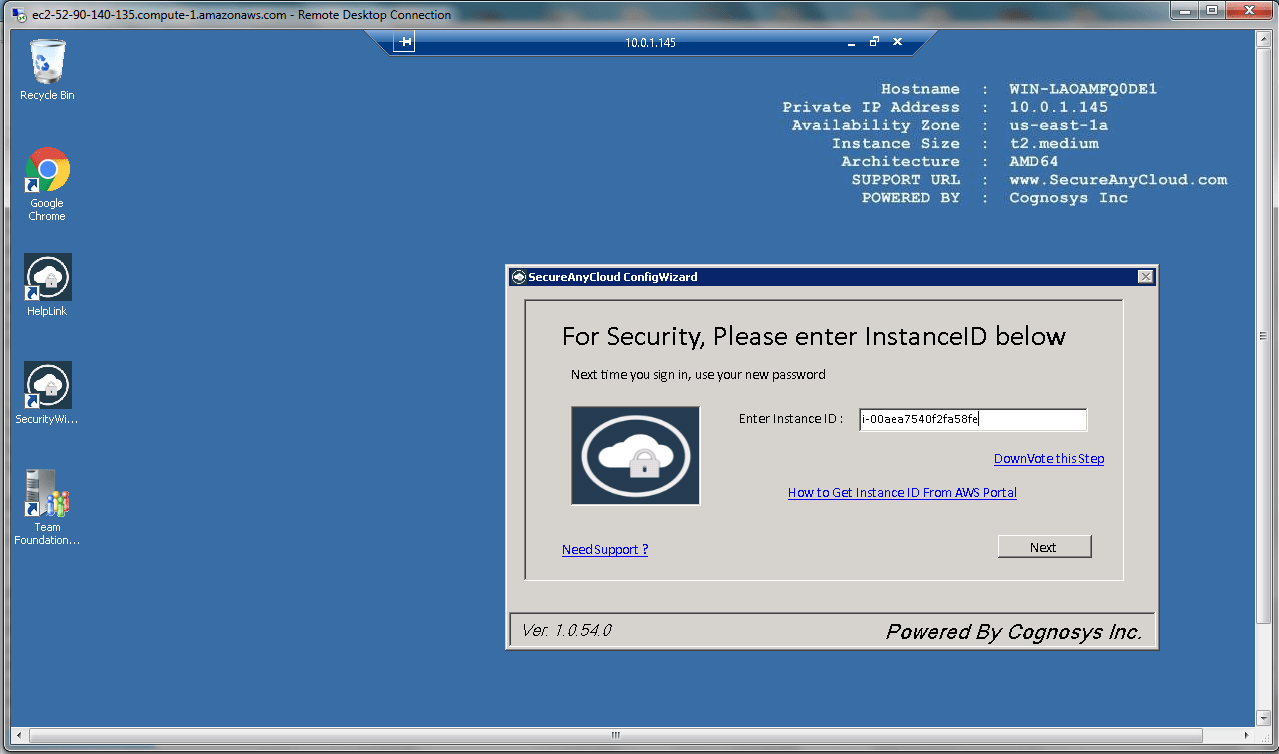
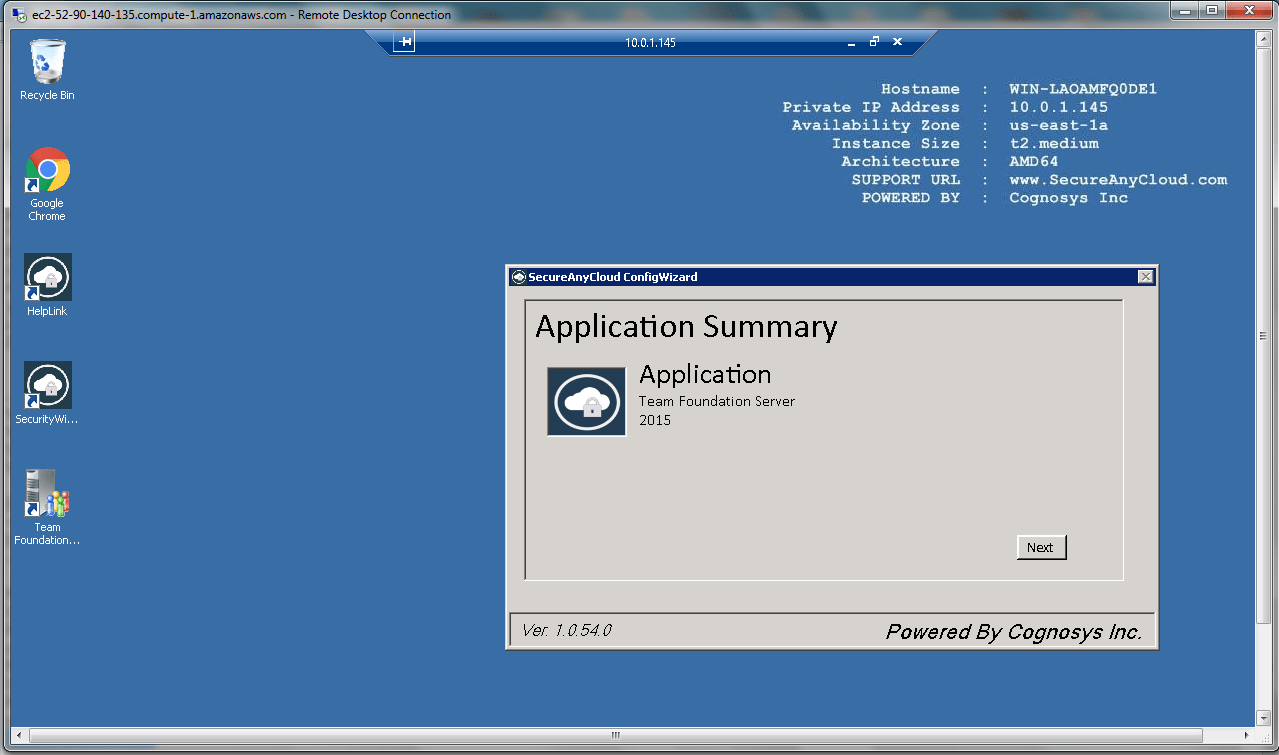
AWS Step By Step Screenshots

Videos
Introducing Team Foundation Server 2010 Basic
Deep Dive into Agile Planning for Team Foundation Server 2013 and Visual Studio Online
