Overview
Sugarcrm with Aurora on Linux Server
SugarCRM CE with a high performing Mysql compliant Offering-Aurora with Built-in Security, Scalability and managed service.
Sugarcrm Admins can completely remove their overhead of maintaining a MySQL server by using Aurora which is not only 100% Mysql Compliant but highly Scalable and Managed by AWS.
SugarCRM is one of the best customer management systems on the market, working with than 50,000 businesses in providing precise account management for tasks related to sales. As seen on the company’s records, the SugarCRM app has been downloaded and tried for more than 7 million times, as it is available in 9 different languages. Many customers praise the app’s customizability, particularly its ability to create unique customer relationships, spread brand awareness, and deliver high-quality customer service. SugarCRM’s customizability comes from the app being an open-source platform, allowing users to manage and sort out organization structures easily even at first glance. SugarCRM aims to assist medium to large enterprises, which also needs a specialized team to grow it further on the right path. SugarCRM’s available communication channels are immense which is definitely advantageous for its users. The developers have aimed to solve a business’ need to communicate with customers in different ways, hence providing them with empowered phone calls, emails and personalized messages, social networks, and even one-to-one meetings. Looking from a company’s perspective, this multi-faceted process provides professionalism and tracks opportunities to boost company influence. All of SugarCRM’s processes happen on an easy-to-learn navigation system which can be incredibly familiar for users who’ve used the app’s free version. Like most CRM systems, the user is brought from the basics as they can see the options laid out in neat categories such as Accounts, Contacts, Calendar, Leads, Reports, Campaigns, Documents, Quotes, Emails, Calls, and Meetings menus. Each category comes with search filters and subsection for faster traversal in the app. The app also has the “+” button, which can be used for further customization of the app as it can add new captures, meetings, leads and even new sections for the user’s ease.
Overview
This section of Sugar’s Developer Guide begins with a high-level overview of the Sugar platform’s architecture and contains documentation on granular concepts in Sugar such as logic hooks, caching, logging, extensions, job queue, and more.
Platform
Sugar® is built on open standards and technology such as HTML5, PHP, and JavaScript, and runs on a variety of free and open-source technology like Linux, MySQL, and Elasticsearch. The Sugar platform also supports common proprietary databases such as Oracle, IBM DB2, and Microsoft SQL Server.
All of Sugar’s customers and partners have access to source code that they can choose to deploy on-premise or utilize Sugar’s cloud service for a SaaS deployment.
Out of the box, Sugar uses a consistent platform across all clients and devices (e.g. mobile, web, plug-ins, etc.).
Front-End Framework
Our clients are based on a front-end framework called Sidecar. Sidecar is built on open source technology: Backbone.js, jQuery, Handlebars.js, and Bootstrap. The Sidecar framework provides a responsive UI (to support a variety of form factors) and uses modern, single-page client architecture. Sugar clients connect to Sugar server application via our client REST API. The REST API is implemented in PHP and drives server-side business logic and interacts with a database. If it can be accomplished via one of our clients, then its equivalent functionality can be accomplished using our REST API.
The Sugar platform uses modules. Modules are a vertically integrated application component that is traditionally organized around a single feature or record type (or underlying database table). For example, contact records are managed via a Contacts module that contains all the business logic, front-end interface definitions, REST APIs, data schema, and relationships with other modules.
Custom modules can be created and deployed as needed in order to add new features to a Sugar application instance.
Metadata
Sugar’s modules are defined primarily using Metadata. There are two types of metadata definitions within Sugar: Vardefs, which define the data model for Sugar modules; and Viewdefs, which define the user interface components that are used with a module.
Sugar Metadata is implemented as PHP files that can be modified directly by a Sugar Developer making filesystem changes, or indirectly through the use of Sugar Studio and Module Builder by a Sugar Administrator.
Metadata allows you to configure solutions instead of having to write countless lines of custom code in order to implement common customizations such as adding custom fields, calculated values, and changing user interface layouts
SugarCRM is a Customer Relationship Management platform which is widely used and recognized as the most successful tool for managing customers by many large companies over the world. With a convenient separation of all the customer related departments in your company you will be able to easily manage large customers base and many other useful features:
- Customer Management
- Sales Management
- Sales Opportunities Management
- Leads Management
- Support
- Marketing
- Collaboration
How to Install SugarCRM CE Manually
If you are more into installing applicaitons manually than using auto-installers then this tutorial is exactly for you. In the next few lines of this tutorial we will show you how easy it is to install SugarCRM on your Web Hosting account with us.
To manually Install SugarCRM, you will need to:
- Step 1: Download and preparing the installation package
- Step 2: Follow the Installation Wizard
Step 1 Download and preparing the installation package
SugarCRM CE is available for download at the official SugarCRM website downloads section. There you will need to register and then you will be provided with the option to download the application’s installation archive.Once this is done you should upload the extracted installation files on your hosting account using the FTP service for your account.
You should be able to receive more information on How to use FTP client in our related tutorials section.
Once you have uploaded all the files for your SugarCRM Installation you can move forward with the installation process of the application. This will require for you to access the location where you have uploaded the application – if it is uploaded in a subfolder of the public_html folder then you will need to access your domain name followed by the name of the subfolder (e.g. mydomain.com/subfoldername).
Step 2 Follow the Installation Wizard
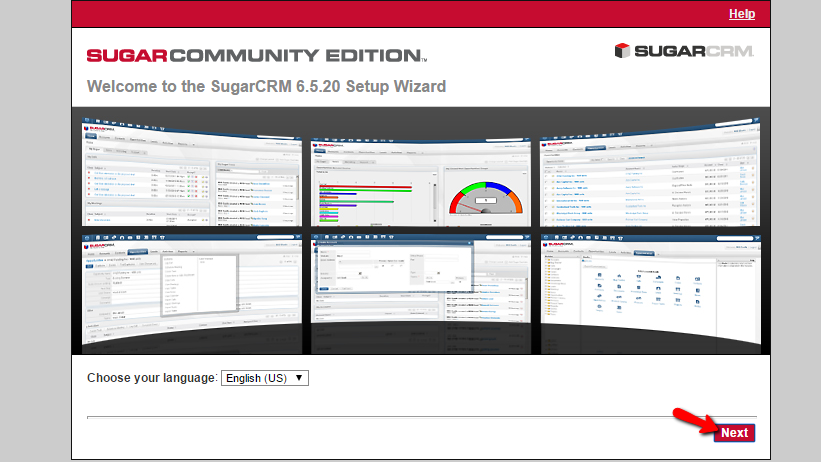
When you access the folder where you have uploaded the files of your SugarCRM installation package you will be redirected to the installation page for the software. The first page is mostly informative and there you will be able to choose the language you would like to have the SugarCRM application installed:
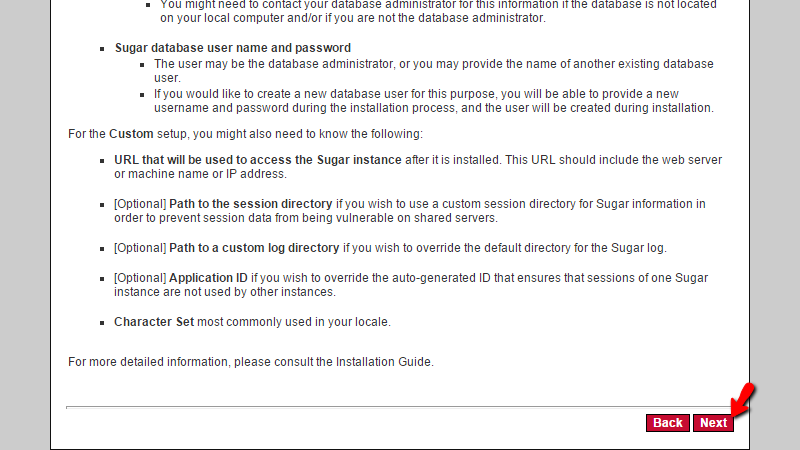
If you click on the “Next” button you will be presented with several additional lines of documentation on the installation process. Please read it carefully and press the “Next” button so you can be able to proceed.
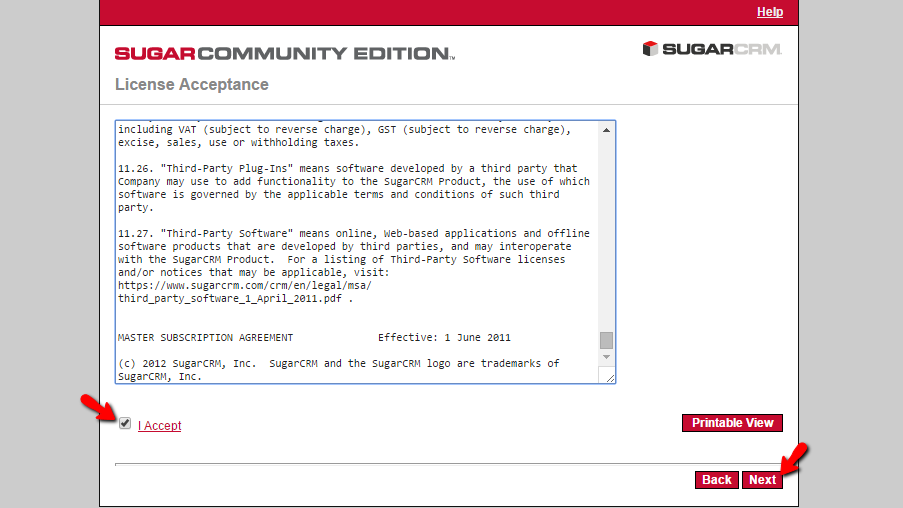
On the next page you will be presented with the main license SugarCRM CE is distributed with. Please read it and it you agree simply put a check on the “I Accept” checkbox and click on the “Next” button.
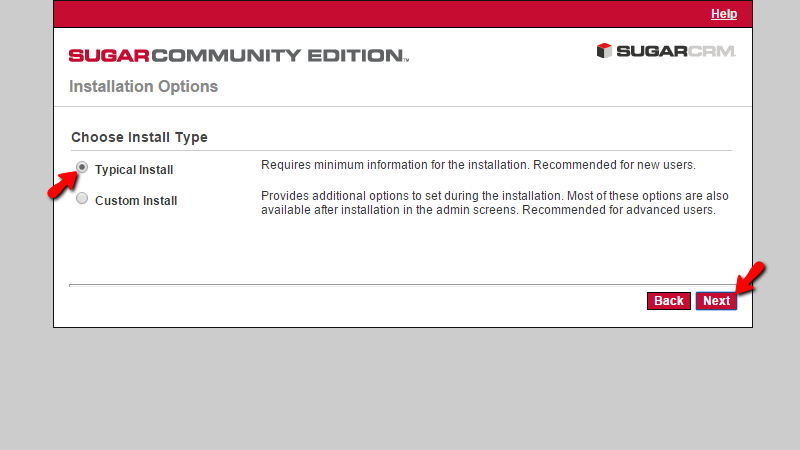
Great! We are moving on! The next page is for choosing the type of installation process you would like to use. We strongly suggest to use the “Typical Install” installation type as there you will not need to configure any additional settings. When you are ready please click on the “Next” button once again.
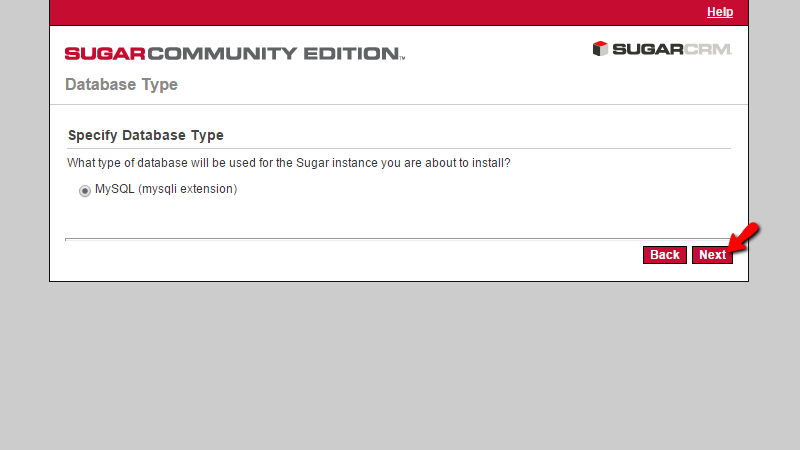
Then you will need too choose “Databases Type“. Please make sure that the “MySQL(mysqli extension)” is checked and click on the “Next” button so you can proceed with the setup.
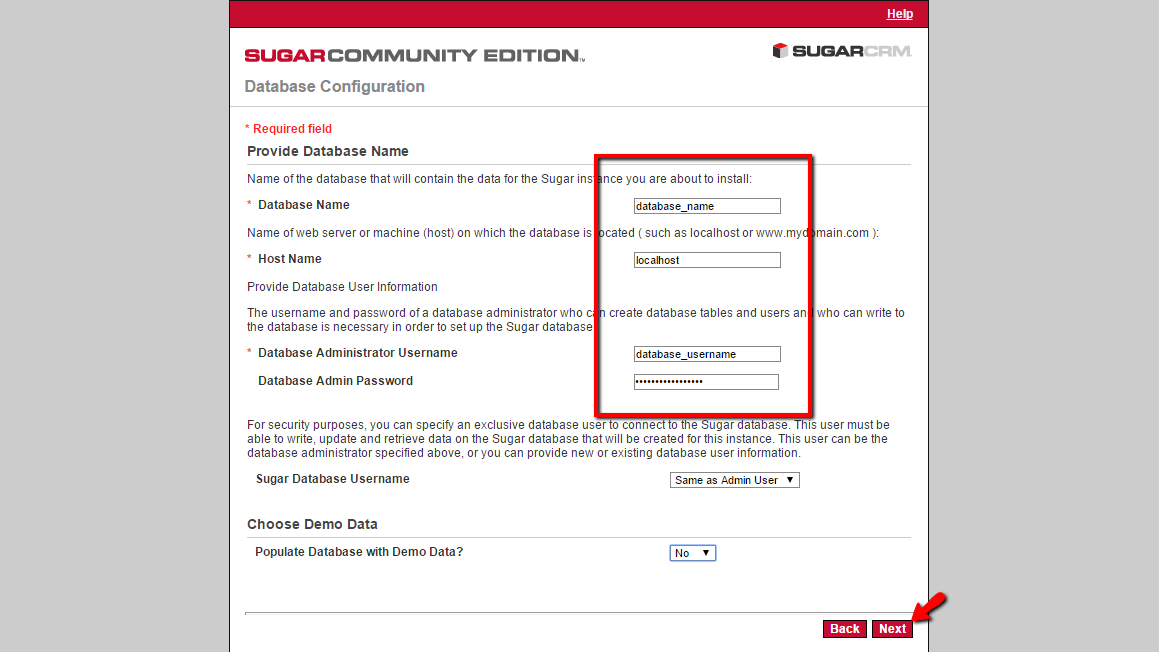
Finally we reached the page where you will need to input the information for the database which will be used by the SugarCRM CE application. If you are not quite sure how to create a database, assign a user for the same and generate a strong user password please check our Create a Database cPanel tutorial.
When you have your new database and username created it is time to proceed with the setup. On the page you are currently at you will need to configure the following options.
- Database Name – The name of the database you would like to use.
- Hostname – The hostname of the server – usually this should be set to localhost.
- Database Administrator Username – The username of the user allowed to operate with that database.
- Database Admin Password – The password for the above used username.
- Choose Demo Data – If SugarCRM CE should populate the database with demo contents.
Once you are done with all these changes please click on the “Next” button so you can be able to proceed with the installation process.
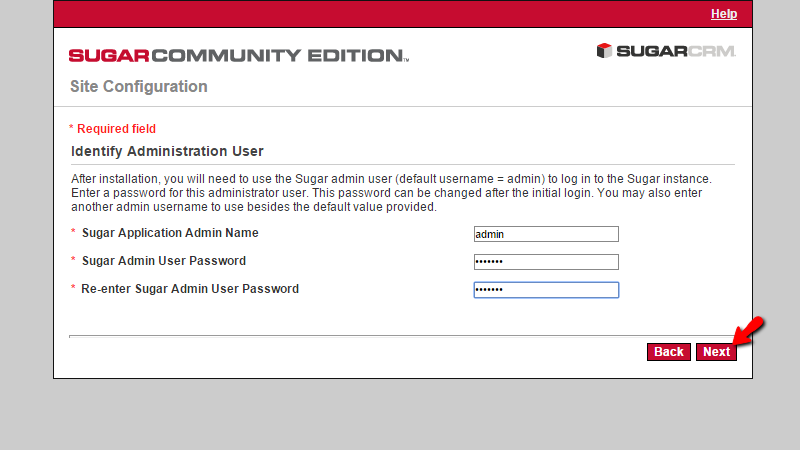
On the next page you will need to fill the information for your admin user. This will require from you admin name and admin password. Please make sure that you will use a Strong password type so you can ensure maximum security of your CRM instance.
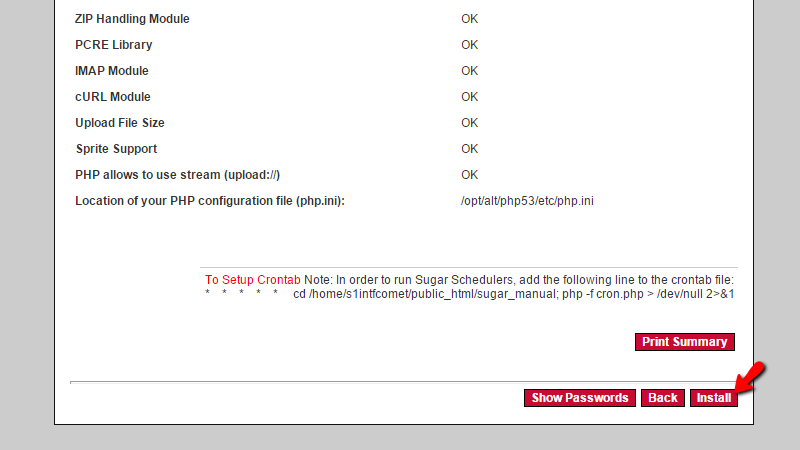
When you are ready please click on the “Next” button so you can be presented with all the installation summary. Check all the information in the provided summary and before you can proceed with the installation please add the cron to your cPanel > Cron jobs. Once the cronjob is created please return to the installer and click the “Install” button so the installation can start.
The next page will track the progress of the installation and when it is done you will be informed about that. Please click on the “Next” button so you can finalize the installation.
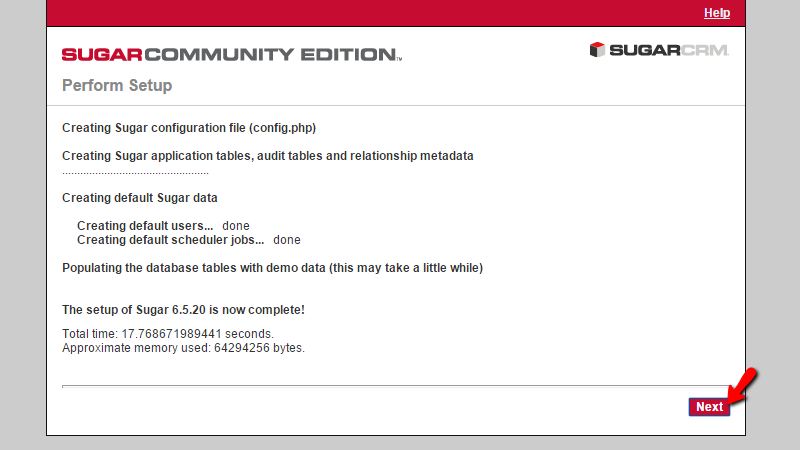
Congratulations! You have successfully installed SugarCRM CE on your website!
How to upgrade SugarCRM
If you are running an older and outdated version of the SugarCRM CE application then most probably you would like to have that upgraded to the most stable recent version of SugarCRM CE. This can be down quite easily if you follow the upgrade steps we will fully describe in the next few lines of this tutorial.
Step 1 Download the Upgrade Packages
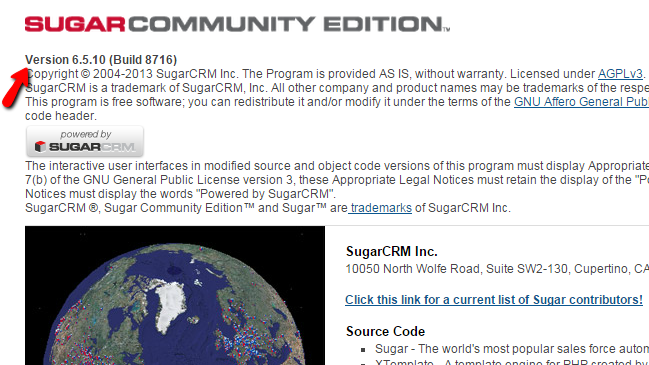
In order for the upgrade you are about to perform to be successful you will need to first find out the version of your current SugarCRM CE installation. This can be found quite easily if you login into the application with the admin user and click on the About link which is located in the upper right corner of the page.
This will cause for the About page to be displayed and there you will be able to see the version at the very first line of text.
Now that you know the actual version of SugarCRM CE it is time to download the upgrade package. All the upgrade packages are available under the SourceForge SugarCRM CE upgrading page.
For example if you are running SugarCRM CE version 6.5.10 and you would like to upgrade it to the most recent one you will need to download the SugarCE-Upgrade-6.5.x-to-6.5.20.zip package from the SourceForge page.
Once you download the archive you are ready to move on with the upgrade.
Step 2 Access the Upgrade Wizard
In order to initiate the upgrade of the SugarCRM CE application you will need to login into the Admin area of the application.
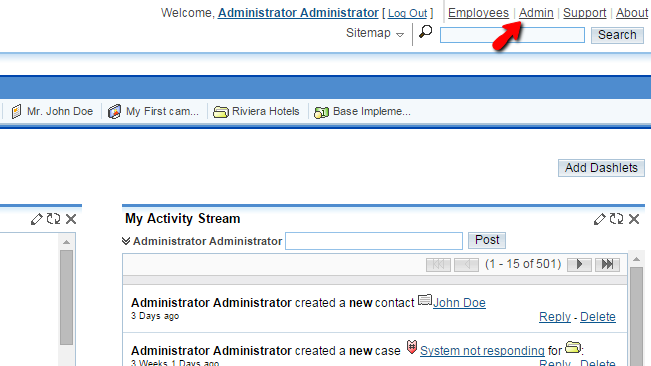
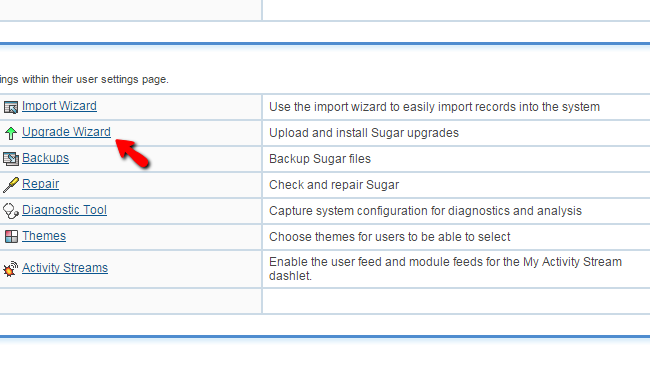
Then navigate to the Upgrade Wizard link located under the System section of settings.
Once there you will be able to start with the upgrade and respectively finalize it. The whole process will be further discussed in the next step of this tutorial.
Step 3 Upgrade SugarCRM CE using the Upgrade Wizard
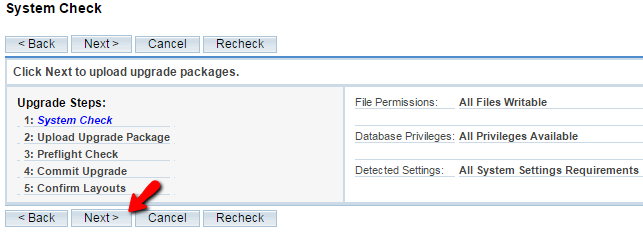
Once the Upgrade Wizard is accessed you will need to click on the Next button so the wizard can perform a check on all the configuration options for your SugarCRM CE and verify if the upgrade will be compatible with the current setup.
Once this is done you will be forwarded to the second step of the upgrading process where you will need to upload the upgrade archive which you have previously downloaded from SourceForge.
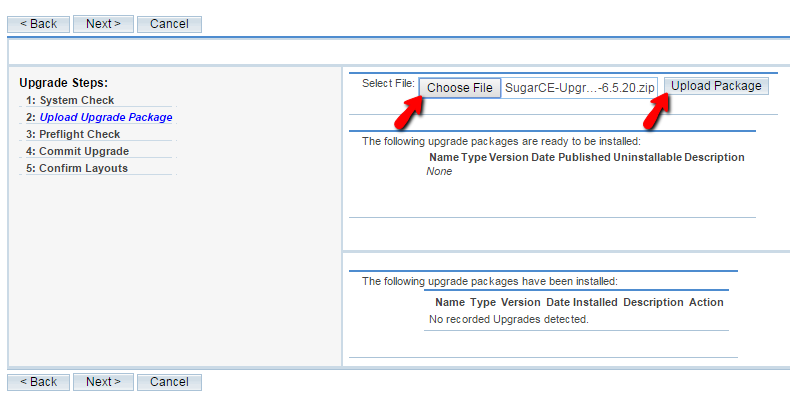
Please click on the Upload Package button once you gave the package pointed. Then the script will extract the archive and verify it. If everything is ok with the upgrade package you will notice how the package will appear under one of the sections in this step.
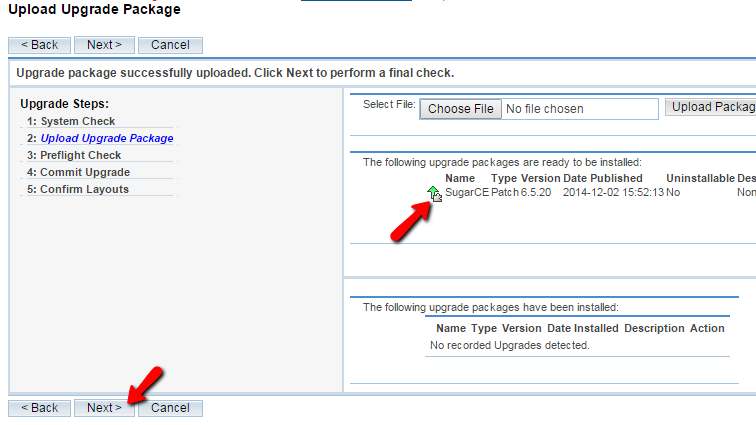
Please click on the Next button so the wizard can proceed further with the Preflight Check. This type of check will verify if the upgrade package and all the requirements for the successful upgrade are met and if they are you will be informed about that.
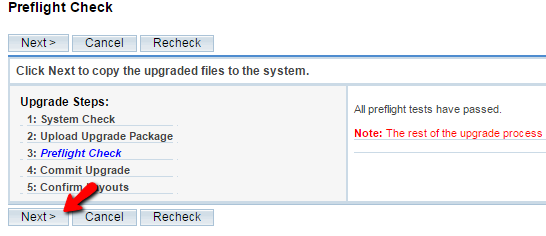
If everything is ok with the check you should click on the Next button so the actual Upgrading process can be initiated.
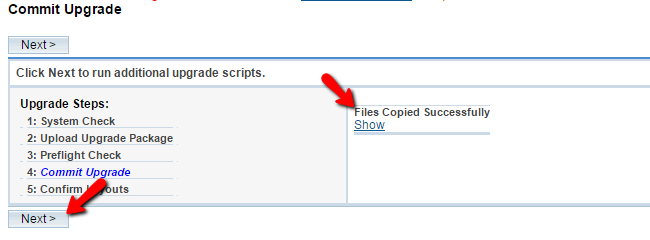
On the next screen you will be provided with information that all the files were successfully upgraded. Then you will need to click Next once again so the wizard can also upgrade the database.
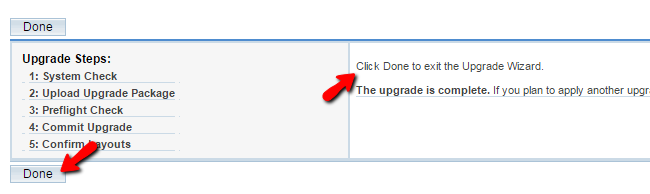
Finally after the whole process is completed you will be provided with the appropriate message and by clicking on the Done button you should be able to finalize the upgrade and cancel the upgrade wizard.
How to Restore SugarCRM backup
In case of emergency or a recent change you have applied which affected your website in a bad manner you probably would like to restore the functionality of your SugarCRM CE instance. This tutorial assumes that you have a locally generated backup which if you have followed our SugarCRM CE Backup tutorial should have been able to generate easily. In the next few lines of this tutorial we will show you how to completely restore your SugarCRM CE website.
To restore your SugarCRM CE, you need to:
- Step 1: Restore the Files
- Step 2: Restore the Database
- Step 3: Link the Database and the Files
Step 1 Restore the Files
In order to get the files of your website restored you will need to upload those and replace the files currently available for your SugarCRM CE website. If you have issues with recent changes only performed to the database you can skip this step as most probably you will not need to restore the files at all.
First and most importantly you will need to connect to the FTP service for your website. If you are not aware of how this should happen – you will need an FTP client such as FileZilla and also you will need to configuration for that email client. The configuration information has been provided in the welcome email you have received when you have signed up for a service with us and the actual configuration of the FTP client can be reviewed in our FileZilla configuration tutorial.
Once you connect to the FTP service you will need to browse the folder where your website is located. If you are accessing your website directly on your domain (domain.com or www.domain.com) without an actual subdomain (subdomain.domain.com) or subfolder (domain.com/subfolder) then the files of your SugarCRM CE instance should be in the public_html folder. In any other case you will need to find the folder by checking where is the home folder of your subdomain via your cPanel → Subdomains.
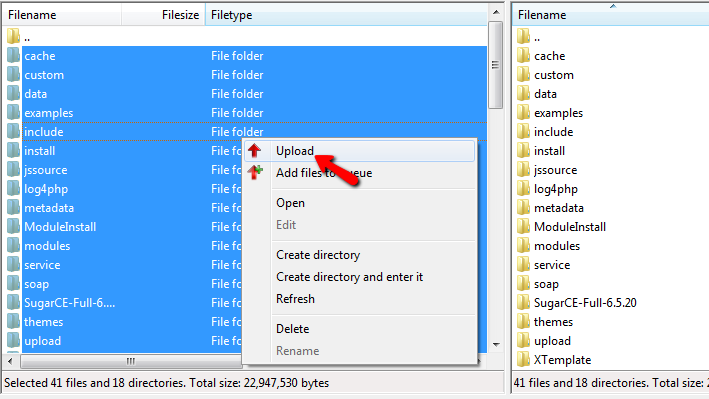
Now that you are able to see the working files of your SugarCRM CE installation the only thing remaining is to upload the local files on top of the files located on your web hosting account. This can be easily done by selecting all of the local files (by marking a single file and then using key combination of CTRL + A), right-clicking on the selected files and choosing the “Upload” option.
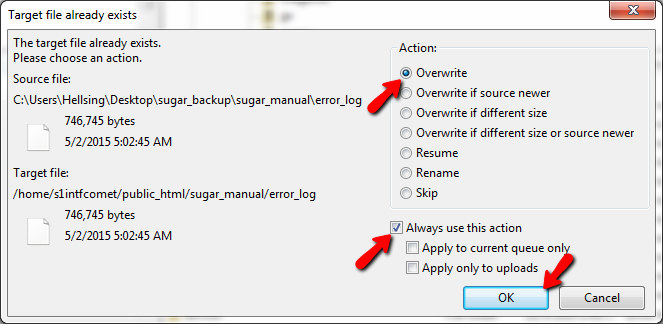
Then you will notice how your FTP client will ask you if the files should be overwritten on the remote server. Here you should choose the options “Overwrite“, “Always use this action” and then you should only click the Ok button which will initiate the upload and overwrite process.
Once the upload is completed this will finalize also the file restoration process.
Step 2 Restore the Database
The database restoration is maybe the most used restoration option s SugarCRM CE is not about the design but it is all about the records of your organizations about the clients. Thus in most of the cases you will be restoring the database since all of the records are stored there. Let’s see how this should happen.
Assuming that you have a local backup of the database in .sql format, you will need a database in which you should restore that backup. Thus you will need to create such via your cPanel → MySQL database wizard. If you are not aware of how to do so please follow our cPanel database tutorial.
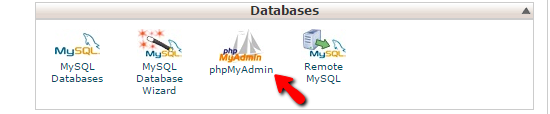
Once you have create the database and you have the database name, username and password it is time to import the .sql file. This will require for you to access the phpMyAdmin feature of your cPanel.

Once there you will need to find the newly created database and then to click on the same. Initially if everything is ok with the database there will be no tables. Then you will need to click on the “Import” button located in the top horizontal menu bar.
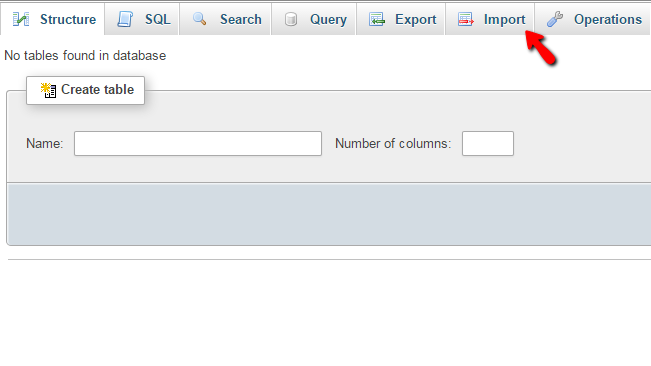
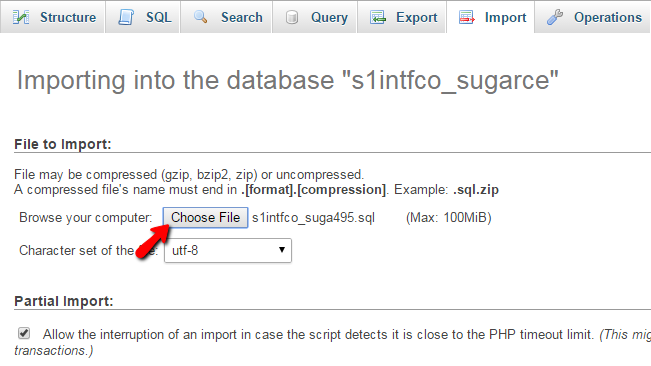
This button will present you with the uploading interface. There you will be able to point the .sql file located on your local computer and then if you scroll down to the bottom of the page and click on the Go button you will be able to start the import.
Once the import is finished you will see how the database is populated with the tables of your database.
Step 3 Link the Database and the Files
Now that you have restored all the files and the database of your SugarCRM CE installation it is time to configure the application with the restored database. Since you were creating your database in Step 2 of this tutorial you should have the database name, username and password. Now you will need to input these in the main configuration file of the application.
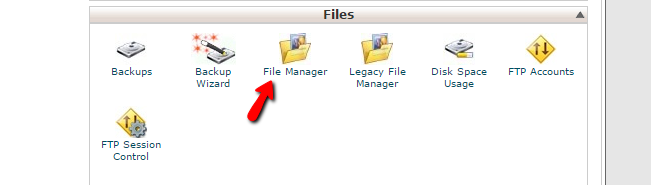
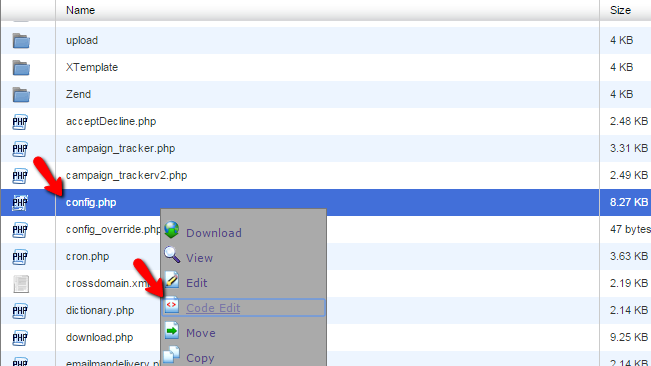
To do that you should login into your cPanel and then access the File Manager feature.
Then you will need to navigate to the folder where your SugarCRM CE application is installed into. Once there you will need to look for a file called config.php. Now that you have found that file you will need to right-click on the same and choose the Code Edit option.
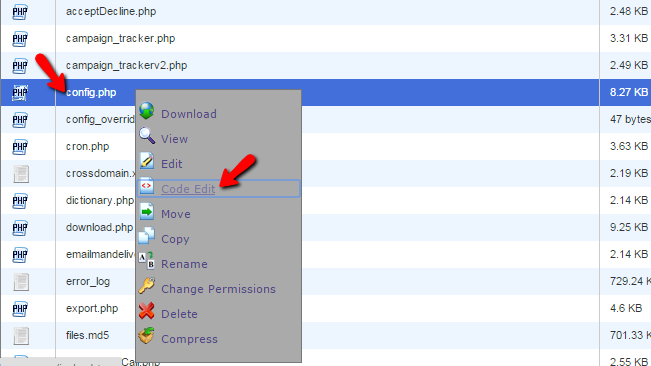
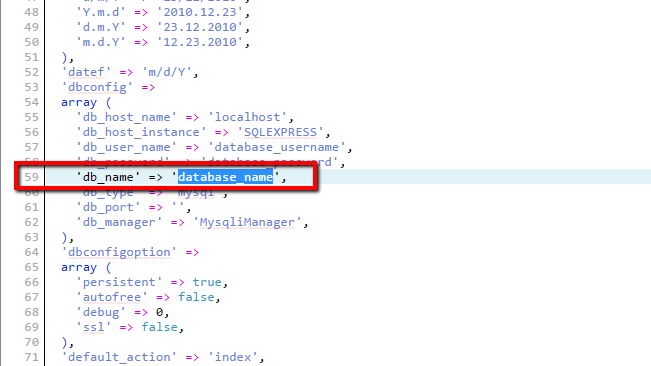
This option will open a new page where you will be able to edit the code of the file and more particularly the code located between lines 56 and 60. The code there is the following:
 'db_user_name' => 'database_user',
    'db_password' => 'database_password',
    'db_name' => 'database_name',
Here you will need to change the “database_name” with the name of the database you have used for the restoration in Step 2 of this tutorial, the “database_user” with the actual username and the “database_password” with the actual password for your database.
Once you are done with the changes please click on the “Save” button located at the upper right corner of the page so the edit of that file can be save and if you now access your website you will notice how the website should be fully accessible if you have performed the restoration properly and following this tutorial. Congratulations! You now can restore your SugarCRM CE website whenever you need to!
How to Backup SugarCRM
Creating a backup for your websites regularly will ensure that you will have a restore point in case of emergency with your website. Our SugarCRM Hosting Package provides our customers with weekly backups and if you would like to have some additional backup for your website you can follow this tutorial.
To backup your SugarCRM CE website, you need to:
- Step 1: Backup the Files
- Step 2: Backup the Database
Step 1 Backup the Files
First you will need to get the files of your website backed up. For this purpose you will need to use the FTP service of your account with us for which you will be able to find configuration details in the welcome email you have received when you have signed up with us. More information on how to configure the FTP service you can find in our FTP Tutorial series.
Once you connect to the FTP service you will need to find where your SugarCRM installation is located. If you are accessing the website directly on your primary domain(not on subdomain and not in subfolder – e.g. yourdomain.com) the files for your website are located in the public_html directory. If your website is hosted on a subdomain you will need to check in your cPanel → Subdomains for the correct folder.
When you find the files for your website you will need to select them all by clicking on a single file and then by using key combination CTRL + A. Then you will need to right-click on the selected files and use the “Download” option.
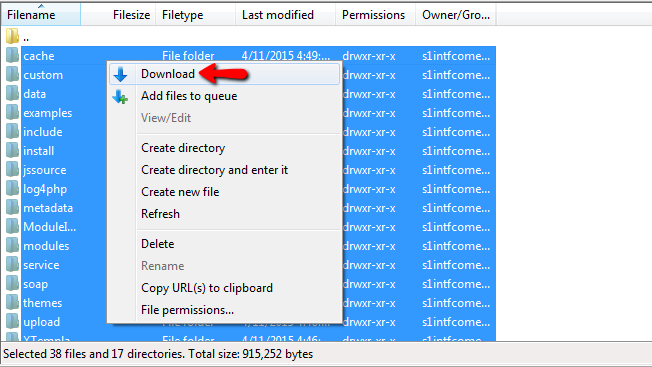
When the files are downloaded on your local computer the backup of the files is ready. We recommend using a new folder on your local computer in terms of file organization.
Step 2 Backup the Database
The second and final step is to backup the database of your website. For this reason you will need to know the name of the database. If you are aware of the name of the database you can skip to the second part of this step, however if you are not aware of that name you can read the next few lines.
In order to get the name of the database used by your SugarCRM CE instance you will need to check the code of the config file. This code is available in the config.php file which you will be able to find in the installation folder of your SugarCRM CE. You can view the code of the file in the File Manager of your cPanel service. Once you find the file you can right-click on the same and choose the “Code Edit” option.
Then on the 59th line in the code of the file you will fine a line containing “‘db_name’ => ‘database_name’” here you will need to take the “database_name” part as this is the actual name of your database.
Now that you have your database name it is time to export it. In order to do that you will need to access the cPanel service for your account and find the phpMyAdmin feature.
When you access the feature you will need to locate the database name in the left vertical menu and click on the database so you can be presented with the tables list. From there you will need to click on the Export link so you can proceed with the exporting of your database.
There you will need to simply click on the Go button so the exporting process can be initiated and once finalized you will be provided with a copy of your database in the downloads folder of your web browser.
How to manage the Emails
The Emails module which is part of the Activities module will provide you with the option to manage all the emails related to your SugarCRM CE installations. With that module you have all the features usually provided by desktop email clients – sending and receiving emails. In the next few lines of this tutorial we will provide you with detailed information on how you should be able to use that module.
To be able to manage your emails properly, you need to know how to:
- Step 1: Access the Emails Module
- Step 2: Check Mail and Send Emails
- Step 3: Configure the Settings for the Emails Feature
Step 1 Access the Emails Module
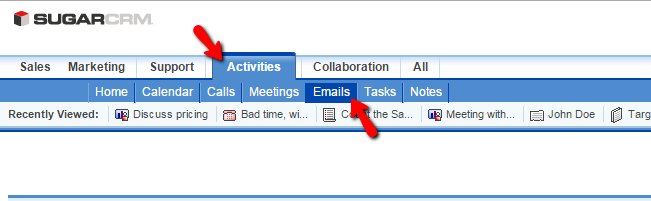
In order to access the Emails module you will need to first and foremost login into your SugarCRM CE application. Once there you will need to hover over the Activities link in the top navigation menu and then to click on the Emails link.
This link will land you directly on the Emails management page where you will be presented with a simple interface separated on three sections.
In the first section you will be able to see the email accounts linked for check and also their folders.
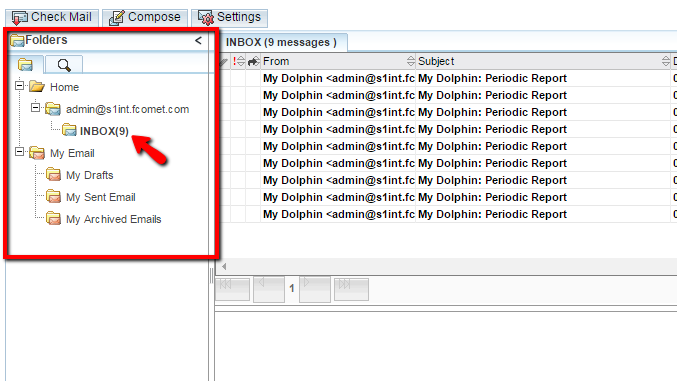
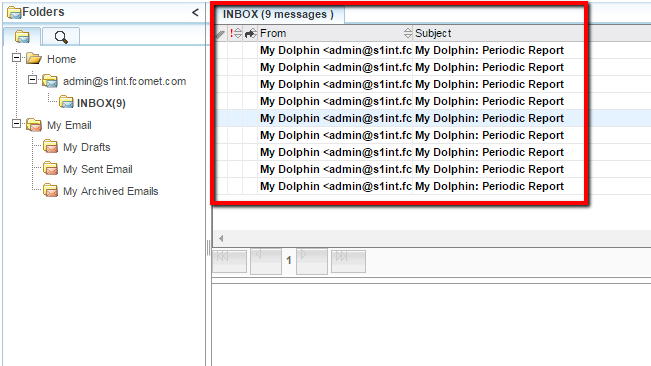
You can click on the different folders in order to browser different emails. The next section contains the received emails stored in the Inbox folder.
There if you click on a single email you will be able to see its content at the third and final section.
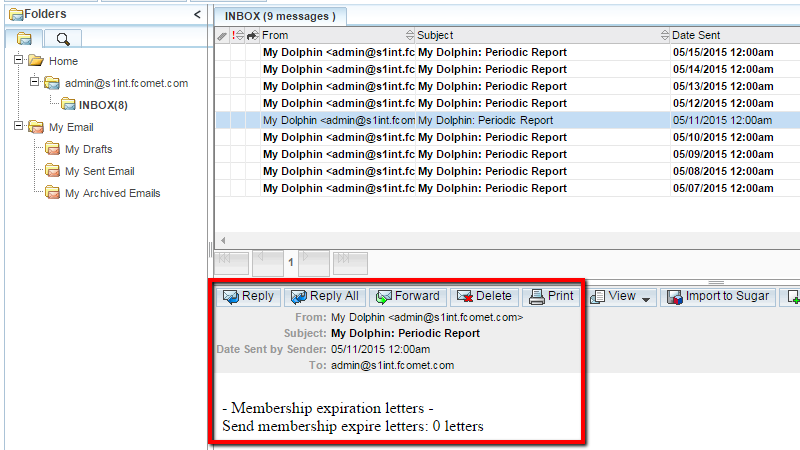
That is the basic structure of the Emails module and for more actions with this module you should move forward to Step 2 of this tutorial.
Step 2 Check Mail and Send Emails
In order to check the incoming emails associated with the email account you have configured in your SugarCRM CE instance you will need to simply press the Check Mail button.
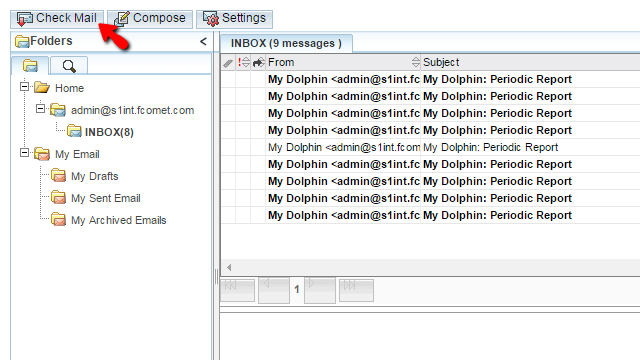
The button will initiate an Ajax script which will be used to check the emails and update the list of emails in the INBOX folder.
In order to send an email on the other hand you will need to click on the second button labeled Compose.
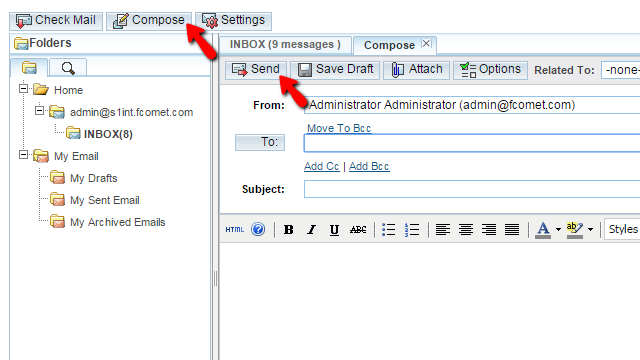
Once you click on that button you will be presented with a common mail sending interface where you need to simply add an email TO which you will be sending the message, of course the subject and the message itself. When you are ready, simply click on the Send button and the message will be successfully sent to your recipient.
Step 3 Configure the Settings for the Emails Feature
The setting for the Email feature of the Activities module will allow you to configure new email accounts for checking emails or other key settings for the displaying of the emails. In order to access this feature you will need to simply click on the Settings button located on the Emails page.
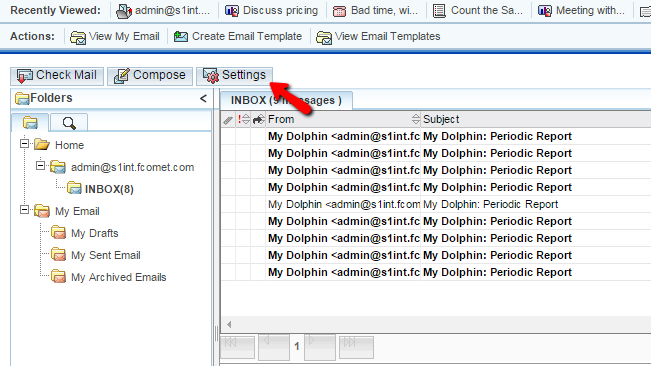
This will prompt a window where you will be able to configure two type of settings. The first one are the General settings and there you will find the following configuration options:
- Check for New Mail – Here you will be able to configure how often the emails for the configured email accounts should be checked
- Signatures – Here you can crate and assign signatures
- Send Plain Text Emails Only – If the outgoing emails should be sent in Plain text only
- Signature above reply – If the signature should be displayed when replying
- Character Set – The character set your emails should be using
- Emails per Page – The amount of emails displayed per page
- Available User Folders – The folders that should be checked
The other available configuration options are the Mail Accounts options where you will be able to configure new mail accounts and of course to add new SMTP servers.
How to Manage the Meetings
Updated on Mar 13, 2019
The meetings Module of the SugarCRM CE application will provide you with an easy way to manage your Meetings. There are few ways to schedue a meeting and in the next few lines of this tutorial we will show you how to do that via the dedicated page to that module.
To be able to manage your Meetings, you need to complete the following steps:
- Step 1: Access the Meetings page
- Step 2: Schedule a New Meeting
- Step 3: Edit and Delete Meetings
Step 1 Access the Meetings page
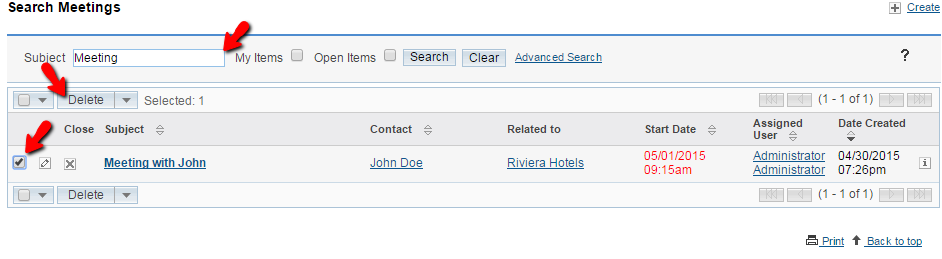
In order to manage the Meetings of your organization you are provided with a standalone page where you will see a table view of all the scheduled Meetings. In order to access that page you will need to navigate to Activities > Meetings.
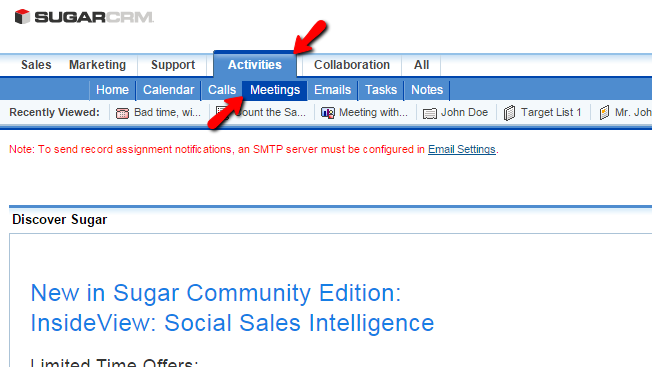
Once you click on the Meetings link you will be redirected to the actual page with the table view for all the Meetings added to your SugarCRM CE installation.
Step 2 Schedule a New Meeting
In order to schedule a new meeting you will need to simply click on the Schedule a Meeting link located in the top Actions bar.
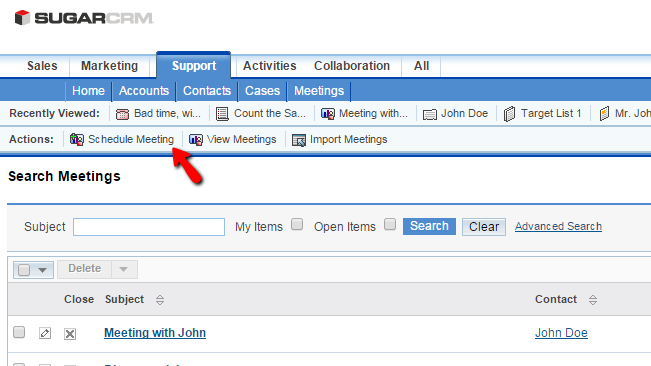
This link will redirect you to a new page where you will be able to configure the new Meeting you are scheduling. The available options are:
- Subject – The subject of the meeting
- Status – The status of the meeting
- Start Date – The starting date for the meeting
- Related to – Any related module record
- End Date – The ending date of the meeting
- Location – The location of the meeting
- Duration – The duration of the meeting
- Reminders – If any reminders should be triggered
- Description – Few words regarding the meeting
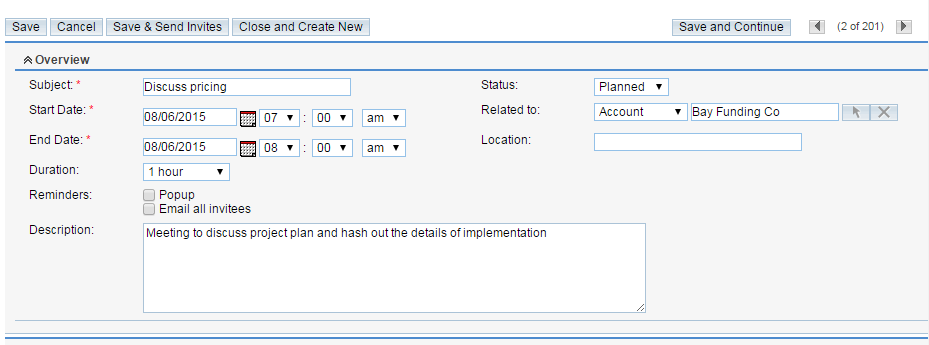
Once you are ready with the Overview settings you can move to the other sections of settings where you will be able to assign an employee for that meeting and also to add invetees. When you are ready with all the settings please click on the Save button so you can schedule the meeting.
Step 3 Edit and Delete Meetings
In order to edit a meeting you will need to access the home page of the Meetings module and to find the meeting you would like to edit using the Search module at the top of the Meetings list.
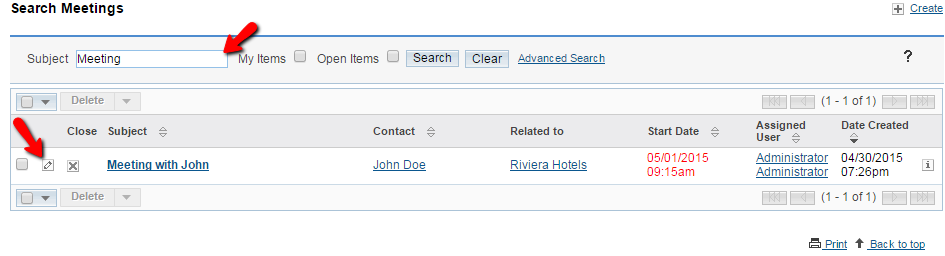
Next you will need to click on the small pencil-like button and you will be redirected to the same page you have used to schedule a meeting, however with most of the configuration fields already being filled. Please change those based on your needs and click on the Save butn so you can save the changes you have performed.
In order to delete an entry you will need again to use the search module in order to find it and then you will need to select it for deletion by clicking on the small check box before the information for that call and finally you will need to click on the Delete button at the top of the table view with the Meetings.
Congratulations! You can now fully manage the Meetings of your organization in SugarCRM CE!
Congratulations! You no know how to use the Mail module of your SugarCRM CE based website!
Due to the initial setup of this image, it may take up to 20 minutes to launch.
SugarCRM is owned by SugarCRM Inc ( www.sugarcrm.com) and they own all related trademarks and IP rights for this software.
Features

The main benefits of SugarCRM are it streamlines your help desk process, helps you launch campaigns faster, gives you full-team engagement, supports mobile apps, generates intelligent reporting, provides an in-built support hub, and it integrates with plenty of other SugarCRM-based apps. Here are the details of its benefits:
Full-team engagement
While amassing all support tasks to helpdesk agents is a sensible way to save money, it is the biggest talent and energy-wasting system that the CRM world has seen. Picture yourself as a customer: Is it just frustrating to call ten people before you reach the marketing vice-president and have your answer.
SugarCRM provides a substantial solution for this issue as it involves customers in the problem-solving process. There are eight user types in the system, from the main administrator down to the support and account representatives handling different channels and campaigns. The whole workforce will operate in a joined platform for easier collaboration rather than obstructing each other on the info. Lastly, the whole workforce can have a centralized database of contact behavior to further help with the decisionmaking.
Practical campaigns
One of SugarCRM’s features to help users get familiar with the app is through Campaign Wizard. Users can execute, create, and record their communication channels and marketing campaigns. This tool can also gather leads in the system and distribute the data in web-to-load forms and other engagement programs. The Campaign Wizard also assists in this task as agents can evaluate their leads, and even assign the leads to the right agents.
Outstanding contact management
SugarCRM goes the extra mile in your contact listing as the app also collects related information in profiles, even some behavior data that you may have missed. Editing is as easy as simply adding accounts and contacts through few clicks to get them done.
Once you’re done filling up the contact’s profile, SugarCRM can support your creativity: Document and note modification is possible according to your liking, attaching big files easily, mark contacts for easier managing, and sort them out by priority. With the app’s bulk editing capacity, you can be efficient with your time when sorting out your contacts. Similarly, you can make a specialized list and export it out to other integrated apps as easy and as much as needed.
Lastly, the app’s multilingual and multicurrency features make it easy to adapt and work well for many companies around the globe.
Lots of handy integration
Some users may be frustrated that SugarCRM doesn’t integrate natively with known business apps, but its SugarExchange(a public accessible API code) feature is a better solution to this issue. With this feature, you can associate the product with other popular providers that cover Zapier, CloudAgent, MailChimp, Zendesk, Pardot, and many others. The LDAP integrations are also allowed and even streamline the access for customers to simplify the company’s ways of managing leads.
Intelligent reporting
SugarCRM’s reporting is professional and even shows you the boundaries of Business Intelligence’s data analysis. The app summarizes performances effects and allows trend forecasting and notices issue patterns. It can handle many visualization dashboards to illustrate your data, even adjust modules and types that come with customizable search parameters and filters.
In-built support hub
SugarCRM’s Help & Support button is a built-in feature in its platform and placed in the lower left corner for easy access. On the customer service side of this feature, a 24/7 experienced SugarCRM agent will assist you in its situations. SugarCRM also provides excellent training about the app and grants a large knowledge database from Sugar University. Meanwhile, The Help Dashlet is a specialty support page that shows you relevant discussions and provides your feedback to the developers and other SugarCRM users.
Sugar Mobile
SugarCRM is aware that most customers are always on the go and rely on their mobile devices and provides a mobile app service in response to that need. The Sugar Mobile app allows agents to assist customers even out of the office and managers can perform their duties such as performance tracking and campaign managing out of the reach of a personal computer.
AWS Template
SugarCRM with Aurora (RDS) and AWS Elastic Load Balancer on Linux Server
Installation Instructions for AWS Template for SugarCRM on Aurora – RDS
A) Application URL: Template Output provides the Application URL as well as Database details.
Access the application via a browser at the load balancer URL which is the Website URL from the template output.
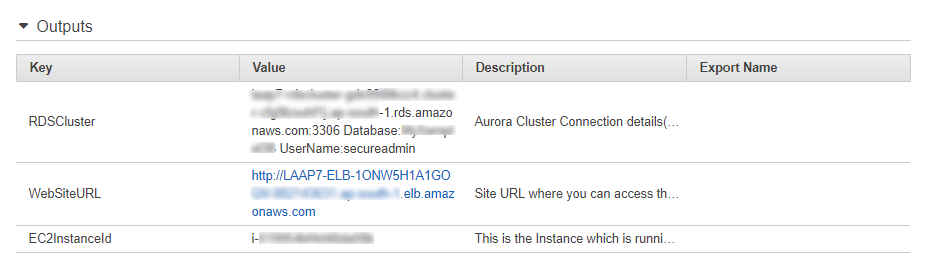
B) RDS Cluster / Aurora Details:
RDS Cluster / Aurora Details can be obtained from the Output of the template.
Being your installation with the WebSiteURL from the Output and enter custom details for your site
Please enter the RDS Cluster / Aurora details in the configuration of Database stage.
Details are also available in
/root/aurora_credentials.txt in the ec2 Instance
C) SSH Connection: To connect to the deployed instance, Please follow Instructions to Connect to Ubuntu instance on AWS Cloud
1) Download Putty.
2) Connect to the virtual machine using SSH key Refer this link:
- Hostname: PublicDNS / IP of machine
- Port : 22
Username: To connect to the operating system, use SSH and the username is ubuntu.
Password : Please Click here to know how to get password .
D) Other Information:
1.Default ports:
- Linux Machines: SSH Port – 22
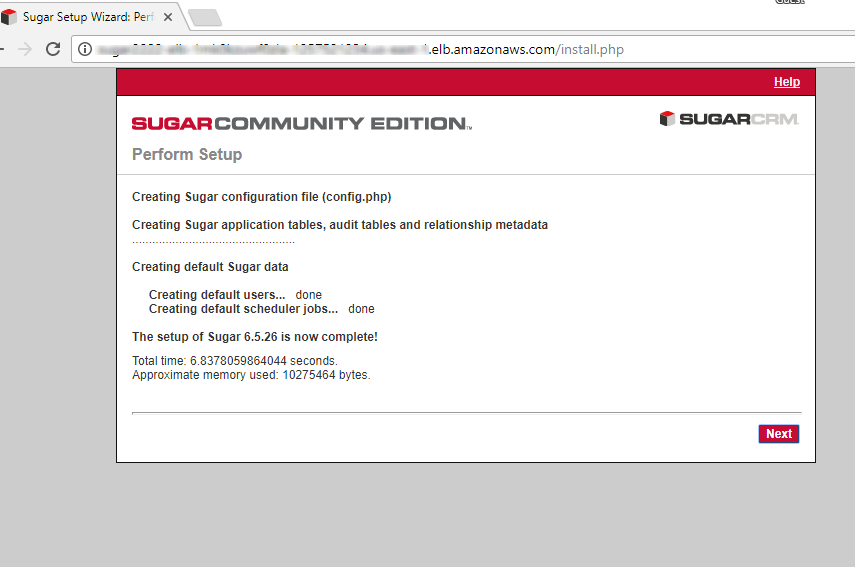
On opening the output URL you can see the welcome screen.
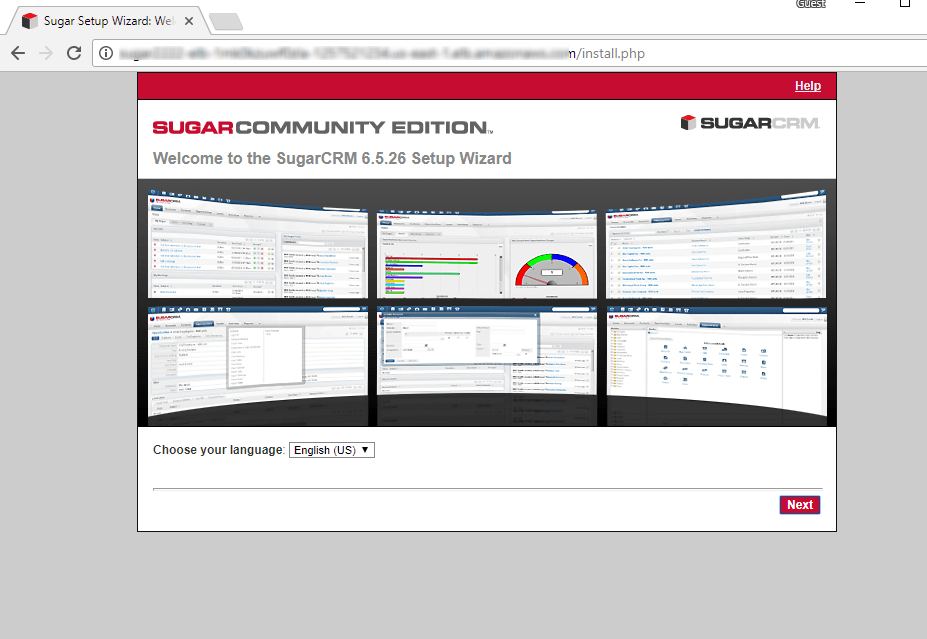
Please continue with next till you reach Database Configuration Page
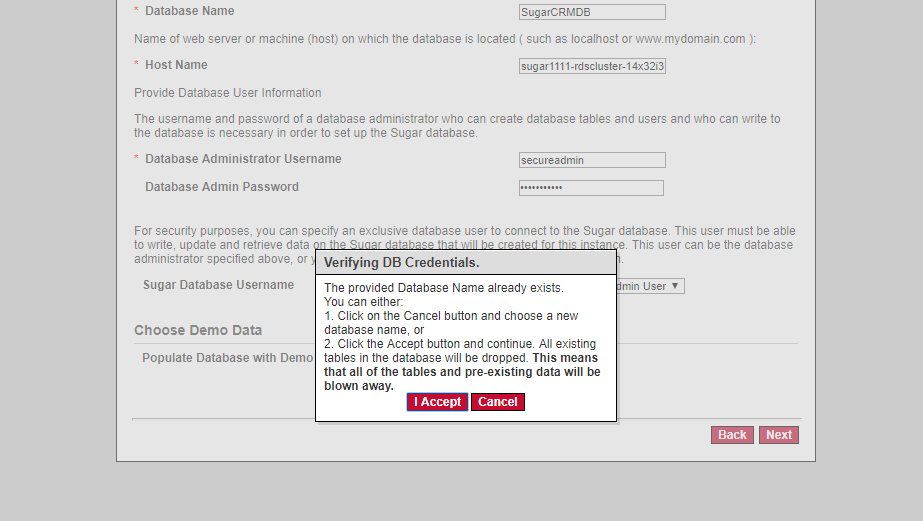
During Database configuration for Database hostname field enter the RDS details from Template Output.
Database Name , Username and Password can also be referenced from the template output which is same as input during Template deployment
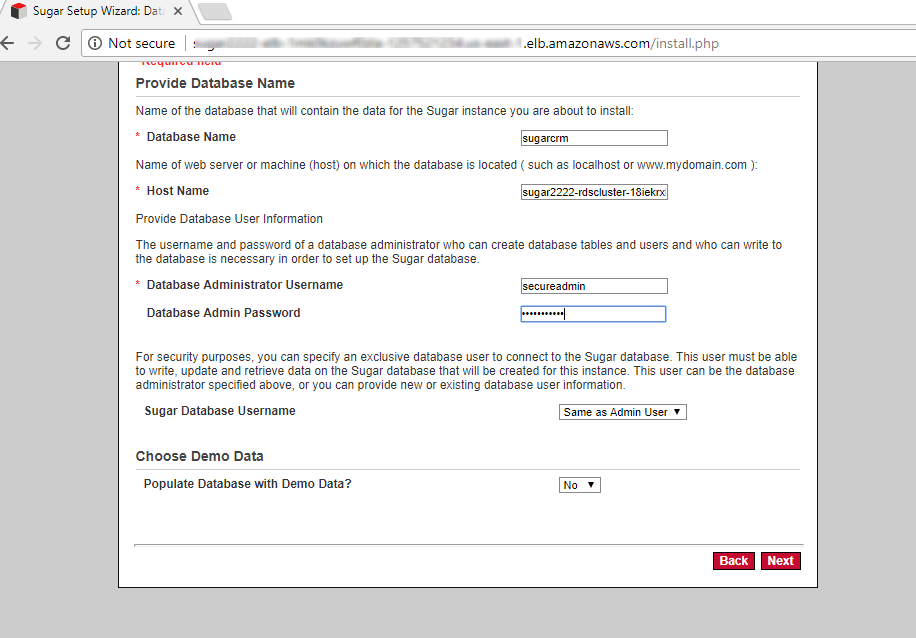
You will get a warning message about existing database being overwritten, please click “Accept”
After configuration is complete you will see summary page
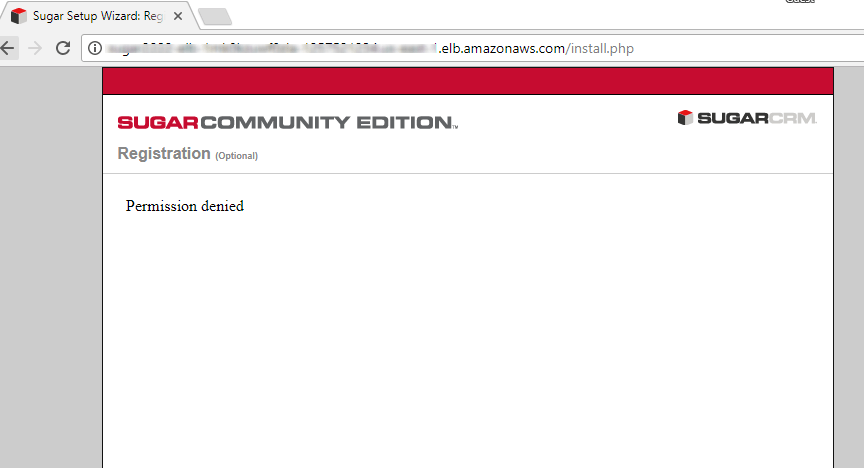
In registration page you may see a message as Permission denied – you can ignore this message and click Next
You can now access the SugarCRM site with the credential you configured during setup.
