1-click AWS Deployment 1-click Azure Deployment
Overview
With Question and Answer Support Forum, you can totally build up a whole fully featured question & answer section where users can Submit questions, Search and Filter questions by status and Add answers to other questions. Users can comment and reply to a question or an answer, can vote and definitely can pick one best answer for their questions.
Cognosys provides hardened and ready to run images of Question and Answer support forum on all public cloud ( AWS marketplace and Azure).
Deploy your Question and Answer support forum securely on cloud i.e. AWS marketplace and Azure with reliable services offered by Cognosys at one-click with easy written and video tutorials.

The portal allows user to ask specific questions on selected topics which are answered by other community members.
It provides quick search preview at the header which helps the users to find answers easily. It also gives the power to either approve or reject topics which are not of your viewers concern.
Question and Answer support forum On Cloud for AWS – Windows
Features
Key Features
- Instant search by keywords
- Vote and Pick Best Answer
- Questions / Answers follow function
- Private/ Public for Question and Answer
- Notification Email system
- Submit / Filter / Order / Edit / Delete Question
- Answer / Comment
- Offers quick customer registration and login module
Azure
Installation Instructions for Windows :
Note: How to find PublicDNS in Azure
Step1 ) RDP Connection: To connect to the deployed instance, Please follow Instructions to Connect to Windows instance on Azure Cloud
Connect to virtual machine using following RDP credentials:
- Hostname: PublicDNS / IP of machine
- Port : 3389
Username: Your chosen username when you created the machine ( For example: Azureuser)
Password : Your Chosen Password when you created the machine ( How to reset the password if you do not remember)
Step 2 ) Database Login Details:
Username : root || Password : Passw@rd123
Note: Please change the password immediately after the first login.
Step 3) Application URL : Access the application via a browser at http://PublicDNS/wp-admin
Steps to access the Admin Panel:
- To login to Question and Answer Support Forum Administrative Panel, you need to open your browser and navigate to http://PublicDNS/wp-admin
- Enter username and password in the given fields and click on the“Login”button to access the Admin Panel.
- After successful login to the Admin Panel, you will get access to the Question and Answer Support Forum.
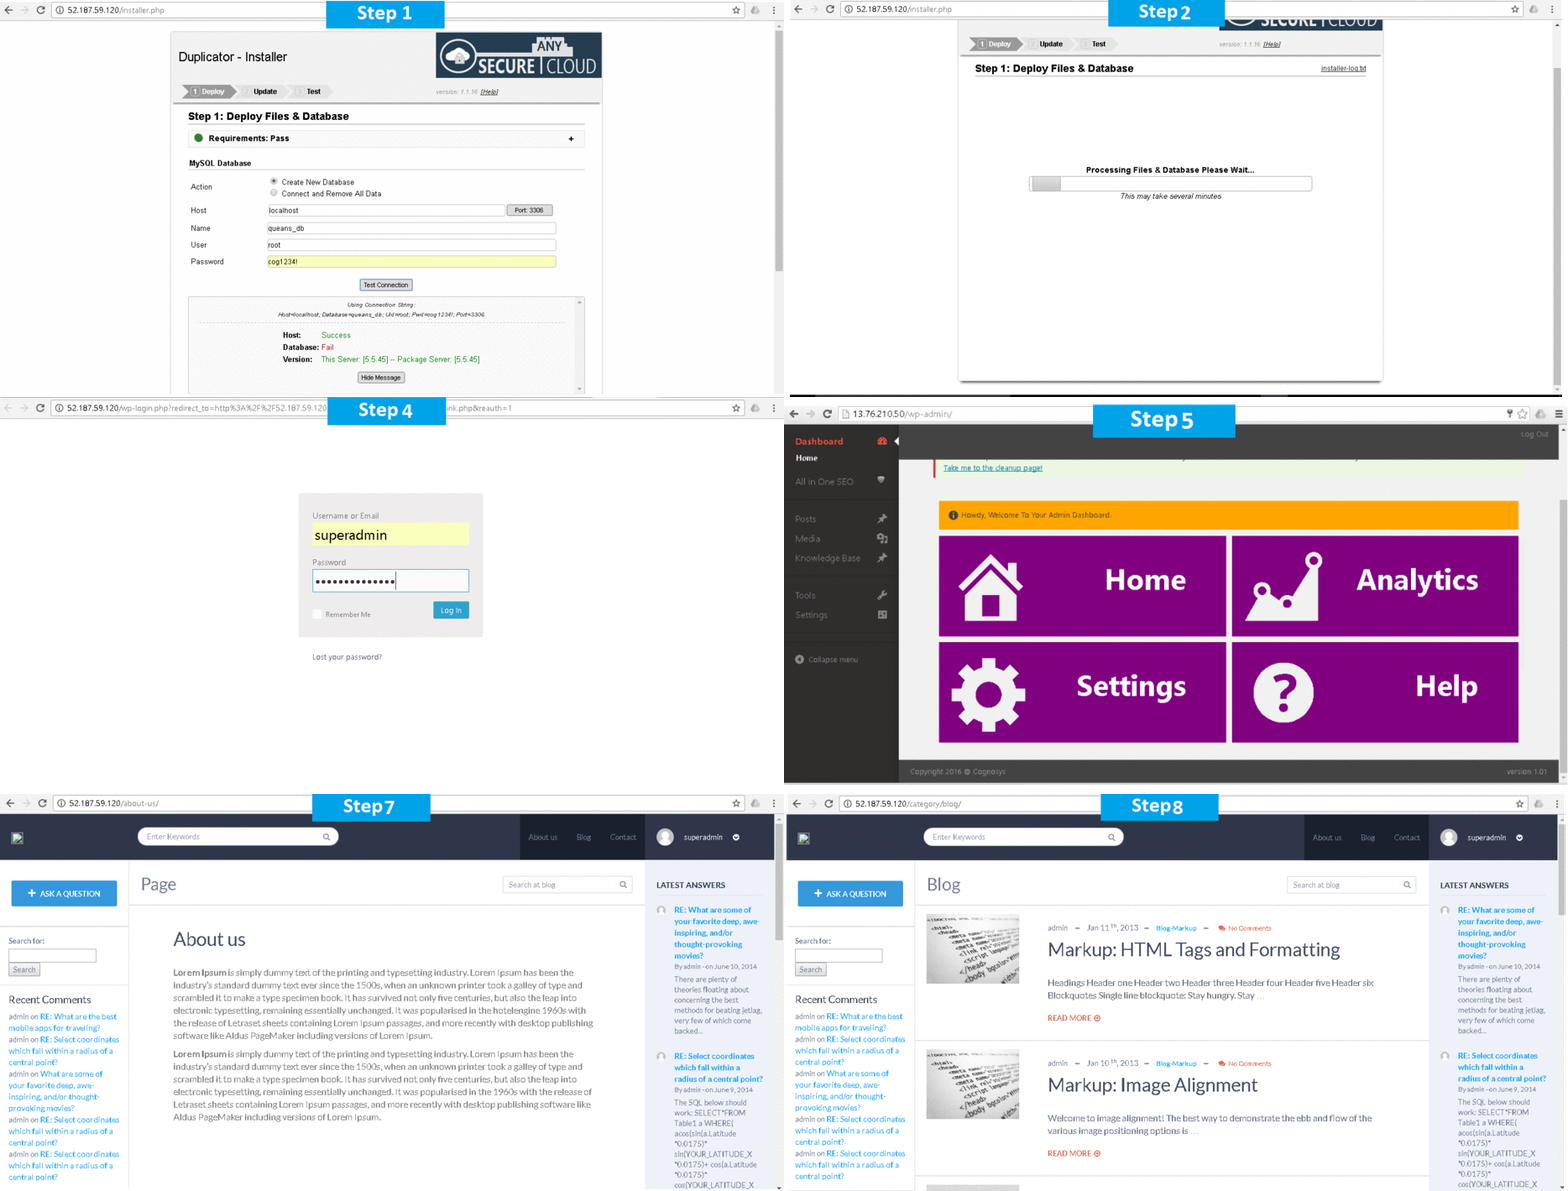
Step 4) Click on ‘Deployment’ button to run the installer file.
Step 5) Once you run the installer file, fill all the required details to create database and press ‘Test Connection’ button to check if the script can connect to the database.
Step 6) You’ll get a pop up box confirming you that the server is detected and the script has successfully managed to connect to the database.
Note:- If you get a ‘Fail’ remark then it implies that new database is created. If you get a ‘Success’ remark then it implies that previous database alreday exists and proceeding further shall overwrite the database. For further instructions, follow the advice under ‘Common connection issues’ or contact your ‘Hosting Provider’.
Step 7) Before proceeding, you need to check the box to confirm thay you have read all the warnings and notices, and then further click ‘Run Deployment’. You’ll get a warning reminding you that any data existing in the database will be overwritten (so cross-check again if you have entered the name of your new database and not an existing one!) which you can click OK to.
Step 8) Once above step is done you will then see the system starting to deploy the files. If you get an error, try re-uploading your archive file in case it became corrupt during the file transfer.
Step 9. After installation, click on “Save Permalinks” button and then login by given credentials. Then just click on “Save changes” button to proceed further.
Step 10) Close Permalinks window, and click on Test Site Button to browse your site.
Step 11) After all above is done, you’ll be presented with a page showing you the old and new Path and URL settings for your site. You have the opportunity to change your page title here and create a new admin user if you wish to.
Step 12) Other Information:
1. Default installation path: will be in your web root folder “C:\inetpub\wwwroot”
2. Default ports:
- RDP:3389
- Http: 80
- Https: 443
- MYSQL ports: By default, these are not open on Public Endpoints. MYSQL: 3306
Configure custom inbound and outbound rules using this link
Video


