1-click AWS Deployment 1-click Azure Deployment 1-click Google Deployment
Overview
PrestaShop e-Commerce Solution was built to take advantage of essential Web 2.0 innovations such as dynamic AJAX-powered features and next-generation ergonomy. PrestaShop guides users through your product catalog intelligently and effortlessly, turning intrigued visitors into paying customers.
PrestaShop is owned by PrestaShop (https://www.prestashop.com/en) and they own all related trademarks and IP rights for this software.
Cognosys provides hardened and ready to run images of PrestaShop on all public cloud ( AWS marketplace and Azure).
Deploy your PrestaShop securely on cloud i.e. AWS marketplace and Azure with reliable services offered by Cognosys at one-click with easy written and video tutorials.
Home Page

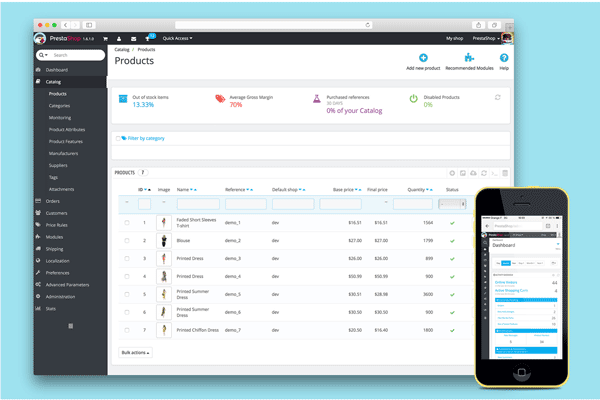
Products Page
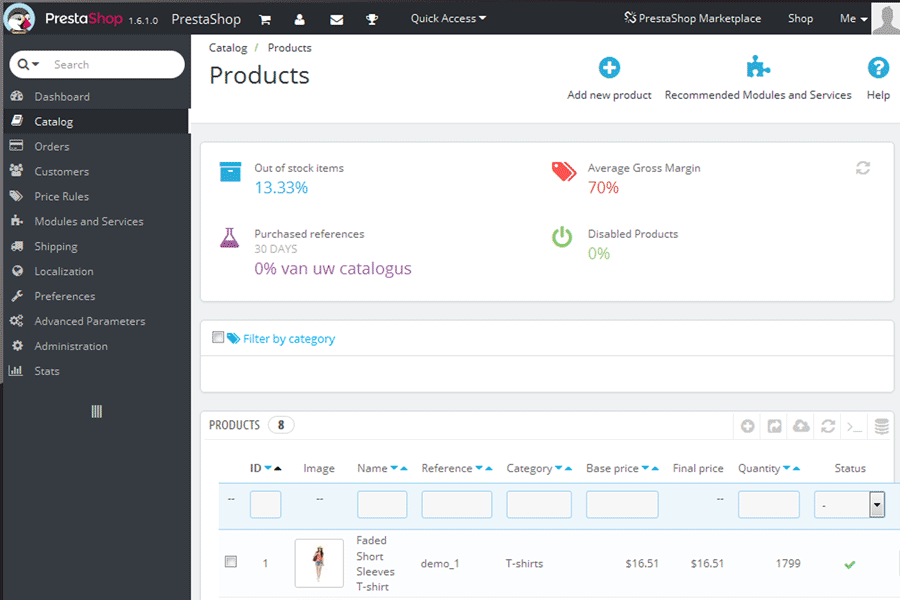
Catalog Page
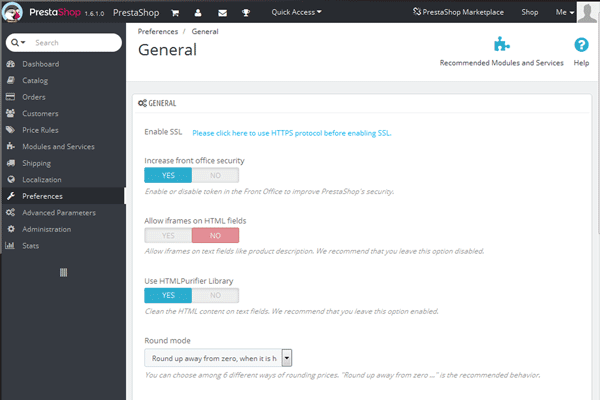
General Page
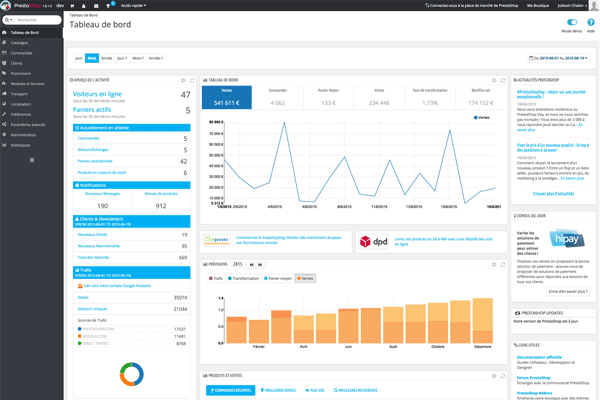
Admin Panel
Features
Major Features Of PrestaShop
Front-office
- Special deals (price reductions, gift vouchers)
- Featured products on homepage
- Top sellers on homepage
- New items on homepage
- ‘Free shipping’ offers
- Cross-selling (Accessories)
- Product image zoom
- Order out-of-stock items
- Customer subscription & user accounts
- Unlimited payment methods
- Payment by bank wire
- Google Checkout module
- Cash-On-Delivery (COD)
- Preconfigured for Paypal™
- Multiple-recipient contact form
- Product tagging & tag cloud
- Search
- Merchandise return (RMAs) & credit slips
- Package tracking
- Offer gift-wrapping & recycled packaging
- PDF customer invoice
- Shopping Cart recall
- Sale of services & virtual goods
- Custom Favicon
- RSS feed
- Newsletter opt-in
- ‘Pick up in-store’ option
- Customized product (text and images)
- Wishlist
- Loyal customer program
- Affiliate program
- Sponsor-a-friend benefit program
- Customer product reviews
Back-office
- Unlimited categories & subcategories
- Full-featured WYSIWYG text editor
- Unlimited product attribute combinations
- Unlimited product specs
- Unlimited images with automatic resizing & file optimization
- Unlimited currencies
- Unlimited tax settings
- Unlimited carriers & destinations
- Tax by state, country, both, zones, or no taxes
- Digressive pricing (Quantity discounts)
- Real-time currency exchange rates
- Inventory management
- SMS/Text-message alerts
- Add/delete function modules
- Bar codes
- Contextual help
- Attribute Combo Generator
- Delivery status notification e-mails (customizable)
- Unlimited languages & dialects
- Import/export language translations
- 13 default language translations
- Search Engine Optimization (SEO)
- Friendly URLs / Permalinks
- 100% modifiable graphic themes
- Back Office users & permissions (ACL )
- Maintenance Mode
- Minimum order amount
- Newsletter contact export
- Alias search
- Bulk lister/import .CSV files
- SSL (Secure Sockets Layer) encryption
- Visitors online
- Content Management System (CMS)
- Reports
- Customer groups
AWS
Installation Instructions For Ubuntu
Note : 1. Please use “Prestashop” in the place of “stack_name”
2. How to find PublicDNS in AWS
Step 1) SSH Connection: To connect to the deployed instance, Please follow Instructions to Connect to Ubuntu instance on AWS Cloud
1) Download Putty.
2) Connect to virtual machine using following SSH credentials :
- Hostname: PublicDNS / IP of machine
- Port : 22
Username: To connect to the operating system, use SSH and the username is ubuntu.
Password : Please Click here to know how to get password .
Step 2) Database Login Details :
- MYSQL Username : root
- MYSQL Password : Passw@rd123
Step 3) Application URL: Access the application via a browser at http://PublicDNS/Prestashop
Configure custom inbound and outbound rules using this link
Step 4) Other Information:
1. Default installation path: will be on your web root folder “/var/www/html/Prestashop” ( Please see above Note for stack name)
2. Default ports:
- Linux Machines: SSH Port – 22 or 2222
- Http: 80 or 8080
- Https: 443
- Sql or Mysql ports: By default these are not open on Public Endpoints. Internally Sql server: 1433. Mysql :3306
AWS Step by Step Screenshots
Stack Name-This will be your Current stack.

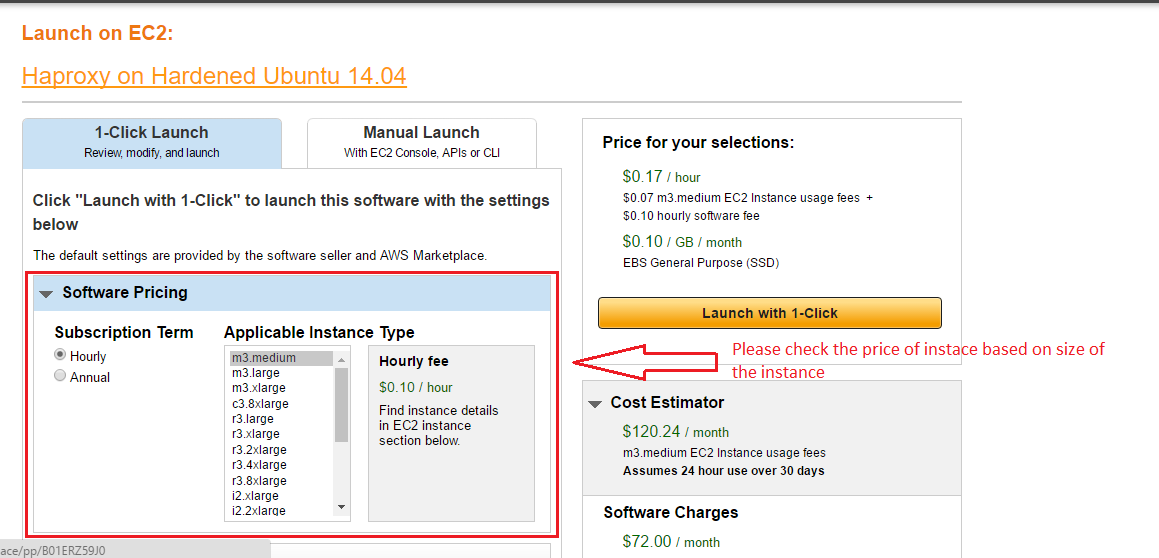
Choose Software Pricing
Choose your Version
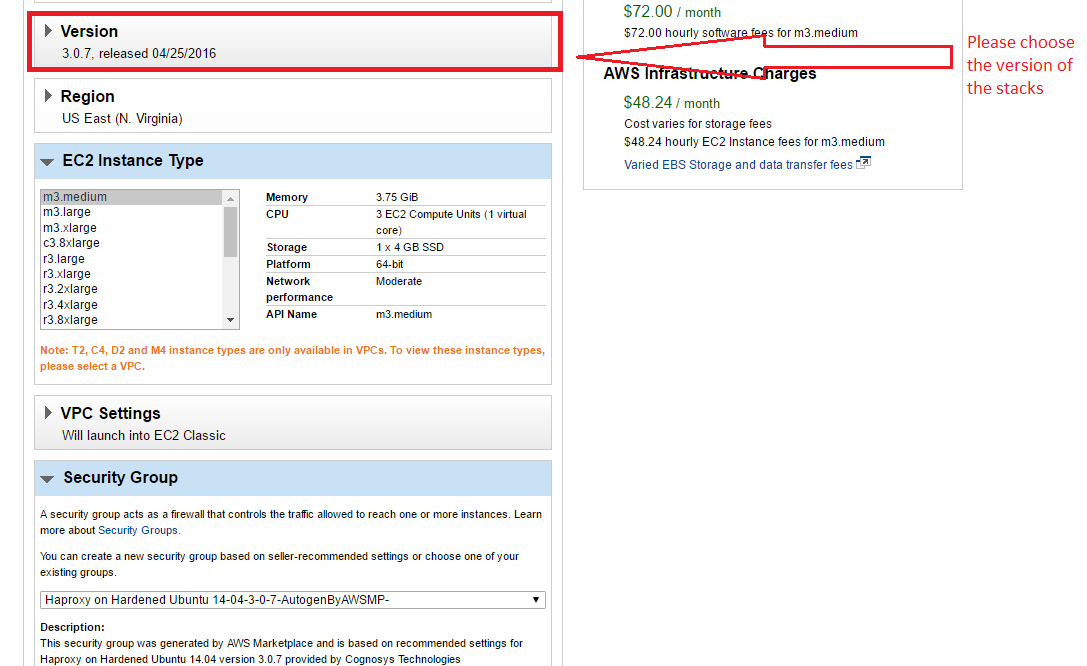
Choose your EC2 Instance Type

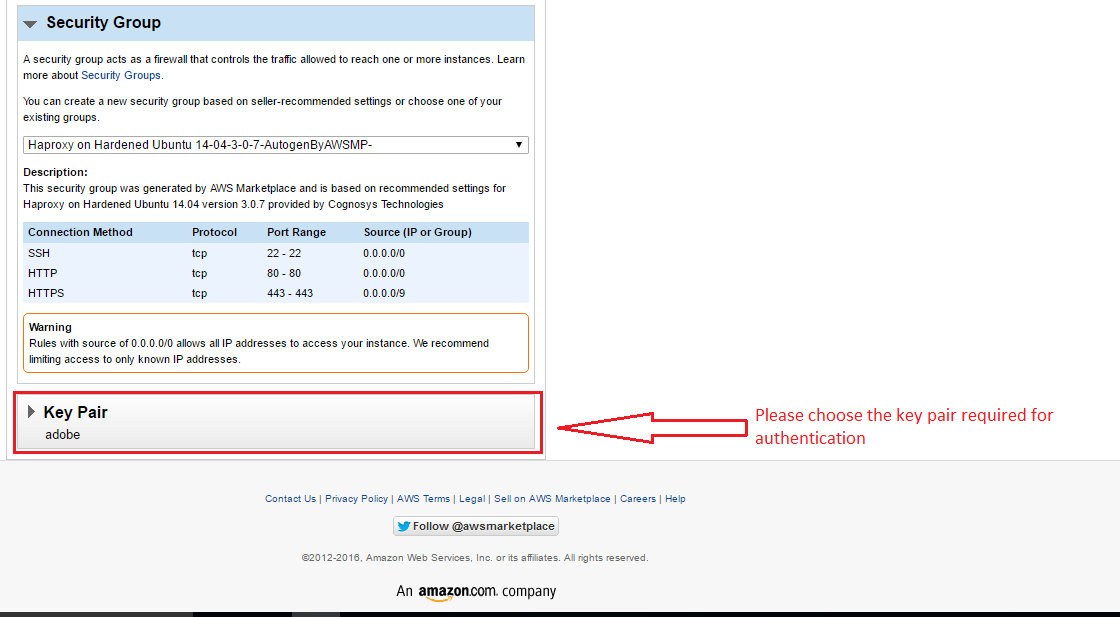
Choose Your Key Pair
Choose your Region
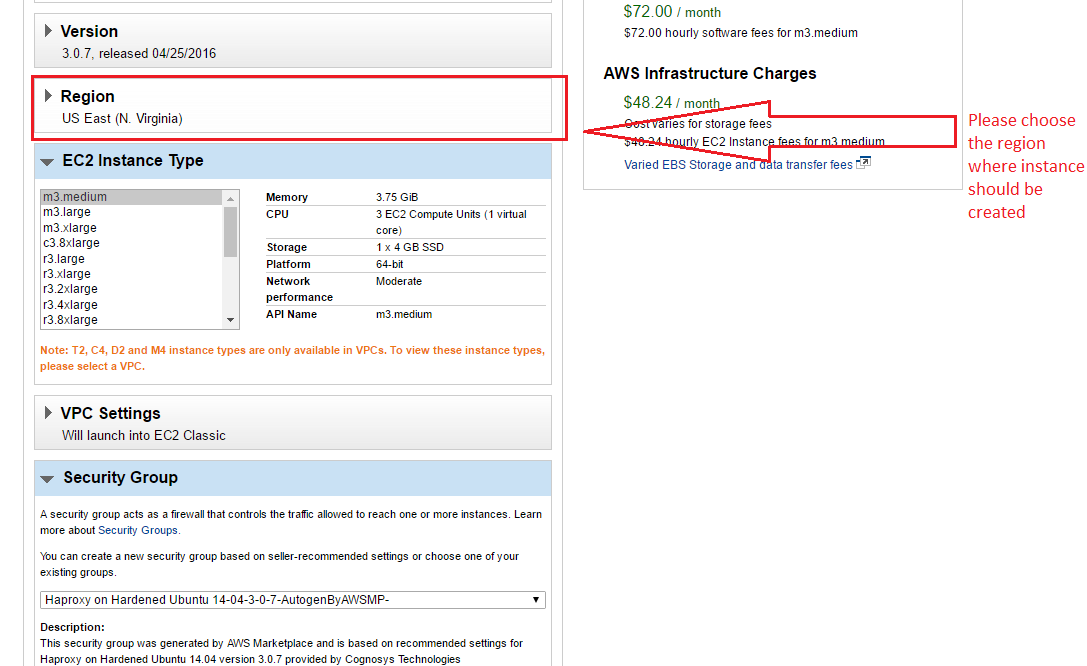
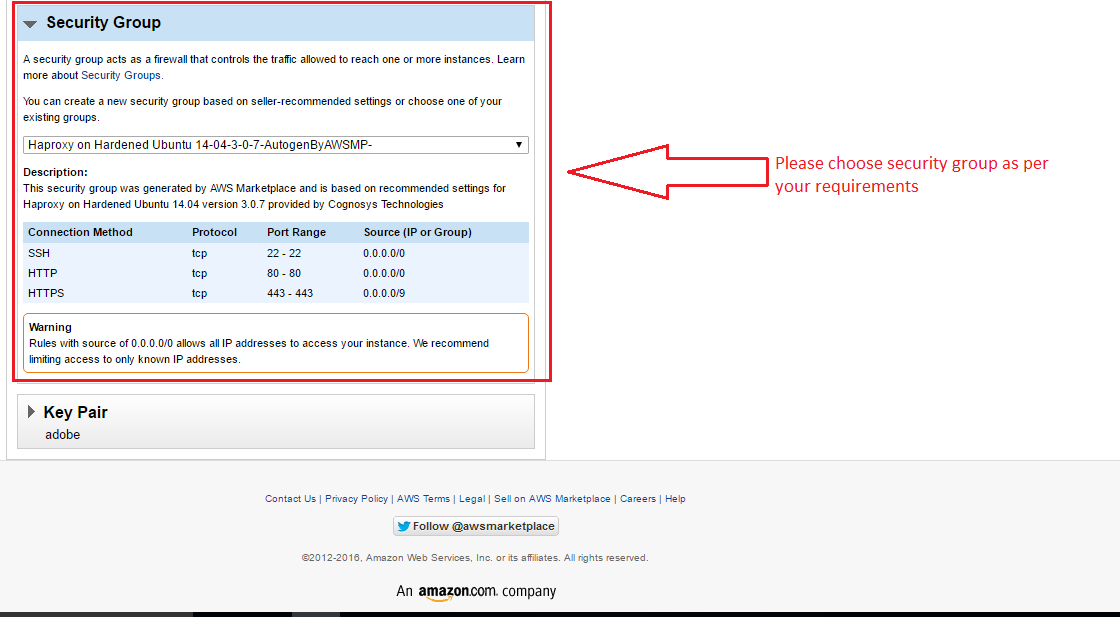
Choose your Security Group
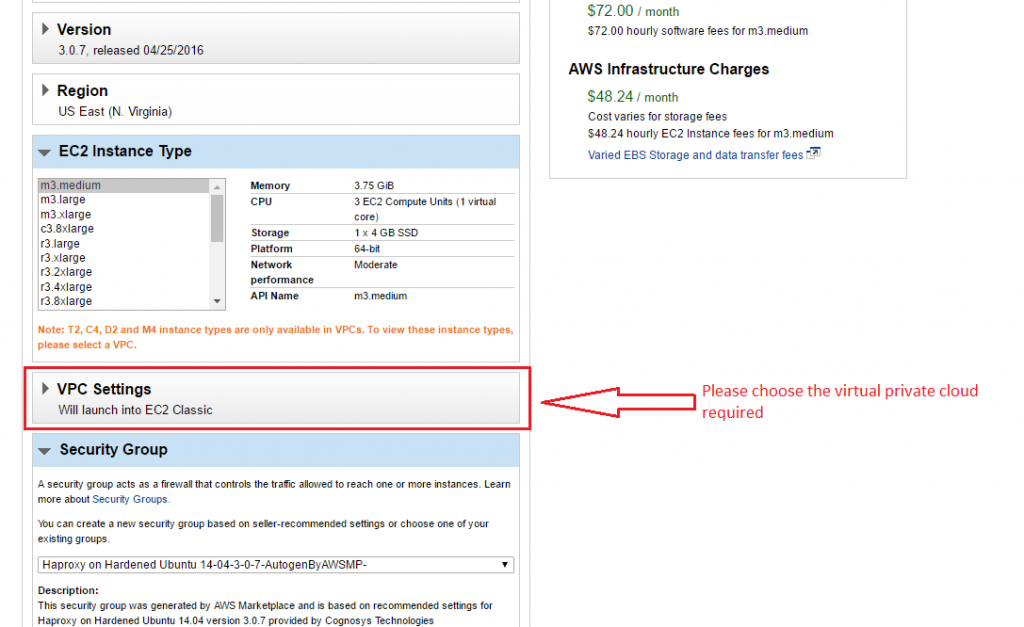
Change VPC Settings
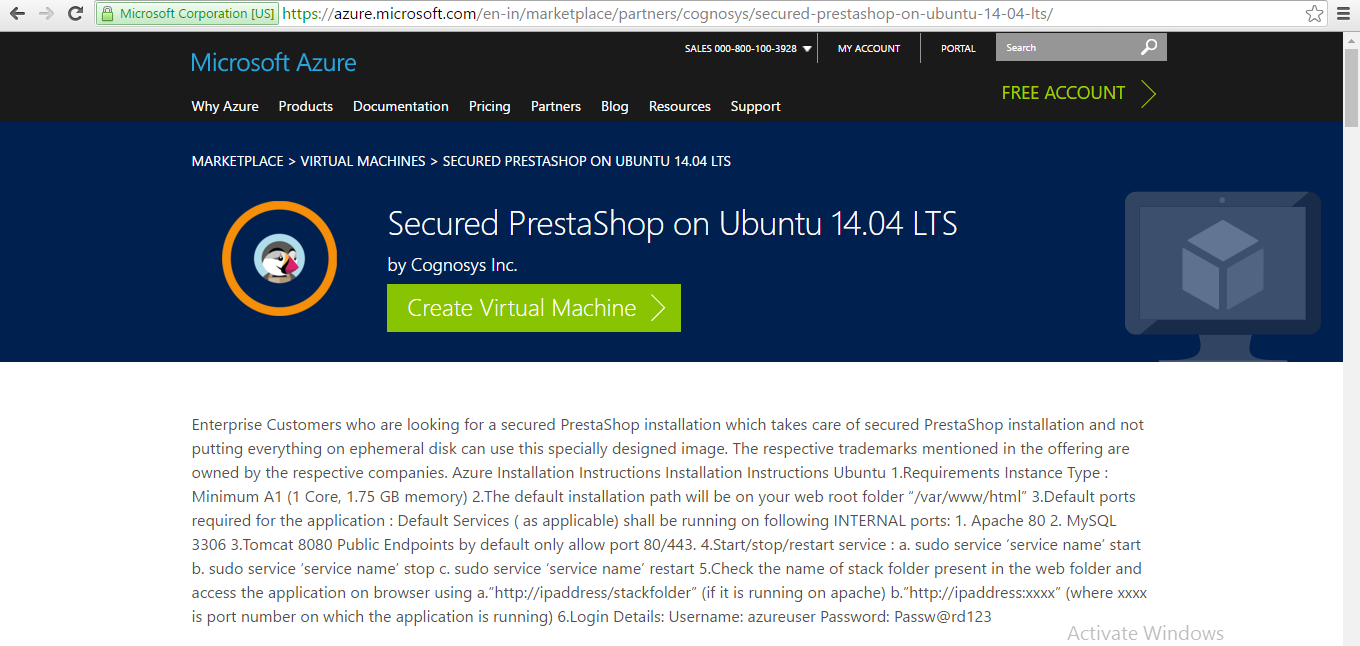
Azure
Installation Instructions For Ubuntu
Note : How to find PublicDNS in Azure
Step 1) SSH Connection: To connect to the deployed instance, Please follow Instructions to Connect to Ubuntu instance on Azure Cloud
1) Download Putty.
2) Connect to virtual machine using following SSH credentials :
- Host name: PublicDNS / IP of machine
- Port : 22
Username: Your chosen username when you created the machine ( For example: Azureuser)
Password : Your Chosen Password when you created the machine ( How to reset the password if you do not remember)
Step 2) Database Login Details :
- MYSQL Username : root
- MYSQL Password : Passw@rd123
Note: For Stack Databse prestashopdb with user prestashopuser and password Passw@rd123 has already been created. Please use this database for you Stack Configuration.
Step 3) Application URL: Access the application via a browser at http://PublicDNS/
Configure custom inbound and outbound rules using this link
Step 4) Other Information:
1. Default installation path: will be on your web root folder “/var/www/html/”
2.Default ports:
-
- Linux Machines: SSH Port – 22
- Http: 80
- Https: 443
- MySQL ports: By default these are not open on Public Endpoints. MySQL :3306
3. To access Webmin interface for management please follow this link
Installation Instructions For Centos
Note : How to find PublicDNS in Azure
Step 1) SSH Connection: To connect to the deployed instance, Please follow Instructions to Connect to Centos instance on Azure Cloud
1) Download Putty.
2) Connect to virtual machine using following SSH credentials :
- Host name: PublicDNS / IP of machine
- Port : 22
Username: Your chosen username when you created the machine ( For example: Azureuser)
Password : Your Chosen Password when you created the machine ( How to reset the password if you do not remember)
Step 2) Database Login Details :
- MYSQL Username : root
- MYSQL Password : Passw@rd123
Note: For Stack Databse prestashopdb with user prestashopuser and password Passw@rd123 has already been created. Please use this database for you Stack Configuration.
Step 3) Application URL: Access the application via a browser at http://PublicDNS
Configure custom inbound and outbound rules using this link
Step 4) Other Information:
1. Default installation path: will be on your web root folder “/var/www/html/”
2. Default ports:
- Linux Machines: SSH Port – 22
- Http: 80
- Https: 443
- MySQL ports: By default these are not open on Public Endpoints. MySQL :3306
3. To access Webmin interface for management please follow this link
Azure Step by Step Screenshots
Product Name
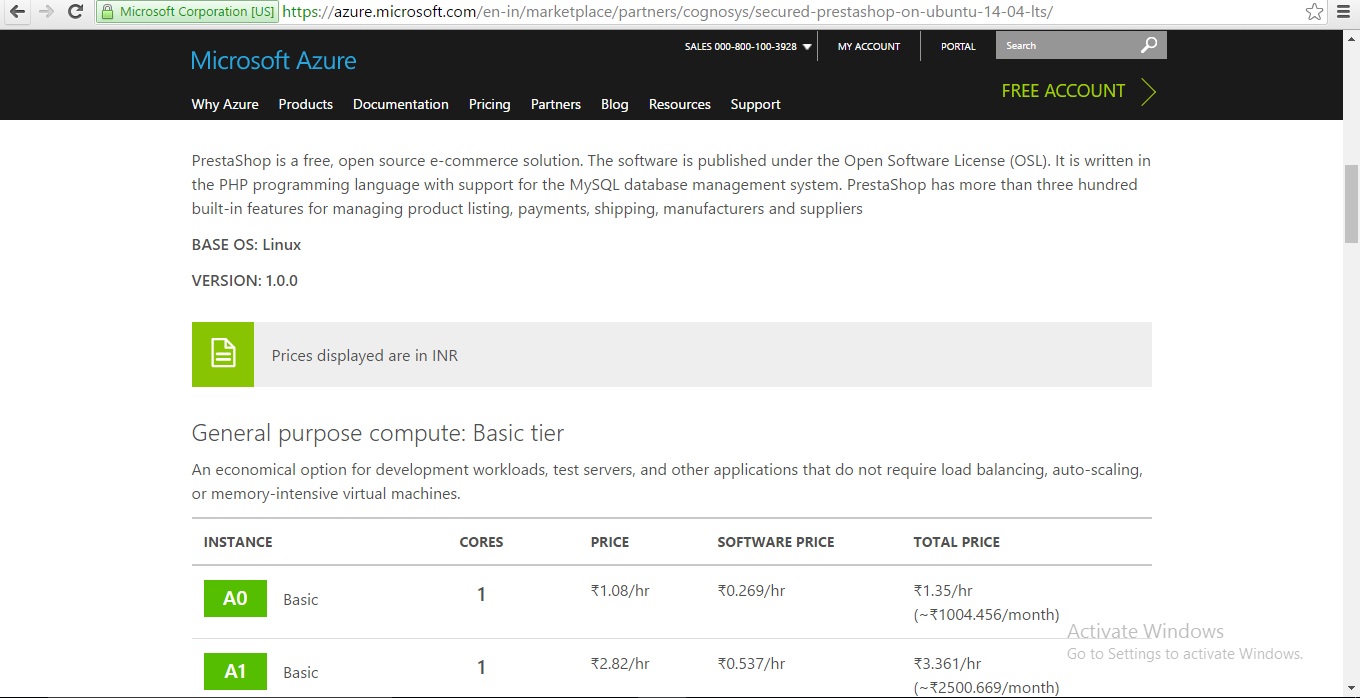
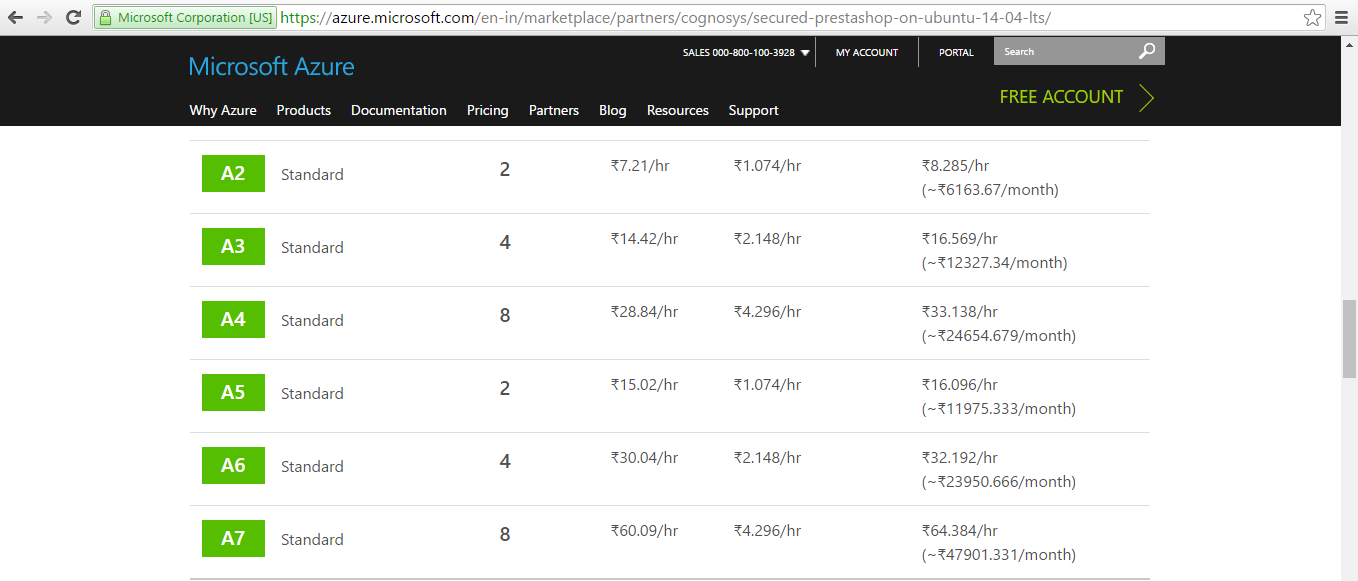
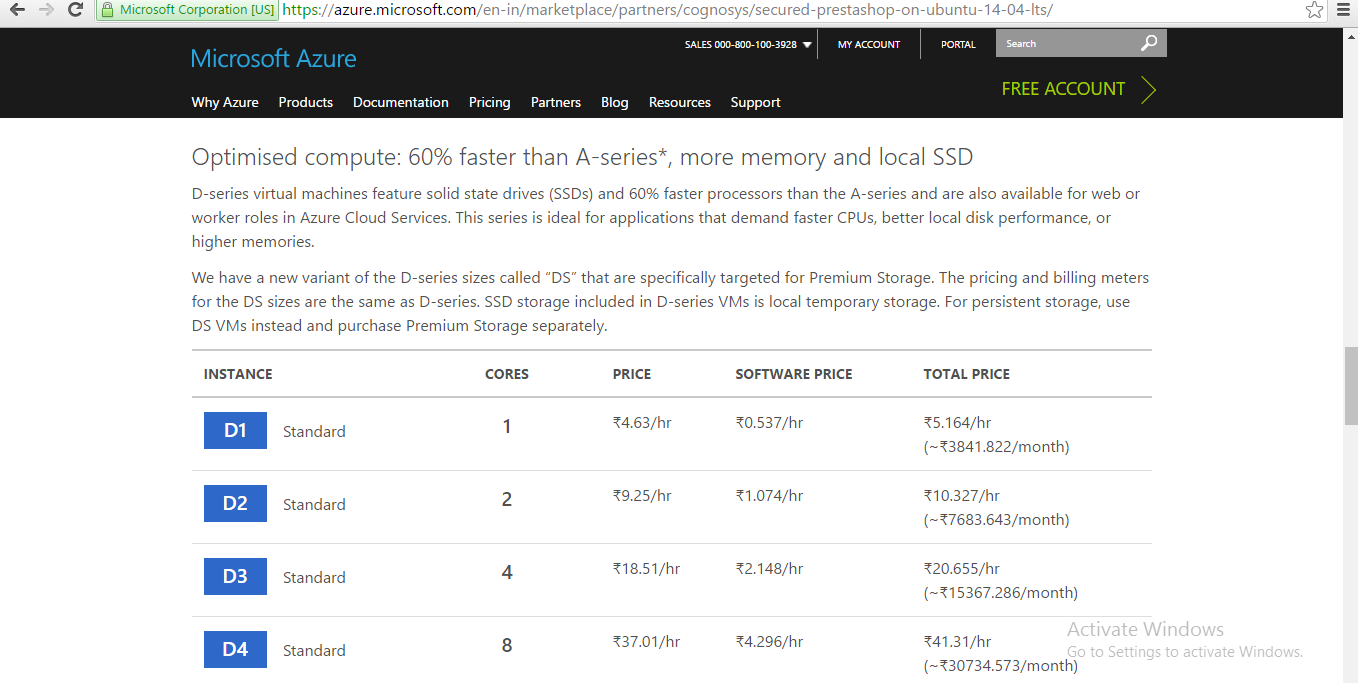
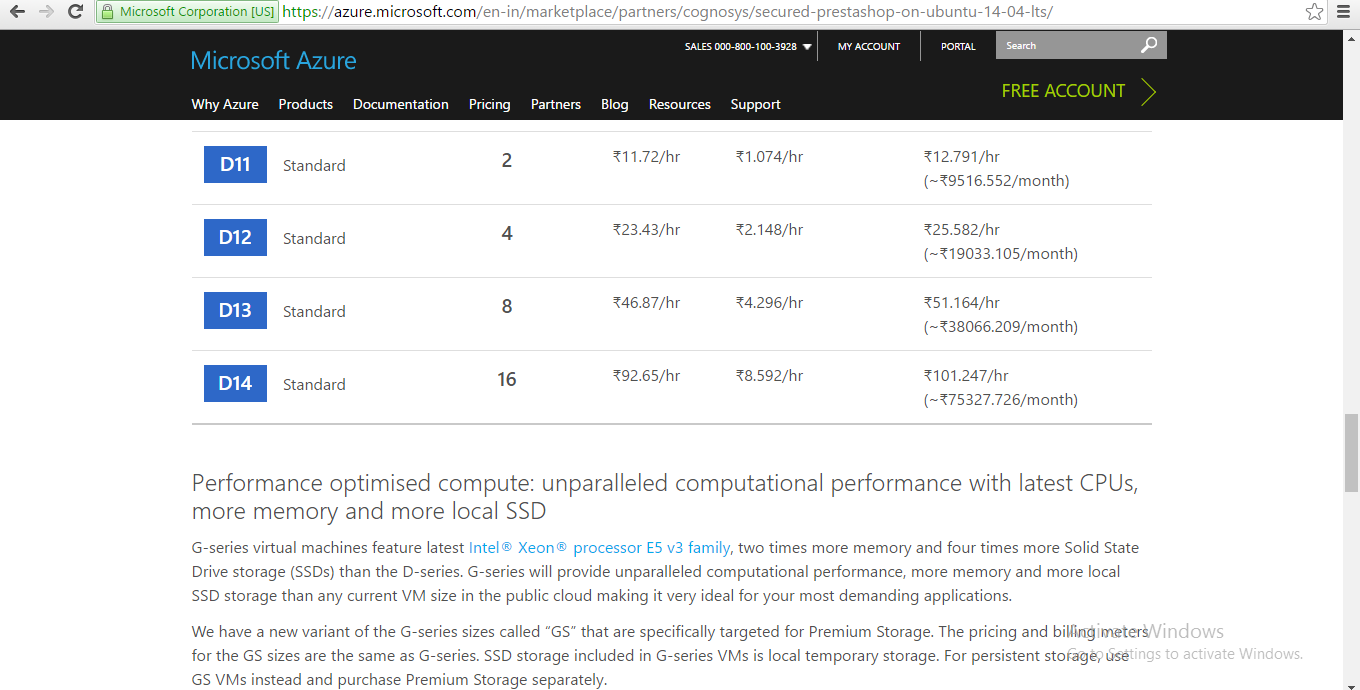
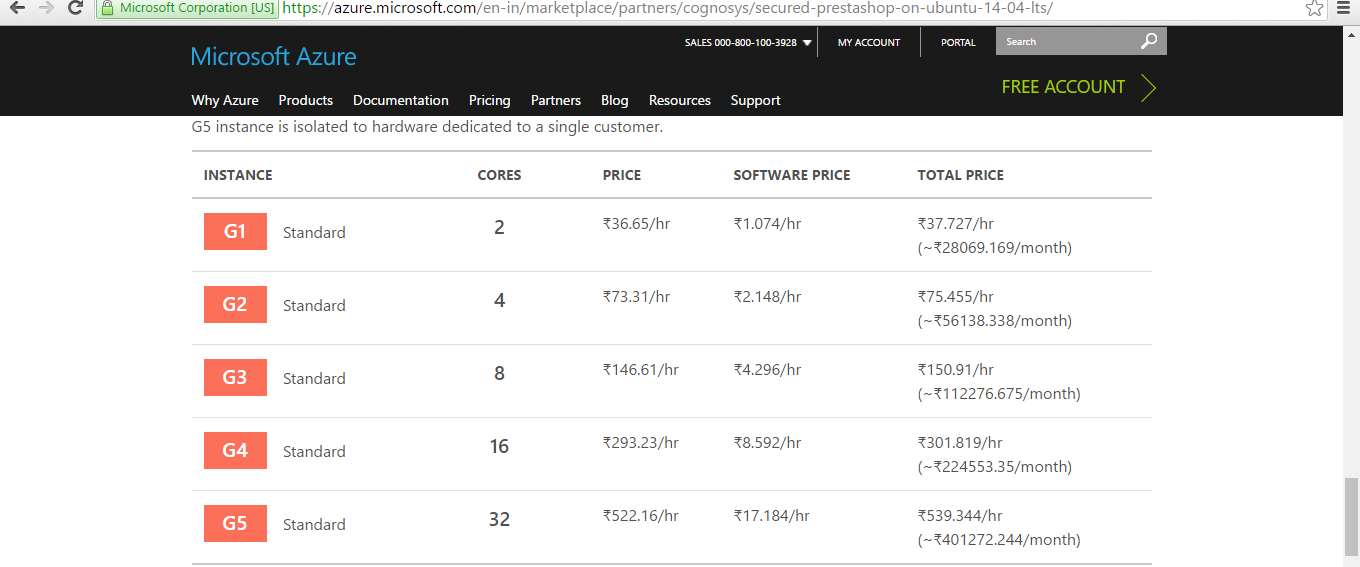
Pricing Details

Installation Instructions For Windows
Step 1) VM Creation:
1.Click the Launch on Compute Engine button to choose the hardware and network settings.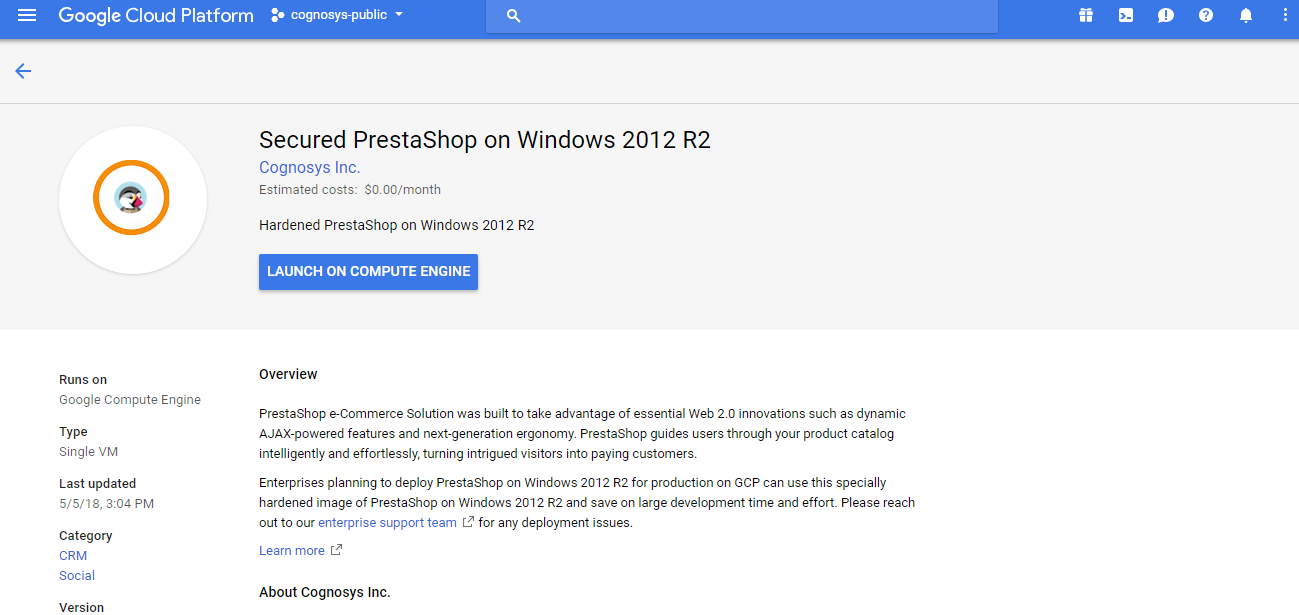
2.You can see at this page, an overview of Cognosys Image as well as some estimated costs of VM.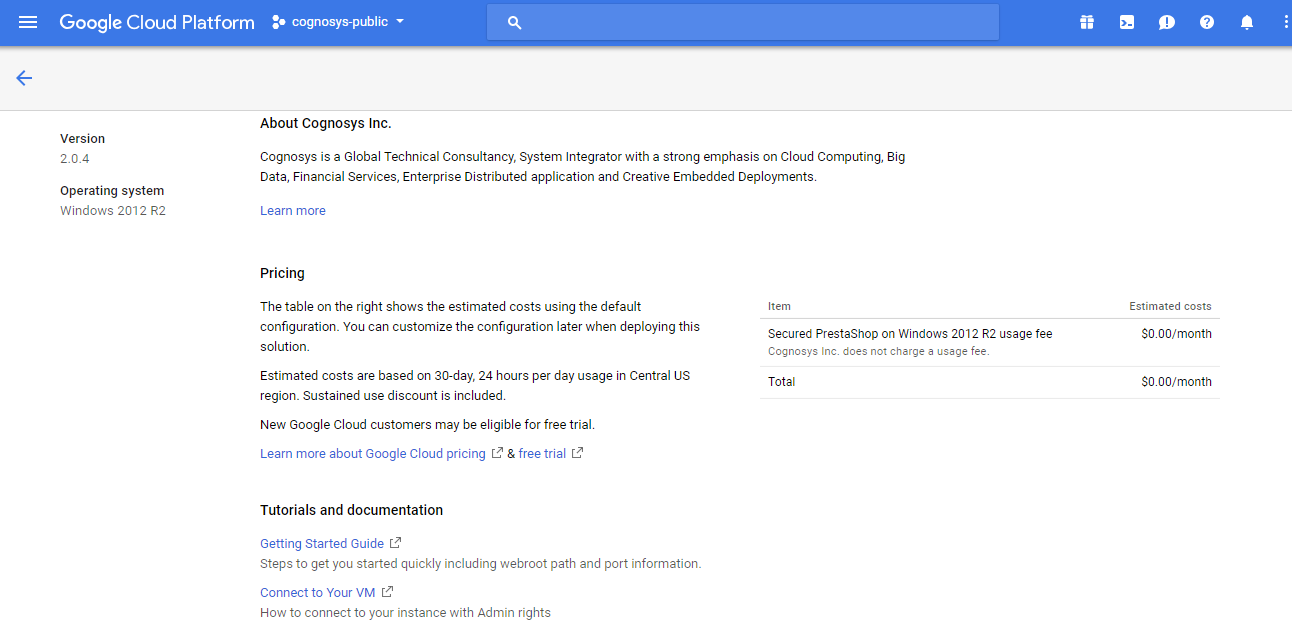
3.In the settings page, you can choose the number of CPUs and amount of RAM, the disk size and type etc.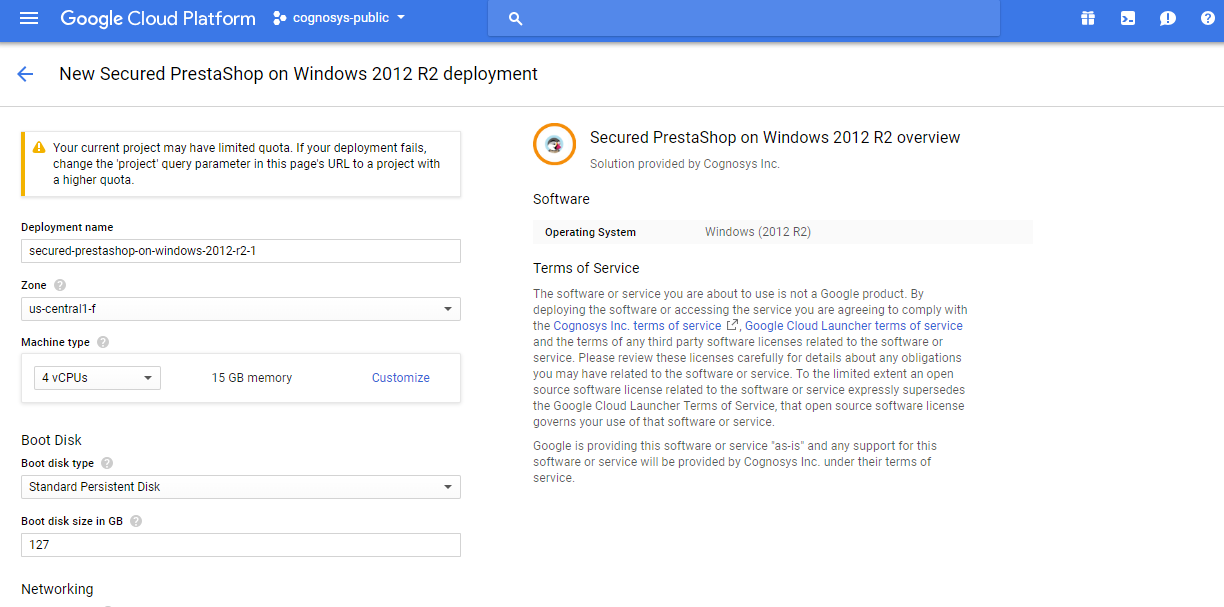
Step 2) RDP Connection: To initialize the DB Server connect to the deployed instance, Please follow Instructions to Connect to Windows instance on Google Cloud
Step 3) Database Login Details:
The below screen appears after successful deployment of the image.

For local MySQL root password, please use the temporary password generated automatically during image creation as shown above.
i) Please connect to Remote Desktop as given in step 2 to ensure stack is properly configured and DB is initialized.
ii) You can use MySQL server instance as localhost, username root and password as shown above.
If you have closed the deployment page you can also get the MySQL root password from VM Details “Custom metadata” Section
Step 4) Application URL: Access the application via a browser at http://PublicDNS/Prestashop
Step 5) Other Information:
1. Default installation path: will be on your web root folder “/var/www/html/Prestashop”
2.Default ports:
- Windows Machines: RDP Port : 3389
- Http: 80
- Https: 443
Videos
PrestaShop beginner tutorial 1 – Introduction to PrestaShop
