1-click AWS Deployment 1-click Azure Deployment
Overview
What is Node.js?
Node.js is an open-source, cross-platform runtime environment for developing server-side Web applications. Although Node.js is not a JavaScript framework,many of its basic modules are written in JavaScript and developers can write new modules in JavaScript. The runtime environment interprets JavaScript using Google’s V8 JavaScript engine.
The simplest definition of Node.js is that it is a Javascript run-time environment that helps in the execution of JavaScript code server-side. It is an open–source cross-platform JavaScript that helps in the development of real-time network application.
It offers the developers event-driven I/O APIs and asynchronous. It can also interpret JavaScript code via Google’s V8 JavaScript engine.
Moreover, it operates on a single threaded event based loop to make all executions non-blocking. However, you cannot consider Node.js as not a framework and it has nothing to do with the PHP, .NET or JAVA.
Node.js Process Model
In this section, we will learn about the Node.js process model and understand why we should use Node.js.
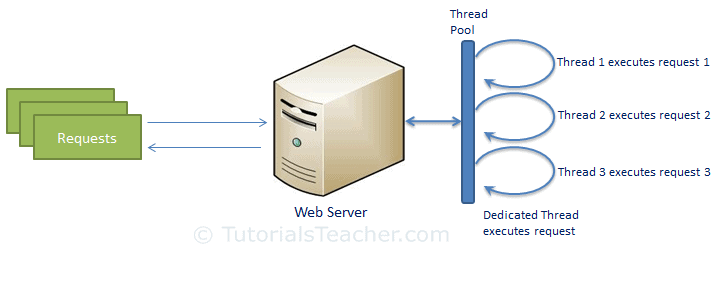
Traditional Web Server Model
In the traditional web server model, each request is handled by a dedicated thread from the thread pool. If no thread is available in the thread pool at any point of time then the request waits till the next available thread. Dedicated thread executes a particular request and does not return to thread pool until it completes the execution and returns a response.
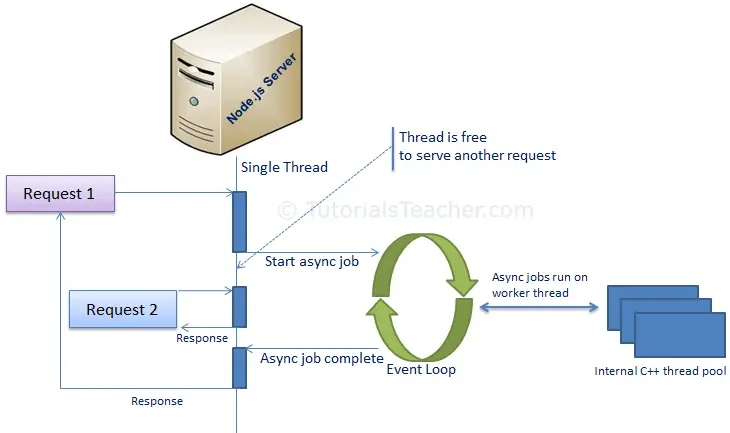
Node.js Process Model
Node.js processes user requests differently when compared to a traditional web server model. Node.js runs in a single process and the application code runs in a single thread and thereby needs less resources than other platforms. All the user requests to your web application will be handled by a single thread and all the I/O work or long running job is performed asynchronously for a particular request. So, this single thread doesn’t have to wait for the request to complete and is free to handle the next request. When asynchronous I/O work completes then it processes the request further and sends the response.
An event loop is constantly watching for the events to be raised for an asynchronous job and executing callback function when the job completes. Internally, Node.js uses libev for the event loop which in turn uses internal C++ thread pool to provide asynchronous I/O.
The following figure illustrates asynchronous web server model using Node.js.
Node.js process model increases the performance and scalability with a few caveats. Node.js is not fit for an application which performs CPU-intensive operations like image processing or other heavy computation work because it takes time to process a request and thereby blocks the single thread.
Setup Node.js Development Environment
In this section, you will learn about the tools required and steps to setup development environment to develop a Node.js application.
Node.js development environment can be setup in Windows, Mac, Linux and Solaris. The following tools/SDK are required for developing a Node.js application on any platform.
- Node.js
- Node Package Manager (NPM)
- IDE (Integrated Development Environment) or TextEditor
NPM (Node Package Manager) is included in Node.js installation since Node version 0.6.0., so there is no need to install it separately.
Install Node.js on Windows
Visit Node.js official web site https://nodejs.org. It will automatically detect OS and display download link as per your Operating System. For example, it will display following download link for 64 bit Windows OS.

Download node MSI for windows by clicking on 8.11.3 LTS or 10.5.0 Current button. We have used the latest version 10.5.0 for windows through out these tutorials.
After you download the MSI, double-click on it to start the installation as shown below.
Click Next to read and accept the License Agreement and then click Install. It will install Node.js quickly on your computer. Finally, click finish to complete the installation.
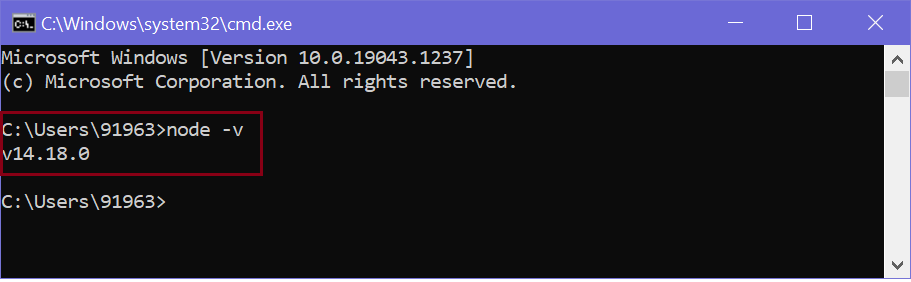
Verify Installation
Once you install Node.js on your computer, you can verify it by opening the command prompt and typing node -v. If Node.js is installed successfully then it will display the version of the Node.js installed on your machine, as shown below.
Install Node.js on Mac/Linux
Visit Node.js official web site https://nodejs.org/en/download page. Click on the appropriate installer for Mac (.pkg or .tar.gz) or Linux to download the Node.js installer.

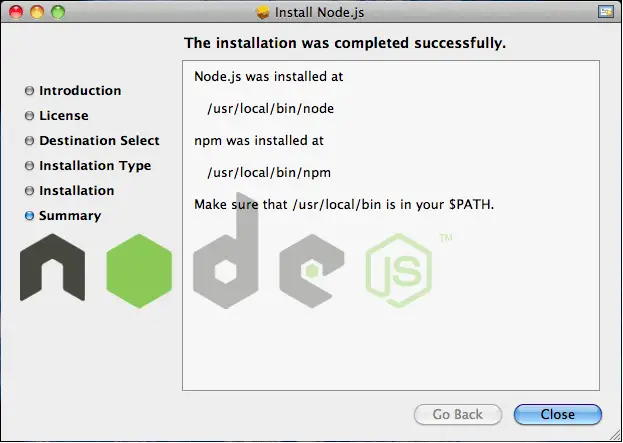
Once downloaded, click on the installer to start the Node.js installation wizard. Click on Continue and follow the steps. After successful installation, it will display summary of installation about the location where it installed Node.js and NPM.
After installation, verify the Node.js installation using terminal window and enter the following command. It will display the version number of Node.js installed on your Mac.
$ node -v
Optionally, for Mac or Linux users, you can directly install Node.js from the command line using Homebrew package manager for Mac OS or Linuxbrew package manager for Linux Operating System. For Linux, you will need to install additional dependencies, viz. Ruby version 1.8.6 or higher and GCC version 4.2 or higher before installing node.
$ brew install node
IDE
Node.js application uses JavaScript to develop an application. So, you can use any IDE or texteditor tool that supports JavaScript syntax. However, an IDE that supports auto complete features for Node.js API is recommended e.g. Visual Studio, Sublime text, Eclipse, Aptana etc.
Node.js Local Module
Local modules are modules created locally in your Node.js application. These modules include different functionalities of your application in separate files and folders. You can also package it and distribute it via NPM, so that Node.js community can use it. For example, if you need to connect to MongoDB and fetch data then you can create a module for it, which can be reused in your application.
Writing Simple Module
Let’s write simple logging module which logs the information, warning or error to the console.
In Node.js, module should be placed in a separate JavaScript file. So, create a Log.js file and write the following code in it.
var log = {
            info: function (info) {
                console.log('Info: ' + info);
            },
            warning:function (warning) {
                console.log('Warning: ' + warning);
            },
            error:function (error) {
                console.log('Error: ' + error);
            }
    };

module.exports = log
In the above example of logging module, we have created an object with three functions – info(), warning() and error(). At the end, we have assigned this object to module.exports. The module.exports in the above example exposes a log object as a module.
The module.exports is a special object which is included in every JS file in the Node.js application by default. Use module.exports or exports to expose a function, object or variable as a module in Node.js.
Now, let’s see how to use the above logging module in our application.
Loading Local Module
To use local modules in your application, you need to load it using require() function in the same way as core module. However, you need to specify the path of JavaScript file of the module.
The following example demonstrates how to use the above logging module contained in Log.js.
var myLogModule = require('./Log.js');

myLogModule.info('Node.js started');
In the above example, app.js is using log module. First, it loads the logging module using require() function and specified path where logging module is stored. Logging module is contained in Log.js file in the root folder. So, we have specified the path ‘./Log.js’ in the require() function. The ‘.’ denotes a root folder.
The require() function returns a log object because logging module exposes an object in Log.js using module.exports. So now you can use logging module as an object and call any of its function using dot notation e.g myLogModule.info() or myLogModule.warning() or myLogModule.error()
Run the above example using command prompt (in Windows) as shown below.
C:\> node app.js
Info: Node.js started
Node.js Module
Module in Node.js is a simple or complex functionality organized in single or multiple JavaScript files which can be reused throughout the Node.js application.
Each module in Node.js has its own context, so it cannot interfere with other modules or pollute global scope. Also, each module can be placed in a separate .js file under a separate folder.
Node.js implements CommonJS modules standard. CommonJS is a group of volunteers who define JavaScript standards for web server, desktop, and console application.
Node.js Module Types
Node.js includes three types of modules:
- Core Modules
- Local Modules
- Third Party Modules
Node.js Core Modules
Node.js is a light weight framework. The core modules include bare minimum functionalities of Node.js. These core modules are compiled into its binary distribution and load automatically when Node.js process starts. However, you need to import the core module first in order to use it in your application.
The following table lists some of the important core modules in Node.js.
| Core Module | Description |
|---|---|
| http | http module includes classes, methods and events to create Node.js http server. |
| url | url module includes methods for URL resolution and parsing. |
| querystring | querystring module includes methods to deal with query string. |
| path | path module includes methods to deal with file paths. |
| fs | fs module includes classes, methods, and events to work with file I/O. |
| util | util module includes utility functions useful for programmers. |
Loading Core Modules
In order to use Node.js core or NPM modules, you first need to import it using require() function as shown below.
var module = require('module_name');
As per above syntax, specify the module name in the require() function. The require() function will return an object, function, property or any other JavaScript type, depending on what the specified module returns.
The following example demonstrates how to use Node.js http module to create a web server.
var http = require('http');

var server = http.createServer(function(req, res){

  //write code here

});

server.listen(5000);
In the above example, require() function returns an object because http module returns its functionality as an object, you can then use its properties and methods using dot notation e.g. http.createServer().
Node.js Basics
Node.js supports JavaScript. So, JavaScript syntax on Node.js is similar to the browser’s JavaScript syntax.
Visit JavaScript section to learn about JavaScript syntax in detail.
Primitive Types
Node.js includes following primitive types:
- String
- Number
- Boolean
- Undefined
- Null
- RegExp
Everything else is an object in Node.js.
Loose Typing
JavaScript in Node.js supports loose typing like the browser’s JavaScript. Use var keyword to declare a variable of any type.
Object Literal
Object literal syntax is same as browser’s JavaScript.
var obj = {
    authorName: 'Ryan Dahl',
    language: 'Node.js'
}
Functions
Functions are first class citizens in Node’s JavaScript, similar to the browser’s JavaScript. A function can have attributes and properties also. It can be treated like a class in JavaScript.
function Display(x) {
    console.log(x);
}

Display(100);
Buffer
Node.js includes an additional data type called Buffer (not available in browser’s JavaScript). Buffer is mainly used to store binary data, while reading from a file or receiving packets over the network.
process object
Each Node.js script runs in a process. It includes process object to get all the information about the current process of Node.js application.
The following example shows how to get process information in REPL using process object.
> process.execPath
‘C:\\Program Files\\nodejs\\node.exe’
> process.pid
1652
> process.cwd()
‘C:\\’
Defaults to local
Node’s JavaScript is different from browser’s JavaScript when it comes to global scope. In the browser’s JavaScript, variables declared without var keyword become global. In Node.js, everything becomes local by default.
Access Global Scope
In a browser, global scope is the window object. In Node.js, global object represents the global scope.
To add something in global scope, you need to export it using export or module.export. The same way, import modules/object using require() function to access it from the global scope.
For example, to export an object in Node.js, use exports.name = object.
exports.log = {
    console: function(msg) {
        console.log(msg);
    },
    file: function(msg) {
        // log to file here
      }
}
Now, you can import log object using require() function and use it anywhere in your Node.js project.
Node.js Console – REPL
Node.js comes with virtual environment called REPL (aka Node shell). REPL stands for Read-Eval-Print-Loop. It is a quick and easy way to test simple Node.js/JavaScript code.
To launch the REPL (Node shell), open command prompt (in Windows) or terminal (in Mac or UNIX/Linux) and type node as shown below. It will change the prompt to > in Windows and MAC.

You can now test pretty much any Node.js/JavaScript expression in REPL. For example, if your write “10 + 20” then it will display result 30 immediately in new line.
> 10 + 20
30
The + operator also concatenates strings as in browser’s JavaScript.
> “Hello” + “World”
Hello World
You can also define variables and perform some operation on them.
> var x = 10, y = 20;
> x + y
30
If you need to write multi line JavaScript expression or function then just press Enter whenever you want to write something in the next line as a continuation of your code. The REPL terminal will display three dots (…), it means you can continue on next line. Write .break to get out of continuity mode.
For example, you can define a function and execute it as shown below.

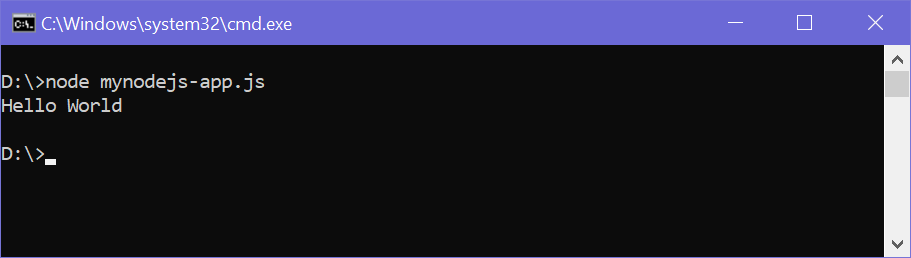
You can execute an external JavaScript file by writing node fileName command. For example, assume that node-example.js is on C drive of your PC with following code.
console.log("Hello World");
Now, you can execute node-exampel.js from command prompt as shown below.
To exit from the REPL terminal, press Ctrl + C twice or write .exit and press Enter.

Thus, you can execute any Node.js/JavaScript code in the node shell (REPL). This will give you a result which is similar to the one you will get in the console of Google Chrome browser.
The following table lists important REPL commands.
| REPL Command | Description |
|---|---|
| .help | Display help on all the commands |
| tab Keys | Display the list of all commands. |
| Up/Down Keys | See previous commands applied in REPL. |
| .save filename | Save current Node REPL session to a file. |
| .load filename | Load the specified file in the current Node REPL session. |
| ctrl + c | Terminate the current command. |
| ctrl + c (twice) | Exit from the REPL. |
| ctrl + d | Exit from the REPL. |
| .break | Exit from multiline expression. |
| .clear | Exit from multiline expression. |
Node.js Web Server
In this section, we will learn how to create a simple Node.js web server and handle HTTP requests.
To access web pages of any web application, you need a web server. The web server will handle all the http requests for the web application e.g IIS is a web server for ASP.NET web applications and Apache is a web server for PHP or Java web applications.
Node.js provides capabilities to create your own web server which will handle HTTP requests asynchronously. You can use IIS or Apache to run Node.js web application but it is recommended to use Node.js web server.
Create Node.js Web Server
Node.js makes it easy to create a simple web server that processes incoming requests asynchronously.
The following example is a simple Node.js web server contained in server.js file.
var http = require('http'); // 1 - Import Node.js core module

var server = http.createServer(function (req, res) {   // 2 - creating server

    //handle incomming requests here..

});

server.listen(5000); //3 - listen for any incoming requests

console.log('Node.js web server at port 5000 is running..')
In the above example, we import the http module using require() function. The http module is a core module of Node.js, so no need to install it using NPM. The next step is to call createServer() method of http and specify callback function with request and response parameter. Finally, call listen() method of server object which was returned from createServer() method with port number, to start listening to incoming requests on port 5000. You can specify any unused port here.
Run the above web server by writing node server.js command in command prompt or terminal window and it will display message as shown below.
C:\> node server.js
Node.js web server at port 5000 is running..
This is how you create a Node.js web server using simple steps. Now, let’s see how to handle HTTP request and send response in Node.js web server.
Handle HTTP Request
The http.createServer() method includes request and response parameters which is supplied by Node.js. The request object can be used to get information about the current HTTP request e.g., url, request header, and data. The response object can be used to send a response for a current HTTP request.
The following example demonstrates handling HTTP request and response in Node.js.
var http = require('http'); // Import Node.js core module

var server = http.createServer(function (req, res) {   //create web server
    if (req.url == '/') { //check the URL of the current request

        // set response header
        res.writeHead(200, { 'Content-Type': 'text/html' });

        // set response content
        res.write('<html><body><p>This is home Page.</p></body></html>');
        res.end();

    }
    else if (req.url == "/student") {

        res.writeHead(200, { 'Content-Type': 'text/html' });
        res.write('<html><body><p>This is student Page.</p></body></html>');
        res.end();

    }
    else if (req.url == "/admin") {

        res.writeHead(200, { 'Content-Type': 'text/html' });
        res.write('<html><body><p>This is admin Page.</p></body></html>');
        res.end();

    }
    else
        res.end('Invalid Request!');

});

server.listen(5000); //6 - listen for any incoming requests

console.log('Node.js web server at port 5000 is running..')
In the above example, req.url is used to check the url of the current request and based on that it sends the response. To send a response, first it sets the response header using writeHead() method and then writes a string as a response body using write() method. Finally, Node.js web server sends the response using end() method.
Now, run the above web server as shown below.
C:\> node server.js
Node.js web server at port 5000 is running..
To test it, you can use the command-line program curl, which most Mac and Linux machines have pre-installed.
curl -i http://localhost:5000
You should see the following response.
HTTP/1.1 200 OK
Content-Type: text/plain
Date: Tue, 8 Sep 2015 03:05:08 GMT
Connection: keep-alive
This is home page.
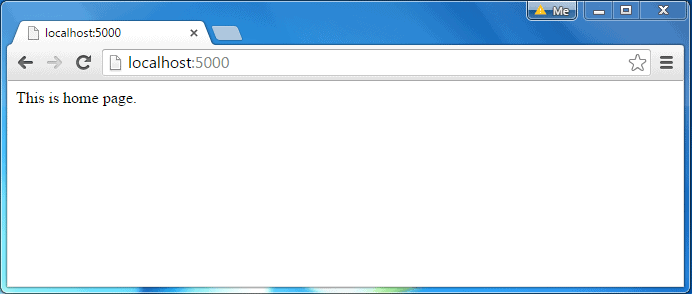
For Windows users, point your browser to http://localhost:5000 and see the following result.
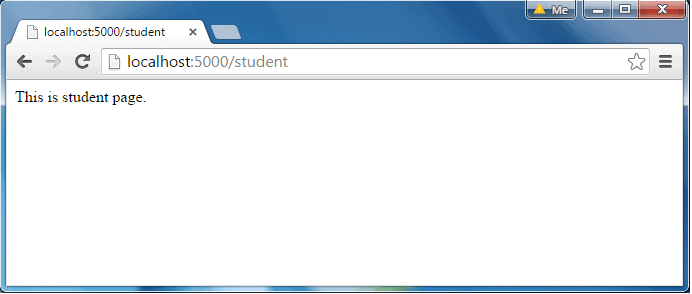
The same way, point your browser to http://localhost:5000/student and see the following result.
It will display “Invalid Request” for all requests other than the above URLs.
Sending JSON Response
The following example demonstrates how to serve JSON response from the Node.js web server.
var http = require('http');

var server = http.createServer(function (req, res) {

    if (req.url == '/data') { //check the URL of the current request
            res.writeHead(200, { 'Content-Type': 'application/json' });
            res.write(JSON.stringify({ message: "Hello World"}));
            res.end();
    }
});

server.listen(5000);

console.log('Node.js web server at port 5000 is running..')
Debug Node.js Application
In this section, you will learn ways to debug Node.js application.
You can debug Node.js application using various tools including following:
- Core Node.js debugger
- Node Inspector
- Built-in debugger in IDEs
Core Node.js Debugger
Node.js provides built-in non-graphic debugging tool that can be used on all platforms. It provides different commands for debugging Node.js application.
Consider the following simple Node.js application contained in app.js file.
var fs = require('fs');

fs.readFile('test.txt', 'utf8', function (err, data) {

    debugger;

    if (err) throw err;

    console.log(data);
});
Write debugger in your JavaScript code where you want debugger to stop. For example, we want to check the “data” parameter in the above example. So, write debugger; inside callback function as above.
Now, to debug the above application, run the following command.
node debug app.js
The above command starts the debugger and stops at the first line as shown below.
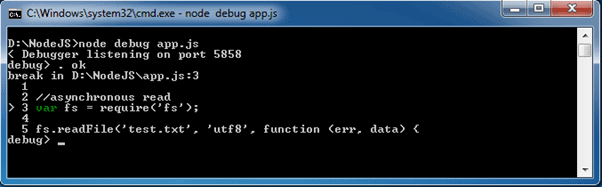
As you can see in the above figure, > symbol indicates the current debugging statement.
Use next to move on the next statement.
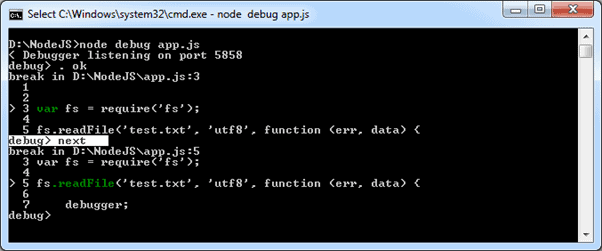
In the above figure, next command will set the debugger on the next line. The > is now pointing to next statement.
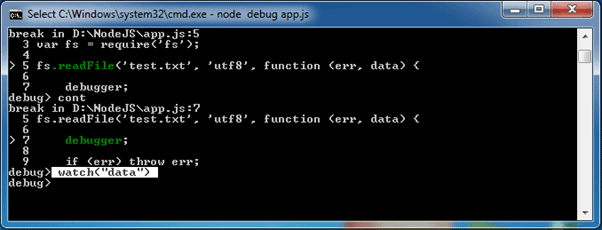
Use cont to stop the execution at next “debugger”, if any.
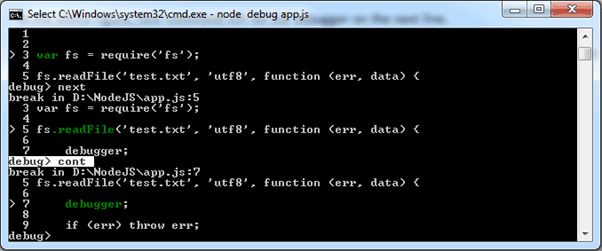
In the above figure, you can see that cont command stops at the “debugger”.
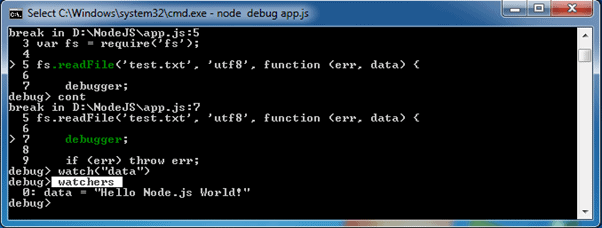
Use watch(‘expression’) command to add the variable or expression whose value you want to check. For example, to check the value of data variable in the above example, add data into watch expression as shown below.
Now, write watchers command to check the value of all the variables added into watch().
The following table lists important debugging commands:
| Command | Description |
|---|---|
| next | Stop at the next statement. |
| cont | Continue execute and stop at the debugger statement if any. |
| step | Step in function. |
| out | Step out of function. |
| watch | Add the expression or variable into watch. |
| watcher | See the value of all expressions and variables added into watch. |
| Pause | Pause running code. |
Thus, you can use built-in Node.js debugger to debug your Node.js application. Visit Node.js official documentation to know all the Node.js debugging commands or write “help” in debug mode in the Node.js console (REPL).
Node Inspector
In this section, we will use node inspector tool to debug a simple Node.js application contained in app.js file.
var fs = require('fs');

fs.readFile('test.txt', 'utf8', function (err, data) {

    debugger;

    if (err) throw err;

    console.log(data);
});
Node inspector is GUI based debugger. Install Node Inspector using NPM in the global mode by writing the following command in the terminal window (in Mac or Linux) or command prompt (in Windows).
npm install -g node-inspector
After installing run it using node-inspector command as shown below.
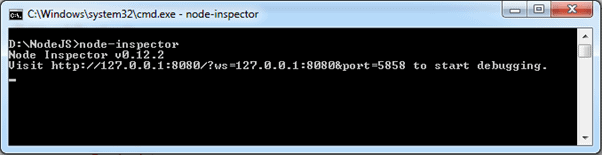
As you can see in the above figure, it will display an URL for debugging purpose. So, point your browser to http://127.0.0.1:8080/?ws=127.0.0.1:8080&port=5858 and start debugging. Sometimes, port 8080 might not be available on your computer. So you will get the following error.
Cannot start the server at 0.0.0.0:8080. Error: listen EACCES.
In this case, start the node inspector on a different port using the following command.
D:\>node-inspector –web-port=5500
Now, open Google Chrome browser and enter the URL.

Now, open another terminal window or command prompt in Windows and start debugging using the following command.
> node –debug-brk app.js
Refresh the browser and you will see that it stops at the first line of the program as shown below.
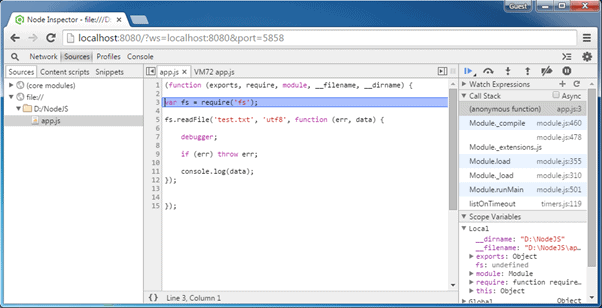
Now, debug the program as a normal program in Chrome developer tool. Also, use watch expression on the right pane or hover the cursor on the variable to see the value as shown below.

In this way, Node Inspector can be used to debug in Windows or MAC OS.
How to Install Node.js and NPM on Windows
Step 1: Download Node.js Installer
In a web browser, navigate to https://nodejs.org/en/download/. Click the Windows Installer button to download the latest default version. At the time this article was written, version 10.16.0-x64 was the latest version. The Node.js installer includes the NPM package manager.

Note: There are other versions available. If you have an older system, you may need the 32-bit version. You can also use the top link to switch from the stable LTS version to the current version. If you are new to Node.js or don’t need a specific version, choose LTS.
Step 2: Install Node.js and NPM from Browser
1. Once the installer finishes downloading, launch it. Open the downloads link in your browser and click the file. Or, browse to the location where you have saved the file and double-click it to launch.
2. The system will ask if you want to run the software – click Run.
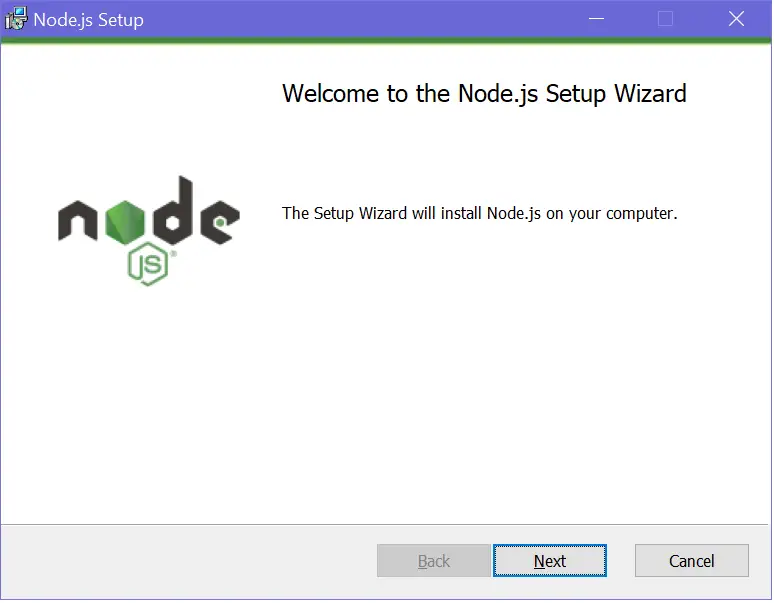
3. You will be welcomed to the Node.js Setup Wizard – click Next.
4. On the next screen, review the license agreement. Click Next if you agree to the terms and install the software.
5. The installer will prompt you for the installation location. Leave the default location, unless you have a specific need to install it somewhere else – then click Next.
6. The wizard will let you select components to include or remove from the installation. Again, unless you have a specific need, accept the defaults by clicking Next.
7. Finally, click the Install button to run the installer. When it finishes, click Finish.
Step 3: Verify Installation
Open a command prompt (or PowerShell), and enter the following:
node –vThe system should display the Node.js version installed on your system. You can do the same for NPM:
npm –v
How to Update Node.js and NPM on Windows
The easiest way to update Node.js and NPM is to download the latest version of the software. On the Node.js download page, right below the Windows Installer link, it will display the latest version. You can compare this to the version you have installed.
To upgrade, download the installer and run it. The setup wizard will overwrite the old version, and replace it with the new version.
How to Uninstall Node.js and NPM on Windows
You can uninstall Node.js from the Control Panel in Windows.
To do so:
- Click the Start button > Settings (gear icon) > Apps.
- Scroll down to find Node.js and click to highlight.
- Select Uninstall. This launches a wizard to uninstall the software.
Basic Node.js Usage
Node.js is a framework, which means that it doesn’t work as a normal application. Instead, it interprets commands that you write. To test your new Node.js installation, create a Hello World program.
1. Start by launching Windows PowerShell as an administrator.
2. At the prompt, enter the following:
notebook c:\Users\<your_username>\myprogram.jsReplace your_username with your actual Windows username. The system will tell you the file doesn’t exist, and ask you to create it – click Yes.
3. Next, copy and paste the following into the text editor you’ve just opened:
var http = require('http');
 http.createServer(function (req, res) {
   res.writeHead(200, {'Content-Type': 'text/html'});
   res.end('Hello World!');
 }).listen(8080);
4. Save the file, then exit. Switch back to PowerShell, and enter the following:
node \users\<your_username>\myprogram.jsIt will look like nothing has happened. In reality, your program is running – your system is now a server. You may see a Windows Defender notice about allowing traffic – for now, click Allow.
5. Next, open a web browser, and enter the following into the address bar:
http://localhost:8080In the very upper-left corner, you should see the text Hello World!
Right now, your computer is acting like a server. Any other computer that tries to access your system on port 8080 will see the Hello World notice.
To turn off the program, switch back to PowerShell and press Ctrl+C. The system will switch back to a command prompt. You can close this window whenever you are ready.
PHP is a server-side scripting language designed for web development but also used as a general-purpose programming language. PHP code may be embedded into HTML code, or it can be used in combination with various web template systems, web content management system and web frameworks. PHP code is usually processed by a PHP interpreter implemented as amodule in the web server or as a Common Gateway Interface (CGI) executable. The web server combines the results of the interpreted and executed PHP code, which may be any type of data, including images, with the generated web page. PHP code may also be executed with a command-line interface (CLI) and can be used to implement standalone graphical applications.
What You Can Do with PHP
There are lot more things you can do with PHP.
- You can generate pages and files dynamically.
- You can create, open, read, write and close files on the server.
- You can collect data from a web form such as user information, email, phone no, etc.
- You can send emails to the users of your website.
- You can send and receive cookies to track the visitor of your website.
- You can store, delete, and modify information in your database.
- You can restrict unauthorized access to your website.
- You can encrypt data for safe transmission over internet.
The list does not end here, there are many other interesting things that you can do with PHP. You will learn about all of them in detail in upcoming chapters.
Advantages of PHP over Other Languages
If you’re familiar with other server-side languages like ASP.NET or Java, you might be wondering what makes PHP so special. There are several advantages why one should choose PHP.
- Easy to learn:PHP is easy to learn and use. For beginner programmers who just started out in web development, PHP is often considered as the preferable choice of language to learn.
- Open source:PHP is an open-source project. It is developed and maintained by a worldwide community of developers who make its source code freely available to download and use.
- Portability:PHP runs on various platforms such as Microsoft Windows, Linux, Mac OS, etc. and it is compatible with almost all servers used today such Apache, IIS, etc.
- Fast Performance:Scripts written in PHP usually execute or runs faster than those written in other scripting languages like ASP, Ruby, Python, Java, etc.
- Vast Community:Since PHP is supported by the worldwide community, finding help or documentation related to PHP online is extremely easy.
Internet Information Services (IIS, formerly Internet Information Server) is an extensible web server created by Microsoft for use with Windows NT family.IIS supports HTTP, HTTPS, FTP, FTPS, SMTP and NNTP. It has been an integral part of the Windows NT family since Windows NT 4.0, though it may be absent from some editions (e.g. Windows XP Home edition), and is not active by default.
Internet Information Services (IIS) 7 and later provide a request-processing architecture which includes:
- The Windows Process Activation Service (WAS), which enables sites to use protocols other than HTTP and HTTPS.
- A Web server engine that can be customized by adding or removing modules.
- Integrated request-processing pipelines from IIS and ASP.NET.
Components in IIS
IIS contains several components that perform important functions for the application and Web server roles in Windows Server® 2008 (IIS 7.0) and Windows Server 2008 R2 (IIS 7.5). Each component has responsibilities, such as listening for requests made to the server, managing processes, and reading configuration files. These components include protocol listeners, such as HTTP.sys, and services, such as World Wide Web Publishing Service (WWW service) and Windows Process Activation Service (WAS).
IIS Architecture
IIS has two main layers – Kernel Mode and User Mode. The Kernel Mode contains the HTTP.SYS and User Mode contains WAS and W3 service. The subsection of both are shown in fig
IIS is a web server that runs on the Microsoft .NET platform on the Windows OS. While it’s possible to run IIS on Linux and Macs using Mono, it’s not recommended and will likely be unstable. (There are other options, which I’ll present later). It’s versatile and stable, and it’s been widely used in production for many years. Version 10 is the most current. Once it’s installed you’ll see this welcome page in your browser. “Tervetuloa!”
But before we dig into the nitty-gritty of IIS, let’s start by defining a web server in a general sense.
Steps to Install PHP manually on Windows 2016 server
REQUIREMENTS
- Virtual Machine
- IIS Web Server
- WinCache Extension for PHP
- PHP Binary Files
- VC++ Compiler
INSTALLING IIS
- Open the Windows PowerShell and type the below command to install IIS service with CGI extension.
Install-WindowsFeature -name web-server,web-cgi –IncludeManagementTools
![]()
![]()
- It will take few minutes to complete the installation.


- Once the installation is completed, verify the CGI feature was installed in the server using the below command.
Get-WindowsFeature web-cgi

INSTALLING PHP
- Go to the below URL to download the PHP 7.1 version.
http://windows.php.net/download/

- Extract the ZIP file to C:\program files folder.

- There will be two PHP.ini files are available in that folder. Rename the php-.ini-development to php.ini.

- Open the php.ini file Add the following line at the end of the file.
extension=php_wincache.dll

- Save and close the php.ini file.
- Right-click on the windows start menu and click on system.

- Click on Advanced system settings.

- Click on Environment Variables.

- Under System Variables, select path variable and click on Edit.

- Click on New button and add the PHP binary path.

- Click OK thrice to close the system properties window.
INSTALL WINCACHE EXTENSION
- Browse the below URL to download the Wincache extension for PHP.
https://www.iis.net/downloads/microsoft/wincache-extension

- Scroll down and download WinCache 2.0 for PHP 7.1 under download section.

Note : In this demo, we are installing PHP 7.1, so we are downloading corresponding wincache version
- Once you download, double-click on the wincache-2.0.0.8-dev-7.1-nts-vc14-x64.exe file and extract the files to a folder.


- Copy the php.wincache.dll file to C:\Program Files\php-7.1\ext folder.

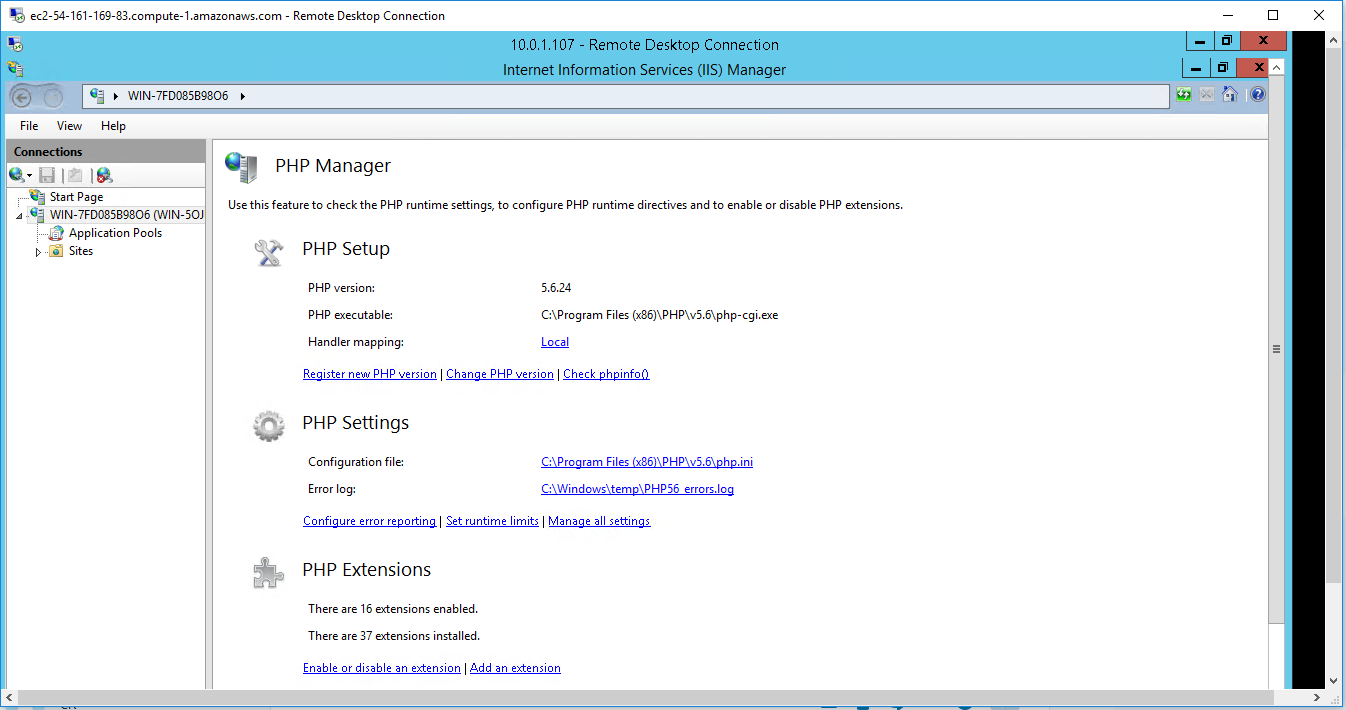
CONFIGURE PHP IN IIS
- Open IIS snap-in and click on the server name.

- Double click on Handler Mappings icon.

- Click on Add Module Mapping… under actions menu.

- Provide the below information as shown below. And click on Request Restrictions, under Mapping make sure you have select the File or Folder button.

- Click OK twice to close configuration window. Now the PHP will be listed under Handler Mappings List.

Hardened Node.js PHP IIS on Windows server
Features
Major Features of PHP
- HTTP authentication with PHP
- Cookies
- Sessions
- Dealing with XForms
- Handling file uploads
- POST method uploads
- Error Messages Explained
- Common Pitfalls
- Uploading multiple files
- PUT method support
- Using remote files
- Connection handling
- Persistent Database Connections
- Safe Mode
- Security and Safe Mode
- Functions restricted/disabled by safe mode
- Command line usage — Using PHP from the command line
- Introduction
- Differences to other SAPIs
- Options — Command line options
- Usage — Executing PHP files
- I/O streams — Input/output streams
- Interactive shell
- Built-in web server
- INI settings
- Garbage Collection
- Reference Counting Basics
- Collecting Cycles
- Performance Considerations
- DTrace Dynamic Tracing
- Introduction to PHP and DTrace
- Using PHP and DTrace
- Using SystemTap with PHP DTrace Static Probes
**Major Features of Nodejs
1. Node.js offers an Easy Scalability
One of the key advantages of Node.js is that developers find it easy to scale the applications in horizontal as well as the vertical directions. The applications can be scaled in horizontal manner by the addition of additional nodes to the existing system.
Moreover, Node.js also offers you the option of adding extra resources to the single nodes during the vertical scaling of the application. So, it is highly scalable and provides better option than other JavaScript servers.
2. Easy to Learn
Since JavaScript is one of the most popular programming languages, most of the front-end developers have a good grasp over it.
It becomes much easier for them to start using the Node.js at the backend. It is easier to learn Node.js and consumes less time to work with it.
3. Node.js is used as a Single Programming Language
Node.js offers the developers the luxury of writing the server-side applications in the JavaScript. This allows the Node.js developers to write both the front-end as well as the back-end web application in JavaScript using a runtime environment.
And they don’t need to use any other server-side programming language. It also makes the deployment of the web applications simpler because almost all the web browsers support JavaScript.
4. The Benefit of Fullstack JS
Node.js has been regarded as a full-stack JavaScript for serving both the client and the server-side applications.
Therefore, the advantage is that you don’t have to hire separate developers for backend as well as the front-end development. It saves both your valuable money and time.
5. Known for Offering High Performance
It has been mentioned earlier that Node.js interprets the JavaScript code via Google’s V8 JavaScript engine. This engine complies the JavaScript code directly into the machine code. This makes it easier and faster to implement the code in a effective manner.
The speed of the code execution also enhanced by runtime environment as it supports the non-blocking I/O operations.
6. The Support of Large and Active Community
Node.js is blessed to have a large and active community of developers who keep on continuously contributing towards its further development and improvement.
In fact, the groups of developers are well supported by the JavaScript programmers providing ready-made and easy solutions and codes in GitHub. It is expected that the developers will initiate many further developers in the future.
7. The Advantage of Caching
The open-source runtime environment of the Node.js also provides the facility of caching single modules. Whenever there is any request for the first module, it gets cached in the application memory.
The developers don’t have to re-execute the codes as caching allows applications to load the web pages faster and responds more swiftly to the user.
8. Offers the Freedom to Develop Apps
Another advantage that Node.js offers to the developers is the freedom to develop the apps and software.
This is one essential feature, which remains absent in Ruby on Rails imposing certain guidelines. You can begin everything from the scratch while developing applications.
9. Getting Support for Commonly Used Tools
With Node.js, the developers can get an extended support for the various commonly used tools. Let’s take an example. Suppose, you want to test the source code of Node.js application; you can do so by using the Jasmin and other such unit-testing tools.
Similarly, if you want to identify and install the project dependencies, you can make use of npm, a powerful package manager. You can use grunt for task running of the project.
10. Handles the Requests Simultaneously
Since the Node.js is providing the option of non-blocking I/O systems, it relatively helps you to process several requests concurrently.
The system can handle the concurrent request handling efficiently better than others including Ruby or Python. The incoming requests get lined up and are executed quickly and systematically.
11. Node.js is Highly Extensible
The Node.js is known to be highly extensible, which means that you can customize and further extend Node.js as per their requirements.
You can also make use of JSON to provide the scope for exchange of data between the web server and the client. It also is facilitated with built-in APIs for developing HTTP, TCP, and DNS etc. servers.
**Heightened Features In IIS
1) FTP Logon Attempt Restrictions
This module ensures the security and manageability. Due to this feature you can now use greylisting and access patterns enabling you to smoothly and dynamically manage access for number of sites to the internet and FTP servers.
2) Improved CPU Throttling
In IIS8 there are kernel level changes to support real CPU throttling. There are two actions possible for sites that reach the CPU threshold. These are:
1. Throttle
2. Throttle Under Load
Throttling is based on the user and not specifically on the application pool. The throttle feature will keep the CPU for a particular worker process at the specified level.
Throttle under load will allow a site to use all possible CPU, while throttling the worker process if the server is under load. If you used WSRM (Windows System Resource Manager) in the past, you no longer need to do so.
3) Application Initialization Module
Priorly known as the application warm-up module which was used for a time, and now it is completely ready as Application Initialization Module. This allows loading sites and pages before the traffic arrives and handling of requests in a friendly and more smoother way while the application first loads. It is possible to set up home page or use URL rewrites.
4) SSL Scalability
In previous versions of IIS each SSL (Secure Socket Layer) site required its own IP address, and since each certificate was loaded into the memory on the first visit to an SSL site, startup performance can be slow. In IIS8 the SSL certificate is easily scalable to thousands of secure sites per system because only the certificate that is needed is loaded. Additionally, also loading of large numbers of certificates is essentially improved.
5) SNI / SSL Host Header Support
Using host headers and a shared IP address with SSL certificate has always been ambiguous. IIS8 now offers Server Name Indication (SNI) support through which many SSL sites can share the same IP. SNI is a pretty new feature which allows host headers to work with SSL. The most recent browsers are supporting SNI.
6) Use ASP.NET 3.5 And 4.5
IIS 8.0 on Windows Server 2012 runs ASP.NET applications on all .NET Framework versions supported on Windows Server 2012. This means ASP.NET applications can run on IIS 8.0 using either .NET Framework 3.5, or .NET Framework 4.5. IIS 8.0 hosts versions of the .NET Framework in different application pools, thus allowing multiple ASP.NET applications with different .NET Framework versions to run simultaneously on Windows Server 2012.
7) Web Sockets
Allows you to build more interactive and powerful web applications because of a continuous and bidirectional communication between the web browser and the web server. Web Sockets require Windows Server 2012 or higher versions.
8) Dynamic IP Restriction (DIPR)
With DIPR we can Customize IIS reply like Unauthorized (HTTP 401), Forbidden (HTTP 403), Not Found (HTTP 404), or Abort (IIS terminates the HTTP connection). Also we can allow or deny specific IP address or a range of IP addresses, even if they violate a dynamic restriction setting. We can block dynamic IP addresses based on the number of concurrent requests or the number of requests over a period of time.Finally it is a very useful feature for web servers behind firewall, because of the proxy mode property that enables IIS to cross checks the values in the X-Forwarded-For HTTP header. So it can verify the IP address of the client who initially made the request.
9) Multicore Scaling On NUMA Hardware
Internet Information Services (IIS) on Windows Server 2012 supports Multicore Scalling on NUMA hardware and provides the optimal configuration for the IT administrators. Following options describes the different configuration options to achieve the best performance with IIS 8.0 on NUMA hardware.IIS supports following two ways of partitioning the workload:
I. Run Multiple Worker Processes In One Application Pool
If you are using this mode, by default, the application pool is configured to run one worker process. For maximum performance, you should consider running the same number of worker processes as there are NUMA nodes, so that there is 1:1 affinity between the worker processes and NUMA nodes. This can be done by setting “Maximum Worker Processes” AppPool setting to 0. Due to this setting, IIS determines how many NUMA nodes are available on the hardware and starts the same number of worker processes.
II. Run Multiple Applications Pools In Single Workload/Site
In this configuration, the workload/site is divided into multiple application pools. For example, the site may contain several applications that are configured to run in separate application pools. Effectively, this configuration results in running multiple IIS worker processes for the workload/site and IIS intelligently distributes the processes for maximum performance.
II. Run Multiple Applications Pools In Single Workload/Site
In this configuration, the workload/site is divided into multiple application pools. For example, the site may contain several applications that are configured to run in separate application pools. Effectively, this configuration results in running multiple IIS worker processes for the workload/site and IIS intelligently distributes the processes for maximum performance
Azure
Note: How to find PublicDNS in Azure
Step1 ) RDP Connection: To connect to the deployed instance, Please follow Instructions to Connect to Windows instance on Azure Cloud
Connect to virtual machine using following RDP credentials:
- Hostname: PublicDNS / IP of machine
- Port : 3389
Username: Your chosen username when you created the machine ( For example: Azureuser)
Password : Your Chosen Password when you created the machine ( How to reset the password if you do not remember)
Step 2) Choose Start, expand All Programs, and then select PHP
Step 3) Other Information:
1.Default installation path: will be in your root folder “C:\inetpub\wwwroot”
2.Default ports:
- Windows Machines: RDP Port – 3389
- Http: 80
- Https: 443
Configure custom inbound and outbound rules using this link
Videos
Hardened Node.js PHP IIS on Windows server
How to install and configure PHP Website on IIS 8 in Windows 2012
